100 micron 3d print
CREAT3D handy 3D printing tips
This post was originally written in 2016 and has since been refreshed and republished for accuracy purposes
May 2021
With plastic extrusion (FFF/FDM) desktop 3D printers, one of the most used, and perhaps, most mis-used terms acting as a means of comparing different machines is microns. Printer A can do 20 microns whereas Printer B can only do 100 microns, so A must be a better printer!
Right? Well our Technical Team have put it to the test to highlight what microns really mean in a real-world application.
What is a micron? A micron is equal to one millionth of a metre. It is normally used to refer to the layer height, also known as print resolution or Z height. So 100 microns is equal to 0.1mm. The lower the micron, the higher the resolution.
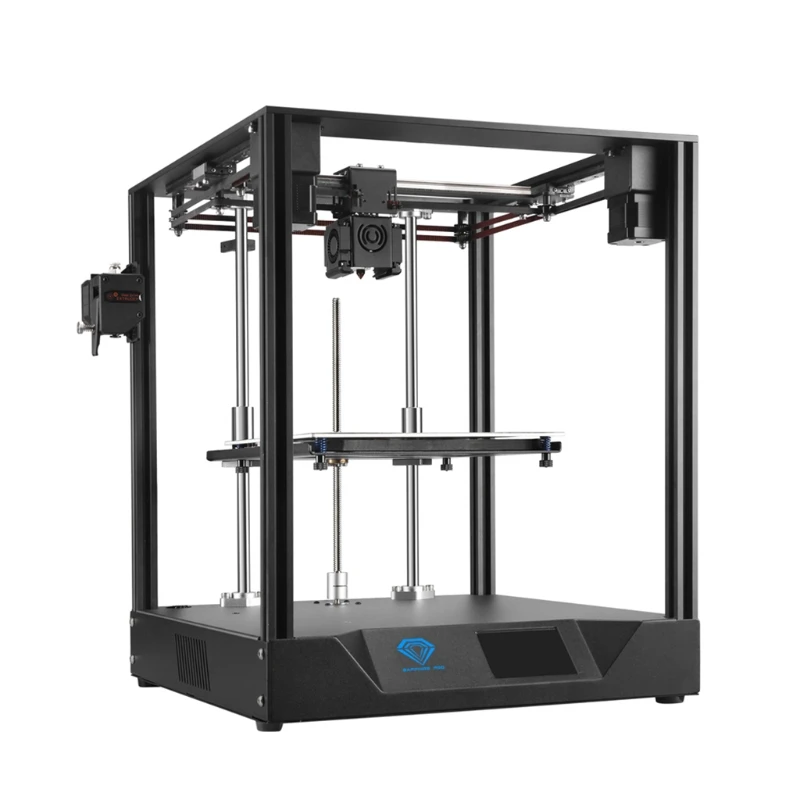
FDM 3D printers vary in their layer height capability, generally we see machines running from 10 microns to 300 microns layer heights.
So in theory, if you always print at a lower layer heights (i.e. lesser microns) then you should always get better results. Right?
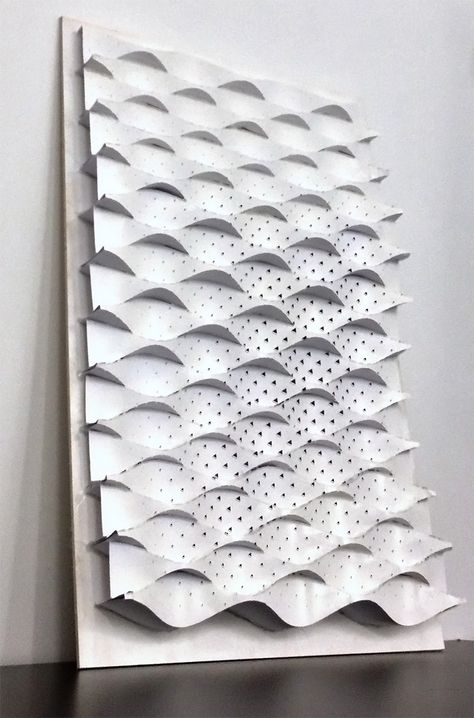
Take a look at the Coupling in the photo (part source: Thingiverse Thing 38678).
Same part, printed on the same printer, same material, same settings except for one thing - the layer height:
- One part is printed at 20 microns
- One part is printed at 60 microns
- One part is printed at 180 microns
Which one visibly looks the best? Easy answer: Part C. So which part was printed at which layer height? Was Part C printed at 20 microns?
No, in fact it may surprise some, but Part C was 3D printed at 180 microns. Part B was printed at 60 microns and Part A at 20 microns.
Confusing!
There are so many other factors that affect the finished output, these include (but aren't limited to!) 3D printer set-up (build & configuration), accuracy, part geometry, part size and the type of material used.
In the case of the coupling above, one of the main reasons that printing at 20 micron layer height produced a worse finish was mainly due to the small surfaces in the main section. When printing at lesser microns, you are putting more layers down. As the surface area is relatively small on the groves, what we see is the effect of heat transfer / disruption from the current layer on the layer previous, whereby the heat from the nozzle when applying layer 3 on top of layer 2, has distorted layer 2.
You can see this heat transfer effect reduces as you move up the micron ladder. So at 60 microns, there is some minor distortion and at 180 microns there is none, and we see a good quality print.
In our experience, the best practice is to select your layer height according to the model shape and your desired output.
For example, the model such as the 3D Hubs Marvin keyring pictured, due to its size and the fine detail is best 3D printed at a lower layer height, in this case 80 microns (part source: 3D Hubs Thingiverse Thing 215703).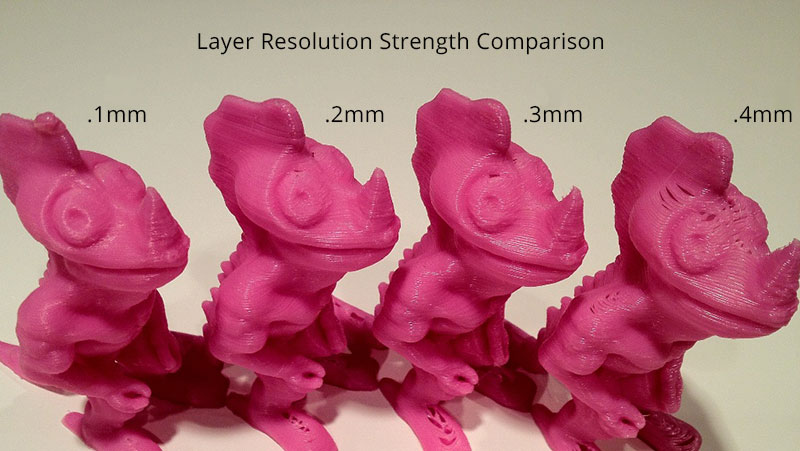
However, printing the same Marvin model in ColorFabb woodFill needs to be printed at a increase layer height, in this case around 270 microns because of the material properties.
Both outputs produce a good quality print, but are from opposite ends of the micron scale.
Think about microns in the same was as you would think about mega-pixels in cameras - more doesn't always mean better! There is a whole load of other factors that will impact on your output. The key is to find the printer that is designed to do the job you need, rather than hunting for the theoretical "best of everything".
If you already have a 3D printer, then it is a case of learning! In addition to the part's geometry and size, you also need to consider your printer's capabilities and set-up, as well as the properties of the material you are using. You also need to balance the required output versus time, as printing at a lower microns takes longer and as we have shown you above, doesn't necessarily give better results. Sometimes it can just be a case of experimentation until you find the right parameters!
If you are looking for advice on which printer is going to deliver the best results for your needs, then contact the CREAT3D team and we can talk you through the options.
If you'd like to cover off any of the above, or other aspects of 3D printing in more detail, take a look at our training options, including our 1 hour phone / video training, great for a top-up or refresh for £115 plus VAT.
Back to News >
Is 100 Microns Good for 3D Printing? 3D Printing Resolution – 3D Printerly
When it comes to 3D printing resolution or layer height, you always hear or see the term microns, which definitely confused me at first. With a little research, I’ve figured out the micron measurement and how it’s used in 3D printing to describe 3D print resolution.
100 microns is equivalent to a 0.1mm layer height, which is a good resolution for 3D printing.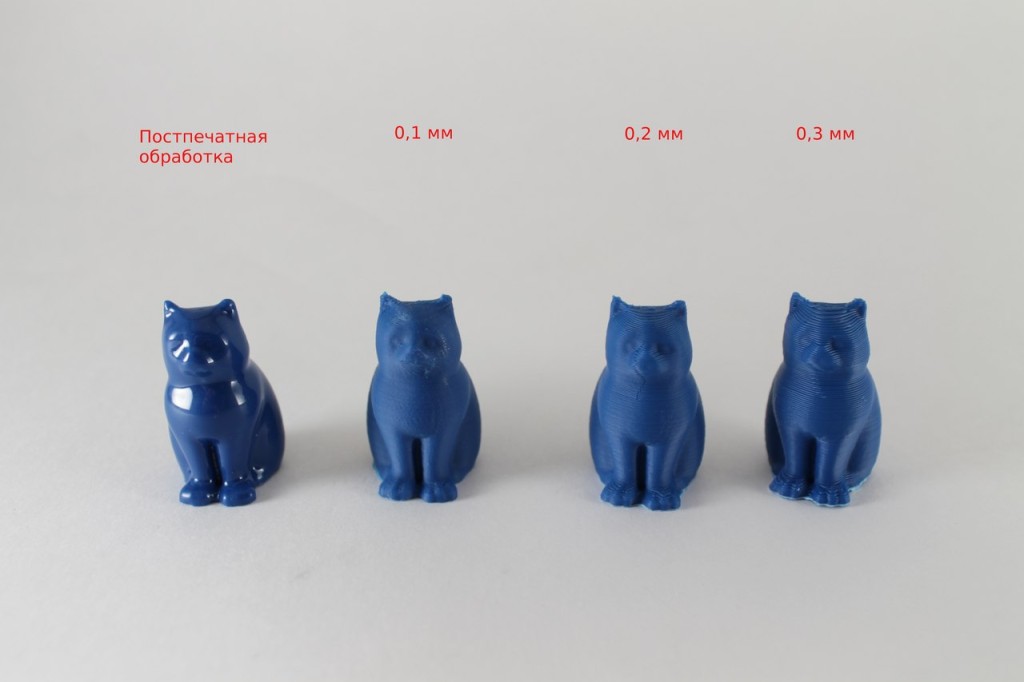 It’s relatively on the finer side of a 3D printed object, with the normal default micron measure for Cura being 200 microns or 0.2mm. The higher the microns the worse the resolution.
Microns are a measurement that you should get comfortable with if you are in the 3D printing space. This article will give you some key details that you can use to expand your knowledge of 3D printing resolution and microns.
What Are Microns in 3D Printing?
A micron is simply a unit of measurement similar to centimeters and millimeters, so it isn’t specific to 3D printing but it is definitely widely used in the field. Microns are used to indicate the height of each layer of a 3D print by a 3D printer.
Microns are numbers to determine the resolution and quality of the object being printed.
Many people get confused while buying a 3D printer because they don’t know that a printer with fewer microns is better or a printer with a higher number of microns is actually lower resolution.
When looking directly at the numbers side of things, microns are equal to the following:
- 1,000 Microns = 1mm
- 10,000 Microns = 1cm
- 1,000,000 Microns = 1m
The video below shows just how high your 3D printing resolution can go, and it can go even further than this!
The reason you don’t hear much about microns in everyday life is because of just how small it is. It’s the equivalent of 1 millionth of a meter. So each 3D printed layer goes along the Z-axis and is described as the height of the print.
This is why people refer to resolution as layer height, which can be adjusted in your slicing software before you print a model.
Do keep this fact in mind that only microns do not ensure the print quality, there are many other factors as well that contribute to it.
The next section will get into what a good resolution or number of microns is desired for 3D prints.
What is a Good Resolution/Layer Height for 3D Printing?
100 microns is considered a good resolution and layer height since the layers are small enough to create layer lines that aren’t too visible. This results in higher quality prints and a smoother surface.
It becomes confusing for the user to determine the resolution or layer height that works well for your print. Well, the first thing you should note here is that the time taken for the print to complete is inversely proportional to the height of the layer.
In other words, generally the better your resolution and print quality, the longer its going to take to print.
Layer height is a standard to define the print resolution and its quality but thinking that layer height is the whole concept of print resolution is wrong, a good resolution is much more than that.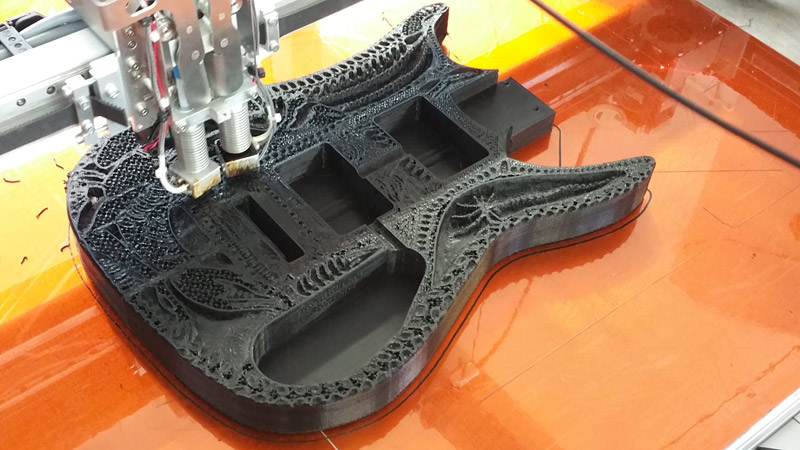
Printer height capability varies but usually, the object is printed anywhere from 10 microns to 300 microns and above, depending on the size of your 3D printer.
XY and Z Resolution
XY and Z dimensions together determine a good resolution. The XY is the movement of the nozzle back and forth on a single layer.
The print will be more smooth, clear, and of good quality, if the layer height for the XY dimensions is set at a medium resolution such as at 100 microns. This is the equivalent of a 0.1mm nozzle diameter.
As previously mentioned, the Z dimension relates to the value that tells the printer about the thickness of each layer of the print. The same rule applies in terms of the fewer the microns, the higher the resolution.
It is recommended by the experts to set the microns by keeping the nozzle size in your mind. If the diameter of the nozzle is about 400 microns (0.4mm) the layer height should be between 25% to 75% of the nozzle diameter.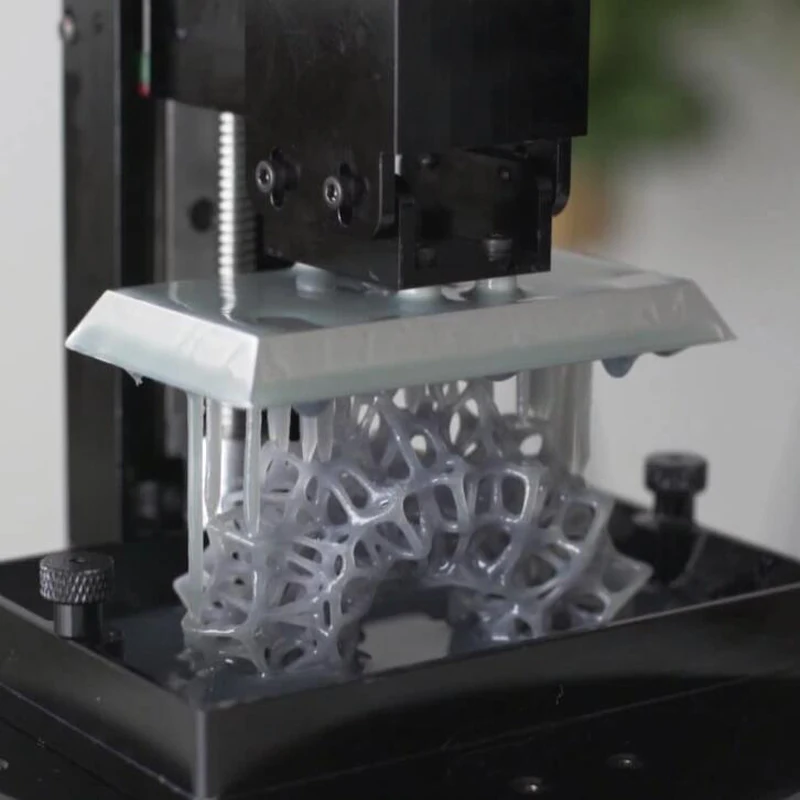
The layer height between 0.2mm to 0.3mm is considered as best for a nozzle of 0.4mm. Printing at this layer height provides a balanced speed, resolution, and printing success.
50 Vs 100 Microns in 3D Printing: What’s the Difference?
Smoothness and Clarity
If you print one object at 50 microns and a second at 100 microns then up close, you will be able to see a clear difference in their smoothness and clarity.
The print with fewer microns (50 microns vs 100 microns) and higher resolution will have less visible lines as they are smaller.
Make sure you are doing regular maintenance and checking over your parts because 3D printing at lower microns does require a fine-tuned 3D printer.
Bridging Performance
Overhangs or stringing is one of the major problems that occur in 3D printing. The resolution and layer height does have an impact on it. Prints at 100 microns compared to 50 microns are more likely to have bridging issues.
Bad bridging in 3D prints leads to much lower quality, so try to fix your bridging issues. Lowering layer height helps out a bunch.
Time Taken to 3D Print
The difference between printing at 50 microns and 100 microns is twice as many layers need to be extruded, essentially doubling the printing time.
You have to balance the print quality and other settings with printing time, so it is down to your preference rather than following the rules.
Is 3D Printing Accurate?
3D printing is very accurate when you have a high quality, fine-tuned 3D printer. You can get very accurate 3D printed models right out of the box, but you can increase accuracy with upgrades and tuning.
A factor to take into account is shrinkage and ease of printing, because materials like ABS can shrink a decent amount. PLA and PETG don’t shrink very much, so they are great choices if trying to achieve printing accuracy.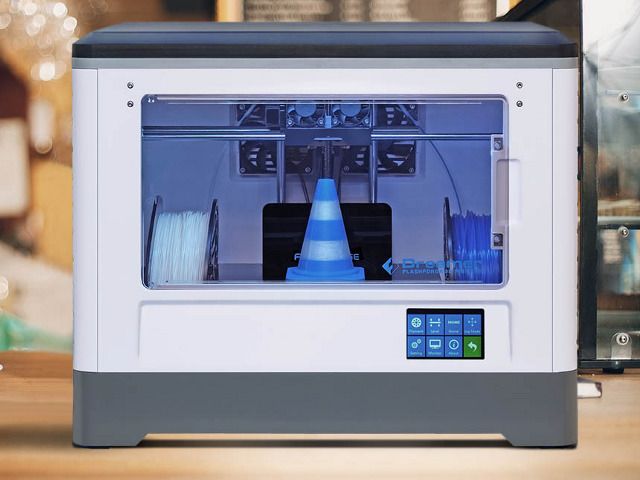
ABS is also fairly hard to print with and requires ideal conditions. Without it, you can find your prints start curling around the corners and edges, otherwise known as warping.
PLA can warp, but it takes a lot more for it to happen such as a gust of wind hitting the print.
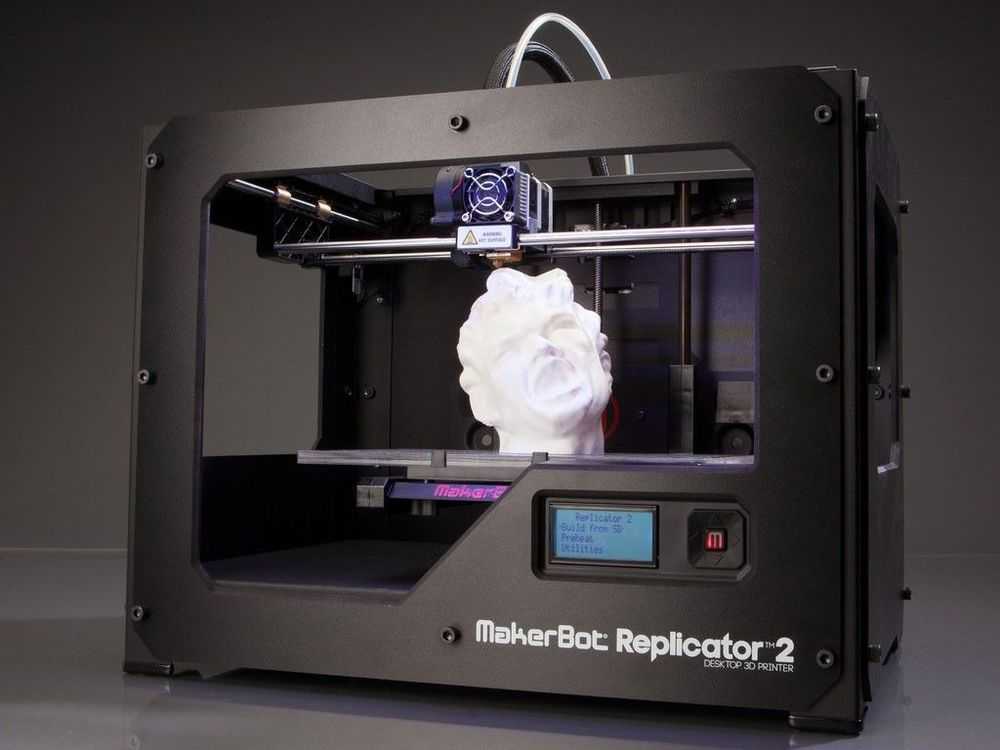
3D printers are more accurate in the Z-axis, or the height of a model.
This is why 3D models of a statue or bust are oriented in a way where the finer details are printed along the height region.
When we compare the resolution of the Z-axis (50 or 100 microns) to the nozzle diameter which is the X & Y axis (0.4mm or 400 microns), you see the large difference in resolution between these two directions.
To check the accuracy of a 3D printer it is recommended to create a design digitally and then get your design printed. Compare the resultant print with the design and you will get the actual figure on how accurate your 3D printer is.
Dimensional Accuracy
The easiest way to check 3D printer accuracy is to print a cube with a defined length. For a test print, design a cube that has equal dimensions of 20mm.
Print the cube and then manually measure the dimensions of the cube. The difference between the actual length of the cube and 20mm will be the dimensional accuracy for every axis of the resultant print.
According to All3DP, after measuring your calibration cube, the measurement difference is as follows:
- Greater than +/- 0.5mm is Poor.
- Difference of +/- 0.2mm to +/- 0.5mm is Acceptable.
- Difference of +/- 0.1mm to +/- 0.2mm is Good.
- Less than +/- 0.1 is Excellent.
Do keep this fact in mind that the dimensional difference in positive values is better than the negative values.
3D printing in 1-2 days! White photopolymer
What do you get?
- Material: white photopolymer
- Printing accuracy: 100 microns
- 3D printers: Sharebot VIKING, Protofab SLA 600, Voxeljet VX500
- Max. model dimensions: 600 × 600 × 400 mm
- Technology. Stereolithography (SLA) - layer-by-layer curing of a liquid material under the action of a laser beam
- We work with companies and individuals
- Convenient territorial location of the production premises - Moscow (10 minutes from Kuntsevskaya metro station)
request a call
All you need is...
3D model in .STL format.
No .STL file?
We will help you scan the product to create a 3D model
submit your application nine0002 Important information- What if I need to print not just one product, but a whole series?
- For small-scale production, we recommend using photopolymer resin printing.

Ready to discuss all your questions!
Fill out the form or call +7 (495) 223 01 21
Request a call
Additional services
3D scanning
leave a request
Plastic injection molding
Submit a request more
Examples of our work
The most interesting orders of our clients in various industries
see all works
- nine0006
Obtaining a 3D support bearing
- #3D scan
more details
Mercedes car scan for video tour
- #3D scan
more
Aircraft 3D scan
- #3D scan
more details
NURBS modeling of rubber car mats
- #3D modeling
more details
3D-modeling and control of deviations of the mechanism body part
- #3D modeling
more details
3D simulation of lifting unit
- #3D simulation
more details
3D Jewelry Stencils
- #3D Print
more details
3D printing of car headlight
- #3D printing nine0019
- #3D printing
- #BIM modeling
- #BIM modeling nine0019
- #BIM-modeling
- #Plastic molding
- #Measurements
- #Measuring work
- #Measuring work
- Sharebot VIKING
- Protofab SLA 600
- Voxeljet VX500 nine0019
-
making master patterns for casting two-component polyurethanes into silicone
-
Creation of burn-out patterns for metal casting in mechanical engineering and jewelry making
-
manufacture of dental prototypes, prostheses, crowns, skull and jaw elements
-
creation of master models, fully functional prototypes
-
manufacture of end products
- impressive precision
- ability to create geometrically complex, smallest and thin-walled objects
- light post-processing
- perfect surface finish
- the best choice for subsequent low-volume production using vacuum casting technology in silicone molds
- good moisture resistance
- high speed additive systems
- Standard
Characterized by increased strength and flexibility.
 It makes it possible to produce parts with a flat and smooth surface.
 - Robust
The material is very similar to ABS and has maximum strength and good toughness and ductility relative to other resins. nine0021
- Rigid
It has the characteristics of both durable and standard resin. It has increased tensile strength. - Heat resistant
Due to its high melting point, which can reach up to 238°C, the resin is ideal for parts requiring high temperature resistance.
- nine0387 Ceramic
A very rigid material that does not warp, making it possible to create parts with thin walls and a polished surface.
more details
3D printing of a combine part from casting wax
more
BIM model for restoration of a cultural heritage site
more
BIM model for church restoration
details
Construction control of a building in Khimki
more
Fork production
more details
Measurements of the facade of the fashion house Dior
details
Scanning the interior of the apartment
more details
Scanning a church in the Tver region to obtain data for restoration
details
Our clients
Aluminum and alumina production
Russian state company.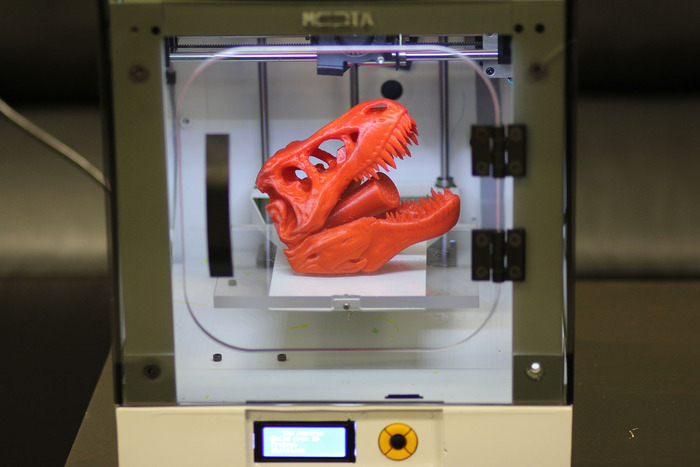 Operator of the Russian railway network
Manufacture of combat and civil aircraft. Flight personnel training
Russian airline. Domestic and international passenger air transportation
R&D in the field of nanotechnology, robotics, space activities, ammunition
Design and manufacture of equipment for thermal, nuclear and hydroelectric power plants
Defense enterprise. Military-technical cooperation of the Russian Federation with foreign partners
Russia's leading underwater shipbuilding design bureau
Design, manufacture and after-sales service of aircraft
Development and production of complexes, systems and means of communication for the Armed Forces of the Russian Federation
Leading university of the Upper Volga region
Engineering university. One of the nine backbone universities in Russia
Leading enterprise in Russia for the production of metal superstructures of bridges
Russian instrument-making concern. Production of electronic equipment for the Russian Navy
Creation of equipment for control systems of aviation and rocket technology, as well as for gas and oil pipelines
The largest research institute in the country, solving problems of defense, scientific and national economic importance
Development, manufacture and maintenance of engines for the aerospace industry
Development , production, testing, maintenance of operation, maintenance of aviation equipment
Creation and maintenance of the aerospace defense system in the interests of the security of the Russian Federation
Leading Russian developer of gas turbine engines for military and civil aviation
Production of equipment for post-harvest processing, drying and storage of grain
Equipment park
Sharebot VIKING
Technology: LCD/ UV Resins
Material: photopolymer
Max.-kupit-v-soin-store.ru-1.png) model dimensions: 190 x 120 x 200 mm
model dimensions: 190 x 120 x 200 mm
Layer thickness: Z resolution 50 - 100 µm, XY accuracy 75 µm
nine0022 Protofab SLA 600Technology: Stereolithography (SLA) is a layer-by-layer technology for solidifying a liquid material under the action of a laser beam. Suitable for creating mock-ups, tooling and burn-out models for casting.
Material: photopolymer
Max. model dimensions: 600 × 600 × 400 mm
Layer thickness: 0.05 - 0.25 mm
nine0022 Voxeljet VX500Technology: Powder Binder Jetting (PBJ)
Material: PMMA - Modified Polymethyl Methacrylate Powder (PBJ)
4 Max. model dimensions: 500 x 400 x 300 mmLayer thickness: 70 µm
Photopolymer specifications
White (subject to change)
Density
1. 21 g/cm³ (at 25°C)
Tensile Strength, MPa
43-48 MPa
Thermal Deformation Temperature, °C
56-60°C Shore D, %
81-85%
Material
3d printing sla, or photopolymer printing, is a technology for manufacturing three-dimensional objects using layer-by-layer photopolymerization under the action of a laser beam. With its help, a three-dimensional object created on a computer is synthesized from a liquid polymer in successive thin layers of 0.05-0.2 mm, formed under the action of laser radiation on a moving platform. nine0021
The materials used in photopolymer 3D printing are very diverse and are considered universal. So, products made from them can be transparent, colored, matte, rigid, resistant to high temperatures and even biocompatible.
They are used in modern 3D prototyping, 3D master model making and final products. Also, such 3D products are suitable for experiments and functional tests.
Services
Benefits of laser stereolithography technology
Resin specifications
3D services using SLA technology at TWIZE
We provide sla 3d printing services in Moscow, and we also deliver finished prototypes to all cities of the Russian Federation and CIS countries. Our specialists will print your model with an accuracy of up to 100 microns in just 1-2 days. nine0021
The cost of 3d printing with a photopolymer depends on the required level of detail and the size of the model, the timing of the work, the number of parts and is compiled individually for each project.
To order, write to us at [email protected], call:
+7 (495) 223 01 21 or leave an online application.
File requirements
For printing, please send the model in .STL format. You can also submit a solid model in .STEP or .x_t format if the part was designed in CAD software such as Creo Parametric, Siemens NX, Catia, Solidworks, or Autodesk Inventor. We will convert your model to .STL for further printing with optimal detail and quality. nine0021
Maximum part size up to 600 × 600 × 400 mm. If necessary, we can make a composite prototype, that is, a structure assembled from several parts.
Clarity, Accuracy & Tolerance in 3D Printing
Just because your 3D printer says it has "high resolution" does not mean it will produce accurate or sharp prints.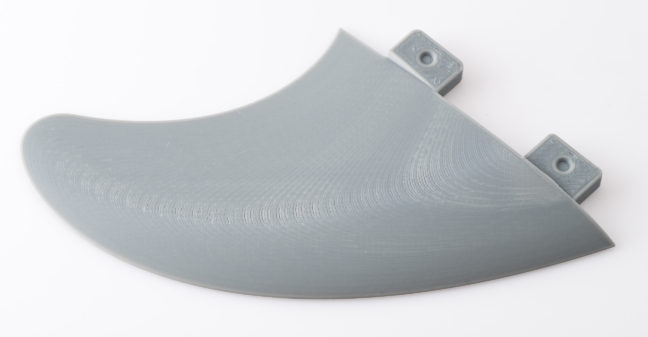
Understanding the meaning of terms accuracy , clarity and approval is a prerequisite for achieving quality 3D printing results, regardless of the industry. In this article, we will analyze what these terms mean in the context of 3D printing.
Webinar
Want to learn how to use 3D printing for design? Watch our webinar and learn about the stereolithography (SLA) 3D printing process, different types of materials, and tips from experts on how to optimize your printing process to make it as efficient as possible. nine0021
Watch the webinar now
Let's start with some definitions: what is the difference between precision, clarity and tolerance? For each term, we will use a target - a common example for understanding these concepts, helping to visualize them.
Precision determines how close the measured value is to the true value.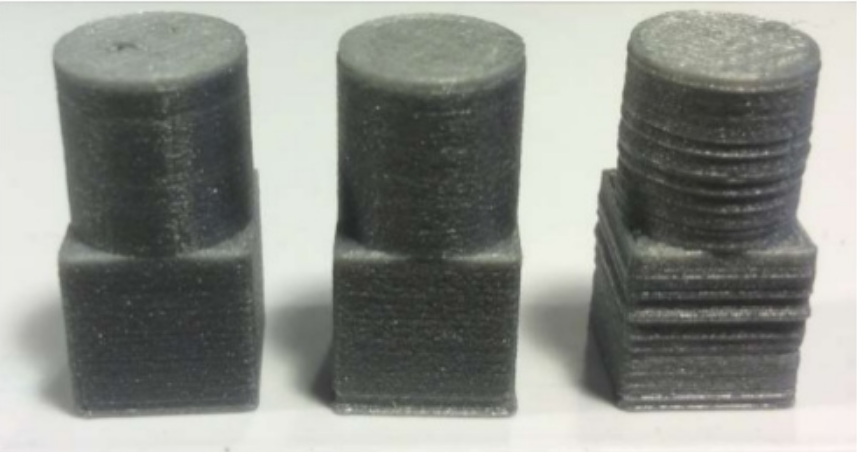 In the target example, the true value is the bullseye. The closer you are to the bullseye, the more accurate your throw. In the world of 3D printing, the true value is the dimensions of your CAD model. To what extent does a product made on a 3D printer correspond to a digital model? nine0021
Clarity corresponds to measurement reproducibility - how consistent are your hits on the target? Clarity only measures this reproducibility. You can always hit the same spot, but it doesn't have to be the bullseye. In 3D printing, this ultimately leads to reliability. Are you sure that you will get the expected results for each model produced by your printer?
In engineering terms, "clarity" is used to measure the reproducibility of results. Applied to materials for 3D printing, “clear” can mean the ability to manufacture complex geometries. For example, Formlabs Gray Pro Resin and Rigid Resin resins have a high "green modulus", or modulus of elasticity, that can successfully print thin and intricate details. nine0463
What accuracy is required in this case? This is defined by tolerances that you define. How much wiggle room do you have based on the purpose of the model? What is the allowable variability in the closeness of the measurements to the exact ones? It depends on the specifics of your project. For example, a component with a dynamic mechanical assembly needs tighter tolerances than a conventional plastic housing.
If you're specifying tolerance, you'll probably need precision as well, so let's assume we're measuring bull's-eye clarity. Earlier we called the shots in the picture with the target on the right fuzzy. nine0021
But if you have wide tolerances, this may not be a problem. The shots are not as close to each other as they are on the target on the left, but if the acceptable range of sharpness is ±2.5 hoops, then you are not out of range.
As a rule, achieving and maintaining tighter tolerances entails higher production and quality control costs.
White Paper
Tolerance and fit are important concepts that engineers use to optimize mechanical functionality and manufacturing cost. Use this white paper when designing 3D printed workpieces or as a starting point when designing a fit between parts printed with Formlabs Tough Resin or Durable Resin. nine0021
Download white paper
There are many factors to consider when thinking about precision and clarity in 3D printing, but it's also important to get your needs right.
For example, a sharp but inaccurate 3D printer may be optimal for some applications. An inexpensive Fused Deposition Modeling (FDM) machine will produce less accurate parts, but for a teacher teaching students 3D printing for the first time, the exact fit of the student's CAD model doesn't matter as much. nine0021
But if the printer performs to specifications and delivers the quality expected of it within the tolerances the user is accustomed to, it may be sufficient for successful operation.
Check out our detailed guide comparing FDM vs. SLA 3D printers to see how they differ in terms of print quality, materials, application, workflow, speed, cost, and more.
There are four main factors that affect the accuracy and clarity of a 3D printer:
3D printing is a type of additive manufacturing where models are made layer by layer. Violations can potentially occur in every layer. The layering process affects the level of clarity (or reproducibility) of each layer's accuracy. For example, when printing on an FDM printer, layers are formed using a nozzle, which cannot provide the same accuracy for obtaining complex parts as other 3D printing technologies. nine0021
Since layers are extruded, layer lines are often visible on FDM models and inaccuracies can occur around complex features. (Left is an FDM printed part, right is an SLA printed part.)
In stereolithography (SLA) 3D printing, each layer is formed by curing a liquid polymer with a high-precision laser, resulting in more detailed models and achieve high quality on a consistent basis.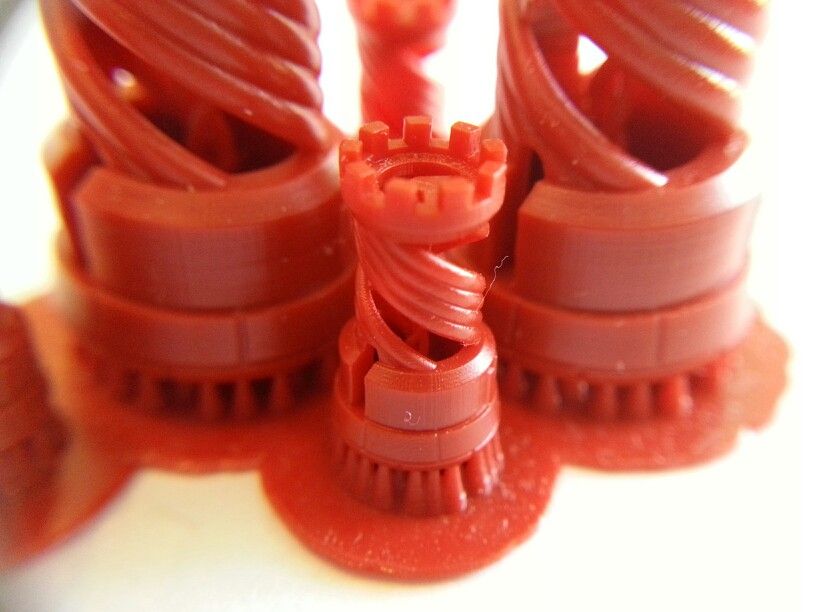 nine0021
Selective Laser Sintering (SLS) also uses a laser to accurately convert nylon powder into lightweight, durable parts.
The technical specifications of a 3D printer alone do not give an idea of the accuracy of the models produced. One of the common misconceptions about the accuracy of various 3D printing technologies is describing XY resolution as dimensional accuracy.
For Digital Light Processing (DLP) printers, the XY resolution corresponds to the projected pixel size. Many 3D printer systems use this projected pixel size, or XY resolution, as a general measure of accuracy, such as stating that with a projected pixel size of 75 µm, the accuracy of the device is ±75 µm. nine0021
Check out our guide to SLA and DLP 3D printing, where we talk about the features of the two processes and how they differ.
But this data does not affect the accuracy of the printed model. There are many other sources of error that affect accuracy, from components and calibration to materials and post-processing. We will consider the last two factors in more detail.
The best way to appreciate a 3D printer is to study the models printed on it. nine0263
Accuracy may also vary depending on the media you are printing on and the mechanical properties of those media, which can also affect the likelihood of model warping.
Formlabs Rigid Resin has a high green modulus, or modulus of elasticity, prior to final polymerization, allowing you to print very thin models with high definition and reliability.
But, again, it all depends on your goals. For example, in dentistry, the accuracy of 3D printed models is critical. But if you're printing a concept model, chances are you just want to get a general idea of the physical product, and accuracy won't be that important. nine0021
Margins, mold surfaces, and contact surfaces printed with Formlabs Model Resin are accurate to within ±35 µm of the digital model at over 80% of surface points when printed at 25 µm settings. The overall accuracy across the entire arc is within ±100 µm on 80% of surfaces when printed with settings of 25 or 50 µm.
3D printed models often need to be cured, which often leads to shrinkage. This is normal for any part made using SLA or DLP 3D printing. Depending on the printer, this phenomenon may need to be considered in the design. PreForm, Formlabs' free file preparation software, automatically compensates for this shrinkage, ensuring that the final cured models are the same dimensions as the original CAD model. nine0021
How does the final polymerization work? Learn more about the theory behind the process and see efficient ways to successfully finish curing models made with stereolithographic 3D printers.
Producing quality models on a 3D printer requires attention not only to the printer itself, but to the entire production process.
The final result may be affected by the print preparation software, post-processing materials and tools used. In general, integrated systems designed to work together produce more reliable results. nine0021
Unlike machining, where parts are progressively improved to tighter tolerances, 3D printing has only one automated production step. While complex coating adds cost to processes such as CNC milling, creating complex features with 3D printing is essentially free, although the tolerances of a 3D printed model cannot be automatically improved beyond the capabilities of the printer. without resorting to subtractive methods. nine0021
3D printing is a great option if you have rough complex features like undercuts and complex surfaces and don't necessarily need a surface accuracy better than ±0.125mm (standard machining). Tolerances beyond standard machining must be achieved using subtractive methods, either through manual or machine processing, for both 3D printed and CNC models. nine0021
SLA has the highest tolerance compared to other commercial 3D printing technologies. The tolerances for stereolithographic 3D printing are somewhere between standard and precision machining.