Flsun cube 3d printer review
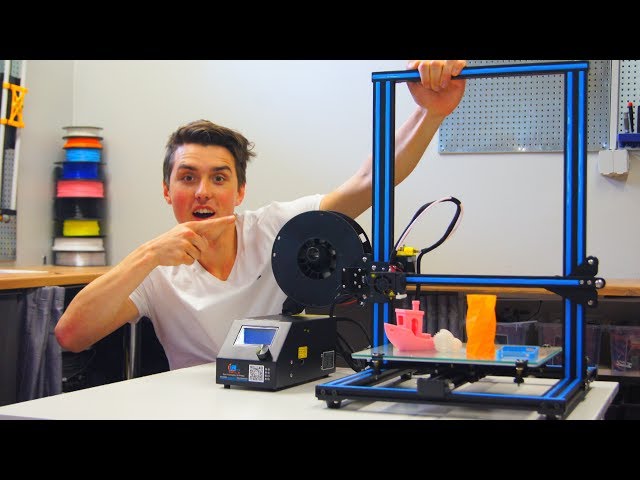
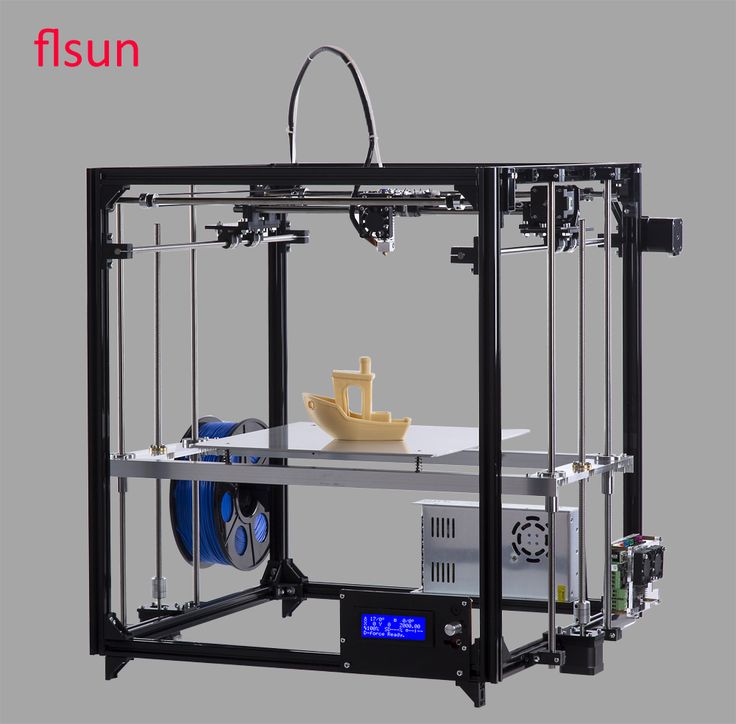
Flsun Super Racer (SR) Review: Fast Delta 3D Printer
The Flsun Q5 was my first delta 3D printer, and it performed well considering the price point. But this changes today, with the new Flsun Super Racer (also known as Flsun SR). This is the newest delta offering from Flsun, boasting fast printing speeds and larger build volume.
Flsun Super Racer Shipping and Packaging
The packaging for the Flsun Super Racer is compact compared to other 3D printers, while providing good protection on all sides. Thick foam is used to keep all the parts safe during shipping. Even though my box had some shipping damage, I did not encounter any issues with the included parts.
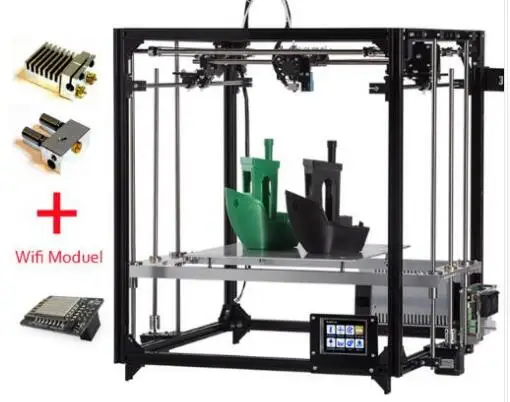
With the Flsun Super Racer, you get the following accessories:
- 200g spool of white PLA filament
- Manual
- Spool holder
- Clippers
- Spare hotend (nozzle, heatblock and heat break)
- Spare PTFE tube
- Spare thermistor
- Spare heater cartridge
- Needle for nozzle clogs
- USB Card Reader with 2GB MicroSD Card (no name – I recommend using a better one)
- Bag of screws and wires
- Scraper
- Hex wrenches
- Zip ties
- Power cable
- USB Cable
- Grease tube
- Printed clips
I really like the whole accessories package you get with the Flsun SR, and the inclusion of a spare hotend with heater cartridge and thermistor is a welcome addition. This way, you have a spare if something goes wrong with the printer, minimizing downtime.
Assembly of the Flsun Super Racer
Assembling the Flsun Super Racer takes around 45 minutes. The installation steps are detailed in the assembly guide, making it really easy to put together, even by a total beginner. When assembled, you only need to start the bed leveling process then start printing.
I really like the design of the Flsun Super Racer. It’s built well and it looks like a lot of thought was put into this 3D printer to make it as good as possible out of the box. The tick aluminum extrusions make the printer quite stable, but the soft rubber feet give the printer a bit of a wobble. Having the bottom of the printer heavier would have helped, but I can’t say it’s an issue in its current form.
I don’t really like the MicroSD card position in the back left of the printer, and I think having it somewhere in the front would help with accessibility. In the bottom front of the machine there’s also a handy drawer where you can store the tools and your bed leveling sensor.
Flsun Super Racer Specs
| Brand Name | Flsun |
| Model Number | Super Racer |
| Origin | CN(Origin) |
| CE Certification | Yes |
| Consumables Diameter | 1.75mm |
| Printing Speed | 150mm/S |
| Bed Temp | 100°C |
| Slice Thickness | 0.2mm |
| Language | 8 languages |
| Maximum Printing Speed | 200mm/s |
| Interface Type | SD |
| Color Print Speed | 150-200mm/s |
| Fliament | PLA/PETG/ABS/WOOD |
| Slice Software | CURA/Repetier/Simplify 3D |
| Power Supply | 24V |
| Precision | 0.05-0.3mm |
| File Format | STL/OBJ/AMF/3DS |
| Nozzle Diameter | 0.4mm |
| Auto Leveling | Yes |
| Maximum Print Size | 260*260*330mm |
| Molding Technology | FDM |
Linear rails and 10mm belts
One of the most interesting features of the Flsun SR is the use of linear rails.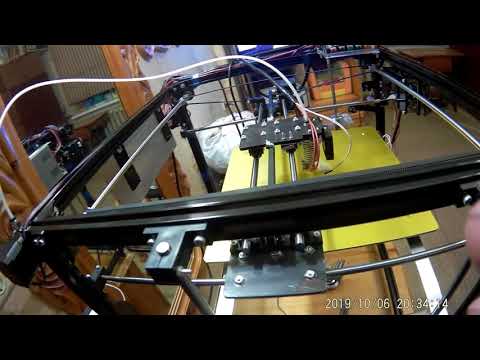 This allows the printer to reach high printing speeds while maintaining accuracy. The linear rails don’t produce a lot of noise during movement which is great!
On the bottom of each linear rail there’s a belt tensioning knob. If you decide to adjust it, it’s extremely important to have the same belt tension on each axis, to avoid dimensional accuracy issues for your prints. These tensioning knobs are a bit hard to turn because they are recessed in the aluminum extrusion but considering that you won’t really need to do this process more than once, we can somewhat ignore this minor issue.
It’s also worth noting that the Flsun Super Racer uses 10mm belts. They are not GATES belts like we get with the Ender 6, but they seem to be good enough. These belts will help with fast movements during printing, and I really hope more 3D printers will use wider belts in the future.
Carbon Fiber rods
Delta printers greatly benefit from light moving parts and to improve this, the Flsun SR comes with carbon fiber rods.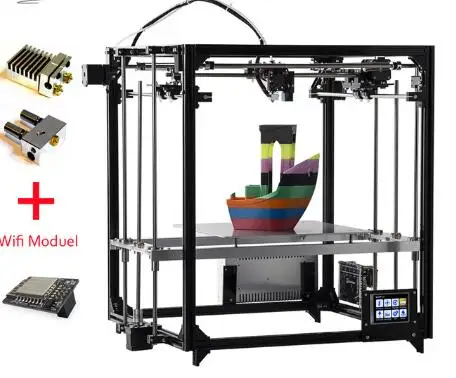 I’m not 100% convinced these rods are made from carbon fiber, but they are light and stiff. Between each pair of carbon fiber rods, we get two springs to hold them in place.
The weight of these carbon fiber rods is only 177 grams.
I’m curious to see how the plastic caps inside these fiber rods will work after a few thousand hours of printing. Even though there’s grease on them to minimize wear, they will fail at some point and right now I can’t see any replacements available.
Super Racer Effector
The Flsun Super Racer has an aluminum effector with a V6 hotend clone, a volcano-like heatblock and a volcano nozzle. For part cooling, we get two 4010 radial fans with plastic ducts to direct the air close to the nozzle. The whole effector assembly, including the cooling fans and hotend weight 264g.
Because of the way it’s mounted to the arms, removing the whole effector to service the hotend is really easy, and it takes less than 10 seconds. If you were to purchase a second effector as a spare, you could easily swap it and start printing again in less than 10 minutes.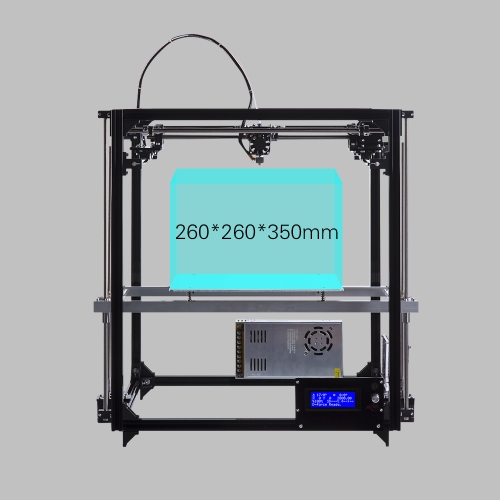
BMG Extruder clone
Compared to the Titan clone extruder used on the Q5, the Flsun SR uses a BMG extruder clone which has a gear ration of 3:1 and dual gears which help push the filament efficiently to the nozzle. It’s especially important to have a good extruder with this printer because you won’t be able to print fast with a regular style single-gear extruder.
The extruder is not the highest quality, especially considering the gear quality but I’ve used the exact same unit on other printers with good results and it performed well on the Flsun Super Racer.
PTFE lined V6 hotend with Volcano-like heatblock
The hotend is a regular V6 clone with a volcano-like heatblock, and the PTFE tube goes right up to the nozzle. This means that your printing temperatures shouldn’t be pushed over ~240C, because the PTFE tube starts to degrade and release harmful fumes. While I would have liked to see an all-metal heat break, instead of the PTFE lined one, this is not a huge issue, and an upgrade is not that expensive. For regular PLA and PETG printing, the stock one should be good enough.
Unfortunately, the volcano-like heatblock is shorter than the original. This makes the nozzle stick out substantially and I’m almost sure this is not ideal for consistent temperatures.
In the future I will surely upgrade the hotend asembly with a bi-metal heat break and a proper Volcano nozzle to properly take advantage from the print speeds this printer is capable of.
During my first 3D Benchy I discovered that the PTFE tube was not correctly installed, and I needed to disassemble everything to clean up the clog and install the tube properly. This fixed my clogging issue and retractions performed well after that. The hotend fan start only after the hotend temperature goes over 50C.
Dual air ducts for improved cooling
Having all these features wouldn’t help too much if the part cooling is not up to the task. Fortunately, with the Flsun SR we get dual part cooling fans and ducts. They do decent job on larger models, but I would have preferred to have more airflow.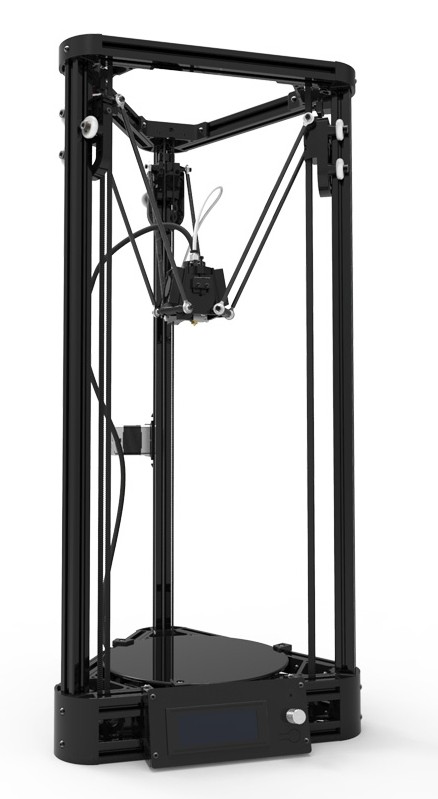 They quickly become a limiting factor when doing fast PLA prints because the layers don’t have enough time to properly cool and this causes lower quality prints. Maybe having a pair of 5015 fans will further improve print quality with fast printing.
Removable magnetic auto-leveling sensor
Just like the Flsun Q5, the Super Racer comes with a magnetic auto bed leveling sensor which is used after installing the printer. I must say, this sensor works really well and after performing the initial calibration, there was no need to re-level again.
32-Bit board with silent stepper TMC2209 drivers
While the included board looks familiar, it’s not a BIGTREETECH board. Instead, Flsun used a clone of the popular SKR 1.3 board.
The stepper drivers have big heatsinks and to keep them cool we have a 60mm fan which provides good airflow while limiting the noise produced by it. I’m not a huge fan of the added hotglue on the side of the stepper drivers, but that’s what we get.
There’s not much to talk about this board. If you know about the SKR 1.3, then the clone used by Flsun should be just the same.
Glass print surface
The aluminum heated bed is covered with a textured glass print surface, similar to what we got with the Flsun Q5, and with other Creality printers. This is one of the most popular print surfaces right now, and it works well. Adhesion is great when heated, and the prints pop of easily after it cools down.
The heatbed also has some insulation underneath covering the whole radius of the aluminum bed, which is nice.
Cheng Liang 360W 24V Power Supply
Unfortunately, the power supply we get with the Flsun SR is a Cheng Liang unit. It’s not terrible, but this brand is not my favorite. In the past, I had one unit which got damaged, and I needed to replace it. Either way, considering that the Flsun SR doesn’t draw more than ~230W at a time, it should be good enough.
Removable 3.5-inch touchscreen
Another interesting feature of the Flsun Super Racer is the removable touch screen. When you install it, there’s a nice magnetic support which attaches to the printer to keep the screen easy to reach. Most of the time I use it in place, without removing it, but I am sure other people like having the option to grab the touchscreen and use it just like a smartphone.
The touchscreen is nice and responsive, and it has the basic feature set to operate the printer. I also like that you can see the print speed during printing. My only concern is the cable connection on the top of the printer which might get damaged over time.
Printing experience with the Flsun Super Racer
Out of the box, the printer performs well, and the Super Racer name is somewhat true for this printer. I was able to do regular prints with increased speed compared to a regular cartesian 3D printer, or even a CoreXY. Print speeds of ~80mm/s are possible with no tinkering if the slicer profile is tuned well.
But if you are looking to go past ~80mm/s, then part cooling starts to show its weakness especially for smaller PLA prints.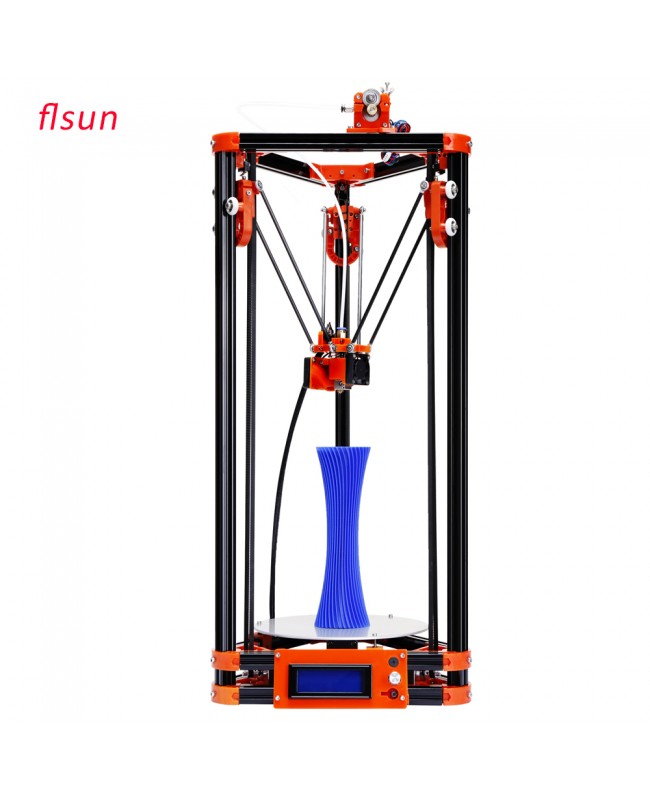 On PETG and ABS you can maybe push it over ~100mm/s, but then you hit the second bottleneck which is ringing. With the current Marlin firmware, ringing starts to show up with these speeds which will require acceleration and jerk tuning for good results.
Installing Klipper firmware is the right way to go with this printer. After installing Klipper, you will be able to use Input Shaper which will greatly improve the print quality and ringing at high speeds.
Please note that I am talking about “real” speeds you can achieve with the stock Super Racer. You can also crank up the speed to ~200mm/s and keep acceleration values low, but that doesn’t mean that the printer is actually printing at that speed even though you see that on the touchscreen.
Heating time and power consumption
I tested the heating time for both hotend and heat bed and here are the results:
Hotend
- 200C in 1 minute and 35 seconds
- 250C in 2 minutes and 10 seconds
Heatbed
- 60C in 2 minutes and 30 seconds
- 100C in 7 minutes and 20 seconds
Power Draw
Idle power draw is around 10W. When the hotend and heatbed are heating up, the Flsun Super Racer draws around 220W. After it starts printing, the power draw stabilizes to around 60W.
All these measurements were taken with a Blitzwolf smart power socket which indicates the power draw, and it can also be used for remotely powering on and off the printer.
Bed Temperature Uniformity
I tested the temperature uniformity for the Flsun Super Racer bed with the Flir Camera installed on the CAT S62 Pro. The bed has been set to 60C and I waited 2 minutes after reaching that temperature for the temperature to stabilize.
The bed temperature is a few degrees higher in the center, but the uniformity is great right up to the sides.
Flsun Super Racer Noise Levels
I’m happy to report that the fans are quieter compared to the Flsun Q5, and the printer is quiet when idle. As previously mentioned, the hotend fan only turns on after you start heating the hotend and the rest of the fans are pretty quiet.
It’s also interesting to see that Flsun also chose to add some cork gaskets between the stepper motor and the frame, to minimize vibrations.
IdeaMaker profiles for Flsun Super Racer
During my time with the printer, I also tuned four IdeaMaker profiles for the Flsun Super Racer using the tools available in the 3D Printer Calibration Guide using IdeaMaker article. These profiles are tuned for the stock printer and worked well for me. Feel free to give them a go.
Flsun Super Racer IdeaMaker Profile – PLA – 3DPrintBeginner
Flsun Super Racer IdeaMaker Profile – PETG – 3DPrintBeginner
Flsun Super Racer IdeaMaker Profile – ABS – 3DPrintBeginner
Test prints on Flsun Super Racer
3D Benchy
After fixing the PTFE tube inside the hotend, I printed a 3D Benchy.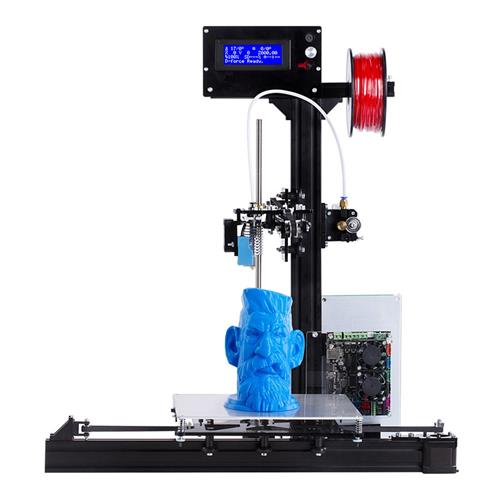 For an out of the box setup, the results are really good especially considering the print speed. The layer lines are consistent, and print quality is good but for a print this size the part cooling setup starts to show its limits.
- Material: Sunlu Grey PLA
- Layer Height: 0.2mm
- Nozzle Temperature: 210C
- Bed Temperature: 60C
- Print Speed: 70 mm/s
200% Calibration Cube
Delta 3D printers are not known as really accurate machines, so I printed this 200% calibration cube in PETG. I’m happy to report that the cube dimensions are really good, with 0.02mm differences compared to the model which is negligible. You could print this a bit faster, but print quality starts to degrade and ringing will show up more.
- Material: Devil Design Pink PETG
- Layer Height: 0.2mm
- Nozzle Temperature: 235C
- Bed Temperature: 65C
- Print Speed: 80 mm/s
Voron Calibration Cube
I also printed the Voron calibration cube to test how accurate round holes are printed. The bearing fit perfectly so I’m happy with the results. Bridging performance is also good but the Z seam has some bulges. This is caused by the filament pressure inside the nozzle and can be further tuned with Linear Advance or with a bit of coasting.
- Material: Devil Design Pink PETG
- Layer Height: 0.2mm
- Nozzle Temperature: 235C
- Bed Temperature: 65C
- Print Speed: 80 mm/s
Phil-A-Ment
With the first test prints done, it’s time to go a bit faster and see what the Flsun Super Racer can do. The internal and external perimeters were printed with 100mm/s and the results are nothing short of amazing. The extrusion is consistent, and the model looks great even on the steep overhangs under the gloves. Really happy with how this model turned out.
- Material: Gembird Red PLA
- Layer Height: 0.2mm
- Nozzle Temperature: 215C
- Bed Temperature: 60C
- Print Speed: 100 mm/s
Fluffy the Unicorn
Here’s another model printed with the same settings as Phil-A-Ment. The model is almost flawless, if we ignore the badly aligned Z seam which I forgot to align before slicing.
- Material: Gembird Blue PLA
- Layer Height: 0.2mm
- Nozzle Temperature: 215C
- Bed Temperature: 60C
- Print Speed: 100 mm/s
Sponge Bob
I changed the filament and started another PLA print. Sponge Bob was printed with the same PLA profile as with the previous two models, but this one has some small sections where extrusion is not as consistent as I would like. But either way, considering the print speed, which was used, I’m happy with the result.
- Material: Gembird Yellow PLA
- Layer Height: 0.2mm
- Nozzle Temperature: 215C
- Bed Temperature: 60C
- Print Speed: 100 mm/s
Torture Toaster
Bigtreetech sent me some Matte PLA to test, so I printed the Torture Toaster. The model came out well, but there are some issues with it. First, two of the overhang parts broke during printing (I blame the layer adhesion for this specific filament). Second, is the bad overhang portion on the right, where the part cooling fans didn’t properly cool the layers and the filament started to droop.
- Material: BIQU Olive Green Matte PLA
- Layer Height: 0.2mm
- Nozzle Temperature: 215C
- Bed Temperature: 60C
- Print Speed: 70 mm/s
Su Laegildah
I had some Extrudr BioFusion filament for a while and thought it would be a good idea to also test the Flsun Super Racer print quality using some shiny filament. The model is flawless, with excellent detail and without any kind of print issue. It’s hard to take proper pictures of this model because of the shiny nature of the filament, but you really can’t ask more from an FDM 3D printer. Please note that this model was printed at ~40 mm/s which is close to the top recommended speed of this filament. If I were to print it faster, adhesion would suffer, and the shiny surface would have some imperfections.
- Material: Extrudr BioFusion Epic Purple
- Layer Height: 0.15mm
- Nozzle Temperature: 215C
- Bed Temperature: 60C
- Print Speed: 40 mm/s
Sisu the Dragon
I’m so happy with the print quality you can get from the Flsun Super Racer, and I probably printed too many models with PLA, but here’s another example of the excellent print quality you can get. The print speed was a bit lower, at 80mm/s but I lowered it a bit to make sure that all the small details are printed correctly. If print speed is too high, cooling issues can occur.
- Material: FilamentOne Glint Red PLA
- Layer Height: 0.15mm
- Nozzle Temperature: 215C
- Bed Temperature: 60C
- Print Speed: 80 mm/s
Black Cat
I also did an ABS print just to test how fast I could push the Flsun SR. The Black Cat model from Eastman was printed at ~80mm/s with no enclosure. Even though the model completed successfully, there are two small delaminations on the external walls of the model which are caused by printing ABS without a completely enclosed machine. The printer was set in a position where drafts were not present, but if there’s a big difference in environmental temperature compared to the model, these small cracks show up. You can also see some less-than-ideal overhangs caused by the increased printing speed.
- Material: Gembird Black ABS
- Layer Height: 0.15mm
- Nozzle Temperature: 235C
- Bed Temperature: 105C
- Print Speed: 80 mm/s
The Dogefather
The one and only, Elon Musk, also called “The Dogefather”. Printed at a relatively low speed, but the print quality is excellent. The BioFusion filament works really well with the Flsun Super Racer, if the print speed is not too high.
- Material: Extrudr BioFusion Metallic Grey and Sunlu Carbon PLA
- Layer Height: 0.15mm
- Nozzle Temperature: 215C
- Bed Temperature: 60C
- Print Speed: 50 mm/s
Conclusions: Is the Flsun Super Racer worth it?
YES! If you are looking for a fast Delta 3D printer, then the Flsun Super Racer is an excellent option. It’s able to produce impressive looking prints while also doing it fast. Most of the time, the print speed you can achieve with the Flsun SR is limited only by the material you choose to print with, and the part cooling fans which are a bit underpowered. But other than that, there’s not much to complain about. To get this kind of quality and print speed for under 500$ is impressive and I can only congratulate Flsun for the achievement.
The Flsun Super Racer has a good list of features and hardware that works really well. Sure, it’s not perfect, and some of the hardware used can be considered a small drawback for this printer (I’m talking about the heatblock and the PTFE lined heat break and the low power part cooling fans) but these can be upgraded later.
I can only imagine how the print speed can be improved after setting up Linear Advance or installing Klipper to further improve the print quality at higher speeds to eliminate ringing with the use of Imput Shaper. I will make sure to document the process when I get to do it. Besides that, if you upgrade the part cooling fans, I’m sure the print speed can be pushed even further.
Later Edit: Linear Advance is enabled in the firmware but the value is set to 0. A value of 0.20 works great as a starting point, but this might be different according to your filament type. The slicing profiles have been updated.
Where to buy the Flsun Super Racer?
Amazon
Flsun
Banggood
AliExpress
Geekbuying
I recommend checking out the Discount Codes page before purchasing. I regularly update the article with discount codes for various online shops, and you might find one for this particular model.
Klipper and other upgrades for FLSUN Super Racer
After some time with the FLSUN Super Racer, I found some improvement points for the printer and you can read more about my recommended upgrades in the FLSUN Super Racer Upgrades article. I also wrote a guide on How to Install Klipper on FLSUN Super Racer if that’s what you’re interested in.
The Flsun Super Racer was provided free of charge by Flsun for the purpose of this review. While the article includes affiliate links, all opinions are my own. Nobody reviewed the article before it was posted, following the Review Guidelines.
Liked it?Consider supporting 3DPrintBeginner if this content helped. You can also join Patreon for exclusive perks! |
Flsun Q5 Review: Delta Printer For Beginners
I have a lot of printers, but the Flsun Q5 is my first delta machine. For some reason I never got my hands on a delta and I was really interested in testing one.
What are delta printers?
Most common FDM 3D printers right now are cartesian and Core XY printers.
Cartesian printers move the bed on the Y axis, and the hotend moves on the X and z axis. In this case, the heaviest movement part is the bed, and this can cause ringing on the surface of the prints if speeds are not tuned well. This is the reason most of the cartesian printers are used at relatively low speeds.
Most Core XY printers move their bed only on the Z axis, and the hotend moves on the X and Y axis. Because the heaviest part of the printer moves only in small increments on the Z axis, you can now push the printer to higher speeds.
With a bowden setup, Core XY printers can print faster than a cartesian printer and usually with better quality.
For delta printers, the bed is completely stationary, and the hotend moves in all three XYZ axis. This movement is made possible by three moving arms which are connected to the hotend assembly. Each arm is controlled by a single stepper motor and moves independently to control the position of the nozzle.
With this type of movement included in a delta printer, the hotend is a bowden setup to keep the weight as low as possible.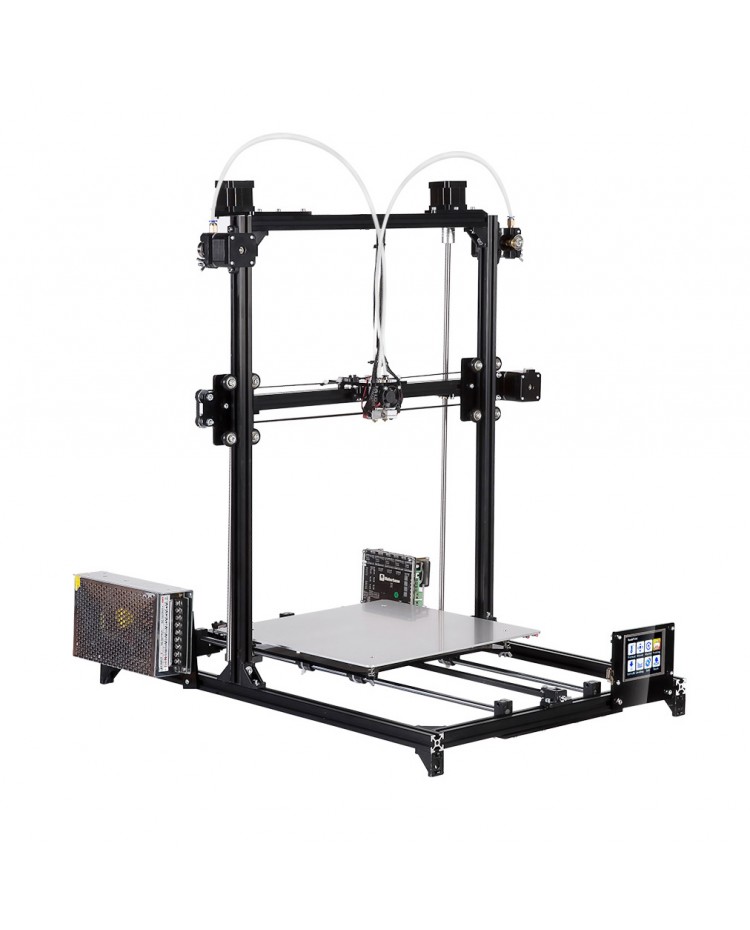 Movements can be much faster which translates to faster print speeds and you are usually limited only by the cooling capacity of your part cooling fan and the hotend.
Unfortunately, there’s also a downside with delta printers. Usually, the build volume is about half of its height because the moving arms I was telling you about need extra room in order to perform the movements on all three axes. Besides the volume loss on the Z axis, you also loose a bit of space on the X and Y due to the circular bed.
A delta printer is a good contender for Klipper and that’s the main reason I was interested in playing around with the Flsun Q5.
Flsun Q5 Packaging and Shipping
The printer was shipped from a local warehouse (UK) and delivery took around 5 days. Packaging for the Flsun Q5 is much smaller than I expected, but all the components are properly secured and protected during shipping.
With the printer you also get the following accessories:
- Leveling sensor
- Hotend assembly
- Effector arms
- Installation screws
- Filament cutting pliers
- Spatula
- USB cable
- MicroSD Card
- Spare 0.
 4 mm nozzle
 - A set of hex wrenches
- Metallic spool holder
- PLA sample
Assembly of the Flsun Q5
The assembly process of the Flsun Q5 is straight forward and easy to do even for a beginner. First, you need to connect the three extrusion assemblies on the base plate then install the top of the printer.
Next, you install the effector arms to each axis and finally, install the hotend assembly. With the printer assembled, you just need to install the spool holder on top of the printer, and double check all the wire connections. If everything looks good, then you’re ready to start printing.
Flsun Q5 specs
| Build Volume (L X W X H) | φ200X 200 mm |
| Maximum layer resolution | 0.1-0.4 mm |
| Recomended layer resolution | 0.2-0.3mm |
| Printing speed | 20-200 mm/seg |
| Recomended speed | 80mm/s |
| Filament Diameter | 1. 75 mm 75 mm |
| Nozzle Diameter | 0.4 mm |
| XY Positioning Precision | 0.012mm |
| Z Positioning Precision | 0.004mm |
| Operation Temperature | 5-37°C |
| Product Dimensions | 300x300x650mm |
| Shipping Box | 660x360x150 mm |
| Product Weight | 7kg |
| Shipping Weight | 8KG |
| Power | 200W |
| Input Voltage | AC 100-240V |
| Power output | DC 24V 8A |
| Filament Material | PLA ABS |
| Printer Case | Aluminum |
| Monitor Screen | Touch screen |
| Print Technology | FDM (Fused Deposition Modeling) |
| Supported File Type | STL,G-code, OBJ |
| Connectivity | USB, SD card |
| Software | Cura,Repetier-host |
| Language | English |
Titan clone extruder
It’s nice to see that the Flsun Q5 comes with a geared extruder in the form of a Titan clone. The quality is acceptable and it’s much better than any kind of cheap extruder you can find on some Creality machines.
Considering that the Flsun Q5 is a delta, and you can push the printer at much higher speeds compared to a regular 3D printer, the Titan extruder will ensure the consistent extrusion needed.
V6 hotend
The Flsun Q5 comes with a V6 hotend clone with a few changes from the regular V6. It gets mounted on the printer using two screws that go inside the heatsink trough the bottom.
The heatblock is smaller than a regular V6 and the head break is PTFE lined so I don’t recommend going over 245C for a long period of time.
The hotend can be a limiting factor when printing because if you raise the print speed too much, the hotend cannot keep up. A volcano hotend would have been a better addition to this printer, but the current one works fine for up to 70mm/s. Heating is fast and the nozzle can reach 210C in about 2 minutes.
Unfortunately, there’s no silicone sock on heatblock but this is a really cheap upgrade which will keep your heatblock clean.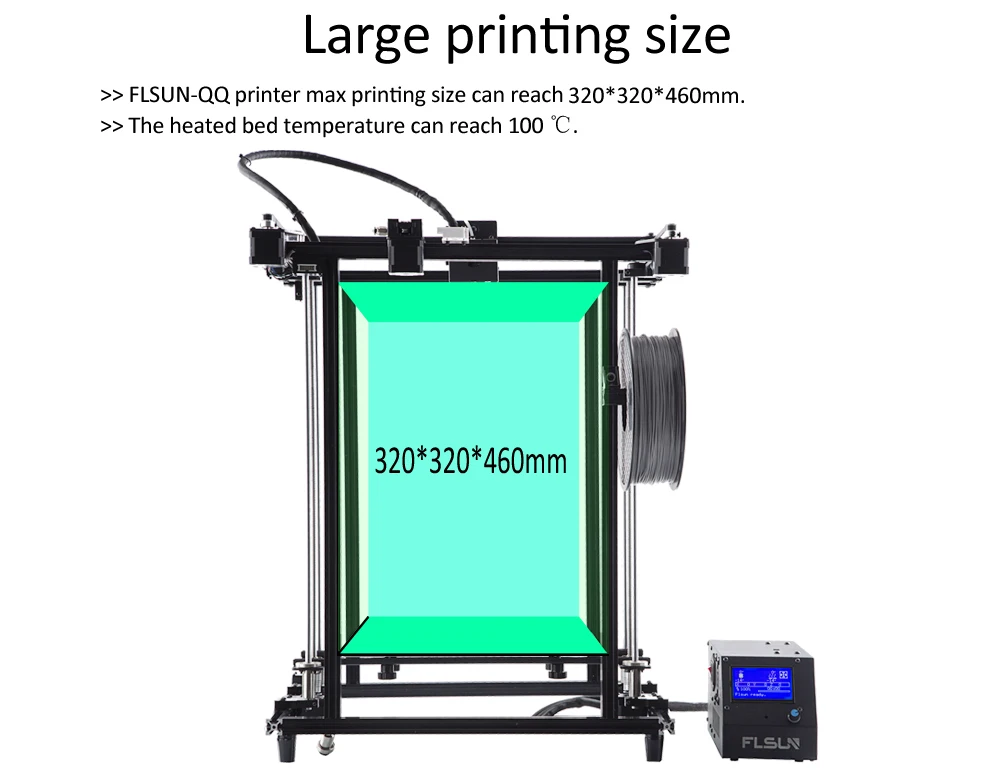
MKS Robin Nano 1.2 (32-bit board with TMC2208 silent drivers)
The board included with the Flsun Q5 is made by Makerbase. It’s the Robin Nano 1.2 board with 3x TMC2208 silent stepper drivers. The extruder uses an A4988 stepper driver which is a bit louder. It should be easy enough to replace the stepper driver with a similar TMC2208 to make the printer even quieter.
Considering the price of the printer, I can understand why they saved a few dollars with an older stepper driver but a TMC2208 would have been nice.
As you can see, there’s room for another stepper driver, so the printer can be upgraded to dual extrusion in the future, if you’re looking to try it. Of course, this will require some modification to the printer. Specifically, adding an extra stepper motor, extruder, and a split connector for the filament
The MKS Robin Nano V1.2 also has a port for connecting a MKS Wi-Fi module which can allow you to send prints remotely to the printer.
Small 2.
 8inch touch screen
The touchscreen included with the Flsun Q5 is a MKS 2.8 TFT which is responsive and offers most of the controls you would expect.
It doesn’t have any special functions like the BTT TFT35, but it gets the job done. I like that the screen menu takes you through the Z calibration process so it will be easy for anyone to correctly do the calibration whenever it’s necessary.
Ultrabase style glass bed
The printing surface included with the Flsun Q5 is an Ultrabase style glass bed, similar to what you can find with an Anycubic or Creality printer. The round glass bed has good adhesion and prints can be removed easily after the bed cools down.
There was no need for me to use the metal spatula to remove the prints because they get released by themselves after the bed cools down.
The print surface is flat and after calibrating the Z offset and probing the bed, I never had to touch it or use babystepping for a perfect first layer.
You can reach up to 100C, thanks to the DC powered heat bed underneath the glass.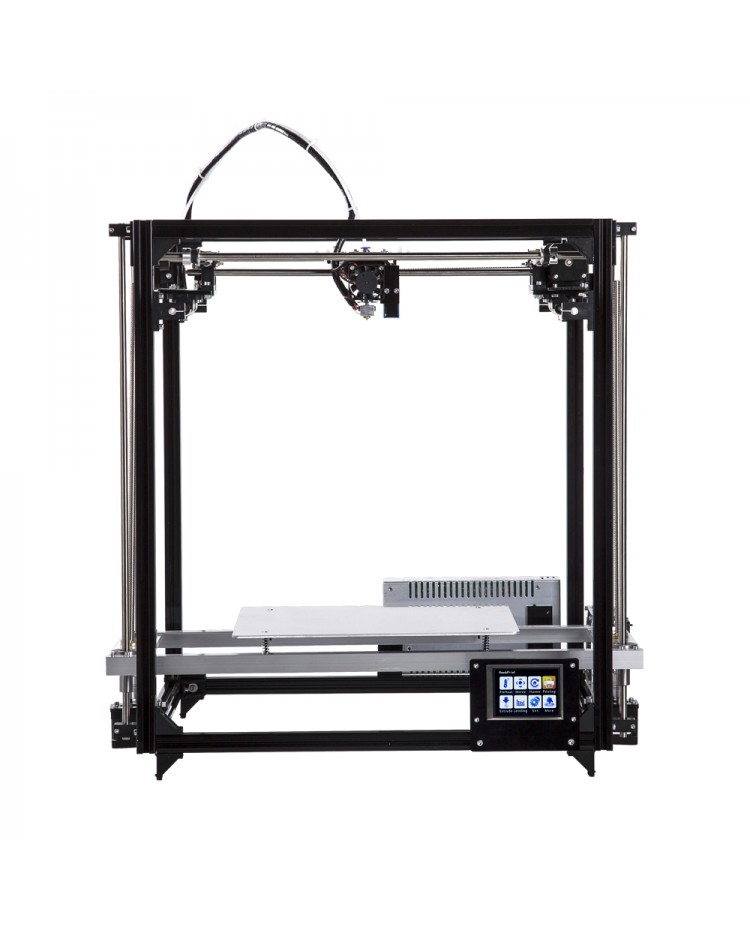 Heatbed insulation material is also present which helps the bed reach the required temperature faster, and lower the overall power draw during operation. The bed reaches 60C in 2 minutes, and 100C in about 6 minutes.
Auto bed leveling
For leveling the printer (or maybe it’s better to call this “calibrating the printer”) you get a removable sensor which clips next to the hotend.
With the help of this sensor, the Flsun Q5 probes the bed in 25 points and then generates a mesh to compensate for the inaccuracies that might be present in the heat bed. It works really well and makes the whole setup a breeze. I only used it once since I got the printer.
Small footprint
I like the fact that a delta printer takes a lot less space compared to a regular printer. The Flsun Q5 makes no exception and it takes only 50cm on the desk. It takes about the same space as a regular resin printer.
Fanless power supply
Because the heated bed is relatively small, it doesn’t draw a lot of power.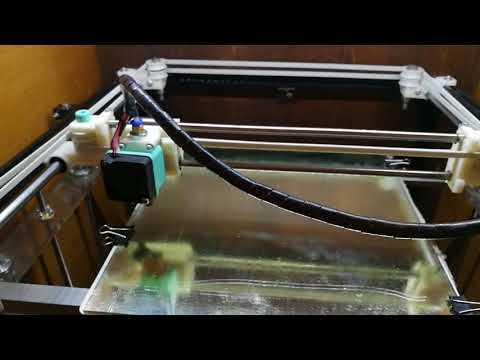 This allows the manufacturer to use a lower power power supply (240W) which doesn’t need a fan. The benefit of using a lower power supply with no fan is lower noise during operation.
Inside the enclosure there’s a 4020 fan which blows air over the stepper drivers and power supply, so cooling is fine.
Not the greatest spool holder
Unfortunately, the spool holder is not the best. Because it is connected with only two screws on the relatively thin metal sheet on top, it’s not that stable.
It works but I think an upgraded spool holder with bearings would work much better for the Flsun Q5. The spool holder arm is also a bit small and it will not allow the use of wider spools of filament.
Fortunately, there are a lot of 3D printable solutions available so this is an easy fix.
Good calibration from factory
I was pleasantly surprised to see that the printer is properly calibrated right from the factory. I didn’t need to perform any kind of extruder or flow calibration. Everything was on point.
This made the whole experience with the printer painless and I am sure any beginner will appreciate this. You just take the printer out from the box, assemble it then start printing. Of course, you will need a decent profile, but otherwise, the Flsun Q5 is one of the easiest printers to setup
Mirrored prints
It’s also worth noting that the prints from the Flsun Q5 are mirrored, and I could not find a reason for this but I will update this review when I find a solution.
This can be probably fixed by editing the firmware but I think it’s worth mentioning the current state of the printer firmware.
Later Edit: The issue was fixed by flipping the X and Y motor wires and end stops. They were not installed correctly during assembly in the factory. After flipping the connectors, everything printed in the correct orientation.
Slicer profile for Flsun Q5
During my time with the printer, I tuned a Prusa Slicer profile for the Flsun Q5. This profile is tuned for the stock printer and worked well for me. If you are looking to give it a go, then feel free to download from the links below:
Flsun Q5 Prusa Slicer Profile – PLA – 3DPrintBeginner
There was no need for me to calibrate the extruder of flow, but if you notice some extrsion issues, you can follow the Flow Rate Calibration article in order to do that.
Test prints on the Flsun Q5
3D Benchy
As I regularly do, I started a 3D Benchy because it’s the easiest way to determine what kind of settings I need to adjust on my slicer profile to improve the quality. Not the best benchy, but considering I used a default untuned profile, I think it’s decent.
- Material: Sunlu Gray PLA
- Layer Height: 0.2
- Nozzle Temperature: 210C
- Bed Temperature: 60C
- Print Speed: 60 mm/s
Unicorn
I thought I try the printer with a slightly bigger model and a tuned slicer profile before moving on.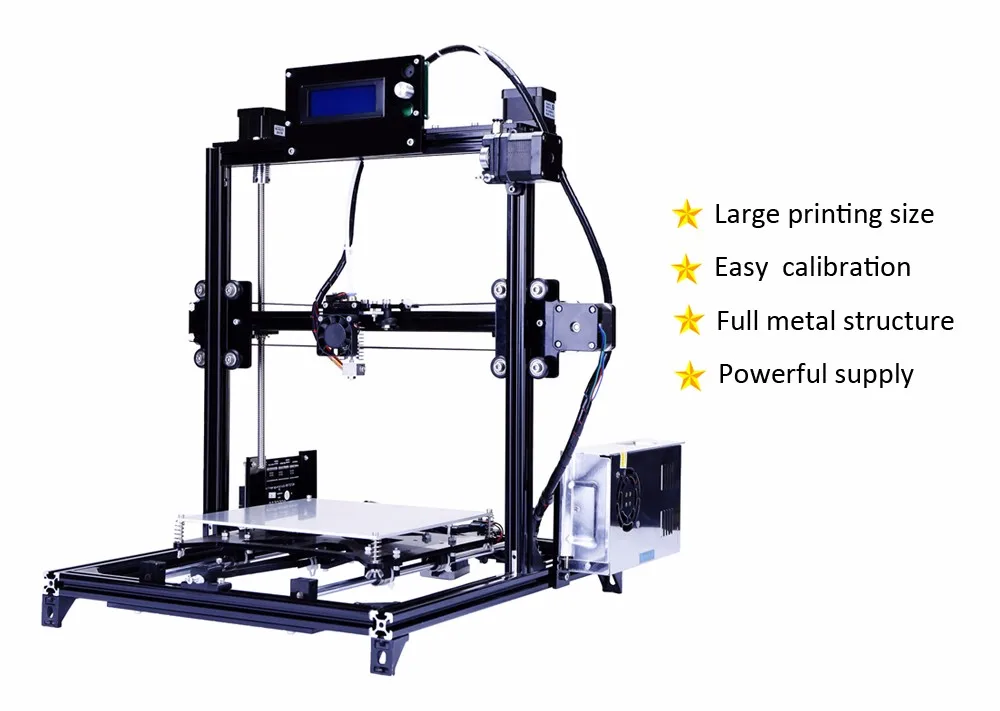 So, I grabbed the Unicorn from Alsamen and started a print. It finished in less than 3 hours and as you can see, the results are excellent.
No sign of Z banding, extrusion is consistent, and I was amazed by the quality you get out of the box.
- Material: FilamentOne PLA Glint Purple
- Layer Height: 0.15mm
- Nozzle Temperature: 210C
- Bed Temperature: 60C
- Print Speed: 70 mm/s
Knurled Bolt
I printed the sliced G-code from the SD card with decent results. The nut can spin on the bolt but the slicer settings used are a bit too much (retraction too high, bed too hot).
So, I printed a second one with my PLA profile and the tolerances are better. The nut spins freely and it looks great. I’m happy with the results.
- Material: Gembird Christmas Green
- Layer Height: 0.15mm
- Nozzle Temperature: 210C
- Bed Temperature: 60C
- Print Speed: 70 mm/s
Cyclops
Now that I confirmed that all the slicer settings are right, I printed the Cyclops bust from Eastman.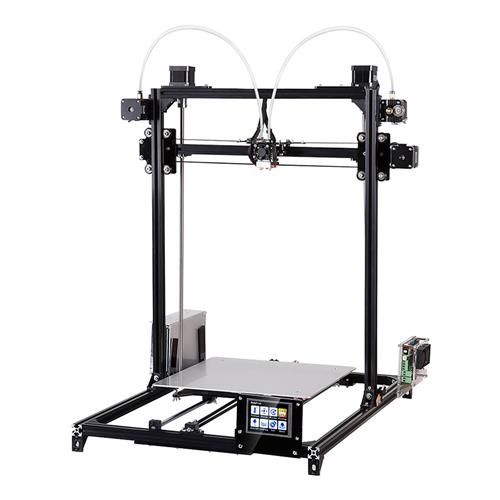 I also increased the speed a bit, because it’s a bigger print and layers have more time to cool.
Results are again, impressive! Considering the speed this bust was printed, you can’t really ask for more. Print time was about 8 hours.
- Material: FilamentOne PLA Glint Blue
- Layer Height: 0.15mm
- Nozzle Temperature: 210C
- Bed Temperature: 60C
- Print Speed: 70 mm/s
Elven Assassin
Using the same settings, I printed the Elven Assassin from Eastman. The quality is just as good and I can’t see any problem with the printed model.
- Material: FilamentOne PLA Glint Gray
- Layer Height: 0.12mm
- Nozzle Temperature: 210C
- Bed Temperature: 60C
- Print Speed: 70 mm/s
Moai
In order to check the TPU performance of the printer, I printed the Moai from Thingiverse. This time, I lowered the print speed to ~35mm/s for consistent results. It’s not really possible to print TPU faster on the Flsun Q5 because the filament compresses in the bowden tube and can’t be extruded consistently.
With a lower speed, the results are good.
- Material: Devil Design Pink TPU
- Layer Height: 0.2mm
- Nozzle Temperature: 215C
- Bed Temperature: 60C
- Print Speed: 35 mm/s
200% Calibration Cube
I also tested the PETG performance and the printer can do it but with a maximum speed of ~60mm/s. If you try to go faster, the hotend cannot keep up and melt filament efficiently.
You can also see some small artifacts on the side of the prints. I noticed this on all prints which have straight lines. I am not sure what causes this effect but it’s something to keep in mind when considering the Flsun Q5.
- Material: Devil Design Pink PETG
- Layer Height: 0.
 2mm
2mm - Nozzle Temperature: 240C
- Bed Temperature: 60C
- Print Speed: 60 mm/s
Conclusions: Is the Flsun Q5 worth buying?
The Flsun Q5 is an excellent Delta printer for beginners. It offers a pleasant experience and excellent print quality out of the box, even at higher speeds. It’s held back by the stock hotend, so it will be hard to print faster than ~70mm/s but otherwise everything works well.
During my time with the printer I haven’t encountered any kind of issues during printing, and all the models I tested came out great (if we ignore the mirrored print issue). The printer is silent, but I would have liked to see a TMC2208 driver used for the extruder instead of the A4988.
For the current asking price of around 200$ I think the Flsun Q5 is an excellent budget 3D printer for beginners and I can’t find any reason not to recommend it. I would get the Flsun Q5 instead of an Ender 3 for example, because it’s faster and easier to use. And watching a delta printer is much more satisfying compared to the regular cartesian machines.
Where to buy the Flsun Q5?
AliExpress
Banggood
Amazon
I recommend checking out the Discount Codes page before purchasing. I regularly update the article with discount codes for various online shops, and you might find one for this particular model.
The Flsun Q5 was provided free of charge by FLSUN for the purpose of this review. While the article includes affiliate links, all opinions are my own. Nobody reviewed the article before it was posted, following the Review Guidelines.
Liked it?Consider supporting 3DPrintBeginner if this content helped. You can also join Patreon for exclusive perks! |
FlSun Cube 3D - overview and some upgrade steps. Blowing the printable area.
So, finally I assembled and launched the FLSun Cube 3D printer bought more than half a year ago.
It took a long time. But only because I could not bring myself to collect it in the stock version. The poet's soul could not bear it... I had to finish it right away, and this time, thoughts, building and setting up a router for cutting the necessary parts, assembly, alteration, breakdown, elimination, etc. As a result, today he finally earned as a normal full-fledged printer. nine0003
So. What can I say about the product codenamed FLSun Cube 3D... Nothing good. I bought it almost by accident, when I was completely disappointed in my old Flying Bear P902. And having encroached in the advertising banner on the "large print area" and the simple kinematics already familiar from the "Bear", I ordered in the maximum configuration. Which he later regretted.
Printer almost entirely - a solid set of examples of how not to make 3D printers. I'll try to be short, but capacious and in order. nine0003
Printer - profile cube, Makerbot kinematics, Bowden feed, V5 extruder, MKS Gen L board, fully equipped - Cyclops and Chimera, capacitive auto level sensor, MKS TFT 32 v4 touch screen, Wifi module.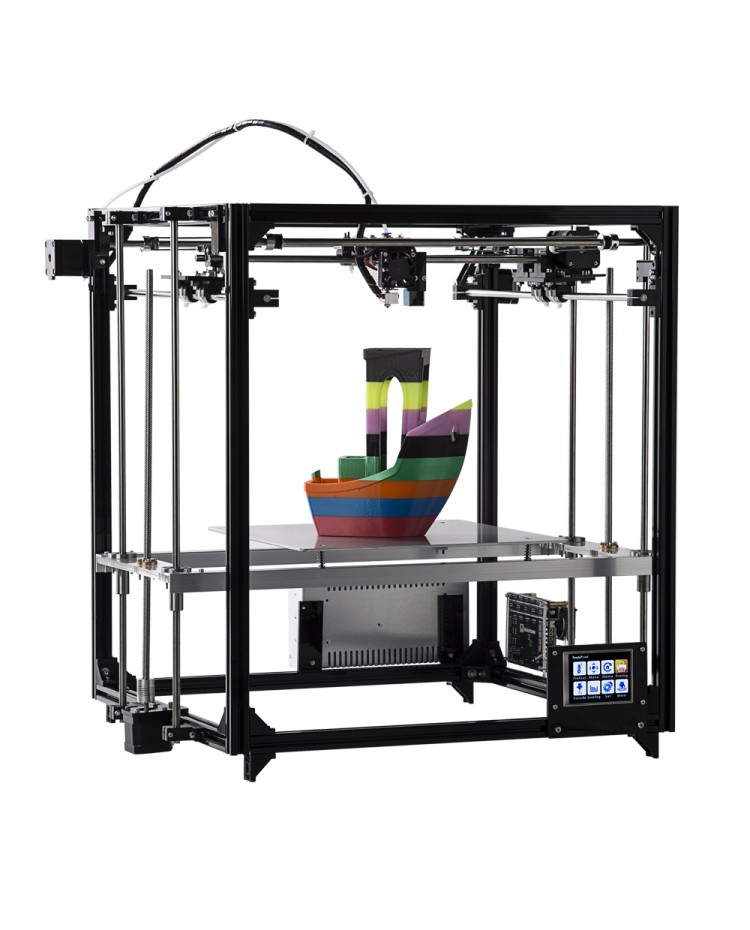 Price at the time of purchase 22500 fully loaded.
A video demonstrating all of the following can be viewed here: https://www.youtube.com/watch?v=bqPOv7ZpjD0
1. Frame. The printer is huge. This is due to a completely wrong way in its design (below, item 6). Well, a large print area. And with such dimensions, it is assembled from a flimsy 20x20 profile. In small corners. Without any slopes. As a result, we have a parallelepiped without a hint of rigidity. There is only one way - to sew up with plexiglass (other sheet material). Otherwise, it's just jelly. nine0003
2. Shafts. Again, with such dimensions, the shafts are 8mm. And 500mm long. The carriages hang on them like on laces. The total sag of the Y and X axes, even at rest, reached a few millimeters. I decided by replacing the Y-axis shafts with 12 mm, the corresponding alteration of the Y-axis carriages - I threw it on for a home milling CNC3018 and cut it out of thick plexiglass. I left the X and Z axes on 8 mm shafts - more or less normal.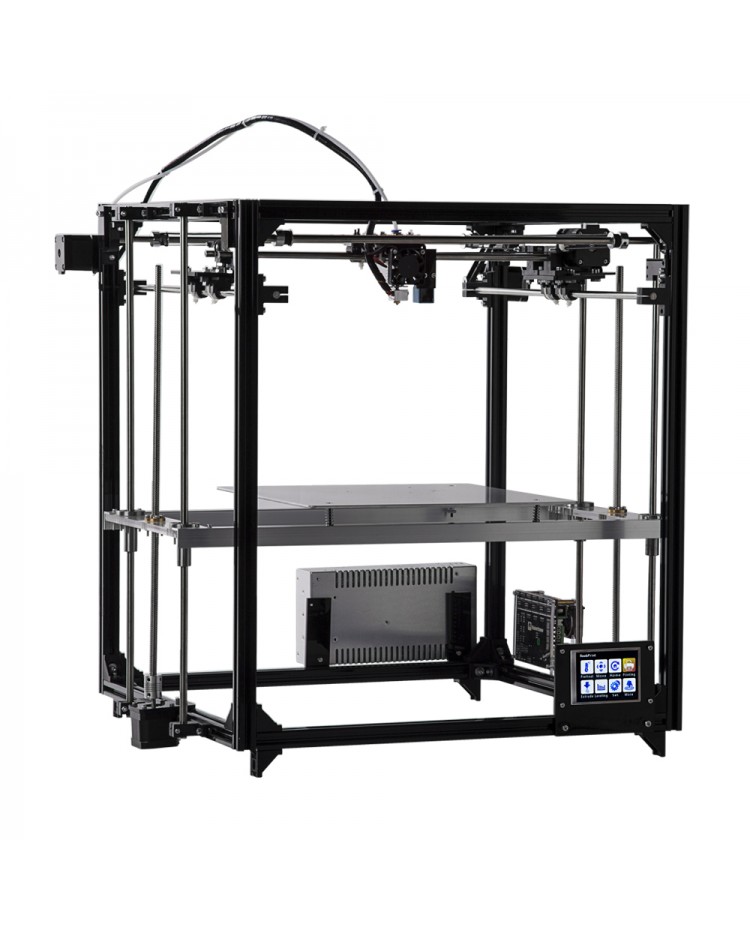
3. The material of the kinematic elements is thin plexiglass (acrylic). I remade the Y axis to thick acrylic, I haven’t touched the rest yet. Although I know that for someone it just breaks down over time. But I have CNC3018 =)
4. Linear bearings are attached to the carriages with nylon ties. On the Y axis, I replaced it with normal ones, I left it on X. I will change everything at once - both the carriage and the wheels for it.
5. Z axis!!! It was painful. Well, why did a student from a Chinese vocational school design it hanging on cantilever supports outside the frame perimeter ??? I could not leave it and removed the Z axis into the frame. It's SIMPLE and the shafts are even shorter, and the design is more rigid and the dimensions are immediately smaller by 60-80 mm on both sides!
6. The Y-axis carriages are horizontal. This caused the printer to bloat in size to "fit" them. Badly. I mnu in the "Bear" carriages are vertical, and therefore the design is more compact and there is less "emptiness" in the printer. In FLSUN 3D Cube this is bad. nine0003
7. Extruder V5. Immediately change to V6 ... And ... look for a long time in the box for BLOWING the print area. And she is not there. And this is a bummer. What to print on this printer? PLA? We don't have airflow... ABS? And we do not have a closed box. At first, I printed ABS-m, covering the printer with a bag for packing car wheels. For a long time on thingiverse.com I selected the airflow for the FlSun Cube so that it was not confused, under 50x15, it blew the print area from both sides, and it fit on the V6 and kept well at the same time. With difficulty I found the FLSun designed for the version of Pryusha. The cards are similar. Combined it with a 40x10 V6 nozzle from another project and put it back together. I printed it out and it worked. Mega satisfied. True, I had to bite off a piece of the carriage X with tongs right on the printer - I had no strength to disassemble and grind neatly ... I risked the breakdown of the entire carriage, but everything worked out, thank God. The airflow turned out to be powerful and brutal looking. nine0003
8. Everything else - all these numerous pieces of plexiglass twisted by dozens of M3 screws, just a feeling of longing during assembly ... The power supply unit is not mounted on the case - the mount does not fit. Shafts are not cut to size. The regular hotend blower mount is funny. Did I mention bearings on tie rods?
9. Regular plastic feeder is inconvenient. Unspringed, changing the filament is terribly inconvenient. It pushes badly. Replaced with aluminum MK8. It became good.
10. Little things. An external mosfet is used to power the table. 5mm mirror on the table, insulation under the table. On the supply wiring ferrite rings. Y Axis motor placed more rigidly and compactly. Under the engines, cork "shock absorbers", legs out of the corners, thick santehrezina foreva. All wiring to carriage X for connectors - heater, thermistor, fans, limit switch, so that everything can be opened.
Prints as a result. But how does it shake him at the same time !!! Prints well, evenly, neatly. All supports, slopes, everything holds. But the speeds are low - do not raise above 40 mm, accelerations and jerks are minimal. nine0003
Personal recommendation to buy - do not buy. It is better to do some sort of a clear and promising public project on CoreXY.
This is roughly what I think of this printer. I hope someone will help or decide on a purchase or with ideas for improving this device, if already available.
Flsun cube 3d Printer
I’ll tell you my story of how I became a 3D printer)
(! all the funny pictures below!)
And so, I love to create, invent, make, and at one fine moment I realized that without a 3D printer it’s not life..week I left for an introduction, that is, at least a little understanding of what to buy in general, first I came to the prusha i4 then to the bear and when I got to order it I saw this Flsun Cube 3D Printer
without really understanding anything, proceeded from logical conclusions - more print area, auto level in the kit .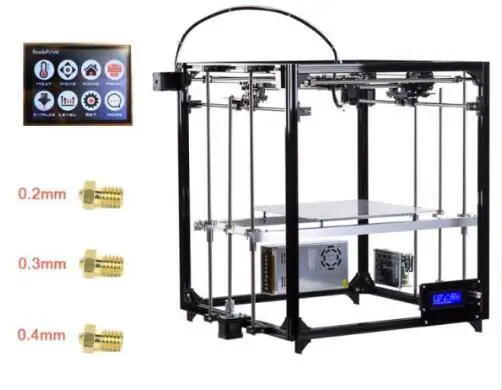 ...
...
only - number of orders: bear - over1000, flsun - 2 ....
read a couple of reviews on it here and decided that, as usual, easy ways are not for me and ordered the same flsun...
... from the Russian warehouse https://ru.aliexpress.com/item/Large-Printing-Area-260-260-350mm-Aluminum -Frame-3D-Printer-kit-with-Auto-Leveling-and-Heated/32817254286.html
ordered on Sunday evening, the printer arrived (exceeding all expectations) on Wednesday morning to the entrance!
includes two plugs, America and Europe) bolts, nuts, etc. all in signed bags, a small screwdriver from the tools, then I realized - in order to tighten the contacts on the terminals) and hexagons
on the sd card software, pictures, instructions, model pla ... and assembled it, connected an old netbook and monitor
, in principle, everything is clear, but very long, a lot of tiny screws and nuts and you sit and wind them, the sizes are long, sometimes excessively ... but oh well, no more less)
the table is somehow stained, shabby, the wire fell off during installation, a good reason (yes, it’s a reason to change the wire)) immediately change it! put it on the sleeves, wire 2x1.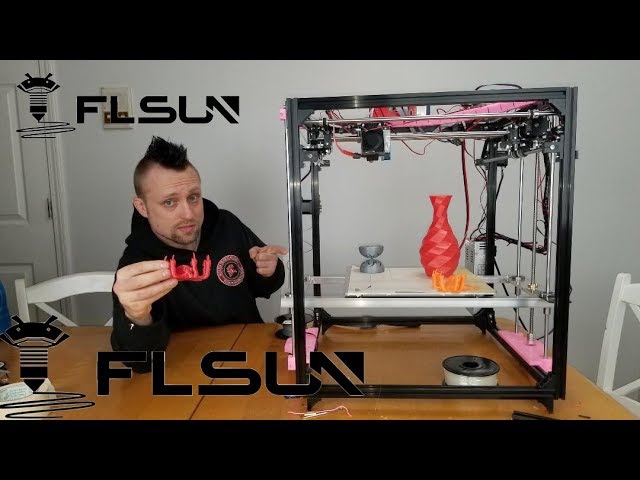 5 sq. reminiscent of a children's constructor))
I assembled it in a couple of days, launched it, and ... I struggled with auto-level for a long time, I just can't figure out how to set it up ... at first I assembled it, according to the instructions without it, just with a limit switch, it didn't react at all ( limit switch Z). In general, then I figured out how it all works, but I put the auto-level sensor as a limit switch to the side, printed out a couple of parts for it for fastening and adjusting in haste. I understand if you put these g29then he starts scratching the table but not at 9 points, but, like at 36! this is very long .. I don’t know ... I already got used to calibrating by eye ...
acrylic is brittle, breaks twice, it’s good that it’s not critical (I broke off) everything can be replaced, for example, where this thing is attached .. uh extruder? it broke off on the left and right, sawed out a detail from an aluminum strip to fix it ..
about the splinter - I thought what to steam, put it on the cabinet, screwed the cabinet to the wall, screwed the printer to the cabinet .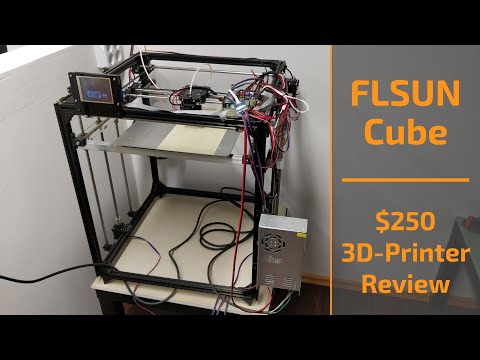 .. I also thought the printer was cornered to the wall and everything, together with the house will move ... but! the printer itself is quiet, when you stand stuck to the print only the fans are audible, but as soon as you go to another room you can immediately hear the singing of the engines, and if you lean against the wall somehow, screw it on, the wall starts to sing on the other side (five-story building) ... like a speaker, it's all about frequency apparently, so it's not that simple...
bp - turned it up to 12.8, the fans on the board were like turbines, they created more noise, put a handkerchief - turned the lowering on ~ 9v - calmed down) to any temperature, the table is up to 100 for about three minutes, probably ..
printing - two spools are written PLA in the kit, but it’s very strange, it’s more or less possible to print on settings closer to ABS - I heat the table - otherwise the bottom starts to rise, and the nozzle 230 is the most then it turns out - below - crap
printed out the airflow, but what with it or without - the same thing .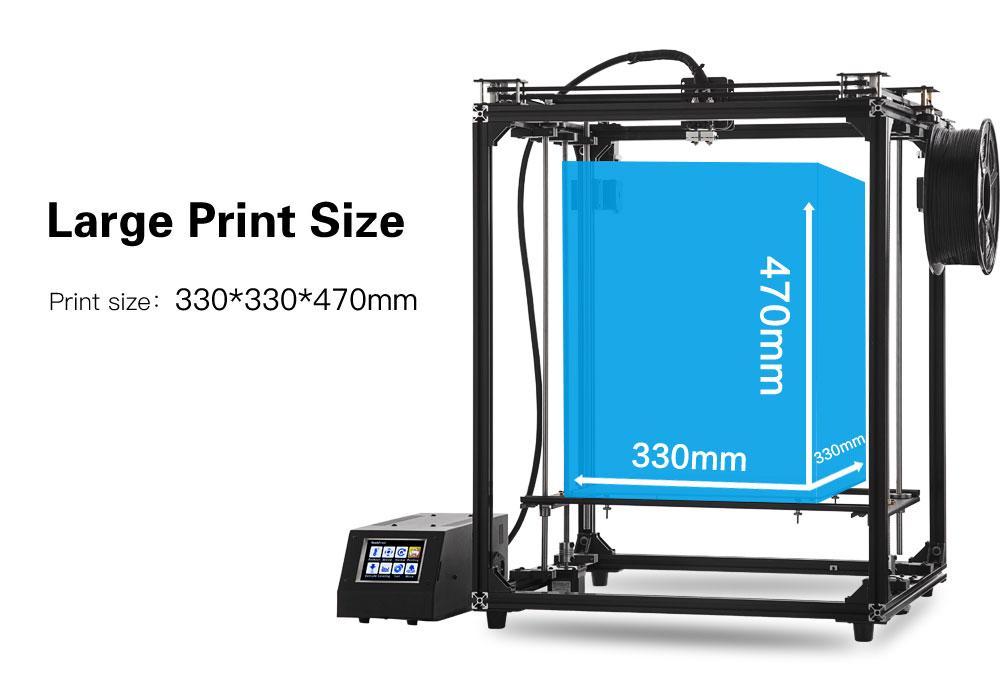 . maybe the stickers were mixed up for plastic ??? xs in general .. while I'm learning .. the second coil is coming to an end and I still can't choose where to buy plastic ...
in print everything seems to be clear and not bad except for the bottom layer ... I tried glass and glue stick, but not a kalyaka-malyaka and not a krauser, but some other kind of crap. Here, in a review for this printer, a person wrote that he accidentally found a way with Kapton - his top film came off and everything became super - but shouldn't it? Kapton is like double-sided tape, you stick it on - you tear off the film and voila! now I’m just typing like this, it’s a pity that I just immediately lost almost the entire Kapton from the kit (((because I didn’t know how to use it ....
general impressions - well, what can I say, in general, since I mainly need it for cases, and the case is usually printed face down, the problem of the first layers remains open ...
while everything is hanging, sticking out, etc.