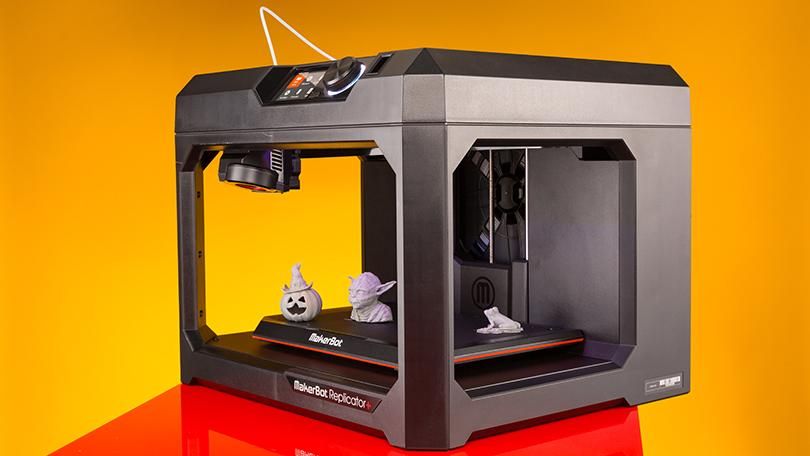
3D printed sound diffuser
Sound diffuser | Acoustics First BLOG
DIY – Nouveau™ Home Theater Back Wall
It wasn’t a difficult install, but these Nouveaus made this space sing.
Adding Nouveau™ wood diffusers to a home theater is not as daunting a task as it may seem, and can be done with a little planning and a few tools. This install used an ingenious mounting method to ease the final install. Instead of mounting the z-track to the wall directly, it was mounted to sheets of plywood which were hung with Gorilla/Hercules hooks.
The first task was to pick a stain. You can use the back of a plank to get an idea of how the poplar will respond to the different options. Poplar has a very interesting and varied structure that will take stain differently than some other woods. Darker stains may be more consistent, but don’t reveal the character and variation in the wood. This install chose a Smoke Gray which grayed out soft areas and browned the harder heart wood. A semi-gloss clear coat was used to finish.
Using the back of the Nouveau™, you can see how the stains will “take.”
While the stain dried, the mounting plywood was cut down to hide behind the planks. Four hanging straps with eye-loops were then added to the top edge of each of the plywood sections, and spaced to avoid studs.
Industrial hanging eyelets were added to the top edge of the sheets to make them easy to level and hang with the Gorilla Hooks.
The Z-track that would normally be installed on the wall was installed on the opposite side of the plywood. This will make it easy to hang the Nouveaus onto the sheet after it’s on the wall.
Z-Bar track was added to the top and bottom of the plywood sheet to accept the z-bars that are going on the back of the finished Nouveau™ planks.
After the Nouveau™ planks are finished with the staining, and left to cure for a few days, they are ready to have the mating Z-bars attached to the back. They are installed with the same spacing as the Z-tracks on the plywood sheets. This will make it easy to align them after the plywood is hung on the wall.
The z-bars are measured, marked, and installed at the same spacing as the z-tracks on the plywood.
The Gorilla/Hercules Anchor hooks are rated to around 50-60 lbs each. The Nouveau™ planks are roughly 25lbs each (at 48 inches) and each section has 4 hooks supporting 4 planks plus the weight of the 3/8″ plywood. The hooks are installed so that the plywood will hang level – with the weight distributed evenly across all four hooks.
When installed properly and leveled, each of these hooks will hold up to about 50-60lbs each. In this configuration, they should only need to support about half that.
Finally, the Nouveau™ planks are installed into the Z-Tracks on the plywood, and moved into position. Because the z-bars were installed square and level, there is no shifting, and they hang true. The undersized plywood sections disappear behind the planks leaving the impression that the planks are floating slightly off the wall.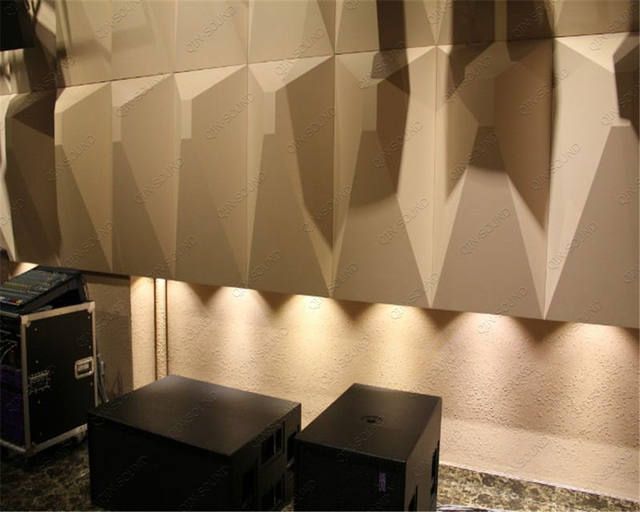
The install doesn’t look much different from a direct mount z-track installation, with a small gap against the wall.
While this mounting method may not be ideal for every scenario, this was an effective way to install 8 Nouveau™ planks with only 8 small hook holes in the wall. These can now be installed in apartments or temporary environments with minimal damage to the existing walls – and once you are done, they’re easy to take down and reinstall somewhere else. You just need a level!
diffuser, diy, nouveau, Sound diffuser
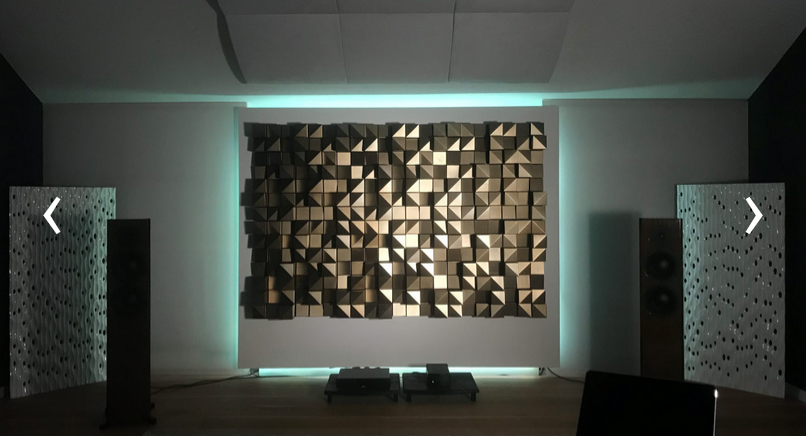
Big3 Studios – Aeolian® Diffusers
Aeolian® Diffusers in Big3 Studios
We recently received these wonderful installation pics from our friends at Big3 Studios in Florida. They redid the back wall in one of their control rooms using our Aeolian® Sound Diffusers. In a couple of the pics you can also see our Model C & Model F Art Diffusors® (black) in the ceiling!
aeolian, art diffusor, ArtDiffusor, model c, Model F, Sound diffuser, sound diffusion
Introducing the Aeolian™ Diffuser
Production Unit – Photo
Acoustics First® is pleased to announce our latest creation: The Aeolian™ Sound Diffuser. In some ways a simplified version of our popular Art Diffusor® Model D, the Aeolian™ is the latest in our line of ‘Organic Quadratics’. Part of the Aeolian’s™ unique design comes from its use of “implied symmetry”. Although the edges are all asymmetric, the height variations are just subtle enough to create an illusion of symmetry when installed in a standard 15/16” grid, or spaced appropriately on a wall. The lack of a uniform edge also has added acoustical benefits in the way of “randomness”.
3D Development Model
Simulations are compared to final test results before production. (Test result by NWAA Labs.)
The development process for the Aeolian™ was similar to that of our ‘Model D’. Various 3D models were created and refined, after which we ran acoustical simulations. Once we settled on what we considered the optimum design for what we were going for, a full scale 3D model was printed for lab testing. With the ‘real world’ test results in hand, confirming our predicted results, we set about making the final mold, and this new diffuser was born.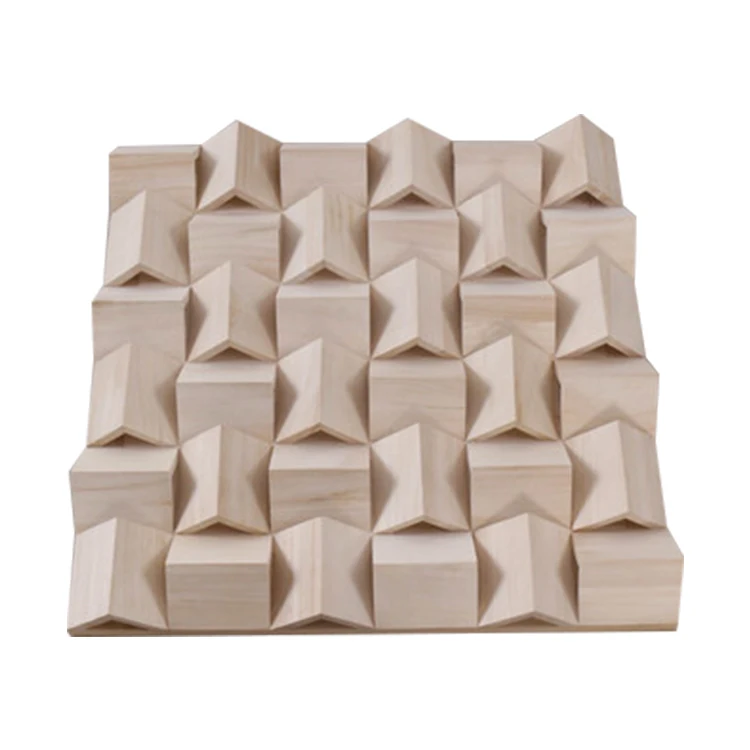
Pre-Production Prototype printing on the Gigabot
Aeolian Mold.
First batch of Aeolians!
The Aeolian™ Diffuser is class A thermoplastic, and 4 lbs. per unit.
Nominal size is 23-3/4” x 23-3/4” with a depth of 5.1”.
Download the Aeolian™ Diffuser Data.
3d, 3d printer, acoustic diffusion, acoustical materials, acoustics first, aeolian, diffuser, diffusion, diffusors, gigabot, gigglebot, NWAA, simulation, Sound diffuser, sound diffusion
Comprehensive Diffuser Data Now Available!
3D Polar “Balloons” are used to display a full hemispheric acoustic level response, at specific frequencies, in front of the diffusive surface. This is how a 5000Hz signal would reflect off an Art Diffusor® Model D: If we could see acoustic energy, this is what it might look like!
Acoustics First® has long been at the forefront of many exciting developments in the world of sound diffusion. In the spring of 2015, we created a method to evaluate sound diffusers using particle computer simulations. Then we utilized 3D printing technology to streamline the development of new diffuser prototypes. Recently, we received a patent for our innovative Art Diffusor® Model D design. Now we’re excited to announce the release of a new comprehensive data booklet for our entire line of sound diffusers!
In essence, this booklet represents an entirely new way to view and compare sound diffusers. “With technological advances accelerating at a staggering rate, we believed it would be advantageous to compile all of the measurable acoustic parameters of these devices, in order to develop an operating profile for each.” Since sound absorption and sound reflection can both be measured with great accuracy, we foresee a use for this data, or similar data, in virtual acoustic room modeling, along with other useful applications.
Click to Download the PDF version of the Diffuser Data Book
Contact us for your own print copy of the Acoustics First Diffuser Data booklet (or click here to download the PDF). The electronic data that was used to create the polar diffusion balloons is also available per request (Data compiled for Acoustics First by NWAA Labs in Elma, WA).
Currently, we are working closely with other members of the industry in an effort to develop a universally accepted standard for testing sound diffusion. In the absence of such a standard, Acoustics First is presenting this data in good faith as we believe it represents the best of what is currently available.
We look forward to sharing more advances in the field of sound diffusion!
acoustic diffusion, acoustical diffuser, art diffusor, ArtDiffusor, diffuser panel, diffusion, diffusors, polar balloons, polar patterns, Sound diffuser, sound diffusion, test data
Barrett’s Technology Solutions has a Happy Easter
Sometimes at Acoustics First we get a call from someone who is so knowledgeable that we can’t help but be tickled that they called us to help them. We received one such phone call from Pete Heskin at Barrett’s Technology Solutions in Naperville, IL.
Pete and his team were putting together an acoustic treatment for a listening room at their facility and wanted the room’s acoustics to really showcase their lineup of high-end audiophile speakers. No joke here – these guys have over 50 years of experience in the audio industry – and they keep on the bleeding edge of audio and video. This treatment is serious acoustic business – and these are some of the most discriminating ears in audio.
Happy Easter guys!
Happy Easter Guys!
In keeping with their high-standards and cutting edge approach, they were looking for an acoustic treatment that is as visually stunning as it is capable of treating a room containing some of the world’s greatest sound sources. As you can see, the results are simple and elegant.
The room contains an array of Sonora® panels, Silent Pictures® and clusters of ArtDiffusor® Model D‘s to make this space sound as good as it looks. (While all of their gear makes the gear junkies at Acoustics First drool…)
So, if you find yourself near Chicago, or on a “Wayne’s World” pilgrimage, stop into Barrett’s – and if you fancy yourself an audiophile – put your money where your ears are, and hear how discriminating ears listen to music…
… No Stairway to Heaven.
acoustic diffusion, acoustical panels, critical listening, diffusers, diffusion, diffusor, diffusors, fabric wrapped panels, improving sound, silent pictures, Sound diffuser, sound diffusion
« Older Entries
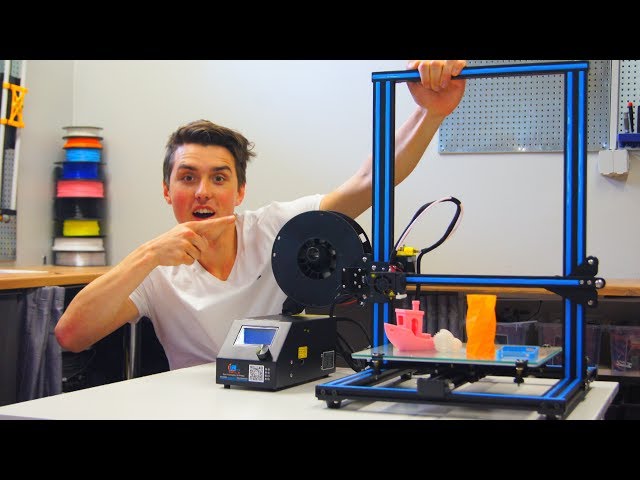
DIY 3d printed audiophile sound diffusers
DIY 3d printed audiophile sound diffusers
I have a plan to build a music room in a old brick shed in my back yard. I want to have cheap HiFi vinyl listening setup. After a research I learned that sound diffusers are goot thing to have. I went to Thingiverse and found 3d printed sound diffusers by dkubicek.
The idea is good but the time needed to print sufficient are is ridiculous and the costs are just too high for me.
I'll maybe make couple of modules just for decoration and stick with the wooden ones from wood scraps laying around.
From Thingiverse description:
What is a diffusor ?
If you have an room with unpleasing audio properties, one possibly reasons can be echos that occur in a structured way.Early echos (e.g. <0.4 sec) are e.g. well known for inhibiting personal speaking comfort.
Now to get rid of echos, there are two practical ways: sound absorbers and sound diffusors.
The goal of a good diffusor is to scatter sound, so that a specific incoming sound goes to all possible output directions. Hence echos are quite "mute" and do not start at a precise time, but one hears a slow buildup and decrease of echo noise.
Audio absorbers create a harsh empty environment, similar to speaking in open air, while diffusors create a "warm" and sound of a well stocked living room.
Mainly, there exist one and two-dimensional variants, and a you will find heaps of information in the references. And, they are extremely common in recording studios.
Where do you want to put your diffusor ?On the sides and above the "viewing direction" to the sound source. In your rear, sound absorbers are a better choice.
Building a diffusor
Usually, diffusors are made from wood.The material should be reasonably stiff, so sound does not deform it. Ideally, the material should not burn, which sadly, PLA and ABS do. So, please be aware that a room with diffusors is a possible deathtrap.
I figured that these diffusors can be printed easily with 3d printers, although the printsize requires to join many pieces to obtain a large enough area to actually effect the room sound. For a minimal effect, you want a couple of square meter (>25 prints).
Cost Analysis
I found one offer where 6 pieces of 0.6*0.6 mm diffusor cost 370 E. Thats 170 E per square meter.
If you 3d print it with the octagonal structure, you will need 5kg of filament per square meter. Thats in a similar price regime. If you print for material costs. Also, you need to print for 16 days for a square meter on my printer...
The files
All files are created using openscad, the stls are just examples, and its highly recommended that you do not reuse a single part in a panel, but each part should be different.Also, you want to set the wall thickness according to your 3d printers nozzle.
2d rectangular diffusor. It has sideholes, to mount the pieces together. It is suited for 3d printing, but takes quite a while.
Hexagonal diffusor. I figured that instead of a recitlinear grid, the diffusor cells can be aligned in a hexagonal layout. Really neat, no? However, you need to play with your slicing software, so that the outside walls actually print.
Manhatten 1d diffusor, which prints quickest, but only diffuses in one direction. The figer structure might be to small, you might want to increase the cell size to 20mm, for even faster printing.
Reference:
The videos linked here are also shown above. They are not from me, and I just wanted to link them for further information for the reader.
http://en.wikipedia.org/wiki/Diffusion_%28acoustics%29
http://www.youtube.com/watch?v=qFeM2uWuMZI
http://www.youtube.com/watch?v=FOjHsexNBTQ
http://arqen.com/sound-diffusers/http://www.mh-audio.nl/diffusor.asp
http://www.thingiverse.com/thing:189052
Here is a video on how-to build skyline sound diffuser from wooden boards:
Newer Post Older Post Home
Acoustic reality suppression device, or music from a 3D printer / Sudo Null IT News
Good day to you, dear geeks and sympathizers!
According to my observations, almost all owners of 3D printers are divided into two groups: those who need it, and those who really need it. It was with the aim of stimulating the growth of the number of citizens in the second group that this publication was written.
Anyone who is interested in what connects a 3D printer and music, why some old sayings have lost their relevance, and how to turn a simple cardboard into a steel blank - welcome under the cut! nine0007
It's no secret that thanks to the efforts of greedy scoundrels effective management and unscrupulous scammers modern marketers, the shelves of audio equipment stores are mostly filled with ordinary garbage, the real technical characteristics of which are skillfully hidden under kilometers of advertising texts with incomprehensible abbreviations and inflated results of some meaningless tests.
What should a lazy and stingy person who wants to buy inexpensive, but high-quality "desktop" speakers do? As in most of these cases, the question already contains part of the answer: the columns need to be done. nine0003
Taking this opportunity, I decided to realize my old dream - omnipolar loudspeakers. These speakers differ from conventional front speakers in that sound waves are emitted simultaneously in all directions with the same amplitude and phase, which in theory should create the most natural sound picture. In its simplest form, this is achieved by placing a diffuser cone on top of the upwardly directed full-range loudspeaker head. The correct calculation of such acoustic systems (hereinafter referred to as AC) is not an easy task and requires serious education in this area. Therefore, I chose the oldest method of conducting research incomprehensible garbage complex processes - empirical. Simply put, you will have to act at random and at random, with alterations and design improvements in the manufacturing process.
The most important component of any speaker, which cannot be modified at home, is the loudspeaker head (hereinafter referred to as HG). Since I decided to make a compact and inexpensive single-way speaker, choosing a head turned into a non-trivial task with many unknowns.
For myself, I have developed the following search algorithm: suitable size - bandwidth - uniformity of frequency response and phase response - nominal resistance - price. nine0003
The leader of the search was the broadband GG FR88EX manufacturer Fountek:
This driver has an aluminum frame and cone, a wide frequency range, smooth frequency response and phase response. All parameters are given by the manufacturer in the technical documentation:
For the speakers, the simplest design was chosen: a cylindrical body, a GG is fixed on the upper end. A sound-diffusing cone should be fixed above the GG. The design of the case is an acoustic impedance panel at the bottom end, loose sound-absorbing material throughout the volume of the speaker. For the case, a pipe made of thick cardboard with a diameter of 125 mm (corresponding to the dimensions of the GG) was chosen. Self-adhesive bituminous vibration-absorbing mats were glued to the inner surface of the pipe, which made it possible to completely suppress vibrations and the boom of the body. The technology is simple: heating the mats with a hair dryer, we roll them with the sticky side to the pipe from the inside using an aluminum “rolling pin”. The hardest part here is finding a woman with a hair dryer. nine0003
Further, highly scientific experiments were carried out. In absolute contradiction to the proverb “Measure seven times, cut once”, diffusers were printed, crushed, cut, melted, thrown away and reprinted for the sake of experimental curiosity. By the way, PETG as a material is ideal for printing experimental parts of the speaker.
The conical sound diffuser is the undisputed winner. On the right side of the photo, this cone is visible above the GG, mounted at the end of the case on a plug-holder printed on a 3D printer. nine0003
A few words about the design: due to the use of dissimilar materials and the complex shape of parts, I excluded gluing with some kind of veneer or similar material as unnecessarily labor-intensive. The black color was considered boring, the silver color was considered vulgar. I decided to make my modest contribution to the creation of the post-apocalyptic universe and give the AU the appearance of a battered military equipment created using radioactive materials.
The process of creating parts of the speaker looked like this: creating a model in DesignSpark Mechanical - printing on a 3D printer - cleaning the part - priming - painting. At the same time, in the process of priming the AC case, the wet primer was partially erased with fingers, which ensured the presence of distinct traces of metal corrosion hello Spider . The parts were painted in several stages: first, the parts were painted with stainless steel effect paint and thoroughly dried on the heated working platform of the printer. The next layer was applied transparent varnish, followed by drying for 24 hours. The last layer was applied paint "khaki forest green", roughly corresponding to the color of the old Soviet military equipment. After two hours of drying, you can begin to create the effect of worn metal. To do this, with a piece of cloth soaked in acetone, you need to carefully wipe off the last layer of paint from protruding parts, edges, roundings, edges and “corroded” surfaces. As they say, it's better to see once:
A very complex detail: bottom cap with acoustic impedance panel grille and cable connector panel.
After painting and drying, one speaker was assembled to check the sound quality. The next photo shows a part of the structure: the M3 studs are passed through the end cap - the holder and the holes in the flanges of the GG and the sound-diffusing cone. All parts are secured with M3 flange nuts. The cone is fixed high enough above the GG: this position was determined experimentally by the maximum of reproducible high frequencies.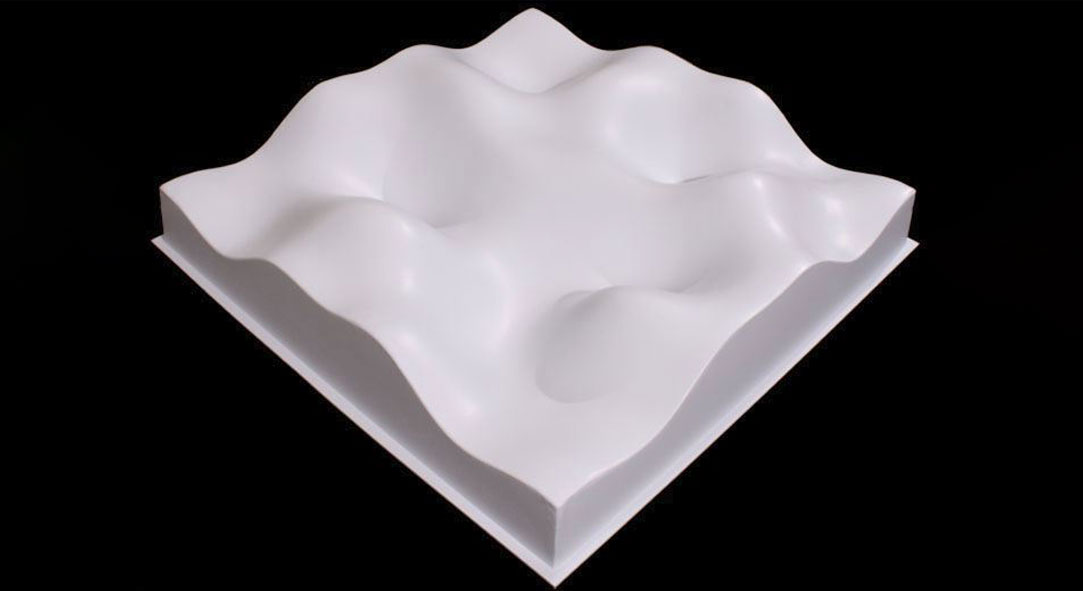 nine0003
Unfortunately, in this case, the considerable length of the relatively thin studs resulted in significant vibration of the diffuser cone.
As a measure to eliminate this unpleasant effect, I decided to make the sound diffuser heavier and “muffle” by filling it with loose vibration absorber. Since the volume of the cavity of the sound diffuser cone is small, an additional hollow part with a cap was designed and manufactured:
A mixture of lead shot and fine quartz sand was chosen as a filler. Lead was chosen for its high specific gravity, and fine quartz sand suppresses vibrations well and prevents the shot from turning the cone into a rattle. Due to the presence of lead in the cone, the cap with the radioactivity symbol is not only decorative, but also a functional element (lead contains a certain amount of radiogenic isotopes). nine0003
The final version of my homemade omnipolar speakers looks like this:
Unfortunately, on this optimistic note, my camera gave its soul to God, and more photos did not come out. The sound quality of these speakers fully meets my needs: gray everyday life melts into the enchanting sounds of “Spente le stelle” by Emma Shapplin already at a third of the available volume, and if you wish, you can effortlessly eject from reality along with “Teutonic Terror” from Accept. nine0003
Published under WTFPL license
And the traditional: Have fun!
At the request of workers 3D models and dimensions of the case: drive.google.com/folderview?id=0B3W31PA4TxKDdjU3ZHA4bEt4Rms&usp=sharing
Comparison of 3D printing technologies: FDM, SLA and SLS
Additive manufacturing or 3D printing saves time and expands technological capabilities in product development. 3D printing technologies offer versatile solutions for applications ranging from rapid concept and functional prototypes in the field of prototyping to fixtures and clamps or even final parts in manufacturing. nine0003
Over the past few years, high resolution 3D printers have become more affordable, more reliable and easier to use.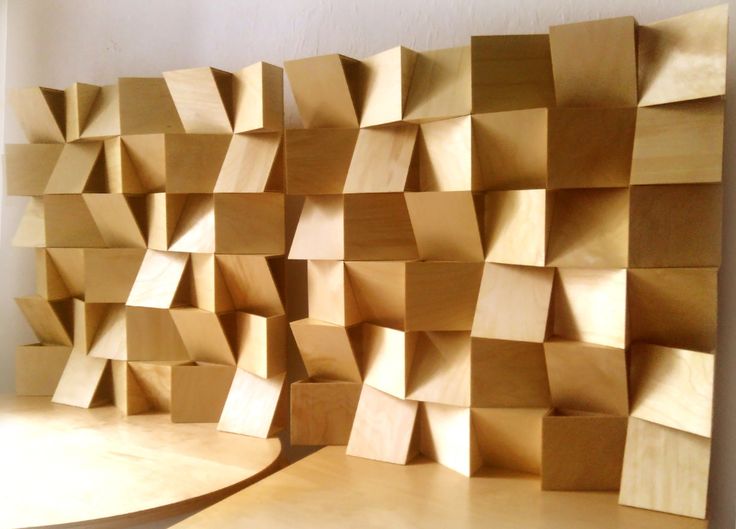 As a result, more companies have been able to use 3D printing technology, but choosing between different competing 3D printing solutions can be difficult.
Which technology is right for your needs? What materials are available for her? What equipment and training is needed to get started? What are the costs and payback? nine0003
In this article, we take a closer look at three of today's most well-known plastic 3D printing technologies: Fused Deposition Modeling (FDM), Stereolithography (SLA), and Selective Laser Sintering (SLS).
Choosing between FDM and SLA 3D printer? Check out our detailed comparison of FDM and SLA technologies.
Download this high resolution infographic here.
VIDEO MANUAL
Can't find the 3D printing technology that best suits your needs? In this video tutorial, we compare Fused Deposition Modeling (FDM), Stereolithography (SLA), and Selective Laser Sintering (SLS) technologies in terms of the top factors to consider when purchasing.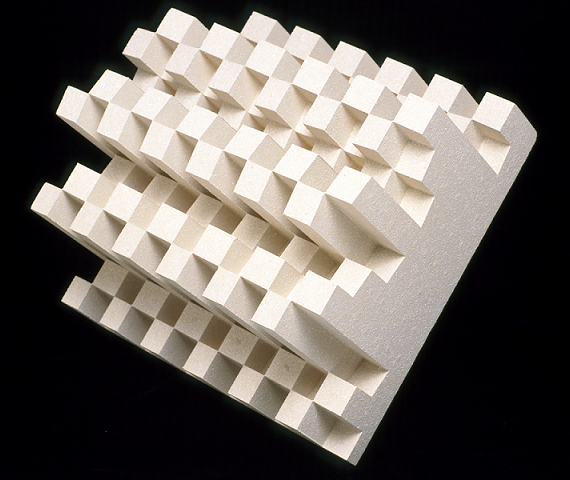 nine0003
Watch Video
Fused Deposition Modeling (FDM), also known as Fused Filament Manufacturing (FFF), is the most widely used form of 3D printing at the consumer level, fueled by the rise of consumer 3D printers. On FDM printers, models are made by melting and extruding a thermoplastic filament, which the printer's nozzle applies layer by layer to the model being built.
The FDM method uses a range of standard plastics such as ABS, PLA and their various blends. It is well suited for making basic experimental models, as well as for quickly and inexpensively prototyping simple parts, such as parts that are usually machined. nine0003
FDM models often show layer lines and may have inaccuracies around complex features. This sample was printed on a Stratasys uPrint FDM industrial 3D printer with soluble support structures (price starting at $15,900).
FDM printers have the lowest resolution and accuracy of SLA or SLS and are not the best option for printing complex designs or parts with complex features. Surface quality can be improved by chemical and mechanical polishing processes. To address these issues, industrial FDM 3D printers use soluble support structures and offer a wider range of engineering thermoplastics, but they are also expensive. nine0003
FDM printers do not handle complex designs or parts with complex features well (left) compared to SLA printers (right).
Invented in the 1980s, stereolithography is the world's first 3D printing technology and is still one of the most popular technologies among professionals today. SLA printers use a process called photopolymerization, which is the conversion of liquid polymers into hardened plastic using a laser.
See stereolithography in action.
Models printed on SLA printers have the highest resolution and accuracy, the sharpest detail and the smoothest surface of all plastic 3D printing technologies, but the main advantage of the SLA method is its versatility. Materials manufacturers have developed innovative formulas for SLA polymers with a wide range of optical, mechanical and thermal properties that match those of standard, engineering and industrial thermoplastics.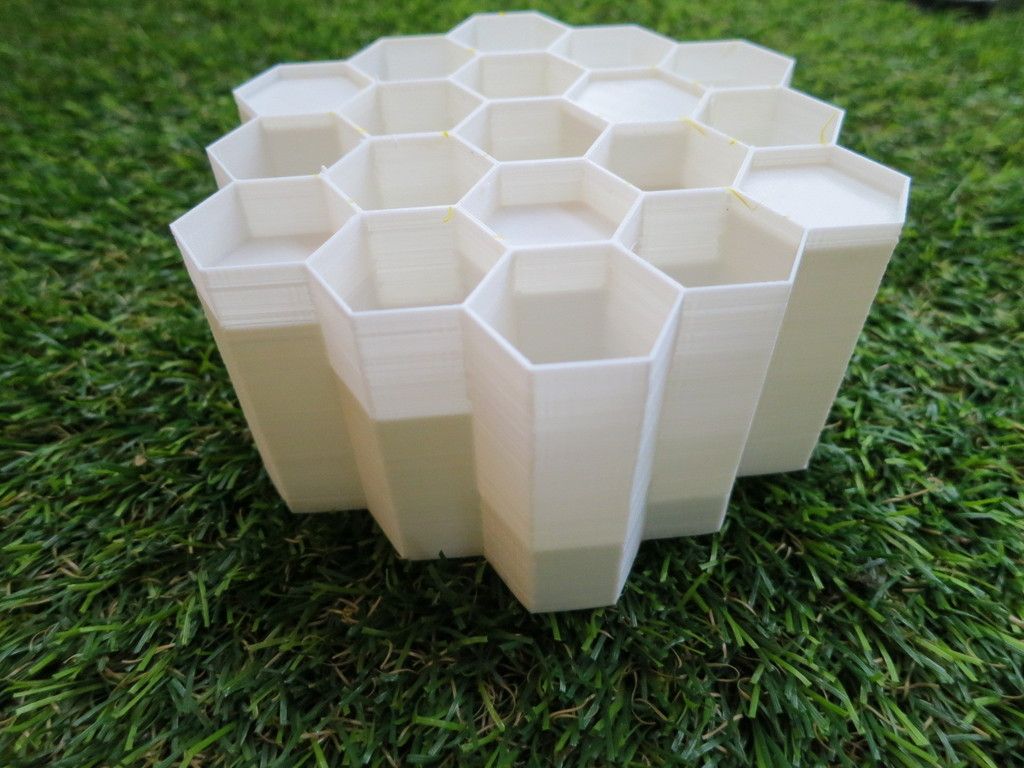 nine0003
Models created using SLA technology have sharp edges, a smooth surface and almost invisible layer lines. This sample was printed on a Formlabs Form 3 Desktop Stereolithographic 3D Printer (price starting at $3499).
SLA is an excellent option for making highly detailed prototypes that require tight tolerances and smooth surfaces such as molds, templates and functional parts. SLA technology is widely used in industries ranging from engineering and design to manufacturing, dentistry, jewelry, modeling, and education. nine0003
White Paper
Download our in-depth white paper to learn how SLA printing works, why thousands of professionals use it today, and how this 3D printing technology can be useful in your work.
Download white paper
free sample
Experience Formlabs print quality firsthand. We will send a free 3D printing sample directly to your office.
Request a free sample
Selective laser sintering is the most common additive manufacturing technology used in industry.
Selective Laser Sintering (SLS) 3D printers use a high power laser to sinter fine polymer powder particles. The unsprayed powder supports the model during printing and eliminates the need for special support structures. This makes SLS ideal for complex geometries, including internal features, grooves, thin walls, and negative taper. Models produced using SLS printing have excellent mechanical characteristics: their strength can be compared with the strength of injection molded parts. nine0003
Models created with SLS technology have a slightly rough surface, but almost no visible layer lines. This sample was printed on the Formlabs Fuse 1 SLS workshop 3D printer (price starting at $18,500).
The most common selective laser sintering material is nylon, a popular engineering thermoplastic with excellent mechanical properties.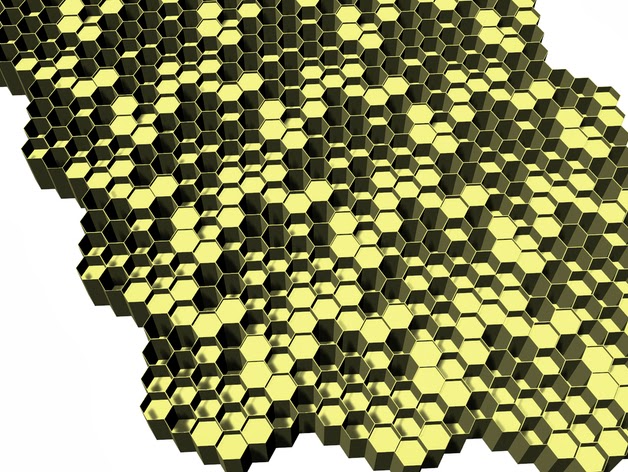 Nylon is light, strong and flexible, resistant to impact, heat, chemicals, UV radiation, water and dirt. nine0003
The combination of low part cost, high productivity, and widely used materials makes SLS a popular method for engineering functional prototyping and a cost-effective alternative to injection molding in cases where production runs are limited.
White Paper
Looking for a 3D printer to create durable, functional models? Download our white paper to learn how selective laser sintering (SLS) technology works and why it is popular in 3D printing for functional prototypes and end-use products. nine0180
 nine0187
 Either way, you should choose the technology that best suits your business. Prices have dropped significantly in recent years, and today all three technologies are offered in compact and affordable systems.
3D printing costing doesn't end with initial equipment costs. Material and labor costs have a significant impact on the cost of each part, depending on the application and production needs. nine0187
INTERACTIVE MATERIAL
Try our interactive ROI tool to see how much time and money you can save by printing with Formlabs 3D printers.
Calculate savings
FDM, SLA and SLS printed ski goggle frame prototypes (left to right).
We hope this article has helped you narrow down your search for the 3D printing technology best suited to your needs.