Tronxy x8 3d printer
3.831 Tronxy x8 3D Print Models
Reset Filters
3.831 Models available (0.02s)
Did you mean:
-
tronxy x8 t-corner 7mm wizeus download free stl model printablescom 3d models hobby & makers ideas 3...
-
tronxy x8 spool holder
-
chain cable supports tronxy x8 - supporti pinshape support cable-chain tronxy-x8
-
guida cavo tronxy x8 - guida cavo tronxy x8 pinshape tronxy cable guide game-design-contest
-
tronxy x8 - supporto ventola 3d printer parts enhancements supporto support ventola fan tronxy x8 es...
-
tronxy x8 z-wobble 3d printer parts enhancements piastra plate staffa stirrup blocco olsson block as.
..
-
z axis endstop tronxy x8 3d printer parts adjustable z endstop endstop pla tronxy tronxy x8 tronxy x...
-
x belt tensioner tronxy x8 3d printer accessories
-
tronxy x8 - supporto ventola 3d printing supporto tronxy x8 ventola
-
right support bed y axis chain tronxy x8 3d printer accessories tronxy x8
-
tronxy x8 - blocco aste asse z 3d printing blocco boccola tronxy z-wobble
-
tronxy x8 webcam mount 3d printer accessories anet a8 anet a8 upgrade tronxy tronxy x8 tronxy x8 upg.
 ..
.. -
supports moteurs z pour tronxy x8 3d printer parts 3d printer tronxy tronxy x8 tronxy x8 upgrade
-
extruder mount anet a8 bowden extruder 3d printer parts 2020 extrusion anet anet a6 anet a6 upgrade ...
-
wire clip tronxy x8 3d printer accessories tronxy x8 wire guide wire management wire manager wire ma...
-
filament guide tronxy x8 3d printer accessories filament-guide filament guide tronxy x8 tronxy x8 up...
-
tronxy x8 bracing 3d printer parts
-
tronxy x8 wobble 3d printer parts
-
tronxy x8 sd card reader holder 3d printer accessories sdcard sdcard holder tronxy tronxy accessorie.
 ..
.. -
tronxy x8 main board case 3d printer parts
-
tronxy x8 fan duct upgrade 3d printer accessories fan duct tronxy tronxy x8 tronxy x8 upgrade
-
led strip holder tronxy x8 3d printer accessories holder led strip tronxy tronxy x8
-
betterductx8 3d printer parts anet a8 fan duct tronxy x8
-
tronxy x8 x carriage belt tension mod 3d printer parts tronxy tronxy x8 tronxy x8 upgrade
-
y axis chain tronxy x8 3d printer parts bed chain frame heatbed prusa support tronxy tronxy x8 tronx.
 ..
.. -
support z axis 3d printer parts bed level bed leveling prusa tronxy tronxy x8 tronxy x8 upgrade z ax...
-
tronxy x8 fan duct upgrade 3d printer extruders
-
psu cover tronxy x8 prusa switch iec c13 3 pin 3d printer accessories 3 pin iec c13 prusa psu cover ...
-
fixed registrable z motor support tronxy x8 supporto motore z 3d printer parts autodesk fusion autod...
Can't find what you are looking for?
Find a professional for your 3D project
Look for the best 3D professional to bring your project to life
Request a 3D Service from a professional
Publish a request with your requirements for a 3D professional
Store and request to print a 3D model list
Create your print list of 3D Models for 3D professional to get a quotation
Print your models or execute your ideas on a safe mode.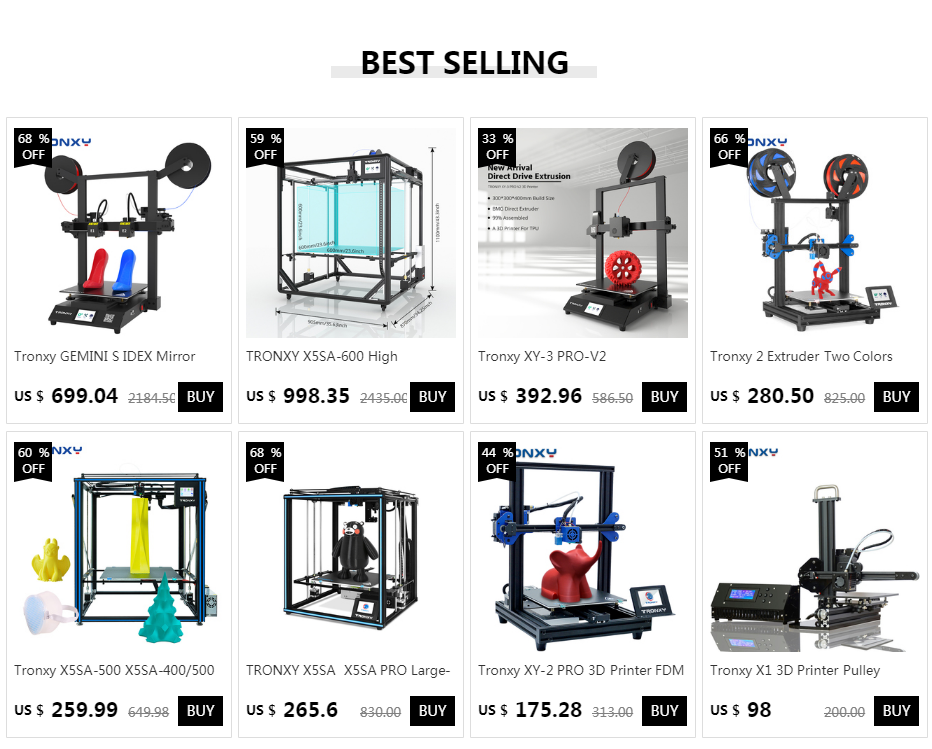
▷ tronxy x8 3d printer review 【 STLFinder 】
Tronxy X3 Review
thingiverse
Courtesy of GearBest°, I recently received this printer and I wanted to share my thoughts and experiences. Through time I will update this post and upload each upgrades in this <a...
Tronxy X8 LCD Case
thingiverse
... a case for my Tronxy X8 LCD screen. ...It's strong and simple, I plan on doing some updates on it later on to have it angled and maybe also integrated the 3d printer board with some ventilation. ... For now here goes my first Tronxy X8 upgrade, Enjoy!
Tronxy X8 filament guide
thingiverse
Remixed it because it didnt fit on the Troxy X8.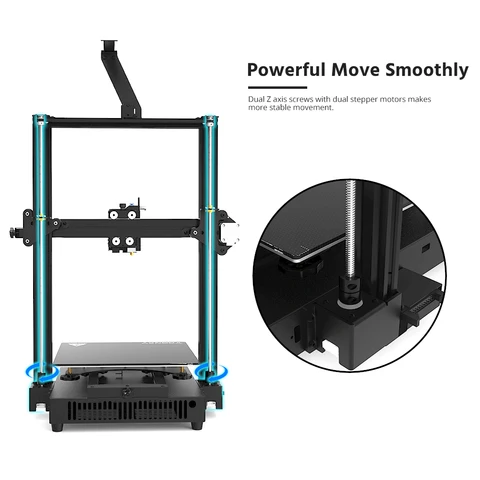 ... Affiliate-Link to the Printer: https://goo.gl/MYWPaz Coupon Code = TronxyBK1
Tronxy X8 - Supporto Ventola
prusaprinters
Supporto per togliere la ventola senza dover smontare nulla su Tronxy X8, per un facile accesso all'estrusore Category: 3D Printing
Tronxy X8 Webcam Mount
thingiverse
A simple but effective camera mount for a TRONXY X8 3D Printer. Would work with any printer with front mounting holes (mine are 17mm apart) and I can make it for different printers e.g anet a8 The length and angle of the arm is adjustable, just add...
Tronxy X8 Z Wobble
thingiverse
Tronxy X8 Anti Z Wobble Upgrade
TronXY X8 spool holder
thingiverse
This is a spool holder for the TronXY X8.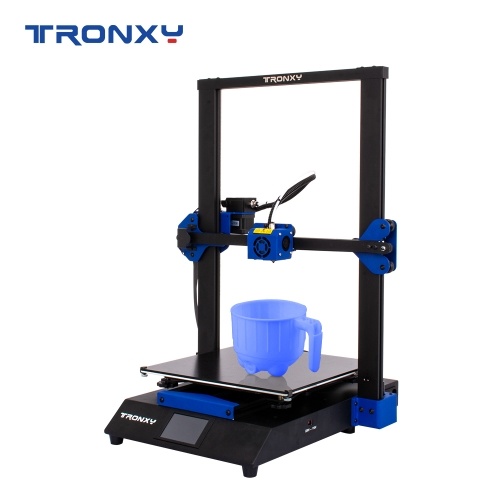 My design must go on the right just like in the picture.
It doesn't need any screw or something because is single block, that your tronxy can easely print without support.
I leave in the thing file,...
My design must go on the right just like in the picture.
It doesn't need any screw or something because is single block, that your tronxy can easely print without support.
I leave in the thing file,...
Tronxy X8 - Supporto ventola
youmagine
Supporto per togliere la ventola senza dover smontare nulla su Tronxy X8, per un facile accesso all'estrusore
Tronxy X8 - Supporto Ventola
cults3d
Supporto per togliere la ventola senza dover smontare nulla su Tronxy X8, per un facile accesso all'estrusore
Tronxy X8 - Supporto Ventola
thingiverse
Supporto per togliere la ventola senza dover smontare nulla su Tronxy X8, per un facile accesso all'estrusore
Tronxy X8 X Chain
thingiverse
X Chain for Tronxy X8.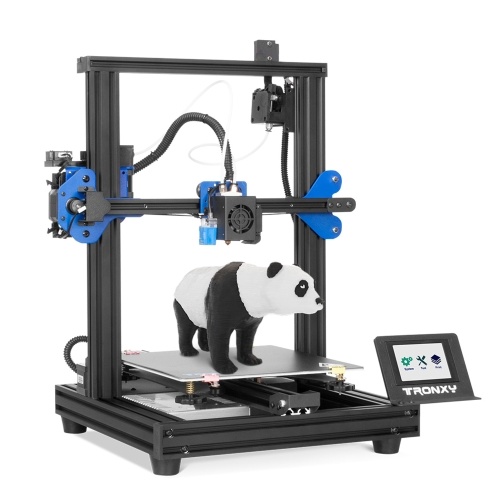 .
This is not perfect.
I was expected Linear Line, But It's too difficult.
...
Please share your ideas.
.
This is not perfect.
I was expected Linear Line, But It's too difficult.
...
Please share your ideas.
filament guide Tronxy X8
thingiverse
This is filament guide for tronxy X8 Its LCD acrylic plate in 7MM.you can aslo use it for oiling filament with some foam. ...
Tronxy X8 Z-wobble
youmagine
Piastre per eliminare il gioco sulle aste asse Z ( Z-wobble ) della tronxy X8, piastra da applicare nella parte motori e boccola per la parte superiore ( per chi a problemi di gioco nella parte superiore, deve allargare il foro per potere inserire la...
Tronxy X5SA 3D Printer Model
prusaprinters
This is a model of the Tronxy X5SA CoreXY 3D printer.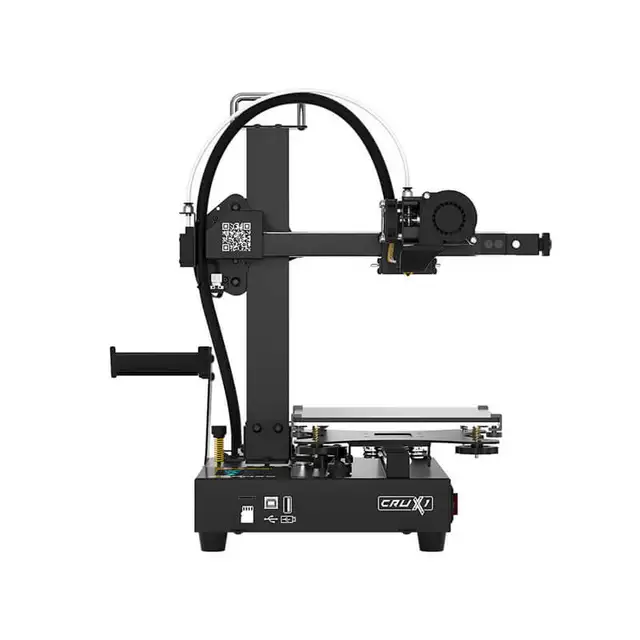 ...I designed the model in TinkerCAD. </p>
Tronxy X1 3D Printer (Mechanics)
grabcad
Given the low cost of this printer, it is an interesting help for the workpiece in the implementation of their own creative ideas. For such owners , this digital twin will be very useful for modernization purposes . Be careful, the dimensions of some...
Guida cavo per Tronxy X8 - Guida cavo per Tronxy X8
pinshape
Accessorio per la stampante Tronxy X8 e similari. Accessory for Tronxy X8 and similar printer.
Patrick — Fuel 3D Scanify Review
sketchfab
Part of my Fuel 3D Scanify Review.
Teddy — Fuel 3D Scanify Review
sketchfab
Part of my Fuel 3D Scanify Review.
TRONXY X8 FAN DUCT UPGRADE
thingiverse
TRONXY X8 FAN DUCT UPGRADE
TronXY X8 Leveling Sensor Bracket
thingiverse
TronXY X8 Z-axis sensor bracket for automatic bed leveling
TronXY X8 fan duct upgrade
thingiverse
I modified the Hi-flo Ring with 123d design for the tronXY X8 but it's compatible with all printers, plus there is a small piece that you need as distance for let the fun duct fit just for the tronxy, also, after that you need to reduce the distance. ..
..
Tronxy X8 LCD 2004 Adapter
thingiverse
An adapter I made to attach the 2004 lcd to the tronxy x8
Wire clip for Tronxy X8
thingiverse
Wire clip for Tronxy X8. ...Its front LCD acrylic plate is 7MM
Tronxy X8 Main Board Case
thingiverse
Tronxy X8 Main Board(Electronic Box) 1 Case, 3 Holder You need make hole in Rear Frame for fix(3mm*2EA)
Tronxy X8 T-Corner (7mm)
prusaprinters
This is a scaled down version of the "Anet A8 T corner" by " Electrico". Original Thing: https://www.thingiverse.com/thing:1672959 I made this to fit my Tronxy X8 which utilizes 7mm thick acrylic. If you build this project and want to give me...
Tronxy X8 T-Corner (7mm)
thingiverse
Original Thing: https://www.thingiverse.com/thing:1672959 I made this to fit my Tronxy X8 which utilizes 7mm thick acrylic. <h4>If you build this project and want to give me something back in return, I'd be extremely happy to see a post under...
Filament Guide for Tronxy 3D printer
thingiverse
I had made some changes to original design for better fit for my Tronxy 3D printer my frame is 7.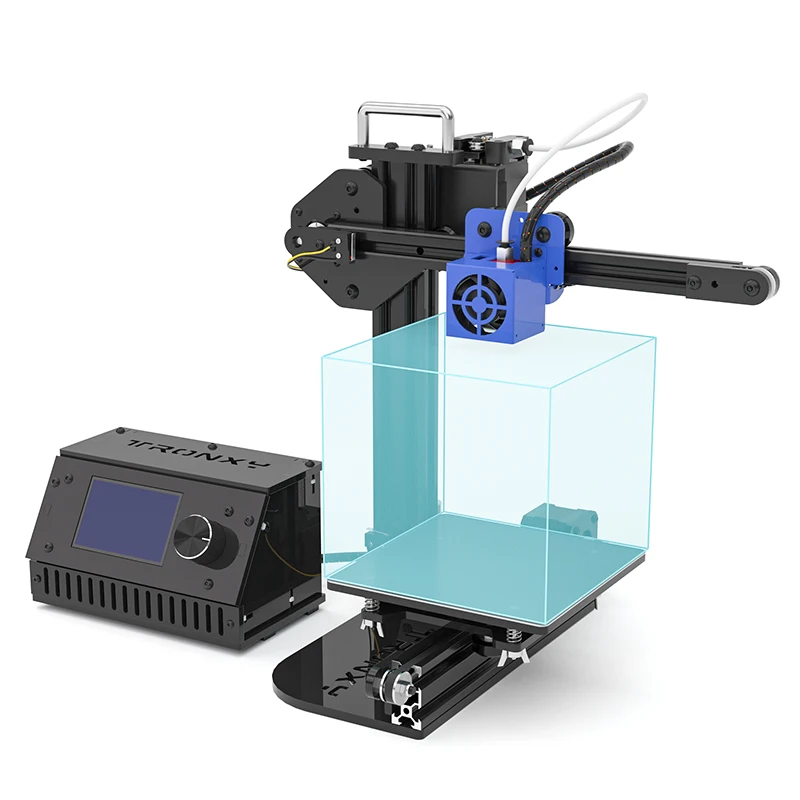 2mm thick, the original part is too loose. ...
Tronxy X1 3D Printer Top fixed Extruder
thingiverse
A revisited Tronxy X1 Extruder that fits on top of the printer rather than supporter by the Y axe arm. ... CAD model is publicly accessible on Onshape platform : ...
Buddha Flash-only — Fuel 3D Scanify Review
sketchfab
Part of my Fuel 3D Scanify Review.
The Number 5 — Fuel 3D Scanify Review
sketchfab
Part of my Fuel 3D Scanify Review.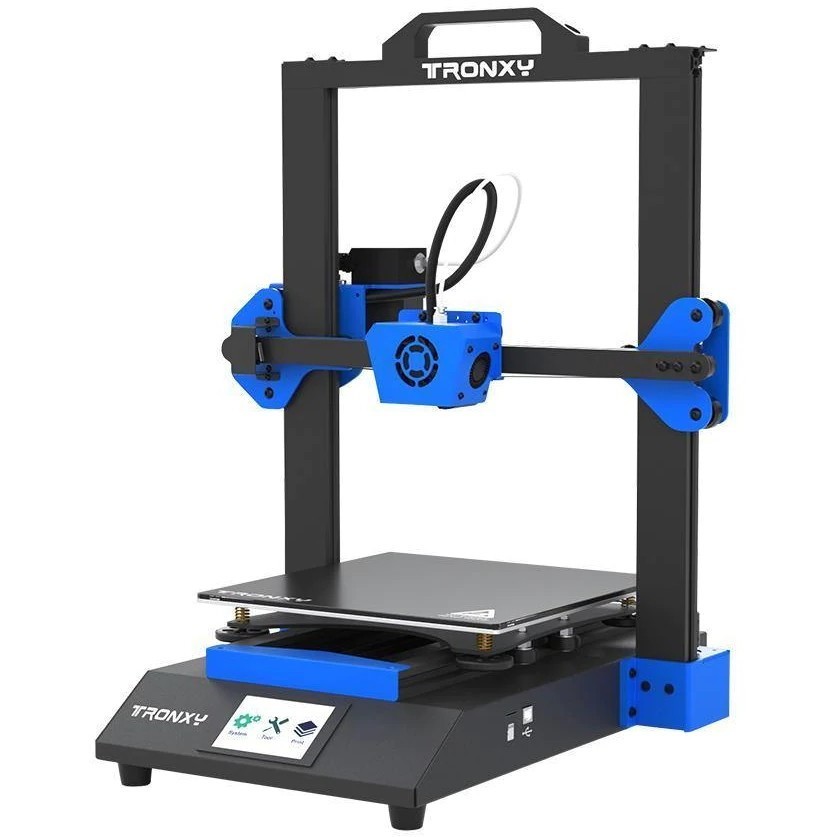
a good choice for a beginner maker / 3D printers, machines and accessories / iXBT Live
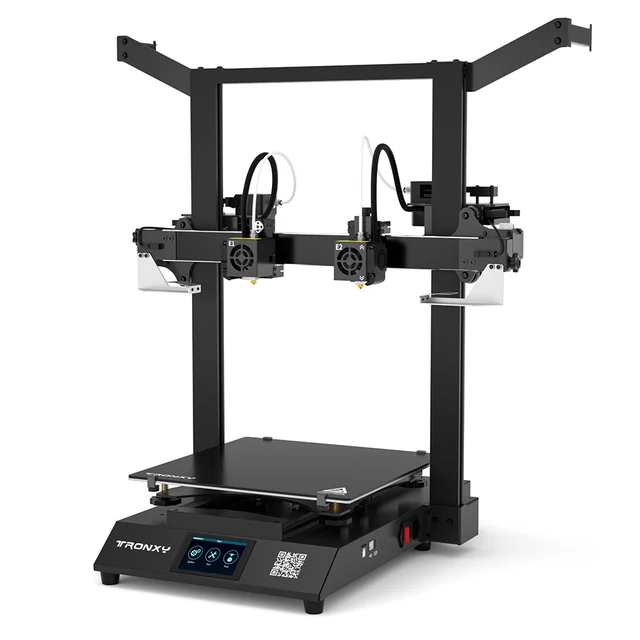
A good beginner 3D printer is an inexpensive and high-quality 3D printer with auto-calibration and useful functions (filament detector, print pause). The new model from TRONXY - the XY-2 printer with the “PRO” modification has not only this, but also an increased print size (up to 255 x 255 x 260 mm), as well as a powerful power supply that gives quick warm-up and start, and all this for modest price of $180. The mounted inductive sensor on the movable head ensures accurate multi-point calibration in automatic mode. The printer is already assembled and configured, so you do not have to rack your brains upon receipt. I will try to tell in general terms about the printer itself and the basic things at the first start of printing.
TRONXY XY-2 PRO 3D PRINTER
The newest Tronxy XY-2 Pro 3D printer is an improved version of the already popular 3D printer that can "just a little more". Print field 255 x 255 x 260 mm. The printer is all metal, has a rigid frame, inductive self-leveling sensor, huge (3.5") touch control display, filament sensor. Specially designed extruder allows printing with soft materials (for example, TPU). Current cost is $180 minus store coupon ($3 and promo codes) .
Features:
Brand: Tronxy
Model: XY-2 Pro
Print field 255 x 255 x 260 mm
Control: 3.5" touch screen
Calibration: automatic, inductive Z sensor
Options: filament sensor fast warm-up, print pause, automatic filament change
Power: 360W
Plastic type: PLA HIPS WOOD PC PVC ABS PETG 1.75mm
Maximum working speed: 180mm/s
Nozzle diameter: 0.4mm
Positioning accuracy: 0.0125mm0011 Layer thickness: 0.1-0.4mm
The packaging of the printer is thoughtful and compact - the portal is laid in the foam, accessories are in layers, at the bottom there is a frame with electronics and a table.
Kit includes: assembled vertical gantry (completely, with X-axis and extruder), lower part (stand, table, Y-axis, power supply, display, control unit), bag with gouges and screws, tools, spatula, spare ends and hot end, power cord, detailed instructions and frame for the coil.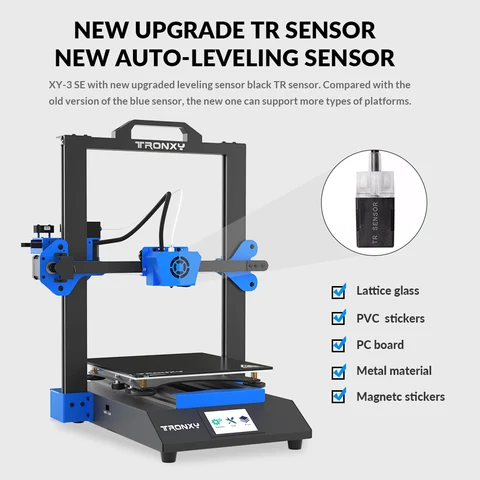 Well, a trial spool of filament (PLA 330g).
I will immediately make a reservation about the features of the assembly.
First you need to dock the portal to the base part. Specifically, for this printer model, you must first rearrange the display, which is fixed in the transport position (hidden under the table).
| Carefully remove the display from under the table and rearrange | … onto the front frame profile. Mounting in T-nuts in the groove |
| Check that it does not touch the table when moving | Next, we prepare the portal for assembly (4 screws m6x30 mm) |
Holes are already pre-drilled and chamfered in the frame. We carefully try on everything and twist it. There is a tool in the kit, I personally use an electric screwdriver (quickly and conveniently). It makes sense to install the screws on the thread lock - this will eliminate loosening, but complicate reverse disassembly. So if you are not going to disassemble it, then you can use it.
This is what the assembled printer looks like. As you can see, it was already checked at the factory, the belts were tightened and set up.
The printable area is 255 x 255 (XY) and 260 mm (vertical). A fairly large size, 20 percent more than the usual Ender-3. The plastic used for the printer is common - you can see it here and here.
After installation, we check the electrics.
| We connect the motor connector Z | All connectors in the printer are marked (Z1 in the photo) |
| X-Axis Adapter Cable - The PRO version has a special adapter that simplifies connection | This method is much more convenient than the usual "spider". |
In the kit there is a special adhesive pad - it is better to calibrate with it.
| Inductive sensor mounted on the head | Table tilt adjustment screws visible on the table |
The hot part is covered by a cover.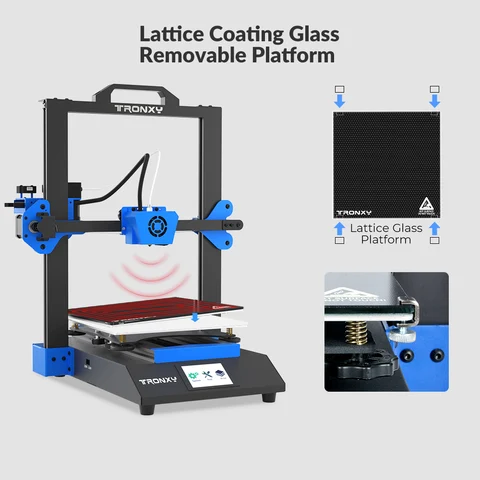 | Carriages and brackets with metal rollers |
| The blower is located outside the casing: an impeller with a nozzle | |
On the electronics unit, the manufacturer placed a sticker with information about the model and basic characteristics. There is also a QR code - a link to the official Tronxy group on FB.
The printer has a well-placed electronics and power supply.
| in the photo Tsevik Y, an engine with an engine, a circuit of | can be controlled by USB, or printed with Microsd |
| Power supply is supplied through a standard connector, a number of safety curser and a tummer in the back. | Simple plastic extruder modified for soft plastics |
| Coil is mounted on a bracket on the top bar | Z-axis screw is clamped in the bearing on the top part.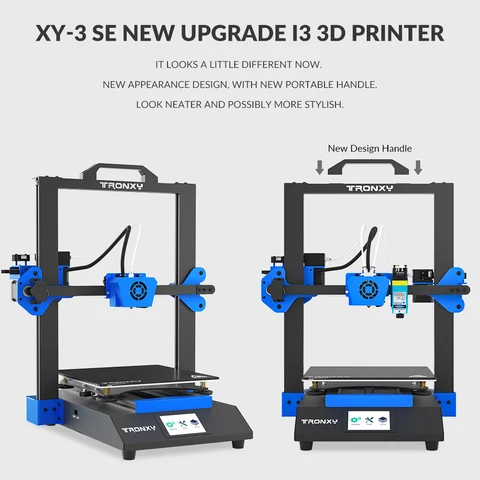 |
Exterior view of the Tronxy printer ready to go.
In principle, it does not take up much space on the table.
Before starting work, you need to calibrate the level of the table at several points. It works automatically, there is a corresponding menu.
Alignment takes place using an inductive sensor. The head moves along the grid, lowers until the sensor is triggered, and deviations are calculated. When triggered, the red LED lights up.
Large touch screen. With the help of this, it is a pleasure to manage the printer. The menu contains the main functions. The screen starts with the display of 3 icons - settings (System), tools (Tools), printing (Print).
| At startup, select the desired menu. | In the Tools menu, manual movement, preparation, plastic loading, leveling, fan adjustment, emergency stop and Z level change (for example, when using additional glass) are available warning - check that nothing is in the way on the table | The sensor automatically calculates table deviations.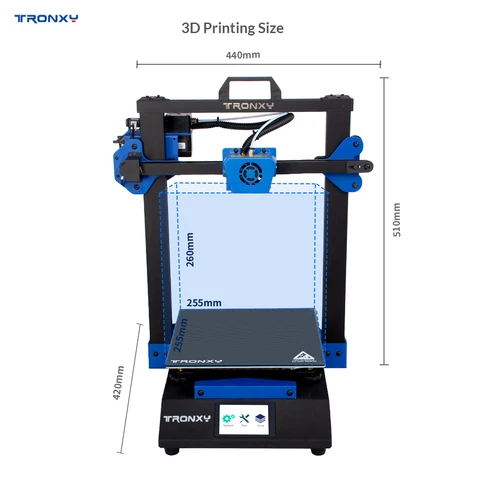 The first time is best done in the cold. And the “working” version is with a heated table. The fact is that when warming up, the deviations increase significantly The first time is best done in the cold. And the “working” version is with a heated table. The fact is that when warming up, the deviations increase significantly |
| To refuel the Philament Pre -refill the rod | there is a preliminary heating of the table and nozzle | |
| menu of the manual movement of the axes. 4 axes (XYZ+E), home position. | All three fans are controlled by software. Thermal barrier and model airflow in %, electronics airflow on/off only. The printer can be made “quieter” | |
| In the settings menu, there is not a lot - this is information and language. | Firmware version is fresh. You can update with Microsd | |
| The printer status window - position and temperature | Print menu “Print” | |
select the file, starting the file. There is a pause for changing the filament There is a pause for changing the filament | Some adjustments are available when printing. | |
The printer is ready to go. We fill the plastic - we press the extruder lever, we push the bar. If you are interested in how extruders differ and how they work, you can read the article about the BMG extruder.
Please note that there is a filament break (end) sensor in front of the extruder. The plastic is filled - the light is on.
Install the coil on the bracket.
Push the bar through the hot nozzle. I have red PETG refilled, but you can see that they checked it with blue PLA at the factory.
Before the start, I check the operation of the heating elements - I check the heating of the table and nozzle with a thermal imager.
Slicers are standard, there are no tricks, there are profiles on the USB flash drive, examples of models for the test.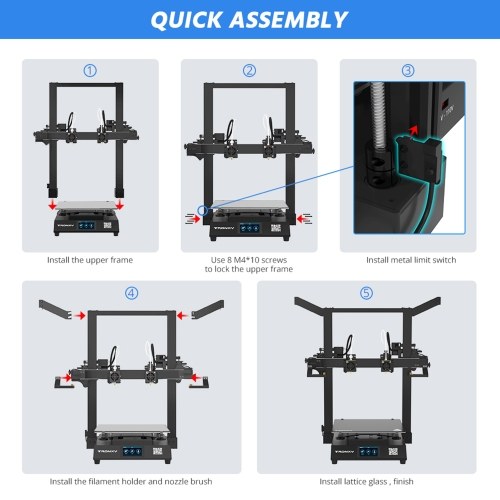
Print test)))
During printing, you can change the parameters on the fly - speed, temperature, etc.
Measured piece approx. 20 cm.
Battery case.
If you pause during printing, the automatic offers to change the color. So the printer allows you to print in layers in different colors. plus the printer.
The enlarged working area (255 x 255 mm) makes it possible to print also large parts. The photo shows a detail of a compound bow.
TRONXY XY-2 PRO 3D PRINTER
So, using the printer is easy and convenient. The basic things have already been implemented - the printer is assembled, configured, tested, the belts are tensioned. You are required to fasten 4 screws to fix the portal and carry out automatic table calibration. Next, fill the bar and print. Moreover, a convenient filament change with a print pause is available - it is possible to print color models in layers.
The printer is very easy to use, does not require any deep knowledge of 3D printing, and is suitable for beginners.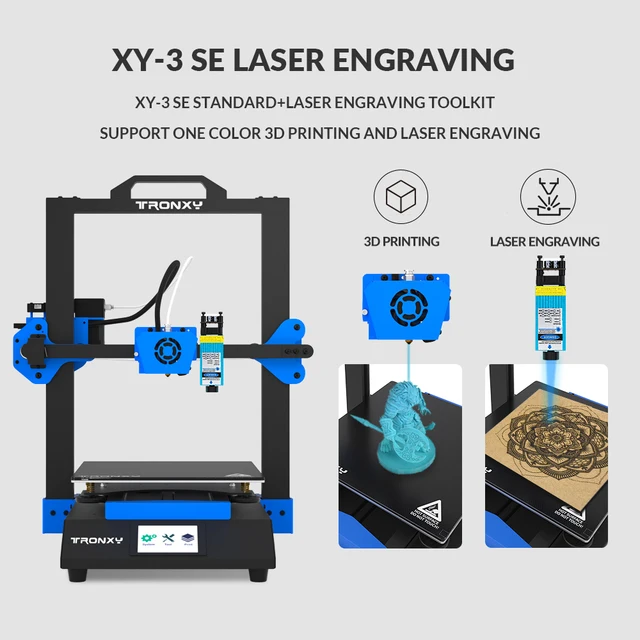
At this price, I would recommend Tronxy as the first 3D printer. Discount coupons are available in the store.
3d printer tronxy xy-2 pro modernized barzo zagryavane automatically leveled and renewed for current detector for iztichane at the end of the helix on titanium buy online / Computers and office ~ Trigovina-shop.com
sku: t52390
Presale for TRONXY XY-2 Pro 3D printer please pay attention:
The process on the citizen is complicated, it is completed before and from the central government, but the printer is trying to just save it, and collect the information for it.
Parameter
Maximum print size: 255*255*260 mm
(XY-2 PRO titanium Print size: 255*255*245mm)
Print color: Monochrome
Debelinate per print: 0.1-0.4 mm (optional)
Positioning accuracy: X/Y: 0.0125 mm Z: 0.02 mm
Size per nozzle: 0.4 mm
Material support: PLA, COREMA, HIPS, SHELL, PC, PVC (XY-2 PRO titanium and support:TPU)
Machine material: Aluminum and sheet metal
Teglo per machine: 8.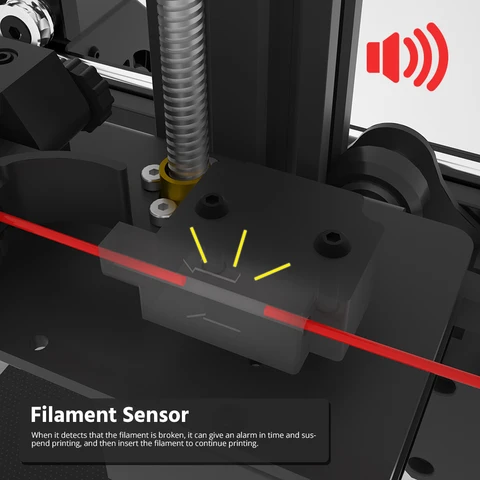 5 kg
5 kg
Sheet for wrapping: 11 kg
Packing size: 495x460x220 mm
Machine size: 460x450x510 mm
Screen: 3.5 full color touch screen
Automatic nivo: included
Consumirana power: 110/220 v
Initial power: 24 360 W
Certification: CE, FCC
Software for ordering: Tronxy slicer
File format: STL, OBJ, DAE, AMF, G-code
Software for work: Repetier-Domakin, Cura
Operating system: Windows/mac os/Linux
Inlet: USB interface, TF card
Spirane for current Renewal for printing: included
Spiral direction stick detector: included in kit
Attention to
Consumativi 0.25 kg and a sticker with burning lay down from PVC, attachments to the machine, garden, provide TRONXY on the client, somehow and consumativi.
The client will exchange it for a former for a handkerchief in private, the machine will ruin the qualification for osigurevane for quality, go away, which will be taken from the client.