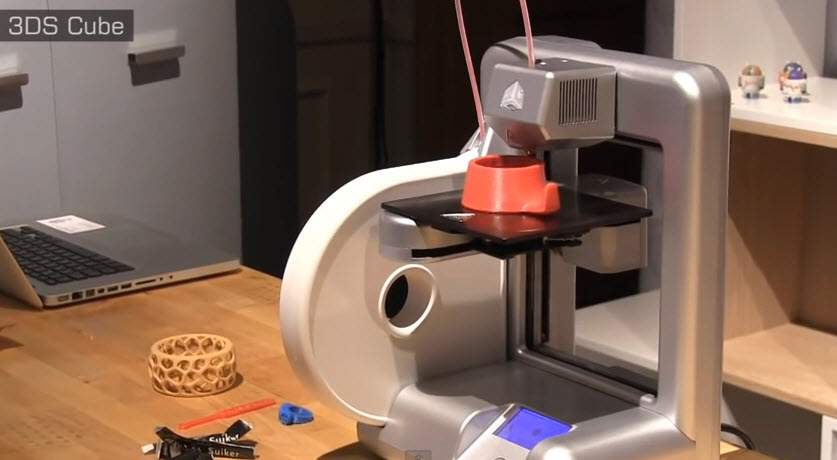
Translucent 3d printing
Guide to Transparent 3D Printing
Clear materials, such as glass or acrylic, have a wide variety of applications in consumer products, industrial uses, healthcare, and more. However, prototyping or producing low volumes of clear parts can be expensive and inefficient with traditional methods, which raises the question: can you 3D print transparent parts? The answer is yes, with the right technology and materials.
Stereolithography (SLA) 3D printing can create transparent objects that, with some post-processing, can be made optically clear. Formlabs' latest SLA 3D printers, the compact Form 3+ and the large format Form 3L, take clarity one step further by using a flexible resin tank that reduces peel forces, resulting in clearer parts with smooth surface finish.
There are multiple materials for producing translucent and transparent 3D printed parts:
- Clear Resin is a rigid material that polishes to near optical transparency, making it ideal for fluidics, moldmaking, optics, lighting, showcasing internal features, and any parts requiring translucency.
- BioMed Clear Resin is a rigid, transparent material for biocompatible applications requiring long-term skin or mucosal membrane contact.
- Elastic 50A Resin is a soft and stretchy material that is semi-translucent. It is ideal for prototyping parts normally produced with silicone.
- Flexible 80A Resin is a more stiff soft-touch material that is also semi-translucent. It is ideal for simulating the flexibility of rubber or TPU.
In this guide, we walk you through various finishing methods to create transparent 3D printed parts for a variety of applications, from optics to light pipes to fluidics. Methods range from quick solutions for adequate transparency, to niche techniques for creating optically clear parts.
Clear and transparent 3D prints are ideal for creating clear prototype parts, showing internal cavities and details, housing LEDs, creating windows, or printing see though anatomical models and medical devices. Formlabs and our customers have used Clear Resin to create a completely optically clear lens for a fully 3D printed camera, tiles for a Fresnel lens installation in Times Square, light pipes, prisms, millifluidic devices, and more.![]()
Formlabs applications engineer Amos Dudley designed and 3D printed a lens for a fully 3D printed camera.
Sample part
Curious to see how transparent 3D prints SLA 3D printing is capable of? We’ll ship a free clear 3D printed part to your office.
Request a Free Sample Part
Yes, but with caveats. Polymethylmethacrylate (PMMA), commonly known as acrylic, is a transparent thermoplastic that is commonly used as a more durable alternative to glass. While 3D printing acrylic is possible with fused deposition modeling (FDM) 3D printers, it's not really user-friendly as the material itself is toxic and prone to warping, while the 3D printed parts are only semi-translucent due to the lower resolution of FDM printers.
For a 3D printing acrylic-like fully transparent parts, we recommend printing on an SLA 3D printer with Clear Resin and then post-processing the 3D printed parts for full transparency using one of the methods mentioned in this article. Using an acrylic spray is one of the methods to ensure clarity.
We’ve tested several techniques for post-processing parts 3D printed in Clear Resin. In this post, we’ll cover manual sanding, clear coating, and resin dipping. Each finishing option requires varying levels of effort, depending on the degree of transparency and surface finish your part requires.
Applications: Manual sanding and polishing can be effective for simple shapes with few details, but are less suited to finishing complex models. It is very difficult to reach total optical transparency with this method.
You’ll have to sand to extremely fine grits to manually finish a transparent part, but with some effort, you can sand and polish parts to be as clear as a magnifying glass. It is, however, very challenging to completely eliminate all layer lines via manual finishing—you may notice micro-scratches when holding the part at a shallow angle to the light.
Instructions: Use a range of incremental sandpaper grits to smooth your surface, then polish the part with acrylic cleaner and a microfiber cloth.![]()
At around 3000 grit, transparent 3D printed parts become glossy and very smooth to the touch. By 12000 grit, they are reflective. Try using a range of sandpaper and micromesh pads with grits from 400 to 12000, in increments of 200, slowly and carefully to clean the parts between grit levels and to eliminate scratches from the previous level before moving on to the next.
Our support site offers a simple visual step-by-step guide for manual sanding, including an optional finish with acrylic spray.
Tip: If you only need semi-transparency, simply use mineral oil to create an even finish and hide any light spots on your part.
We’ve tested a variety of methods of polishing clear 3D prints, from hand sanding and spray coating to resin dipping.
Applications: Spray coating is an easy, fast way to improve the clarity of parts without much reduction in detail. This method is effective for all kinds of models, as it's able to coat complex details that may be hard to reach with regular sanding and polishing.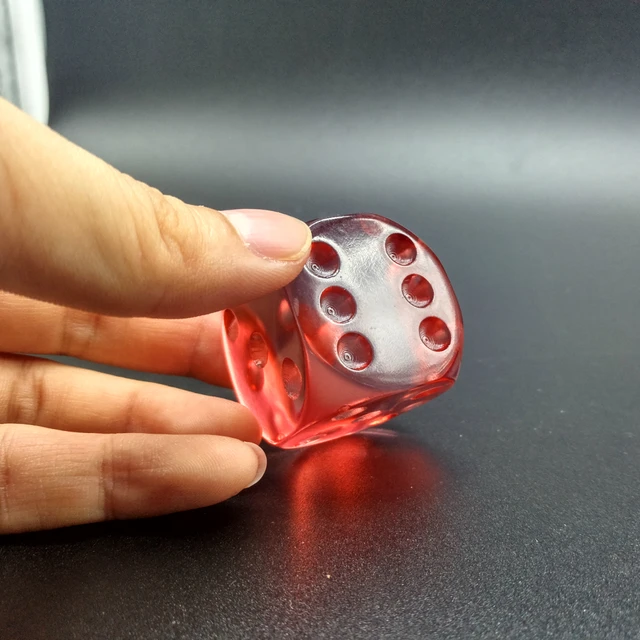
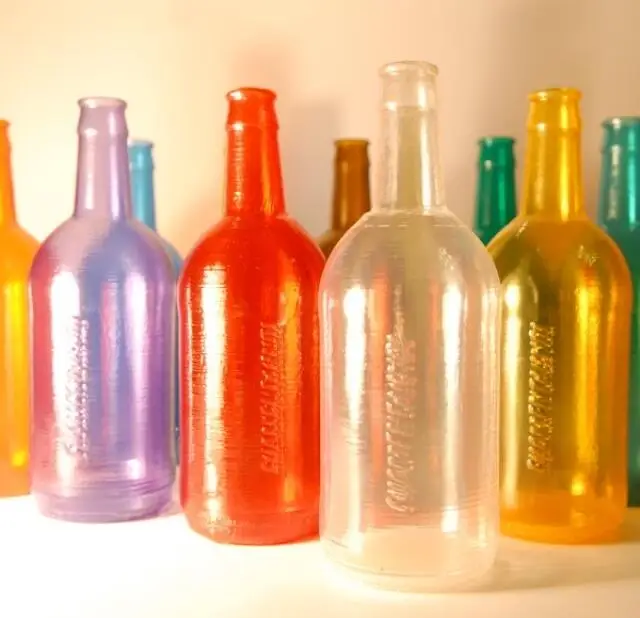
Clear coating alone helps to conceal layer lines and protect parts from UV exposure, which can cause yellowing and unintended post-curing. If you’re looking for a smooth, glass-like surface finish, perform the manual sanding and polishing technique prior to coating; the more sanding that comes before clear coating, the better the clarity. This additional step is great for post-processing prototypes that look like fully transparent plastic, e.g., packaging, bottles, and microfluidics.
Instructions: There are several options for clear coating 3D prints, from inexpensive sprays to products that require a dedicated room and tools.
- General purpose clear coat spray paints: There is a wide variety of high quality and affordable sprays. We recommend using a 2K clear coat.
- Automotive sprays: High-solids acrylic urethane clearcoats offer very high gloss and are designed for air-dry and baking conditions, but require a spray gun and dedicated space for spraying, as well as a base coat.
For spray coating, start with a clean, dry part already washed in isopropyl alcohol (IPA). Do not post-cure the part ahead of spraying, as this can cause yellowing. Let the part air dry. Once it’s completely dry, apply two to three spray coats in a dust-free environment.
Tip: For a fee, auto body shops may do the coating for you with a spray like Lesonal Universal Clear. In most cases, these shops will use a light solvent, like naptha to clean and prepare the part’s surface prior to painting.
For an installation in Times Square, Window to the Heart, the Formlabs and Aranda/Lasch teams worked with an auto body shop to spray coat each tile in Lesonal Universal Clear.
Applications: This method is best for when you need very transparent parts, and only works on flat or near-flat surfaces, such as a lens or a window into the interior of a part.
Resin dipping results in parts that are extremely smooth, with clear and sharp surface reflections.
This technique can be used to create an even smoother finish for parts printed in other SLA materials, although it can reduce detail.
Instructions: Apply Clear Resin to the part with drops from a syringe, or by dipping the part as as desired. The viscous resin will fill layers and scratches on the part, forming a completely smooth surface.
The layer of resin should be as thin as possible, while still eliminating layer lines. Pull off any bubbles with a syringe. Completely post-cure the part using the appropriate settings, then repeat the process for the other side, both dipping and post-curing.
Three stages of resin-dipped lenses, with the final lens on the left.
Note: The dipping process alters focal length slightly for lenses. For our 3D printed camera lens, Formlabs applications engineer Amos Dudley designed and printed a lens testing device.
With the Form 3+ SLA 3D printer, you can create clear and fully transparent 3D prints affordably and with minimal post-processing.
Download our white paper for a detailed overview of SLA ecosystems and the step-by-step 3D printing workflow.
Curious to see the quality and clarity firsthand? Request a free transparent 3D printed sample part.
Request a Sample Printed in Clear Resin
How to 3D print clear plastic parts
3D printing offers unparalleled freedom when it comes to the appearance of the objects you print. It’s possible to change the color, texture, size, and shape of your print, just by changing what material you use. There is one material property that is often overlooked, however, and that’s transparency.
Whether you need a part to be clear for functional reasons, or you just want something that looks nice, it’s good to have the option of printing clear parts. Read on to find out how you can do so.
Is it possible to 3D print clear parts?
The answer to that is yes, and… maybe. Depending on your definition of clear and whether you’re willing to do some post-processing.![]()
While it is possible to print an object using the right material and settings and then pull a translucent print off the build plate. You’ll have to do some extra work if you’re hoping to print anything that is perfectly transparent.
In order to understand why that is, we should talk about what we mean when we use the words transparent and translucent.
What is the difference between a transparent print and a translucent one?
There is a whole bunch of science around what makes something transparent or translucent but for the purposes of this article, transparent is what you’re probably thinking of when you imagine a clear material like a glass window or a flawless crystal. It lets almost all visible light pass through it. A translucent material is instead one that lets only some light through and is therefore not perfectly clear, like a stained-glass window or the lenses of your sunglasses. Any material that lets no light through whatsoever is opaque.
When it comes to 3D printing, these terms are often conflated, and it is standard in the industry to label 3D printing filament and resin with translucent properties as ‘transparent’ despite it being very difficult to get perfectly transparent prints with them. In order to follow those naming conventions, when talking about materials with translucent properties we will refer to them as transparent.
Most of the time, when you try to 3D print using a transparent filament, particularly with an FFF printer, your prints will end up looking cloudy. Depending on your settings, you will probably still be able to see some light pass through them, but they will be translucent at best.
This is because a 3D print is made up of lots of layers of material stacked on top of each other. The small gaps and irregularities between these layers refract and scatter light, preventing it from passing through. Luckily, there are ways of reducing and possibly even eliminating this issue.
How do you print clear parts?
To get the best clear parts, there are three areas that are important. The material used, your slicer settings, and post-processing.
Materials for printing clear parts
When it comes to printing both translucent and transparent parts, there are two very different material categories you can use.![]() The first is thermoplastics using an FFF printer. And the second is resins using an SLA or PolyJet/MultiJet printer.
The first is thermoplastics using an FFF printer. And the second is resins using an SLA or PolyJet/MultiJet printer.
As a rule of thumb, resin and resin-based printing technologies give you the most transparent parts. However, getting good prints with resin can be a more difficult and much messier affair. Polyjet/MultiJet printers are also astronomically more expensive than FFF printers.
Thermoplastics have the advantage of being accessible, requiring less cleanup, and coming in a wide range of options. Some of the FFF materials that can be printed transparent are:
PLA
PLA is one of the cheapest and most used FFF materials. It is possible to find transparent PLA and in fact, when it first came onto the market, most PLA was transparent. However, it is difficult to get clear prints with PLA, and the other materials mentioned are normally a better option if you’re looking to get the clearest prints possible.
PETG
If you are looking for an easy and affordable way to get translucent prints without post-processing, PETG is your best bet.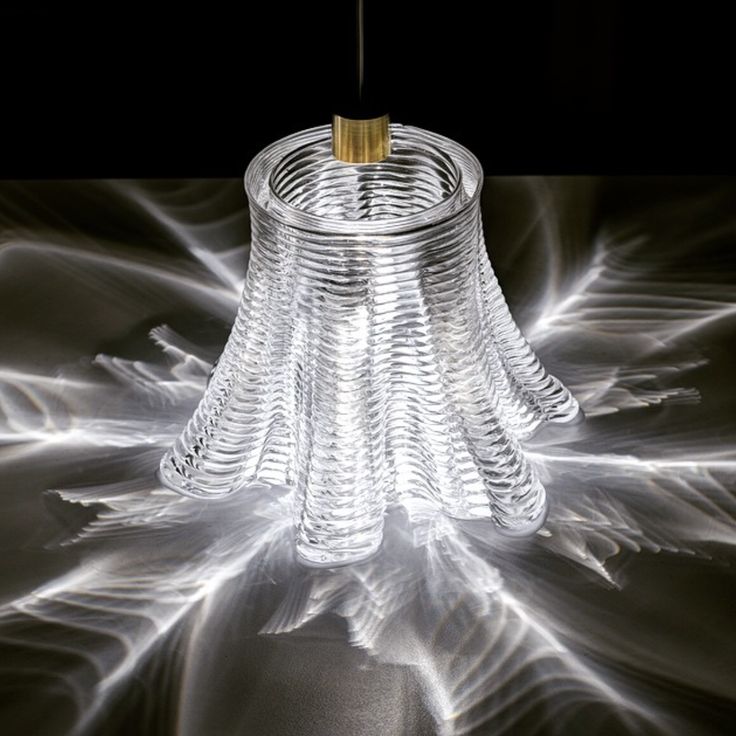 Transparent PETG is easy to find and it prints better than transparent versions of PLA and ABS will. Post-processing is still required if you want an actually transparent final print, however.
CPE/CPE+
Both CPE and CPE+ can be found in transparent varieties and CPE+, in particular, is suited to being printed transparent as it can be more easily post-processed with heat treatment due to its higher heat resistance. It also had good mechanical properties which makes it a good option for functional parts.
PP
Polyproylene is another material with transparent filament options. PP is a little more expensive than other options but it is possible to get decently translucent prints using it and it also has some specific mechanical properties that the other materials mentioned don’t have, making it appropriate for certain functional parts.
ABS
ABS is common, affordable, and comes in transparent varieties. The downside of ABS is that it’s harder to print than PLA and PETG as it requires an enclosed printer and, similar to PLA, the prints you get off the build plate are unlikely to be especially transparent. The one major upside that ABS has is that it can be vapor smoothed using acetone. We will talk more about vapor smoothing in the post-processing section.
PVB
PolySmooth is a PVB-based material made by PolyMaker that is easy to print and has mechanical properties similar to PETG with the added advantage that it can be vapor smoothed with isopropyl alcohol in a manner similar to how ABS is smoothed with acetone. PolySmooth is more expensive than ABS but it’s easier to print and isopropyl alcohol is much less dangerous to work with than acetone making the smoothing process easier and safer.
Which settings to use for printing clear parts?
The settings you need to tune and tweak for printing clear parts are mostly the same you need for getting a good print in general.
Different materials and printers will also have different requirements but there are some of the settings that you should pay special attention to. Most are relevant for FFF printing. They are:
Infill percentage
There are two options for infill percentages. 100% or 0% (for any infill pattern except lightning). 100% percent will create clear solid objects and is the best option for functional parts. However, for large parts, the amount of filament used will be high. The alternative is to use no infill and a wall that is a single line thick That will create a hollow object with very little material to displace light passing through it. The downside is that many objects will not be able to be printed without infill. Any other infill percentage will create complex internal structures that will reflect light and make the print less transparent.
Spiralize outer contour (vase mode)
Vase outer contour is a setting that enables smooth printing of objects with a single wall thickness. It turns the print into one continuous print path which means there are no retractions between layers and therefore no Z seam. This can be perfect for making thin translucent parts like a lampshade.
Layer height
Changing your layer height will change how translucent your parts are. As a rule, low layer heights create smaller gaps between layers which creates clearer parts. This is also the only setting in this list that is also relevant to resin printing. As with FFF, a lower layer height is usually best. For FFF printing, there is one exception when larger layers are better. That is when using vase mode with a single line thick wall. In that case, larger layers and even a larger nozzle size will often result in a clearer part.
Temperature
Temperature can have an effect on clarity. A higher temp will help your layers fuse more completely resulting in more clarity but once the temp gets too high your material will bubble or even burn as it leaves the nozzle resulting in a less transparent part.
Extrusion rate
Increasing the extrusion rate slightly above 100% can prevent under extrusion and help fill in the gaps between layers better leading to clearer prints. If you increase the extrusion rate too much you will get over extrusion which will have the opposite effect.
How to post-process a 3D print to make it transparent
Post-processing is the magic step that, in the right circumstances, can turn a cloudy underwhelming print into one that’s crystal clear. In most cases, a bit of post-processing will at least help. Some of the techniques you can use include:
Sanding and polishing
Sanding a print is one of the most straightforward way to smooth out the layer lines that stop a print from being transparent. However, you will need to use an extremely fine grit of sandpaper and ideally even polish to get a perfectly smooth surface. This is also very difficult to do on parts with complex geometries. It’s also worth mentioning that you should wet sand PLA or any material with a low thermal resistance to stop the heat created when sanding from damaging the part.
Clear coating
When done properly, clear coating a 3D print can be transformational. A clear coat is a transparent layer of paint that, when applied, sinks into the layer lines, filling them up and giving the part a smooth finish. If all of your settings have been dialed in and the right material was used, a clear coat can be the difference between a translucent part, and a transparent one.
Vapor smoothing
Vapor smoothing is the process of using either acetone (for ABS) or isopropyl alcohol (for PVB) to ‘melt’ the outer layer of a print thereby smoothing out the layer lines that prevent a print from being transparent. Vapor smoothing can be a difficult process to get right as overexposing a part can actually cause the part to melt completely.
With practice, this can be a great technique for improving the transparency of your parts. Be aware though that vapor smoothing can be dangerous (especially when using acetone) so you should only do this in a controlled environment and when using the appropriate safety precautions.
Temperature treatment
It is possible to fuse the layer lines of a print by exposing the outer surface of
the print to heat.![]() The principle is similar to vapor smoothing except using
The principle is similar to vapor smoothing except using
heat instead of a chemical reaction to melt the surface of the model. This can
be done with a heat gun and works particularly well with temperature-resistant
materials such as PETG and CPE+. This is extremely difficult to do reliably with
materials that melt quickly like PLA as you can easily deform your print by
accident.
What are the applications for 3D printed clear parts?
The uses you can find for clear 3D printed parts are limited only by your imagination. Here are some possibilities to get you started:
Scientific Research
Custom transparent parts have various uses for scientific research. For example, researchers at Cardiff University have used 3D printed parts to study microfluidics in a way that is cheaper and more flexible than traditional alternatives would provide.
Visual prototypes
Visual prototypes are an important part of the rapid prototyping process and the more accurate they are, the more useful. If you are working on a product with transparent parts, being able to print those parts and have them look exactly how you want them to can be extremely valuable.
Household decorations
Why not spruce up your home with some fancy new lampshades or vases? With 3D printed transparent parts, you can decorate your home exactly how you want it with parts that not only look good, but are functional too.
Art projects
3D printed transparent and translucent parts open up a whole new world of artistic opportunities. One example is lithophanes. Lithophanes are made by varying the thickness of an object so that when a light shines on it, an image is revealed. It’s possible to create lithophanes with
Transparent 3D Printing Guide
Stereolithography (SLA) 3D printing can produce transparent objects that, after some post-processing, become optically transparent.
Formlabs' latest stereolithographic 3D printer, the Form 3, improves model transparency by using an elastic resin reservoir that reduces forces on the model, resulting in smoother, more transparent parts. 3D printing on a Form 3 in Clear Resin is a great way to produce parts that require light transmission and, with the right post-processing techniques, transparency.
The following processing methods can be used to 3D print transparent parts for a variety of purposes, from optical devices to light guides and liquid elements. Techniques range from quick solutions to obtain sufficient transparency to specialized techniques for creating optically transparent parts.
Clear and transparent 3D models are ideal for creating transparent prototyping elements, showing internal cavities and details, making LED housings or windows. Formlabs and our customers have used Clear Resin to create an optically clear 100% 3D printed camera lens, Times Square Fresnel lens tiles, light guides, prisms, millifluidic devices, and more.
Formlabs application engineer Amos Dudley designed and 3D printed a lens for a fully 3D printed camera.
Curious to see with your own eyes what a transparent SLA 3D printed part looks like? We will send a free transparent 3D printing sample directly to your office.
Request a Free Sample
We have tested several post-processing methods for 3D printed Clear Resin parts. In this article, we will cover hand sanding, spray clear coating and resin impregnation. Each treatment option requires a different amount of effort, depending on the required degree of transparency and surface quality.
Application of : Hand sanding and polishing can be effective on simple shaped models with few fine details, but is not suitable for complex shaped models. With this method, it is very difficult to achieve complete optical transparency.
Hand sanding will require you to sand with very fine grit sandpaper, but with some effort you can sand and polish the parts to the transparency level of a magnifying glass. However, it is very difficult to completely remove all the layer lines with manual processing - if you turn the part at a slight angle to the light, you can notice micro-scratches.
Instruction : Use sandpaper to smooth the surface, then polish the part with acrylic cleaner and a microfiber cloth.
With approximately 3000 grit sandpaper, transparent SLA 3D printed parts become glossy and very smooth to the touch. After sanding with 12.000 grit, they reflect light. Try different sandpapers and abrasive sheets from 400 to 12,000 grit in 200 increments. Before moving on to the next grit step, slowly and carefully clean the lens and remove scratches from the previous level of sanding.
Our support site offers a simple step-by-step manual sanding guide that includes an acrylic spray finish.
If all you need is translucency, mineral oil will suffice to create a smooth surface and hide light spots.
We have tested various polishing methods for transparent 3D models, from hand sanding and spray coating to resin impregnation.
Application of : Spray coating is a quick and easy way to improve the transparency of parts without significantly reducing detail. The method is effective for all types of models, since it is possible to spray the coating on complex-shaped parts, which can be difficult to grind and polish.
Clearcoat application helps to hide layer lines and protect parts from UV exposure which can cause yellowing and unintended final cure. If you require a smooth, glass-like surface, hand sand and polish before coating; the more thorough the sanding before applying the clear coat, the better the clearness. This extra step is great for post-processed prototypes that look like completely transparent plastic, such as packaging, bottles, and microfluidic devices.
Instruction : A variety of aerosols can be used to apply a clear coat, from inexpensive sprays to products that require a separate room and tools.
- General purpose clear aerosol paints: : The selection ranges from good, very inexpensive options like Rustoleum Painter's Touch 2X to affordable high quality aerosols like Spray Max 2k Clear Glamor.
- Automotive sprays : Products such as Lesonal Universal Clear, a high solids acrylic urethane clear coat, give a very good glossy effect. They are designed for air drying and stoving and require a spray gun and free space to spray. A base coat must be applied before applying Lesonal Universal Clear and similar aerosols.
Coat a clean, dry model already rinsed in isopropyl alcohol (IPA). Do not finalize the model before spraying as this may cause yellowing. Air dry the model. Once it is completely dry, apply two to three coats of spray in a dust-free environment.
For a fee, a coating such as Lesonal Universal Clear can be applied at a workshop. In most cases, bodyshops use a volatile solvent such as naphtha to clean and prepare the surface of the model prior to spraying.
For the Times Square installation, Window to the Heart, Formlabs and Aranda/Lasch spray-coated the tiles with Lesonal Universal Clear in an auto body shop.![]()
Application of : This method is best suited for cases where very high transparency of parts is required and can only be applied to flat or nearly flat surfaces such as lenses or "windows" into the interior of the part.
Resin immersion produces very smooth details with crisp and sharp surface reflections.
The method can be used to increase the smoothness of parts printed with other SLA materials, although it may reduce detail.
Instruction : Apply Clear Resin to the part using a syringe or by dipping the part into the resin, as desired. The viscous polymer will fill in the delaminations and scratches present on the part, forming a completely smooth surface.
The resin layer should be as thin as possible while still eliminating layer lines. Remove all bubbles with a syringe. Completely cure the part using the appropriate parameters, then repeat the process on the other side, both dipping and final curing.
Lens subjected to a 3-step polymer immersion procedure, final result on the left.
The polymer immersion process slightly changes the focal length of the lenses. Formlabs Applications Engineer Amos Dudley designed and 3D printed a lens tester to create a fully 3D printed camera.
With the Form 3 Stereolithographic 3D Printer, you can create crisp and fully transparent 3D models at an affordable price with minimal post-processing.
Check out our white paper, , for a detailed overview of SLA ecosystems and a step-by-step 3D printing workflow.
Would you like to see the resulting quality with your own eyes? Request a free transparent model sample.
Request a sample printed in Clear Resin
Modeling in 3ds Max, applying STL files
Share on Facebook Share on Twitter Share on Vkontakte
Introducing the 3D Modeling Basics Guide and 3D Printing STL Source Files .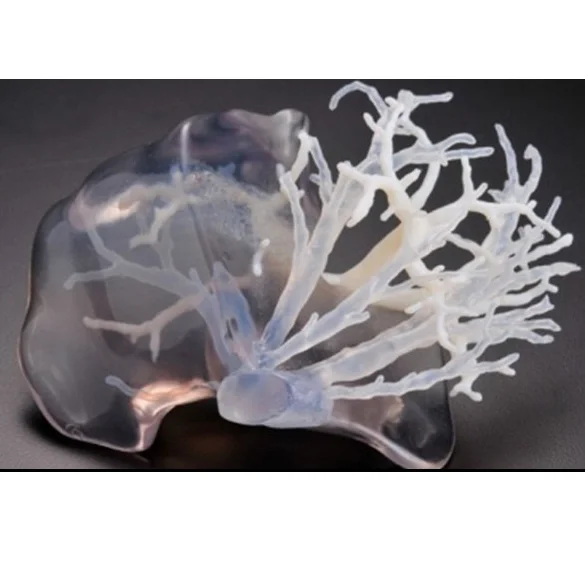 In this article, we will look at modeling using the 3ds Max program.
3ds Max is a special software package developed by Autodesk Media and Entertainment for 3D modeling, animation and rendering. It has spatial modeling capabilities, an extensible architecture, and can be used on the Microsoft Windows platform.
In this tutorial, we'll take a step-by-step look at how to create a simple key fob. If you have used this program before, then everything should be clear to you. If you have never used 3D modeling software , then this instruction will help you get a certain idea of the essence of the work.
This walkthrough was created using 3ds Max 2010 software . For your convenience, some large pictures are clickable.
Most programs have multiple ways to use the same functions to achieve the same result. Often, I use the icons on the right-hand toolbar to create the main part of the model, but here I will describe how to work with the opening menu of the main panel.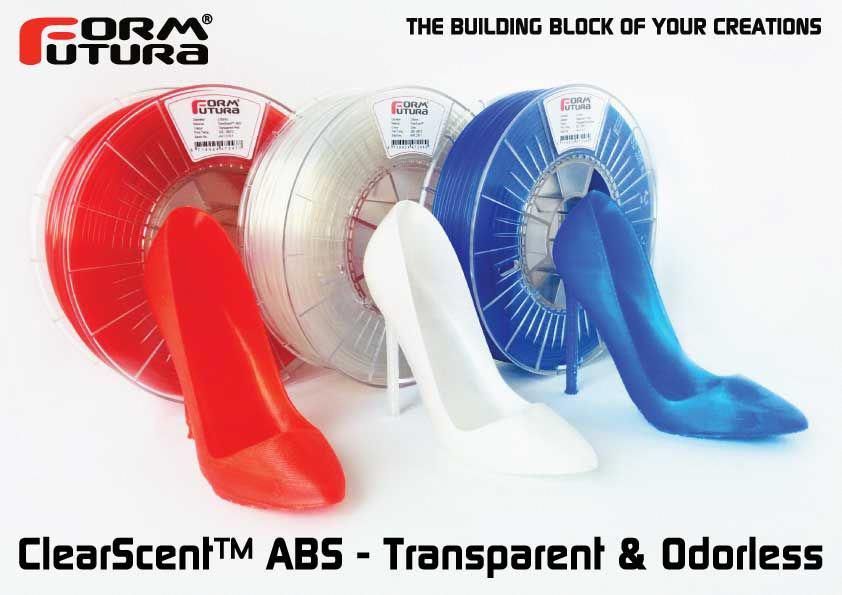 It's a little easier to work with her.
Step 0
The first thing we need to do is set the units. This is necessary so that the objects that we create are measured in millimeters we are used to. Go to menu Customize -> Units Setup .
Select Generic Units as shown in the picture.
Check and, if necessary, change the system units. Click button System Unit Setup . Make sure millimeters is selected in the window that opens. Press OK .
Now you can be sure that if you built a cube with a side of 10 cm, then 3D printer will create it exactly that size.
Step 1
On the top toolbar, click the Create > Shapes > Text button. (If you are using the right-hand panel, then you need to select Create > Shapes > Splines > Text ).![]()
Step 2
In the dialog box on the right in the "Parameters" tab, you can set the font, text size and enter the text itself. I chose the font Arial, set the font size to 10, and entered can-touch.ru in the text field of the dialog box. Step 3
Next we need to turn the 2D spline(s) into a 3D object using command Extrude . To do this, open Modifiers > Mesh Editing > Extrude . Step 4
In this step, we will adjust the Extrusion parameters using the side toolbar on the right side. There we set the value Amount - 2. I, for example, arbitrarily set the value Segments - 3. Especially important are the parameters Cap Start and Cap End , which must be enabled to ensure that your objects are airtight. 9Step 5
Next, we need to create a field in order to combine all the letters. To do this, select the tab Create>Standard Primitive>Box . We can change the field parameters using the same side toolbar. We do this so that our field matches the parameters of the letters. By setting the length to 10.0, the width to 60.0, the height to -3.0, we get a 10x60x3 mm field after we print it with the 3D printer .
Since the field might not be in the correct position right now, you can easily move it by right-clicking on the field and selecting Transform>Move . This way you will be able to place the field exactly behind the text. You will need to make sure that they match in order to move on to the next step - merging.
Step 6
To connect all components together, select tab Create>Compound>Boolean , you will have to select one of the objects. Options are available in the toolbar on the right to select which type of variable to use. In this case, you need to select Pick Operand B and Operation Union , then select the second object as well.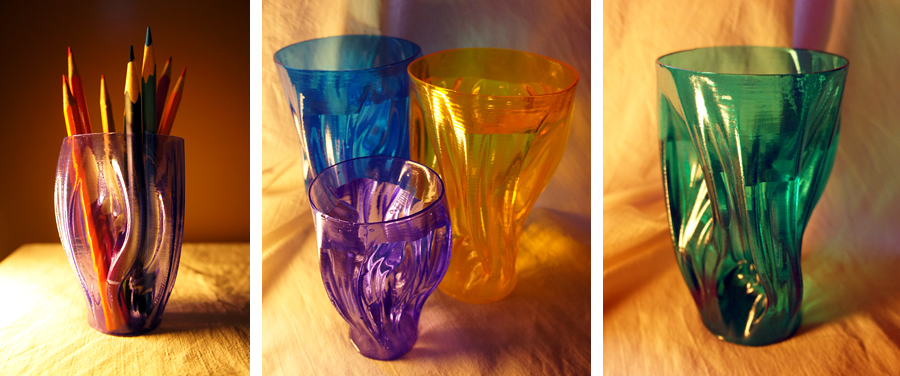
Step 7
You can see how the subtractive boolean works by creating a hole for our key fob. First, let's create a cylinder - Create>Standard Primitive>Cylinder with a radius of 3 and a height of 10. Next, use the move function and place the cylinder at the end of the object where the hole should be. Then select Create>Compound>Boolean , keeping the cylinder selected. You select Operand B again, but this time the function Subtraction (B-A) , then select the merged text box.
Step 8
Now everything is ready to use the tab File>Export the 3D design as a .STL (stereolitho) . Before uploading your project to can-touch.ru, make sure once again that the scale is set in millimeters. STL files don't have units, so setting the scale is the only way to tell the printer that your object is 120 millimeters, not meters.