3D printer z seam
12 Ways How to Fix Z Seam in 3D Prints – 3D Printerly
Z seam is common to see in many of your 3D prints. It’s basically a line or a seam that is created in the Z-axis, which creates a slightly unusual look in models. There are ways to reduce and minimize these Z seams, which I’ll explain in this article.
To fix and reduce Z seams in 3D prints, you should improve your retraction settings so there is less material in the nozzle during movements. Changing the Z seam location in your slicer is another great method that works for users. Reducing your print speed as well as enabling coasting helps with controlling Z seams.
Keep on reading through for information on how to fix Z seams in your 3D prints.
What Causes Z Seam in 3D Prints?
A Z seam is primarily caused while the printhead lays the outer layer and moves up to print the next layer. Right, where it moves up, it leaves a little extra material, and if it stops at the same point each time while going up, it leaves a seam along the Z-axis.
Z seams are inevitable in 3D prints. At the end of printing a layer, the printhead stops printing for a split second so that the Z-axis stepper motors can move and print the next layer across the Z-axis. At this point, if the hotend experiences high pressure due to over-extrusion, a little excess material oozes out.
Here is a list of some causes that might cause bad Z seams:
- Bad retraction settings
- Not using the right Z seam alignment settings in Cura
- Printing speed too high
- Not using linear advance
- Not adjusting wipe distance
- Not enabling coasting
- Excessive Acceleration/Jerk Settings
In some cases, the Z seam tends to be more visible than others. This depends on the object’s position and structure, and extrusion settings.
How to Fix & Get Rid of Z Seams in 3D Prints
There are quite a few ways to fix or reduce the presence of Z seams in your 3D prints. Some methods help you to hide the Z seam by changing it’s location on your model, while some of them will get fade the seam.
The pressure from the material in your hotend can contribute to how noticeable the Z seam is.
Let’s look into some of the different ways that users have fixed Z seams in their models:
- Adjust Retraction Settings
- Changing Cura Z Seam Alignment Settings
- Reduce Print Speed
- Enable Coasting
- Enabling Linear Advance
- Adjust Outer Wall Wipe Distance
- Print At Higher Acceleration/Jerk Settings
- Lower Layer Height
- Disable Compensate Wall Overlaps
- Increase Outer Wall Line Width
- Enable Retract at Layer Change
- Enable Outer Before Inner Walls
It’s a good idea to test these settings one at a time so you can see what settings are actually making a positive or negative difference. When you change more than one setting at a time, you won’t be able to tell what actually made the difference.
I’ll go through each potential fix in more details.
1. Adjust Retraction Settings
One of the first things you can try doing is to adjust your retraction settings within your slicer. Many users have noticed significant changes to their Z seams after finding their right Retraction Length and Distance.
One user who experimented with retraction settings found that after changing their Retraction Distance from 6mm to 5mm, they noticed a difference in how much the Z seam appeared.
You can increase or decrease your Retraction Distance in small increments to see what works best for your 3D printer and other settings.
Another thing this user did was to define a location for their Z seam (back) which can be done through your slicer settings. We’ll look at that setting next.
2. Changing Cura Z Seam Alignment Settings
By changing Z seam alignment settings in Cura, you can decrease the visibility of a Z seam. This is because it allows you to select the starting point of every new layer that your nozzle travels to.
This is very useful for models which tend to have consecutive equal layers and are very susceptible to a very visible Z seam.
Here are the options to choose from:
- User Specified – you can choose which side the seam will be placed on your print
- Back Left
- Back
- Back Right
- Right
- Front Right
- Front Left
- Left
- Shortest – this tends to place the seam in the exact same spot because it’s ending the perimeter where it began.
 This is not so good for hiding the Z seam.
 - Random – this starts each layer in a totally random spot and thus ends in a random spot as well. This can be a great option.
- Sharpest Corner – this can be a great option for angular 3D models as this places the seam right at the inward or outward corner of the model.
There is also an extra option known as the Seam Corner Preference in Cura which shows up for the above options except for Random. With the help of this setting, you can have more control on where to set the Z seam. There are 5 choices:
- None
- Hide Seam
- Expose Seam
- Hide or Expose Seam
- Smart Hiding
I’d highly recommend doing some of your own testing so you can see how the different settings affect where your Z seam will be. A cool thing you can do in Cura is to check your model in Preview mode after you slice it to see where the seam will be.
Here’s an example of the difference between choosing a Seam Corner Preference of None and Hide Seam at the front. For a miniature model like this, it makes more sense to have the Z seam at the back rather than the front so it doesn’t affect the front aesthetic of the model.
Some users have gotten great results by using the Random setting with the Z Seam Alignment. An example is the model below of the chess piece that has a noticeable Z seam on it. After changing their alignment they said it did the trick nicely.
Is there a setting to avoid the Z line? from Cura
Another user managed to reduce print imperfections by keeping their Z Seam either in the Sharpest Corner or relative to a specific Z Seam X & Y co-ordinate that you can set in Cura. You can play around with these to see where the Z Seam will end up.
Adjust your Z Seam Position will automatically adjust those X & Y co-ordinates, so you can basically choose a pre-set location or get more precise by inputting numbers.
Check out the video below by CHEP on controlling the seams through Cura.
3. Reduce Print Speed
Another potential fix for reducing Z seams in your 3D prints is to reduce your printing speed. When you have a print speed that’s too fast, your extruder has less time to retract the filament between the printing movements.
The slower your printing speed, the more time that the filament has to extrude at the transition of each layer. It also reduces the amount of pressure that’s in the hotend, which leads to reducing how much filament comes out.
One user who was experiencing blobs near the Z seams of his model initially tried calibrating his retraction settings. After tweaking many settings, he figured out that the main fix came down to reducing his Outer Wall Speed to 15mm/s.
Cura gives a default Outer Wall Speed of 25mm/s which should work pretty good, but you can test out slower speeds to see if it makes a difference. Many users who fixed this issue do recommend printing the walls slowly, at the cost of a higher printing time.
When you have a lower maximum speed, it means there’s less time taken to accelerate to and decelerate from, leading to less pressure in the nozzle and reduced Z seams.
4. Enable Coasting
Another useful fix to reduce Z seams is to Enable Coasting. It is a very helpful feature to get rid of those zits and blobs in your Z seam. Coasting is a setting that slightly stops the extrusion of material as it gets to the end of closing a wall in your model.
It basically tries to empty the chamber of filament at the last part of an extrusion path so there’s less pressure on the nozzle for less of a Z seam and stringing.
One user who tried enabling coasting to reduce Z seams got great results on his Ender 5. He also suggested reducing your Travel Speed and Print Speed to get better results.
Another user got even better results after enabling Coasting. He also suggested reducing your Outer Wall Flow to 95%, as well as reducing your layer height and setting the Z Seam Alignment to the sharpest corner.
There are Coasting settings that you can adjust to get even better results, but make sure not to overdo the settings since it can lead to holes in the layer transitions. The default settings usually work pretty well.
Here is a great video by Breaks’n’Makes which can help you get your Coasting settings on point.
Coasting is technically a lesser version of Linear Advance as it tries to approximate what Linear Advance does, but can lead to print imperfections. Let’s look into Linear Advance itself.
5. Enabling Linear Advance
There’s a setting called Linear Advance that has helped many users reduce bad Z seams. It is basically feature within your firmware that makes compensations for the amount of pressure that builds up in your nozzle from extrusion and retractions.
When your nozzle moves fast, stops, or moves slow, there is still pressure in the nozzle, so Linear Advance takes this into account and does extra retractions based on how fast the movements are.
One user that enabled Linear Advance said he used to constantly get bad Z seams on all his 3D prints, but after enabling it, said it worked wonders for him.
You need to enabled it within your firmware then calibrate a K-Value which depends on your filament and temperature. The process is pretty simple to do and can significantly improve your 3D prints.
He also mentioned that once you enable it, you can decrease your Retraction Distance by quite a lot which can reduce other printing imperfections such as blobs and zits.
Check out the video below by Teaching Tech to learn how to setup Linear Advance properly.
Do keep in mind, you don’t want to have coasting on if you are using Linear Advance.
6. Adjust Outer Wall Wipe Distance
The Outer Wall Wipe Distance is a setting that was specifically created to reduce Z seams in Cura. What it does is lets the nozzle travel further without extrusion at the end of every outer wall, to wipe the contour closed.
One user who was experiencing Z seams on his Ender 3 Pro suggested adjust your wipe distance to fix this issue. Another user who tried this setting said you can try a value of 0.2mm or 0.1mm to see if it fixes the issue. The default value in Cura is 0mm, so try a few values and see the results.
You can even try increasing it to 0.4mm, the same size as a standard nozzle diameter.
After a week of calibration it looks better but not 100% yet. Details in comment from ender3v2
Check out the video below for more details about Z seams, wiping, combing and coasting. They get to a point where their Z seams are almost invisible, along with better print results.
7. Print At Higher Acceleration/Jerk Settings
Some users have got good results for reducing Z seams by increasing their Acceleration & Jerk settings. This is because the printhead gets less time for the residual pressure to drive out more material, leading to a cleaner Z seam.
Printing at higher acceleration and jerk settings can reduce Z seams to some extent. These settings actually make acceleration or deceleration much faster.
It seems as though some of the previous fixes would be better to implement than this one.
One user recommends to increase the X/Y acceleration and/or Jerk limits to let motions start and stop quicker, leading to a shorter time for the uneven level of extrusion to occur. Going too high can lead to layer shifts or bad vibrations though, so it needs testing.
They mentioned that their Ender 3 could handle Accelerations of at least 3,000mm/s² in the X & Y, along with 10mm/s for Jerk, though you could probably go higher with testing.
8. Lower Layer Height
Using a lower layer height for your model can also help to reduce the visibility of Z seams as some users have found.
Many users have got great results by using a lower layer height, at around 0.2mm and below, mainly if you are experiencing gaps and are using a higher than usual layer height.
If you are doing prototypes, a layer height of 0. 2mm or 0.28mm are good choices, but if you are looking for details and a good aesthetic, 0.12mm or 0.16mm works well for relatively smaller models.
9. Disable Compensate Wall Overlaps
Compensate Wall Overlaps is a print setting in Cura that, when disabled showed good results for a lot of users for reducing Z seams.
One such instance is a user who was getting defects all over his print model. He disabled Compensate Wall Overlaps and it helped their model look better. They did also mention that after changing to PrusaSlicer from Cura, they got better results, so this could be another potential fix.
Just discovered the ‘compensate wall overlaps’ setting and that helped with my skin finish but still getting lots of artifacts in the skin. Outer wall prints at 35mm/sec and jerk is currently at 20 from FixMyPrint
Another user was getting zits on his model. He was suggested by another user to completely disable the Compensate Wall Overlaps setting. In Cura, this has 2 sub-settings, Compensate Inner Wall Overlaps and Compensate Outer Wall Overlaps. Make sure to disable both the sub-settings.
This can help to smoothen out your Z seams.
10. Increase Outer Wall Line Width
Increasing the Line Width can be a good solution to smoothen out Z seams. You can specifically adjust your Outer Wall Line Width in Cura.
One user who was initially getting rough Z seams on 3D printed cylinders found that a key setting was to increase his Line Width. He ended up finding the Outer Wall Line Width setting and increasing it from the default 0.4mm to 0.44mm and noticed an instant improvement.
This was after printing several cylinders. He also suggested disabling Compensate Wall Overlaps as mentioned above. He got much smoother walls and an improved Z seam as well on his prints.
11. Enable Retract at Layer Change
Another potential fix for reducing Z seams is to enable Retract at Layer Change in Cura.
This works because it helps to prevent extrusion from continuing during the move to the next layer, which is where Z seams happen. Do keep in mind that this setting works best when your Retraction Distance is very low.
When your Retraction Distance is fairly high, the time it takes to retract allows the material to ooze to the point where it counteracts the retraction.
12. Enable Outer Before Inner Walls
The last setting on this list to help fix or reduce Z seams is to enable Outer Before Inner Walls in Cura. This is off by default and has worked for some users after enabling it.
It’s supposed to help by ensuring that your layer change happens on the inside of the model rather than on the outer surface since the outer surface isn’t the last or first thing printed on that layer.
Best Z Seam Tests
There are a few Z seam tests from Thingiverse that you can try to see how well your Z seams are without doing a full 3D print:
- Z-Seam Test by kuhnikuehnast
- Z Seam Test by Radler
You can simply download one of the models and test out the changes you make to see if it makes a positive difference to your Z seams.
Z Seam | How to Hide & Avoid
- Author
- Recent Posts
Martin
Besides many test devices, Martin now has his fourth own 3D printer running and prints as a hobby for friends, family and himself. He is happy to share his experience with each new article.
Latest posts by Martin (see all)
Disclosure: Links marked with * are Affiliate Links. I earn from qualifying purchases if you decide to make a purchase through these links – at no additional cost for you!
A Z seam is a line of print defects that runs along the Z axis of a 3D print from top to bottom. The resulting print defects are usually discontinuities and sometimes accompanied by blobs or zits.
A Z seam is usually visible on smooth and round objects that have not been printed in Vase Mode. With objects with corners, the slicer usually finds places where it can set the starting points of the individual layers so that they are not noticeable in the final result. With particularly smooth and especially round objects this is difficult.
A Z seam is created by over-extrusion at layer transitions. If the transitions are on top of each other, a seam is created along the Z axis. Z seams can be prevented/reduced by correct extrusion settings and hidden by slicers. Z seams do not occur in Vase mode.
Table of Contents:
- 1 Z Seam Causes
- 2 Z Seam Prevention
- 2.1 Nozzle Temperature
- 2.2 Retraction
- 2.3 Extruder Calibration & Flow Rate
- 2.4 Print Speed
- 2.5 Wiping
- 2.6 Coasting
- 3 Z Seam Hiding – Cura
- 3.1 Z Seam Alignment
- 3.2 Seam Corner Preference
- 4 Z Seam Hiding – PrusaSlicer
- 4.1 Seam Position
- 4.2 Painting the Z Seam
- 5 Vase Mode
Z Seam Causes
In principle, every 3D print has a Zseam. In some prints, it is more visible than in others. How visible it actually is depends on its position, the structure of the object and the extrusion settings.
A visible Z seam is caused by too much pressure in the hotend. When the printhead moves to the next layer, the pressure is released by an unwanted extrusion of filament. If the starting points of each layer are on top of each other, a visible seam is created along the Z axis.
At the end of each layer, the printhead stops for a very short time and tries to stop extruding as it is moved across the Z-axis to the next layer to continue printing. If over-extrusion occurs during this transition to the next layer, there will be a small blob of excess material.
This over-extrusion is due to too high pressure in the hotend. And this is exactly where the prevention of a visible Z seam lies. If you adjust the extrusion correctly and avoid over-extrusion at the transitions of the individual layers, you will get a less or hardly visible Z seam.
But even if you have set the extrusion perfectly, a Z seam can remain visible on very smooth objects. You will see a line that is no longer accompanied by blobs, but a tiny gap between the beginning and the end of each layer.
If you’re disappointed that you can’t completely avoid a Z seam (except with Vase Mode – see end of article), there are still a few ways to hide it. Further down in this article I’ll introduce you to the options Cura and PrusaSlicer offer you for this.
Z Seam Prevention
The best way to eliminate any problem is to solve the cause. Increased visibility of Z seams due to over-extrusion at the junctions of the individual layers can be prevented by making the correct settings.
However, there are several settings that affect the extrusion. Perfecting each setting will take a long time. And even if you find the perfect setting for each of these options, a Z seam may still remain visible. This is simply the nature of 3D printing and the transition from one layer to the next.
I therefore recommend optimizing the extrusion settings a bit and then try to hide the Z seam with the slicer or to avoid it completely with the vase mode for certain objects. In 95% of all cases, this is sufficient to get a perfect result.
If you want to perfect the last few percent, you should take a close look at the following options for improving extrusion.
Nozzle Temperature
Printing Temperature in CuraThe nozzle temperature is one of the most important factors in extrusion. If it is too low, under-extrusion occurs. If it is too high, too much material will be extruded as the filament becomes more fluid.
So if you see a Z seam where there are blobs, it would make sense to lower the temperature a bit.
Retraction
Retraction in CuraRetraction is another setting that can greatly affect the extent of Z seams.
Retraction controls the negative movement of the filament at the end of a print motion. So when the printhead reaches the end of a layer and moves up the Z-axis to the next layer, the retraction causes the filament to be pulled slightly into the nozzle.
This way you can avoid over-extrusion at the layer transition.
Retraction is also a critical setting to avoid stringing. Don’t overdo it though, or you could produce a filament jam.
Extruder Calibration & Flow Rate
Flow Rate in CuraIn order for the extruder to output the desired amount of filament, it must be calibrated. For example, if the slicer or G-code wants 1 mm of filament to be extruded, it should actually extrude exactly 1 mm of filament.
If the extruder extrudes more filament than it should, there will be a visible Z seam with filament blobs.
After the extruder has been calibrated, you can determine the flow rate. The flow rate determines the rate at which filament is extruded.
Print Speed
Print Speed in CuraThe print speed also affects the visibility of a Z seam. If the speed is too high, the extruder has too little time to retract the filament between two printing movements.
So the slower you set the speed, the less likely you are to over-extrude at a layer transition.
Wiping
Wiping in CuraWith this setting you don’t prevent the excess pressure in the hotend, you just release it at a different place than the layer transition.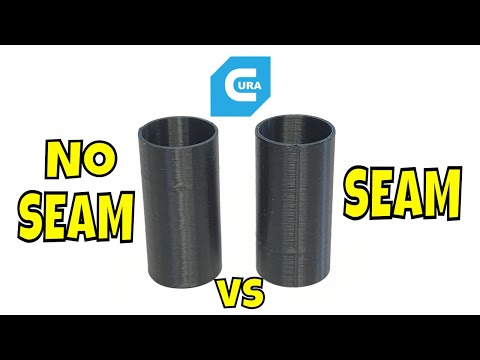 Wiping removes the excess filament from the nozzle before moving on to the next layer.
While this is not the most elegant solution, it can be effective in avoiding a Z seam.
Coasting
Coasting in CuraIf you can’t avoid over-extrusion, you can deal with it better with coasting just as you can with wiping.
With this setting, the 3D printer stops extruding just before the end of a layer. With the correct settings, the excess pressure in the nozzle is sufficient to extrude enough filament to complete the layer.
As you can probably imagine, this setting is quite inaccurate. The only thing that helps here is trial and error. If you set too much coasting, you will get small holes at the layer transition.
Z Seam Hiding – Cura
With “hiding” I don’t mean that you should simply place the finished object so that the Z seam is no longer visible. You can use certain settings in Cura to hide the Z seam in edges, place it at the shortest point of the object, or hide it by randomizing the start of the layers.
With this feature, you can bypass the time-consuming optimization of all extrusion settings and hide the Z seam with one click. You can find the settings for the Z seam in the settings for the walls of the print object.
To illustrate the different settings and their effects, I printed test objects with extremely poor extrusion settings. You can clearly see the transitions between the individual layers as large filament blobs.
Z Seam Alignment
With this option, you can determine the position of the Z seam. There are four options to choose from.
User Specified: This selection allows you to place the Z seam at a location of your choosing. You can specify exact X and Y coordinates or predefined locations (front, back, right, left and 45° in between). This setting makes sense especially for objects where you know which side is mostly at the back and is rarely or never looked at. Also, if you can’t get the extrusion under control, you can place the seam where it is least noticeable.
- Classic Z Seam on a round object
Shortest: With this setting, you can’t actually hide the Z seam. The slicer always looks for the shortest path from the end of the current Layer to the next Layer. This is in almost all cases always directly above. This results in the feared Z seam.
Random: Here the beginning of the next Layer is chosen randomly. If you have the extrusion under control, this function is good to avoid a visible Z seam. If you still have over- or under-extrusion, you will still see print defects at the layer transitions. These are then no longer arranged as a seam along the Z-axis but are randomly distributed over the entire object.
- Random mode
- Random mode on square object
Sharpest Corner: This is usually the default selection and makes the most sense for objects with edges. Cura then looks for the sharpest edge of the object and builds the layer transitions there. The Z seam will then not be as visible. Especially if you have set the extrusion well, the Z seam will be invisible. So unless you have a round object, this is the best setting to hide a Z seam.
- Z Seam on a corner
- Z Seam barely visible on corner
Seam Corner Preference
With this setting, you can set the preference of the slicer where the Z seam is set. If “Random” is selected when aligning the Z seam, this option disappears, as it then no longer makes sense.
There are a total of five choices to tell the slicer where it makes the most sense to place the edge.
None: Except for the settings when adjusting the Z seam, no special preference is made for this selection.
Hide Seam: With this selection, the slicer tries to place the edge on the inside of the model. The transition from the current layer to the next is then preferably not done on the outside of the model but on the inside. This should make the Z seam less pronounced or not visible at all.
Expose Seam: If you want to hide the Z seam, this selection is obviously the wrong one. Here the slicer tries to put the edge on the outside of the model, making it more visible. For most objects, this is not really useful, but it can be used for special cases.
Hide or Expose Seam: Here Cura sets the seam either outside or inside. This setting is also not useful if you want to hide the seam.
Smart Hiding: For some objects, it is very difficult to place the seam at the innermost edge. With smart hiding, Cura uses the next edge further out when the innermost edge is too inconvenient to print.
Z Seam Hiding – PrusaSlicer
Z seams can also be hidden with PrusaSlicer. You can place them in a specific location, similar to Cura, or randomize them on the object.
But there is another interesting feature that allows you to paint the Z seam on the model. This way you can define the places where the Z seam is allowed to appear and define areas where a Z seam is not allowed to appear at all.
Seam Position
- Aligned
- Nearest
- Random
Random: Just like in Cura, this setting will randomly distribute the Layer transitions along the Z-axis. This means that the start of the next layer is always somewhere else, which means that no seam can occur. However, this can cause randomly distributed print defects over the whole object. This setting only makes sense if you have a round object, have optimized the extrusion setting and the object has to be viewed from all sides. For objects with edges, other settings are always preferable.
Nearest: This option places the seam in the next edge. If you have optimized the extrusion a bit, this will make the Z seam practically invisible. This setting makes the most sense for objects with edges.
Aligned: This setting does much the same thing as the previous one, but it selects the edge closest to the starting point of the previous layers. This will cause the Z seam to overlap across the entire object (even round objects).
Rear: Here the Z seam is placed in a corner just as with “Nearest” or “Aligned”, but as far as possible to the rear of the object (as far in Y max direction as possible). So this setting combines hiding the Z seam in a corner and orienting it to a place that is not in focus when viewing the model. So you can hide the Z seam in two ways.
Painting the Z Seam
If you don’t trust the slicers’ algorithms and want to put the Z seam in a very specific place, this is the setting for you.
Here you can use your mouse to define areas on the object where the Z seam is allowed and exclude areas where the layer transition is not allowed.
- Blue: Enforce seam; Red = Block seam
- Sliced Result
For some objects, it can make sense to place the Z seam at a specific point on the object that is not an edge. It is even possible to create curved lines that move along the Z-axis across the model.
Of course, such individual Z seams cannot be specified to the algorithm. This feature is exactly right for such applications.
Vase Mode
The Vase Mode (in Cura “Spiralize Outer Contour”) can prevent the Z seam completely. In PrusaSlicer the function also exists as “Spiral Vase Mode”.
Vase Mode in CuraVase Mode in PrusaSlicerIn vase mode, you can print objects that consist of a single layer wall quickly and without a visible Z seam. The layer transitions are not abrupt as in a normal print, but occur as a smooth transition from one layer to the next.
The printhead does not stop at a layer transition, but simply continues printing while it moves upwards in the Z-direction to the next layer and continues moving in the print direction.
The prerequisites of a Z seam are therefore no longer given. With very coarse prints you can see the slight change of direction in the Z-direction on closer inspection, but no blobs of over-extruded filament.
The extrusion always remains the same in Vase mode and therefore cannot produce a visible Z seam.
In Cura, you can activate an additional setting in the vase mode to smooth the movements of the print head even more.
- No Seam
Disclosure: This website is the property of Martin Lütkemeyer and is operated by Martin Lütkemeyer. Martin Lütkemeyer is a member of the Amazon Services LLC and other Affiliate Programs. These are affiliate advertising programs designed to enable websites to earn advertising revenue through advertising and linking to Amazon.com and others. Links marked with * are affiliate links.
(There is a solution) How to get less Z-seam?
ultimaker-cura anycubic-chiron
I printed this Seductive Vase from the Universe of Things and it came out pretty well on my Chiron.
However, I am not happy with the Z-seam, which is very large. When I look at other people's problems with it, they often seem like too small threads in a seam, but I have too many. What setting should I change to make it less noticeable?
- Printer: Anycubic Chiron with Marlin 2.
 0.7
0.7 - Material: PLA
- Slicer: Cura 4.8.0.
- Nozzle: 0.4 mm
All Cura settings are here (except I lowered the print temperature to 200 ºC while printing).
All used files and some photos are here.
2021-03-07 Addition of after I made 19 proof prints of a small part of the neck of the vase. Below are some of my notes:
- Comb Mode=Better Than Off
- Speed \u003d 60 is worse than 40
- Retract In front of Outer Wall=On. worse than Off.
- Exterior wall line 0.45 to 0.35 wide gave a Z-joint on the outside with a large extension
- Line width of interior wall(s) from 0.45 to 0.35. Some places have less contact between layers and are therefore less attractive and less reliable. In addition, less material is used.
- Wipe the outer wall 2.0 cm from the seam (too much) and also make a ditch in front of the Z-seam (on the outside of the ring).
- Roll forward has tripled to Vol=0.
 588 and the 5.0 wipe distance is more attractive. Two changes at the same time make it impossible to know which one helped. 5 mm is not enough to completely wipe.
 - 50% printing speed improved Z-seam and surface smoothness
In the future I will use a slower speed for the outer walls, test wipe distance=2*Linewidth, use brushing (disabled due to some advice to do this when using LIN_ADVANCE) and experiment with faster retractions and Z-movement. Photos and full notes are available here.
@Dotswe, #5
Discussion
4 Reply
Best answer:
▲ 2
Convex seam is caused by a number of factors, in particular:
-
Mater layer change point (including the time spent on the Z-travel). This can be mitigated by increasing the maximum speed and Z acceleration and/or enabling retraction when changing layers with a very fast retraction speed and non-reaction (not doing this very quickly, time spent retracting has the same effect as time spent to move Z).

-
Excessive extrusion is caused by pressure remaining on the nozzle during deceleration. This can be mitigated by turning on Linear Advance and adjusting the K factor to match the properties of the Bowden tube and your printer material. A value around 0.5 is probably what you need for PLA on your printer. Increasing the acceleration limit to reduce the time it takes to accelerate/decelerate can also greatly mitigate this problem.
, @ R.. GitHub STOP HELPING ICE
▲ 4
This Cura support page lists shell configuration options, specifically:
Seam angle preference
By default, the Z-seam is hidden as much as possible. However, for some projects, especially those that require post-processing, seam exposure may be necessary for post-print processing. To do this, you can configure the following parameters:
- No: The seam will remain in place of the Z-seam alignment.
- Hide the seam: The seam will be hidden as much as possible.
- Expose the seam: The seam will be exposed as much as possible.
- Hide or show: The seam will be hidden when possible and revealed when there is no other choice.
You don't have "Nothing" in your environment. You may need to set it to "Hide Seam".
, @ agarza
▲ 6
Shell menu has Cura option to select random seam alignment:
Aligning the Z-seam
This setting lets you choose where each new layer starts in the Z direction and affects where the model's seam will be. This is useful for models with successive equal layers, as the seam may be visible. By changing the alignment of the Z-seam, you can reduce the visibility of the seam. The following options are available:
- User defined: Set the coordinate for the X and Y direction of the Z-seam.
By default, this coordinate is absolute. Example: X 100, Y 200 will move the seam to the center of the back of the pattern.
- Shortest: The next layer starts at the end point of the previous layer. This is the fastest way to print, but also creates the most visible seam.
- Random: The next layer starts at a random point on the previous layer, eliminating the possibility of a seam. The printing time will increase due to the required strokes.
- Sharpest corner: This places the seam at the sharpest inside or outside corner of the design when available. This is the best way to completely hide the seam.
, @ Trish
▲ 1
Use Cura's "Vase Mode" (known as Spiral Outline ) for seamless printing.
, @ markcosmic
Almost all settings required for normal Cura 3.
 6 printing. Part 2. Filling and material.
 Technical
Follow author
Follow
Don't want
20
Let's continue where we left off. (previous post) Guardrail
7) Aligning the seam along the Z axis.
After printing the first model, which has rounded walls around the perimeter, you may notice a vertical seam or a strip of plastic. This is a consequence of the transition from one layer to another. (Google image)
This setting affects where the next layer will start printing.
1) Acute corner - puts the transition between layers in a corner, which can hide it. Therefore, it is not visible on objects that have any corners.
2)Custom - you must manually set the coordinates to which the Slicer will strive. ATTENTION: it is necessary to activate the settings X coordinate of the seam and Y coordinate of the seam
Strongly spoils the model, saves a couple of seconds.
4) By chance - everything is clear here. the transition point can be anywhere on the perimeter.
8) Seam angle setting
Influences how the seam position will be calculated.
Hide seam - the slicer will try to hide the seam in a 'fold'. For example, for a star, this will be the junction of triangles.
Show seam - the slicer will try to show the seam on the tips of the star. This can be useful if it is possible to cut with a knife.
Show or hide the seam - the slicer will act according to the situation.
Next time look at tab Material . It goes a separate post, because the topic is extensive. I will also touch on the topic of profiles and materials.
Follow the author
Follow
Don't want
20
More interesting articles
17
Follow author
Follow
Don't want to
During one of the attacks of perfectionism, I decided to get rid of the problem of fi.