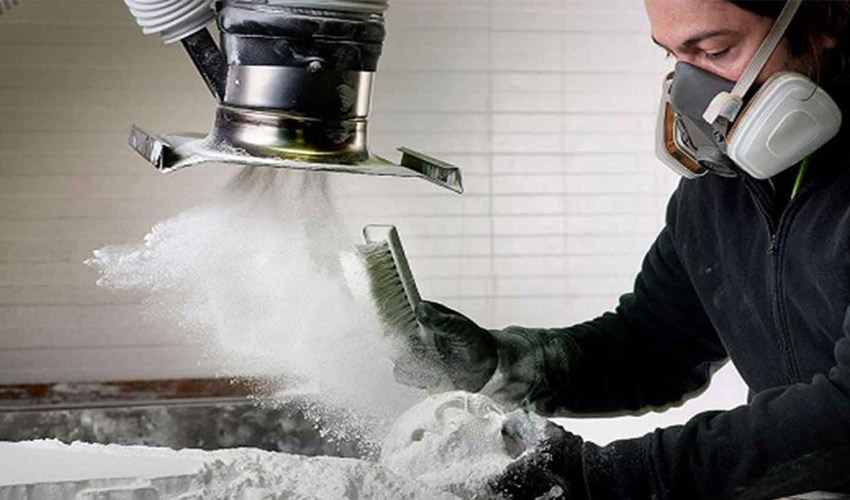
Powder coating 3d printed parts
3D Print Post Processing - Ultimate Guide
Get more from your 3D prints with smoother surfaces, improved mechanical properties, enhanced aesthetics, and more.
Get an overview of 16 post-processing techniques in this guide or see some real life examples in the ebook and webinar:
SMOOTH SURFACES
Reduce the appearance of print layers and refine surfaces
Strengthen Parts
Reinforce prints for added strength and durability
ADD FUNCTIONALITY
From UV and weather resistance to conductivity and more
AESTHETIC FINISHING
Transform the surface appearance for visually striking parts
All 3D prints are produced layer by layer, which results in a notched surface texture that is more pronounced with lower print resolutions. If support structures are needed for your part, it may have additional flaws on its touch points. This guide covers the first step to part finishing, support removal, and the three categories of post-processing: Subtractive, Additive, and Material Changing.
Support Removal
Unless your print is optimized for supportless 3D printing, you’ll probably be printing with support structures. These are usually easy to snap off, but even well designed supports will leave behind imperfections where they were once attached. To smooth these areas, it is recommended to post-process the entire part by any number of methods outlined below.
With dual extrusion you can print soluble support structures that disintegrate in water and leave no trace on your part. They’re especially useful when post-processing isn’t otherwise necessary.
SUBTRACTIVE
The most common post-processing category, subtractive post-processing is the act of removing material from the part surface to make it more uniform and smoother.
ADDITIVE
Additive post-processing puts additional material directly onto printed parts. Additive techniques are highly efficient for smoothing parts while adding strength and other mechanical properties.
PROPERTY CHANGING
Neither removing nor adding material, property changing post-processing redistributes molecules of a 3D print. Smoother and stronger parts are achieved with thermal and chemical treatments.
Subtractive Post-Processing Methods
Probably the most common post-processing category, subtractive post-processing is the act of removing some of your part’s material. Usually this is in the form of sanding or polishing a part, but there are a variety of other methods that includes tumbling, milling, abrasive blasting, and chemical abrasive dipping.
Sanding & Polishing- DIFFICULTY
- SMOOTHNESS
Both sanding and polishing techniques remove surface layers by rubbing it with an abrasive material. Sanding requires coarser grit sandpaper and sanding tools, while polishing may use finer sandpaper, steel wool, polishing paste, or cloth.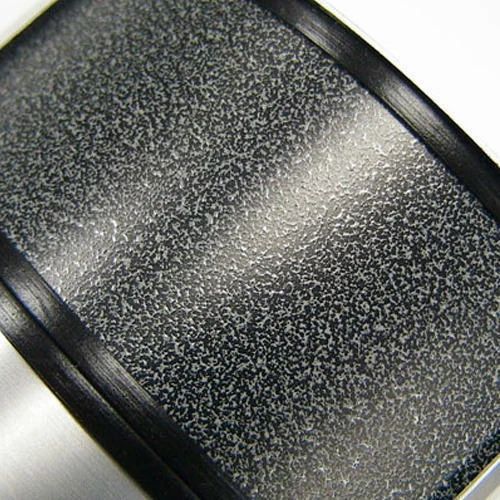
Sanding removes larger blemishes such as support remnants or print irregularities and reduces the visibility of print layers. The sanding process will leave a gritty, although more uniform surface texture, and very course sandpaper will leave surface scratches. Polishing the part after sanding will produce an even smoother surface.
Simplicity and affordability make sanding and polishing the most common methods of post-processing, but both require labor that is time consuming for larger parts and batches. These methods may not be suited for parts with hard to reach cavities.
Tumbling- DIFFICULTY
- SMOOTHNESS
A tumbling machine consists of a vibrating vat containing lubricating fluid and abrasive media, which are specialized stones that wear objects down according to their size, shape, and hardness as they tumble together. A 3D printed part is simply placed into the vat of tumbling abrasive media for a specific length of time. Some expertise is required to pair parts with the correct abrasive media and processing time, but when done correctly it is very effective at producing uniform finishes.
Tumbling is a largely automated subtractive method that can post-process multiple parts simultaneously, which is useful for smoothing batches of parts. Tumbling vats come in a range of sizes so larger parts can also be processed. Since the abrasive media is constantly in contact with the part, larger pieces do not require longer processing time, but only larger machines with the adequate amount of abrasive media. However, complex shapes may lose detail and sharp edges may become slightly rounded by tumbling.
Abrasive Blasting (Sand Blasting)- DIFFICULTY
- SMOOTHNESS
Abrasive blasting, also known as sand blasting, is subtractive post-processing method where abrasive material is blasted onto 3D printed parts at high pressure. For large parts this can be done in an open environment, but smaller parts are typically processed in a containment chamber that collects and reuses the abrasive material. Like other grit-based subtractive methods, there are a range of grits available and grit must be chosen based on part geometry and desired finish. Sand is a frequently used abrasive material, but other small coarse objects such as plastic beads can be used for different results.
Since the abrasive material is smaller than that of tumbling, abrasive blasting is less effective on very rough parts or high layer heights. This method only treats surfaces reachable by the stream of blasted material, so complex geometries and cavities may not be feasible. Additionally, the blasting tool can only treat limited areas at a given time, so this method may be slower and difficult to process multiple parts simultaneously.
CNC Machining (Milling)- DIFFICULTY
- SMOOTHNESS
CNC milling, also called CNC machining, is the inverse of 3D printing - it uses a computer-programmable drill moving (and sometime rotating) in three axes to carve out geometries. Like 3D printers, the technology uses a “G-Code” to program tool movements, in this case a milling bit rather than a filament extruder.
While CNC machining is considered highly accurate from 0.005” to 0.00005”, it cannot produce certain geometries and wastes material, which is often expensive. Conversely, large-format 3D printing cannot achieve the same accuracy, but can achieve much more complex geometries and wastes very little material.
It is typically not time or cost effective to mill the entire surface of a 3D print and it may be difficult to calibrate the milling tool to the print position. But while these two production methods are seemingly at odds, there are some situations where they may be used together. If a portion of a 3D printed part must be extremely smooth or accurate, that specific area can be milled. Alternately, manufacturers can save material by 3D printing a part in a rough finish before milling it to perfection.
- DIFFICULTY
- SMOOTHNESS
Chemical dipping, also called aid dipping, is the process of submerging parts in a chemical bath that eats away the surface. The process involves caustic materials, such as lye, sodium hydroxide, or dichloromethan, and should only be done by experts in facilities with the requisite safety features. The appropriate chemical choice is entirely dependent on the material of the 3D print, as the chemical must be abrasive to the print material.
Some expertise is required to determine how long parts should remain submerged: too brief and the part will not be sufficiently smooth, too long and it could be ruined entirely. Some care should be taken to avoid air bubbles trapped inside the 3D print as they will prevent the chemical treatment of the surface. Typically the submerged part is gently moved to agitate the chemical bath and release any air bubbles.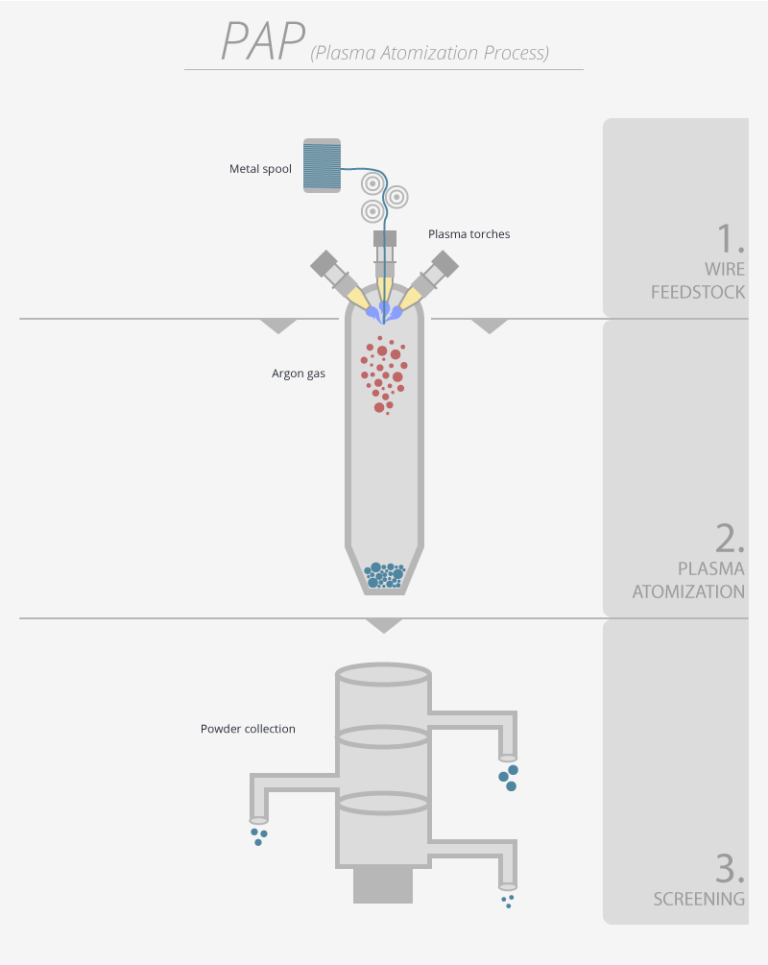
The process is ideal for complex geometries as the chemical bath treats all surfaces of submerged parts simultaneously. However, the size of the chemical dipping container determines the limited part dimensions of treatable prints.
Additive Post-Processing Methods
Additive post processing puts additional material directly onto printed parts and is highly efficient for smoothing parts while adding strength and other mechanical properties. There is a wide spectrum of methods from filling to priming, coating, metal plating, and more.
Filling- DIFFICULTY
- SMOOTHNESS
Filling is a surface treatment that uses a thick adhesive compound, typically a paste, to fill in notches like the tiny gaps between layers of a 3D print. It is commonly used as a first step before sanding or additional additive layers. A wide range of fillers from pastes to sprays are available in many materials from light spackle to 2K resins.
Paste fillers, like wood fillers or household spackle, are usually the most accessible option. They are simply spread over the part surface and can be easily smoothed with light sanding. Spray fillers are easy to apply but provide only a thin surface covering, resulting in a rougher coating. More robust, but more advanced options are resin fillers that must be cured by one of two methods: mixing with a hardener or UV exposure. Resins are available with various viscosity, cure speeds, and advanced features like UV and a high heat deflection temperature. For some UV-cured fillers leaving parts in the sun may be sufficient, but others will require a specialized UV chamber.
When using any kind of resin cover skin, wear gloves, and keep the working space well ventilated. Ensure you’re familiar with the requirements of your filler or coating before applying it to a part as this may drastically change the time or equipment required for post-processing.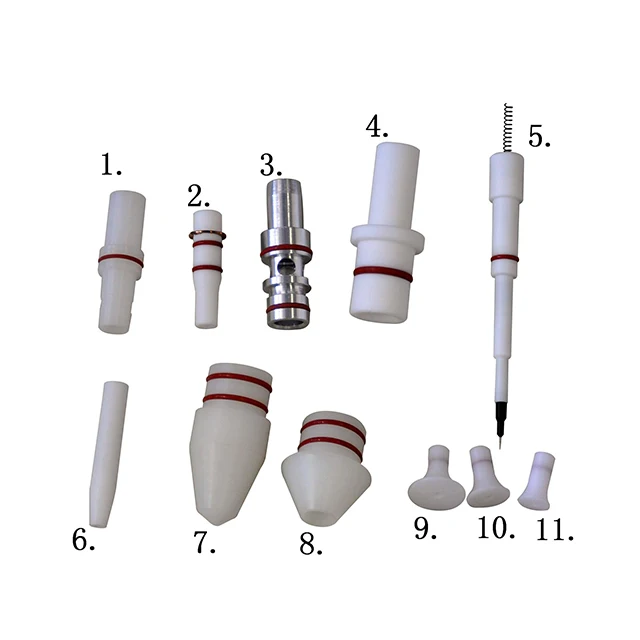
- DIFFICULTY
- SMOOTHNESS
Primers prepare 3D-printed parts for the addition of subsequent layers by pre-treating the surface for better adhesion. They are far less viscous than fillers and may only smooth very small surface imperfections, so their main function is adhesive surface preparation. Primers are available in spray or brush form, but spray primer may produce a more even coating.
To prime a part most effectively, the imperfections and layers notches should first be reduced by other post-processing methods such as sanding or filling. Ensure that your primer is made for plastic adhesion and is suitable for additional materials you intend to apply later. Leave the primer to set for 24 hours or as otherwise directed.
Brush Coating- DIFFICULTY
- SMOOTHNESS
Liquid coatings vary widely in material such as paint, varnish, resin, or even plastic. While there are several application methods, brush coating is the simplest way to smooth unique or small batches of 3D printed parts. Although the surface smoothness may be inconsistent due to brush strokes, choosing a material with the proper viscosity can avoid these surface irregularities.
For a robust and smooth surface apply a 2K resin, which is a two-component mixture of resin with a hardener. When combined, the mixture creates an exothermic chemical reaction that cures the resin over a given amount of time. There is a huge range of resin products for a variety of uses: laminating resins for thin surface applications, casting resins for larger volumes, fast and slow curing resins, and resins with additives (like aluminum, for example) for additional performance enhancement such as temperature, UV, or chemical resistance. To achieve the smoothest surface when brush coating, use a resin with an appropriate “self-leveling” viscosity that will even out brush strokes without material dripping off the part.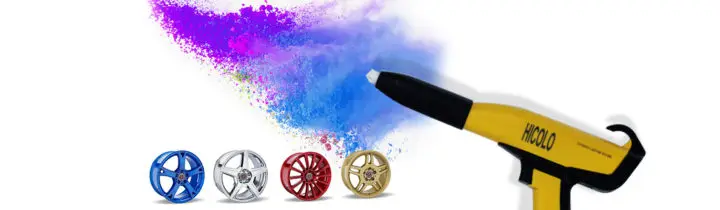 There are resin products specifically formulated for 3D prints that can achieve very smooth surfaces after one coating.
When brushing other materials such as paint or varnish it may be more difficult to avoid brush strokes, but many coatings can be sanded after drying to achieve a smoother surface. It is also possible to apply an additional coating of another material, 2K resin for example, to achieve a smoother final result.
Spray Coating- DIFFICULTY
- SMOOTHNESS
A wide-ranging and scalable post-processing technique, spray coating a offers a number of viable methods ranging from DIY projects to robotic automation at an industrial scale. Spray coatings are available in a huge variety of materials such as paint, varnish, resin, plastics, and rubbers, just to name a few.
The simple approach for DIY projects is a spray can of a chosen material applied in a ventilated/outdoor space.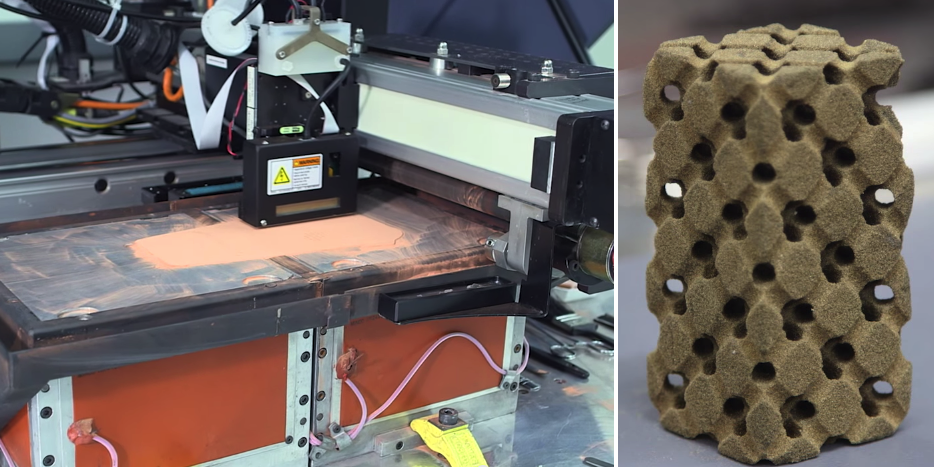 Since this method typically results in minimal surface smoothing, it is recommended to sand the part first and apply several spray coats. Applying a spray primer may help the spray coating adhere to the part. Spray paint can be used for aesthetic enhancements and spray varnish can protect the surface against chipping, wear, and UV damage.
For large volume or industrial spray coating applications, a robotic arm fitted with a spraying tool head can apply a wide range of coatings to a 3D printed part. The application typically takes place in spray booth with an adequate air filter. This method allows a wider range of materials, including 2K spray coatings, primers, paints, and more, and results in higher application precision and uniformity. A robotic arm will speed up the processing time and make high-volume post-processing feasible at an industrial level.
Spray coating is most suitable for finishing large parts, rather than other additive methods such as dipping, foiling, or powder coating. The later methods all require a machine or vat that can contain the entire part, whereas spray coating is only limited by the size of the room in which it is done.
- DIFFICULTY
- SMOOTHNESS
In foiling, or vinyl wrapping, an adhesive foil made of light metals or plastic is wrapped onto an object, often preceded by priming. Commonly known for wrapping vehicles, vinyl wrapping can also be applied to 3D-printed objects with a suitable material. Depending on the material, the foil may increase heat and stress resistance but is often applied for aesthetic enhancement like smoothing and surface quality.
The difficulty of this post-processing technique varies with the size and complexity of your part. A simple geometry, like the gently curved side panel of a vehicle, is relatively easy to foil, but complex shapes are more difficult with some being impossible to foil.
Wrapping is particularly suitable to apply detailed surface designs to 3D-printed parts. Adhesive foils come in a wide range of colors and patterns, as well as custom-printed designs. Foil can be applied by hand, stretching the material over objects to ensure no imperfections like air bubbles remain. Heat guns are often used in the process to make application easier and avoid imperfections. Vacuum foiling will automate the process for faster, precise results to ensure the material wraps around the part as perfectly as possible.
Foiling is usually not suitable for complex parts as the foil will be extremely difficult to apply uniformly and inside cavities.
Dip Coating- DIFFICULTY
- SMOOTHNESS
When dip coating, a part is submerged into a vat of material such as paint, resin, rubber, etc. and removed after a specified time, resulting in an even surface distribution. The part can be redipped multiple times for a thicker coating and smoother surface. Dipping can be used for aesthetic finishing and functional enhancement like increased strength and resistance to heat, chemicals, weather, etc.
The typical dipping process is comprised of five stages:
- Immersion: The 3D printed part is immersed in a vat of material at a constant speed.
- Start-up: The part remains submerged for a specified time for the coating to adhere.
- Deposition: The part is removed at a constant rate as a thin layer of the material is deposited.
- Drainage: Excess material will drip off of the part surface back into the vat.
- Evaporation: As the coating sets the solvent evaporates from the material, leaving a solid film.
Hydro dipping, also known as water transfer printing is a unique method for applying detailed designs onto a 3D print. The part is submerged in a vat of clean water that has a layer of material floating on its surface, typically a water soluble printed film or an oil based paint. As the part passes through the floating layer, the film or paint adheres to the part’s surface. The surface tension of the water ensures that the film curves around any shape. The best results are achieved with parts containing gently curving geometries.
Dip coating is suitable for complex geometries and requires some expertise in the coating material used. The size of the vat determines the dimension of treatable parts. Large prints may not be feasible, although batch processing is possible for smaller parts.
Metal Plating- DIFFICULTY
- SMOOTHNESS
Metal plating is a chemical process where a layer of metal is bonded to a 3D printed part. It is a highly effective method to create 3D printed objects with high resistance to heat, impact, weather, and chemicals, or to create conductive parts.
The first step in metal coating plastic parts is "electroless plating" which metalizes the surface of the print, priming it for proper metal plating. This process ranges from special metal paints that are simply brushed or sprayed onto the part to industrial processes involving numerous steps of cleaning, etching, neutralizing, activating, etc. Typically, this first layer is copper or nickel, although silver and gold layers are also possible.
In the second step in metal plating, the metalized 3D print is submerged in a bath for a specific length of time to deposit a wide range of metals like tin, platinum, palladium, rhodium, and even chrome. In electroplating, the part is placed in a galvanic bath that deposits a thin metal layer from 1 - 50 microns thick. Anode and cathode ions pass through the liquid and adhere to parts in microscopically fine layers. Additional metal plating processes can build up the metallic surface thickness or deposit a different metal material.
When using a metal-acid solution, parts are submerged in the liquid solution for a specific duration, depending on the desired plating thickness.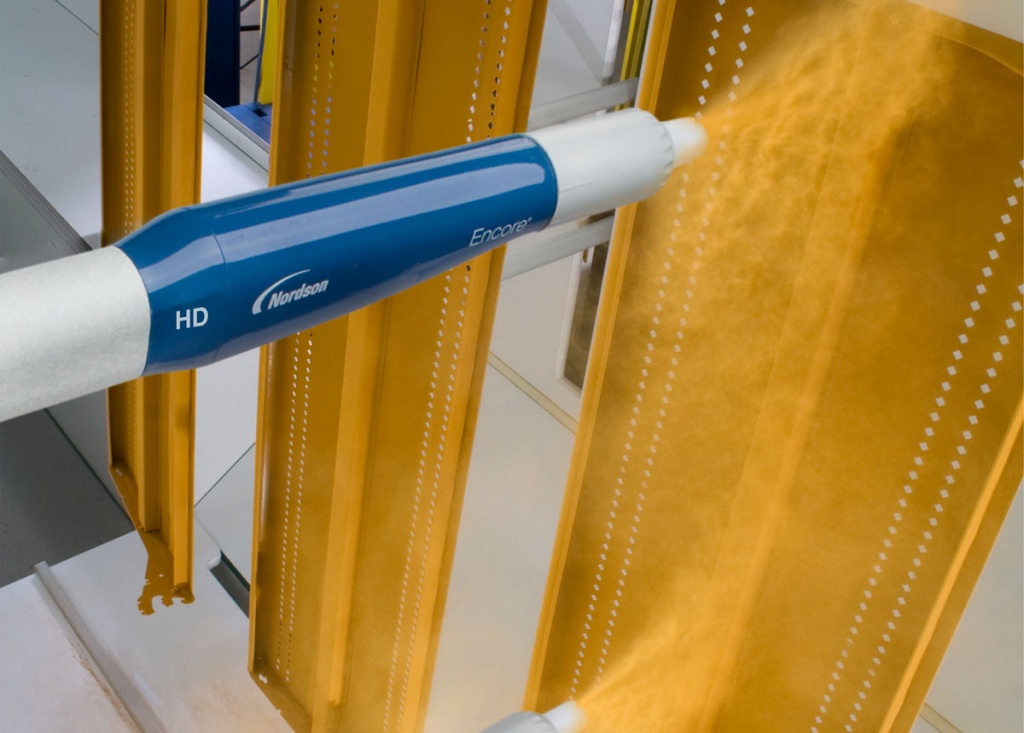 A chemical reaction attracts and adheres the metal ions to the surface of the part. Once removed from the bath, the part can receive a protective coating to prevent oxidation, corrosion, or tarnishing. Heat treatments may be used to strengthen the metal layer adhesion and prevent brittleness.
Metal plating typically works well for complex parts and can produce a range of surface qualities, smoothness, and mechanical enhancements. However, the process requires many stages and expertise.
Powder Coating- DIFFICULTY
- SMOOTHNESS
With powder coating, also known as rotational sintering, a part is heated and rotated within a cloud of powdered plastic. As the powder compound meets the heated part, it is melted to the surface to produce a fine coating. Due to surface tension while spinning, the adhered powder produces a homogeneous, non-porous layer about 400-microns thick. The surface is typically not glossy smooth, but rather has a fine matte texture caused by the plastic cloud particle size, typically 2-50 microns.
Powder coating is a common method for protecting large metal components, but it is difficult to achieve with 3D prints. In traditional powder coating, the metal parts experience temperatures up to 200 °C, but the lower temperature resistance of most 3D printed plastics greatly limits the use of a post-processingsing method. When possible, powder coating is highly efficient for batch production with uniform surfaces, although cavities may be difficult to post-process.
Property Changing Post-Processing Methods
Neither removing nor adding material, property changing post-processing redistributes molecules of a 3D print. Smoother and stronger parts are achieved with thermal and chemical treatments.
Local Melting- DIFFICULTY
- SMOOTHNESS
Local melting is an easy way to reduce the appearance of surface scratches from damage, support removal, or abrasive post-processing like sanding. Rough surfaces are particularly visible on dark-colored 3D prints, which appear to be a white-ish color. Using a heat gun set to high heat, quickly pass hot air over the area requiring treatment, keeping the heat gun 10-20 cm away from the part. Within seconds, the surface will melt to resemble the original print surface quality. A heat gun can also remove strings from travel moves during printing. Using the same method as described above will melt and shrink the strings. If the strings are large, small remnants may cling to the part but are often easily removed by brushing or clipping them off.
This method is not suitable for deep scratches as it is only effective for light surface roughness. It also can easily deform the part, so take care to limit the time an area is heated. The best results are achieved by sweeping hot air across the surface for several seconds. Local melting is not recommended for overall surface smoothing, but for the easy and effective smoothing of small defects and scratches.
- DIFFICULTY
- SMOOTHNESS
Annealing is the process of heating a print to re-organize its molecular structure, resulting in stronger parts that are less prone to warping. Untreated 3D prints have an amorphous molecular structure, meaning that the molecules are unorganized and weaker. Being a poor heat conductor, the extruded plastic cools quickly and unevenly during the printing process causing internal stresses, particularly between print layers. These stress points are most prone to breakage.
To strengthen the part at its molecular level, it is heated to its glass transition temperature, but below its melting point. Achieving the glass transition temperature allows the molecules to redistribute into a semi-crystalline structure without melting the part to the point of deforming. Glass transition and melting temperatures vary between materials and some expertise is required to heat parts to the correct temperature for the proper length of time. 3D prints will shrink during the annealing process, which can be corrected by increasing the original printing dimensions accordingly.
- DIFFICULTY
- SMOOTHNESS
Vapor smoothing is the chemical process of smoothing 3D prints in which parts are exposed to vaporized solvents in an enclosed chamber. Similarly to chemical dipping, the correct solvent must be used in correspondence with the 3D print material. The cloud of solvent dissolves the surface of the print, while its surface tension redistributes the dissolved material, resulting in a smoother finish. Unlike chemical dipping, no material is actually removed from the part.
Solvents can either be heated to a gaseous state or vaporized by ultrasonic misting. The 3D print is exposed to the vaporized solvents for a specific length of time: too short and the part is not adequately smoothed, too long and the part can deform and become brittle. Most suitable solvents are caustic and combustible, and therefore require extreme levels of caution, adequate chemical containment, and disposal, and should only be handled by qualified persons.
Many vapor smoothing machines are available for use with a variety of solvents suitable for different print materials. These machines make the process automated and much safer, but most can only treat smaller parts due to the chamber's limited dimensions.
Post-Processing eBookFor real life industrial examples, download our free eBook Post-Processing for FFF Prints and see this webinar about post-processing techniques.
The eBook explores the three types of FFF post-processing techniques: 1) Material Removal, 2) Material Addition and 3) Material Property Change. Also, learn more about how various techniques like high resolution tumbling, resin coating and aluminum plating are transforming 3D printed parts.
3d Printing Post Processing FAQs
What is 3D printing post-processing?
Once the printer has finished printing, there may still be some work to do on the printed piece. For example, many shapes require supports to print properly. Removing those is a post-processing task. Some people might want to sand or put a finish layer onto a piece. Resin, as opposed to filament, based prints need to have any uncured resin washed off and final curing under UV light.
3D printing post processing is used to enhance the surface properties of prints in many aspects to deliver improved mechanical performance and aesthetic appearance. By improving these key surface characteristics, post processing widely extents the range of use cases and applications across all industries. 3 types of post-processing techniques can be applied to fused filament fabrication (FFF) prints:
- Material Removal
- Material Addition
- Material Property Change
How do you post process PLA 3D prints?
Almost every 3D print requires some sort of post-processing after it’s printed.
Usually this involves 3 steps:
- Removing support structures
- Sanding or polishing
- Painting or coating
What is the most critical step in the post processing process of 3D printing FDM parts?
When post processing your 3d printed part, there are 2 steps that are most critical:
- Removing the part from the print bed
- Removing the support structures from the part
In both steps you need to be careful, not to break your 3d printed part. To lower these risks, you can try using flexible print beds and water-soluble support material.
How do I complete FDM parts?
When producing your FDM part, often the finished look matters just as much as the functionality. There are 4 ways to complete FDM parts.
- Remove any support structures
- Smoothing your print
- Filling the gaps
- Painting your part.
Can acetone smooth PLA?
When PLA and acetone smoothing works, it's due to other materials added to the PLA. Most PLAs and similar non-acetone-dissolving 3D printer filaments cannot be smoothed the same way. That's because PLA in its pure form is not reactive to acetone.
Do I need to cure 3D prints?
It is necessary to cur SLA prints; you don’t have to cure FDM prints. Even though cleaning off any uncured resin is a great start, the step that really brings out the quality of your 3D print is the curing . A high wavelength UV light has the intensity to cure the entire part, it just takes longer for thicker, more solid parts.
Ultimate Guide to Finishing 3D Printed Parts
Time to read: 13 min
The purpose of this article is to detail the different finishing methods for FDM and PolyJet 3D printed parts and the techniques/tips that can elevate the look and feel of your prototypes.
A simple Apple Watch stand design will be utilized as a case study. This stand is a model with pockets and internal and external features that needs to be surface finished to a standard that complements the shiny exterior of an Apple Watch put on it.
Here’s a quick overview of the main points this article covers:
- PLA: If you’re working with a tight budget then PLA is going to be your best material choice; the results aren’t as polished but the price is cheapest.
- ABS: If your budget is moderate then go with ABS. It’s not as cheap as PLA but still at a low price point and the material is more reliable than PLA.
- VeroBlack or VeroWhite: For the highest quality parts go with VeroBlack/VeroWhite. This will give you the best dimensional accuracy and best overall polished look.
The 3d printing post-processing needed for the watch stand parts involves a combination of repairing and preparing the print for post-processing, sanding, and painting.
The finished sample 3D printed parts with all three materials should be smooth, matte black surfaces. Inherent to the 3D printing process, with every print are unique challenges and considerations to arrive at the best finish possible. Although there are ways to mitigate the challenges, experience in 3D printing goes a long way.
The print settings process for each material is detailed separately and a summation of the results may be found in the conclusion of this article.
ABS (Printed on a Dimension Elite)
The Dimension Elite prints are smooth, clean, and ready to sand out of the NaOH bath.
There are, however, clear stepping lines between the printed layers. If we don’t remove these stepping lines, they’ll show up in the final paint coat which will ruin our smooth finish. Thankfully, removing these will be easy thanks to ABS’s high melting point and easy sandability.
Materials Needed
The materials we’ll be using:
- Sandpaper (grits 100 to 600)
- Medium, fine, and extra-fine sanding sponges
- XTC-3D brush-on coating (As an alternative, Bondo putty is a common solution to fill holes in parts. We chose XTC-3D for its viscosity, sandability, and ability to penetrate small perforations, which makes it desirable over Bondo putty)
- Razor blade
- Foam brush, mixing cups and popsicle sticks
- Sandable Krylon Primer
- Montana Acrylic Primer in Shock Black
- Matte Acrylic Varnish
Sanding
Sanding the ABS print is simple and straightforward. First start with 100 – 200 grit sandpaper to remove stepping lines and then gradually increase up to 600 grit to achieve a smooth finish without sanding lines.
Pro Tip: Sand in small circular movements evenly across the surface of the part. Avoid sanding in one direction only, especially in the direction of the stepping lines to prevent striations or “trenches” in the print.
Beware that ABS is very easy to sand, so be careful not to overdo it. Removing as little as .010” can be enough to completely remove any stepping layers and oversanding can compromise critical dimensions.
After sanding the parts, some holes are revealed on our part left by an incomplete layer around the letters DIM. These holes can perforate through the finished paint coat to create ugly sinkholes, so we need to find a solution.
As you can see in the Catalyst tray to the right, there are large holes between the DIM and the edge of the part. Moving the DIM up in our Solidworks model would solve this, but for now we’ll have to find a way to fill these holes with a sandable filler.
We’re going to use a thin, sandable epoxy called XTC-3D to fill the tiny holes and crevices in our print. XTC-3D is cheap (a 24 oz bottle costs about $25), quick, thin, and effective. Note that a small amount goes a long way (within the 10 minute pot life).
Pro Tip: Be sure to maintain a weight ratio of 100 Part A to 42 Part B. Mix thoroughly for one minute and coat your part within the 10 minute pot life. For more details, check Smooth-On’s technical bulletin here, and a great instructional example here.
Before applying the XTC-3D, wash the part with soap and dry with compressed air to ensure your part is thoroughly clean and free of any oils or sanding dust. Also make sure to wear gloves so as not to get any hand oils or sweat on your part.
Fill in holes or gaps in your print with a very thin (1/64”) coat; a thin layer of XTC-3D will level itself out. We used a razor blade to scrape excess XTC-3D into the unwanted holes and gaps, making sure to avoid any areas we didn’t want filled (like the letters DIM).
Allow the XTC-3D sufficient time to become tack-free dry (approximately 2 hours). Now we’re ready to continue sanding away at the excess XTC-3D layer with 300 to 600 grit to reveal the repaired surface.
Then, after another thorough wash, we’re ready to begin preparing our repaired surfaces for painting.
Priming and Painting
Painting 3D printed parts is a vast world of acrylics, enamels, sprays, and airbrushes.
In this example, we’ll be using Montana spray can paints to follow a relatively straight forward process: prime, dry, paint, dry, varnish, dry.
Standard spray painting principles apply:
- First make sure your surface is oil-free, dust-free and hole-free
- Shake your cans for at least two minutes prior to painting
- Ensure your cap is clean to prevent drips
- Be aware of how the paint is accumulating on the part and look for any pooling or dripping
- Paint in many light coats rather than fewer heavy coats; this is especially important for 3D printed parts with internal and obscured geometries
- Paint in controlled, well-ventilated and well-lit areas
The Dimension prints started with very obvious stepping between layers. If you’ve sanded properly up until now to create as smooth a surface as possible, these layers shouldn’t show up in your final paint finish.
The finished ABS part is matte black and smooth to the touch with very little evidence of layering in most surfaces. A few important results to note here:
- Sharp internal pockets are tough to sand. After about 30 minutes of sanding, we still had a hard time removing all the layering and the stepping shows up even after priming, painting, and varnishing the print.
- Because we had to remove more surfaces from the sanding, there is some sacrifice in regards to the final geometry of the part.
- Filling the incomplete layer with a thin coat of XTC-3D worked very well; those holes are invisible in the final paint layer.
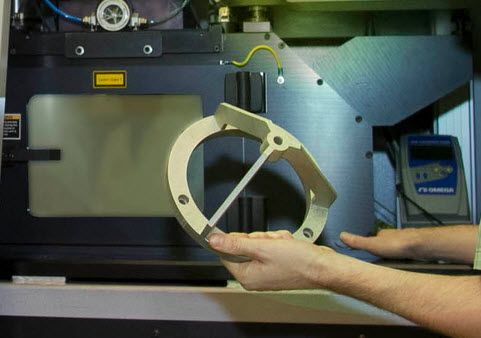
VeroBlack (Printed on an Objet30)
Thanks to .0011” resolution, the Objet30 prints have some stepping between layers, but nowhere near as obvious as in our FDM prints.
The Objet30 prints come out of the printer with a thick layer of support structure material so before we can begin finishing our VeroBlack part, we’ll need to remove this support structure and the residue it leaves behind.
VeroBlack 3D Printed Part Materials NeededThe materials needed for post-3D printing finishing:
- Sandpaper (grits 100 to 600)
- Medium, fine, and Extra fine Sanding Sponges
- Sandable Krylon Primer
- Montana Acrylic Primer in Shock Black
- Matte Acrylic Varnish
Start with 100 grit sandpaper to wet sand the residue and gradually move to wet sand with 300 grit sandpaper; the residue will fall off in small soft white chunks. This is the hardest part of the VeroBlack finishing process and it took us about 30 to 40 minutes to remove all the residual layer.
After removing the residual layer by wet sanding utilizing 300 grit sandpaper, the surface of the part will begin to feel smooth. If you rub the part with your fingernail, you’ll feel it’s harder and more plastic-like beneath the gummy residual coat. Continue wet sanding through to 600 fine grit sandpaper until the part is fully smooth.
Pro Tip: Water breaks up the residue, so wet sanding is a highly effective method to get a smooth, residue-free, paintable, and homogenous surface.
Thoroughly clean your part with soap and water before you move on to the next step to remove any additional residue. Again, we recommend using compressed air to dry the part and clear any accumulated dust.
Beware that VeroBlack is like ABS: very easy to sand, so be careful not to overdo it. Once you break through the residual layer, the actual VeroBlack will sand very easily. Removing as little as .005” can be enough to completely remove any stepping layers. Be careful as oversanding can compromise critical dimensions.
VeroBlack 3D Printed Part Priming and PaintingNext, we’re going to paint the VeroBlack part just as we did the ABS part: using Montana spray can paint with the following process: prime, dry, paint, dry, varnish, dry.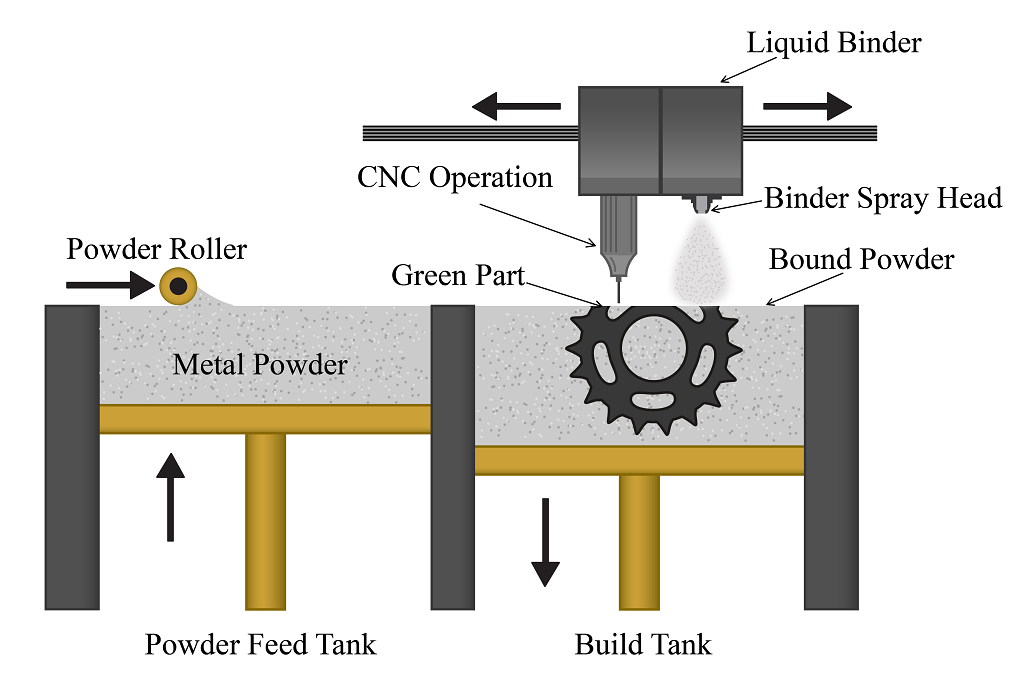
Standard spray-painting principles apply:
- First make sure you have a good surface quality which is oil-free, dust-free and hole-free
- Shake each paint can for at least two minutes prior to painting
- Ensure your cap is clean to prevent drips
- Be aware of how the paint is accumulating on the part and look for any pooling or dripping
- Paint in many light coats rather than fewer heavy coats; this is especially important for 3D printed parts with internal and obscured geometries
- Only paint in controlled, well-ventilated, and well-lit areas
The finished VeroBlack part is matte black and smooth to the touch. A couple points to note here:
- Some of the internal corners were not sanded enough to remove the residue, so you can see how the paint powdered up in these areas.
 This will likely result in peeling paint over time.
 - Although very little stepping is visible on the part, you can see slight evidence of it here. This part could have probably used 30 more minutes of thorough sanding.
Now for the dreaded PLA, a notoriously difficult material to finish. But with some tricks and patience, it too can join ABS and VeroBlack in the ranks of matte black glory!
This Replicator print came off the plate with severe striations: see the parallel grooves in the layers of the part above. This could be a result of machine quality, but for now we’ll just have to find a way to maneuver these striations to a smooth part.
Sanding PLA is difficult, in part because of how soft and gummy it becomes if you try to sand too aggressively or quickly, so we’ll explore options on how to smooth 3d prints with minimal effort and abrasion.
PLA 3D Printed Part SandingIf you choose to sand the PLA directly, the process is straightforward. Note: PLA acetone smoothing is not advisable. PLA smoothing is not as forgiving as ABS when it comes to sanding and abrasion, so you will likely spend more time removing the stepping between layers, especially with the severe striations in a print like ours.
Begin with a low (100 – 200) grit sandpaper, sanding away at the bumpy striations and any raft or support material (aluminum foil) left behind. Particularly in the case of MakerBot support, it’s easiest to remove them with a flush cutter or pair of pliers and brush them with a rotary multi-tool first before sanding away at them.
Depending on the size and geometry of your part, you’ll likely be stuck in the 100 – 300 grit sandpaper range for a while to smooth out striations and pesky support structure remnants.
Once layering and striations are less prevalent, move through finer grits (400 – 600) sandpaper to achieve a shiny surface ready for priming and painting.
Pro Tip: Patience is key when sanding PLA. Turn on a movie or your favorite show, but don’t zone out! Sand in small circles evenly across the surface of the part. If you’re using a sanding multi tool on PLA, be careful not to overheat/melt your 3D printed part.
An alternative method to sanding PLA prints directly is smoothing the PLA print with the XTC-3D first and then sand on top of the coating.
PLA 3D Printed Part FinishingWe’re going to use XTC-3D to create a smooth, sandable, paintable layer of epoxy clear coat glossy finish around our PLA print.
Before applying XTC-3D, ensure that your part is thoroughly clean, free of any oils and sanding dust (sensing a pattern yet?). Wash the part with soap and dry with compressed air to clear any dust. Again make sure to wear gloves to protect both your part and your hands.
Brush on the XTC-3D in a thin (1/64”) coat; as long as the coat is thin enough, it will level itself out. Between coats, leave 1.5 hours for the XTC-3D to dry.
It may be difficult to coat an entire part at once, so don’t be afraid to do it in sections, making sure to keep overlapping to a minimum between sections. Wait 90 minutes between first and second coats and after you’ve finished wait 2 hours to allow the shiny surface to become tack-free.
With striations as severe as ours, it will take multiple coats to get a smooth uniform surface, so patience is key. Remember that multiple thin glossy finish coats will level better than thick coats.
Pro Tip: Internal pockets are susceptible to pooling so be careful to suck up or remove any pooling that occurs before the XTC-3D begins to dry (that’s what we’re doing in the left picture above).
Beware that XTC-3D may compromise critical dimensions, but applying thin glossy finish coats will allow you to minimize the additional material.
After the XTC-3D layer has hardened (two hours after application of the last coat) it should be ready for sanding. Follow basic sanding guidelines, starting with 300 grit sandpaper (thanks to the smoothness of the XTC-3D) and sanding in small circular movements to even the surface. Any wavy patterns may require a coarser grit sandpaper to remove.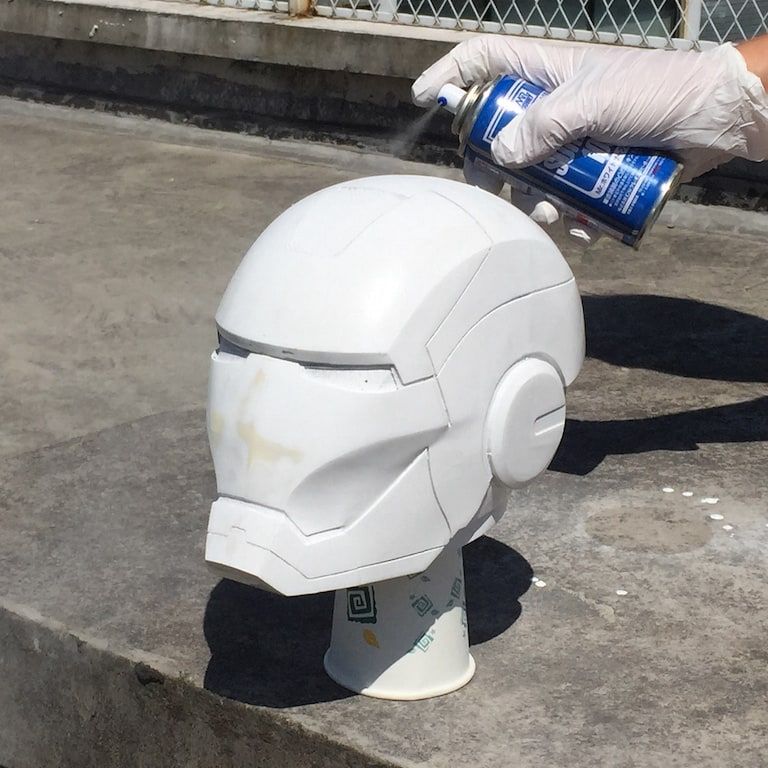
The sandpaper will scratch up the XTC-3D coat; focus on getting a level surface, moving through to 600 grit sandpaper.
After you’ve finished sanding 3D prints, make sure to thoroughly clean your part with soap and water and then dry using compressed air before moving on to the next step.
PLA 3D Printed Part Priming and PaintingPainting PLA parts follows the same process as the ABS and VeroBlack parts: prime, dry, paint, dry, varnish, dry.
Standard spray painting principles apply:
- Make sure your surface is oil-free, dust-free and hole-free
- Shake your cans for at least two minutes prior to painting
- Ensure your cap is clean to prevent drips
- Be aware of how the paint is accumulating on the part and look for any pooling or dripping
- Paint in many light coats rather than fewer heavy coats; this is especially important for 3D printed parts with internal and obscured geometries
- Paint in controlled, well-ventilated and well-lit areas
The XTC-3D coated PLA part is matte, black, and has a smooth surface to the touch with a few problems:
- Although the XTC-3D has worked well to smooth the part and make sanding quicker and easier, it has left pooling in the internal pocket that has shown through the paint finish.

- Striations are still visible on the part. 30 more minutes of sanding 3D prints could have prevented these from showing through the final paint finish.
After finishing all three parts to a smooth, matte black finish, let’s take a look at the differences in process, time, materials and finish.
Differences in ProcessABS (Dimension Elite)- Sand from 100 to 600 grit
- Repair holes with XTC-3D (may not apply to your part)
- Sand away XTC-3D with 300 to 600 grit
- Prime, Paint, Varnish
- Sand from 100 to 600 grit
- Prime, Paint, Varnish
- Coat in 1 to 3 layers of XTC-3D (depending on how bad the striations on your print are)
- Sand away XTC-3D with 100 to 600 grit
- Prime, Paint, Varnish
The part that took the longest to finish was PLA due to the XTC-3D coating time. Even without XTC-3D, however, PLA typically takes longer to sand than ABS or VeroBlack.
In our example, the VeroBlack was ultimately faster to finish since we repaired our ABS print with XTC-3D and stepping between layers was not as significant in the VeroBlack print.
All things considered, VeroBlack was the quickest to get to a smooth, matte black finish.
Pro Tip: If you’re in a rush to get from printer to photoshoot, pick the Dimension Elite or Objet30. Especially in models with overhangs and significant amounts of support material, the Dimension Elite and Objet30 both have support material that is quickly removable via dissolution, whereas the PLA support on a Replicator can significantly increase the time required to get to a smooth surface part.
Differences in Cost and MaterialsIt’s important to consider the amount of time it will take to finish your model as well as the overall look and dimension when considering the price.
PLA is the cheapest out of the three, at $20 per part, followed by ABS at $55, and VeroBlack at $110. In our opinion, VeroBlack is the best bang for your buck since it’s the shortest to surface finish and will give you the most accurate model.
At first glance, all three models may look very similar, but there are a few key differences in the final finish.
Both the ABS and the PLA finished prints have evidence of stepping between layers that is visible in the final paint coat. The VeroBlack print requires much less effort to remove these steps, which ultimately are not as obvious in the final paint coat.
Although the ABS and the VeroBlack finished prints have very similar surface finishes, more material (approximately .020”) was lost in the sanding process for the ABS to remove stepping between layers. In contrast, the VeroBlack print required less sanding, so the final object dimensions are closer to the original design intent.
Individual Summary of Each PartVeroBlack: High layer resolution (. 0011”) means little sanding is required to get a smooth, paintable part. Critical dimensions don’t need to be compromised to get a smooth surface quality part and no repairs are needed for fine detailed features.
ABS: Parts are easy to sand, but small fine detailed features may require repairing and careful sanding to remove stepping between layers. Once this stepping is removed, painting is straightforward.
PLA: The cheapest option, but also has the potential to be the most difficult to finish, depending on support structures and quality of the print. May require significant sanding and repairing via XTC-3D or Bondo filler.
Browse our website to learn more about our capabilities, such as 3D Printing and CNC Machining.
Quick Facts:
- Finishing a 3D printed part often involves a combination of the following processes: smoother application, sanding, polishing, cleaning and painting. The process is unique to the material type.
- A smooth finish with 3D printing is achievable but, post-processing will greatly improve the smoothness of parts.
- Epoxy resins are an excellent choice for sealing PLA printed parts.
- Acetone smoothing is not recommended for PLA prints.
- In general, IPA or rubbing alcohol will not dissolve PLA but there are some varieties that may be IPA soluble. Consult your filament material datasheet or technical datasheet for more information.
- PLA may be smoothed without sanding by dipping it or spraying it with a coating.
- ABS is tougher and lighter than PLA which is stronger and stiffer. Both have their ideal applications, but PLA is typically considered a hobby material whereas ABS is ideal for prototyping.
Painting advice for 3D models (PLA, ABS, PETG, NYLON)
3DPrintStory Reviews Recommendations for painting 3D models (PLA, ABS, PETG, NYLON)
Despite multi-material extruders and a stunning variety of 3D printable plastic colors, you'll still want to paint some of your 3D models sooner or later. The most common reason is to improve the external 3D model, especially if you are printing on an FDM 3D printer where the model is built up by layering material over time. It is FDM 3D printers that form a model with feature lines along the Z axis.
When finishing a 3D model, small cavities between layers are sanded, filled, or both. The result is a smoother surface. Painting can also help protect the model from the environment.
This article is divided into two parts: the first will introduce you to the different techniques for painting a 3D model, and the second will (hopefully) answer all your little questions about painting techniques and how best to do it. Read on to find out how to enhance your 3D models with paint!
Primer is paint's best friend
Priming a printed model improves ink adhesion. With any painting method (other than nylon dyeing), using a primer is a good idea. Spray primer is said to be the easiest way to get good results. The process for using the primer is very simple:
- Clean and sand your 3D model.
- Apply the primer in thin, even coats.
- Sand after the first and last coats until the surface is smooth.
- Let each coat dry according to the instructions supplied with the primer.
Method 1: Paint with a brush
Best for: PLA, ABS, PETG plastics.
If you paint a 3D printed model with a brush, you will definitely achieve a unique "handmade" effect.
Try a few brushes first because it's easier to get good results with a comfortable brush. As a rule, it is enough to use only 1 or 2 different flat brushes.
Brush
- Choose a quality brush that is hard enough to handle the viscosity of the paint you are working on.
- Experiment with different bristle types and handle shapes to find the one that works for you.
- Stop painting to clean the brush as soon as the paint starts to dry.
 Naturally, the brush must be cleaned after each use. Do not leave drying paint on the brush bristles.
 - The brush must be stored on the handle after cleaning and not on the bristles.
Paint
When it comes to brush painting, you're better off using acrylic paints.
Painting process
- Clean and sand your 3D printed model.
- Apply the paint in thin, even coats.
- Let the individual layers dry.
Method 2: Spray painting
Best for: PLA, ABS, PETG plastics.
If you want to paint a 3D printed model uniformly using one color, then using an aerosol will give the best result.
Spray can
Some brands offer nozzles with different specifications.
Shake can according to manufacturer's recommendations before use. Allows the paint to come out more evenly.
Keep the nozzle clean. This is usually achieved by spraying the inverted can slightly at the end of each session.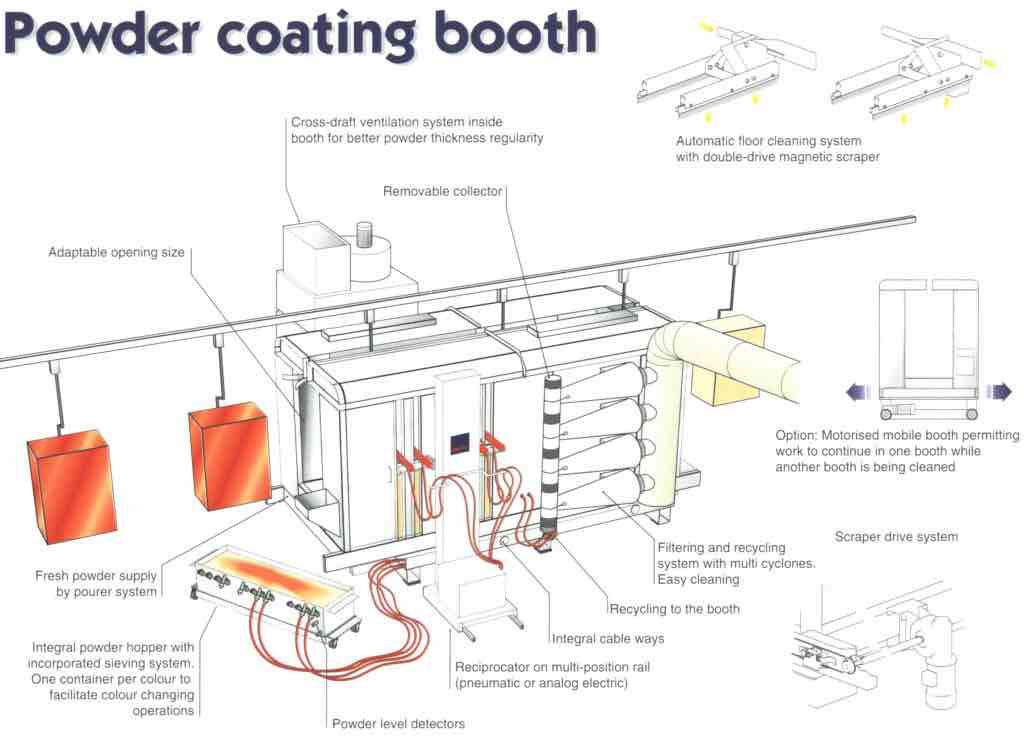
Keep can away from open flame and store in a cool place. Don't forget that this is a high pressure container!
Paint
When looking for spray paint, you will find that there are many varieties. If you want to use a specific shade, please read the RAL, CMYK and RGB values on the can carefully.
Painting process
- Clean and sand your 3D printed model.
- Start spraying by aiming the jet a little beyond the edge of the object you want to paint.
- Apply the paint by spraying on the surface you want to paint in slow, even strokes.
- Stop spraying by directing the jet a little beyond the object you want to paint.
- Let the paint dry.
Method 3 Liquid Color (nylon only)
Best for: NYLON plastics.
Instead of trying to get paint to adhere to the surface of your 3D printed nylon model, we recommend using liquid dye instead. Note that this will not work with other materials. Although PLA is hygroscopic and absorbs some water from the environment, it cannot be dyed by absorbing dye. ABS and PETG are also not suitable for this technique.
In order for the ink to give a good pronounced color after absorption, it is better to use a translucent or white nylon material when 3D printing. Darker nylon fibers can also be dyed, but the color will be much less pronounced.
Colorant
There are many brands of colorant to choose from, but MatterHackers recommends Rit DyeMore for example. But in general, if the dye is intended for synthetic fabric, then everything will be in order.
Staining process
Since nylon is very hygroscopic, it absorbs water even outdoors. This is why you should always dry your nylon material before 3D printing. We recommend painting the finished model, not unprinted.
How to use
Read the manufacturer's instructions for your colorant. In short, using a dye is a pretty simple method:
- Clean up your 3D model.
 When sanding, remember that painting will not cover scratches and marks on the surface of your model. Everything will be visible even after staining.
 - Mix the dye with water and heat in a saucepan.
- Use a thermometer to monitor the dye temperature. Follow the manufacturer's instructions, but keep the temperature below the thermal deflection temperature of the filaments.
- Attach the weight to the 3D print and dip it into the paint pot.
- After coloring, rinse well in a bath of cool water.
- To make sure you get the expected color, it's worth doing a few test coats.
How to tell if a paint will set with a 3D model
Probably the most important factor in causing the paint or liquid of your choice to stick to a solid surface is the difference in surface energy between the liquid and the solid. The one with the most surface tension always wins (surface tension has its own unit called dynamos, or dynamos per square centimeter).
The general rule is that the surface tension of the paint must be at least 10 units lower than the solid material for good adhesion. This means that we have a liquid with a high wetting ability on a solid, and we need wetting.
To get an idea of how well the surface to be painted is wetted, look at the shape of the drop of liquid on the solid surface:
- Apply a drop of paint or liquid to the surface of the 3D model you want to process.
- If the liquid forms a ball, it has too much surface tension to effectively wet the object, and the solid cannot "pull" the liquid onto itself.
- If the liquid spreads over the surface, forming something like a lens, wetting is better.
Is it possible to paint a 3D model from any material?
Painting 3D models from PLA and ABS plastics is a fairly simple task.
PETG can have paint durability issues, but the same techniques apply as for PLA and ABS. But if you really need a rich, vibrant color, then it's best to print your 3D PETG model in the desired color and leave it as it is.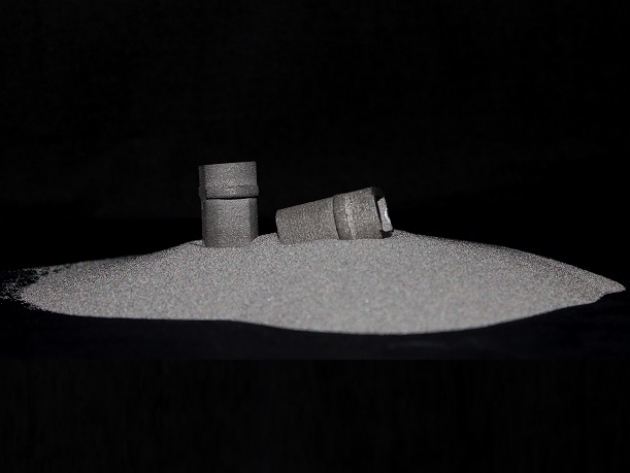
When it comes to nylon, which is used for 3D printing, we must remember that the paint does not set well. In general, it is possible to paint with acrylics and nylons, but this will require some heat treatment to maximize the surface tension and allow the paint to wet. Often this is done with an open flame or plasma... In general, this does not look easy at home, so it is better to use dyes.
Planning before 3D printing
In order to facilitate the process of finishing and painting, before 3D printing your model, we recommend that you consider the following:
- Lower 3D printing resolution saves printing time, but increases processing time.
- Consider the geometry of your model. Your tools should reach where you want to sand or paint.
- Do the smallest details need sanding, priming or both? If so, can they handle it without breaking?
- If dimensional accuracy is important for some parts of your 3D model, you may need to take this into account when modeling.
 Add material to be sanded to size, or reduce size to make room for primer and paint.
 - Primer and paint add thickness and can completely hide the fine details of your model.
- Sanding removes material and makes your 3D model less durable.
Items to improve paint adhesion
And finally, a few simple steps to improve paint adhesion:
- When working with a 3D printed model, wear clean gloves to protect the skin from chemicals and the surface of the model from sebum.
- Remove dirt before sanding, you don't want dirt to get into your model. Often, isopropyl alcohol (rubbing alcohol) on a soft, lint-free cloth works well.
- Use a regular vacuum cleaner with a soft and clean brush to remove sanding particles.
- Sand off any roughness added during the primer.
- Always test chemicals such as paint, cleaning solvents, sanding, or other materials and finishes before moving on to the final model you want to refine.

Printing and painting of car parts
Hello dear community!
In this topic, I would like to move away from the 'home' post-processing of printed parts a bit and describe the process, which is slightly more complex, but also of higher quality, at least in terms of materials.
For 15 years I have been repairing, restoring, sometimes manufacturing plastic parts for cars and motorcycles, and with the advent of the 3D printer, life in general began to sparkle with new colors, in my business it has become a great helper :)
And on the subject - I also visited a car painter , so there is something to tell)
(Attention! A lot of photos and a lot of text)
Collaborating with several auto repair shops, I was sitting in one of them, repairing the next 'puzzles' made of plastic, but an incoming call from good friends of Access Auto amused me - there are parts, all from different machines and only on one side, but you need to make the same ones, but mirrored . ..
..
Here! It's our way!) I finally got a reason to talk about auto painting post-processing :)
I saw the first detail in absentia in the photo:
This is our 2007 AstonMartin DB9 Cabrio.
Aluminum frame with little things on the inside - fun.
The other two will be visible in the text - we have them from two Land Rovers.
You can make it, puff it up, think about it... and make it :) but in our circles it is held in high esteem, when everything is done at once, and preferably in one place. Okay, so let's color it! :)
A couple of photos of prints will not hurt:
Modeled with SolidWorks - doable, but sometimes you want a couple of functions from the artist))) table, adhesion - BF-2, layer - o.2mm, nozzle - 0.4mm, filling - 30-50%, wall, top/bottom - 1.2mm the counterpart was more important to me (grooves at different angles and a clear outline is needed), and let the rest hang on supports in the form of pasta :)
I cut the wheel arch lining into three parts and glued it onto the slurry of ABS + acetone, dried it for a long time, though, but repair / gluing is always best done with related materials, so we'll be patient. It is also possible with a soldering iron, starting from the depth of the seam, at 240 degrees, but the part is with a small filling and there is really nowhere to solder there.
Next, a ring for the fog light - the fasteners are all at their own angle, I decided not to rack my brains and printed them separately, and then glued them - there are no complaints about the strength. On this description we close - let's rather get to the point !!!
And the essence is this:
It is almost always good and convenient to paint with spray cans, even quickly, I myself indulge in spray cans when this is enough for the job :) but there are tasks where you need to take the final appearance of the product and the quality of the coating more seriously - a smoother surface, better paint, stronger varnish. If we take cheap, easily accessible paints in cylinders, we get paint that is not resistant to alcohols and solvents; moreover, even some car shampoos can corrode it.
As a result, it turns out that not everything is strong and durable, that is colored and glitters :(
The reason is that one-component compositions on the shelves of building products for the most part are just a decoration, a cheap way to give gloss.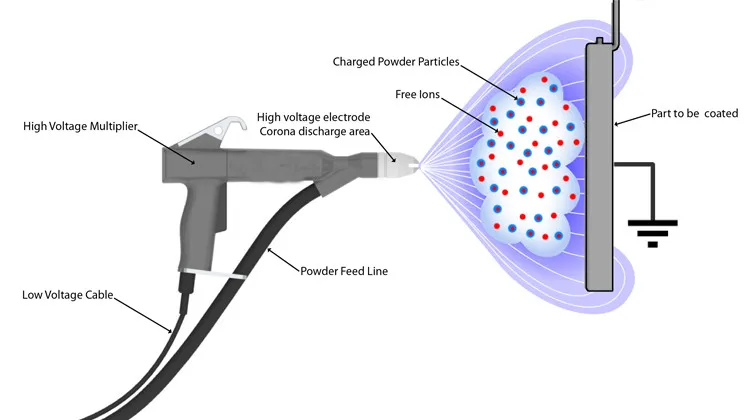 I’ll immediately say to probable denials - , of course, not all! but many :)
But we have three serious and expensive cars, which means we will choose more serious materials, although not expensive, which is beneficial for us, but will not affect the quality in any way.
The only problem is that for 'creativity without bottles' we need a compressor and at least one airbrush :( This should have been said in advance, but among us there are people with garages, workshops, and people with acquaintances and friends, who can help :) as well as our dear comrades who can read and be inspired to purchase air bells and whistles, which will come in handy in a bunch of other projects)))
Well, my garage with all the tools and equipment is full of boxes after the move, so I set up a workshop in the office at the bus station))) Let's go there!
Today we have liquid acrylic filler primer (my favorite), HS acrylic lacquer - with a high solid residue, and little things:
degreaser, solvent 646 for washing spray guns, P-4 or acrylic thinner for primer and varnish. From thick - putty, but I will not show it, because everything is more interesting than it seems;)
From crunchy, let there be measuring cups, stirring sticks, brushes for washing the spray gun, a toothpick (useful). PPE is mandatory: gloves (latex surgical gloves do not behave badly), a respirator, etc., as well as an open window or ventilation at hand.
Further chewing and wiping:
1. Lint-free cloth for wiping/degreasing the surface.
2. Scotch brite - very handy when you need to matte the surface before painting.
3. 'Sticky Rag' - sticky cloth to remove dust/specks from the surface of the part.
4. Grid-shaped emery cloth (AbraNet) - much less clogged with dust during grinding, easy to clean and generally a cool thing :) It is not necessary and you can use classic sandpaper. Useful grit 120,180, 240, 320, 400.
5. Foam-based sandpaper, designed for grinding soil, soft base allows you to bend around corners, as well as gently and gently smooth the surface.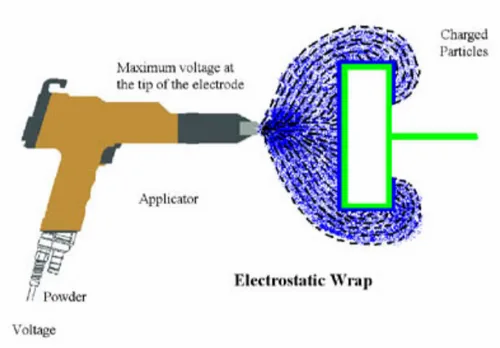 In my case, these are the names Fine, Micro fine and a piece with a grain of 800.
All materials can be purchased from specialized car paint shops or car markets.
Grinding stones, grinders, types of sandpaper - this is a whole separate topic, so we will omit it, especially since many posts on the portal probably touched on this issue.
Next, I decided to take two spray guns, let's call them 'Small' (nozzle 1mm) and 'Large' (nozzle 1.4mm). Small will be painted and varnished, and Large will be primed.
In the meantime, prepare the details. With sandpaper 120/180, we roughly remove the excess at our discretion, then 240 in front of the primer if desired, but I stopped at 180 and left visible layers and flaws, I just want to show you what the filler primer is capable of without a drop of putty.
I prepared Martin's part a little earlier, so there are only a couple of photos after puttying (I had to :) ) and primer (by the way, I primed it at home with a brush):
The aluminum part was left in the office, both of them are plastic.
The process of priming the rest of the elements cannot be conveyed by photographs, and I could not shoot a video with one hand.
But the essence is simple - there is a system: primer and hardener, it says '5:1', this means that we need to take 5 parts of primer and one part of hardener, the measurement is by volume, so it's good to take measuring cups or a syringe for these purposes at very small volumes. We measure, mix, dilute with P-4 or acrylic thinner to the necessary fluidity so that the spray gun can do it all digest spray. On average up to 10% diluent per total volume. I did not find another 'Very Large' spray gun with a 2.4mm nozzle, so I will have to dilute it even thinner for a 1.4 nozzle, nothing bad will happen if you do not overdo it.
Do not dilute 646,647 with thinners as they contain acetone which can 'kill' the hardener.
So, let's not get distracted, the reaction is going on and soon the soil will begin to thicken, so we prime it.
Primer can in principle be applied 'thick', but with experience. In the meantime, we are not afraid and little by little, at medium pressure, we apply a wet, but not thick (we don’t need snot) layer. It almost looks like painting from a balloon, only in the hands the device is cooler than a jar)))
Make it a rule - any spraying is first done on the edges, edges, edges and then we go to the planes. Very often, small details / insides go out of sight and are forgotten.
Excellent! We go to brew tea / coffee and wait until the surface of the soil dries and becomes matte. When this happens, we apply another layer and so on several times until the soul becomes calm or the tea runs out) I finished my coffee on the fourth layer :) We are not afraid to 'pour' more soil into doubtful places, fill holes, cracks ... do on an already dried coating.
In fact, the ground layer grows, but repeats the silhouette of irregularities without spreading or leveling out, so you can visually deceive yourself, as you will see in the photo now:
Rough coating on the ring and clearly visible stripes of layers on the arch. Beauty?....No?! It's strange))))) Nothing, nothing, that's what I wanted to show, let's leave it to dry for a day at room temperature, this is enough for the soil to polymerize. For this I love automotive materials!) The thickness of the soil is about 0.3-0.4 mm, but it will dry and harden anyway! Cylinders do not know how to do this, or these 0.3 mm must be applied all day with drying for two hours, so that there is no damp mass inside ...
In the meantime, the spray gun is thoroughly washed and put on the shelf, one piece of advice - you have soil left in the glass, even a drop, but it can help a lot:
This is a hole in the seam, the defect is one of many. You will later say THANKS to yourself if you take a toothpick on the same day and simply bury these defects with soil.
A day has passed...
Arriving at the station, I immediately took out a can of black matte paint and lightly sprayed on the details so that it became like this:
This is the so-called 'Development' before sanding.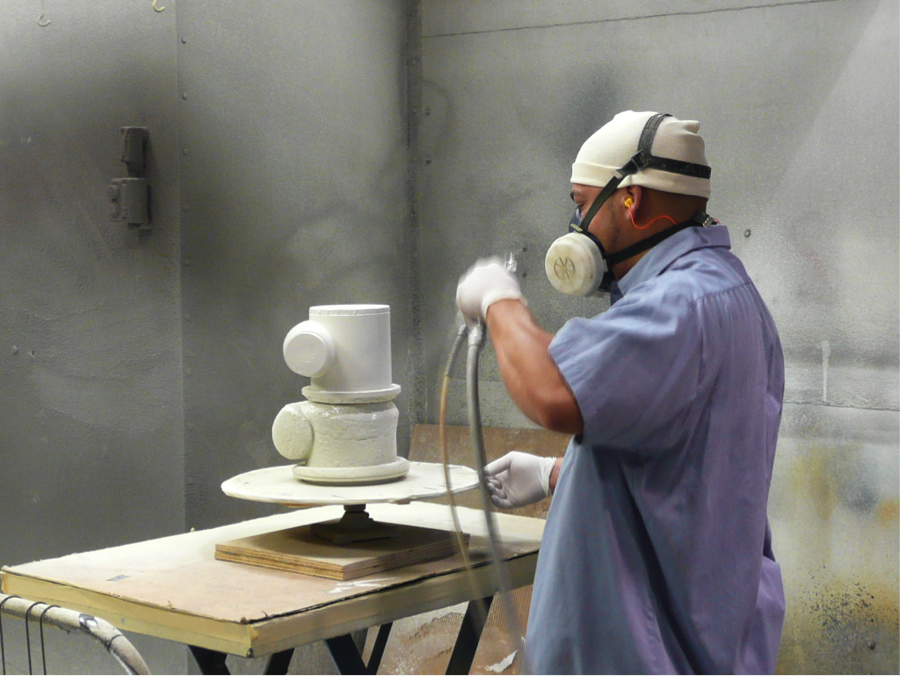 There are also special developing primers and powdered soot to tone the surface, but I ran out of both, so matte paint is fine, because it dries quickly and sands well.
And now, after a cup of tea/coffee, we take sandpaper 240/320/400, put it on a bar and grind. I immediately took 400, because it's more pleasant for me to control the process)
It is very easy to clean sandpaper clogged with dust with the same scotch-brite or cloth so that it can grind normally again.
Pay attention to how the development works - all the flaws, all the bumps are visible, and when all this disappears - we can assume that everything is smooth))) I slightly broke the rules and polished one part more to show the transition from the beginning of grinding to the final , and at the same time we see that with only one primer we removed all the curvature from the surface, even the layering went away without a trace and no putty is needed) Of course, provided that the grinding was carried out correctly) As you can see in the photo above, I have sawdust from the ground diagonally, i.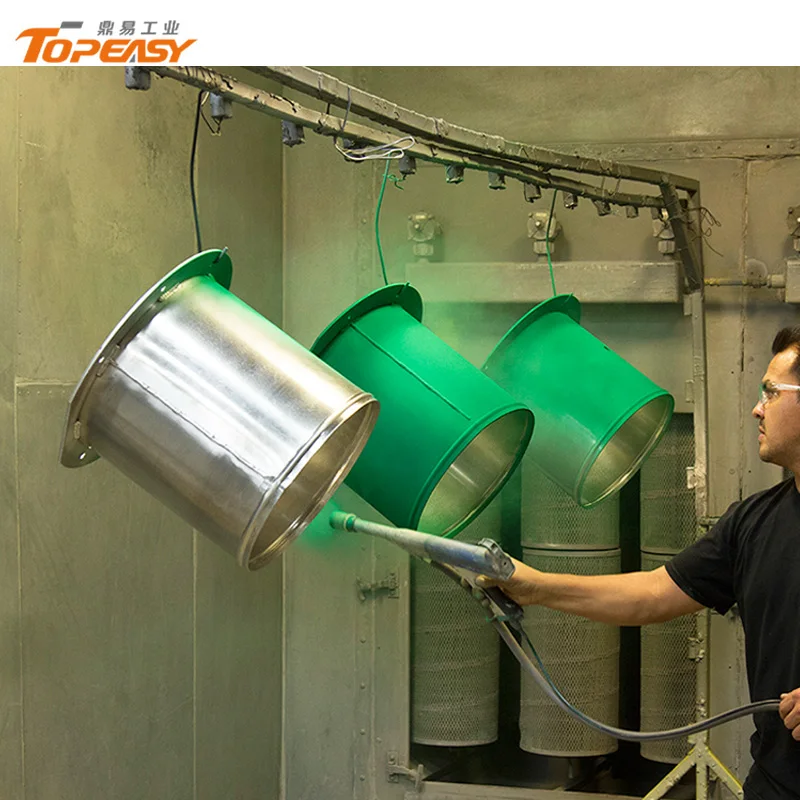 e. you basically need to grind not just back and forth, but with an offset - this will allow you to capture a larger area and grind the surface more efficiently and evenly.
Rule - do not start sanding from corners and edges! first we draw the planes, leaving the edge as a guideline and trimming it if necessary, for example:
silky surface of the element :)
And we say THANKS to ourselves for the defects dropped with a toothpick, because they are gone, they have become even)
The arch is ready, it does not need to be painted, so I take a photo and report to the customer:
The next step is painting.
We will get the 'base' paint prepared (by our own hand / colorist) in advance, dilute it according to the recommendations, often it is 2 parts of paint and 1 part of thinner, in my case 646 thinner is suitable for the base, the paint has not flaked from it and feels good.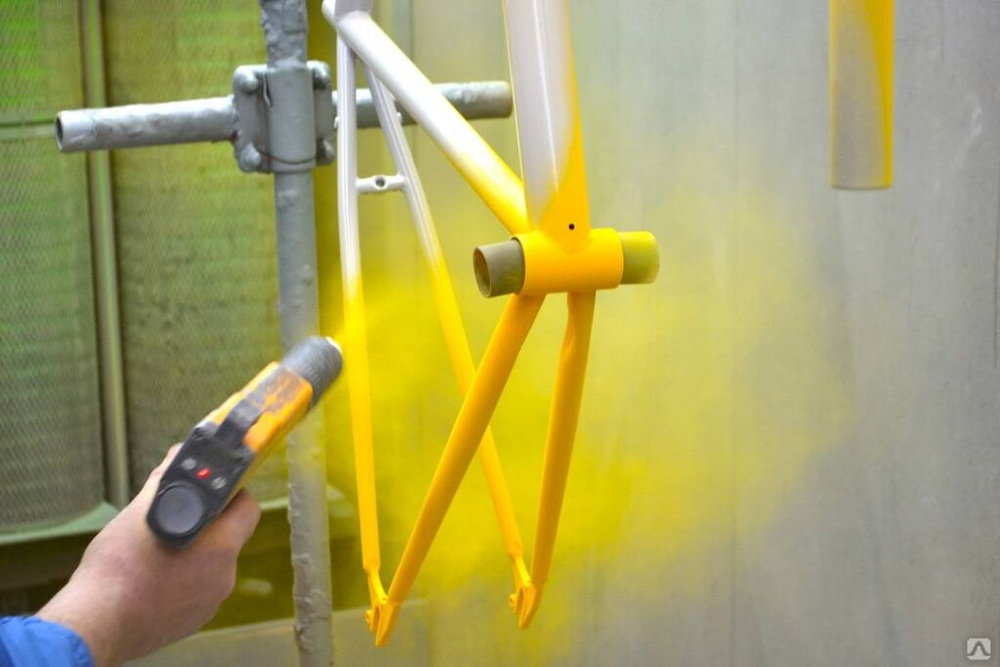
We clean the parts with a lint-free cloth with a degreaser and, if necessary, remove dust particles with a sticky cloth. Pour paint into the spray gun and go to a secluded place for painting.
There is no paint shop at this station, so I'm waiting for lunch and while no one is there - I paint right in the locksmith :D
The first layer is 'adhesive' - applied with a light spray like a spray of matte paint on the ground, this will help the paint to adhere to the surface. Don't forget to start with the edges and insides, and only then - the surface:
Let dry for 5-10 minutes and put the first 'wet layer', color the gray part.
Nuance - You saw the places where I rubbed the primer to the plastic, in these areas the paint can sometimes shrink, so you can give a light spray a couple more times, and then cover it wet. If the paint has shriveled, dry completely and lightly sand the base with 800 sandpaper, often removing the adhering paint from the skin with a cloth, if this happens. Then we cover the defective place with dust a couple of times and again try to give a wet layer. You can do the same if a large mote stuck on a wet layer and you need to grind it off.
So, the wet layer is when the base lay down greasy on the surface and became glossy, it will soon dry out and become matte again, then you can apply another wet layer. On average, two wet coats are enough, but there are also non-opaque paints that need more layers, or even colored primer, but this already needs to be assessed on the spot.
The technology for applying base paints is very diverse, in my case I will make 2.5 layers, i.e. two wet and the last 'dry' - quickly from a distance I will spray without gloss, this will give depth to the color and show more grain in the metallic:
Let it dry, let's prepare the varnish.
This composition is also two-component and is diluted in the ratio of 2 parts varnish and 1 part hardener, knead, wait 5-10 minutes, mix again and prepare for varnishing. Before this, the spray gun is washed clean.
If a mote flew in and said 'I'll sit here, then lightly, barely touching, wipe it with sticky)
Motes are not terrible on dark coatings, they are not visible after polishing, but on white or light ones, motes are like evil black)))))
Applying varnish is one of the most dangerous moments. Underfilling - a bumpy surface (shagreen), overflowing - will flow and then it is either difficult to remove these 'painter's tears', or even repaint. Training will bear fruit and you will succeed)
The first layer is adhesive, we wait about 10 minutes, the second is wet, we wait 10-15 minutes, the third is wet, we wait 2-5 minutes for spreading and see how it turned out, if you like it - leave it, if not, you can risk pouring it again, but it’s better to stop at the second wet layer, not all varnishes adequately tolerate a large layer thickness.
Tip - after each layer, apply a little varnish on something, then at this place it will be possible to determine whether this layer has dried up .