Polishing 3d prints
How to Smooth PLA to a Mirror Finish [Step-by-Step]
Need to make your prints look super smooth? Or perhaps you just want rid of those layer lines to make your print look more ‘factory finished’?
For any 3D printing materials that can’t be acetone smoothed, this quick guide is for you.
This is one of our favorite techniques when smoothing PLA prints: how to polish PLA 3D prints to a shine you won’t believe was ever 3D printed.
And we’re really talking professional grade smoothing.
The best way to smooth 3D prints vs other PLA finishing techniques
Can PLA be acetone smoothed?
It’s often said that ABS is easy to smooth (using acetone baths and similar methods), but what about PLA acetone smoothing?
Most PLAs and similar non-acetone-dissolving 3D printer filaments cannot be smoothed the same way as ABS. That’s because PLA in its pure form is not reactive to acetone.
When PLA and acetone smoothing works, it’s due to other materials added to the PLA. You’ll usually find that very cheap PLAs that have been blended with cheaper plastics to form a less pure PLA can sometimes be acetone smoothed.
Or on the other end of the scale, modified PLAs with additives can make vapor smoothing PLA possible, or at least acetone bonded.
Generally, the purer the PLA, the less acetone has an effect on it. We should maybe note here: our standard PLA won’t acetone smooth, hence us mastering this new technique!
Read on to learn how to sand 3D prints – with the right technique it’s easy.
- We also have an article on acetone smoothing ABS and ASA
Sometimes, PLA vapor smoothing can be achieved with Ethyl Acetate or even Tetrahydrofuran (THF), but we strongly advise against using either of these chemicals. They’re dangerous, the effect only works with some PLAs and you can lose a lot of detail.
We recommend finishing PLA prints using the technique we’re describing here for your most prized prints, as it can take a little bit of time. Additionally, this technique to smooth 3D prints (with PLA filament) does not work as well on very intricate prints.
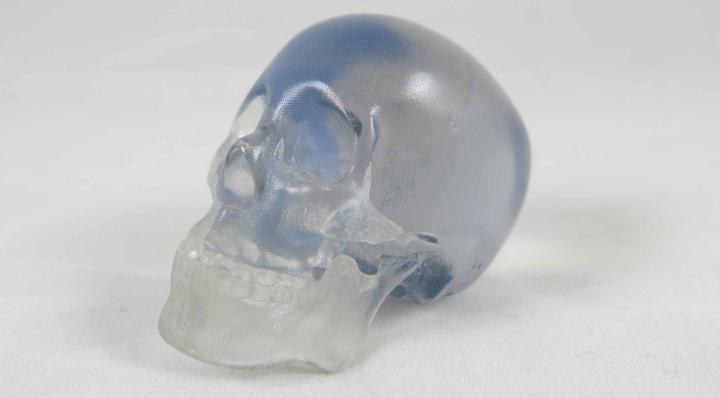
Here’s a close-up of the finished effect. The gold filament is Gold/Bronze PLA. This is a 6cm long 3D Benchy for scale, and we only smoothed one side of the hull to compare. This is one smooth PLA print! Honestly, it’s like glass!
How to Smooth PLA Prints: What You’ll Need
We’re coming clean – this how to smooth PLA guide is mostly achieved from you sanding 3D printed parts.
When sanding PLA and other lower temperature materials it’s important not to be tempted to use a powered sander. The heat generated will deform the outer layers of your print.
It’s worth noting, not all PLA is created equal. Poorer quality PLA isn’t as easy to sand as higher quality. So if you are going to sand PLA, you’ll save yourself hassle printing with high-quality filament.
Now to the sanding. To start, you’re going to need a selection of fine grit sandpapers.
We suggest the following grit sizes when sanding 3D prints (and if you want a really smooth finish like above, we recommend not skipping any steps): 200, 400, 600, 800, 1000, 1200, 1500, 2000, 2500 and finally 3000.
Don’t worry: this sounds like a lot of work – but if your print has a nice finish already each layer will only take a few minutes.
It’s best if you can use ‘wet & dry’ paper when sanding 3D prints (black grit as opposed to beige effect), especially with PLA, because if you’re sanding fast, heat can build up and affect the smooth surface you’re trying to achieve.
Wetting the glass paper will lubricate and cool the surface when you’re sanding PLA prints.
This is not as necessary with smoothing higher temperature 3D printing materials, but still advisable.
1. Start with the coarsest sandpaper (approx. 200), sand and smooth the surface until you cannot feel any printing layer lines at all.
You’ve got to sand in a circular motion, as you don’t want any lines from the sandpaper affecting the surface later on.
2. Start scaling up the grit number. Once you’ve got an acceptable result with the 200 or 400, move higher up and smooth the print in increments. Don’t skimp on the time to sand them down in these early stages, it’ll save more work layer (and keep going with the circular motion).
Try to be mindful of details so you don’t lose definition as you go.
The good news is with each finer grit, you don’t need to spend as much time sanding that layer.
After using 1000 grit sandpaper it’ll start to look really smooth3. Keep working up the sizes, from 400 to 600, then to 800 and upwards. Don’t miss out steps when you get to 2000.
It’ll feel really smooth, and will polish nicely at that level – but if you want a 3D print finishing like a mirror you need to build to 3000. Here we’re at 3000 grit; you can start to see the shine before you’ve polished
4. The final (and most fun) part is when you actually get to start polishing PLA prints. Layering up those sandpaper increments doesn’t feel like you’ve made much progress, but once you polish up, the final finish looks great.
How to smooth out 3D prints polished to that mirror finish? Well, we’ve found you just need any good liquid metal polish. Our favorite is the ol’ trusty Brasso.
The technique to polish your prints is simple. Get a soft cotton cloth, and apply a small amount of liquid polish. Then apply to your 3D print surface in small circles until all the polish is rubbed into the surface.
Once you’ve finished that, the surface should look reasonably shiny. The final stage is to buff up the surface into that mirrored, polished shine.
Just get an unused area of your cloth, without any polish on, and go back over the area you’ve just worked on to buff it up to a shine. And that’s it.
Here’s a before and after reminder on the technique:
Hope you found this guide on how to smooth 3D prints useful.
Checkout our packed, comprehensive guide for even more professional grade 3D printing finishing techniques here. You’ll also find painting techniques, for making those movie-grade replicas.
Raed more:
- PLA 3D printing guide
- Best PLA filament brands
Best way to polish and smooth PLA prints - Materials - Talk Manufacturing
301584
#1
Hi, so I’m printing this vase for a girl I like. The thing is, you can clearly see the 3D print lines and the surface is kind of rough. What is the best way to get rid of this? I am printing in PLA btw.
SOC3D
#2
The best way is quite subjective. It depends on the person, the skillset, the budget etc. Xtc-3d by smooth on along with similar two part casting resins can coat a print and give it a clean smooth surface. Priming and painting. Glazing compound. Sanding and polishing with buffing wheel and compound. Rock tumbling with various media and polish. I’m sure wax dipping is a thing though it may warp the PLA…
3dpGeek
#3
I thought I had a youtube video for you but I don’t so I will try to explain in text.
You want to use sand paper as acetone doesn’t work on PLA. Depending on the thickness of the model walls depends on what grit sandpaper you use. If its a single layer wall its going to be hard. If the wall is 2 or 3 layers thick and is 300+ microns than start with 150 grit. If 250- microns start with 250 grit and work your way down. I print with 250 micron layers and 2-3 layer wall thickness and start sanding with 250 grit and work my way up to 2000 grit. I go 250,400, 800, 4000 grit. WHEN YOU SAND MAKER SURE YOU SAND IN A CIRCULAR MOTION as the purpose of sanding is to make smaller and smaller scratches until they are invisible to the eye.
2 Likes
301584
#4
Ah, I see. The first few models I tested on I sanded back and forth causing the scratches you speak of. I will try sanding in a circular motion.
301584
#5
I’d like to use Xtc-3D but its so expensive lol. I heard there is a alcohol solution you can soak prints in or is it the xtc?
3dpGeek
#6
Don’t push very hard you want the grit of the paper to do all the work. You can use the 4 grits I said or you can add an additional in between 450 and 800.
Arnoldas
#7
Hey @301584,
Do you have some pictures?
CMDRReservoir
#8
If you are using PLA, sanding or XTC-3D is definitely the way to go! As a side note, if this is for a girl you like, XTC-3D is definitely worth the expense. Regardless, I’d use an electric sander if you have one, just to make things easier. There is already some solid sanding advice in here already, so I’ll just tack onto it: Make sure you aren’t sanding too hard/fast. If you do, the plastic will heat up again and you start scraping off large flakes and bits rather than fine material, and you’ll have to sand THOSE blemishes off.
Let’s not forget safety and PPE! Wear a respirator and safety glasses, especially if you are using an electric sander. If you are using one of those, you may also want to wear earplugs.
3dpGeek
#9
I forgot that part, definitely wear a mask! And not it in a well ventilated area.
Enza3D
#10
Hi there! You are very right that XTC-3D is expensive! XTC-3D, also know as Smooth-On, is really just an epoxy resin with a fancy name. That being the case, I’ve had great success by using other epoxy resins that are available at home improvement stores or Amazon. I’m really partial to this one https://www.amazon.com/Clear-Epoxy-Encapsulating-Casting-Gallon/dp/B00IT0APVM, and as a nice little bonus, the epoxy includes UV inhibitors so it won’t yellow that quickly and protects the PLA a bit.
For finishing PLA, I start with 80 grit sandpaper (60 is too abrasive for most part in my opinion, but I will use it if there are noticeable flaws) and work my way up to 400 grit (80, 120, 200, 400). From 400 grit to 1000 grit (400, 600, 800, 1000), I wet sand to prevent buildup of heat in the PLA . I just stick the part in an appropriately sized bowl/container and sand the part under the surface of distilled water, and change the water between grits or when it becomes dirty. After sanding, I clean the part with water and coat with the epoxy resin. If the color of the part got to distorted while sanding, I’ll very lightly apply heat with a heat gun until the color is restored.
Is this a lot of work? Yes, but it produces really nice results.
1 Like
jfield
#11
Of the vase or the girl?
Or both!
MakeCoolThings
#12
Sanding, definitely sanding. But WET SANDING. It keeps the paper from getting loaded up, and it cools the plastic. (If you try to sand PLA too aggressively, it’ll get too hot and the dust loaded up in the paper will actually fuse itself back to the part, making it feel all crusty!)
Here’s what I do: just have a tupperware type container or some other sort of small bucket or tub on your workbench with water in it, and keep running your sandpaper through it to rinse the particles off, periodically dunking the part, wiping the part off with a towel, and wetting it again… Obviously you’ll need sandpaper that can take being wet. (I use 3M Wetordry, their automotive sandpaper…another benefit of this is it’s manufactured to produce a much more uniform scratch pattern.)
If you’re printing at 0.2mm or smaller layers, you probably don’t need to start with 2xx (200, 220, 250 are common, depends on brand) grit and can get away with starting at 400… Then it’s 800, 1000, 2000. If you want to get really super-shiny you can try 3M Trizact in 3000 and 5000 grit. (You should be able to achieve a mirror finish at this level.)
Of course, this is just if you want to polish up something printed-in-color, as-is… Painting is a much more practical approach, because a good high-build automotive primer can take most of the work out of surface prep. Example: (Skip to 2:57) https://youtu.be/CRAlMoCPECs?t=177 (Although this is about making a mold master from a 3D print, you can skip the molding/casting and just paint it at that point…you get the idea.)
1 Like
mariankeller
#13
How do you polish complex surfaces with an electric sander?
Filmdesigner
#14
I have been having a lot of success with warm Epoxy resin on PLA (I haven’t tried it on ABS as PLA is my primary filament). If you use it directly form the mixing bowl its way too thick. By adding 10 degrees of heat the epoxy starts to run like thin honey. Too much heat and it forms lumpy skins.
An additional process is to use a VERY low power blowtorch - I use those little modellers pen-like blow torches - and wave the flame lightly back and forth over the epoxy resin you have just laid-down. This softens the epoxy and smoothes it.
Obviously this doesnt work on smaller or thin elements but works very well on everything else. Its easy to sand afterwards.
jazzlee37
#15
May I ask your detailed procedure? How to heat resin? Use hot water or heat directly? Do you heat the resin before or after mixing the hardender? Thanks.
Post-processing of 3D printed parts (PLA, ABS, SBS, PETG)
Table of contents
- Removal of supports
- Remove Soluble Supports
- Sanding
- Cold welding
- Filling voids
- Polishing
- Priming and painting
- Pair smoothing
- Epoxy coating
- Metallization
Introduction
FDM technology is best suited for fast, low-budget prototyping.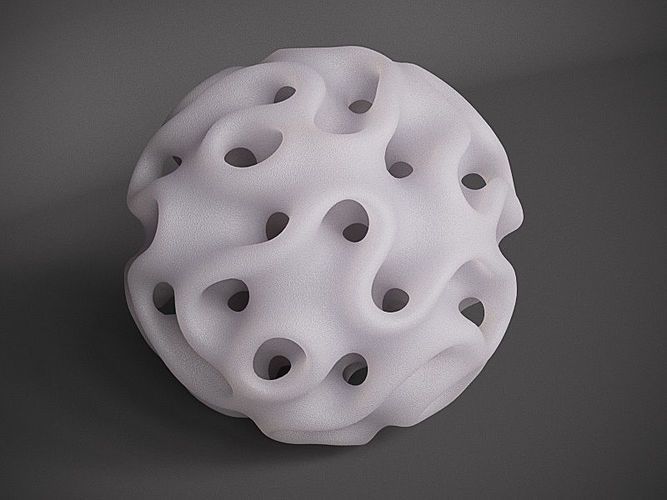 Layer lines are usually visible in FDM prints, so post-processing is essential if a smooth surface is to be achieved. Some post-processing techniques can also make a print more durable by changing the degree of its elastic properties, density, structural and textural features.
In this article, we will discuss the most common post-processing techniques in FDM.
Post-processed FDM prints (left to right): cold welded, void filled, raw, sanded, polished, painted and epoxy coated. Photo 3dhubs.com
Removing supports
Removing supports is usually the first step in post-processing for any 3D printing technology that uses them. In general, props can be divided into two categories: standard and soluble. Unlike other post-processing methods discussed in this article, the removal of props is mandatory and does not result in improved surface quality.
Initial printout with props, poor prop removal, good prop removal. photo 3dhubs. com
com
Removal of standard props
Tools
- Wire cutters, needle nose pliers, tongs
- Toothbrush, brush
| Finishing | ★ ☆ ☆ ☆ ☆ |
| Approvals | ★ ★ ☆ ☆ ☆ |
| Speed | ★ ★ ★ ★ ☆ |
| Suitable for | all thermoplastics FDM |
Process
Normally, backups come off the printout without problems, and hard-to-reach places (such as holes or cavities) can be cleaned of backup material with an old toothbrush. Proper placement of support structures and correct print orientation can significantly reduce the negative impact of supports on how the final printout will look.
Pros
- Does not change the overall geometry of the part.
- The process is very fast.
Cons
- Does not remove layer lines, scratches or other surface defects.
- If excess material or marks remain from the support structure, print accuracy and appearance suffer.
Dissolvable Support Removal
Instrumentation
- Solvent resistant container
- Thinner
- Ultrasonic cleaner (optional)
| Finishing | ★ ★ ★ ☆ ☆ |
| Approvals | ★ ★ ☆ ☆ ☆ |
| Speed | ★ ★ ★ ★ ☆ |
| Suitable for | all thermoplastics FDM |
Process
Soluble support standard materials are removed from the printout by immersing it in a reservoir of the appropriate solvent.![]() Supports are usually printed:
Supports are usually printed:
- HIPS (usually with ABS)
- PVA (usually with PLA)
A glass container like a preservation jar is fine. Any non-porous vessel is suitable for water treatment. To quickly remove props from HIPS/ABS printouts, you will need a solution of equal parts D-limonene and isopropyl alcohol. Many other support structure materials such as PVA (with PLA) dissolve in normal water.
Pro Tips
Use an ultrasonic cleaner to shorten the solution time and change the solvent as it becomes saturated. A warm (not hot) solution works faster - heating is useful if there is no cleaner.
Pluses
- Complex geometry is allowed for which the standard method of removing props is not possible.
- Smooth surface at the support points.
Cons
- Improper dissolution of the props can cause discoloration and skewed printouts.

- Does not remove layer lines, scratches or other surface imperfections.
- May cause small holes or holes if soluble material seeps into the object during printing.
Cleaning with a skin
SHIP SHIP ABS ABS ABS PROBECTION
Instrumentation
- EVERTICAL PREASE with grain
for 150, 220, 400, 600, 1000 and 2000 66666 - Cleaning cloth
- Toothbrush
- Soap
- Face mask
| Finishing | ★ ★ ★ ★ ☆ |
| Approvals | ★ ★ ★ ☆ ☆ |
| Speed | ★ ★ ☆ ☆ ☆ |
| Suitable for | all thermoplastics FDM |
Process
Once the props have been removed or dissolved, sanding can be done to smooth the part and remove any obvious imperfections such as smudges or prop marks. Which sandpaper to start with depends on the thickness of the layer and the quality of the print: for layers of 200 microns or less, or for prints without blotches, you can start with sandpaper at P150. If there are blobs visible to the naked eye, or the object is printed with a layer thickness of 300 microns or more, stripping should begin with P100.
The process can be continued up to P2000 grit (one approach is to go to 220, then 400, 600, 1000 and finally 2000). Wet sanding is recommended from the very beginning to the very end - this will avoid excessive friction, which can lead to an increase in temperature and damage the object, as well as contaminate the sandpaper itself. Between sanding, the printout should be cleaned with a toothbrush and washed with soapy water, then wiped with a cloth to remove dust and prevent it from sticking together. Even P5000 can be sanded to achieve a smooth, shiny FDM part.
Pro Tricks
Always sand in small circular motions - evenly over the entire surface of the part. It may be tempting to sand perpendicular to the layers, or even parallel, but this can lead to gouges. If the part is discolored or has a lot of scratches after sanding, it can be heated a little to soften the surface and allow some defects to smooth out.
Pros
- An exceptionally smooth surface is obtained.
- Further post-processing (painting, polishing, smoothing and epoxy coating) is greatly facilitated.
Cons
- Not recommended for double or single shell parts as sanding may damage the printout.
- The process is difficult in the case of sophisticated surfaces and the presence of small details in the object.
- If the grinding is done too aggressively and too much material is removed, the appearance of the part may be affected. Acetone for ABS. Dichloromethane for PLA, ABS
- Sponge Applicator
| Finishing | ★ ★ ☆ ☆ ☆ |
| Approvals | ★ ★ ☆ ☆ ☆ |
| Speed | ★ ★ ★ ★ ★ |
| Suitable for | all thermoplastics FDM |
Process
If the object is larger than the printer capacity, the object is printed in parts and then assembled. In the case of PLA and some other materials, assembly can be done with Dichloromethane or a suitable adhesive (the choice of adhesive depends on the plastic). In the case of ABS, it is possible to "weld" with acetone. The mating surfaces should be slightly moistened with acetone and squeezed tightly or clamped and held until most of the acetone has evaporated. So the parts will be held together by chemical bonds.
Pro Tricks
Increasing the surface area of the acetone contact increases bond strength. Tongue-and-groove to help.
Pros
- Acetone does not change surface color as much as most adhesives.
- After drying, the compound acquires the properties of ABS, which makes further processing easier and more uniform.
Cons
- The bonding of ABS parts by cold "welding" with acetone is not as strong as if the part were printed as a whole.
- Excessive use of acetone can dissolve the part and affect final appearance and tolerances.
Void Fill
Black ABS Print, Filled and Sanded
Tool Kit
- Epoxy (for small voids only)
- Automotive body filler (for large voids and joints)
- ABS filament and acetone (only for small voids in ABS printouts)
| Finishing | ★ ★ ☆ ☆ ☆ |
| Approvals | ★ ★ ★ ☆ ☆ |
| Speed | ★ ★ ★ ☆ ☆ |
| Suitable for | all thermoplastics FDM |
Process
Unusual voids may come out after the part has been ground or dissolved. These voids are formed during printing when the layers are incomplete due to any restrictions on the trajectory of the print head, which is often inevitable. Small gaps and voids can be easily filled with epoxy and no additional treatment is required in this case. Larger gaps or voids left by assembling a multi-part object can be filled with automotive bodywork filler, but the printout will then need to be re-sanded. Putty works great, is easy to process with sandpaper and can be painted. Moreover, the parts connected by such a filler, or voids filled with it, turn out to be stronger than the original plastic.
Cracks in ABS printouts can also be filled with ABS thinned with acetone, which reacts chemically with the ABS object and seeps into existing voids. It is recommended to make such a putty from 1 part ABS and 2 parts acetone, then it will not spoil the surface if used correctly.
Dichloromethane works on all plastics: ABS, PLA, HIPS, SBS, etc.
Epoxy is also useful if you want to make your 3D printed part more durable
Pros
- Epoxy filler is easy to sand and prime, resulting in an excellent surface for painting.

- An ABS solution of the same filament will give the same color so nothing will be visible on the surface.
Cons
- Auto body filler or other polyester epoxy adhesive is opaque when dry and will leave discolored areas on the printout.
- Additional processing required to achieve a uniform surface.
- If the grinding is done too aggressively and too much material is removed, the appearance of the part may be affected.
Polished
PLA model, polished. Photo rigid.ink
Tools
- Plastic Polishing Compound
- Sandpaper for P2000
- Cleaning cloth
- Toothbrush
- Polishing pad or microfiber cloth
| Finishing | ★ ★ ★ ★ ★ |
| Approvals | ★ ★ ★ ☆ ☆ |
| Speed | ★ ★ ☆ ☆ ☆ |
| Suitable for | all thermoplastics FDM |
Process
Once the part has been cleaned, a plastic polish can be applied to the part to give a standard ABS or PLA object a mirror finish. After the part has been sanded for 2000, it is necessary to remove dust from the printout with a cloth and rinse the printout under warm water using a toothbrush. When the object is completely dry, buff it on a buffing pad or microfiber cloth, adding a polishing compound as you go, such as polishing jewelry. They are designed specifically for plastics and synthetics and give a long-lasting shine. Other plastic polishes, such as those used to polish car headlights, also work well, but some of them contain chemicals that can damage the printout.
Pro Tricks
To polish small parts, place the polishing wheel on your Dremel (or other rotary tool such as a power drill). For larger and stronger parts, you can use a grinder, just make sure that the part does not stay in one place for too long, otherwise the plastic may melt from friction.
Pros
- The part is polished without solvents that can warp it or change its tolerances.
- When cleaned and polished correctly, a mirror-smooth surface is obtained, very similar to cast.
- Polishing and deburring plastics is extremely economical, making this a very cost-effective method of achieving a quality finish.
Cons
- If you want to achieve a mirror-smooth surface, the part must be carefully ground before polishing, which may affect tolerances.
- After polishing, the primer or paint no longer sticks.
Primer and paint
Gray PLA FDM print spray painted black. 3dhubs.com
Tools
- Cleaning cloth
- Toothbrush
- 150, 220, 400 and 600 grit sandpaper
- Aerosol primer for plastics
- Finish paint
- Polishing sticks
- Polishing paper
- Masking tape (only if multiple colors are expected)
- Nitrile gloves and matching face mask
| Finishing | ★ ★ ★ ★ ★ |
| Approvals | ★ ★ ★ ☆ ☆ |
| Speed | ★ ☆ ☆ ☆ ☆ |
| Suitable for | all thermoplastics FDM |
Process
Once the printout has been properly sanded (it is sufficient to reach P600 when painting), it can be primed. Aerosol plastic primer should be applied in two coats. This primer is intended for subsequent painting of models, provides an even coating and at the same time thin enough not to hide small elements. Thick primer, which is sold in hardware stores, can clump, and then you have to seriously work with sandpaper. Apply the first spray coat with short presses from a distance of 15-20 cm from the object, trying to do it evenly. Let the primer dry and smooth out the unevenness with 600 grit sandpaper. Apply a second coat of spray with light, quick pressures, also very gently and evenly.
When the priming is completed, you can start painting. You can paint with artistic acrylic paints and brushes, but a spray gun will provide a smoother surface. Hardware store spray paints are thick and viscous and difficult to control, so use paints that are designed specifically for modeling. The primed surface must be sanded and polished (sanding and polishing sticks, which are used in nail salons, can be purchased online, they are great for our task), and then wiped with a cloth.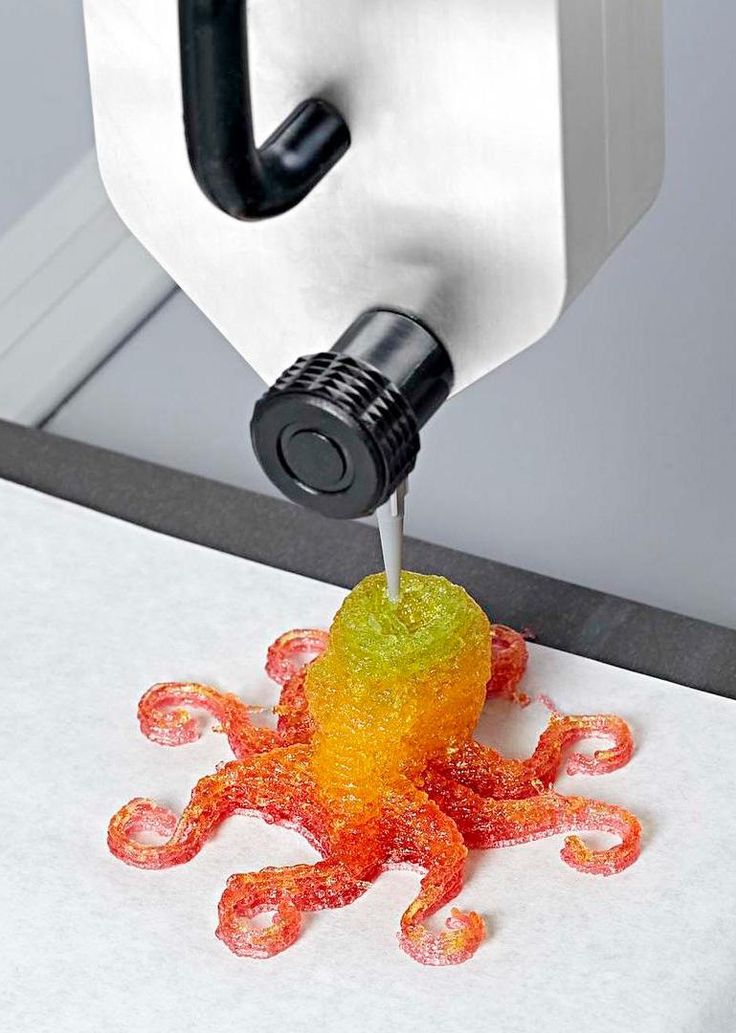 The paint should be applied to the model in very thin layers, the first layers should be transparent. When the paint finish becomes opaque (usually 2-4 coats), let the model rest for 30 minutes to allow the paint to dry completely. Carefully polish the paint layer with manicure sticks, repeat the procedure for each of the colors (between each applied paint).
Separate parts of the model can be covered with masking tape so that the colors, if there are several, do not mix. When painting is complete, remove the masking tape and polish the object with polishing paper. Polishing paper, such as 3M or Zona, comes in a variety of grits and is a relatively new product. It is sold in packs in various online stores, and after processing with this paper, the ink layer or topcoat will literally shine - and nothing else can achieve this effect. Apply 1-2 coats of top coat to protect the paint and let it dry completely. The top coat is selected in accordance with the recommendations of the paint manufacturer. If the topcoat and paint are incompatible, it can render your entire painting job meaningless, so compatibility is very important here.
Pro Tips
Don't shake the can when spraying! It is important not to mix the pigment or primer with the propellant (propellant gas), which will cause bubbles to form in the spray. Instead, the can must be rotated for 2-3 minutes so that the mixing ball rolls like a pearl, and does not strum.
Pros
- Excellent result, if you take into account all the nuances of the process and practice.
- You can do anything with the final look of the object, no matter what material it is printed on.
Cons
- Primer and paint increase the volume of the model, which affects the tolerances and can be a problem when it comes to a part of a larger object.
- High quality aerosol paint or spray gun increases costs.
Vapor smoothed
Vapor smoothed black hemisphere, ABS printed
Tools
- Cleaning cloth
- Solvent resistant sealed container
- Thinner
- Paper towels
- Aluminum foil (or other solvent resistant material)
- Face mask and chemical resistant gloves
| Finishing | ★ ★ ★ ★ ☆ |
| Approvals | ★ ★ ☆ ☆ ☆ |
| Speed | ★ ★ ★ ☆ ☆ |
| Suitable for | all thermoplastics FDM |
Process
Line the bottom of the container with paper towels, if possible along the sides. It is critical that the vapors cannot damage the container and that the container itself is sealed. It is recommended to use a glass or metal container. Apply enough thinner to the paper towels so that they are wet but not soaked - this will also help them adhere better to the walls. Acetone is famous for its ability to smooth out ABS. PLA can be smoothed with a variety of other solvents (dichloromethane works well), but this plastic tends to be much harder to smooth than ABS. When working with any solvents, please follow the safety precautions for handling chemicals and always take appropriate precautions. Place a small "raft" of aluminum foil or other solvent-resistant material in the center of the paper towel-lined container. Place the printout on the "raft" (either side of your choice) and close the lid of the container. Steam polishing can take varying amounts of time, so check your printout periodically. To increase the speed of polishing, the container can be heated, but this must be done carefully so as not to cause an explosion.
When removing the printout from the container, try not to touch it in any way, leave it on the “raft”, take them out together. In all those places where the printout has come into contact with something, there will be defects, since the outer layer will be under-dissolved. Before working with it, let the printout completely “breathe” so that all solvent vapors have evaporated.
Many aerosols and/or solvent sprays are flammable or explosive and their vapors can be harmful to humans. Be extremely careful when heating solvents, always handle them and store them in a well ventilated area.
Pros
- Many small blotches, as well as many layer lines, are smoothed out without additional processing.
- The printout surface becomes exceptionally smooth.
- The procedure is very fast and can be done using commonly available materials.
Cons
- Doesn't "heal" gaps, doesn't completely hide layer lines.

- During the smoothing process, the outer layer of the printout dissolves, which greatly affects the tolerances.
- Negatively affects the strength of the printout due to changes in the properties of its material.
Immersion
PLA model immersed in dichloromethane. Photo 3dpt.ru
Tools
- Solvent resistant container
- Thinner
- Eye hook or cog
- Large wire for sculpture or landscaping
- Dryer or drying frame
- Face mask and chemical resistant gloves
| Finishing | ★ ★ ★ ★ ☆ |
| Approvals | ★ ☆ ☆ ☆ ☆ |
| Speed | ★ ★ ★ ★ ☆ |
| Suitable for | all thermoplastics FDM |
Process
Make sure the container you are using is wide and deep enough to completely submerge the printout in the solution. Fill the container with the appropriate amount of solvent - be careful not to splash. As with vapor smoothing, ABS dip smoothing can be done with acetone, which is easy to find in the store, and for PLA, dichloromethane can also work well with ABS, HIPS, SBS, PETG, and many other materials. PLA is quite resistant to solvent smoothing, so it may take several passes to achieve the desired result. Prepare the printout for dipping by screwing a hook or eye screw into it in an inconspicuous place. Pass the wire through the eyelet or wrap the wire around the screw so that the printout can be immersed in the solvent. If the wire is too thin, it will not be able to withstand the buoyant force on the printout, and it will be difficult to sink the object.
Once the printout is ready, use a wire to completely immerse it in the solvent for a few seconds. Remove the printout and hang it by the wire in a dryer or on a drying frame to allow the solvent to completely evaporate from the surface. After ejection, the printout can be gently shaken to facilitate the drying process and ensure that no solvent has accumulated in the depressions.
Pro Tricks
If an opaque whitish coating appears on the printout after drying, this can be corrected by holding the object over a solvent bath for a while so that its vapor slightly dissolves the surface. This restores the original color of the printout and achieves a shiny outer layer.
Pros
- The surface of the print is smoothed much faster than steam polishing.
- Significantly less fumes are generated than other solvent polishing methods, so this method is less hazardous.
Cons
- The surface is smoothed very aggressively, so you can forget about tolerances.
- Immersion for too long can result in complete deformation of the object and a significant change in material properties.
Epoxy
Black ABS printout, half epoxy coated, half uncoated
Tools
- two-component epoxy06
- Sponge Applicator
- Mixing container
- Sandpaper P1000 or finer
| Finishing | ★ ★ ★ ★ ☆ |
| Approvals | ★ ☆ ☆ ☆ ☆ |
| Speed | ★ ★ ★ ★ ☆ |
| Suitable for | all thermoplastics FDM |
Process
After the printout has been cleaned (preliminary cleaning gives the best end result), wipe it thoroughly with a cloth. Mix the resin and hardener in the proportion indicated in the instructions, accurately measuring all volumes. The curing process of epoxy resin is exothermic, so glass containers and containers made of materials with a low melting point should be avoided. It is recommended to use containers that are specifically designed for mixing epoxy resins. Incorrect ratio of resin and hardener can result in longer curing time or no curing at all and result in a permanently sticky substance. Mix the resin and thinner as directed in the instructions - carefully, in smooth movements to minimize the amount of air bubbles remaining inside the mixture. Very little epoxy is needed, and most of these resins only work for 10-15 minutes, so plan accordingly.
Use the sponge applicator to apply the first coat of epoxy, being careful not to build up in crevices and small parts. When the printout is sufficiently coated, allow the resin to fully cure - as described in the instructions that came with it. One coat may be sufficient, but for optimum results it is best to lightly sand the printout with fine sandpaper (on P1000 and above) to eliminate any imperfections. Wipe off the dust with a cloth and, in the same way as before, apply a second layer of epoxy.
Pros
- A very thin layer of epoxy won't affect tolerance too much (unless the printout has been sanded too hard beforehand).
- A protective shell is formed around the object.
Cons
- The layer lines will remain visible, they will only be covered by a smooth shell.
- If too much epoxy is used, it can flood details and edges, and the surface can appear greasy.
Plating
FDM-printed structural element nickel-plated with Repliform RepliKote
Tools (for home use)
9
- Sacrificial anode. The anode material must match the metal of the solution: for example, if copper sulfate is used in the solution (with water it is copper sulfate), then the anode must also be copper. Any object made of the appropriate metal will do (for example, copper wire for copper plating), or you can buy special strips of metal for galvanization.
- Conductive paint or acetone with graphite. For galvanization, the surface of the printout must be electrically conductive, and this can be achieved with a conductive paint or a solution of equal parts graphite and acetone. Conductive paint will work with any material, but acetone with graphite will only work with ABS.
- Power rectifier. A simple battery can be used as this element, only it will not be as efficient and will not give a fast enough result than the rectifier itself (household current).
 The rectifier is safer in the sense that it can simply be turned off and thus cut off the current during the galvanization process.
 - Conductive screw or eye hook
- Non-conductive container
- Contacts
- Non-conductive gloves and goggles. Electroplating solutions are acidic and can cause injury if splashed into the eyes, so wearing glasses is very important. Solutions also irritate the skin and conduct electricity, so insulating gloves are needed.
- The metallized shell increases the strength of plastic printouts, which greatly expands the scope of their applications.
- Properly galvanized, the metal coating is very thin so that tolerances are generally maintained.
- The surface (again, if everything was done correctly) turns out great, no one will think that the object is printed on a 3D printer.
- In general, it is very expensive to get a professional result. Professional electroplating at home requires a fair amount of equipment.
- Electroplating at home can result in personal injury if safety precautions are not followed.
- Post-processing of FDM parts
- Remove supports
- Removal of soluble supports when printing with a 3D printer with two extruders
- Sanding plastic 3D printed products
- Application of Acetone in ABS plastic processing
- Filling irregularities in ABS plastics
- Polishing ABS/PLA
- Priming and painting 3D printed products
- Acetone baths for ABS products
- Chemical solvent baths
- Using epoxy to finish prints
- gap filling
- raw
- sanded
- polished
- painted
- epoxy coated
- Pliers
- Set with small tools (eg watchmaker's set).
- The overall geometry of the part does not change
- Fast on time
- Does not remove visible layer lines, streaks or smudges on print surface
- If support structures leave excess material or marks behind, the accuracy and appearance of the part will be reduced
- Solvent safe container
- Thinner
- Ultrasonic cleaner (optional)
- HIPS (in conjunction with ABS )
- PVA (in conjunction with PLA )
- Great for complex geometries where standard support removal would be impossible without damaging the base model.
- The result is a smooth surface where the support structure is in contact with the base piece.
- Improper dissolution of the material can lead to discoloration and deformation of the entire part.
- Does not remove visible layer lines, streaks or spots on part surface
- May cause small spots or holes in the final print if soluble material gets on the object during printing
-
- Sandpaper up to 1000
- Rags
- Toothbrush
- Soap
- Face mask
- With this method you get an extremely smooth surface
- This method facilitates additional post-processing (such as painting, polishing, or epoxy coating)
- Not recommended for thin wall prints as this may damage part
- Difficult for surfaces with difficult geometries and fine details
- May affect overall print accuracy if sanding is too aggressive and too much material is removed
- Acetone
- Cotton buds or brush
- Acetone will not discolor the part surface like other adhesives
- After drying, the seam will exhibit ABS properties, making further processing easier and more uniform
- The bond formed by this cold welding is not as strong as a solid impression
- Excessive use of acetone can lead to aggressive dissolution of the part and adversely affect the final result and tolerances
-
- Epoxy (for small voids only)
- Automotive Putty (large voids and joints)
- ABS plastic and acetone (for small voids only and for ABS parts only)
- Epoxies are easy to sand and prime, making the surface easy to paint
- ABS juice will be the same color as your part, as long as you use the same filament by color and manufacturer. Therefore, there will be no discoloration of the surface
- Auto putty or other polyester epoxy will dry opaque resulting in discolored spots on print
- Requires additional sanding to achieve uniform coverage
- May affect overall print accuracy if sanding is too aggressive and too much material is removed
- Polish
- Sandpaper
- Nonwoven wipe
- Toothbrush
- Microfibre cloth or polishing pad
- Polishing is applied without the use of any solvents that can deform the part and change the precision tolerances.
- When properly ground and polished, the part will give the impression of a mirror finish, imitating plastic injection molding
- Plastic polish and cleaner is very economical, making this method quite profitable for a quality finish
- The part must be carefully sanded before polishing if a mirror finish is required. This may affect tolerances
- Primer/paint may not adhere to surface after polishing and you will need additional products
- Non-woven cloth
- Toothbrush
- Sandpaper
- Aerosol Acrylic Primer
- Polishing agents
- Masking tape (only if using multiple colors)
- Gloves and petal mask
- Professional results with attention to detail
- Excellent appearance of the final product, regardless of the material/color in which the object was originally printed
- Paint and primer will increase the volume of the model, which will change the tolerances and can cause problems if the part is part of the assembly
- Buying a high quality spray paint or airbrush is not cheap
- Non-woven cloth
- Sealed container
- Thinner
- Paper towels
- Aluminum foil (or other solvent resistant material)
- Face mask and chemical resistant gloves
- Smooths out many small spots and reduces layer lines present in the print without any additional work
- Creates a very smooth "shell" around part
- A very fast method that can be implemented with improvised means
- Doesn't heal gaps or completely mask layer height
- The dithering process "dissolves" the outer shell of the print, and therefore the tolerances are greatly affected
- Negatively affects print strength due to changes in material properties
- Solvent safe container
- Thinner
- Hook or small screw
- Wire
- Drying rod or stand
- Face mask and chemical resistant gloves
- Print surface smoothes much faster than steam polishing
- Produces much less fumes than other solvent polishing methods and is safer
- Very aggressively smoothes the surface of the part, so the tolerances deviate greatly from the specified
- Immersion too long can lead to complete deformation of the part and a significant change in material properties
- Two-component epoxy (such as XTC-3D)
- Foam applicator
- Brushes
- Mixing container
- Sandpaper 1000 grit or higher
- A very thin coat of epoxy will not significantly affect part tolerances (unless the part has been sanded first)
- Resin provides an outer protective sheath around the part
- Layer lines will still be visible, they are under the "smooth" shell
- Applying too much epoxy can cause surface dripping and over-smoothing of print details
- Plating solution. It can be prepared by mixing a metal salt with acid and water, but if the proportions are not accurate, it will be difficult to get a professional result.
 Buying a ready-made solution guarantees that there are no problems with plating.
 - Sacrificial anode. The anode material must match the metal of the plating solution, so if copper sulfate is used in the solution, then a copper anode should be used. You can use any item made of metal plating (copper wire, for example), or you can purchase a thin strip of metal plating that is made specifically for electroplating.
- Conductive paint or acetone and graphite. The print surface must be conductive for coating, which can be achieved with conductive paint or a 1:1 solution of graphite and acetone. Conductive ink will work on any printed material, but a solution of acetone and graphite will only work on ABS.
- Power Rectifier - A battery can be used instead of a rectifier, but a battery is not as efficient and will not deliver results as quickly and consistently as a rectifier. A rectifier is also a safer option. It can simply be turned off to stop the current flow during electroplating.
- Conductive screw or eyelet
- Non-conductive vessel
- Lead set
- Non-conductive gloves and goggles.
- The metal shell increases the strength of the plastic part, which greatly expands the possibilities of its application and use
- The outer metal coating is very thin so if properly applied, tolerances of 9 can be held tightly0006
- Creates a beautiful surface that, if done correctly, will not look like a 3D printed object
- It is usually very expensive to do this at a professional level, and home plating requires a fair amount of professional processing equipment
- Electroplating at home can cause electric shock if not followed
- Email: Sales@3dtool.
Learn more
- A galvanizing solution can be obtained by mixing a metal salt, acid and water, but if the proportions are inaccurate and the substances are of insufficient quality, one cannot count on a professional result.
 If you buy a ready-made solution (as in Midas kits), you can be sure that the problems with plating are not caused by the solution.
 | Finishing | ★ ★ ★ ★ ☆ |
| Approvals | ★ ★ ★ ☆ ☆ |
| Speed | ★ ★ ★ ★ ☆ |
| Suitable for | all thermoplastics FDM |
Process
Electroplating can be carried out at home or in a professional workshop. To do everything right, you need to be well versed in the materials, in what is actually happening - and at home these opportunities are usually limited. In order to achieve excellent surface quality and to have more plating options, including chrome plating, it is best to use the services of professional workshops. The copper galvanization process will be described below as an example.
At home, you can galvanize with copper or nickel, and this coating will then serve as the basis for galvanizing with other metals. It is critically important that the printout surface be as smooth as possible before it is galvanized. Any bumps and lines in the layers will be enhanced as a result of the process. Prepare the sanded and cleaned object for plating by coating the plastic with a thin coat of high quality conductive paint, or with a graphite and acetone solution for ABS printouts. Allow the conductive coating to dry completely, sand if necessary to ensure a smooth surface. At this stage, it is extremely important not to touch the printout with bare hands or to wear gloves, because sweat marks on the object will certainly affect the quality of the galvanization.
Insert a screw or eyelet in an inconspicuous place on the printout and connect it to the negative terminal of the rectifier. This will be the cathode. Connect the copper anode to the positive contact of the rectifier. Fill the container with enough copper plating solution so that the printout is completely covered with it. Immerse the anode in the container and turn on the power. After the rectifier is turned on, immerse the printout in the container, making sure that it does not touch the anode anywhere. Beware! When the object is already in the bath, the galvanization system is active, and contact with the solution, cathode or anode can be traumatic. Set the voltage on the rectifier to 1-3 Volts, and the process will go to full metallization. To speed things up, the voltage can be increased, but not more than 5 volts. When enough metal has deposited on the printout, simply turn off the power and dry the object with microfiber towels. When it's dry, varnish the object to protect it from corrosion.
Pros
Cons
Plastic processing for 3D printer. Plastic post-processing after 3D printing ABS, PLA, Nylon, Petg
Contents:
Hello everyone, Friends! With you 3DTool!
With the FDM 3D printer you can quickly and economically produce plastic parts of any geometric shape. Finished parts show visually the lines of the layers they were printed on, making post-processing an important consideration if a smooth surface is required. Some post-processing techniques can also increase the strength of finished products by helping to reduce their anisotropic properties.
This article will discuss the most common post-processing techniques in FDM 3D printing .
Catalog of FDM 3D printers
Post-processing of FDM parts
This image above (from left to right) shows the post-processed parts FDM :
Remove supports
Support removal is typically the first step in post-processing for any 3D printing technologies if the part requires support for precision manufacturing. Supports can usually be divided into 2 categories: standard and instant .
Unlike other post-processing methods discussed in this article, support removal is a requirement and does not result in improved surface quality.
Removing supports mechanically is necessary when printing with a 3D printer with a single extruder (for example, PICASO Designer X, Hercules 2018, Zenit, Prusa i3 Steel Bizon) When using 3D printers with two extruders, as a rule, the supporting part of the product is made of special soluble materials.
Catalog of 3D printers with two extruders
Left to right. Original printing with support, poor support removal and quality support removal.
Tools and materials you will need for this job:
Support Removal Process: The support material can usually be removed from the finished model without much effort. Cleaning of the substrate material in hard-to-reach places (for example, in holes) can be done using an awl and pliers. Properly positioned support structures and proper print orientation can greatly reduce the impact of the support material on the aesthetics of the final result.
Plus
Cons
Removal of soluble supports when printing with a 3D printer with two extruders
As we said earlier, the removal of supports printed from soluble materials is done differently than manually, mechanically, so the use of 2 or more extruder printers is preferable. (e.g. PICASO Designer X PRO, Raise3D PRO2)
Catalog of 3D printers with two extruders
Tools and supplies you will need for this job:
Process : the final model is placed in a bath with the appropriate solvent (for example, for PVA plastic it will be ordinary water, for material HIPS it will be D-limonene ) until the support material dissolves. Support is usually printed with:
Glass storage containers such as jars are excellent receptacles for diluting limonene. For dissolution in water, any non-porous container will do. For prints using HIPS/ABS bath with a 1:1 ratio of limonene to isopropyl alcohol works very well for quick support removal. Many other auxiliary materials such as PVA (used with PLA ) are water soluble.
Helpful Hint: Speed up the dissolution time of the support material by using an ultrasonic bath and changing the solution as soon as it becomes saturated with plastic dissolved in itself. Using a warm (not hot) solvent will also speed up the dissolution time if you don't have an ultrasonic cleaner available.
Catalog of ultrasonic baths
Pros
Cons
Sanding plastic 3D printed products
Sanded brown ABS plastic part
Tools and materials you will need for this job:
Sanding process: After the supports have been removed or dissolved, sanding can be performed to smooth the part and remove any visible stains or traces of the supports. The initial grit size of the sandpaper depends on the layer height and print quality.
For layers with a height of 0.2 mm or less, or if there are no spots left on the part after printing, sanding can be started with a paper grain of - 150.
If there are obvious spots or the object was printed at a layer height of 0.3 mm or more, start sanding with 100 grit paper.
purity. The print should be cleaned with a toothbrush in soapy water and then with a rag, between sanding steps to prevent dust build-up and " sintering ". Your FDM parts can be sanded down to 5000 grit to achieve a shiny part surface.
Helpful Hint:
Always sand in small circular motions evenly over the entire surface of the part. Of course, it is more convenient to sand perpendicular or even parallel to the print layers, but this can lead to indentations in the model. If the part becomes discolored or if there are many small scratches after sanding, you can use a blow dryer. With it, you gently heat the part, thereby softening the surface a little and visible unnecessary defects will weaken or disappear altogether.
Pros
Cons
Acetone for ABS plastics
Two white printed halves of ABS bonded with acetone and diluted plastic.
Tools and materials you will need for this job:
Machining process: When the size of the finished part exceeds the maximum size of the 3D printer's camera, the model often has to be broken into smaller parts and assembled later by gluing. For PLA and other materials, bonding can be done using the appropriate adhesive (selection of adhesive will depend on the plastic) . For ABS plastic, multi-piece assemblies can be glued with acetone. The mating surfaces should be lightly moistened with acetone and held firmly together or, if possible, clamped until most of the acetone has evaporated. At this point, the two parts of your model will stick together.
Helpful Hint: increasing the contact area with acetone will increase the strength of the joint. This can be done by including block connections in the design.
Pros
Cons
Filling irregularities in ABS plastics
The gray ABS model had voids after sanding.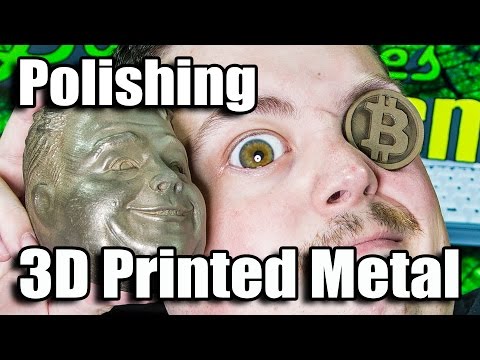 The surface became smooth.
Tools and materials you will need:
Process: After sanding or removing soluble backings, gaps often appear in the print. During printing, gaps are sometimes formed, and often this pattern is unavoidable. Small gaps and voids can be easily filled with epoxy and no further treatment is required. Large gaps, or gouges, left from attaching model assembly parts can be successfully filled with automotive putty, which will require additional sanding after drying.
The putty gives excellent results and can be easily sanded and painted after it has fully cured. The connection will be strong, and will not weaken the plastic. Conversely, autofiller parts tend to be stronger than native plastic.
ABS print gaps can also be filled by making a slurry of ABS filament and acetone ( ABS juice or ABS juice ) that chemically reacts with the part and penetrates any surface voids. A ratio of 1 to 2 between ABS and acetone is recommended. This method will not significantly affect the cleanliness of the surface around the gap if properly applied.
Tip : If gaps are visible on FDM parts before sanding, fill them with epoxy and then sand once until dry. This will greatly reduce the overall time required to achieve a smooth surface.
Pros
Cons
ABS and PLA polishing
ABS plastics catalog
Catalog of PLA plastics
Tools and supplies you will need
Process: Plastic polish can be applied after sanding to give standard filaments such as ABS and PLA a glossy finish. After the part has been sanded to 1000 grit, wipe off any excess dust from the Non-woven » cloth, then clean it in a bath of warm water with a toothbrush.
Allow the piece to dry completely and buff it with a buffing pad, or by hand with a microfiber cloth and a jewelry polish designed specifically for plastic and synthetics that provides a long lasting shine.
Other plastic polishes, such as car headlight polishes, work on the same principle, but some may contain chemicals that can damage the original material.
Helpful Hint: For polishing small parts, attach the polishing pad to the Variable Speed Drill (or other rotating tool such as a drill) . Bench grinders equipped with a polishing wheel can be used for larger, stronger prints, but don't polish too long in the same place. This can cause the plastic to melt due to friction.
Pros
Cons
Priming and painting 3D printed products
White PLA part spray painted gray
Tools and supplies you will need:
Process: after the part has been properly sanded (up to 500 grit sandpaper is required at this stage) , the print can be primed. The primer should be applied in two coats using an aerosol can.
An aerosol primer designed for painting models will provide an even coverage and be thin enough not to darken the part before painting.
A thick primer, such as one available at the hardware store, may stick together and require more sanding.
Apply the first coat in short, quick strokes at a distance of about 15 - 20 cm from the part to avoid the formation of a thick layer of primer. Let the primer dry and sand down any imperfections with 9 grit sandpaper.1286 500. Apply the final coat of primer with light, quick strokes.
Once the primer is complete, painting can begin. Painting can be done with acrylic paints and artist's brushes, but using an airbrush or spray can give a smoother surface.
Hardware store spray paint tends to be thicker and harder to control, so it's best to use paints made specifically for painting models.
The primed surface should be sanded and polished (sanding and polishing sticks used in nail salons are ideal for this application) and then cleaned with a non-woven cloth.
Paint over the model using very light layers; the first few layers will look translucent. Once the paint has developed an opaque coat of (usually after 2-4 coats) , allow the model to dry for 30 minutes to allow the paint to set. Carefully polish the paint layer with nail sticks.
Multi-colour models can be painted with masking tape. Once all layers of paint are ready, remove the tape and buff the paint using polish paper. Polishing paper such as 3M or Zona can be purchased in a variety of grit sizes. You can buy it in a pack in many online stores. It will give the paint a shine that cannot be achieved in any other way.
Tip: Do not shake the can when using spray paint! The goal is to mix the pigment or primer, shaking the propellants will cause bubbles to form in the aerosol. Instead, rotate the jar for 2-3 minutes. The stirring ball should roll, not rattle.
Pros
Cons
Acetone baths for ABS products
Smoothed black model of a petal with a spherical surface made of ABS plastic after an acetone bath.
Tools and materials you will need:
Process: Line the chosen container with paper towels along the bottom and, if possible, up the sides. It is very important that the steam does not disturb the chamber itself. The chamber may be sealed.
It is recommended to use glass and metal containers.
Pour in enough solvent to dampen but not drown the paper towels. This will also help them stick to the side walls of the container.
Acetone is well known for its ability to smooth out ABS parts. For PLA, smoothing is possible with various solvents, they work well, but as a rule, with PLA, it is more difficult to get a smooth surface, unlike ABS.
IMPORTANT! When working with any solvent, please follow the safety regulations for the chemical and always follow the appropriate safety precautions !
A small "raft" of aluminum foil or other solvent-resistant material should be placed in the middle of a lined paper towel container.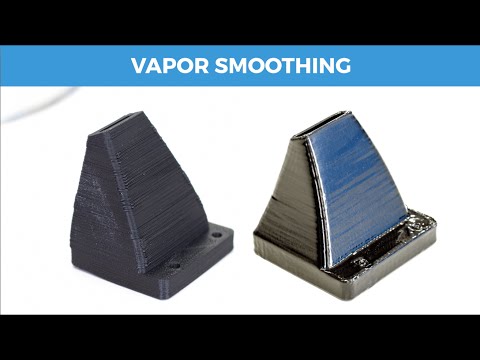
Next, place your part on this raft (either side selected as the bottom on the raft) and close the lid of the container.
Steam polishing can vary in duration, so check the print periodically. Heat can be used to increase polishing speed, but care must be taken to prevent the buildup of potentially explosive fumes.
When removing the part from the chamber, try not to touch it at all, leaving it on the raft and removing it from the container. Any points of contact with the part will generate surface defects because the outer shell will be half dissolved. Allow parts to dry completely before use.
NOTE . Many aerosol and/or spray solvents are flammable/explosive and solvent vapors can be harmful to human health. Be especially careful when heating solvents and always work in a well ventilated area.
Pros
Cons
Chemical solvent baths
Tools and materials you will need:
Process: Make sure the container you are using is wide enough and deep enough to hold the part and solvent. Fill the container with the appropriate amount of solvent, taking care to minimize splashing. As with steam smoothing, acetone should be used to dip the ABS.
PLA is sufficiently resistant to solvents, so it may take several passes to achieve the desired result.
Prepare the part for dipping by screwing an eye hook or small screw into an inconspicuous surface of the print. Pass the wire through the eye of the hook or around the screw so you can lower your piece into the wire bath. If the wire is too thin, you won't be able to submerge the part in the solvent.
After the part is prepared, quickly immerse the entire object in the solvent for no more than a few seconds using wire. Pull out the print and attach it to a wire over a dryer rod or rack to allow the solvent to completely evaporate from the surface. The part should be gently shaken after you remove it to facilitate drying and avoid solvent build-up in depressions on the surface.
Helpful Hint: If, after drying, the part has an opaque whitish color, it can be hung over a solvent bath for a while so that the evaporating vapors slightly dissolve the surface. This will restore the color of the print and provide a glossy outer layer.
Pros
Cons
Using epoxy to finish prints
The part is sanded and coated with epoxy resin.
Tools and materials you will need:
Process : after the print has been sanded (sanding first will give better end results) , completely clean it with a non-woven cloth.
Mix the correct ratio of resin and hardener as directed in the resin instructions. Make no mistake about the proportions. Epoxies are exothermic when mixed, so glass containers and containers composed of low melting point materials should be avoided.
Containers specifically designed for mixing epoxy resins are recommended. The wrong ratio will lengthen the drying time and the epoxy may never be able to fully cure, resulting in a disastrous and sticky part.
Mix resin and hardener thoroughly according to instructions. Stir gently to minimize air bubbles. The faster the epoxy dries, the better. Most epoxies have a working dry time of only 10-15 minutes, so do your post-processing in the proper order.
Apply the first coat of epoxy using a foam applicator and try to minimize resin buildup on recessed surfaces or other details of the print. Once your part is sufficiently covered with resin, allow it to fully cure according to the manufacturer's instructions. One coat may be enough to smooth the detail, but for optimum appearance, the print should be lightly sanded with fine sandpaper (1 ,000 grit or higher) . Remove dust with a non-woven cloth and apply a second coat of epoxy in the same manner.
Pros
Cons
Tools and supplies you will need:
Electrophoresis solutions are acids and can cause eye damage if splashed, so appropriate goggles are required. Also, these solutions can irritate the skin and conduct a charge when used. Therefore, non-conductive gloves should always be used.
Process: metal plating can be electroplated at home or in a professional workshop. Proper plating requires a deep knowledge of materials, and what you can do at home has certain limitations compared to what can be done in a professional workshop.
For a better finish and a wider range of plating options, including chrome plating, a workshop would be the best option. For clarity, the copper plating process will be described below.
At home, galvanization can be done using copper or nickel plate. It is imperative that the surface of the print to be processed is as smooth as possible before coating; any unevenness and visible lines of the layers will start to stand out after coating.
Prepare a cleaned and sanded print. By coating the plastic with a thin layer of high quality conductive paint or a solution of acetone and graphite (if made of ABS) . Allow the conductive coating to dry completely and sand if necessary to ensure a smooth finish. It is extremely important to minimize contact with the print or wear gloves as the sebum on your fingers will interfere with the coating process.
Insert a screw or hook with an eye into an inconspicuous surface of the part, similar to dipping in solvent.
Attach to one of the rectifier leads. This will serve as the cathode. The connection must be made to the negative terminal of the rectifier. Connect the copper anode to the positive terminal of the rectifier using the second power wire and fill the container with enough electroplating solution so that the imprint and the copper anode are completely hidden. Turn on the power rectifier. After the rectifier is turned on, make sure that the part does not touch the anode in any way.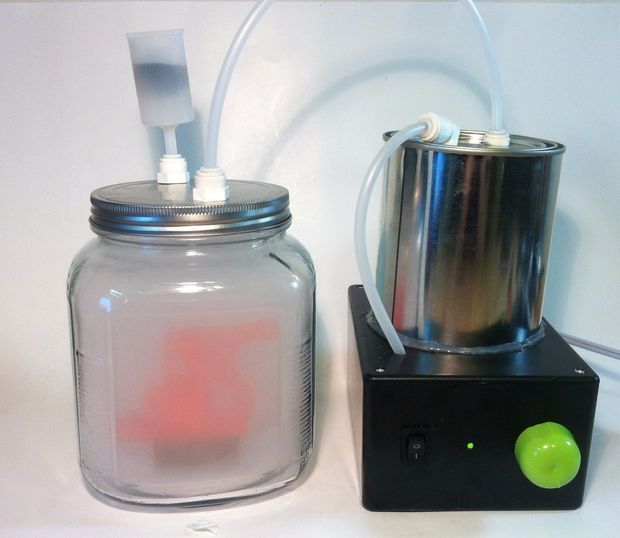
IMPORTANT! Be very careful at this stage. After the part is lowered into the bath and the system is energized, any contact with the solution, anode or cathode may result in personal injury !
Set the power supply rectifier to 1-3 volts. After that, the metallization process will begin until the part is completely covered with metal. Voltage may be increased to reduce coating time, but should not exceed 5 volts. Simply turn off the straightener and remove the print after a satisfactory finish has been applied. Dry the print with microfiber towels. Coat the part with a special varnish for metal after drying. This will protect it from corrosion.
Pros
Cons
Well, that's all we have! We hope this article was useful for you!
Order 3D printer or FDM consumables , you can