Peel 3d scanner review
Review: The peel 2 3D scanner - affordable and effective full-color 3D scanning
0Shares
3D Printing Industry reviews the peel 2 3D Scanner.
Backed by over a decade of research and development in the 3D scanning market, the peel 2 3D scanner is peel 3D’s latest handheld system. Priced at $7,890, the affordable professional-grade machine is intended as an alternative to the pricier industrial devices retailing at $15,000+. As such, it’s suitable for newcomers as well as artists, designers, and engineers looking for a capable piece of kit.
Much like the company’s debut peel scanner, the peel 2 is powered by metrology specialist Creaform and electronics provider AMETEK. In line with its predecessor, it operates on the same structured light technology using white LEDs, which is safe for the eyes unlike laser-based scanning technologies. The device features three individual cameras, each bounded by an array of four LEDs and an additional white light projector to deliver full-color, textured 3D scans.
Lightweight and ergonomic seem to be the name of the game here, as the peel 2’s body only weighs 950g and measures 150 x 171 x 251mm. This makes the scanner feel at home in the hands of the user during those longer scanning sessions, whether it be for a demonstration or a hardcore reverse engineering project.
The machine is generally designed to do its job without the need for targeting points at a scanning range of 0.3m – 3m, although exceptionally smooth or flat surfaces may require them. While the peel 2 also has trouble with objects that are translucent, completely pitch black, mirrors, thin walls, and hair, its limitations are absolutely normal for any scanner in its category and price range. The device has a volumetric accuracy of up to 0.5mm/m and is capable of taking 550,000 measurements a second. The scanning area is an industry standard 380 x 380mm.
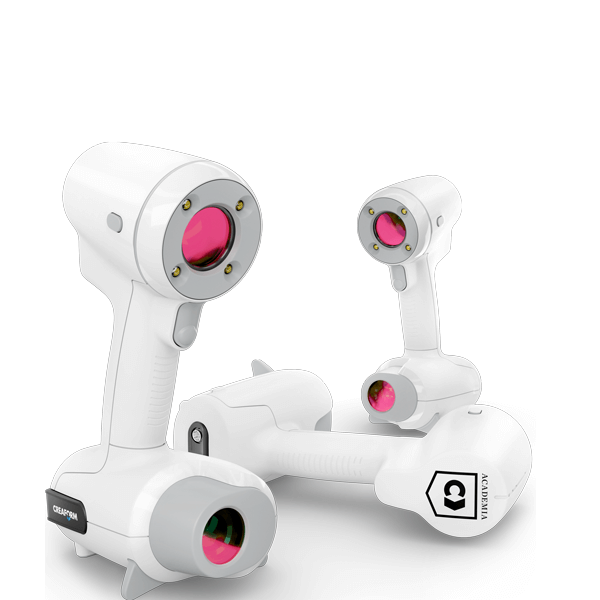
The peel 2 3D scanner. Photo via peel 3D.The calibration and setup process
Packaged in the box is everything you need to start 3D scanning, including a calibration plate, positioning targets, a power supply, and a USB stick containing the manual and software installer.
The calibration process is fairly intuitive, and is recommended (but not essential) before every object scan. Users are required to place the dotted calibration plate on a flat horizontal surface such as a table and scan it in ten different positions. Starting at a perpendicular angle and a distance of approximately 20cm, the scanner is slowly moved away from the plate until it is able to scan the whole thing, taking the necessary snapshots along the way.
Taking around two minutes, this setup stage is quite difficult to mess up but we still thought an absolute beginner could benefit from a quick instructional video. That being said, unlike many other competing scanners, the calibration plate doesn’t need to be slanted and positioned at various obscure angles for the device to get a comprehensive set of readings. This makes the whole experience significantly more user-friendly.
We were also delighted to find that the complementary peel 3D software housed on the USB was easy to get to grips with.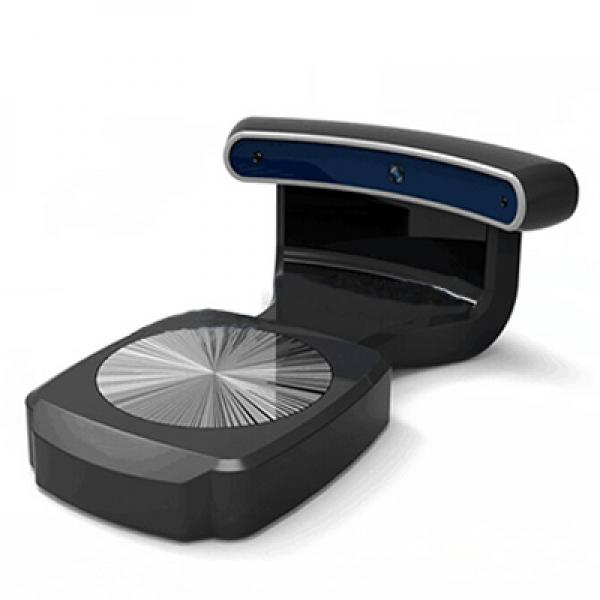 The program not only aids users in selecting the optimal scanning parameters such as the resolution, but also guides them through the post-processing stage with clear, defined functions. These include the ability to remove unwanted background elements, plug up holes, and align and merge multiple scans in an assembly.
Benchmarking the peel 2
It’s time to see what the peel 2 is really made of. Our in-house team of engineers put the 3D scanner through its paces with a wide variety of scan tests, ranging from artistic pieces to functional parts (we even threw a human into the mix!). Each and every one of the tests was performed three times with varying resolutions (2mm, 1mm, 0.5mm) in an open space with plenty of lighting for the best results. First up: the torso of Diadumenos found in the Louvre.
The Diadumenos sculpture. Image by 3D Printing Industry.Much to our dismay, we didn’t have the original at our disposal so we settled for a white 35cm tall 3D printed replica instead. Even still, the peel 2 delivered on all three scans, each of which took a little under three minutes to complete, and a further three minutes in post-processing. We were impressed by how easy it was to capture the whole thing in a single run and just how little of the background the scanner accidentally caught. Furthermore, we noticed a real difference in quality between the resolutions as 2mm yielded 65,936 faces while 0.5mm yielded a whopping 1,992,116 faces. Overall, a fantastic scan.
Next up was our 30cm tall silver spray painted replica of the Still Water horse sculpture. Again, the fact that the object was simple in its geometry meant the average scan time was no more than three minutes, with a further two minutes in post-processing. The more sensitive 0.5mm resolution run captured a significant amount of unwanted table, but it was nothing the peel 3D software couldn’t purge away in a matter of seconds. The curves of the model were emulated beautifully and the scanner even managed to track the crevices of the ears.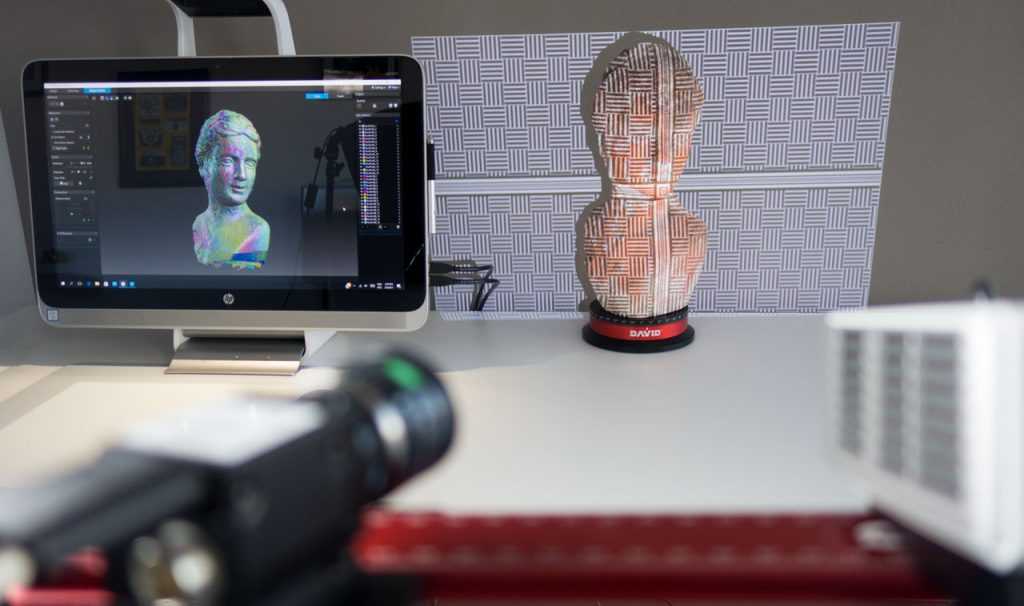
Our third object was a white 3D printed Neapolitan Fisherman sculpture – about 50cm tall. We thought this might finally be the test to trip up the peel 2, but the device held its own admirably despite the complexity of the model. His hair, the fine creases of his rags, and even the detailing on the lute resembled the real thing, albeit after some cleaning up. Naturally, the scanning and post-processing times on this model were a little longer than the previous models, averaging five minutes and four minutes respectively. The 2mm scan comprised 177,758 faces while the 0.5mm scan consisted of 2,837,197 faces.
We also compared the 3D scans to the original STL of the part to test the scanner’s dimensional precision. Impressively, each of the scans were within 0.5mm of the STL’s intended dimensions when looking at all points, with an average discrepancy of about 0.25mm. For a handheld scanner at this price point, we deem this highly accurate.
Moving on, we tried our hand at some everyday items around the office. Both the plant and headphones were scanned at a standard resolution of 1mm and produced precise digital copies. A few minutes of clean-up were required for both objects but the scans only took around 3 minutes each and really only struggled in heavily shaded areas.
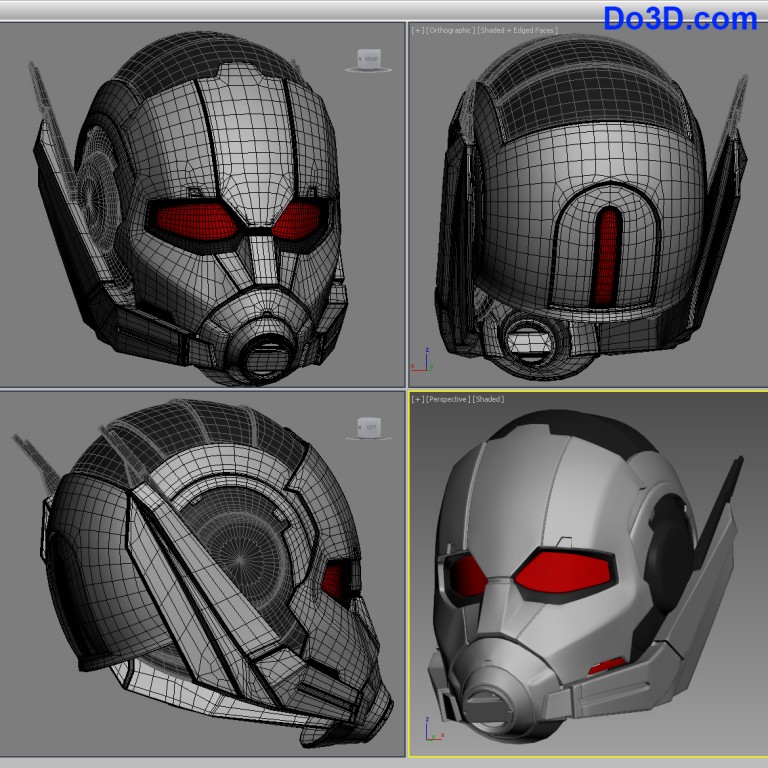
The helmet and footpeg hanger scans. Image by 3D Printing Industry.For the penultimate scanning round, we tested the peel 2 with a helmet and a rear motorbike footpeg hanger, both at a resolution of 1mm. The helmet was generally successful apart from the pitch black padding on the interior, which can be fixed with some additional work in a program such as ZBrush. The footpeg hanger, on the other hand, came out great. Despite the part being a dark grey, the scanner was able to recreate a solid model. It could certainly be used for reverse engineering purposes or even as a basis for a spare part redesign.
Finally, the human scan. While the final model did end up with plenty of holes, a cleaning session in ZBrush would be enough to make it printable. The scan could also do with the addition of a base to eliminate the messiness of the lower half, although this would be necessary anyway.
When it comes to the textures and color capturing, however, the peel 2 certainly performs. The face is recognizable and the finer details deliver a healthy does of realism. It’s worth noting here that human scans are always among the most difficult to get right, and will inevitably need a considerable amount of post-processing before they are ready for the slicer.
The verdict
When all is said and done, we have here one of the most cost-effective texture recording 3D scanners on the market. Everything from the hardware to the software – even the way it’s packaged – is great for the price point. The peel team has very thoughtfully streamlined the calibration process, the scanner feels great in the hands, and the software makes cleaning and merging as easy as pie.
While we found that the device wasn’t ideal for objects under 30cm in length, and often lost tracking on exceptionally small, large, or dark surfaces, these are ultimately minor gripes with what is otherwise a fantastic product. The peel 2 is undoubtedly one of the strongest contenders in its class, and makes for a great 3D scanner regardless of the user’s experience level.
Subscribe to the 3D Printing Industry newsletter for the latest news in additive manufacturing. You can also stay connected by following us on Twitter and liking us on Facebook.
Looking for a career in additive manufacturing? Visit 3D Printing Jobs for a selection of roles in the industry.
Featured image shows the peel 2 3D scanner. Photo via peel 3D.
Tags AMETEK Creaform peel 2 Peel 3D ZBrush
Kubi Sertoglu
Kubi Sertoglu holds a degree in Mechanical Engineering, combining an affinity for writing with a technical background to deliver the latest news and reviews in additive manufacturing.
Review: The peel 2-S 3D scanner - cost-effective full-color 3D scanning with a small part focus
3D Printing Industry reviews the peel 2-S 3D scanner.
Leveraging over ten years of R&D experience in 3D scanning, peel 3D once again targets the mid-range market with its latest handheld, full-color 3D scanner – the peel 2-S. Based on the company’s previously launched peel 2, which we reviewed just a few months ago, the peel 2-S has been revamped to optimize it for small and intricate part scanning, with a smaller field of view and resolutions of up to 0.1mm. Yes, the S stands for ‘small’.
Priced at a relatively affordable $7,890 ($8,090 from October 1st), the professional-grade 3D scanner is aimed at artists, designers, engineers, educational institutions, and anyone else looking to bridge cost-efficiency and performance in their 3D scanning projects. Much like the rest of peel 3D’s product portfolio, including the original peel 1, the peel 2-S is powered by electronics provider AMETEK and metrology specialist Creaform (peel 3D’s parent company).
It’s worth noting that there’s also a higher-performance version of the device called the peel 2 CAD-S ($10,090), which is more suited to hardcore reverse engineering projects. Designed to be fully compatible with most commonly available engineering CAD software, the CAD-S version enables users to export scans directly to various 3D environments without first requiring a third-party conversion program. For this review, we’ll be working with the base peel 2-S.
The peel 2-S 3D scanner. Photo by 3D Printing Industry.White light, black body
Straight out the box, the peel 2-S’ striking new matte black skin is what catches the eye. To date, the firm has exclusively developed its 3D scanners with white-grey bodies, so the visual change is a welcome one that adds a certain flair to the otherwise monotonous product lineup.
What hasn’t changed is peel 3D’s focus on ergonomics and ease-of-use. Just like its older siblings, the peel 2-S feels at home in the hands of the user, with an intuitive point-and-scan workflow that makes it a breeze to handle for longer and more tedious scanning sessions. The company has even managed to shave an additional 20g off the peel 2-S (930g) when compared to the original peel 2 (950g). The scanner itself measures 154 x 178 x 235mm.
All of peel 3D’s scanners so far have featured the company’s signature structured white light technology, and the peel 2-S is no different. Unlike laser-based scanning technologies, white LEDs are safe for the human eye and work by projecting visible light patterns onto the object being scanned. The scanner’s cameras then determine the exact positioning of the projected patterns in real-time, which enables the system to generate a textured 3D model. The peel 2-S, in particular, has three cameras, each surrounded by a set of four white LEDs and an additional white light projector.
The device is designed to work well with objects on the smaller side, with a recommended part size of 0.05 – 0.5m (the scanning area is 143 x 108mm).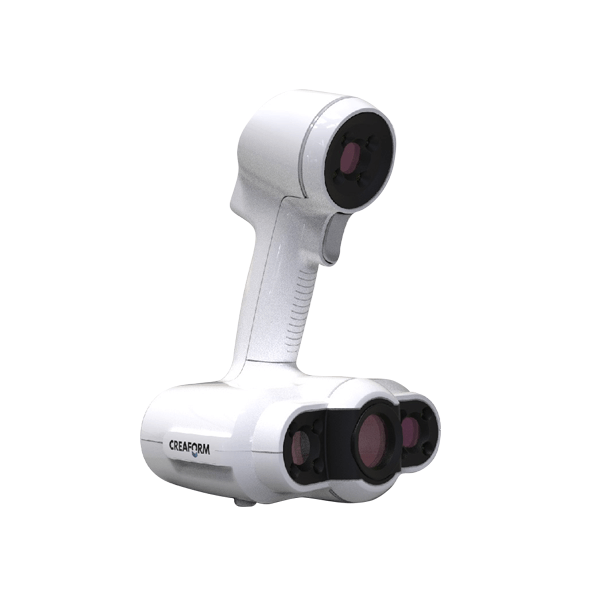 As for material compatibility, the peel 2-S should have no problems scanning metal castings, polymers, and clay-based ceramics. peel 3D’s white light technology is also suitable for full-color human scans but may have some trouble with hair and fur.
Pitch black and mirrored surfaces can also be a little tricky to capture, but this is to be expected since these surfaces are either overly absorptive or reflective. To combat this, it’s not uncommon to coat the part being scanned in a material that is lighter or less reflective. We recommend primer spray or even a dedicated powder-coating spray designed specifically for 3D scanning applications.
If the peel 2-S is still having difficulty with part tracking – perhaps the surface is too large or too flat – there’s always the option to use the positioning targets included in the box. The targets are small, reflective, adhesive dots used to help the scanner maintain its bearings and track its movement relative to the object. We found these worked best when we had at least three or four targets visible to the scanner at all times.
The calibration and setup process
So just how user-friendly is the peel 2-S? As it turns out: very. Everything you need to start 3D scanning is included right in the box, including the calibration plate and a USB key containing the user manual and software installer.
The calibration process is identical to that of the peel 2, meaning getting started is as easy as ever. Although it isn’t essential, scanner calibration is recommended before every object scan – this ensures the best results.
To calibrate the peel 2-S, simply place the dotted calibration plate on a flat horizontal surface such as a table and scan it in the ten different positions specified by the peel 3D software. Starting at a perpendicular angle and a distance of approximately 20cm, slowly move the scanner away from the plate until it’s able to scan the whole thing, taking the necessary snapshots along the way. This only takes around two minutes to complete and is intuitive enough, even for first-timers.
The peel 3D software found on the USB key is also effortless to pick up, provided the user isn’t completely tech-illiterate. Sporting its signature banana-colored UI, the program features a ‘Basic Guided Workflow’ on how to obtain a quality scan, allowing beginners to quickly choose the best parameters for their projects.
Furthermore, the peel 3D software also does a great job of guiding users through the post-processing stage, which is arguably just as important as the scanning itself. The program enables users to remove unwanted background elements, plug up holes, and align and merge multiple scans in an assembly. We thought the video explaining the basics of how to clean a mesh was especially helpful.
The calibration plate and corresponding peel 3D software UI. Image by 3D Printing Industry.Benchmarking the peel 2-S
It’s time to put the peel 2-S through its paces with 3D Printing Industry’s comprehensive 3D scanner testing regime. Much like we do with our 3D printer reviews, we took the time to evaluate the scanner’s performance with a wide variety of parts and 3D printed models, ranging from artistic pieces to functional components. It should be noted that our printers are, on average, precise to around ±0.05mm so the parts we scan may have a margin of error to them.
Each of the tests was performed several times with varying resolutions (2mm, 1mm, 0.5mm, 0.2mm, 0.1mm) in an open office space with ample lighting for consistent results. We also calculated the offset of the scans from the original STLs of the 3D printed parts to test the scanner’s dimensional precision – this is what the 3D heat maps and bell curves depict.
First up was a white PLA print of the Statue of Hygieia, which is located in the park of Schönbrunn Palace, Vienna. The model was chosen for its high surface detail and abundance of crevices and overhangs.
For a first scan, we were quite impressed with how the peel 2-S handled itself. The fine feature details of the physical model were preserved artfully, and the device was as easy to use as its predecessor. We noticed that the number of faces increased considerably with the scan resolution: 168,150 faces at 1mm, 2,461,746 faces at 0. 5mm, and 14,086,457 faces at 0.2mm. It follows that scan time and post-processing time also increased with resolution.
Unsurprisingly, we found that the speed at which the 2-S scanned the model was slightly slower than the original peel 2, owing to the increased focus on small parts. Still, the scans were completed in one run and our scan times clocked in at only 8 – 13 mins, with a further 5 – 12 mins of post-processing.
Looking at the dimensional precision of the scans, the average offset of the vertices between the scanned model and the original STL (which is what we want to emulate) was just 0.005mm with a standard deviation of 0.075mm. Excellent results.
The next scan test was a 3D printed version of ‘Still Water’, a bronze sculpture located at Marble Arch, London. The model we worked with was spray-painted in silver and stood about 30cm high.
Again, the peel 2-S performed admirably here, capturing the likeness of the horse’s head as expected. Geometrically, Still Water is significantly simpler than the Statue of Hygieia, and this was evident in the scanning times. This scan run only took 4 – 12 mins and required an extra 3 – 8 mins of post-processing.
The average vertex offset of the Still Water scans came in at 0.043mm with a standard deviation of 0.321mm – another fantastic result.
Moving on, we scanned a 3D printed Neapolitan Fisherman model. The original marble sculpture was designed by Swedish sculptor Carl Gustaf Qvarnström in the 19th century, but our slightly less impressive version is made of white PLA and stands about 50cm high, which is about the part size limit of the peel 2-S.
This scan run was our most difficult yet, due to the sheer size and complexity of the sculpture. While the 1mm and 0.5mm scans were completed without much hassle, our high-resolution 0.2mm attempt wasn’t successful at all as the peel 2-S constantly lost its positioning and it proved extremely tedious to scan the entire model in one sitting.
For the attempts that were successful, the scan time clocked in at 9 – 13 mins, while the post-processing time took a further 12 – 15 minutes. Since we maxed out the recommended part size on this test, you can expect these time ranges to be the approximate limits of a scanning session with the peel 2-S.
As for the actual quality of the scans: fantastic. The average offset between the scanned models and the original STL file was just 0.061mm with a standard deviation of 0.158mm. Our 1mm resolution scan was particularly impressive, as the peel 2-S managed to capture the entire model within ±0.20mm of the intended geometry.
Of course, we also had to try our hand at some functional scan tests too, to see how the 2-S might fare in a more industrial or workshop environment. First up was the triple clamp.
The scan came out extremely clean with many of the part’s minute details captured accurately. The texture was true-to-life and we could even read the part number etched on one of the faces. While the scan did lose its tracking quite a few times, the post-processing step was quick and only involved mesh alignment and the removal of a few unwanted background elements.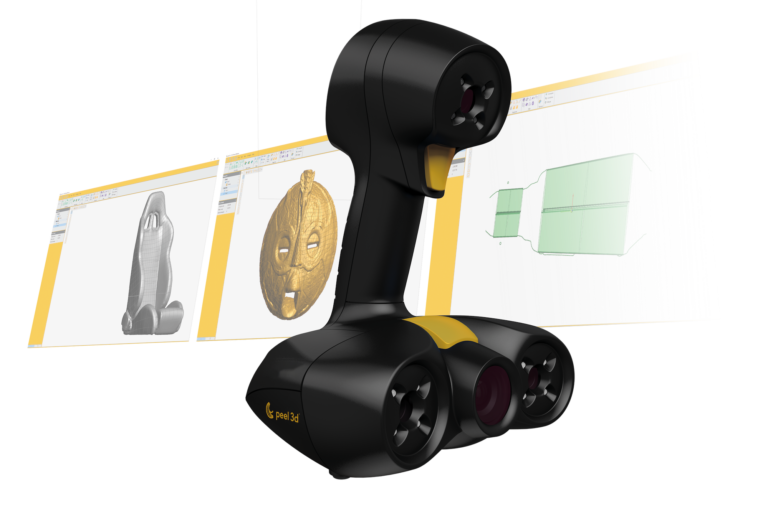 The scanned triple clamp model is precise enough to use in the design of, say, a custom set of motorcycle speed-o-meters for a workshop project.
We then scanned a full-color model of a shoe. The scan was easy as pie, even with the abundance of black material. The only real flaws were on the inside of the shoe and the laces, which moved around. Even still, we were elated with the quality of the scan as the colors and textures were virtually identical to the real thing.
Next in line for the peel 2-S was an anatomical model of a skull. It’s not a stretch to say this was one of the most immaculate scans we’ve ever produced at 3D Printing Industry. The scanner managed to capture the finest of details and the textures were accurate down to the smallest cavities. The scan itself was done in just one shot and the post-processing stage yielded a complete mesh after just a few clicks. Our digital skull could quite easily be used for medical training and educational purposes.
Finally, we scanned a Canon EOS 700D digital camera.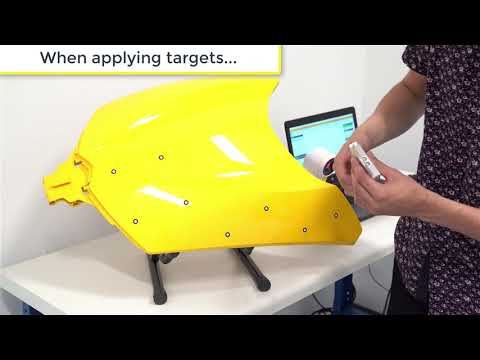 By this point, we’d come to expect great things from the peel 2-S, and it certainly delivered. Despite the overwhelmingly black casing of the camera, the 3D model was as clean as ever. The textures were lifelike and it was possible to read all of the writing on the Canon. Post-processing was also a breeze, as it was enough to remove the background of each scan and align them to obtain the final, complete mesh.
The verdict
In true peel 3D fashion, the peel 2-S once again combines cost-effectiveness, performance, and accessibility in one very ergonomic package. We didn’t experience a single bug in our time testing this scanner, and it passed the majority of our tests with flying colors. The peel 3D software is as user-friendly as ever, and the new black skin makes it look like something out of a Dark Knight movie.
The peel 2-S certainly feels different from its predecessors. It’s more precise than the peel 2 and has a much easier time tracking smaller-scale parts. On the flip side, this also means it struggles to track larger parts and the scans themselves tend to take a couple of minutes longer. Unless you live every facet of your life on a tight schedule, however, you shouldn’t let this discourage you.
One thing that’s particularly noteworthy is the peel 2-S’ ability to scan black surfaces, despite the disclaimer stating otherwise. We threw black polymers and fabrics at this scanner, and it captured them without a hitch. We’re starting to think the only way to trip the peel up is with an object coated in Vantablack.
Ultimately, if you’re in the market for professional-grade, full-color 3D scanning (and you don’t have $15,000+ to spend on the pricier industrial devices), you’d have a hard time going wrong with the peel 2-S.
Technical specifications
| Recommended part size | 0. 05 – 0.5m 05 – 0.5m |
| Accuracy | Up to 0.1mm |
| Mesh resolution | 0.1mm |
| Measurement rate | 550,000 scans/s |
| Volumetric accuracy | 0.5mm/m |
| Scanning area | 143 x 108mm |
| Stand-off distance | 380mm |
| Depth of field | 100mm |
| Light source | White LED |
| Texture resolution | 50 to 250 DPI |
| Device Dimensions | 154 x 178 x 235mm (930g) |
Buy the peel 2-S 3D scanner here. The device is available to order now for $7,890 ($8,090 from October 1st).
Subscribe to the 3D Printing Industry newsletter for the latest news in additive manufacturing. You can also stay connected by following us on Twitter, liking us on Facebook, and tuning into the 3D Printing Industry YouTube Channel.
Looking for a career in additive manufacturing? Visit 3D Printing Jobs for a selection of roles in the industry.
Featured image shows the peel 2-S 3D scanner. Photo by 3D Printing Industry.
review of the peel 2 CAD-S handheld 3D scanner / Sudo Null IT News Compared to its predecessor, the peel 2, the device boasts higher detail when scanning small objects.
Peel 3d is a trademark of Ametek/Creaform. All of the parent company's knowledge and know-how in 3D scanning and reverse engineering has been invested in making peel 3d products more accessible to reach a different target audience.
The peer 2 scanner proved to be very functional and useful in many applications, but it lacked the ability to capture the finer details of objects. Consider the new peel 2 CAD-S model to evaluate the changes that have taken place.
peel 2 CAD-S uses the same structured white backlight technology as the previous model, but with higher resolution and therefore better suited for working with smaller elements. The recommended part size is less than 0.5 m (for comparison, for peel 2 - from 0.3 to 3 m).
In practice, this means that when using the same sensors and cameras, the scan area is reduced from 380 x 380 mm to 142 x 108 mm. Essentially, you get the same number of pixels in a much smaller space, so peel 2 CAD-S can capture 3D shapes at 0.1mm grid resolution – in other words, five times more accurate than peel 2.
Setup and first use 3D Scanner
The setup process is almost the same as for all other 3D scanners. The whole set comes in a regular case with a foam insert: a scanning device, software and a license key on a USB stick, as well as a switch. The cables are designed for power (from a standard power supply) and data transfer (via Hi-Speed USB 2.0). The installation process is simple: insert the flash drive into your computer, run the installation and follow the suggested steps.
For hardware requirements, you'll need a modern workstation or laptop with an Nvidia GPU and at least 2 GB of VRAM. Processor - the faster the better, but because the system is geared towards small parts, the chances of overloading a modern processor are minimal.
Calibration must be performed after installation. Calibration of this type of device is not difficult, and the general recommendation is that it should be done fairly regularly, especially as the conditions in which the scanner is used change. This may be due to light (for example, moving to another office, to another area of \u200b\u200bthe shop or workshop) or temperature. After the calibration is completed, the device is ready for use.
When the peel 3d software is launched for the first time, the user is presented with two main options. You can follow the help guide that will guide you through the entire 3D scanning process, determining how to capture the object, what resolution and positioning methods to use (geometry, texture, or position labels), and help you with your work. Another option is to do the setup yourself.
First you need to define the scan resolution. The default is 1.0 mm, but values from 0.1 mm to 2.0 mm are possible. The lower the value and the sharper the resolution, the better the scan and the larger the data set. Given that peel 2 CAD-S is designed for small objects with fine detail, a good GPU can easily handle even 0.1mm resolution.
The next step is to set how the system will track the movement of the 3D scanner around the object. As with other similar devices, there are three options: texture, geometry, and labels. Structured light scanners equipped with texture capture can use the surface texture to track the movement of the scanner/object. peel 2 CAD-S can also use object geometry. Both of these methods work well for organic shapes and textured objects.
Regularly shaped products with uniform surfaces (most often mechanical parts) may require the use of position marks.
These are small, custom-sized reflective markers that can be stuck on or around an object. They are used to determine the position of the scanner in relation to the object using triangulation methods. As long as there are three marks in the field of view of the 3D scanner at the same time, this method usually gives a good result and ensures correct tracking of the scanner.
The peel 2 CAD-S kit includes a set of small plastic jigs with three marks that can be placed around the object for quick adjustment. These devices are very useful considering that the device is focused on digitizing small details with high detail, and sticking several 4mm marks on them is not a very practical solution. The
peel 2 CAD-S is designed to scan physical objects at high resolution and many of its features are based on the proven Creaform 9 designs.0014 Scanning process 3D scanning typically involves collecting as much data as possible in one position. The device is quite light and well balanced, which many competitors' products cannot boast of.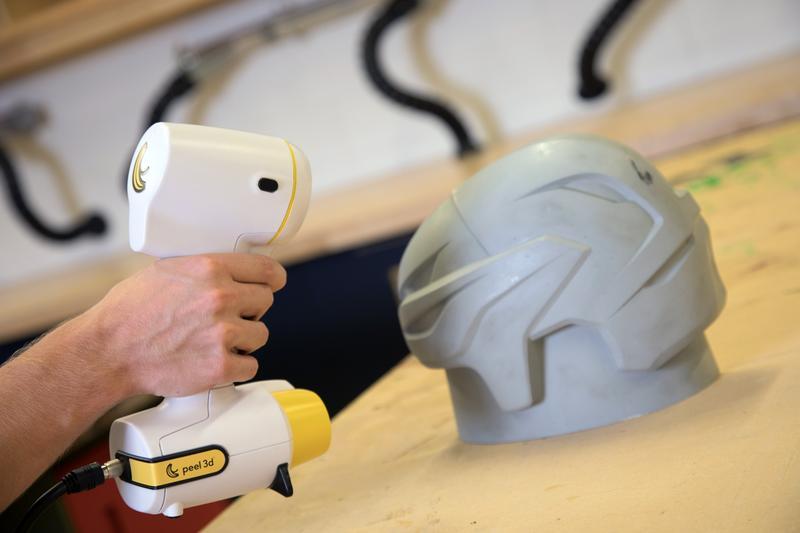 The function of determining the distance to the object (ideally 300 mm) with color indication on the screen and on the device itself allows you to scan very quickly.
It is worth noting that the peel 3d software provides a very rough preview. Since the scanner usually collects a huge amount of data, it makes sense to gradually filter it out as you work.
As you get used to the operation of the device and get used to quickly moving the scanner around an object (or quickly rotating a part on a turntable), you will understand how to maintain continuous tracking. At any time, you can take your finger off the shutter, pause the scan and review the data, and then return to digitizing the missing areas.
There are two paths after the initial scan. If there is enough data, then you can start the cleaning process and remove excess data. There are a number of tools available for this and the procedure is quite simple - this is one area where all the investment in Creaform know-how is worth it. Then the meshing and further cleaning is performed.
Otherwise, especially for complex parts, a more thorough rescan may be required. This repeats the same process, resulting in two or more data sets that need to be matched. Once again, Creaform's knowledge and technology comes into play, allowing you to use common dots (you must select three common dots between two or more images) to combine multiple scans.
After the scan (or set of scans) is ready, the next step is to prepare for data post-processing. You may just need to create a mesh, fill holes, and export the data to OBJ or STL format. In this case, the available tools will help smooth surfaces, remove noise and fill in all holes to ensure reliable export.
You may also need to build analytical surfaces from the point/mesh data, either to get a point of reference to reuse the mesh in CAD (surfaces allow you to align and reassemble the model) or to create reference geometry to build a more complete model.
The peel 3d software is not really designed to build a fully sealed solid model. Its purpose is to help build a set of reference surfaces that are consistent with point and grid data. This view of the scanned data can be imported into a full featured 3D design system and complete the 3D model.
Although it may seem a little complicated, in fact, in most cases, other surfaces (such as cylinders, spheres, planes) can be added to the prismatic model almost instantly etc.).
These surfaces and points can then be loaded into CAD. This usually requires two exports: first a mesh data file in STL or OBJ format, then a surface data file in STEP or IGES format (for example). The result should be a set of two types of geometry that can be used to build the required model.
Conclusions
At first glance, the peel 2 3D scanner makes a strong impression. Relatively low price, excellent build quality and, last but not least, reliable and simple software.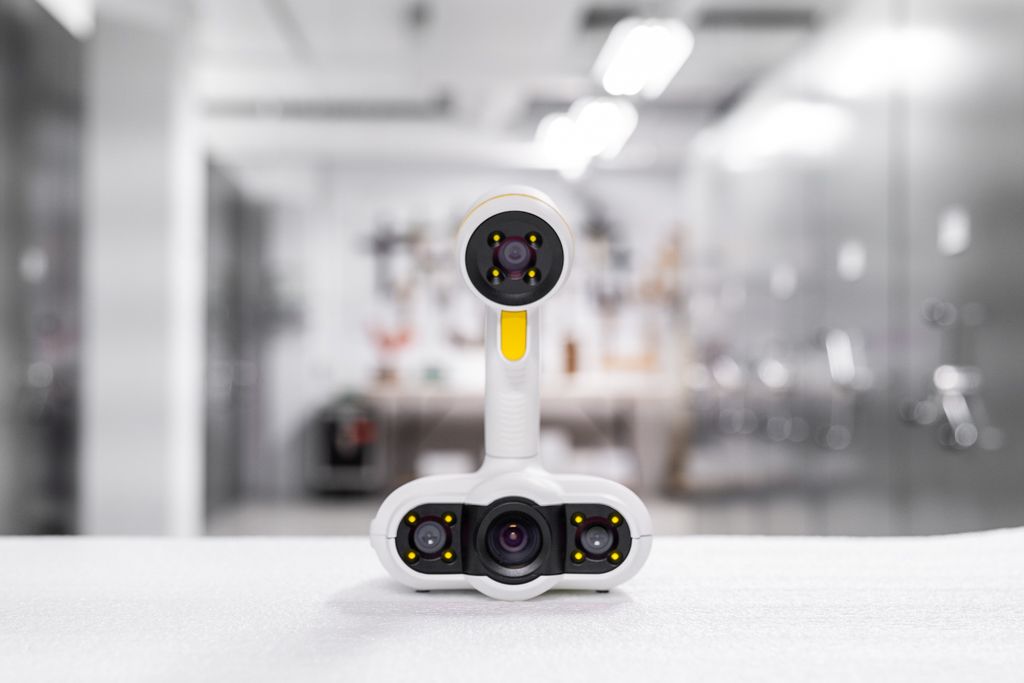 The main problem was that it is not suitable for those who require higher resolution scans. The
peel 2 CAD-S takes the same approach as its predecessor but focuses (both literally and figuratively) on smaller objects and capturing finer details while maintaining the same ease of use when combined with software by Creform.
The resulting scans are of excellent detail, and by mastering the art of multiple scans, stitching and alignment, as well as the practicalities of working with reflective surfaces, you can achieve impressive results.
peel 2 CAD-S and peel 2 complement each other perfectly, and it makes sense to have both scanners at the workplace. In practice, this option is very common. If you are interested in 3D scanning solutions, the peel 3d line deserves a deeper look.
Source: develop3d.com
Range Vision Pro - a review of a Russian-made 3D scanner
The RangeVision Pro 3D scanner is an industrial-grade Russian-made equipment that is certified by Rosstandart as a measuring tool.
Principle of operation - structured light technology, which consists in throwing a mask onto a scanned object using a projector, cameras fixing the curvature of the mask, and reconstructing the scanned surface.
This 3D scanner can be used in various fields:
- reverse engineering
- metrological control of products
- art / architectural field
- education
allowing for high detail when scanning, both miniature models and large ones, for example, a car.
Specifications
| Scan area | L | M | S | |
| Scan area (WxHxD), mm | 550 x 340 x 360 | 320 x 210 x 200 | 140 x 90 x 80 | |
| 3D point accuracy, mm | 0. | 0.03 | 0.018 | |
| 3D resolution, mm | 0.18 | 0.10 | 0.04 | |
| Working distance, mm | 900 | 520 | 350 | |
| Cameras | 6 MP | |||
| Projector resolution | Full HD | |||
| Dimensions, mm | 408 x 350 x 125 | |||
| Output data format | STL, OBJ, PLY | |||
| How it works | Structured illumination | |||
| Scanner module weight | 6. | |||
| Food | 100 - 230 V | |||
RangeVision Pro Package
Standard Package Includes:
- Dual Vision Scanning Module with LED Projector
- Interchangeable optics (for each scanning area) - 3 pcs.
- Plastic case with cradle for storage and transport
- Tripod
- Digital license key
- Self-adhesive marker set, 2 sheets A4
- Mattifying spray, 1 pc.
- Control computer
- Computer and network cable set
- Automatic turntable TL - max. load 60 kg, platform diameter 32 cm
Contents
Wiring kit
Control computer
Control computer has the following configuration:
- Mini-PC, SSD2 GB0, Win6 Core™ i7 pre-installed software RangeVision ScanCenter NG.
- Input, output devices, cables, etc. are not included in the delivery
station.
RangeVision Pro software comes with the free ScanCenter NG 3D scanning and post-processing software that allows you to scan an object using a turntable, using marks and in free mode. The obtained data can be used in various CAD programs and editors: Solidworks, Autocad, Geomagic Control X, Geomagic Design X and others.
Preparing the RangeVision Pro 3D scanner for operation
First, the scanner is mounted on a tripod, connected to a computer, and the scanning area is determined (one of three is selected based on the dimensions of the object being scanned).
Scanner mounted on tripod
Scanner with front cover removed
Protective caps are removed from the cameras and the projector, and the selected lenses are screwed onto the cameras.
Attaching lenses to cameras
For more precise scanning of shiny surfaces, the scanner has a blue light scanning function. To use this function, special light filters are installed on the cameras.
Installing Light Filters on Cameras
Calibrating the RangeVision Pro 3D Scanner
The 3D scanner needs to be calibrated upon initial startup or after changing lenses. It consists in several successive shots of the calibration panel according to a given algorithm. To do this, in accordance with the selected scanning area, the necessary calibration panel is installed, which is included in the kit, and the calibration procedure is started in the scanner software. Further, the program suggests the necessary steps for setting up the 3D scanner for calibration and the algorithm for positioning the calibration panel for images.
The software prompts the following actions in sequence during calibration:
- selection of the scanning area
- installation of the calibration plate
- reminds you to install the appropriate lenses
- adjustment of the distance to the calibration plate
- adjustment of image sharpness
- projector focus
- the required location of the calibration plate for pictures.
After calibration is complete, the 3D scanner is ready for use.
3D Scanning with Turntable
Scanning small objects is convenient and fast with the included turntable. The object to be scanned is placed on the turntable, the scanning parameters are set, the number of scans per revolution is set, and the automatic process of turning the table to the set angle is started. The resulting images are automatically stitched into a common surface.
Extra points (part of the table, noise, etc.) are removed manually by the operator.
After scanning, the object is turned over and the scanning procedure is started again to obtain the surface of the object from the reverse side.
The resulting surfaces on both sides of the scan object are combined into a single model by selecting common points on the model. Next, the software first roughly aligns the surfaces, and then the operator, by setting the settings, more accurately aligns with filling voids if necessary. The resulting model can then be used for both reverse engineering and geometry control.
Metrological verification of the 3D scanner Rangevision Pro
To use the 3D scanner of the Rangevision Pro, as a metrological measuring tool, it is required to verify it, which consists in monitoring the geometry of a special control measure. After a successful verification, a verification certificate is issued for a period of 1 year. Further receipt of a new certificate requires a new verification.
Control measures are not included in the scope of delivery, and verification is carried out by specialized companies. Our company has this measure and performs verification of RangeVision Pro 3D scanners.
The verification procedure is shown in the figures below.