Occipital structure sensor 3d scanner review
Structure Sensor 3D Scanner Review & Tutorial
If you’ve read my previous 3D Scanner Review of the 3D Systems Sense you know that I was impressed by the ease-of-use and geometric details for a device priced below €450. But the quality of the color information — or textures — the Sense captures are completely underwhelming. This has been fixed with the Sense 2 I reviewed later)
In this Review I’m testing the Structure Sensor made by a Occipital. This device was also available as the 3D Systems iSense but that rebranded version has been discontinued*.
I got my Structure Sensor from the Dutch 3D Printing and 3D Scanning Store MakerPoint.
Pricing
If you live in the US, a Structure Sensor will cost $379 with an iPad Air 2 bracket on Amazon. You can also buy them directly from Occipital for that price and have a choice of various iPad brackets and accessories such as a wide angle lens and a pro charger cable that can charge the Structure Sensor and iPad at the same time!
If you live in the EU and don’t want the hassle of international shipping and added customs costs and taxes you can best get the Structure Sensor with fitting bracket from Makerpoint for €499.
It’s compatible with all iPads newer than the 4th Gen iPad and iPad mini 2 (previously known as “iPad Mini with Retina Display”) — including recently added support for the iPad Pro 9.7″ & 12.9″.
I’ve tested it with the least powerful compatible device, the iPad mini 2, which has a 5 megapixel camera with an aperture of f/2.4. Since this camera is used to capture color details, it’s safe to say that using a newer iPad will result in better texture quality. This iPad Pro 9.7″, for example, has a 12 megapixel camera with a faster f/2.2 lens. That being said, I think that testing with an iPad mini 2 is a great benchmark and this iPad is still being sold for €265, bringing the total minimal costs of the Sensor + Bracket + iPad to €765 — which is still a lot less than many other 3D Scanners. (All prices I mention are in Euros and include 21% Dutch VAT).
I’ve tested the Structure Sensor with 3 different applications, which I’ll cover in 3 different parts of this Review:
- Occipital’s own iPad apps
- The third-party itSeez3D iPad app I reviewed and
- Occipital’s Skanect software for Mac and Windows (Review finally coming Q1 2017)
Setting up the Hardware
Attaching the Bracket
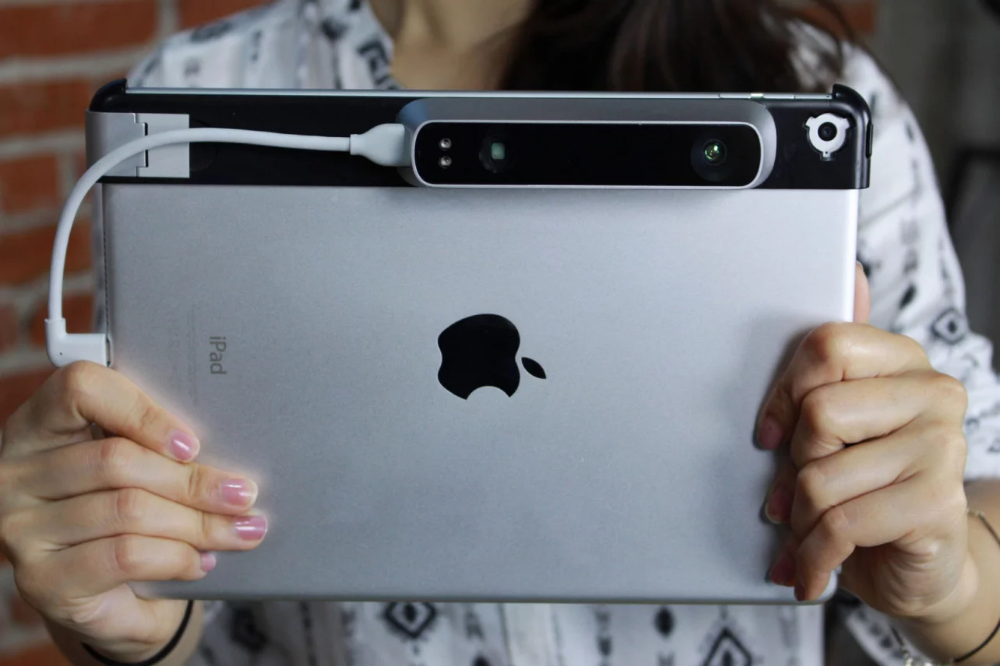
Firstly, you need to attach the Structure Sensor to the bracket—both are available with silver or blue aluminum—for your device. The sensor includes 4 screws and a screwdriver. The bracket can be an official one but you can also order 3D Printed versions through Shapeways or download one from Thingiverse and 3D Print it yourself. The Structure Sensor is a very “open” and customizable system this way. Occipital has even placed CAD drawings on its developer website so you can design your own bracket. Developers that want to experiment with the sensor beyond using it with an iPad, can also buy a €50 USB Hacker Cable to attach the sensor directly to any chosen device.
Structure Sensor (silver) mounted onto the iPad mini bracket with aluminum latch (also silver).
Nice detail: With the Structure Sensor attached, the iPad mini sits at a perfect working angle and rests on the aluminum edge, protecting the glass.
3D Printing a Lens Cap
The brackets are designed to be easily removed from the iPad. This is nice, because like me you’ll probably have a case or sleeve of some kind to protect your iPad during transport. Unfortunately, the Structure Sensor doesn’t come with any kind of carrying pouch. And while the bracket with the sensor attached is sturdy enough to transport in one of the side pockets of my laptop bag, I don’t want any scratches on the glass. A lens cap isn’t included so I downloaded this Structure Sensor Lens Cap from Thingiverse and 3D printed one myself. If you don’t have a 3D Printer yourself, you’ll probably live near a Hub that can help you out.
I 3D Printed the lens cap with strong InnoPET Filament (Check out my Revised Filament Guide for more info about this and other 3D Printing Materials)
Calibrating the Sensor
Before using the Structure Sensor for the first time, it has to be calibrated. This is mainly because the iPad’s native rear-facing RGB camera is used to capture the color information and the location of the camera varies on different iPad models. Because of this the offset between the iPad camera and infrared camera on the Structure Sensor has to be compensated.
There’s a dedicated Calibrator app that makes the process very easy: just go outside on a bright day and point the sensor towards something with a lot of detail. The app will track some details automatically to do the biggest part of the calibration and let’s you fine tune it afterwards if necessary.
The calibration app works perfectly and also gives a good idea of what the infrared camera (left) actually sees outside in bright daylight—more about that later.
3D Scanning with the Occipital Scanner App
The native Scanner app is pretty straight forward. Simply point it at the person or object you want to capture and use a two-finger gesture to scale the indicator box so it matches the size of the subject, which will also be highlighted.
There are only two options:
- Scan using the “Old Tracker” that only uses shape information or use the “New Tracker” that also uses color information to keep track of the object you’re scanning.
 I see no reason to use the old tracker, because scanning without color information make it hard or impossible to scan uniform objects without many geometric details.
 - “Low Resolution” or “High Resolution” Color. From my tests, the difference between the two is that the former outputs a 2K (2048 x 2049 pixels — or 4.2 megapixels) texture map and the latter a 4K (4096 x 4096 pixels — 16.8 megapixels) version.
The high resolution version does take a bit longer to render, or calculate. This is done on the iPad itself and my iPad mini 2 is one of the slowest compatible iPads. The exact time depends on the size and complexity of the subject. During this time you can’t make a new scan.
Scanning with a turntable
You can make 3D scans either by freely moving around an object or by using a turntable. Below is a video of the scanning process with the help of a €6 IKEA SNUDDA Turntable and a €4 tablet stand from Xenos. It’s played back at 4 times the original speed (hence the high-pitched 3D printer sound in the background).
As you can see I put Teddy on top of a book (the marvelous The Art of The Last of Us, to be precise). This makes it easier for the RGB tracker to correctly track the object while rotating. The app particularly had a hard time tracking the side view of the bear without the book. Apart from the natural light from the windows in the studio, I only used a 55 Watts light with a small softbox (visible on the right in the video).
When the rendering is done, you can preview the scan and export it though email as a .OBJ 3D model with separate texture map in .JPG format. Unfortunately there’s no way to save your scans on the iPad, so you need to have an internet connection to email the scan before making a new one. The .OBJ gets emailed as a .ZIP containing the model and texture files. The .ZIP can be uploaded directly to Sketchfab:
I was surprised by the scan quality. Especially taken into account that it took no time to “render” the geometry and only a minute to render the textures on a relatively slow iPad mini. The color quality sits somewhere between the blurry textures of the 3D Systems Cubify Sense (click for reference scan of the same model) and the sharper result of Photogrammetry with the free Autodesk 123D Catch app. I would say a scan like this is usable for many non-industrial purposes and you’d probably get better textures from a higher-end iPad. By scanning like this from a fixed angle I wan’t able to capture under Teddy’s arms.
Free Scanning
For the next example I chose a bigger and less fluffy object: a small oil drum which has been modified into a basket (in Bali through Fair Trade store Jansje). I placed it on yet another of my daughter’s cheerful—and perfectly trackable—placemats on our dining table and walked around it freely, stopping every once in a while when asked to by the app. At those stops it takes a photo for the textures. I was surprised how smooth this experience is and how well the software tracked the object—it never lost it! And this is with the last bit of afternoon daylight and two dimmed ceiling lamps, so far from perfect lighting conditions.
The (new) tracker didn’t even mind that my (even newer) cat walked through the session! Of course I was glad no texture snapshot was taken at that moment.
Below is the result of the scanning session above. As you can see it didn’t completely capture the handle on the lid but the handles on the sides are fine. The texture okay, but not as sharp as I’d hoped. The stitching of the textures quite good, though.
Scanning People
Since I asked my business partner Patrick to model for the Cubify Sense 3D Scanner Review, I asked him to wear the very same shirt to the office for a perfect comparison. As you can see he was very happy.
View this post on Instagram
See? 3D Scanning makes everyone happy—even @patrick_deen_draws! #3d #3dscan #3dscanner #3dscanning #structuresensor #itseez3d #softboxes #photography
A post shared by 3D Scan Expert (@3dscanexpert) on
As you can see below, the result is a lot better than that of the Sense. The resolution is a bit low—both in terms of geometry and texture—but it required no rendering after scanning for the mesh and only a minute for the texture information. To me it kind of looks like a video game character. It also makes Patrick look 10 years younger…
Update June 27th 2016
Occipital just released a new version of their Scanner app which uses their wel 0.6 SDK. The update promises higher quality meshes—a 60% resolution improvement on each of the 3 axis, actually—partially due to their acquisition of Lynx Laboratories.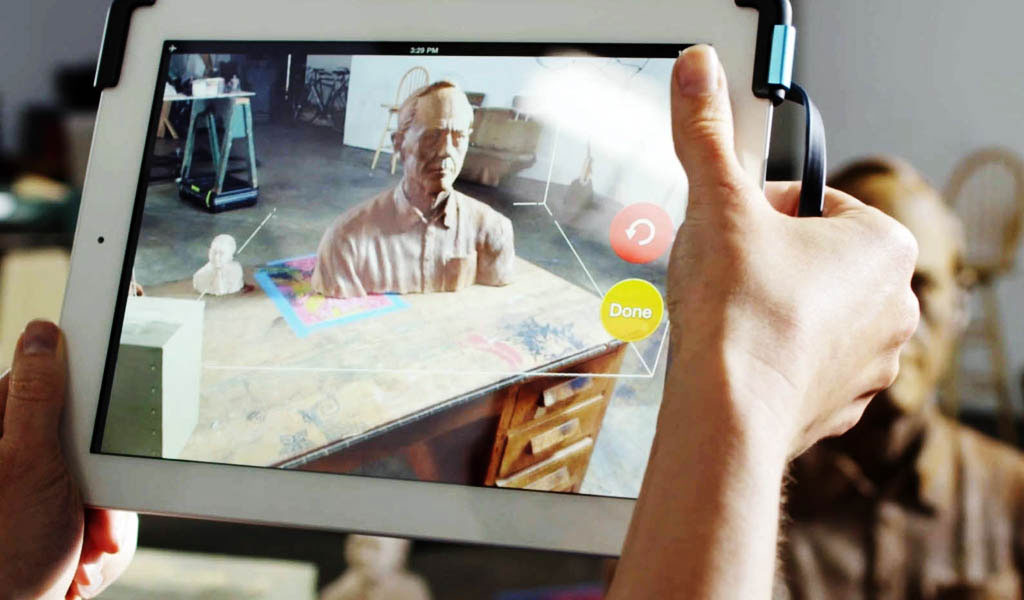
Naturally, I wanted to test if this is true!
As you might have seen on my Instagram, my first test was this 40 cm tall owl statue 3D printed with the Big Builder I reviewed a while ago:
At this size, the polycount was 50.000 vs. 44.000 with the old app based on the 0.5.5. SDK. A 15% improvement, but not really visible. So I scanned my loyal test subject and business partner Patrick:
At this size the upgrade in resolution is very apparent: 24,169 vs. 56,427 faces with the new app—230% more polygons! Even without the numbers, there’s clearly more detail in Patrick’s face (he likes the old mapper better) and T-shirt.
It’s impressive that this kind of improvement can be achieved with just a software update. And remember it’s all rendered locally on an iPad—in realtime—no cloud processing. And according to the Developer Program Manager of Occipital, this is just the beginning:
Excellent to hear and thanks for the kind words.
@mrm_design @structure @NickLievendag Next rev of the SDK will be even better.
— Mark Piszczor (@mpiszczo) June 27, 2016
It’s worth mentioning that since this update to SDK 0.6 there’s no longer support for the 3D Systems iSense I mentioned in the into. So the new Scanner app only works with an actual Structure Sensor bought from Occipital or one of its resellers.
Scanning Outdoors
The Structured Light technology that the Structure Sensor uses to capture depth is great for 3D scanning indoors. Trying to capture objects outside the comfort of my studio I quickly ran into the limitations. As you can see in the calibration image in the beginning of this post, the infrared camera has a hard time capturing details in bright sunlight, let alone see the projected laser pattern.
So I did some experiments on a cloudy day—of which there are enough in The Netherlands. Below is a typically Dutch litter bin.
Note that the icon on the litter bin isn’t covered by the grey preview…
Again I was surprised by the smooth tracking: even without a flat floor surface the litter bin was tracked smoothly. It was a bit hard to capture the back without falling into the canal, but I managed quite well because it apparently doesn’t matter if the object goes out of frame for a moment, because its surroundings are tracked as well.
Below is the result of the scan. It’s far from perfect, but I find it especially interesting that there’s a hole where the icon is printed. Apparently the dark green of the bin absorbs enough sunlight for the infrared sensor to detect the laser pattern, but the white icon is simply too bright. There are also a lot of particles flying around which I’m pretty sure weren’t present in reality.
Below is another outdoors scan of a Dutch mail box when there was a bit more sunlight. The shadow side of the object and the wall are captured decently, but the side that’s facing the sun was totally invisible to the Structure Sensor. The result is rather interesting, but not usable of course.
3D Scanning interiors with the Room Scanner App
The last app I’ll cover in this part of the review is Occipitals Room Scanner App.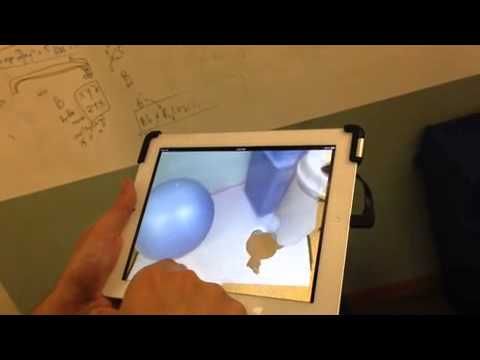 It’s completely foolproof: use the slider to visually indicate the size of the room you’re about to scan, hit scan and move around until every surface is covered by green polygons. Unfortunately, the app forces you to stay more or less in one place, so you can’t walk around a room freely to scan around corners.
It’s kind of like entering the Matrix…
Its usefulness greatly depends on the purpose. As you can see below, the output quality is too low—both in terms of geometry and texture—to use for any purpose that needs to be esthetically pleasing (you can look around in the interactive Sketchfab embed below by changing the navigation from Orbit to First Person with the icons in the bottom-right corner)
However, I can think of a few purposes for which the Room Scanner app is useful. For instance, game level designers can use it as a dimensionally accurate reference to create an interior for a video game. It’s also very handy to take quick measurements, because making a scan only takes a minute and the app has a built in measuring feature.
Measuring this way is a lot faster than with a tape measure—and way cooler.
Wrapping up Part 1
It’s good to realize that Occipital’s Scanner apps are samples to demonstrate new features that are announced every few months. For example, in March 2015 SDK 0.4 was introduced, which offered the New Tracker I wrote about earlier, as well as the ability to output UV-textured meshes. Earlier versions apparently used per-vertex coloring that delivered the same low-quality color information that disappointed my in my 3D Systems Sense Review.
So… the Structure Sensor has an SDK that allows third party developers create their own apps for all kinds of purposes. For example, it can be used to create Virtual Reality & Augmented Reality experiences. However, for this Review I’m merely using it as a iPad-based 3D Scanner and for that purpose there’s only one third party app—itSeez3D—which uses cloud processing for more detailed scans.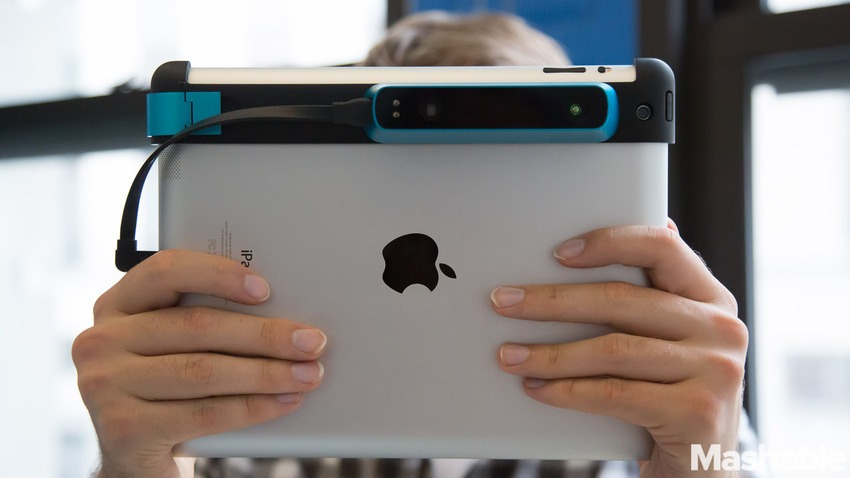
Continue Reading Part 2 about itSeez3D
Skip to Part 3 about Skanect
Subscribe to my Monthly Newsletter
Get great contents delivered straight to your inbox everyday, just a click away, Sign Up Now.
Email address
Occipital Structure Sensor Review | PCMag
Occipital bills its Structure Sensor ($379) as the first 3D sensor for mobile devices. This small gadget, which clips onto an iPad, provides depth data for true 3D imaging. It can act as a 3D scanner, and there are currently a few apps for the Structure Sensor that let you use the device for scanning and mapping, as well as virtual reality gaming. It's intended largely as a platform and playground for software developers; down the line, when more apps are available, it could have considerable consumer appeal.
Anatomy of a 3D Sensor
The Structure Sensor is an anodized aluminum device that measures 1 by 4. 5 by 1.1 inches (HWD). Our test unit was ice blue; it's also available in silver. It is fastened with four screws to a bracket that fits on the iPad. (I tested the Structure Sensor with an iPad Air ($389.99 at eBay)(Opens in a new window) ; it is also compatible with the 4th generation iPad and the iPad mini with Retina Display. The bracket for each model is different, and you choose the appropriate bracket at the time of purchase.) The bracket has a clasp to lock it in place, and a hole through which your iPad's camera can see and collect data.
The device uses a process known as structured light, in which an infrared laser projector casts a specific pixel pattern on the scene in front of it. The Structure Sensor's infrared sensor then records distortions in this dot pattern at VGA resolution as you move your iPad around the object you're scanning, creating a depth (3D) map of the scene and the objects in it. (The Structure Sensor's infrared detector was developed by PrimeSense, now owned by Apple, which designed the 3D sensor for Microsoft's Kinect. ) The device also uses the iPad's camera, to record color data.
There's a Lightning cable included that's just long enough to plug into the iPad's Lightning port. The Structure Sensor has its own internal battery, and comes with a power adapter for charging.
The $499 version of the Structure Sensor comes with a USB "hacker cable," which lets you use the device with a laptop or desktop computer or other USB device (though you lose the benefit of the iPad's camera). It also bundles in the Skanect 3D scanning program for Windows or Mac that can receive data from your iPad, either wirelessly or over the hacker cable.
Occipital's Apps
Occipital offers several free Structure Sensor-related apps for download from the iTunes Store; most are designed to show off the device's ability to developers, for which the company provides an SDK. Although the company has focused on the device's use with the iPad, it can also be used with Android devices, and Occipital is offering open-source drivers, open CAD specs, and the hacker cable for use on other platforms.
The device's main app is called Structure. It offers three data streams to view: IR, which provides solely infrared data; Depth, which shows you a false-color view, with the nearest objects displayed as red, distant objects as blue, and objects of intermediate distance shown in varying shades of orange, yellow, and green based on their distance from the sensor, and tells you the distance (in centimeters) to whatever object is at the center of your screen; and Depth + Color, which combines true color with false color based on depth. In addition, it gives you information on firmware, serial number, and how much charge is left in the Structure Sensor's battery.
With the Structure app, seeing your surroundings on your tablet's screen as imaged through the virtual eyes of the Structure sensor plus iPad is a fascinating and surreal experience. It helps you appreciate the 3D-sensing capabilities of the Structure Sensor.
Virtual Physics
The other apps I downloaded deal with virtual reality (VR) and physics. The Fetch app involves a skateboarding cat trying to reach a yellow ball; the app is designed to show off the platform's VR gaming potential. First, you scan a portion of your surroundingsincluding interesting foreground objects if possibleand your real world will become part of the game's virtual reality setting. For example, the cat can't move through solid, real-world objects in its pursuit of the ball.
A similar app, Ball Physics, lets you launch virtual balls into a representation of a real-world scene that you've already scanned. When they hit the virtual representation of a physical object (such as a colleague's Rocket Raccoon action figure), the balls bounce off it on a realistic trajectory.
The Scanner app lets you scan a scene in 3D, and then view it in X-ray (see-through) mode or in Mesh (as solid object) mode. You can email the 3D file from within the app.
Finally, the Viewer app lets you see your surroundings in three views simultaneously: a Camera (realistic) view; a Depth view, in which surfaces are color-coded according to their proximity to you; and a Surface normal view.
Viewed together, these apps demonstrate the types of data streams that the Structure Sensor offers, as well as the device's application to both 3D scanning and mapping, and VR gaming.
A Third-Party Scanning App for the Structure Sensor
The first third-party iPad app for the Structure Sensor in the iTunes Store, released in late July, is itSeez3D, a scanning app that can scan both objects and human headshots in 3D. In our testing, it did a credible job at 3D scanning, particularly in scanning people, and its files can be uploaded from the app to a 3D model site or emailed. To 3D print the file, you must then open it with your 3D printer's software. We did some 3D scans of people using the app and then printed them out on a MakerBot Replicator 2X($3,856.95 at Amazon)(Opens in a new window), with generally satisfactory results.
If you're looking for an iPad-mounted 3D scanner, you might also want to check out the 3D Systems iSense ($499), which pairs the Structure Sensor as hardware with 3D Systems' own scanning software (also used in the company's Sense 3D scanner), and can also use apps designed for the Structure Sensor. It's a particularly good choice if you own a 3D printer in 3D Systems' Cube line. You pay more money than if you were to buy the Structure Sensor separately, but iSense is designed to integrate with Cube printers such as the 3D Systems Cube 3D Printer($1,299.00 at Dynamism)(Opens in a new window), and you get the ability to directly upload 3D files to Cubify.com for printing through the cloud.
The Occipital Structure Sensor is a 3D sensor that integrated seamlessly with the iPad in our testing. It's geared to software developers, although there are several available apps that can be used for 3D scanning by artists or 3D printing hobbyists. Down the line, when a wider range of apps have been created for it, the device could become popular with gamers and a more general audience. Until then, it provides developers with the opportunity to create apps for a low-cost 3D sensor with great potential. I, for one, can't wait to see what they come up with.
Like What You're Reading?
Sign up for Lab Report to get the latest reviews and top product advice delivered right to your inbox.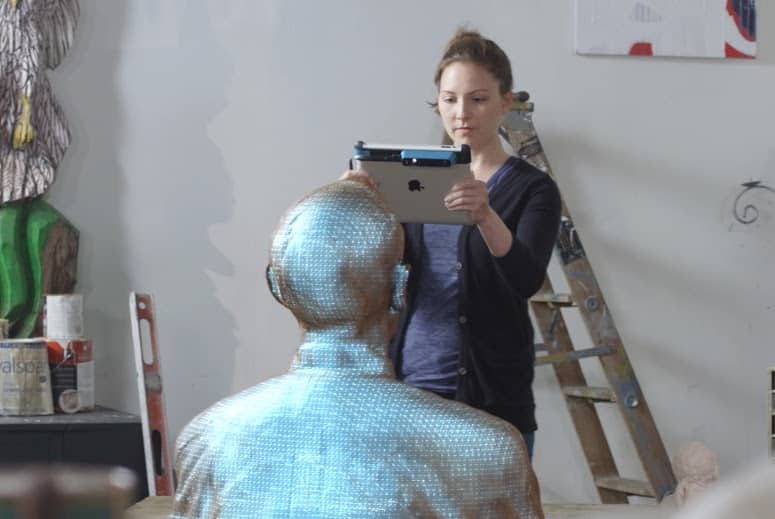
This newsletter may contain advertising, deals, or affiliate links. Subscribing to a newsletter indicates your consent to our Terms of Use and Privacy Policy. You may unsubscribe from the newsletters at any time.
Thanks for signing up!
Your subscription has been confirmed. Keep an eye on your inbox!
Sign up for other newsletters
Gadget Review: 3D Scanner, Wi-Fi Camera, Tile Tracker
In this edition of Gadgetology, our gadget, we take a look at an electronic tracker, 3D scanner, home camera, and one of the most portable USB chargers.
Phone for cafes, keys and items
Since modern technology has come into existence these days, one thing hasn't changed: people are still losing things. Keys, smartphones, their wits - hell, the list just got bigger with all the gadgets people now carry. However, one thing that is different from technology thanks to technology today is that you have a better ability to keep track of missing things. nine0003
One such option is tracker tags such as Tile, which you can sync to your phone through the app so you can track it and the material it's physically linked to. For example, put it on your key chain and you can call if you ever lose your keys in the house. Leaving him somewhere outside the house, running errands? You can use the app to display the map and find its location.
Cost: $25
Official Website
Continue reading below
Coccipital Structure Sensor Rapid 3D Scanner
As someone who remembers when mass market color TVs were a big problem, I still wonder how far technology has come in recent years.
Take, for example, the occipital structure 3D scanner. To think that you can have a compact camera that you can attach to an iPad (or personal computer, if you prefer) and scan objects or even people to create a 3D representation for projects - or even make a 3D printed digit of yourself - is mind boggling.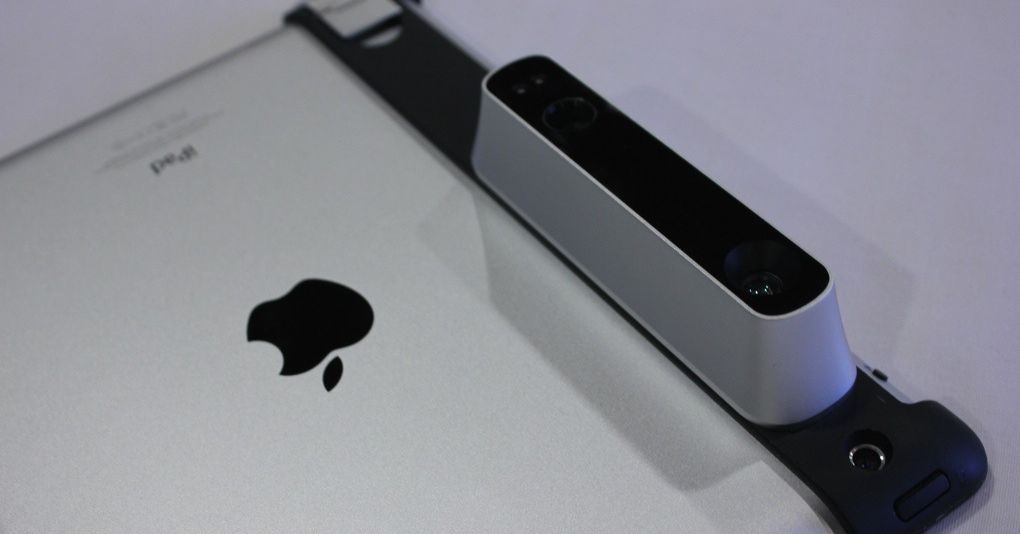 my mind. I mean, man, I remember camcorders that used big, humming VHS tapes! nine0003
In addition to scanning objects and actual homo sapiens, the structural sensor can also be paired with various applications for things like hijinks augmented reality. Then there are other potential applications that are still in the works from inquisitive minds, so you never know what's going to happen in the future.
However, as with most new technologies, there are some drawbacks. One of them is the price, which will not be cheap. The other is that it is by no means perfect and you will encounter some distortion when scanning. It's more for early adopters. nine0003
Cost: $379, $499 with USB hacker cable
Official website
Continue reading below
EZVIZ Mini 720p Indoor WiFi Camera
Sounds like you need an extra pair of eyes in your personal abode for that added peace of mind.
Seriously though, it's never a bad idea to have a security camera in your home, especially when you're traveling for a long time. If you're looking for a less bulky option, the EZVIZ Mini is a tiny indoor camera that lets you view what's up to it via an app on your iPhone, iPad, or Android device. nine0003
The setup is pretty easy and you can view multiple cameras on the app if you have more than one. The Mini also has a nice wide bubble view and performs well in low light. You can even click a photo or record a video from the app and save it to the cloud or your device.
However, the video may be slightly choppy and the microphone may be weak. You also cannot move your camera's orientation with the app, as you can with the Kodak CHF-V15 home video monitor. On the other hand, this is almost half the price of Kodak. nine0003
Price: $70
Official Website
RAVPower Xtreme 26,800mAh External Battery
As someone who owns mobile handheld devices, I am a big believer in having multiple options for portable USB chargers. I even put together a handy dandy guide on how to choose a portable charger.
If tons of juice is your top priority, RAVPower has released another high capacity option as part of its Xtreme series of external batteries. It's one of a whopping 26,800 mAh, which is enough to charge any portable device out there with enough juice to save on charging other devices. It also charges at high speed and comes with three USB ports to connect your devices. nine0003
While still relatively compact in power, it weighs almost a pound and a half, so it's a bit heavy. It also doesn't come with the assortment of connectors you get from its cousin, the 23,000mAh RAVPower Xtreme Power Bank, which allows you to charge laptops. However, when it comes to sheer power, it's pretty hard to beat.
Price: From $50 to $150
Official site
FARO Focus Core 9 laser 3D scanner0001
Reviews
Follow author
Follow
Don't want
2
FARO, one of the leaders in 3D metrology equipment, construction and building maintenance and public safety, has released a new Focus Core 3D scanner.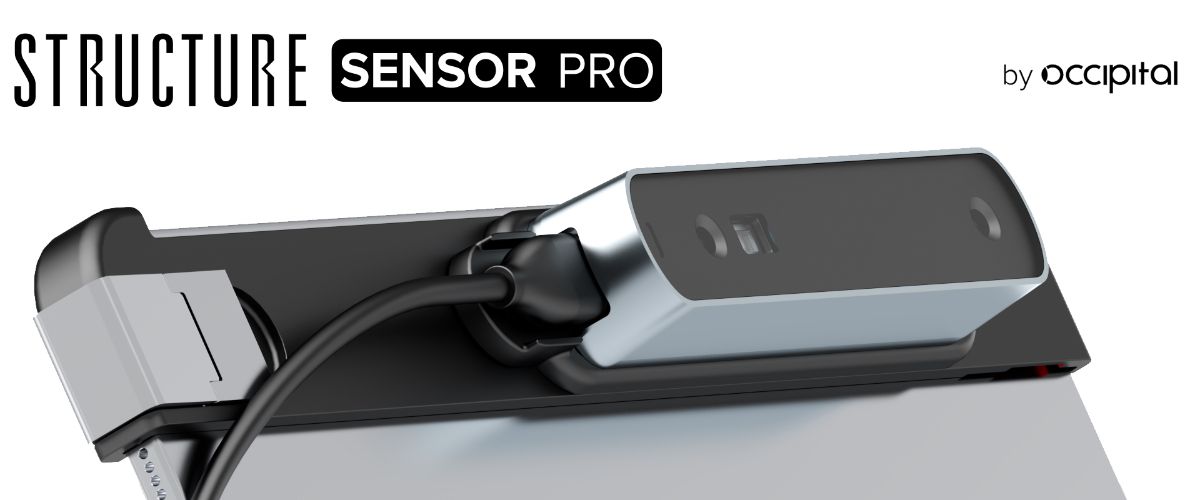 In this article, you will find out what the manufacturer has to offer and what tasks the Focus Core is suitable for.
About the company
FARO is a world leader in 3D measurement and visualization solutions. The company's main goal is to help clients avoid costly mistakes, create amazing projects and achieve better results in the work of law enforcement. nine0003
The company's products are 3D laser scanners, construction and metrology software, CMMs and touch probes. FARO offers its users its own ecosystem for fast and easy data exchange, design and quality control.
FARO holds patents for its own technologies and regularly makes it to the top lists of fast-growing technology companies.
FARO Focus Core - fast, accurate and productive
The new FARO Focus Core continues the Focus line and is a faster 3D scanner with optimized algorithms. This is one of the fastest devices in the line, which allows you to capture not only large amounts of data, but also collect information about the color of an object.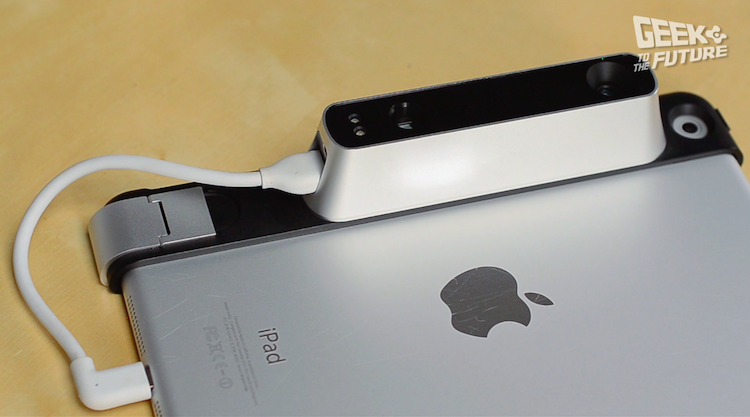 nine0003
The manufacturer positions this 3D scanner as an ideal option for those who wish to introduce digital processes into their work. Focus Core is easy to use and capable of solving problems in various areas.
Who is it for?
FARO Focus Core, like all 3D laser scanners in the Focus range, is a reliable tool for builders and building designers, maintenance and facility management companies, and public security agencies, including police and rescue organizations. nine0003
What tasks does
FARO Focus Core work with laser triangulation technology, so it can collect data on large objects in a short period of time. The equipment is suitable for scanning rooms, buildings and communication systems, therefore it is used in construction and interior design. The data obtained is easy to use in special programs to obtain drawings, compare with the original project, track the progress of construction, plan repairs or identify construction errors. nine0003
In the field of public order, a 3D scanner can be used to collect data from the scene. The scanning range is from 50 cm to 70 meters, which allows you to make both detailed scans and completely capture the selected area.
A selection of articles from the section "Knowledge Base" from the site of the company LIDER-3D: 1) How to produce quality products? • 2) Why does your business need a 3D scanner? • 3) How to choose a 3D scanner that will cope with the tasks of your production? nine0119Technical capabilities of FARO Focus Core
The manufacturer made sure that the use of a 3D scanner is as comfortable as possible, even for users with little experience in using 3D equipment. New solutions and optimized scanning algorithms have improved the performance of FARO Focus Core.
Scan parameters
In the new model, the manufacturer has optimized the scanning range - now it is from 0.5 to 70 m. At the same time, the scanning error is up to 2 mm, which is a good indicator when working with large objects.
nine0003
With the optional panoramic add-on, color scanning has become even faster, and one scan takes only 1-2.5 minutes. The 165 MP color camera resolution ensures the most realistic transmission.
Data download
The Focus Core is equipped with new electronics that improve data management efficiency. Easy control gives complete freedom during work.
In combination with the FARO Stream mobile app (optional, paid subscription), users benefit from real-time data exchange. The functionality of the application allows you to complete the project faster and reduce the number of rescans. nine0003
Communication
Unlike other models, Focus Core has the most convenient control. Users can control scanning from their smartphone and organize their workflow via Wi-Fi.
Using the FARO Sphere cloud service, you can quickly exchange data with project participants, even if they are located in different cities or countries. Convenient access to 3D scanning data allows you to quickly make changes to the project and build convenient communication with customers.
nine0003
Technical characteristics
General:
- Type of scanner: Stationary
- Scan Technology: Laser
Caucasa resolution: 8 MP cells.Scan parameters:
90492 Interface :
- Scan accuracy: 3 - 4 mm
- Accuracy: 2 mm
- Scan area: 300 ° / 360 °
- Scanning / Measurement speed: 97 Gz
- angular accuracy: 19 "
- Paralylax: LAVE NOT
- : 0.009° (40960 3D points at 360°) / 0.009° (40960 3D points at 360°)
- Max.
- Beam Divergence: 0.3 mrad (1/e)
- Output Beam Diameter: 2.12 mm (1/e)
- Working Distance to Object: 0.5 - 70 m
- Connections: WLAN, USB
You can learn more about the new FARO equipment and order the FARO Focus Core 3D scanner on our website. Contact the LIDER-3D manager to get a favorable offer for the purchase of 3D measuring instruments, accessories and software.