Muve 3d printer review
Review: The mUVe 3D DLP Pro+ Creates Clean and Crisp Resin Prints
3D Printing & Imaging Digital Fabrication
This machine was reviewed as part of our 2017 Desktop Fabrication Shootout. See more machines in our 3D Printer Guide and non-3D printer reviews here.
Read articles from the magazine right here on Make:. Don’t have a subscription yet? Get one today.
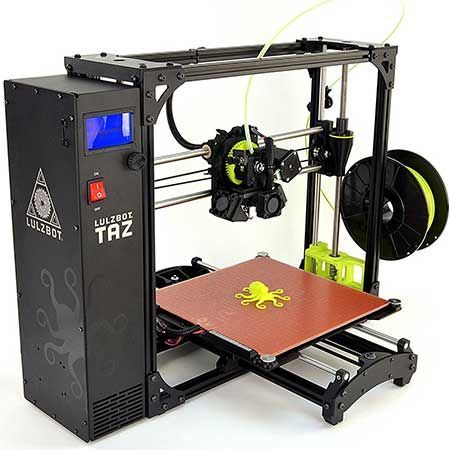
Looking at the mUVe 3D DLP Pro+’s aluminum extrusion legs, projector, visible electronics, and partial coroplast case, it is easy to think that this might not be a high-quality machine. You would be wrong though. The Pro+’s exposed interior leaves the machine open to fix, expand, or change as desired. Beautifully shaped acrylic cases may look nice, but have fun replacing them when you inevitably break something.
It Just Works
The mUVe 3D performed well right out of the box, with the first print coming off without a hitch. Our test prints on the Pro+ were clean and crisp, and the high-resolution projector made the layer lines hard to spot. The lettering detail on top of our rook test looked like it had been chiseled in place with edges so sharp you could feel them. The Pro+ will also not restrict you to a proprietary resin, so you can use a wide range of colors and properties that will not break the bank.
A Standalone Machine
The Raspberry Pi-based nanoDLP software does all the heavy lifting. Once you plug the system into your network, you can control the printer via your web browser with nanoDLP’s built-in web server. There is no software to install on your local computer since the files are sliced onboard the machine in nanoDLP. This makes it easy to share the Pro+ in a collaborative environment like a lab or hackerspace. All the settings and software live on the machine, so there is no need to ensure every team member has the correct software.
A Few Quirks
One of my few complaints with the machine is how the resin vat and build plate are hard to remove. Both are screwed in place, which makes it difficult to switch between resins without cross contamination and removing finished parts from the top-heavy printer.
Remarkable Results
For the highest print quality and detail you can get on a desktop machine, resin printers are the way to go. I could not be happier with the performance of the mUVe 3D DLP Pro+. There is no doubt that this printer has moved to the top of my recommendation list for resin printers.
Our test printDetails
Manufacturer: mUVe 3D
Price as Tested: $1,899
Build Volume: 175×98.5×250mm
Open Resin? Yes
Print Untethered? Yes (Raspberry Pi included for wireless printing via nanoDLP)
Onboard Controls? No
Host/Slicer Software: nanoDLP
OS: Any (web interface through nanoDLP/Pi)
Firmware: Marlin and nanoDLP
Open Software? Partially, Marlin is open source but nanoDLP is not
Open Hardware? Yes, CC-BY-NC 4.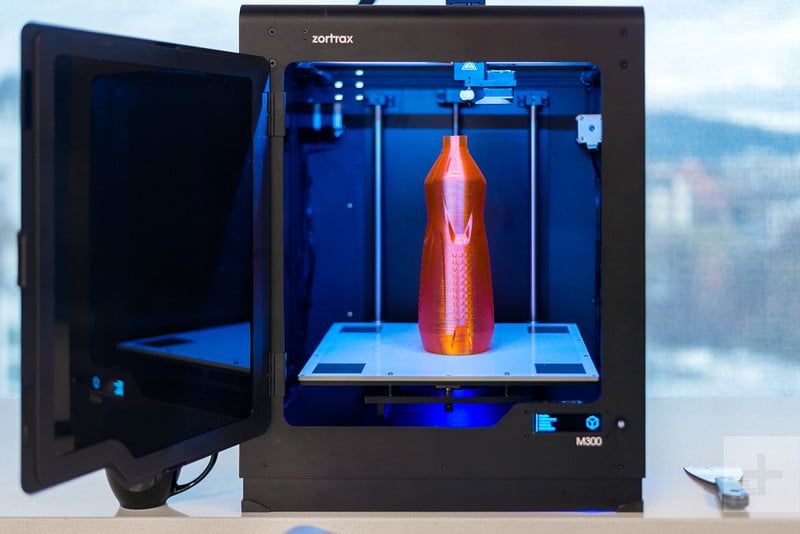 0
0
Pro Tips
Consider your size-to-quality scale when you order so you can have the team pre-configure your machine to your needs. You can adjust it yourself, but it is always better factory-ready.
Why to Buy
This printer gets beautiful results from resin that will not break the bank. If you care more about how a machine performs than how it looks, there are few options better than this one.
Tagged 3D Printing make54 resin ReviewsmUVe 3D Set to Launch New DLP (SLA) 3D Printer Starting at Only $999 - 3DPrint.com
The mUVe 1 3D Printer – DLP version will look almost identical.
mUVe 3D is known for their mUVe 1 resin based 3D printer, which was successfully funded on Indiegogo a little over a year ago. Now, Dean Piper, the founder of mUVe 3D informs 3DPrint.com that they will be opening pre-orders for their new beta mUVe 1 DLP 3D printer, “hopefully this evening”.
The mUVe 1 DLP 3D Printer is a stripped down version of the original mUVe 1 laser based 3D printer, but without the mechanical components of the X and Y axis and of course without the laser. The DLP technology will certainly make for one heck of an open-source SLA printer. The price of this new printer? The kit will cost you $999 without the DLP projector. If you wish to purchase it with a projector, it will cost a total of $1,549 with the 1280×800 projector, or $2,099 with the 1920×1080 version. These are extraordinarily low prices for a high quality DLP 3D printer.
“We recently decided to make a DLP system to help continue to bridge the gap between the person who knows little about 3D printing and wants to get started doing high quality printing for less money,” mUVe founder Dean Piper told 3DPrint.com. “To date I don’t know of another company that can offer what we do, for as little money as we do.”
If you are confused about the difference between the laser based machine and the new DLP one, besides the fact that the laser version utilizes a laser whereas the DLP version utilizes a light projector, Piper explained to us some of the differences:
Prints from the mUVe 1 DLP printer – Click to enlarge
“The laser system operates like an upside down RepRap.
The X and Y axis move the laser around underneath the vat; the laser shoots up through the vat onto the build plate. The problem with driving an SLA machine that has a laser like a RepRap, is that a laser really requires proper controls. Otherwise it’s a bit sloppy.”
“The DLP machine is a replacement of just the X and Y axis on our laser printer. We’ve actually managed to make a bolt-on for our case that allows you to add the DLP projector to the laser system. So you can literally have both DLP and laser in one machine.”
That’s right, you could utilize both a digital light processing (DLP) projector as well as a laser in the same 3D printer. The printer, with both the laser and DLP options in it is expected to be released at a later date, and priced at around $2,499.
First Mount DLP
Those people who have the original mUVe 1 with the aluminum case, will have the option to purchase a projector mount from mUVe 1 and retrofit their current machine to make it DLP compatible. The mount will only be priced at $150, and will allow for the addition of any projector that you’d prefer.
The new DLP model will use the same Z-axis as the laser version, including the dual-motor tilting peel system. The projector mount on the DLP printer will be completely adjustable, so that you can easily change the resolution of your prints. Any project that is compatible with UV resins will work, including low resolution, affordable 1024×768 projectors. Another very unique feature is that the mUVe 1 DLP will allow for the mounting of 2 projectors, which would allow for the increase of print resolution without having to spend a ton of money.
Piper also has been working to improve their original mUVe 1 Laser 3D printer.
“We’ve worked over the last year, since our IndieGoGo campaign last April, to add proper laser intensity and pulsing controls to the main open-source RepRap firmware,” he explained. “As of now we can make the laser pulse a set number of times per millimeter, with specific intensity, and with a specific pulse duration.
All of the settings are user adjustable and can drive pretty much any laser, including a CO2 laser should a person want to do so. So we’re just now getting to the point where print quality should start getting better and better.”
For those interested in pre-ordering this truly groundbreaking new SLA 3D printer, keep an eye on the mUVe3D website, as pre-orders should open up anytime now. Feel free to discuss this news in the mUVe 1 DLP printer forum thread at 3DPB.com.
Stay up-to-date on all the latest news from the 3D printing industry and receive information and offers from third party vendors.
Tagged with: dean piper • dlp • dlp 3d printer • mUVe • mUVe 1 • mUVe 1 DLP • sla • sla 3d printer
Please enable JavaScript to view the comments powered by Disqus.
mUVe 3D LLC 3D Printers
For
For
Professional
Industrial
Personal
Commercial
3D printer type
3D printer type
Tabletop
Food
Professional
For home
Chocolate
Jewelry
Russian
Reprap
Dental
Full color
Industrial
Not expensive
Medical
For training
Material type
Material type
Plastic
606
Metal
50
Photopolymer
245
Other
144
Manufacturer
Manufacturer
3D Systems
84
PICASO 3D
8
Stratasys Ltd
38
Leapfrog BV
6
EnvisionTEC
51
Myriwell
4
3D-Experts
3
PrintBox3D
4
FELIXrobotics
11
Solidoodle
8
WANHAO
32
ROKIT
5
SeeMeCNC
4
mUVe 3D LLC
1
RepRapPro
5
Formlabs
9
Afinia
1
Airwolf 3D
6
Type A Machines
2
iRapid
1
RoBo 3D Printer
3
Mixshop Inc
4
IonCoreLtd
1
Old World Laboratories
1
XYZprinting
13
Panowin Technologies Co. , Ltd.
2
MiiCraft
7
Portabee 3D Printer
2
Zeepro
1
Pirate 3D
1
Qualup SAS
2
BEETHEFIRST
3
Heacent
2
Robot Factory
2
Kuhling&Kuhling
1
3Dfactories
3
Tangible Engineering USA Corporation
1
DWS Lab
1
Sedgwick
2
3DJoy
4
Futura Elettronica
1
Makible Ltd
2
ALT Design
1
Active 3D
2
Trinitylabs
1
Sumpod Ltd.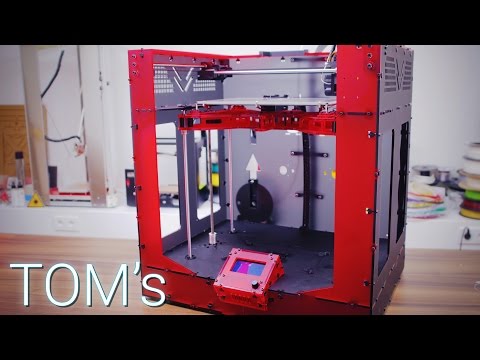
4
Brahma3
1
Hyrel 3D
5
Omni3D
4
BCN3D Technologies
7
Boots Industries
2
ORD Solutions
2
Ironvault
1
2PrintBeta
3
Unique Design
3
Hot Proceed
1
3DD Plas
2
York3dPrinters
1
Code-P
4
Deezmaker
3
Ruian Maitian Network Technology Co
2
CB-Printer
1
Print Technologies Pty Ltd.
5
MaukCC
1
Choc Edge Ltd
2
Shenzhen WeisTek Co.,Ltd
5
Delta Tower
2
Tegelbeckers Ltd
1
Deltaprinter
1
MindKits
1
Robot Co, Ltd
1
Romscraj
2
Fabmaker
1
Peerbhai Robotic
1
Sintermask GmbH
1
KL Services Group Inc
1
Fochif Mechatronics Technology Co. , Ltd
, Ltd
4
Teil3
1
Maker's Tool Works, LLC.
2
Gaminu
1
re:3D
1
inDimension3
4
Acuity Design
1
Essential Dynamics
1
Isis3D
1
Velleman
1
Kentstrapper
4
Blue Eagle Labs
1
Gubbels Engineering
2
Zortrax
8
3dBotic
1
MakerGear, LLC
1
Jelwek
1
it is 3D
2
Cablysa Systems, S. L.
L.
3
Ac123Dc
1
E3D Online
1
Hydraraptor
1
MakerBot Industries, LLC
8
Delta Micro Factory Corporation
3
Ultimaker B.V.
11
Solidscape Inc.
8
MBot3D
4
B9Creations
4
Jinhua Flashforge Technology Co., Ltd
26
Tinkerine Studio Ltd
3
Aleph Objects Inc.
4
DeltaMaker
1
Reprap Austria
3
IC3D LLC.
1
Ultibots, LLC.
2
Intelligent Machine Inc.
1
Metamaquina
1
Shenzhen Mootooh Engineering Co., Ltd.
1
Multitec GmbH
3
German RepRap GmbH
3
Sharebot
17
Nova 3D
1
QU-BD Inc.
4
RDMCU
1
Full Spectrum Laser LLC
1
PieceMaker Technologies
1
Printbot, Inc.
7
Terawatt Industries
1
botObjects
1
Lunavast
2
Maker Farm
3
NWRepRap
1
eMotion Tech
1
Printed Worlds
1
Reprapsource
1
Twelvepro Co
1
Replicator Warehouse
1
Stellamove Inc.
1
Make Mendel
6
Rapide 3D
2
Makealo
1
Crew Ltd.
1
Open cube
1
3D Kits
1
Coombes Solutions Ltd.
1
SHARK Limited Partnership
1
Smartfriendz
1
3D Monster
1
Kikai Labs
2
THY3D
1
Tantillus
1
RepRap Diffusion
1
QSQM International Co.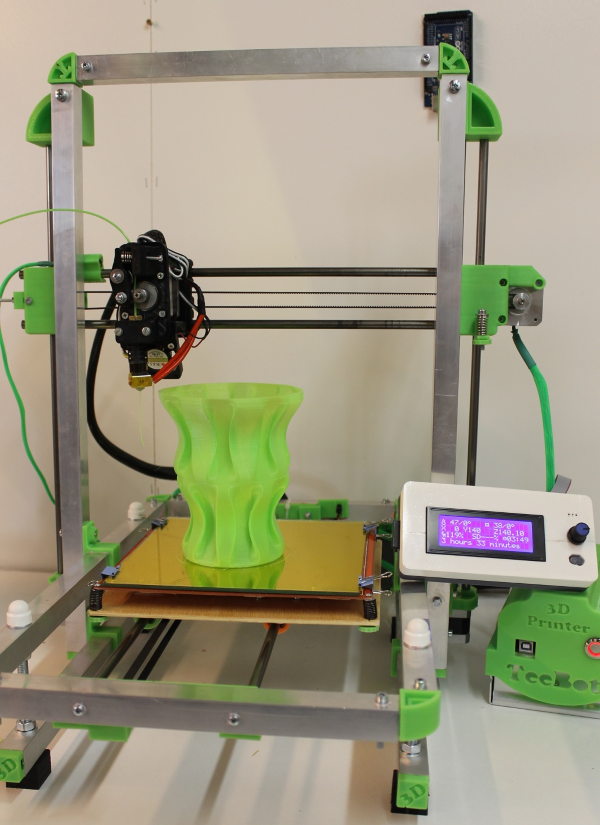
1
Tumaker
1
Makism 3D Corp.
3
3dBotZ
1
ZMorph 3d
1
Eckertech Inc.
1
Imec Proto
6
miniFactory Oy Ltd
1
printMATE 3D
1
CMET Inc.
5
Arcam AB
6
3Geometry Manufacturing Systems Pvt Ltd
8
Electro Optical Systems
15
Trump Precision Machinery Co. , Ltd
, Ltd
4
Wuhan Binhu Mechanical & Electrical Co., Ltd.
11
Optomec Inc.
1
Shaanxi Hengtong Intelligent Machine Co., Ltd.
9
Matsuura Machinery Corporation
1
ExOne Company, LLC
6
Concept Laser GmbH
9
Instrument Tech Co, Ltd
7
UnionTech
8
Renishaw plc
2
D-MEC Ltd.
3
Realizer GmbH
5
SLM Solutions GmbH
5
Fabriconic LLC
3
Mark Forged
8
Keyence Corporation
2
SYS + ENG
1
Lithoz GmbH
1
DWS s.r.l.
12
Beijing TierTime Technology Co. Ltd
17
Carima
3
Mcor Technologies Ltd.
3
Asiga
11
Rapid Shape GmbH
14
solido ltd.
1
Blueprinter ApS
1
Kevvox Pte Ltd.
2
JER Education Technology Co., Ltd
1
Azuma Engineering Machinery Inc.
2
Space Monkey
1
Trimaker
1
Most Fun
1
Iniciativas 3D
1
IdeaLab 3d
1
MendBot Labs
Bonsai Lab
2
MakerDreams
1
i3Dbot Co. , Ltd
, Ltd
2
Natural Machines
1
Cyrus3D
ITALYmaker
Something3D
Cagelli Distribution
E Crew Vis
BigRep GmbH
2
Voxeljet Technology GmbH
5
Sciaky Inc.
Mankati
4
F&B rapid production
3
3DQuality
17
Workshop Churyumov
2
Unimix
2
Center for Additive Technologies
3
ENNOVA
1
Exclusive Solutions
2
Magnum
5
SHEKLA
1
D-Force
3
BigRep
4
Roland
1
Alphabet 3D
2
MAKEX
1
3D Master Kit
7
Shining 3D
25
3NOVATICA
3
AVS Robotics
1
IMPRINTA
11
Createbot
5
AIO Robotics
1
RK-3D
1
SPETSAVIA
3
3DiY
14
Wonwall
1
Apium Additive Technologies
3
3DSUN
1
Cheap3D
1
3rd
1
EGL3D
1
Creality 3D
42
UNIMATECH
2
VolgoBot
3
ZVER 3D
3
Zenith
2
MicroFactory
1
Hewlett Packard
2
Shenzhen Anet Technology Co Ltd
15
MASS PORTAL SIA
11
Cyberon
2
PHOTOCENTRIC
2
TotalZ
11
3dcon
2
Raise3D
6
OOO RUSSIAN ENGINEER
1
Vortex-3D
5
Flying bear
11
Print3D
5
ROBOINO
1
SoloPrint
1
Fun Distribution
1
Alekmaker
2
Cronos
2
TEVO 3D
9
3D printers from China
2
ZAV 3D printer
4
Epo3d
1
FLSUN 3D
3
WINBO
19
PROTOTYPE
1
UNIZ TECHNOLOGY
2
W2P Engineering GmbH
4
MAESTRO
1
Pi 3D printer
1
Shenzhen Tronxy Technology Co
23
Kelandi
1
Geeetech
21
3DCeram
2
Omaker
1
Builder 3D Printers
6
Creatable Labs
1
ROBOZE
3
Desktop Metal
1
Sintratec
2
CreatBot
10
ANYCUBIC
29
3dlaboratorio
2
OOO SPC "Lasers and Equipment"
2
Prusa Research
6
Prismlab
3
ivilol
2
Geralkom-3D
7
EqMex
1
Tsar3D
2
Zhuhai CTC Electronic Co. , Ltd
, Ltd
3
Shenzhen Aurora Technology Co., Ltd
6
Monoprice
1
Shenzhen Salon Technologies Co., Ltd.
1
Shenzhen Sundystar Technology Co., Ltd
2
Shenzhen Easythreed Technology Co., Ltd
1
WOW Innovation Technology Co., Ltd.
2
Jinhua Xingzhe 3D Technology Co., Ltd
1
Shenzhen Zhongxin Microscience Software Co., Ltd.
1
Shenzhen Yaying Trading Co. , Ltd
, Ltd
5
Z Bolt Co.
2
Anisoprint
1
Shanghai 3D ARTEL Science and Technology Co.
3
FABERANT 3D printers
1
Self-assembly 3D printers
4
Z Rapid Tech
21
Zonestar
13
3DGence
3
BLB Industries
1
Hard Light
1
Stereotech
2
TPM3D
7
Artillery
4
Phrozen Tech Co. , Ltd.
8
INDIGO 3D
1
Aconity3d
6
OR Laser
3
Farsoon Technologies
5
QIDI Technology
11
Shenzhen Twotrees Technology Co., Ltd.
7
Mingda
18
Elegoo
14
Longer
9
Sunhockey
2
DUPAS3D
1
Kelant
5
Voxelab
3
DIYMARIA
1
VSHAPER
CREASEE
CNC Barcenas
5
Vistar
11
Kingroon
1
IdeaFormer
3
F2 Innovations
3
Sindoh
8
Eplus3D
8
Print Technology
Print Technology
Plastic Jet Printing (PJP)
8
MultiJet Modeling (MJM) Technology
1
SLA printing technology
Sterolithography (SLA) technology
2
Film Transfer Imaging (FTI)
MultiJet Printing (MJP)
20
Multi-Jet Modeling (MJM) Technology
2
Stereolithography (SLA)
115
Selective Laser Sintering (SLS)
65
Direct Metal Sintering (DMS)
6
Granular
5
Fused deposition modeling (FDM/FFF)
962
DoD/SCP Technology
6
PolyJet 3D printing Technology
19
The EnvisionTEC 3D-Bioplotter 3D printing technique
2
Direct Light Projection (DLP)
31
Photopolymerization
Digital Light Projection (DLP)
5
Digital Light Processing (DLP)
64
Additive Layer Manufacturing (ALM)
2
Laser Stereolithography (LSLA)
1
Direct Light Processing (DLP)
1
Electron Beam Melting (EBM)
6
Laser welding CLAD
6
Laser sintering (LS)
4
Layer by layer manufacturing (LOM)
5
Selective laser melting (SLM)
31
Laser Engineered Net Shaping (LENS)
1
Direct Metal Laser Sintering (DMLS)
11
Laser metal melting (LC)
10
Direct Metal Tooling (DMT)
7
Solid Creation System (SCS)
3
Ultrasonic Additive Manufacturing (UAM)
3
Composite Filament Fabrication (CFF)
1
Drop on Demand (DOD)
1
Lithography Ceramic Manufacturing
1
Melted and Extruded Modeling (MEM)
7
Drop-On-Demand (DOD)
Sliding Separation Process (SSP)
9
Smooth Curvature Printing (SCP)
2
Plastic Sheet Lamination (PSL)
1
Selective Heat Sintering (SHS)
1
ColorJet Printing (CJP)
7
Micro-SLA
1
DLP-SLA
3
WDM (Layer Waxing)
2
SLA-sla
Direct Metal Printing (DMP)
7
HP Multi Jet Fusion technology
2
3D Daylight Polymer Printing (DPP)
2
Smart-Positioning-System Technology (SPS)
2
LCD Stereolithography
62
UV LED DLP
4
Single Pass Jetting (SPJ)
1
Atomic Diffusion Additive Manufacturing (ADAM)
1
bioprinting
3
Powder Binder Jetting (PBJ)
10
Reset filters
Creatbot DX 3d printer overview
Hello everyone, 3DTool is with you!
In this review, we want to introduce you in general terms to the Creatbot DX 3D printer from Creatbot, whose products have appeared more than once in our articles. This Chinese manufacturing company has earned respect - the price / quality ratio of its products and rightfully took pride of place on our pedestal of manufacturers.
Past reviews of the products of this brand, you can see HERE and HERE. And now let's get to know Creatbot DX better!
First acquaintance
The printer comes in a classic cardboard box. Inside it is lined with foam and fixed with adhesive tape.
Equipment
After unpacking, Creatbot DX requires partial assembly, so the package also includes elements of its design. In general, in the box you will find everything you need for convenient work with the device:
1. Network cable.
2. USB cable.
3. SD card.
4. Spatula.
5. Screwdriver and two open end wrenches.
6. Tweezers.
7. PVA glue.
8. Masking tape.
9. Spare screws and nuts.
10. Spare parts:
limit switch, heating element, teflon tubes driver Sh.M. and a door hinge.
11. A set of hexagons.
12. Mounting coils.
13. Stretching mechanisms of the filament 2 pcs.
14. Heating table.
15. Coil bracket axles.
Appearance and first impression
An all-metal body with excellent rigidity has already become a good form for Chinese manufacturers of the middle and upper segment, so Creatbot does not lag behind competitors.
From the sides, the volume of the chamber is closed with plexiglass walls of blue or orange colors, depending on the batch.
In our case, the plexiglass was left covered with shipping paper, because the printer is being tested and has yet to go to the buyer. Door hinges are molded, one spare is included.
A glued magnet is provided for reliable fixation of the doors on the case.
On the front side of the device, we can see the power button (1), a functional touch screen (2), indication LEDs, a slot for a USB memory card (3) and an illuminated company logo on the top plane.
On the rear panel, we see mortgages for mounting coils (1), wire connectors for pulling mechanisms and a braid of wires from the printing unit (2) that go inside the case. At the bottom is a connector for the power cable (3).
On the side wall there is a USB-1 connector for service actions (1), flashing, or connecting the printer to remote control via software.
Display and functions.
The color touch 4:3’ display module is identical to the same on the entire line of Creatbot devices. It was not possible to identify the display itself, because. from the inside of the case, it is closed with a welded metal niche and it is quite difficult to remove it from there, and it is not required.![]()
When the 3D printer is connected to the network, we see a welcome inscription with a logo and then the main interface opens. We will talk about its functions in more detail later.
Specifications
Before talking about the technical characteristics, we want to note several important distinguishing features of this line of printers.
- Firstly , this is a mode of autonomous printing stop and storing coordinates in case of power failure. After power is restored, the printer will be able to continue printing from where it left off.
- Secondly, , the presence of a high-temperature Hot-End with a heating temperature of up to 350 degrees. That in theory will allow the use of refractory materials.
The manufacturer also claims that can be equipped with 3 hotends on one printing unit, but this version, alas, is not supplied to Russia.
It should be noted that with a long idle time - about five minutes, the printer automatically goes into sleep mode, from which it can be awakened by pressing the power button once.
Mechanics
The mechanics of Creatbot DX are familiar to us from 3D printers Ultimake r. According to XY, these are linear cylindrical guides intersecting with each other on cylindrical bearings. The solution is quite reliable and has proven itself well on many similar 3 D-printers. The lightness of the design allows you to achieve a high speed of movement of the printing unit and the printing itself, due to the Bouden plastic supply system. Also, it should be noted that standardized components work for the benefit of maintainability. In addition to the hot end block itself, bearings, axles and spools are easily bought from the respective sellers and are unified.
The Z axis also uses the well-known and reliable system with one ball screw on a stepper motor and two thick cylindrical guides. They run bearings with an elongated housing cage to avoid bites and distortions and maximize the contact area with the axle.
The table console is inserted and removed freely and is not welded tightly to its brackets. Lightweight aluminum parts also work for the overall speed and reduce parasitic vibrations of the entire structure as a whole.
The table is fixed by "driving" onto the brackets (2). At the same time, it does not lose its calibration, because. the calibration screws (1) are located on the console itself and are removed together with it without changing position.
6.5 mm, reinforced, neoprene belts are used as the transmission of the moment of the engines on the axle. Quite expensive and high quality for the Chinese 3 D-printer in the layman's view. However, the tooth profile is standard GT6 . Extension springs are used as a tensioner.
Material feed system and heating table
As we said above, the printer works with print unit and a pull mechanism type Bouden , that is, remote material supply in HotEnd . All components of the company's own production, without borrowing. The diameter of the used filament 1.75 . The extruder heatsink looks like the Vulcano , but the heating block is classically deployed and the heatsink fins are thicker. I must say that the nozzles of Creatbot DX are also their own, it is possible to choose the hole diameter. The default is 0.4. In the high temperature heater and sensor version, the kit also includes steel nozzles for printing with refractory materials.
The blower consists of two standard 12 volt fans with air flow distribution for cooling the radiator and under the nozzles (black objects behind the nozzles in the photo).
This allows for good temperature control and after finer tuning of the retraction and airflow rate, excellent results can be achieved.
Feeder is all metal, mounted on the back of the printer and contains a filament presence sensor. Most likely mechanical, without disassembling the mechanism itself, it is difficult to determine. The body of the feeder is milled from aluminum and made very high quality.
Heating table is a classic "sandwich". Working area dimensions 300 * 250 * 300 mm . This is enough to print even large objects without gluing and unwanted separation.
The table heats up to a maximum of 100 degrees. But in general, this is enough for almost all filaments in the 1.75 format.
Electronics and electrical
We turn to the most interesting, the electronic filling of the Chinese "Comrade".
To begin with, we recall that the printer is equipped with an "emergency stop" system, as well as sensors for the presence of filament in the feeder. This system automatically pauses the printing process and allows you to replace the problematic spool, continuing printing from the place where the malfunction occurred.
What does Creatbot DX have under the hood?
Under the hood is a standard and slightly hackneyed, but still reliable AtMega 2560, factory wired and with replaceable drivers. By the way, the printer is VERY quiet. The knowledgeable reader will guess why. Yes. Precisely quiet drivers TMC2208.
The etching of the board and the wiring is done with high quality and does not cause any complaints. All connectors are tightly crimped, wire braids are fixed with ties and removed away from the boards for better ventilation.
Here we can also see capacitors for the emergency shutdown system (1), a power relay and a box - a converter (3) it is interesting that it is 3D printed. And a pretty good power supply (2).
As we wrote above, access to the display is closed and only the display board with LEDs and a USb slot is visible. All connectors are filled with hot-melt adhesive, which provides additional fixation and eliminates loss of contact.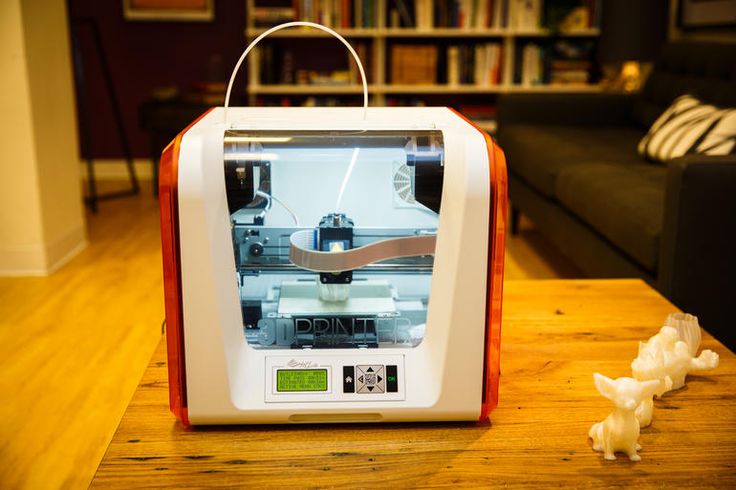
Display functions and software.
So, we got acquainted with the printer in some detail, it's time to turn it on and see it in action. But before that, let's figure out what functions the touch screen has and what P.O.
Software
The software is the converted Cura, which in this version is called CraftWare. It does not differ from its prototype by almost anything other than the built-in settings for the entire line of its printers and a beautiful 3D model of the table. So we will not analyze the interface in detail, but simply run several print jobs to evaluate the quality.
We remind you that the printer was just taken out of the box and no settings were made in the slicer, everything is standard
.
The first time you turn on CraftWare, it will ask you to connect the printer via USB and perform a familiar calibration. Let's follow all the instructions of the program.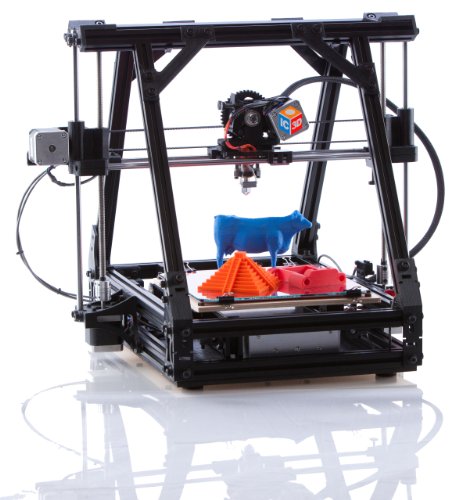
And here are the print settings with which we launched the task. The well-known Ctrl-V test from thingiverse was chosen as a test 3D model. We start the calculation and save the G-code to a USB flash drive. Let's move on to the printer and touch display features.
Main screen:
On it we can see all the available functions of the screen. Button Preheat
Starts the preheating of the extruder and heating table to the set values. By default, under the settings of PLA plastic. This can be changed in menu Settings.
Move Axis (move menu)
Next comes the axis movement menu. In this menu, we have access to the classic movements of the printing block along the axes. Choice of the number of steps and their direction.
Filament (Plastic Menu)
Here, too, everything is quite familiar, the left icon controls the left extruder, the right icon controls the right one. The amount of material fed and the retraction and extrusion buttons imply a preheated extruder to the desired temperature.
Settings (Settings)
Allows you to set the exact settings for the temperature of the table and the printing unit, blowing speed, printing speed and other parameters. You can also reset or store them in the printer's memory.
Status
Allows you to monitor the temperature of the printing blocks and the table, position coordinates and other parameters. It also allows you to instantly adjust the temperature on any of the heating elements. But when you run another function, the changes will be cancelled.
At the same time, pressing the extruder temperature, or any other parameter, calls up a special Pin-Pad, or a numeric keypad, on which we type the given number.
USB (Memory card)
Shows a list of files and allows you to start a print job. It does not show any settings, but during printing, we can pause, cancel the job, or change the plastic.
If you click on the progress bar, the settings menu will open, where you can adjust the temperature or print speed.
Printing process
As we noted earlier, the printer is very quiet, even the blower fans are almost inaudible. Motors thanks to good drivers move smoothly and also do not create unnecessary noise.
Printing Quick Summary
In general, the result of printing on a 3D printer just unpacked from the box is pretty good. All elements of the test were printed. In some places you can see overheating, or incorrect retraction settings, but this is solved by adjusting the settings and, first of all, also depends on the plastic. We used purple PLA E-Sun. However, after playing with the settings a little more, we achieved a better result on red PLA from the same manufacturer.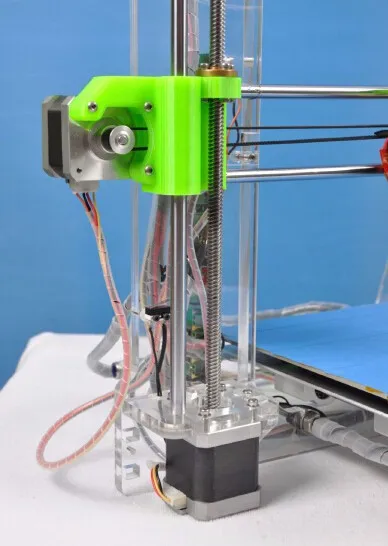
After changing the plastic to blue ABS and slightly twisting the retraction, the result was noticeably better. A metal extruder and a powerful pulling mechanism affect. Printing temperature 240 degrees, table 100 degrees. Layer height 0.2mm, speed 65mm/sec.
Then they made a few more models on different settings. For example, the logo of the company creatbot, which came on a flash drive complete with a printer. Print layer 0.3mm, speed about 80mm/sec.
Next came the turn of gray ABS plastic from another domestic company and long-term printing for 8 and a half hours.
It was also possible to achieve two-color printing. The settings are about the same as in the first screenshot from P.O. Slightly edited speed and plastic feed ratio.
Final word
Despite the printing that requires adjustment, the printer works quite confidently out of the box with the two most common types of materials.
A user-friendly interface, two print units, printing out of the box, interesting design solutions and a fairly competitive price in its segment make this printer an excellent choice for educational institutions, CMITs, workshops, manufacturing enterprises, design, engineering, architectural bureaus, art and design and those who are just looking for a high volume 3D printer.
Well, that's all we have! We hope the review was useful for you!
You can order a Creatbot DX 3D printer, consumables for it, or any other 3D printer or CNC machine, ask your questions and find out the status of your order, you can
By email: [email protected]
By phone: 8(800)775-86-69
Or on our website: http://3dtool.ru
If you have any questions, you can always ask our consultants on our website 3Dtool.ru or call the toll free number 8 (800) 775 86 69 – the call within Russia is free. You can also send your requests to sales@3dtool.