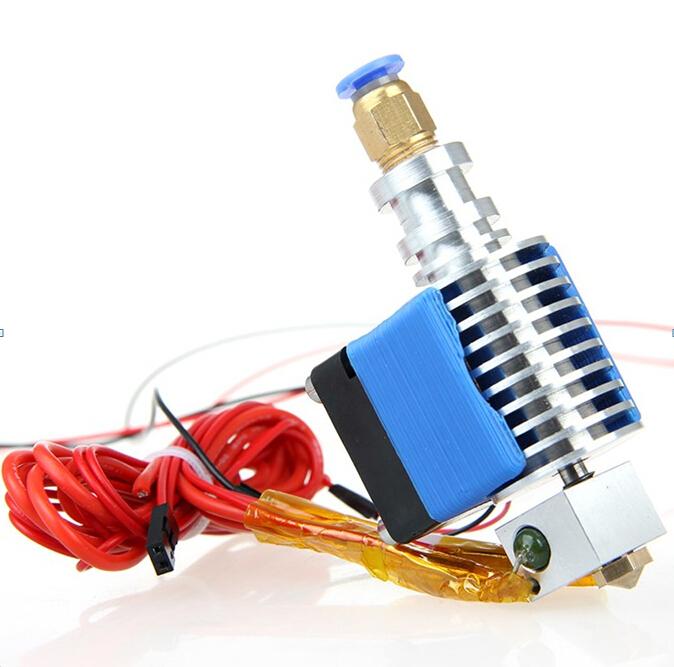
All metal hotend 3d printer
The 7 Best 3D Printer Hot Ends (All-Metal!) – Clever Creations
When it comes to 3D printing, the hot end is one of the most important components. It’s responsible for melting and extruding the filament, so it’s crucial that you have a good one.
In this article, we’ll discuss some of the best 3D printer hot ends on the market. We’ll also give you a few tips on how to choose the right one for your needs. So, without further ado, let’s get started!
| 3D Printer Hot End | Max. Temp | Filament Dia. | Voltage(s) | Price (~) | Best Offer |
|---|---|---|---|---|---|
| E3D V6 | 300 °C | 1.75 mm, 2.85 mm | 12V, 24V | $59 and up | Amazon |
| Micro Swiss All Metal Hotend Kit | 300 °C | 1.75 mm | 24V | $63 | MatterHackers |
| E3D RapidChange Revo | 300 °C | 1.75 mm | 12V, 24V | $88 and up | E3D |
| Slice Engineering Mosquito | 500 °C | 1. | 12V, 24V | $145 | MatterHackers |
| E3D Supervolcano Upgrade Kit | 300 °C | 1.75 mm, 2.85 mm | 12V, 24V | $96 and up | E3D |
| DyzEnd PRO | 500 °C | 1.75 mm | 12V, 24V | $130 | MatterHackers |
| Phaetus Dragonfly Hot End | 500 °C | 1.75 mm | 12V, 24V | $69 | BIQU |
What is the hot end in a 3D printer?
A hot end is the heating element in a 3D printer. It comprises several parts, including the heating element, nozzle, heat sink, and heat break.
The heating element is responsible for heating the filament to its melting point. The nozzle is a small hole through which the molten filament is extruded. And finally, the heat break limits the amount of heat that transfers to the heat sink.
These elements work together to provide an even flow of melted material and give you a smooth 3D printing experience.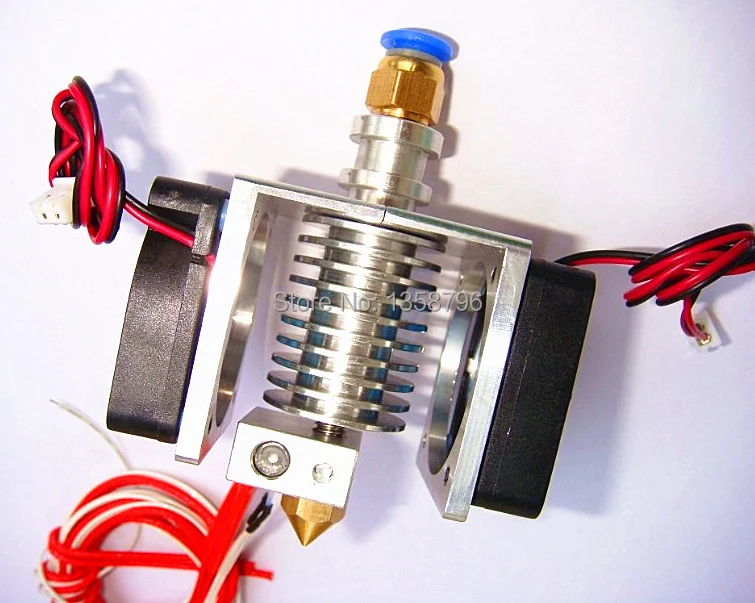
What makes a good hot end?
The best 3D printer hot ends have good heat management, durability, material compatibility, and material flow rate. They minimize heat creep and maintain a stable printing temperature during extended 3D printing times. A stable hot end temperature reduces the chances of the hot end clogging up and prevents print failures.
A hot end with a high flow rate lets you print at faster print speeds and larger layer heights. This reduces print times and creates a strong 3D printed part.
Another aspect you need to consider is the material composition of the hot end. 3D printer hot ends with brass nozzles are not the best for printing with abrasive materials. Instead, you should look for hot ends with stainless steel or hard-coated nozzles. These nozzles are more wear-resistant and can handle abrasive materials better.
Similarly, if you want a hot end for 3D printing high temperature (>300°C) filaments, you are best off with a hot end with a copper-plated heater block, a high-powered heater cartridge, and a thermocouple.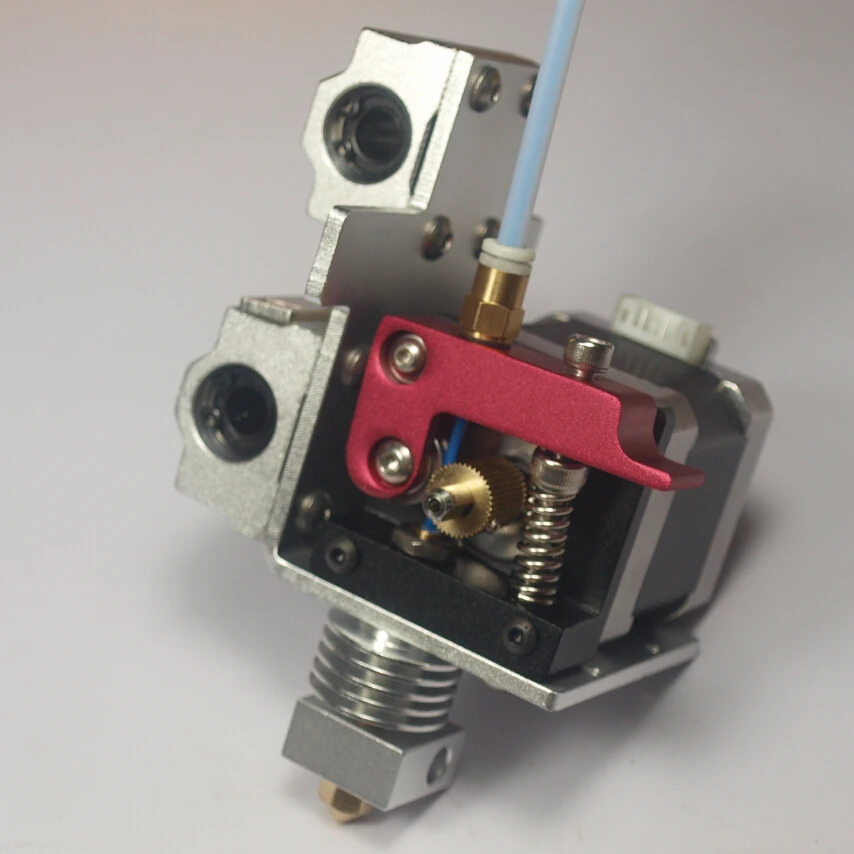 These hot ends can handle the higher temperatures required for printing with polycarbonate, PEEK, and other engineering-grade filaments.
The Best All-Metal 3D Printer Hot Ends in 2022
E3D V6
Best overall
Check Price
AmazonE3DMatterHackers
E3D manufactures some of the highest quality hot ends and the E3D V6 is one such example of that. It is simple yet effective and delivers excellent printing performance. It is suitable for both direct and Bowden drive extruders, and you can further customize it for your 3D printer directly through E3D’s website.
The E3D V6 is an all-metal hot end capable of reaching temperatures of up to 300 °C in the standard configuration. The cartridge-style heating block facilitates the easy removal of heater cartridges and thermistors for easy installation and maintenance. Its heatbreak is designed to maintain consistent and accurate temperature in longer prints.
As with all E3D products, the V6 has excellent community support, ensuring that you can quickly resolve any issues. Overall, it is a superb hot end that will take care of most of your printing needs and is suitable for hobbyists and professionals alike.
Standout Features
- All-metal heatbreak
- Cartridge style heating block
- Simple design
Technical Details | |
|---|---|
| Maximum temperature | 300 °C |
| Filament diameter | 1.75 mm, 2.85 mm |
| Available voltages | 12V, 24V |
What We Like
- Excellent printing performance
- Available in several configurations
- Excellent community support
Could Be Better
- Big form factor
Find E3D V6 at
AmazonE3DMatterHackers
Micro Swiss All Metal Hotend Kit
Best hot end for Ender 3
Check Price
AmazonMatterHackers
The Micro Swiss hot end is an upgraded version of the stock hot end for Creality 3D printers.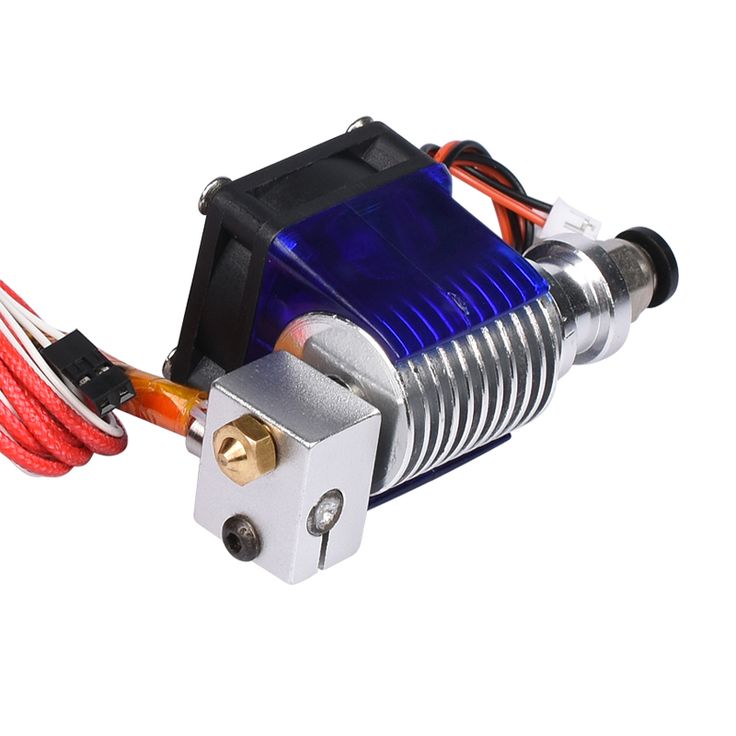 You can install it directly on the default setup of CR-10 and Ender 3 series 3D printers without any extra mounting systems and brackets.
The Micro Swiss comes with a similar appearance to the stock Ender setup, albeit delivering improved performance. You get a titanium heat break that does an excellent job in thermally separating the hot and cold regions of the hot end resulting in a more defined melt zone.
You will need to recalibrate your retraction settings and ensure proper assembly of this hot end, however. Set it up correctly, and the Micro-swiss hot end is an excellent upgrade for anyone who wants to print high-temperature materials on a budget.
Standout Features
- Aluminum heater block
- Titanium heat break
- Brass plated MK8 nozzle
Technical Details | |
|---|---|
| Maximum temperature | 300 °C |
| Filament diameter | 1. 75 mm 75 mm |
| Available voltages | 24V |
What We Like
- Easy to use with Creality printers
- Good build quality
- Good customer support
Could Be Better
- Requires tweaking
- Potential retraction and leakage issues
Find Micro Swiss All Metal Hotend Kit at
AmazonMatterHackers
E3D RapidChange Revo
Best high-end
Check Price
E3DMatterHackers
Swapping out a 3D printer nozzle can be a labor-intensive process and result in significant downtimes in your 3D printing process. To speed this process up, the E3D Rapid Change Revo comes with a unique design that lets you quickly change your nozzles without any tools.
It features a design similar to the E3D V6 hot end but in a more compact and lightweight form factor. The hot end comes with a redesigned heating block that is engineered for safety and maximum heating performance. The Revo is compatible with most high-temperature materials and delivers superb print quality out of the box.
You can get the hot end in three configurations – Revo Micro, Revo Six, and the Revo Hemera. Each version is developed for different use cases. Together, the Revo Rapid change system covers a wide range of 3D printing applications.
A RapidChange Revo hot end is well-suited for professional users who are looking for the best hot ends with easy maintenance.
Standout Features
- Quick-swappable nozzles
- Lightweight design
- Fast heating times
Technical Details | |
|---|---|
| Maximum temperature | 300 °C |
| Filament diameter | 1.75 mm |
| Available voltages | 12V, 24V |
What We Like
- Compact form factor
- Faster print speeds
- Easy maintenance
Could Be Better
- Limited nozzle options
- Pricy nozzles
- Not compatible with 2.
 85 mm filament
Find E3D RapidChange Revo at
E3DMatterHackers
Slice Engineering Mosquito
Best for high-temperature filaments
Check Price
AmazonMatterHackers
The Slice Mosquito hot end comes with a unique design that separates it from other hot ends. The heater block is entirely separated from the frame of the hot end with the help of four support rods. It helps to eliminate heat creep and improves thermal performance.
This design allows the hot end to be highly compact and lightweight, resulting in extra vertical height and faster print speeds. Its rigid construction allows for one-handed nozzle changes making maintenance an easy task.
In contrast to the previously mentioned hot ends, the Slice Mosquito is rated to print at high temperatures of up to 500 °C, covering filaments such as PEEK, ULTEM, and PPSU.
At a starting price point of $144.99, it is certainly not for budget 3D printer users. However, the Slice Engineering Mosquito hot end is ideal for professionals who need a high-performance hot end that delivers excellent print quality and broad material compatibility.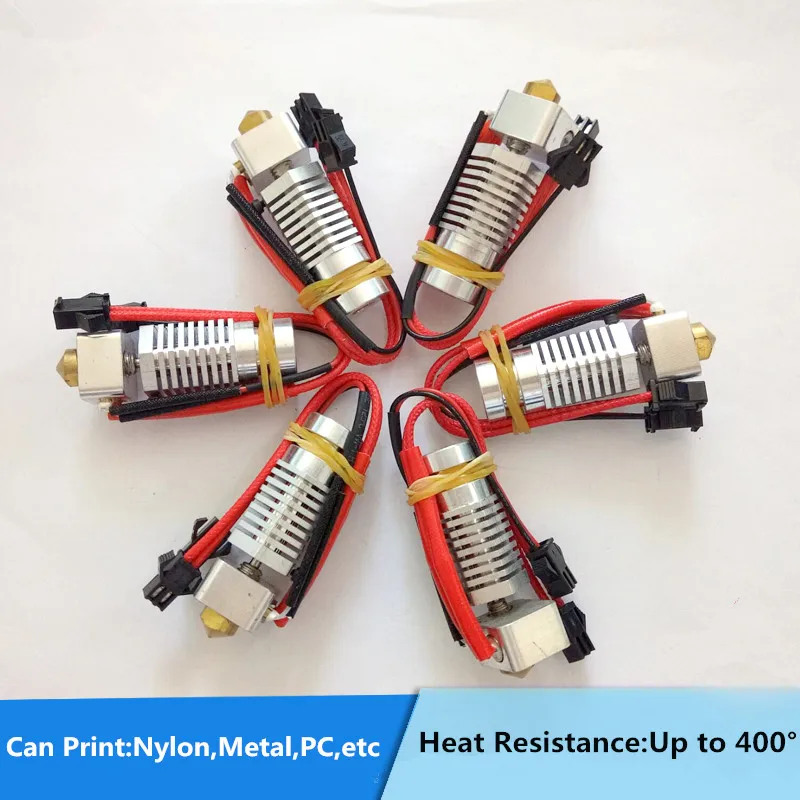
Standout Features
- Unique design
- High printing temperatures
- High structural rigidity
Technical Details | |
|---|---|
| Maximum temperature | 500 °C |
| Filament diameter | 1.75 mm |
| Available voltages | 12V, 24V |
What We Like
- Lightweight and compact design
- No heat creep
- Compatible with majority of FDM 3D printers
Could Be Better
- No liquid cooling option
Find Slice Engineering Mosquito at
AmazonMatterHackers
E3D Supervolcano Upgrade Kit
Best for large 3D printers
Check Price
AmazonE3DMatterHackers
The E3D Supervolcano upgrade kit is specifically designed for fast printing of large objects. It delivers up to 11x more volumetric flow rate than regular E3D V6 hot ends. This lets you 3D print at higher speeds with large layer heights and widths.
Wider layers allow for better interlayer adhesion resulting in a stronger 3D printed part. While 3D print strength is something you can also increase by choosing the strongest infill pattern and strongest filament, printing wider layers gives you another option to do so.
The Supervolcano can reach a maximum print temperature of 300 °C, letting you print with materials like PLA, ABS, PETG, and TPU. It is fully compatible with various other E3D hot ends and extruders, so you can easily upgrade your default setup to a Supervolcano.
This is the best 3D printer hot end for a large format 3D printer to carry out high-volume printing. If your printing workflow consists of large-scale and high-volume 3D printed parts, the Supervolcano kit is crucial in reducing your 3D printing times.
Standout Features
- 11x volumetric flow rate (compared to V6)
- Copper plated heat break
- Readily compatible with E3D hot ends
Technical Details | |
|---|---|
| Maximum temperature | 300 °C |
| Filament diameter | 1. 75 mm, 2.85 mm 75 mm, 2.85 mm |
| Available voltages | 12V, 24V |
What We Like
- High filament melting rate
- Suitable for large objects
- Option for second thermistor
Could Be Better
- Reduces print height
- Increased chances of thermal runaway and safety issues
Find E3D Supervolcano Upgrade Kit at
AmazonE3DMatterHackers
DyzEnd PRO
Most durable nozzle
Check Price
MatterHackers
The DyzEnd Pro hot end is a high-performance hot end developed for a professional workflow. It comes in a lightweight and compact design that takes up less space.
This hot end comes with a tungsten carbide nozzle with excellent wear resistance. This means you can use the DyzEnd PRO for 3D printing abrasive materials, like carbon fiber or glow-in-the-dark filament, without fear of it wearing out.
Its all-metal heat zone and steel heater block ensure that you can print materials up to 500°C with ease. You can also quickly cold swap the nozzle on the DyzEnd Pro for less downtime and easy repairability.
It is a superb hot end meant for serious professionals who regularly print with high-temperature materials. If you’re looking for a lightweight, robust and good quality hot end for your 3D printing workflow, the DyzEnd Pro is one of the best hot ends available.
Standout Features
- Cold swappable nozzle design
- High maximum temperature
- Liquid cooling ready
Technical Details | |
|---|---|
| Maximum temperature | 500 °C |
| Filament diameter | 1.75 mm |
| Available voltages | 12V, 24V |
What We Like
- Fast printing speeds
- Increased durability with abrasive filaments
- Compatible with different temperature sensors
Could Be Better
- Limited nozzle sizes
- Requires considerable fine-tuning
Find DyzEnd PRO at
MatterHackers
Phaetus Dragonfly Hot End
Check Price
AmazonBIQU
The Phaetus Dragonfly hot end is an all-metal hot end designed for hobbyists and professionals. It uses copper alloy material for its heat sink for better heat dissipation. The Dragonfly also lets you print at up to 500 °C, making it one of the cheaper 3D printer hotends that can reach these high temperatures.
This hotend has a smooth inner surface that aids in getting an uninterrupted filament flow. Its conical heat break designs allow fast heat dissipation, maintaining good thermal separation and a stable melt zone.
Compared to the other hot ends that can reach 500 °C on this list, the Dragonfly is reported to come with more quality control issues. This is something that can be expected given its low price but it is still something we think you should be aware of.
The Dragonfly Hot end comes in two variations suitable for Creality and Prusa 3D printers. It is ideal for individuals who need a high-temperature hot end that’s easy to use and comes at a budget price.
Standout Features
- All-metal design
- Conical heat break
- Copper alloy construction
Technical Details | |
|---|---|
| Maximum temperature | 500 °C |
| Filament diameter | 1. 75 mm 75 mm |
| Available voltages | 12V, 24V |
What We Like
- Excellent heat dissipation
- High printing temperature
- Relatively low price
Could Be Better
- Quality control issues
- Inconsistent printing performance
Find Phaetus Dragonfly Hot End at
AmazonBIQU
Buyer’s Guide – How to Choose a 3D Printer Hot End
3D Printer CompatibilityHot ends are not a generic component and are often designed for a specific set of 3D printers. Checking the hot end’s compatibility with your 3D printer is essential for getting the best results. It will ensure that you get the right hot end that supports your 3D printer’s hardware and electronics.
One of the things to look for is the heater cartridge voltage on the hot end. It has to match the printer’s voltage to ensure proper heating of the hot end.
You also need a mounting system for the hotend. Any additional mounting plates and hardware will translate to an increase in the cost, even though you can 3D print these yourself sometimes.
Material Compatibility
A hot end with wide material compatibility is always a good thing to have. This allows you to experiment with different materials and find the ones that work best for your needs.
The most important thing to look for is the maximum temperature that the hot end can reach. This number will give you a good idea of the range of materials that the hot end can work with.
Typical all-metal hot ends can reach up to 300 °C and can easily print most thermoplastics. This range covers PLA, ABS, PETG, Nylon, and flexible filaments like TPU and TPE.
If you need to print high-performance plastics such as PEEK, ULTEM, Polycarbonate, and PEI, you will need a hot end that has a maximum printing temperature of 500 °C.
High-performance hot ends will be more expensive than the basic ones and might not yield good results when printing at lower temperatures. If you primarily print with materials that melt below the 300 °C points, basic all-metal hot ends like the E3D V6 and the Microswiss should be enough for you.
Nozzle Compatibility
A nozzle is an important component of the hot end assembly. Nozzles are designed with their hot end’s specifications in mind. The nozzle you use defines the printing capability and material compatibility of your hot end.
A larger nozzle size will let you print fast and with large layers, while a fine nozzle is suitable for printing detailed parts. Both can be properties to look for when looking to make money with your 3D printer.
Similarly, a nozzle’s material will also affect the print quality. Nozzles made from stainless steel can handle higher temperatures and are more wear-resistant. As a result, they can last longer, but they might not be the best choice for printing with PLA.
On the other hand, brass nozzles are a good all-around choice and can be used with most materials. If you are unsure about the material of the nozzle, always check with the hot end’s manufacturer.
Due to the hot end’s design, nozzles aren’t interchangeable between 3D printer hot ends from different brands. For example, the DyzEnd nozzle is specific to the DyzEnd Pro hot end. Similarly, the E3D Supervolcano exclusively supports E3D nozzles of sizes 0.6 mm – 1.2 mm.
If you 3D print with parts of varying layer heights and with different materials, you need to ensure that you get a hot end that’s compatible with various nozzle sizes and materials.
Build Quality
A hot end is the critical component of the 3D printer and is responsible for extruding the filament smoothly. A poorly manufactured hot end will lead to many issues down the line.
Nozzle clogs, hot end jamming, filament leakage, and improper filament flow all indicate poor hot end build quality. These issues can be frustrating and time-consuming to deal with. Checking the user reviews before you purchase the hot end will give you a better idea about its build quality.
Cheaper hot ends tend to have poor overall quality and while they might work well in the beginning, they can experience many issues after prolonged use.On the other hand, a well-manufactured hot end will have a high upfront cost and give you consistent printing performance and a high-quality experience.
Should You Buy an All-Metal Hotend or Not?
All-metal hot ends are helpful for printing materials like ABS, PETG, and Nylon. Where PTFE-lined hotends are only suitable for printing up to around 250°C, an all-metal hot end typically reaches temperatures of either 300°C or 500°C
These temperatures are more than enough for printing a wider variety of materials. The all-metal design also eliminates the need to replace the PTFE liner in the hotend over time, as the PTFE tube is no longer exposed to extreme temperatures.
However, the all-metal design can create more filament jamming issues when not configured correctly. A shorter retraction distance helps to minimize stringing and consequently prevent filament jams, however.
If you plan on printing with a lot of different materials or if you want to experiment with higher temperatures, an all-metal hot end is a good investment. Otherwise, a PTFE-lined hot end will suffice for most applications.
That said, you can’t ever go wrong with an all-metal hotend upgrade. If you simply want the best 3D printer hot end for your machine, all-metal is the way to go.
FAQ
When should I replace my 3D printer hot end?
There’s no need to replace your 3D printer hot end unless you’re looking for an upgrade to get better performance. You might have to periodically replace certain components, like the nozzle, when they wear out, however.
If you are experiencing issues with your prints, then it may be time to check your hot end for any damage or debris that may be causing problems.
Is an all-metal hot end good for PLA?
Yes. While all-metal hotends are ideal for higher-temperature filaments, they can also be used with lower-temperature filaments like PLA. Some users find that they get better results using an all-metal hotend with PLA than they do with a standard hotend with PTFE lining.
What type of hotend does the Ender 3 use?
The Ender 3 uses a PTFE-lined hot end, which allows for smoother filament flow and reduced clogging. PTFE is a low-friction material that is resistant to wear and tear, making it an ideal choice for a hot end.
If you want to upgrade your Ender 3 hot end, the Microswiss is one of the best hot ends to swap the stock one out with.
Which hot end is best?
In our opinion, the E3D V6 hotend is currently the overall best hot end on the market. It is made of high-quality materials and has a modular design that makes it easy to assemble and maintain. It also has a wide range of compatibility with different types of printers, making it a popular choice for both beginners and experienced users.
Conclusion
Choosing the right hot end for your 3D printer will extend your printing potential. The best 3D printer hot end minimizes heat creep while maintaining a stable printing temperature. However, you need to check that the hot end you select fits your 3D printing needs and is compatible with your 3D printer.
The E3D V6 hot end ranks on the top as the best 3D printer hot end. It is one of the most reliable hotends that has been well-tested over the years and is suitable with a good of materials. It has an all-metal design, broad 3D printer compatibility, and excellent build quality at a reasonable price.
Its only drawback is its limited range of printing materials. With a maximum temperature of 300°C, it won’t handle true engineering materials like PEEK.
This is where the Slice Engineering Mosquito and the DyzEnd Pro hot end step in. These are rated to print up to 500 °C and come with unique designs with elegant features.
So, what is the best 3D printer hot end for you? It depends on your specific needs. Consider the type of materials you want to print with, your budget, and your 3D printer compatibility when making your decision.
Let us know your experience if you’ve used any of these hot ends. We’d love to hear if you have anything else to add in the comments below.
Micro Swiss All Metal Hotend Kit for Ender 3 / CR10 Printers — Micro Swiss Online Store
Original price $ 63.50 - Original price $ 63.50
Original price $ 63.50
$ 63.50
$ 63.50 - $ 63.50
Current price $ 63.50
| /
SKU Part Number: M2583-04
This is an All Metal Hotend Kit for CR-10 / Ender Printers.
This is a drop in All Metal Conversion kit for the CR10 printers. It requires absolutely zero modification to your printer to install. Our uniquely designed cooling block eliminates need for a thermal tube. By not having a separate thermal tube inside the cooling block, it allows for faster heat dissipation.
The thermal heat break is made from Grade 5 Titanium Alloy to provide excellent thermal isolation between the heater and the cooling block. Titanium is extremely strong material and offers almost 3x lower thermal conductivity than stainless steel, creating more defined melt zone.
CNC Machined and Assembled in USA
Fits- CR-10 (Will NOT fit CR-10 V2)
- CR-10-S5
- CR-10-S4
- CR-10S
- CR-10 MINI
- CR-20
- CR-20 Pro
- Ender 2
- Ender 2 Pro
- Ender 3
- Ender 3 V2
- Ender 3 Pro
- Ender 3 Max
- Ender 5
- Ender 5 Plus
- Ender 5 Pro
- Ender 6
- Elegoo Neptune 2S
- TronXY X5S
- TronXY XY2 Pro
- Tevo Tornado
- Alfawise U20
- Longer LK5 Pro
- Lotmaxx SC-10
- Voxelab Aquila
- Aluminum Cooling Block
- Grade 5 Titanium Heat Break
- Aluminum Heater Block
- Brass Plated Wear Resistant MK8 .4mm Nozzle
- Silicone Sock
- Hardware kit
Installation Instructions - Video
Extra NozzlesBrass Plated MK8 Nozzles
A2 Hardened tool steel MK8 nozzles
M2 Hardened High Speed Steel Nozzle MK8 nozzles
Share this:Best so far
Well machined hot end little overpriced imo but isn't everything these days, I have tried using a Noctua fan on this but it clogs (wanted quieter printer for my small apartment but sadly seems not an option) Just make sure you have plenty of airflow cooling or you will run into issues, very easy to install & I have it setup on a cheap Chinese linear rail works great :)
Not direct replacement for Ender-3 Max Neo
Nice hotend, but was not a direct replacement for the new Creality Ender-3 Max Neo. The new Neo hotend comes with cartridge stye temperature sensor. So, I had to upgrade the heater block to my new upgraded MicroSwiss hotend.
Beautiful prints
Prints are coming out excellent
MicroSwiss Life
Hot End works perfectly. It does take a little bit to get it setup up right.
I had a defective one at first and then the second was perfect.
Follow installation instructions, overwise you will be screaming CLOG.
Print with a the DC fan on! OTHERWISE you won't be happy. Trust me.
Thank you MicroSwiss. Good product.
123
View from the side of the head / Habr
General view - how to use them, native analogies. Humble reality. Only FDM, only home, live - but from the inside and in detail. Hotend? In the context, with zones and a temperature graph. Advantages and disadvantages, properties of various solutions in the design of printheads.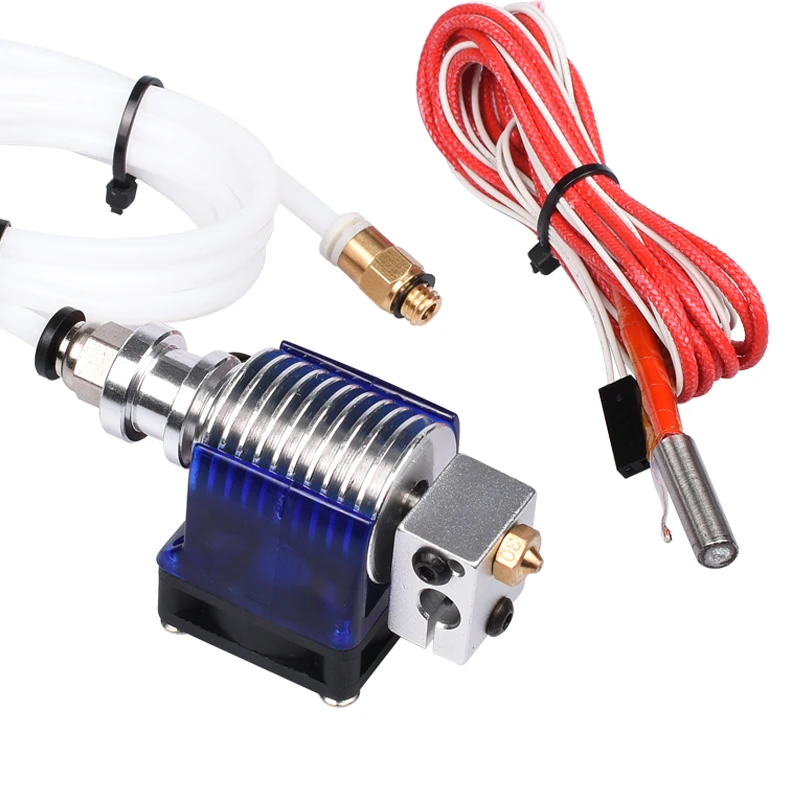 Features of printing with a trimmer line, and experiments on obtaining tables of optimal settings for high-speed printing with capron (nylon). conclusions from them. On the organization of a good supply of a nylon rod in an extruder. Everything is very exciting and dramatic.
A lot is written about 3D printers now, they write with enthusiasm, many models and technologies are described, as well as many of their skills. And now, I am standing in front of you, a simple Russian man from Lithuania (C), with a 3D printer. Of course, I assembled it myself. Not from a set - a year and a half ago, there were few sets, and they were expensive. I planned and chose everything myself, focusing exclusively on the Internet. But I don’t want to talk about this, I want to talk about what happened later - after it was built, and I think the questions are - Why is this? - What can he do? - Why are they buying it? - many people who are passionate about technology ask themselves.
Let's go in order: first I built it.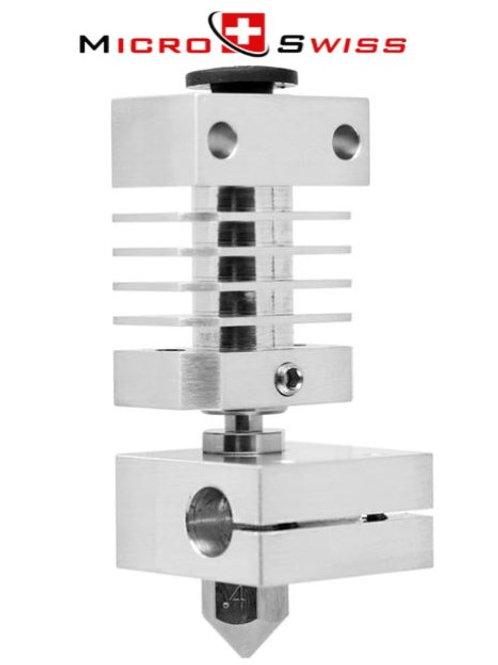 It was very interesting, in the sense that I had to constantly solve many technical issues, find the reasons for abnormal work - by calculation, often by indirect signs. A sort of game of technical riddles. Earned. Adjusted. I saw a lot of possible improvements. Made a few - with great pleasure. Then he developed a really convenient end sensor assembly for the printer. I even sold it once. Well, a set of sensors - you won’t get rich on this, but what a pleasure I got from the sincere gratitude of the buyer. Having fiddled with the print head, I was convinced that, despite the good workmanship (branded MK IV), it also has a number of drawbacks. Yes, and there was only one - and buying more is expensive. I developed my own - you will laugh, the first time something turned out, although not perfect. True, I didn’t blind like that, but carefully studied what was available, read what they wrote, and only then did it. Then he began to understand. Set up experiments. There was a long break - disappointment and depression, but this is not connected with printers, so, a straw that broke the elephant's back.
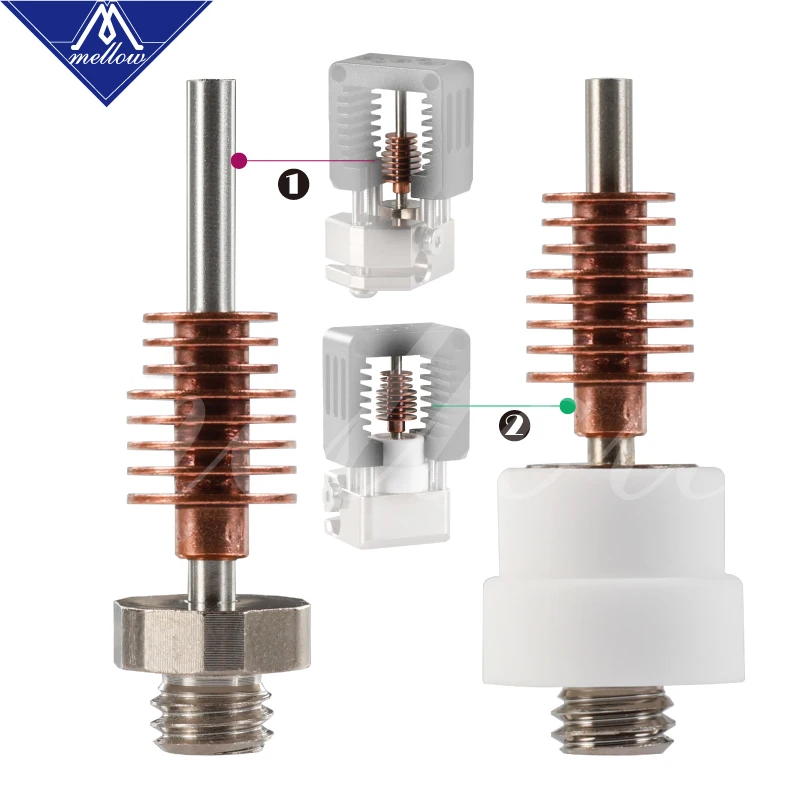 Now I have 4 heads, different diameters, and the printer prints three times faster than is considered normal and prints with a layer of 150 microns. Moreover, it prints not with expensive imported filament, but with cheap fishing line for trimmers. It turns out very, very strong, although not without tricks.
Let's talk further about the picture, but now:
So, definitely, I got a convenient tool to make a little thing out of plastic and a lot of positive emotions from technical creativity, improved my skills in solving technical problems. Something like that. But don't forget that I was being trained as a scientist and chemist-technologist. i.e. I already had certain skills and owned the methodology for finding the result, besides, I was also an amateur electronics engineer and computer scientist.
So the mass character of this method of acquisition is questionable. Now I was reading another article on Habré about Them, and it reminded me of something . .. since I have old scientific and technical journals, I can remember. So, in the 60s, 70s, 80s, more and more was written everywhere about the wonderful possibilities of computers, they became more and more, they became smaller, and in life they appeared little by little and from afar. Then they will bring a printed sheet with the calculation of the salary - it’s also with errors! That train tickets, in Moscow, suddenly becomes unusually good to buy. Then Household Computers appeared - BK-0010, Radio-86, Mikrosha - they were mainly used for their own technical creativity, it was difficult and inconvenient to actually apply them. They came up with thousands of unconvincing and inconvenient applications, they were modernized - I had a Radio-86 with 56K (!) Memory and 64K ROM (!) - it contained all the necessary programs, and at that time there were areas in industry where there was no computer no longer manageable. But how far they were from the people! (C). It was very similar to the current situation with 3D printing now: - a lot of "radio amateurs", fiddling with their small FDM printers (i.
 e. - those that print in a trickle of something), and at this time, dentists and jewelers are already using them to the fullest. Doctors, so far in single copies - but they are used where, due to the singularity of production, it would cost too much
It turns out that we have received another tool for the development of technical progress. So far, only this. But medicine is at a low start, it is preparing to start using them actively, and this is understandable, medicine is a science-intensive industry. You can probably find quite a lot of such places, but it would be dishonest to lay out to Habr's readers only a bunch of bare reasoning - even if it's on the topic, even if it's honest.
So, today I want to tell you about how one of the components of our home printer works - the print head. You say - yes, what is there interesting! The plastic melts and flows out through the hole. If in three words - then so, but dozens of different models of heads fall under this definition, among which there are completely unsuccessful ones - people constantly clean them and curse dirty plastic. Oops, I have some doubts about that. There are heads that will only work fine with PLA-polylactide. Although it is very environmentally friendly, it is far from being good everywhere. Rather, it is good because it is easy to make a cheap and stable printer for it. There are heads that degrade quite quickly from work, especially when working at high speeds and with plastics that are not too fusible. I will try to tell you in an interesting way, the general patterns, which I partly dug up on the Internet, partly found myself - I had to put a lot of experiments and think a lot, it happened to get confused in all this, so if my opinion does not coincide with yours, please do not strongly beat, and take into account what I write based on the results of measurements of my system, so they may differ from the usual ones. I tried to check everything - to one degree or another. Think, try, maybe you will benefit from this information.
So, let's talk about the heads of the most common type of printers so far - printers, where a line of one or another plastic turns into a printed object.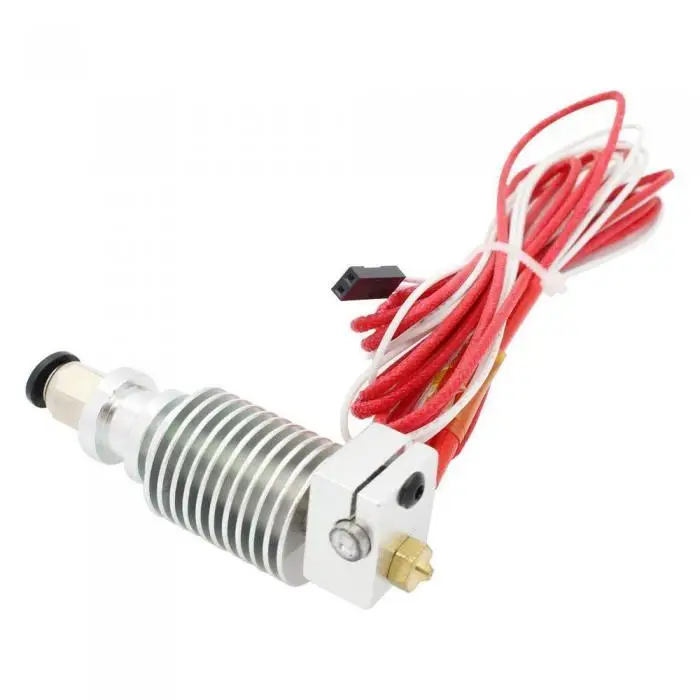 Fishing line is usually called filament or welding rod. Its material is usually ABS plastic, which means - Acrylonitrile-Butadiene-Styrene - a fairly common plastic, PLA-Polylactide is also common, this name in Russian is correct, despite the direct translation from English that contradicts it - this polymer is specially produced for 3D printers. However, theoretically almost any thermoplastic can be used. In practice, they use - nylon / nylon, polyvinyl alcohol - it can dissolve in water and others. PLA plastic is loved by printer manufacturers because it has the least problems, parts from it are obtained in almost any conditions. There are rumors of craftsmen printing on many other types of plastic.
So - the part of the printer in which the filament melts and the molten polymer stream is squeezed out is called the print head. An important part of it is the extruder, a unit that captures the filament and pushes it into another, heated part of the head - the hot end. She is in the picture above. Let's look at a picture of a hot end in a section, and how the temperature is distributed. Must thank colleagues at reprapology.info/archive/1422/rheology
- from this page I got the initial idea of how the melting and extrusion of the melt thread from the head takes place. A little bit according to the scheme: purple outside the head is a heating coil made of nichrome or kanthal, however, a resistor is often used as a heater in heads - this is convenient in production, but reduces the reliability and uniformity of the heating field, since the resistor is located locally, therefore it experiences local overheating . However, there is no fundamental difference here - a resistor or winding.
The red at the bottom of the head is the zone of molten polymer, it is not uniform, since the polymer changes viscosity over a range of temperatures, and the orange zone is the area where the polymer has already warmed up to plasticity, but is not yet fluid. This zone is very important - in it the plastic rod expands slightly, fits snugly against the walls and turns into a piston, which pushes the melt through the outlet - the die. Green - the zone where significant changes in plasticity have not yet occurred and the bar transfers pressure further without crushing. Different shading depicts a brass head and an aluminum heatsink. The fluoroplastic guide tube is highlighted in white, because of the very low friction, the rod passes through it with minimal resistance. Gray - stainless steel tube carrying the head and heatsink, as well as a liner ring - it avoids mechanical stress on the Teflon tube in the hottest part. This is important - Teflon, under such conditions, is extremely mechanically fragile, so here it rests on steel everywhere - it can leak a little, but not soon, and this piece of Teflon tube is very easy to replace. The stainless steel tube is soldered to the brass head with silver solder, so there are no questions about thermal stability and strength. The ring (polished from the inside to reduce friction!) is simply inserted inside and pressed down with a Teflon tube from above. Please note - stainless steel should be with low thermal conductivity, for which it was chosen.
 Usually it's something like X18H10.
On the left, in the picture, you see the temperature plot (approximate graph) along the axis of the tube. I can't vouch for the accuracy of the scale, but the directions must be correct. The farther from the axis with zone markings, the higher the temperature. So let's describe by zones, starting with the last : Top - everything is cool.
Zone 6 - the temperature rises evenly down the tube, since stainless steel has a low thermal conductivity, so the growth is quite fast. There's nothing special here. The Teflon liner works in good conditions, the filament warms up slowly, the heat passing through the tube is dissipated by the upper radiator or holder.
Zone 5 Due to the fact that in it, a small aluminum radiator is put on the tube, the temperature is almost constant and lies in the area no higher than the beginning of the softening of the plastic! The heat flowing through the tube from zone 4 has time to be dissipated by the radiator - since the tube in zone 4 is a thermal barrier between the hot and cold parts.
Zone 4 - active plastic softening zone, thermal barrier zone. Its length is not great. Here the plastic begins to heat up to form a cork, which serves as a piston pushing further and further. As colleagues from reprapology.info have shown, if the piston plug increases in length, this leads to printing stops due to increased friction and excruciating cleaning problems. To prevent this plug from growing, a small radiator is used above, in the 5th zone. With the influx of heat through the stainless steel thermal bridge, it heats up, which means it begins to dissipate more heat. Thus, the process self-stabilizes and it becomes not at all difficult to get into the area of stable operation. The heat dissipation by the heatsink is high, and the thermal resistance of the bridge between the head and the heatsink is large, so the temperature rise with distance is high, which means that the optimal operating temperature point for creating a short, efficient piston is likely to fit in this segment.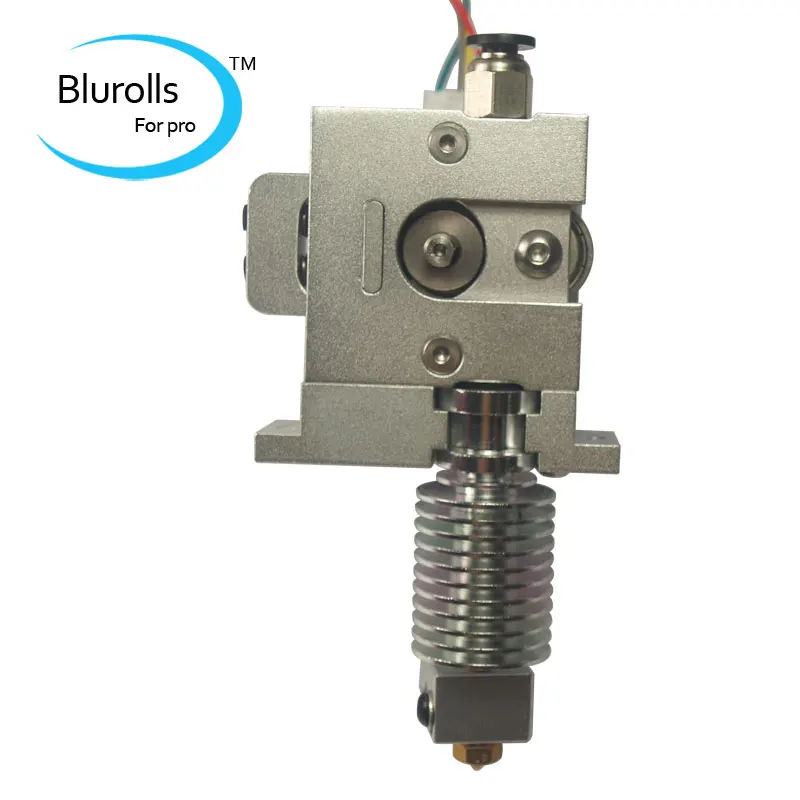 I didn’t even have to bore the stainless steel tube into a cone, as they had to, just slightly polished so that the Teflon liner went in and out well. The ring-liner polished well - from the inside, of course. The size of the lower radiator must be selected so that its temperature is in the region of 100-110 degrees, probably (this is the usual temperature of the printer's desktop). This is done so that as much of the thermal barrier zone as possible is within the likely operating temperature range (plugging!). So, in short, for stable operation of the head, the existence of a narrow zone with high thermal resistance (it is called a thermal barrier) is necessary, in which the temperature would change over a short distance from the operating temperature (we consider 235) to 100 degrees - approximately the temperature of the desktop. I consider it inexpedient to cool the lower radiator below this temperature - it becomes more difficult to control the actual width of the plug formation zone, and a lot of heat does not leak upward through the stainless steel tube, and unnecessary energy losses.
 Yes! Important! Most heads are rated, or work better, with continuous airflow from a small fan!
Zone 3 - I believe that it is in it that the final formation of the cork takes place, since there is quite a strong heating, this is the junction of the brass head and the steel tube. However, this heat somehow works to melt the filament.
Zone 2 - zone of active melting. When pulling a bar out of a working head (experiments), it was clear that the central part at some distance from the walls remained unmelted, that is, as the theory promises, melting occurs from the walls to the center of the bar. The zone of active heating is chosen quite long - a centimeter and a half. For a rod 3 mm in diameter, this matters, since it warms up more slowly, and it is also more convenient to wind the heater - there is room to turn around.
Zone 1 The temperature is almost stable, gradually decreasing towards the nozzle, it is good to place a temperature sensor here - it will show the temperature closest to the actual temperature of the outflowing melt.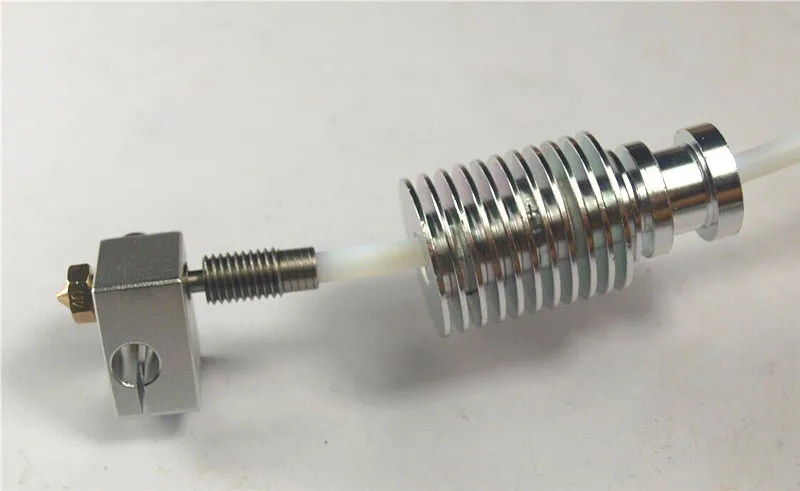 The overall length of the brass part is the same as the popular J-Head Mk 5-VB.
It should be said that the absence of threaded connections at the junction of the heated part and the stainless steel tube - a thermal insulator, is fully justified, since the melt does not seep through, and the thread with plastic that has got inside is still difficult to unwind. It was not difficult to clean the hot end in case of changing plastic and sometimes freezing - I turned on the head for heating, waited, took out the filament with the reverse of the extruder, helping with my hand, I squeeze out the liquid residues with a bamboo barbecue stick through the die - the diameter is just right. If it is really necessary, the melt can be removed with a drill - just let it warm up along with the plastic until the latter melts. Fluoroplastic, too, when hot, is pulled out easily.
More about why all-metal hot ends are becoming more and more popular. Yes, plastic gives much less friction than metal, especially if you take fluoroplastic. The only trouble is that fluoroplastic (Teflon) under mechanical load flows and bends a little, even at ordinary temperatures. This property of it led to the almost complete disappearance of structures where Teflon played the role of a thermal barrier. It turned out bad. It remains to use it as internal liners - where there is nowhere for it to flow, and a slight curvature of the channel does not lead to anything unpleasant, and the tube liner, if necessary, can be easily removed and a new one inserted. However, I haven't had to change them yet. To take out to see - took out, but to change - no. Here he is out of competition - very slippery. For a thermal barrier, another type of plastic is often used (as in the photo above) - PEEK. It is a significantly stronger, more heat-resistant and less slippery plastic. By the way - both expensive and scarce. The problem with the heads where it is used is that the maximum operating temperature there is about 250ºС. Above, the risk of leakage through the threaded connection begins.
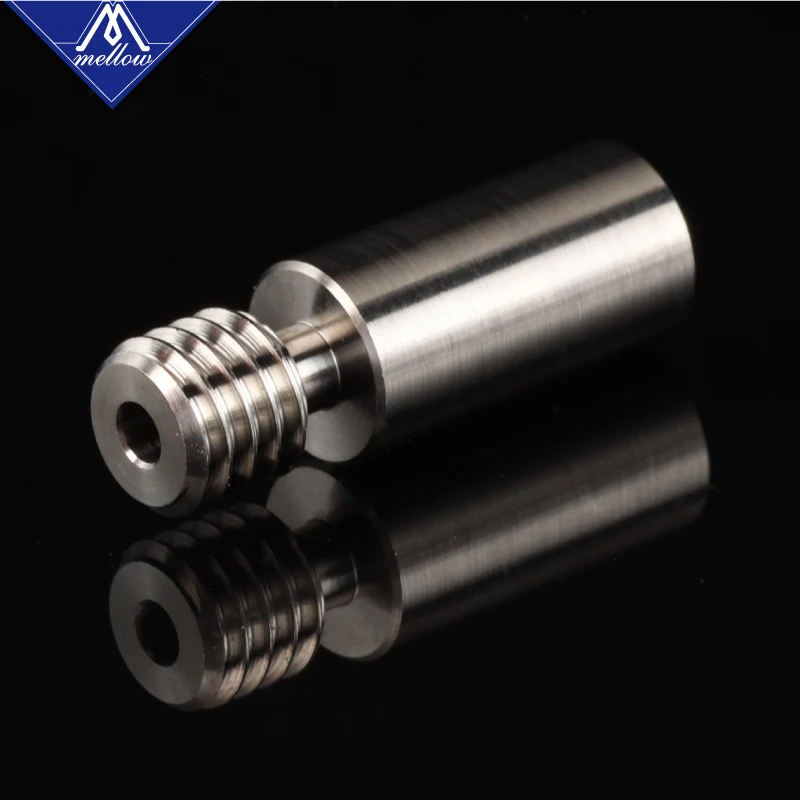 However, usually these temperatures are enough.
Now about the printing itself - look at the drawing, at the end of the hot end there is such a patch around the die, it serves to smooth out the protruding stream of plastic. When printing, the layer height is specified in the settings - it is always less than the die diameter. For example, for 0.35 mm, the height can be both 0.2 mm and 0.25 mm, it depends on what we need. Thus, a trickle of plastic, squeezing out in the form of a cylinder, is smeared with a patch at the end of the head. With a small smear, the worst connection between the layers is obtained, with a large one, the line width increases, which means that the print resolution decreases. On the extruded fishing line, even if it is completely even, you can see bubbles - this is water that the filament could collect. ABS - captures moisture from the air weaker, capron - stronger. Moreover, when printing with wet nylon, the product turns out noticeably softer, and even slightly lighter.
In order to be able to somehow evaluate the capabilities of the heads, I undertook a series of experiments. The main parameter that interested me was speed. The Pronterface program that controls printing allows you to manually set all print parameters: head temperature, desktop temperature, extruder feed speed. The thread was squeezed into the air - the complete absence of other obstacles. It was necessary to estimate the yield of a plastic thread by weight - due to the significant heterogeneity of the thread along the length. This is due to the non-uniformity of the weight of the extruded filament acting on the filament at the exit of the nozzle, where it is most easily stretched. In order to avoid the effect of plastic leakage during idle time, before the measurement, a command was given to extrude a small piece, when the extruder stopped, the extruded piece was very quickly cut off and the measuring section was already started for extrusion (quite large - 10 cm of filament).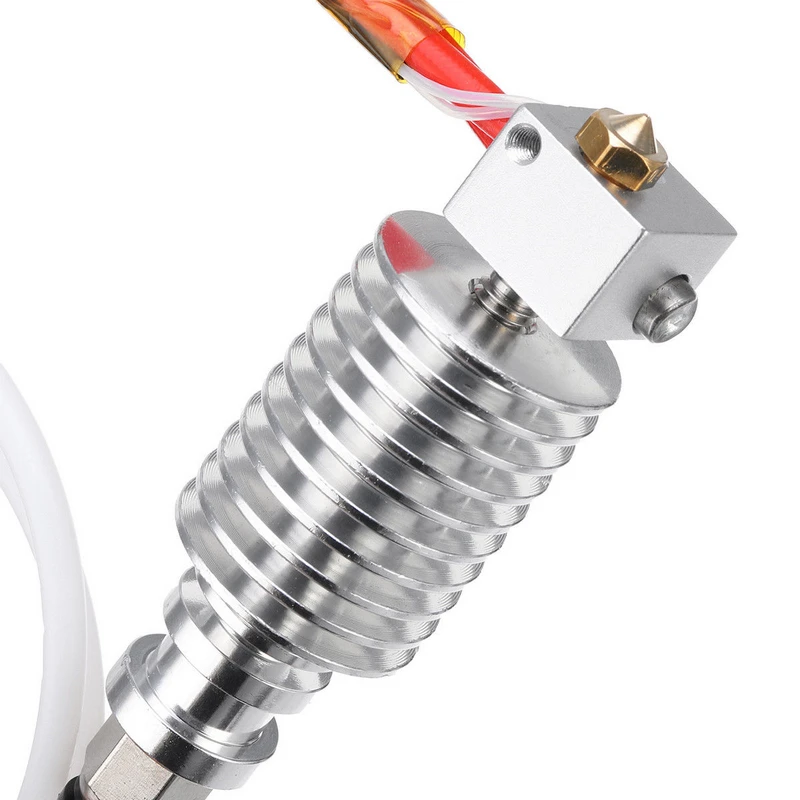 It was also necessary to take measures against the revealed phenomenon that appeared at very high feed rates - the hobbolt began to gnaw out part of the material due to slipping. This could introduce distortions up to 20% by weight. Therefore, after measurements at high speeds, 10 cm of filament had to be simply drained at medium speed - or rather, I was not guided by speed - it may differ depending on the diameter of the nozzle, but was guided by the difference in the theoretical weight of the supplied piece of filament and in reality squeezed out.
If the difference is 2 or more times, then the damage to the filament was great. I'm talking about nylon printing - ABS is not very interesting to me, there is nothing particularly exotic. Maybe later. If I get a small, precise lathe, I can try to make even faster printing, it will be possible with ABS.
And here is another head - my work, let's call it BASS (Brass-Aluminum-Stainless Steel) materials
So, having taken all these measures to avoid mistakes, I began to press the plastic at different speeds, temperatures and heads, and this is what found out:
1. Head J-Head Mk 5-VB - native, USA, 0.4mm nozzle.
I brought to the speed of the plastic thread at the nozzle exit - according to its diameter.
I do not give tables of experiments here, only conclusions. At a filament feed rate of 130–200 mm/min, the flow rate at the nozzle exit reached a maximum of 90 or 120 mm/s. For capron and ABS, respectively. A further increase in feed only led to a decrease in extrusion. The slippage grew, the chipping grew, the speed did not grow. However, raising the temperature from 240°C to 245°C increased the flow rate by 25%.
It is clearly seen that here insufficient heating of the plastic limits performance.
I didn't raise the temperature much for this model, because it's close to the recommended limit.
2. Now the BASS-0.6 head - with a nozzle diameter of 0.6 mm, and at a temperature of 230ºС and at 240ºС,
at 264 mm/min filament feed, the limit was not reached. In this case, the shear speed was about 90 mm / s, which, due to the larger nozzle cross section, corresponds to a plastic flow rate of about 200 mm / s for the Mk 5 head! At the same time, slippage was only about 20%, that is, the speed could be increased! Melting efficiency was much better, probably due to the annular winding and mini-radiator design (shorter piston plug).
3. Now the BASS-0.6 head - 0.3 mm diameter - is the thinnest nozzle I could make.
It is clear that here the performance rests on the resistance to flow in a narrow nozzle.
To do this, I did a series of experiments at temperatures of 240ºС, 250ºС and 260ºС. With each rise in temperature, the maximum speed grew and rested at 95 - 110 - 140.
Then I did one more thing. He laid out a strip of fine sanding paper (600) on the desktop, lowered the head to a slight pressure (in the cold, of course) and began to drive back and forth. Lowered three times by 0.1 mm, when it became easy to grind. This gave strict parallelism and reduced the narrow channel of the head by 0.3 mm. This action gave a speed of up to 170 mm/sec.
So I got for myself a fairly accurate knowledge of the maximum speeds at different temperatures, as well as the feed defect for these conditions. That is, how much less plastic will actually flow at this speed. After that, he introduced a plastic feed correction of 1.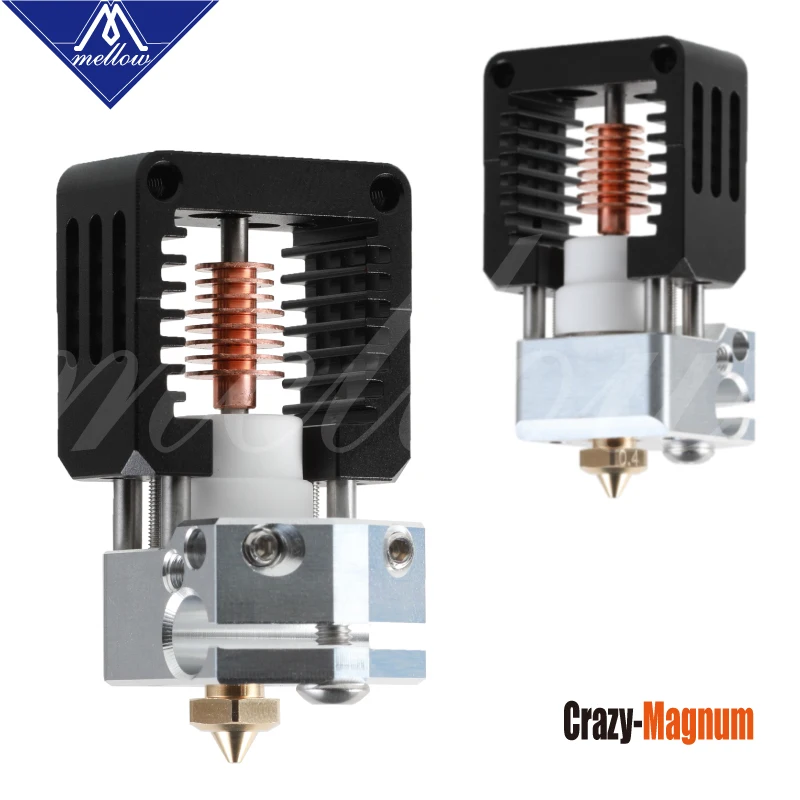 25. I set the temperature to 260ºС and made all the speeds in the settings close from 90 to 140 mm / s.
When the hot head is idle, without any pressure, quite a lot of melt can flow out of it, then on the start command - extrusion will begin only when the entire void in the head is filled. Sometimes because of this, I had problems with the adhesion of the first layer - and this is critical! Now, before starting printing, I warm up both the table and the head to operating temperature, give the command to extrude a small amount of the bar at medium speed, and then give the command to print the model. In this case, the thread starts to go immediately (more precisely, it does not interrupt) and this cause of poor adhesion is eliminated. Also, an important point - I took the working temperature of the printing table at 50ºС, I tried 100 and 110, the adhesion turned out worse, but the peeling was better. It is very, very difficult to peel off a nylon product from Kapton tape on a cold one.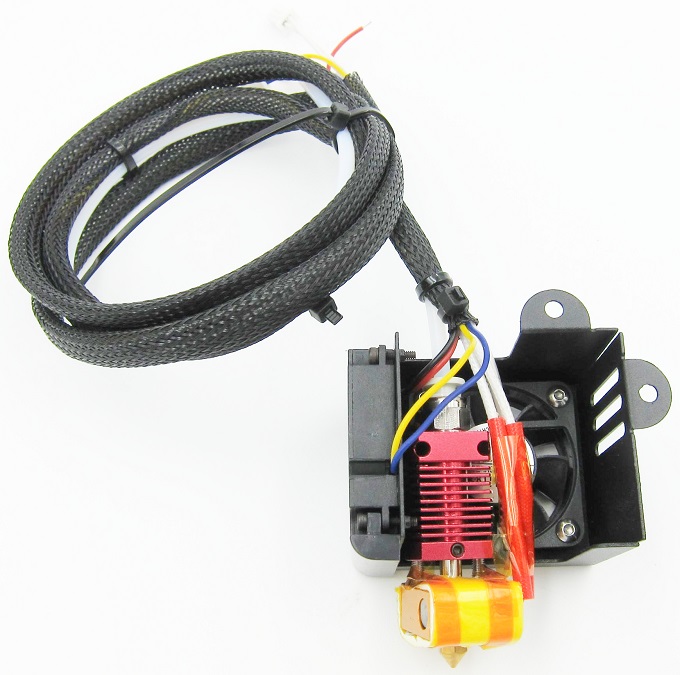 Kapton is a sticky film that is glued to glass and is a common and convenient substrate for printing - almost everything sticks to it well, and when necessary it peels off. So, now I print at 50ºС, and when the printing is over, I turn on the heating of the table at 100-110ºС, wait until it warms up and start to separate. It works out much better.
It is also important that with a solid product made of nylon with dimensions of more than a few centimeters, its edges begin to bend upwards, lagging behind the substrate. A skirt (an available feature to counteract this phenomenon) helps little. That is, it helps, but the plastic is so hard that if it does not separate the skirt from the kapton, then it locally separates the kapton from the glass substrate, this is true, not so bad, but ... Facilitates the situation, low filling density, thin walls and the absence of solid arrays - holes, cuts, bends. The decision has to be made at the product design stage. ABS - does not have such a degree of deformation, although it exists, but less. And PLA, they say, does not have this property at all. ABS plastic, moreover, perfectly breaks and cracks - it is quite fragile, but it sticks together perfectly. A drop of acetone in the crack, after 10 minutes everything is fine again. Kapron, on the other hand, does not stick, although it does not break, it is quite flexible.
So, everything worked out. In some places, in the first layer, uneven spreading is visible - but the first layer ... Of course, for precision printing, you can and should reduce both the speed and temperature, but I really liked the result that I got. Now the main thing is to learn how to design products correctly. So that they do not bend and it will be very good. Raising the temperature to 270ºС did not work for me due to a limitation in the printer firmware - I will have to redo it. Trying to apply 265ºC - did not give any increase - is the minimum viscosity reached? We must try to make a head with a different configuration of the internal part to further increase the speed.
Thus, I got tables, according to which I can say at what maximum speed (and, accordingly, set it in the slicer settings), at a given temperature, nylon will be crushed through a nozzle of a given diameter (0.3 and 0.6 have been tested Good). In this case, I will know the amount of the Extrusion Multiplier correction. With a nozzle diameter of 0.4mm, the maximum speed can reach 200mm/s. This is an estimate, you can check if there is a working BASS head by 0.4 mm, but you need to shorten the thermal barrier tube.
An important point in the print head is the feed mechanism of the extruder. The efficiency of its work determines the quality of the print. Printing with nylon makes especially high demands on this mechanism, because nylon is rigid and slippery, in order to effectively push the hobbolt bar, it must crash into it. This only works if the hold down springs are strong enough and the knurling of the hobbolt needs to be very sharp. More precisely, two points. A hobbolt is a bolt, with risks applied around the circumference, which, when pressed against the filament, capture and advance it in the right direction. If you're using 1.75mm filament it's probably not that important, but if it's 3mm and you're trying to print with nylon/nylon, there's a very good chance your hobbolt will start to slip over the stiff nylon. So I use a diamond cut hobbolt - I got the idea for it from Prof Braino's Prusa Build Log
In general, it grabs everything well, only on soft ABS, with excessive pressure, it can crumble the rod - like a grater, if there is a plug in the head - well, here it’s already in any way, the problem needs to be solved, and it doesn’t in a hobbolt.
For a filament diameter of 3 mm and a Wade extruder, the total spring pressure should be in the region of 7-20 kg. This, of course, may depend on the design of the extruder.
In conclusion, it should be added that an extremely important parameter of the print head is weight and this is understandable, it is difficult to move a heavy head at high speed, these are unnecessary loads, chassis vibrations.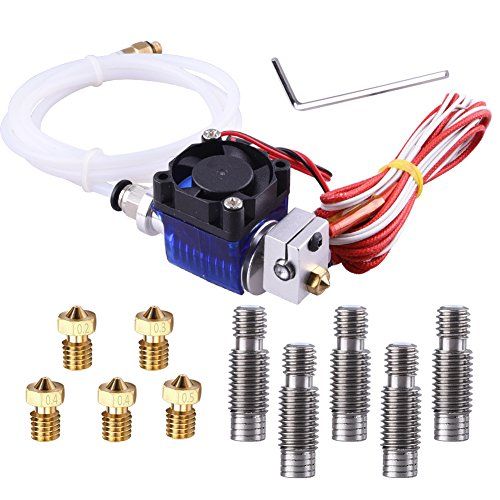 One of the solutions -bowden extruder, consists in separating the extruder with a motor and the hot end, and unfortunately, it has its drawbacks, so I did not use it, as I focused only on the simplest and most reliable solutions.
With this I stop permitted speeches (C). It would be necessary to build tables for 0.4 and 0.5 mm heads, for ABS, we should try to change the internal profile of the head - there are such bastings that should help.
3D Printer Extruder - Complete Manual Heatle
Learn the basics of direct drive and Bowden extruders, hot and cold ends, nozzle sizes and materials, and find the best 3D printer cartridge for your needs.
The 3D printing process can be briefly described as follows: a filament of plastic material is fed into a heated metal block with a nozzle, where it is melted and extruded in a given form. This path is repeated, gradually building up until a solid three-dimensional object is formed.
The entire business task of handling the material, melting it and exiting for printing takes place in a block called 3D printer extruder .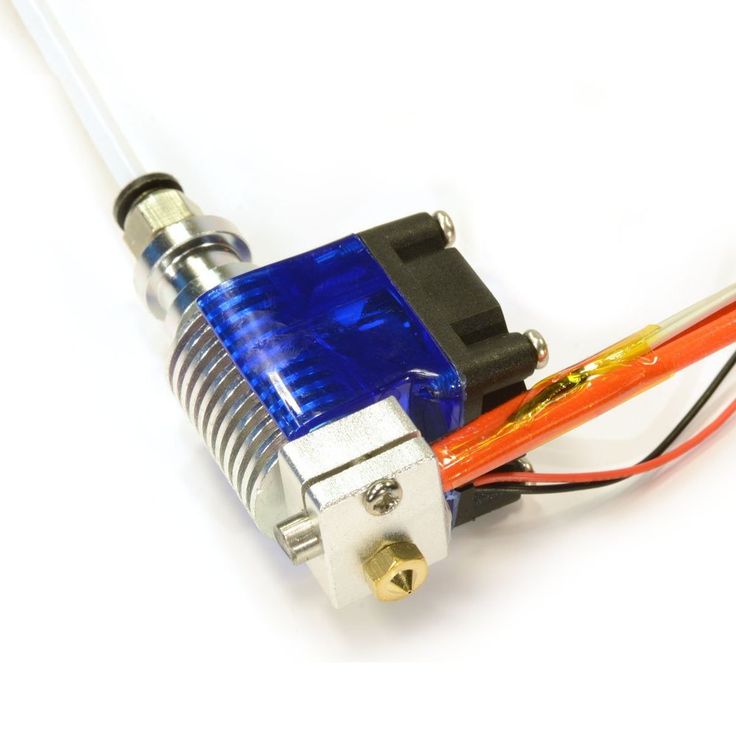
In this article, we will look at the main sections of the 3D printer extruder, the options and advantages of different styles of extruders, popular models on the market, as well as cartridge heaters for 3D printers and other items.
What is an extruder
The 3D printer extruder is a set of parts that together process and move plastic filament.
Some consider the extruder to be just the motor and associated parts that push and pull the filament, others the entire assembly including the heated part that melts and deposits the filament.
For simplicity, this article treats the entire assembly as an extruder. To begin with, while explaining the key components of a 3D printer extruder, we will divide it into two elements: a cold zone and a hot zone.
Cold zone
As the name implies, the cold zone is exactly that - cold. This is the top of the 3D printer's extruder system, where the filament is fed into and then passed into the hot zone to be melted and extruded onto the print bed.
The appearance and location of the cold zone on your 3D printer depends on whether it is a direct drive or Bowden drive extruder (both of which are detailed below).
There is no filament heating here. The cold zone consists of the extruder motor and gear train, which are usually mounted either on the printer frame or on the print head itself, depending on the type of extruder, and a PTFE tube to smoothly guide the filament into the hot end.
What happens in the cold zone?
With the heatsink removed on this e3D Titan Aero, we can see the inner workings of the 3D printer's extruder.
Essentially, the cold zone consists of a stepper motor, some form of gear, a toothed bolt or gear, a spring-loaded idler (usually a bearing of some kind) to hold the filament, and then a PTFE tube to guide the filament.
A humble stepper motor with a metal gear required for a 3D printer's extruder drives the filament extrusion in most if not all modern desktop 3D printers.
However, one stepper motor is not enough to feed the filament to the hot end. The parts attached to and operating the stepper motor drive shaft must physically grab the filament and push it on its way to the hot end.
In this cutaway view of a 3D printer extruder, we see a metal gear and a plastic gear with a toothed shaft.
This usually uses a combination of toothed gears and toothed bolts or shafts (in the image above we see a metal gear and a plastic gear with a toothed shaft) serving as a pressure wheel along with a bearing or other rigid frictionless material.
Here we see a plastic lever with an integrated bearing, an extension spring and a plastic gear with a toothed shaft. Together they apply pressure to the filament and force it through the extruder.
Alternatively, there are versions of the cold end of the 3D printer extruder that use a slightly different arrangement of parts to feed the filament. Such deviations are often claimed to provide increased traction and yarn delivery.
Here we see both sides of the Prusa i3 Mk3 cold end, including the Bondtech extruder gear train.
As mentioned, there are varieties of 3D printer extruder that use these parts in slightly different layouts. Each has its pros and cons. Next, we will look at what is the difference between a direct drive 3D printer extruder and a Bowden 3D printer.
Direct drive extruders
The Direct Drive 3D Printer Extruder is different in that it places the extruder motor directly above the heating unit. This arrangement minimizes the travel distance of the filament to the hot end and can enable more reliable 3D printing of flexible filaments.
The advantage of using direct drive is more precise retraction control. Due to the location directly above the hot end, there is less distance between the clamp and the thread passing through the thermal barrier into the heating block.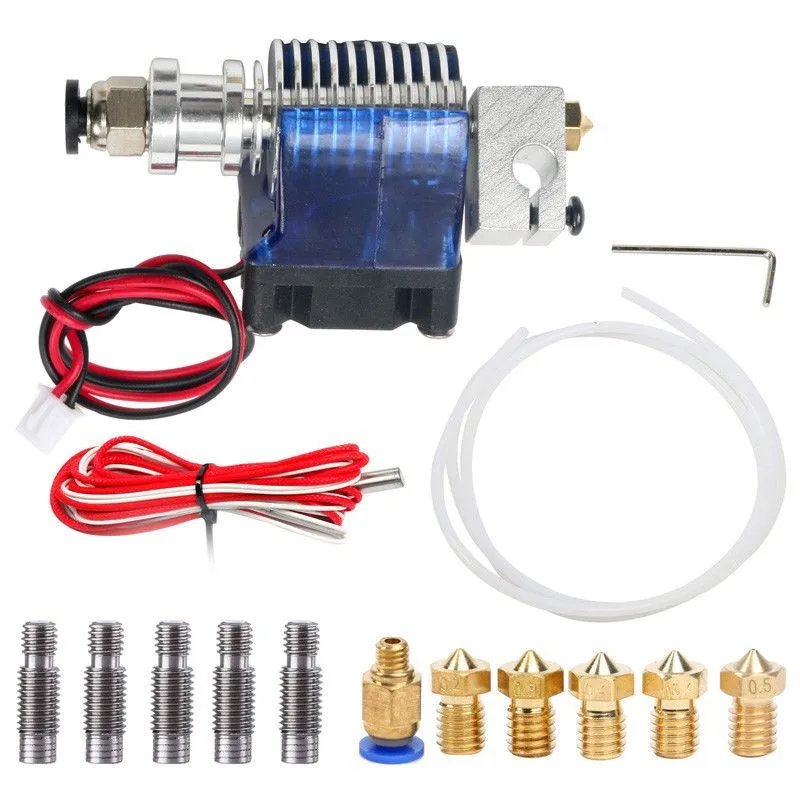 Consequently, the filament has less room to bend and deform under pressure.
Bowden extruders
Bowden Style 3D Printer Extruder The does not mount directly on the top of the hot end like a direct drive 3D printer extruder, but the motor and gear assembly mounts on the frame of the printer. This gives this type of extruder an advantage over its head-mounted direct drive brother: speed.
By placing the mass of the 3D printer's extruder on the frame instead, the printhead is freed up to print at higher speeds without sacrificing print quality.
A side effect of placing the 3D printer's extruder this way is that the filament now has to travel a long way in a tube that's a fraction wider than it is. There should be enough room along the entire length of the tube for a slight bend in the thread. When pulling in the thread between strokes, this slack in the thread shortens the pull-in distance. Without correction (i.e., an increase in retraction), this results in a delay in relieving the pressure exerted on the hot end. In short, you can get confused if you don't change your retract settings.
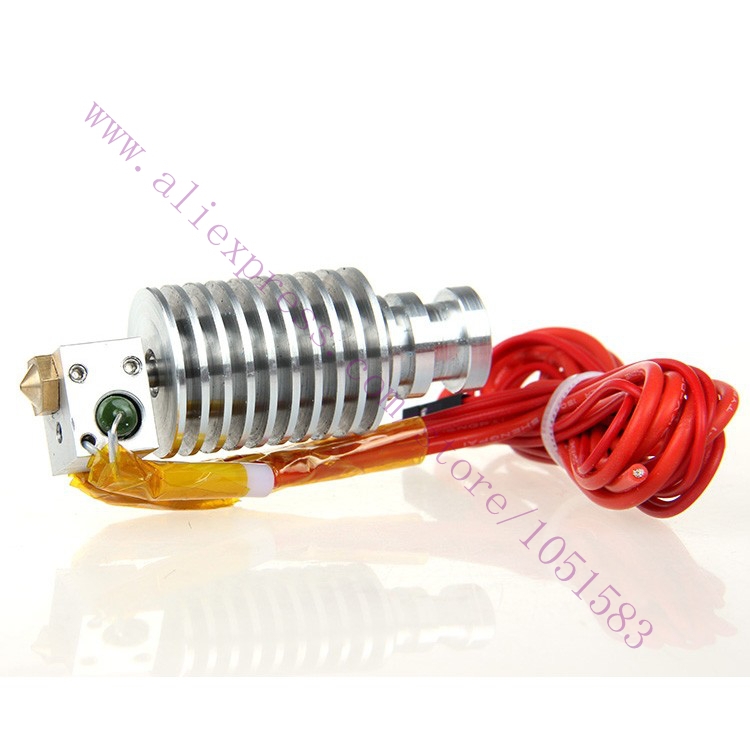
Heating block (Hotend)
Inside the knot, known as the hot end, the filament passes into a heated chamber where it changes from solid to liquid. Sounds simple, and mostly it is. Although there is a lot more to make the filament silky extrude onto the build plate.
What happens in the heating zone?
The E3D Titan Aero combines a heating unit and an extruder in one compact unit. The hot end usually only has the central parts of this image: the heatsink (and fan), the heating element (micro cartridge heater), the heater block, the thermistor, and the nozzle.
A typical 3D printer hot end consists of a certain sequence of parts. There is a slight difference depending on whether you are using PTFE/PEEK or a full metal hot end. Here we explain the all-metal hot block.
First, it is a filament supply tube. In both a Bowden 3D printer extruder and a direct drive extruder, it will just be a PTFE tube coming from your cold filament feeder.
You can sometimes find direct drive 3D printer extruders where the filament runs straight into the print head.
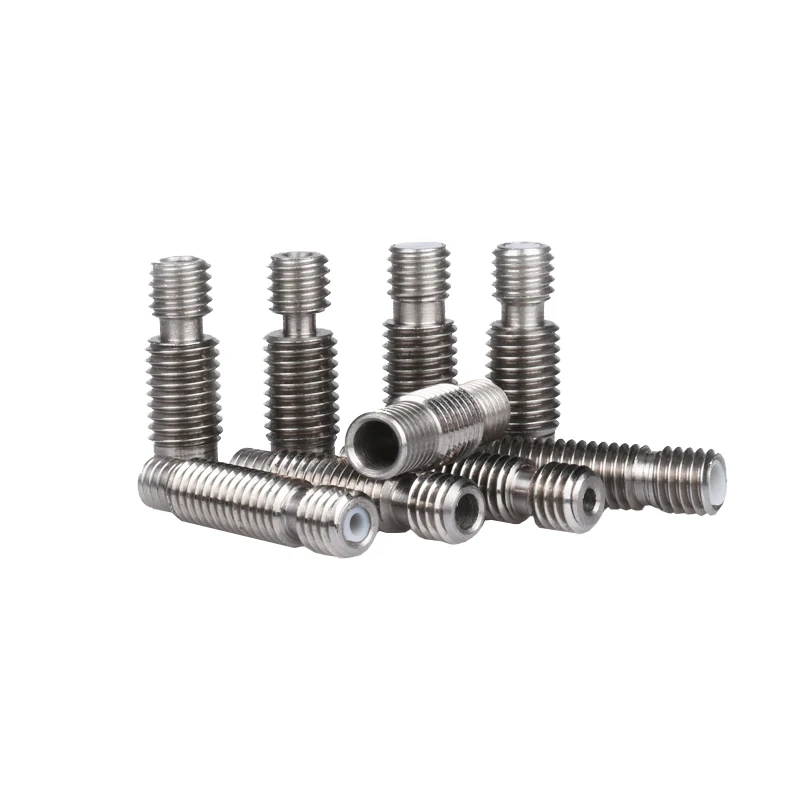
On a Bowden 3D printer's extruder, this feed tube inserts the filament directly into the thermal barrier via a heatsink. The thermal barrier that is screwed into the heatsink is often a threaded stainless steel (or other non-conductive metal such as titanium) tube.
Split in two (note the two separate threads in the image below - longer for the heatsink, shorter for the heater block) and machined on the inside, the thermal break allows the filament to pass freely into the extrusion nozzle.
Clockwise from bottom left: steel thermal barrier, aluminum heating block and brass nozzle.
But since we're dealing with precision and a material that liquefies for rapid recooling, the 's temperature management is critical. The thermal barrier, in combination with the heat sink, maintains a certain limit at which the filament is exposed to high temperatures.
The top, which is actively cooled by a heatsink and dedicated fan, prevents heat from escaping from the hot end and weakening the filament before it is where it needs to be for extrusion. This unwanted phenomenon is known as thermal creep.
The lower part of the thermal barrier is located inside the heater block together with the cartridge heater, the temperature switch thermistor and the nozzle.
The heater block, usually made of aluminum, ensures a smooth transition of the filament from the open end of the thermal break tube to the nozzle.
The temperature to melt the filament has to come from somewhere, and this is where the cartridge heater comes into play. Under the action of an electric current, the cartridge heating element heats up, transferring heat to the nozzle through the heater block, in which they are both enclosed.
Clockwise from top left: heating block, thermistor, cartridge heater, nozzle, thermal break.
Power resistors are an alternative means of heating a hot end block, but they are less common these days.