Scanner 3d casero
6 DIY 3D Scanners You Can Build at Home
Creating a 3D model of a real object can be done extremely fast if you have a 3D scanner at home. The problem is: 3D scanners are expensive to buy new.
If you're looking for a solution, why not try building your own affordable 3D scanner at home? It might not create perfect 3D models, but it's a cost-effective alternative to buying a 3D scanner.
Is It Cheaper to Build a DIY 3D Scanner?
The cost of buying a decent 3D scanner ranges from $700 to $10,000 at the highest end. On the other hand, building a DIY 3D scanner can cost less than $200—some even as little as $35.
Depending on the resolution of your homemade 3D scanner, you will still have to work to tidy up the 3D model so that it can be used for things like 3D printing, game development, or perhaps design prototyping. But overall, it will still speed up the design process when compared to building a model from scratch.
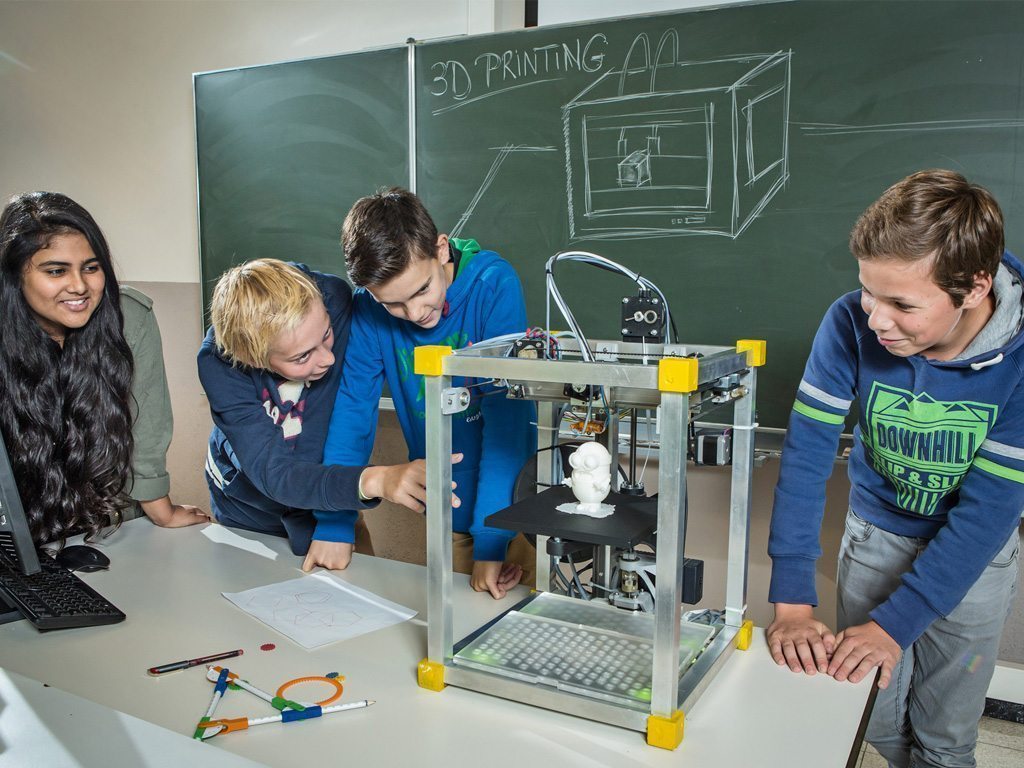
1. Cheap 3D Printed 3D Scanner
This 3D scanner is built using 3D printed parts, featuring both open source software and open source hardware files. If you choose to install the maximum of four lasers, then the cost of the project comes in at $35 to $50. Once it's built, handling the digital scan will require some legwork to smooth out. But considering its price tag, it's well worth giving it a go.
You can find the STL files and a full build guide on Instructables. Besides the 3D printed components, you will need one to four lasers, a stepper motor, a turntable, and an Arduino Nano to bring it all together. One benefit of this project is that it's been built many times by community makers, resulting in plenty of images and feedback surrounding the project to help fill in any gaps.
2. DIY 3D Scanner Using a DSLR Camera
Another option for building a 3D scanner is to use a DSLR camera and a method called photogrammetry. At its most basic, it involves taking a lot of images of an object from different angles and stitching those photos together in a software program to create a 3D model.
Alongside a DSLR camera, you will need an Arduino, a stepper motor and driver, an LCD screen, and an IR LED. The goal of the hardware is to build a rotating platform that moves by set amounts so that your camera can photograph the object in a very detailed and controlled way. You can find a great explanation of the project on Instructables.
The real difficulty of this project comes in processing the photos. A good photogrammetry program is essential, and that can cost over $150 to license. There is some free software available, but it may come with limitations.
If you're wondering if there is an alternative solution, you can read our guide to how to turn everyday objects into 3D models without a 3D scanner.
3. Optical CT/3D Scanner With Arduino
For something a little different, in this project you will build a 3D scanner that also doubles as an optical CT scanner. This type of scanner will do the trick if you have objects that are semi-transparent, like a gummy bear or a segment of orange. Otherwise, you can use this setup with the photogrammetry method for regular 3D scans.
Everything in this build is enclosed inside a box. This allows greater control over lighting the object to produce sharper images. While it involves some woodworking and construction, the hardware is still powered by a humble Arduino Nano, plus additional parts that you can find at any hardware store.
A great guide is available on Instructables for building the box, alongside details for creating a sleek control panel for changing photo parameters on the go.
4. FabScan: Raspberry Pi + Arduino 3D Scanner
This 3D scanner uses both a Raspberry Pi and an Arduino to build a 3D laser scanner. What sets this build apart is that it can be operated remotely via a web browser on a phone.
Much like other DIY 3D scanners, a stepper motor and driver are used to rotate a turntable holding the object you want to scan. Additionally, you will need a line laser and a Raspberry Pi camera. You can find the guide and a full components list on Instructables.
While the creators have gone with a laser-cut MDF box, you can just as easily use spare parts lying around the home to create the enclosure. Alternatively, cardboard can work too, and painting it black will aid in diffusing the laser light so that it doesn't interfere with the scan.
Once you have a good scan of your object, you might be interested in 3D printing it. Haven't got a 3D printer? Here is our pick of the best 3D printers.
5. The Ultimate Human Sized 3D Scanner With Raspberry Pi
While most homemade 3D scanners are built to capture a small object, it's also possible to build a human-sized 3D scanner. The way to do this is with a lot of Raspberry Pis, as you can see over on Instructables.
The maker behind this project scaled up his 3D scanner using a whopping 47 Raspberry Pis plus a Raspberry Pi camera for each module. The goal was to use the photogrammetry method to take a photo of his subject from every possible angle. Because he wanted to capture a 3D model of his two-year-old son, this all had to happen instantly.
Incredibly, it works, and it works very well too. If you have the time and investment to buy a box full of Raspberry Pis, you won't be disappointed because the results are impressive.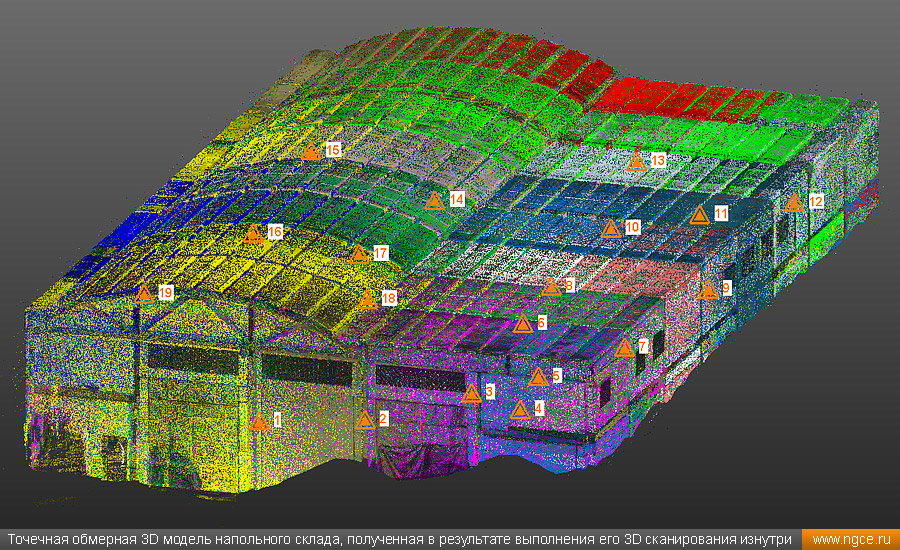 The maker says you can use fewer Pis and cameras and still get good results, especially if you only need to capture the front of a person’s face.
6. Standalone 3D Scanner
Maybe you're just after a simple and small 3D scanner that you can make over the weekend. If so, then this project will suit you. This 3D scanner on Instructables is designed to be all-in-one, meaning that the photos are compiled onboard and an STL file is saved directly to a memory card. Instead of compiling the photos in a separate photogrammetry program, this 3D scanner handles them for you.
While it doesn't produce incredibly detailed scans, it does make for a rapid way to take a 3D model straight to 3D printing. One thing to bear in mind, however, is that the dimensions of the 3D scanner structure need to be kept exactly as written in order to match the code.
Building a Homemade 3D Scanner
Putting together a 3D scanner at home isn't extremely difficult to achieve. When compared to the expensive price of commercial 3D scanners, it's well worth building a DIY 3D scanner yourself.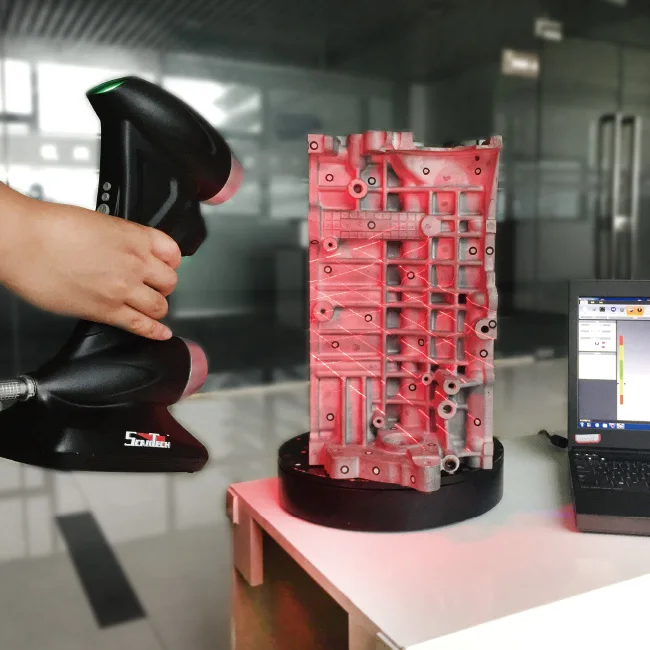
With a Raspberry Pi or Arduino and a few extra affordable parts, you'll be well on your way to creating a cheap and awesome 3D scanner.
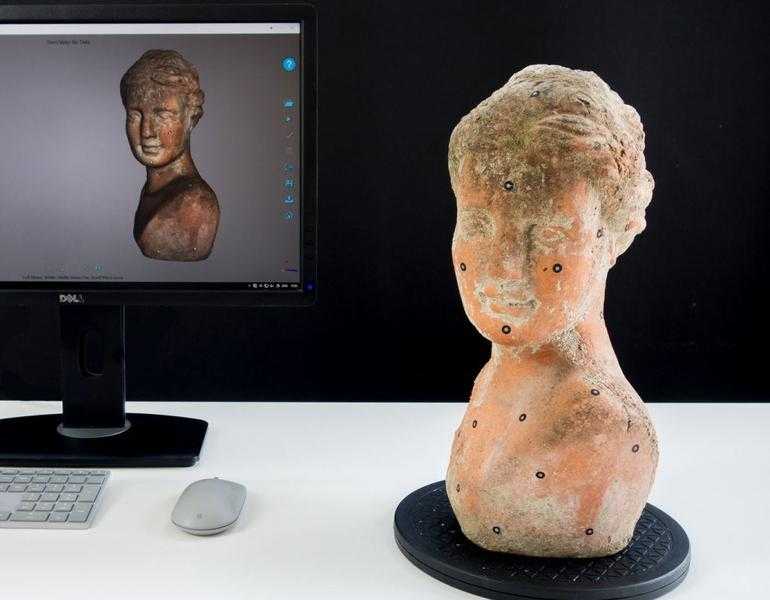
Cómo construir un escáner 3d casero.
Habéis leído bien. Existe la posibilidad de hacerse un escáner 3d casero. Con esta entrada inauguro una serie de post sobre cómo hacerte tu propio escáner 3d. Si no sabes lo que es un escáner 3d puede ver este post, en el que explico en qué consiste.
Existen diferentes formas de hacerse uno y a lo largo de varias entradas intentaré explicaros como hacéroslo.
Para ir entrando en materia, el escáner 3d casero puede ser de dos tipos atendiendo a la forma de adquisición de los datos: de luz estructurada o láser. Vamos a empezar por ver cómo montarnos uno láser ya que su coste es relativamente bajo.
Para hacernos un escáner 3d casero láser necesitamos: Un PC, una webcam, un láser, un panel de calibración, un software e iluminación controlada.
Webcam: Lo ideal es que sea de alta resolución como por ejemplo esta, pero para empezar a trastear vale con cualquiera que puedas tener en casa. Cuando cojas un poco de soltura puedes utilizar una de alta definición para conseguir mejores resultados. Es importante que tenga un trípode o algo para poder sujetarla y que la mantenga estable. Ya que una vez calibrada no vamos a poder moverla.
Láser: Pasa igual que con la webcam, si quieres obtener resultados lo suyo es que te compres un buen laser de línea horizontal. Puede ser con batería incluida o alimentado por cable y que se pueda ajustar el grosor de línea. Aunque también vale un nivel láser que puedas tener en tu casa.
Panel de Calibración: Es el tercer elemento que vas a necesitar para montarte el escáner 3d casero. Consiste en unos paneles, que se fijan a 90º y que contienen una serie de marcadores.
Puedes hacértelos tu con unos contrachapados y pegando encima la hoja con los marcadores impresos. Muy importante que el panel de calibración tenga 90º.
Podéis descargar la hoja de marcadores para diferentes medidas de panel de calibración desde este post o si os descargáis el software del punto siguiente, viene incluido los tamaños más generales.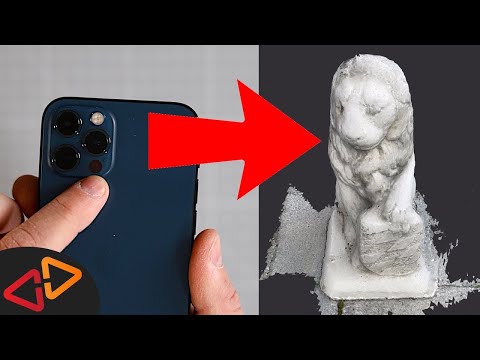
PC: Con el que tenéis en casa os vale apara empezar.
Software: Para poder usar nuestro escáner 3d casero necesitamos un software. Uno que está muy bien y preparado para usarlo con diferentes webcams es el Software David 4. Pertenece a la empresa David 3d Scanner. Podéis Descargarlo desde aquí. Una vez instalado podéis usar todo el programa, la única pega es que, sin licencia, no os dejara exportar los escaneados que hagáis en alta resolución. Lo bueno que tiene, es que la licencia, no es cara en comparación con otros softwares de este estilo.
MODO DE USO
Deberemos tener lo que yo llamo “la zona de escaneado”. Debe ser un sitio, a poder ser oscuro, en el que podamos controlar de alguna manera la iluminación. Tiene que tener espacio suficiente para poder colocar el panel de calibración, la pieza a escáner y la webcam con su suporte. Hay que tener en cuenta que la webcam debe ser capaz de tener en su campo de visión todo el objeto. Con lo que para objetos pequeños deberá estar cerca, pero para uno grande tendrá que estar más separada. Un poco apartado de todo ello tendremos que tener el ordenador.
El espacio es importante porque si vamos a escanear un objeto girándolo 360º deberemos estar rotando la pieza después de cada escaneado, con lo que tendremos que acceder a ella y girarla manualmente sin mover la webcam ni los paneles de calibración. Para ello, ayuda tener una base giratoria.
Un hándicap que tiene este modo de hacerte un escáner 3d casero, es que es manual. Esto quiere decir que tendrás que sujetar con tu mano el láser y moverlo arriba y abajo y viceversa durante varias pasadas. Esto tiene sus inconvenientes pues se necesita mucha práctica para poder conseguir escaneados buenos. Pero no os asustéis, existe la posibilidad de motorizar el escáner, pero lo veremos en otras entradas.
Os recomiendo que empecéis por escanear cosas de un tamaño medio. Más o menos de unos 15 cm. Y si veis que se os da bien continuéis con objetos más grandes y más pequeños.
No os desaniméis cuando veáis que vuestros primeros escaneados son malos.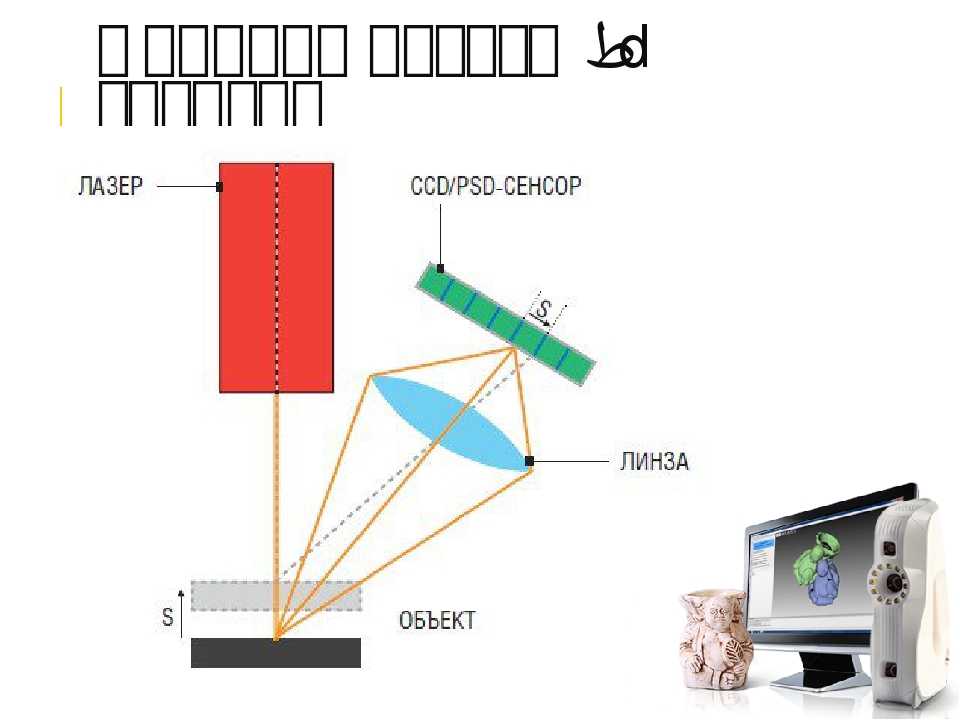 Porque van a serlo. Conseguir una buena técnica de escaneado con este sistema se consigue a base de muchas horas y muchas pruebas. Como he dicho anteriormente la iluminación es muy importante, pero también lo es el material del objeto y su textura. No es lo mismo escanear un objeto de madera que una porcelana. Evitar los objetos brillantes y que produzcan reflejos.
De momento hoy llego hasta aquí. Os dejo un tiempo para que os hagáis con una webcam, un láser y os fabriquéis un panel de calibración. La próxima entrada os enseñaré a como configurar el programa David 4 para que podáis empezar a escanear. Es bastante sencillo, por si alguien no puede esperar y se quiere poner a probar.
¡A escanear amigos!
La imagen del panel de calibración casero la he cogido de aquí
3D scanner working with high-temperature materials
Geometry control
Implementation stories
Author: Olga Gorobets
Author: Olga Gorobets
Quality control in steel production | How 3D laser scanners solve quality control problems in metallurgy | FARO 3D Scanner: No More Inefficiency!
The use of 3D scanning for quality control is still a relatively new technology in steel mills. Since the finished product is quite homogeneous, the profits of steel companies are highly dependent on the differences between their own production costs and the overall profitability of the industry. It is in such competitive conditions that the most important tasks of companies are to reduce costs and maximize profits.
Various types of containers are used in the steel production process for transportation and smelting. The impact of molten steel, slag and furnace gases leads to physical, mechanical and chemical erosion of their protective layer. To avoid serious damage to metallurgical equipment, regular monitoring and quality control of containers is necessary.
Let us turn to the experience of China, where steel production is one of the leading industries.
Left: Conventional high temperature steelmaking containers. Right: before carrying out the control, the equipment must be cooled down / Photo: faro.com
Quality control in steel production
Hangzhou Pucheng Teddy Industrial Co. , Ltd. (PUTEDY) is a cutting-edge enterprise with a strong team of experts and young professionals. The company is engaged in research and development in the field of automated monitoring and control in the metallurgical industry. PUTEDY offers professional quality control solutions for slag ladles and converters. With their help, steel companies around the world manage to achieve safe production and reduce costs.
Mr. Shen Guuzhen, Head of R&D at PUTEDY, gives a simple example: "Each ladle should be inspected 2-3 times a day, and it should take a maximum of 10-15 minutes." During this time, the ladle does not have time to cool down, and it has to be inspected at a temperature of 1700 °C. “Even at a distance of 10 meters, it is impossible to withstand the heat from the oven for more than 30 seconds,” Mr. Shen adds.
Left: Harsh working conditions in a steel plant. Right: the classic way to control equipment / Photo: faro.com
Working conditions are affected not only by high temperature and lack of time, but also by factors such as dust, constant noise and vibrations.
Prior to the introduction of 3D laser scanners, workers used classical methods to check production capacities. For example, melting furnaces were either simply visually inspected after cooling, or the integrity of the lining was checked using long iron rods that were placed at various angles, calculating erosion by comparing changes.
The main disadvantage of these methods was that their accuracy depended on the experience of the workers. In addition, there was no way to check this accuracy. This had a very negative impact on the efficiency of metallurgical plants. In addition, direct contact with hot equipment could cause injury to personnel.
Thanks to the high speed of the FARO 3D scanner (up to 976 thousand points per second), the inspection of the inner surface of the container is carried out in a few minutes
How 3D laser scanners solve quality control problems in metallurgy
By adopting modern technology, PUTEDY has become one of the leading companies in the field of geometry control of hot forging equipment, solving the problem of monitoring the erosion of high temperature materials.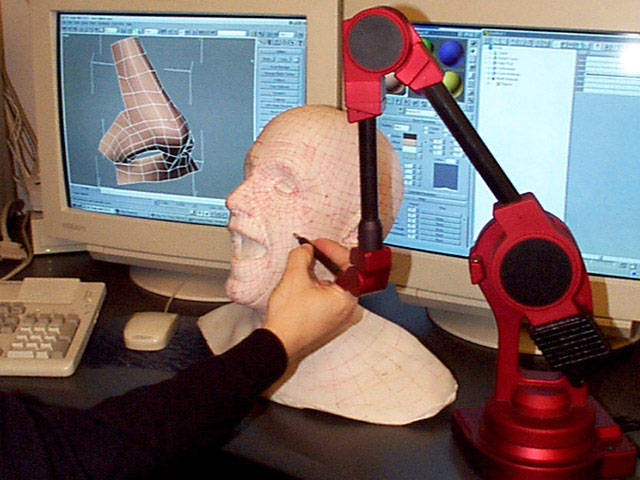 However, this was preceded by years of research and technological experimentation. Here is what Mr. Shen says about the decision to use the FARO 3D scanner: “We have always been looking for equipment that would allow us to inspect high-temperature objects. We started experimenting with 3D scanning in 2014 and soon discovered that not all 3D scanning devices are capable of operating at temperatures of 1600-1700°C. However, FARO's 3D laser scanners did an excellent job of this task.”
PUTEDY purchased its first FARO Focus 3D X 130 3D scanner in 2016 and subsequently purchased four more. Prior to the purchase of FARO scanners, the control of high-temperature objects practically did not give results. However, FARO Focus 3D, thanks to its in-situ compensation function, is able to produce high-quality measurements even in the harshest conditions, which previously seemed an impossible task.
iQB Technologies experts recommend article: Focus on measurement quality with FARO Focus
FARO 3D Scanner: no more inefficient!
PUTEDY uses FARO Focus 3D 3D scanners to control the geometry of heated steel and iron ladle ladles, regularly monitor lining defects and determine the need for repairs.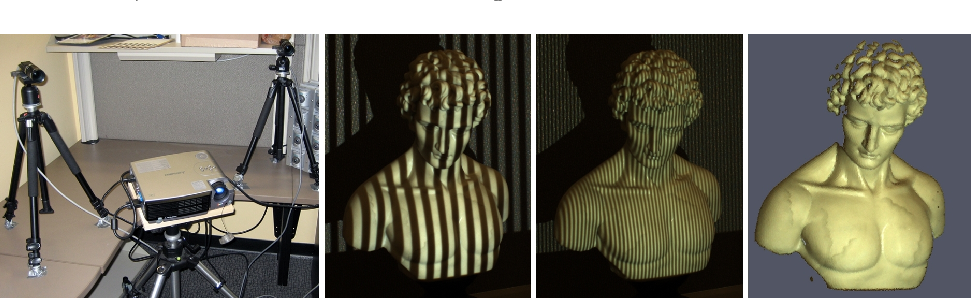
The technology team used Focus 3D to develop a long-range 3D scanning system that can perform non-contact measurement of high-temperature objects. With a simple push of a button, operators can perform scanning, data analysis and necessary calculations that are stored in the device's memory. This is a big improvement over the classic, highly inefficient control method.
Left: Using a FARO 3D laser scanner to inspect equipment on site. Right: analysis of 3D scan data / Photo: faro.com
Before carrying out the inspection, the personnel stops the production and adjusts the position of the oven. Then the 3D scanning system is installed in front of the object and takes 2-3 data acquisitions, scanning the furnace from different angles. As a rule, objects are cylindrical in shape with a diameter of 3 to 5 meters and a wall thickness of 0.6 to 1 meter.
Thanks to the high speed of the FARO 3D scanner (up to 976 thousand points per second), the inspection of the inner surface of the container is carried out in a few minutes. This reduces inspectors' time on site and, more importantly, provides a detailed record of all critical data. All useful information is captured, and errors and data loss are eliminated. In addition, streamlining the inspection process saves time, labor and money.
“Our customers are getting more profit from each furnace,” states Mr. Shen. “The ability to perform quality control of equipment during technical intervals greatly improves operational efficiency.”
3D laser scanning technology allows you to automatically import data into a computer to create mathematical 3D models of the inner walls of containers. By comparing measurement data, customers can find out how much the interior surface of the vessel has been eroded over a given period of time. Thanks to the efficiency and accuracy of the data obtained, it is possible to avoid long furnace downtimes, as well as to clearly identify which furnace components need to be replaced. This saves lining time and costs, as well as extending the life of the furnaces and increasing their efficiency.
Mr. Shen's comment: “We chose FARO Focus 3D because its scanning speed and accuracy fully meet the needs of steel mills. In addition, this 3D model scanner is the perfect combination of price and quality.”
In the future, PUTEDY plans to expand the scope of cooperation, not limited to metallurgy. The company plans to provide 3D measurement services for the construction of coal mines, tunnels, ships, as well as the preservation of cultural values. The company hopes to make the most of FARO's 3D laser scanning technology for quality control projects.
Material provided by FARO. Screensaver photo: wired.com
Article published on 10/17/2019, updated on 10/27/2022
Chinese-hot-girl Video-XVIDEOS.com
- Free 1 160
- 37
Sort by: relevance
- Relevance
- Rating date 0081
- Medium videos (3-10min)
- Long videos (10-20 mins)
- Long videos (+20 mins)
- All
- 720P+
- 1080P+
date
Video quality
1080p
Petite Chinese Girl With Glasses Sofia Su Is Creampied By Casting Agent - 60FPS POV 28 min.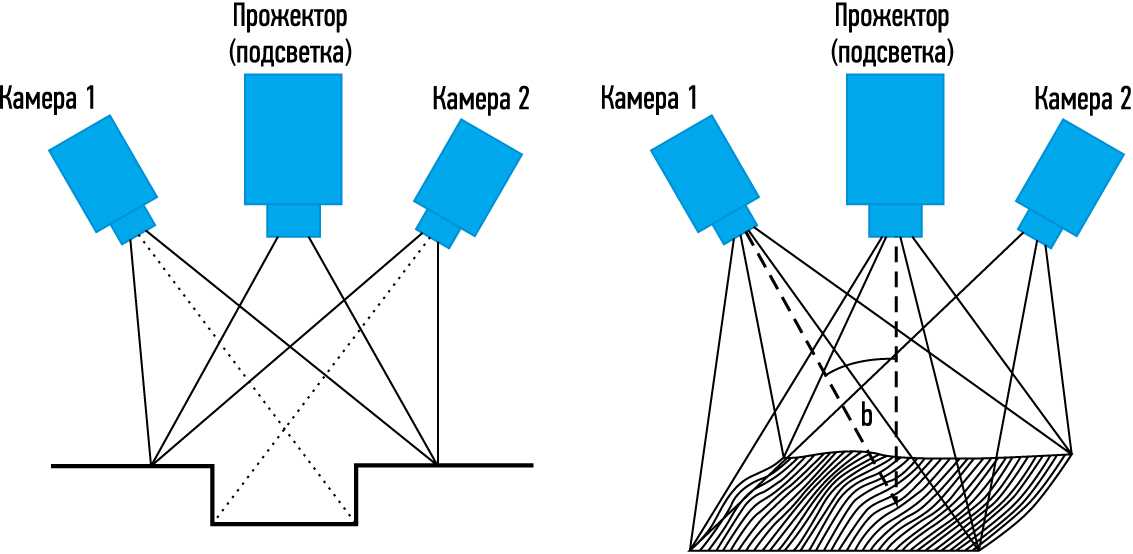
28 min Fit 18 - -
1080p
FIRST squirt confirmed! (hot asian office girl) insanely noisy amateur chinese singapore girlfriend finger fuck.. AFFECT hotel bed during real closeup squirting yoni massage Taiwan vlog | HunkHan 73 min.
73 min Hunk Hands - -
1080p.
4 min.Lavender Snowe - -
1080p
Chinese Asian girl masturbates alone at home 2 15 min.
15 min Cee Cute1 - -
720p
12 min.
5 min Silverbert1 - -
1080p
She is my best friend's mistress but I still want to fuck her 6 min.
6 min Silverbert1 - -
1080p
Hot yoga student seduces male Asian instructor - BananaFever 27 min.
27 min Banana Fever - -
Cowgirl fucking my hot stepsister's hairy pussy.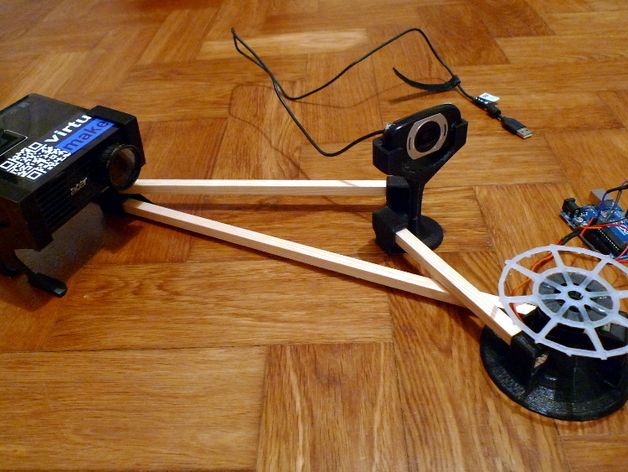 10 min.
10 min. Hunny Bunny - -
1440p
PORN CASERO MY TASTY CHINESE BALLS 8 min.
8 min Jhyfly - -
720p
Asian girl at home 25 13 min
13 min.
6 min Silverbert1 - -
720p
Asian girl feels alone at home and alone 12 12 min.
12 min Cee Cute1 - -
1080p
my stepsister says my cock is better than her boyfriend 6 min.
6 min Silverbert1 - -
1080p
Fucking brunette and hot black girl 6 min
6 min Casal Safado Do Carai - -
1080p
PsychopornTW Taiwanese girl back to school days 18 min.
18 min Psychoporn Tw - -
5 min Cee Cute1 - -
Delicious Dildo in Ass 7 min.
7 min Lipsex1 - -
1080p
RealAsianExposed - Dana Vespoli dips twice and swallows cum 26 min.