Idler 3d printer
The Idler Wheel of Your 3D Printer's Thermoplastic Extruder
By: Richard Horne and Kalani Kirk Hausman and
Updated: 09-26-2017
From The Book: 3D Printing For Dummies
3D Printing For Dummies
Explore Book Buy On Amazon
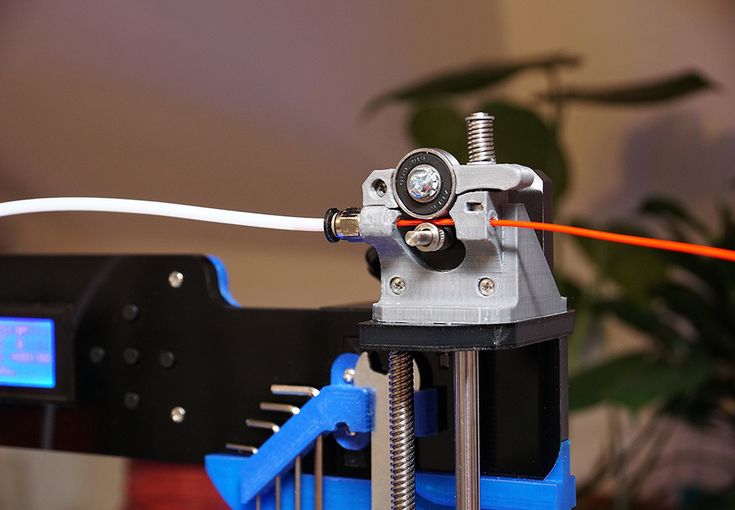
Any standard 3D printer's single-grip extruder also needs an idler wheel to push the filament into the teeth of the drive wheel. An idler wheel usually is a round bearing pushed by a spring or a rubber bushing.The following figure shows an idler bearing/wheel fitted to a printed lever; the spring on the left causes the bearing on the right of the image to be pushed into the drive wheel (middle), gripping the filament tightly. With a design using a bearing idler wheel, it must not be overtightened or it will squash rather than grip the filament. If your extruder uses the dual-drive system, in which teeth grip both sides of the filament, the bearing idler wheel is no longer required and the filament is unlikely to be squashed.
The idler wheel is essential and must be tightened just enough for the drive wheel to grip the filament.
Don't overtighten the idler bearing. If the grip on the filament starts to squash it out of shape, the hot-end's thermal gets harder to force down, and it may jam. Check how much the drive wheel is biting into the filament. You should see small, regular marks where the teeth bite in, and the filament shouldn't be crushed.
The hot-end normally is attached to the extruder body with bolts to allow it to be removed if the extruder jams or gets blocked. A finished extruder also requires a heating element on the hot-end, as well as a temperature sensor (see the following figure). This wiring, along with the four motor connections, must go back to the RepRap electronics wiring.
A wired-up hot-end fitted to the motor and drive assembly. This figure shows a complete thermoplastic extruder with a machined gearbox.
Never try to drive the motor or rotate the gears driving the filament if the hot-end isn't at the correct temperature. Doing so can cause the extruder to strip and chew up the filament, and you have to clean the teeth on your drive wheel before you can print again.
A thermoplastic extruder needs to be carefully calibrated to operate well. Extruders are highly active subjects of development for RepRap. Many designs exist, some more specialized than others, offering higher temperature, faster extrusion, or finer detail. Most extruders usually meet the requirements of home 3D printing with thermoplastics.
RepRap extruder designs.
This article is from the book:
- 3D Printing For Dummies ,
About the book authors:
Richard Horne (RichRap) has worked as an engineer, marketer, and product designer. He blogs and shares ideas on making 3D printing easier for everyone. Kalani Kirk Hausman has experience as an IT consultant, enterprise architect, auditor, and ISO. He conducts research on integrating 3D-printed materials into educational curricula.
This article can be found in the category:
- 3D Printing ,
Idler best 3D printing models・Cults
1/35 M41 Walker Bulldog Idlers
€2.44
Y Belt Tensioner Mount 2020 Extrusion
Free
DTXC8083 Idler Gear Cliff Climber Duratrax
Free
ReliaBuild 3D - 16 tooth Pulley Option
Free
Toothed Y-Idler for Ender 2 Pro
Free
GT2 pulley double screw
Free
P3STEEL Y Idler GT2 3mm
Free
Orballo P3STEEL Y axis Belt Tensioner
Free
608 ball bearing pulley
Free
Tensioner Insert for 10mm Wide Gates Idler - Updated
Free
Yard-Man push mower parts
Free
1/35 scale WWII Soviet KV tank Idler wheel for Tamiya 372.
€3.63
ALZRC X360 Rear Belt Idler Pulley UPGRADE
Free
Parametric Pulley Library - Retainer improved
Free
Filament guide - with idler pulley
Free
Anet A8 Idlers
Free
FLSUN SR Idler pulley stabilization
Free
SolidCore XY-Idler Mount Bracket
Free
Y Axis Idler - JG Aurora A5
Free
Hexagon hotend idler
Free
Idler Lever Artillery Sidewinder X1
Free
Robust and reliable XY Idlers Mount for Hypercube Evolution 5mm idler edition
Free
Redesigned parts for Vulcanus V1 - Leadscrew and Belt Tensioner
Free
z-Axis for 3D printer - CorEssentials
Free
CoreBot - CoreXY 3D printer with linear rails
Free
808 Adjustable Idler Pulley for Tevo Little Monster
Free
Bear Extruder X End Idler Mount using E3D Gates Powergrip® 2GT Toothed Idler 6mm Belt - 20 Tooth - 5mm ID
Free
Wanhao Duplicator D9 X Axis Upgraded Brackets - Left and Right - V7
Free
JeSc HyperCube XY Idler T16 v2.
 0
0Free
JeSc HyperCube 2020 Corner Brackets v1.0
Free
Creality/Ender 3 belt shim for X carriage
Free
Pulleys - Round
Free
Prusa Mini Dual Extruder Idler Stock Extruder
€1.50
Hypercube Evolution Upgrade All Parts
Free
Prusa MK3S MMU2S Extruder Idler door (debris opening)
Free
Idler Lever
Free
X and Z MGN12 linear rail conversion for 2020 frame cartesian printers (cr-10 / Tevo Tornado)
Free
Mendel Max 3 extruder improved idler arm.
Free
E3d Titan Idler Arm redesign
Free
Creality CR-10 / Tevo Tornado : Y-Axis Belt Tensioner Remix (Improved Idler)
Free
Hypercube Evolution Pulley Mount For 8 & 10mm Rod
Free
OpenSCAD Idler Pulley
Free
Taz 5 Extruder Idler Block
Free
Pulley (customizable, with lots of tooth profiles)
Free
Customizable V-Belt Pulley w/Shackle
Free
3mm Idler Pulley 2020 mount
Free
e3D Titan Solid Idler Tensioner
Free
pulley for panels | m5 bolt
Free
Free 3D File 21T・3D Printer Model Download・Cults
20T
Free
cat dog
Free
Drum Stick Prosthetic
Free
The best files for 3D printers in the Tools category
The open source tool to slow the spread of COVID-19
Free
Asian hornet trap
Free
Anycubic i3 Mega Enclosure (IKEA LACK Table)
Free
Learn the time
Free
Filament Dust Cleaner Filter
Free
Alternative spoolholder
Free
Arduino Humidity Sensor Holder
Free
Holder for Screwdriver Set 6pcs 030 I for screws or peg board
Free
Bestsellers in the Tools category
PRECISE DIAL INDICATOR 3D PRINT DIY
€1.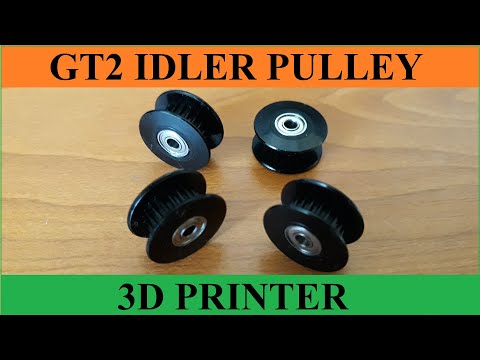 90
90
Business card embossing system
3 €
well designed: Hemera fan duct
2.50 €
PRECISION CALIPER 3D PRINT DIY
3,11 €
Fast print ink bottle rack (6 sizes)
€2.89
Armadillo - flexible wire conduit
€1.75 -fifty% 0.87 €
PET-Machine, make your own plastic bottle filament at home!
50 € -70% 15€
Case for Chill Buddy lighter
0,97 €
Quick print stackable parts containers / storage boxes
2. 89 €
89 €
telephone ring holder
0,90 €
ARTEMIS -> Shop for Alligator 2 || 6.5" Arrows || Repeating Crossbow
6.25 €
UNIVERSAL BED LEVELING INDICATOR FOR VERY ALL PRINTERS
2,92 €
Phone holder
2.53 €
Filament shielding
2.83 €
3D printed wave transmission (harmonic drive)
4.99 €
Fire hydrant storage container
1.95 €
Do you want to support Cults?
Do you like Cults and want to help us continue our journey on our own ? Please note that we are a small team of 3 people, so supporting us in maintaining activities and creating future developments is very easy. Here are 4 solutions available to everyone:
-
AD: Disable the AdBlock banner blocker and click on our banner ads.
-
AFFILIATION: Shop online with our affiliate links here Amazon.
-
DONATIONS: If you want, you can donate via PayPal here.
-
* INVITE FRIENDS: * Invite your friends, discover the platform and great 3D files shared by the community!
Polyester resin experiment
Hello colleagues!
Today I would like to raise the topic of post-processing again, but this time without solvents, primer and in some cases even without paint) an indecent abundance of jars, boxes and bottles, so I decided to diversify this disgrace by printing a cup under all sorts of garbage pens and pencils)
6 hours later (I ventured to put it on at night), such a pencil crock was born:
I’ll make a reservation right away - my printer prints far from well, even very far, because in the future it’s better to assemble a printer, and then I’ll get to Pryusha’s MOT))) ABS plastic (GREG of course) behaves well, stuck to the table notably, printing was successful even without supports, although our experimental subject lost several teeth because of this)))
Printing was done for a couple of days before the installation of new windows in the apartment, so the draft (the printer is in the kitchen by the window) slightly hurt, causing a couple of small delaminations . .. it was necessary to put a layer of 0.15 instead of 0.2.
I brought this product to the workshop and I'm sitting working, looking at a jar of soil...
'And why? Again you fill it with soil and again you will not write anything on 3DToday, slacker!' - laziness told me and completely repelled the desire to wash the spray gun after the primer :)
Okay, laziness :)
Since I'm working a lot with fiberglass now, why not do an experiment? Why are we worse then? There is resin, everything is there! Fortunately, I was not too lazy to fight off this idea))
I went to the rack and poured a bit of black gelcoat and two bits of polyester resin into a glass.
A bit of theory:
Gelcoat (gelcoat, whatever you want) - essentially the same resin, but it can be of a different composition, and also contains pigment, thixotropic and functional additives. It is a protective/decorative coating for fiberglass products in particular. It can be colored or transparent, as well as for brushing or spraying. I have for brush application - thicker. An important property is thixotropy, which prevents the composition from draining from inclined surfaces.
Resin - everything is clear here with one exception, it contains paraffin (not in the gel coat), which is released during polymerization and restricts oxygen access, from which the resin is not sticky after solidification.
If I could find my solution of paraffin in styrene, I would make TOPcoat - a non-sticky gelcoat that is used as a paint for finished products.
As a result, the resin will give paraffin, and the gelcoat will give density... a wonderful duet!))
Moving on.
Cut off half of the bristles of the brush to apply the mixture more gently)
This potion will spread well due to the fluidity of the resin, have color due to the pigment and will not flow down much due to the part of the gelcoat ... theoretically everything is fine, let's get down to practice .
After adding about a couple of percent of the hardener, then mixing thoroughly, I started applying ... first with a 'stingy' brush, smearing the mixture dryly over the surface, and then more abundantly, filling the ribbing, smoothing out the places with an excess of 'mazyuki' with light strokes :)
Don't torture yourself with guesses - I didn't do anything with the skull at all, neither sanded nor glued the delaminations - I left everything to 'eat up' the mazuk))) I just screwed in three self-tapping screws so that poor Yorick would have 'legs';))
The result is visible in the photo - everything was covered with a smear, only traces of brush strokes remained, well, okay, this is an experiment) the composition became slightly matte, not sticky at all, you can see a slight ribbing on the forehead.
'What? Like everything?! Did you take a picture of the skull, throw it into the article and be proud of yourself? Let's work on your ugliness, slacker!' - inspiration said, kicking me to the rack in search of sandpaper)
At the same time I remembered:
But my misfortune, friends, is one: cat:
- Sit down, brave hussar, on a horse,
And show off your talents a little! (c)
After rubbing just a couple of minutes with FINE-type sandpaper, the traces of ribbing disappeared instantly. I took SUPER FINE and lightly ran over the whole skull to 'fill the risk', so to speak, because an idea appeared:
And what's next? And then you can dump it in the ground and put it on a shelf...
Although no, not that, I'll just paint it... or... not just...
there is also exotic)
To do this, you need to polish the skull sloppily to create 'wear from time to time'. Degrease afterwards necessarily)
And now chrome effect paint and an airbrush come into play :) Not to be confused with paint in cans, that's not it.
At a minimum flow with high pressure, light spraying, our skull acquires a metallic sheen)
The trick of the paint is that the better the surface shines, the steeper the mirror effect up to almost a mirror.
As I wanted - allegedly a metal casting, carelessly sanded and slightly polished in protruding places) Add a little 'darkness' to the cavities and between the teeth and it's indistinguishable from an old garage trophy!) Although the employees did not believe that it was plastic, until they looked inside and below))
That's all, dear friends, below will be thoughts aloud, because it's not so often that we have to talk meaningfully about this and that, and draw conclusions about the same)
Will I use this technique in the future? Undoubtedly! I liked this experiment and its result) Maybe not everywhere, maybe partially, but it's quite a suitable solution, it worked for me)
Does ABS resin eat? Yes, without a doubt.