Hp 3d printer launch
HP launches new Metal Jet S100 3D printer at IMTS: technical specifications and pricing
0Shares
The HP Metal Jet 3D printer has been launched by HP at the 2022 International Manufacturing Technology Show (IMTS). 3D Printing Industry is in Chicago this week for the show.
HP’s efforts to expand into metal 3D printing began to take shape in 2017 when plans for a high-volume jetting system were unveiled at its Security Analyst Meeting. As identified by 3D Printing Industry in 2017, HP’s metal 3D printer was expected to use Metal Injection Molding powder. HP would confirm this a year later.
Announced in 2018, HP’s much-anticipated Metal Jet technology is designed to work with Metal Injection Molding (MIM) materials rather than the spherical powders used in laser sintering metal additive manufacturing systems. According to the Global Head of the firm’s 3D Printing Metals business, Ramon Pastor, this is “a big deal,” as it enables users “to drive down cost-per-part” by 20% to 33%.
The Metal Jet S100 will launch with stainless steel 316L and 17-4PH compatibility. Pastor says that its efficiency improves its ergonomics in a way that allows it “to drive scale,” and HP “sees huge opportunities” for the system to address clients in the industrial, medical, consumer, and automotive industries.
A facility fitted with Metal Jet S100 3D printers. Photo via HP.HP’s Metal Jet 3D printing journey
Since unveiling its MJF concept back in 2014, HP has built a 3D printing offering in polymer-based machines and materials. In that time, HP systems have 3D printed over 130 million parts, and MJF continues to address the needs of firms across sectors, with the likes of Toyota now 3D printing automotive spares via the technology and Ocado 3D printing fulfillment bots.
Desktop Metal, Markforged, and Digital Metal have all launched their MIM powder-based machines. With a longer history and broader customer base, metal injection molding powders are currently cheaper than the metal powders required for additive manufacturing processes such as Direct Metal Laser Sintering (DMLS) or Electron Beam Melting (EBM). However, it has often been pointed out that material cost is not the only challenge when it comes to scaling metal 3D printing; repeatability/reliability, cycle time, post-processing, and capital investment are just some of the other considerations. Potential customers will no doubt be happy to pay less for materials.
Speaking ahead of the Metal Jet S100’s launch, Pastor described the platform as the “first introduced that is prepared to economically bring parts at scale.” HP’s metal 3D printing boss added that the system has been built with a “focus on total cost of ownership,” in a way that ensures “the variable cost of a part is the point at which users can scale production.”
HP’s metal 3D printing portfolio. Photo via HP.Launching the Metal Jet S100
So, how does HP’s first Metal Jet 3D printer work? As the company has now revealed, the Metal Jet S100 comes fitted with a 430 x 309 x 200 mm powder bed onto which droplets of material are jetted by six HP Thermal Inkjet printheads attached to two print bars, equipped with a total of 63,360 nozzles.
Using these printheads, the system is capable of precisely placing up to 630 million nanogram-sized drops of liquid binder per second layer-by-layer to form parts with a resolution of 1,200 dots per inch (dpi).
In practice, the Metal Jet S100 is designed to be modular, so more than one can be installed to create a continuous production line as part of a four-step process. After print preparation and manufacturing via HP’s powder management station, users can then debind parts using its curing station before removing any excess powder with any third-party system of their choosing.
To help realize the potential of this automated process, HP has begun working with partners GKN, Parmatech, Cobra Golf, the Legor Group, and Volkswagen. User-wise, the technology has also been adopted by initial clients like Domin Digital Motion, Lumenium, and Schneider Electric, the latter of which has already harnessed it to optimize the production of industrial metal air filters.
“This metal air filter is used in circuit breakers for when you have an inspected electric arc, and you need this not to affect the rest of the installation,” explained Pastor. “Usually, these filters are made through traditional measures, and it’s very, very expensive. We’ve been able to cut the time to produce it, and make weight reduction improvements, as they’re now 20% more compact.”
Speculators have argued that the massive gap between announcement in 2017, and launch in 2022 of the HP Metal Jet was a deliberate tactic. The announcement giving pause to potential customers who might defer their capital investments knowing an HP metal 3D printer was on the horizon. Will the success of HP’s efforts with Multi Jet Fusion translate into similar results in the metal 3D printing space?
Furthermore, it is noteworthy that the number of additive manufacturing companies producing MIM-based 3D printing systems is relatively small – with an element of cross-pollination.
Schneider Electric’s Metal Jet-3D printed 690V power filters. Photo via Schneider Electric, HP.Technical specifications and pricing
Below are the technical specifications for the HP Metal Jet S100 3D printer. Debuted at IMTS 2022, the system is available to order now in the US, Western Europe and China, and is expected to be made widely available by h2 2023. Pricing information has been requested from HP and the article will be updated.
| Technology | HP Metal Jet |
| Build Platform Volume | 430 x 309 x 200 mm |
| Effective Build Volume* | 430 x 309 x 140 mm |
| Build Speed | 1,990 cc/hr8 |
| Layer Thickness | 35 – 140 μm |
| Print resolution (X,Y) | 1,200 dpi |
| Printhead system | 6 Thermal Inkjet Printheads (63,360 nozzles) |
| Dimensions | 2,975 x 1,350 x 2,410 mm |
| Weight | 851kg |
*HP states Build Platform Volume meets MPIF standards for stainless steel with HP Metal Jet SS 316L and 17-4PH materials.
To stay up to date with the latest 3D printing news, don’t forget to subscribe to the 3D Printing Industry newsletter or follow us on Twitter or liking our page on Facebook.
While you’re here, why not subscribe to our Youtube channel? featuring discussion, debriefs, video shorts and webinar replays.
Are you looking for a job in the additive manufacturing industry? Visit 3D Printing Jobs for a selection of roles in the industry.
Featured image shows a facility fitted with Metal Jet S100 3D printers. Photo via HP.
Tags Desktop Metal digital metal Domin Digital Motion GKN HP IMTS 2022 Legor Group Lumenium markforged Ocado Parmatech Ramon Pastor Schneider Electric Tim Weber Toyota Volkswagen
Paul Hanaphy
Paul is a history and journalism graduate with a passion for finding the latest scoop in technology news.
HP launches HP Jet Fusion 5420W 3D printing system; debuts new Metal Jet applications at Formnext
×
Expand
HP
HP Jet Fusion 5420W.
HP has announced the launch of its HP Jet Fusion 5420W 3D printing system as part of a new machine series that facilitates the additive manufacture of white parts.
At Formnext, the company is also showcasing its HP Metal Jet S100 solution for the first time in Europe, with a new production application from John Deere a feature of its booth (Hall 12.1; D59).
“Additive manufacturing delivers on today’s most urgent market demands including sustainable innovation, hyper-personalisation, and business resiliency,” said Didier Deltort, President of Personalization & 3D Printing, HP Inc. “Together, with our global network of partners and customers, we are scaling additive manufacturing to meet these needs.”
HP Unveils New Jet Fusion 5400 SeriesTo enable entirely new production applications, HP is adding the new HP Jet Fusion 5400 Series to its existing Jet Fusion portfolio, with the HP Jet Fusion 5420W the series' first product. This product has been designed to enable the high-quality additive manufacture of white parts and is said to provide all the benefits of HP's Multi Jet Fusion technology, initially commercialised via the 4200 and 5200 Series. HP says the new machine is ideal for the automotive, consumer goods, healthcare, and industrial markets. Early customers using the new system to produce innovative white applications include DI Labs, Prototal Industries, and Weerg.
“HP continues to provide us with the advancements we need to push the boundaries of additive manufacturing and produce the final parts our customers need,” said Jan Löfving, CEO, Prototal Industries. “Beyond the industrial grade production HP delivers, we are seeing immediate interest in the new white applications made possible by the latest addition to HP’s Multi Jet Fusion family. As a proud Digital Manufacturing Partner in HP’s DMN, we are equipped to take on bold, innovative projects and help companies get the most value out of AM production. ”
”
HP has also announced since announced its cumulative 100 million Multi Jet Fusion parts milestone at last year's Formnext, more than 70 million additional parts have been printed in the past 12 months. Among them are the following applications, also on show at Formnext.
×
Expand
- Using their HP Jet Fusion fleet, GKN Forecast 3D produced 60,000 spoiler closeout seals with BASF ULTRASINT TPU01 (thermoplastic polyurethane) for General Motors. Innovative vapour polishing and drying processes enabled by AMT cleared a bottleneck, halved production time, and were used to finish parts, eliminating the need for post-print dyeing. The seals close out gaps on the left and right sides of the rear spoiler, improving finish and fuel efficiency, and the spoiler closeout seal recently earned top prize in the additive manufacturing category at the 51st annual SPE Automotive Innovation Awards.

- Demonstrating the power of hyper-personalisation, Smith I/O MAG Imprint 3D Goggles are produced with Multi Jet Fusion technology and offer a truly custom fit based on the individualized features of a person’s face. Named one of Time Magazine’s Best Inventions of 2022, these first-of-their-kind goggles eliminate light leaks, air gaps, and hot spots for world class performance on the slopes.
Launched in September, HP’s Metal Jet S100 Solution is enabling industrial customers, such as Domin Digital Motion, Lumenium, and Schneider Electric, to achieve 'better productivity, low part cost, and outstanding quality' per HP. John Deere, the global manufacturing leader of agricultural and construction equipment, is the latest adopter - using Metal Jet technology for the production of a valve in the tractor fuel system.
Together with GKN, John Deere is now manufacturing Metal Jet-printed valves in its agricultural machinery. In addition to significant productivity gains and environmental benefits, the high-quality part is said to be functional in extreme weather conditions. John Deere is also leveraging HP’s Multi Jet Fusion technology to optimise its production processes using 3D printed prototypes to test and fine tune components and parts such as windshield holders, reducing pre-assembly from 30 days to ten, delivery times by up to ten weeks, and overall production costs by between 20 to 25 percent.
“Our focus on innovation and sustainability is at the core of everything we do for our customers,” said Dr. Jochen Müller, Manager Global Digital Engineering at John Deere. “We are proud to be among the first in the agricultural industry to leverage the benefits 3D printing for both prototyping and final parts production. Leveraging industrial 3D printing platforms for polymers and metals, we are discovering opportunities to deliver more efficient, reliable, and sustainable equipment.”
Materials, post processing, and DMN updatesOn materials, HP partner Lubrizol has announced the new ESTANE 3D M88A TPU, a flexible and highly durable material which enables complex geometries and lattice structures.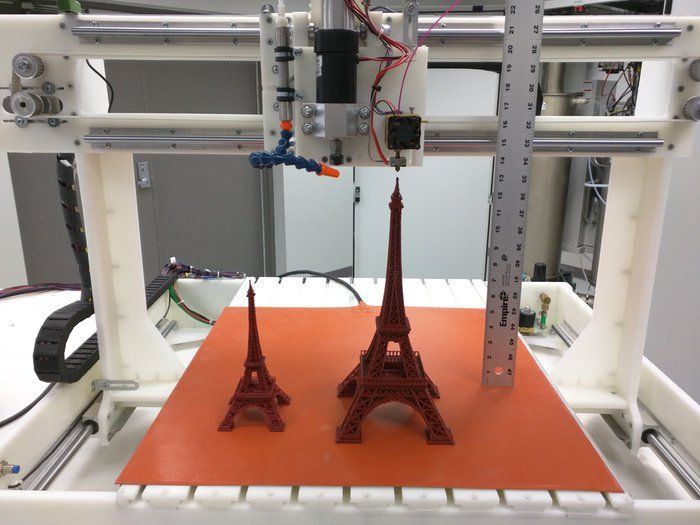 And in post-processing, HP and AMT have announced a new strategic alliance to provide customers with 'seamless, fully automated post processing support' through the entire 3D printing production workflow.
Together, HP and AMT are working to help customers more efficiently and cost effectively apply post processing capabilities like unpacking, cleaning, surface finishing, colouring, sporting and quality control for applications produced with HP’s industrial Jet Fusion 3D printing portfolio. In addition to its partnership with AMT, HP is collaborating across the post processing ecosystem to ensure customers have access to a broad range of alternatives from providers including AM Flow, DyeMansion, and Rösler Group AM Solutions. DyeMansion is offering advanced post processing options for Multi Jet Fusion customers including surface finishing and colouring for white parts produced with the new Jet Fusion 5420W Solution.
Supplementing the updates from HP on materials and post-processing, the company has also announced Oechsler as a new Digital Manufacturing Partner in HP’s DMN. Oechsler is the first to take advantage of the joint post processing support with AMT and develop a range of applications.
“At Oechsler, we choose to work with companies who have a shared vision of working together to deliver optimal outcomes. HP and AMT building a comprehensive approach from printing to an integrated post processing solution is a critical step in the adoption of additive manufacturing at scale,” said Matthias Weisskopf, General Manager, OECHSLER Motion.
HP's commitment to sustainability
In line with its sustainability commitments, HP has announced it is offering its customers using polymer-based technologies a new Virtucycle recycling and buyback programme by Arkema. The programme enables interested HP customers to sell used PA11 and PA12 powders, and printed parts, as opposed to disposing materials via costly, environmentally harmful practices such as landfilling or burning.
Want to discuss? Join the conversation on the Additive Manufacturing Global Community Discord.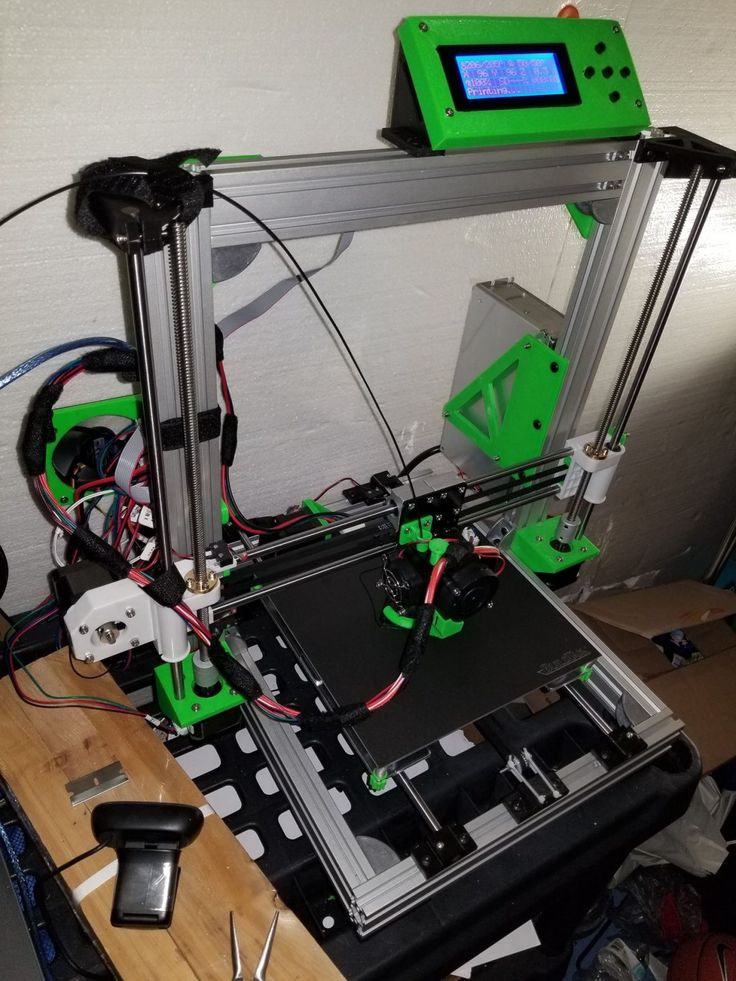
Gain 3D printing insights from Boeing, Jack Wolfskin and more at the TCT Conference @ Formnext. Get your pass here.
Get your FREE print subscription to TCT Magazine.
Beginner's Tips on Getting Started with a 3D Printer, Table Calibration and Slicer Setup
Despite the abundance of videos and articles, the information in them is scattered and it can be difficult for a novice 3D maker to understand such an abundance of facts. In fact, everything is not so difficult, at the first stages it is enough to deal with just a few important nuances.
First use
Before using the printer for the first time, it is best to read the instructions. Each printer may have its own usage and settings. Some 3D printers are able to calibrate automatically, without user intervention, and some need to be configured manually.
If there was no paper instruction in the box, you can download it from the manufacturer's website.
Some manufacturers stick a sticker on the box with a link to the current version of the instructions.
Before the first run, make sure all shipping locks are removed from the 3D printer. You can gently try to move the extruder along the axes with your hands to make sure that nothing interferes with its free movement.
Table calibration
The result of the entire operation of the printer depends on the calibration of the table. It is very disappointing to see that the model, after many hours of printing, came off the surface of the table and deformed or “moved out”. In order to prevent this from happening, it is necessary to correctly set the working plane and the gap between the table and the nozzle.
In many printers, manufacturers began to add an automatic print surface calibration sensor. A special sensor measures the distance from the table to the nozzle and makes a “map” of irregularities that are taken into account when printing.
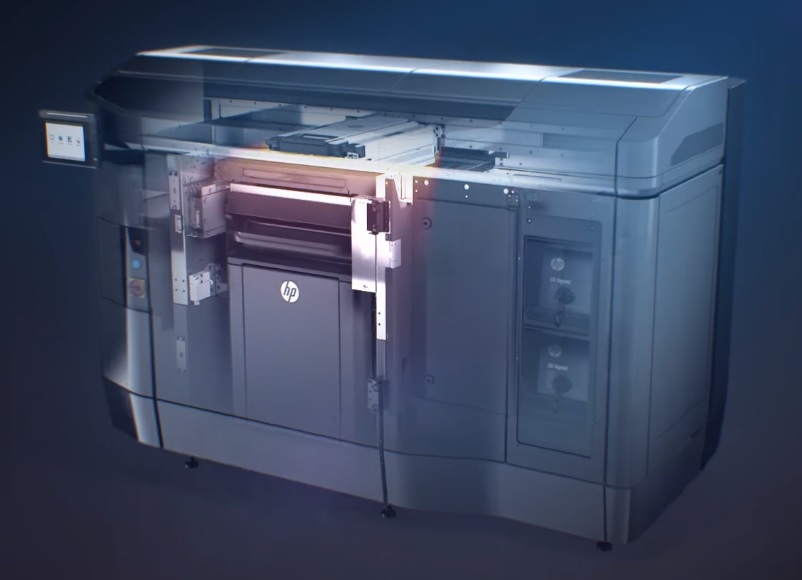
Table auto-calibration sensor
There is a semi-automatic calibration. In this case, the printer, using a sensor, determines the distance to the table and tells you in which direction to turn the adjusting screw.
Here we will look at the manual calibration of the working surface of the most popular mechanics of FDM printers - Prusa, H-BOT, CoreXY, etc.
Table leveling
First you need to level the plane of the table. To do this, using the adjusting bolts, it is necessary to set the same distance between the table and the nozzle. Anything can be used as a probe, but it is better to take the probe recommended by the manufacturer (usually 0.1mm).
Table calibration
-
Heat up the table. The 3D printer table is made of a metal plate, when heated, the metal expands, so it is better to heat the table before calibrating.
_Angle_View.jpg)
-
Tighten the calibration screws as far as possible at the bottom of the print surface. This will help prevent the work surface from colliding with the nozzle in the next step.
-
Send table and extruder to zero position. Raise the table as high as possible or lower the extruder as far as possible with Prusa kinematics. This can be done from the menu with the HOME command. Make sure that the nozzle does not “crash” into the work surface.
-
Using the menu, move the nozzle so that it is above the calibration screw.
-
Place the probe between the work surface and the nozzle, use the screw to raise or lower the work surface so that the probe is firmly clamped. Repeat this for all table gauge bolts. There may be 3 or 4 of them.
-
Move the extruder to the center of the table and use a feeler gauge to check the gap between the table and the nozzle. If the gap is the same as above the calibration bolts, then the plane is aligned correctly, if the gap is different, then it is worth repeating the calibration or checking the evenness of the printed surface.
The square test can be used to check the uniformity of the table plane calibration.
Work surface flatness test
Depending on the size of the work surface, you can place test squares in different places.
Test squares on the printed surface 30x30 cm
For this test, you need to print several thin squares (1 layer thick) on the printed surface. Depending on how they are printed, you can see if the table plane is evenly calibrated.
Table for determining the correct calibration of the table and nozzle.
Sometimes the printed surface is a bit uneven on its own and there are some small depressions or bumps in some places. If it is not possible to change the working surface or there is no time to re-calibrate, you can try to print the model on the “raft”.
The raft is a thick substrate that is printed under the model. A thicker layer of plastic adheres better to the printed surface and “smoothes out” its bumps.
3D model printed on raft
Table to nozzle gap calibration
If a feeler gauge was used to align the work plane, which matches the required gap between the table and the nozzle, then the extruder does not need to be calibrated separately. If the printer has 2 extruders, then only the second extruder needs to be calibrated.
Some 3D printers, like the Raise 3D, come from the factory with a leveled bed, but it's a good idea to check the gap between the bed and the nozzle before printing. Settings may change during shipping.
-
Using the menu, you need to send the table and extruder to the zero position (HOME).
-
Using a feeler gauge, set the distance between the working surface and the nozzle recommended by the manufacturer (usually 0.1 mm). Some manufacturers recommend calibrating the nozzle “to the table” without clearance.
 The distance between the nozzle and the working surface can be adjusted by the calibration screw, which is located at the z-axis limit switch, programmatically or by the extruder.
 -
If the printer has 2 extruders, then the calibration must be repeated with the second extruder.
-
It is necessary to heat the extruder to the melting temperature of the plastic filament. The temperature range is usually marked on the box or spool of plastic.
-
After heating the extruder to a predetermined temperature, depress the lever that presses the filament in the feeder and push the plastic into the extruder until it starts to flow from the nozzle.

-
If necessary, fix the pressure lever so that it firmly presses the filament against the feed gear. (If the lever is not spring-loaded and does not return to its original position).
After changing the nozzle, thermal barrier, table surface or moving the printer - it is necessary to check the gap calibration between the work surface and the nozzle, and sometimes the plane of the table.
Loading filament
After setting up the print platform, you can load the filament (plastic).
In some 3D printers, the plastic loading process is automated and starts from the menu.
After loading the filament, you need to push the plastic bar a little until the remnants of the old plastic come out of the nozzle.
Setting print options
In order to get a neat and accurate model of the insufficiently good mechanics of a 3D printer, it is important to properly prepare the model using a special slicer program.
Table and nozzle temperature
Perhaps the two most important parameters are the temperature of the nozzle and the working surface. These settings may affect other slicer settings.
Slicer CURA
Table temperature settings
A heated work surface is necessary for better adhesion of plastics with a high percentage of shrinkage, otherwise the part will simply come off the printed surface during printing. But due to too high a temperature, the lower layers can soften and deform under the weight of the growing model.
Depending on the surface of the table, the recommended temperature may vary. For example, if ABS is printed on a special substrate, the recommended table temperature is 100 degrees, and if glass with stationery glue is used as the work surface, the temperature should not be raised above 80 degrees.
Some manufacturers indicate the recommended table temperature on the box or on their website. But there are general temperature ranges that you can focus on.
-
PLA - 0 - 50 degrees. During printing, the plastic must be blown.
-
ABS - 80 - 90 degrees. Drafts should be avoided during printing.
-
Nylon - 80 - 90 degrees. Drafts should be avoided during printing.
-
Flex - 80 - 90 degrees. Drafts should be avoided during printing.
Nozzle temperature settings
The required temperature range is indicated by the manufacturer on the filament spool, but it is better to print a couple of small tests to determine the ideal temperature for a given filament.
After changing the nozzle to a nozzle with a different diameter or a significant increase in printing speed, it is necessary to slightly increase the temperature of the extruder. Due to the small “melt chamber”, the plastic may not have time to warm up to the desired temperature.
There are extruders with a large volume of "melting chamber" of plastic, but they are not suitable for every 3D printer and are designed to work with large diameter nozzles.
Conventional heating block and Vulcano block with enlarged “melting chamber”
Printed tests
To configure some slicer parameters, it is convenient to use special tests, rather than setting the settings at random. Some of the tests can be printed every time you change the spool of filament. For example, plastic from the same manufacturer, but with a different dye, may have slightly different temperature settings.
XYZ Cube
Printed cube
This is one of the most popular tests that can be used to evaluate the quality of the surface and the accuracy of the kinematics of a 3D printer (belt tension, number of steps per mm, etc. ). You can download it here
Boat 3D Benchy
A small test boat that allows you to evaluate many 3D printer parameters and slicer settings. 3DBenchy has become so popular that enthusiasts have come up with various fun and practical accessories for it.
Parameters to pay attention to in the finished model
For two extruder printers, there is a boat that needs to be printed in two colors. You can download the model or find models of accessories for the finished boat here.
Boat for two-color printing
Simple temperature tower
Setting the correct print temperature is one of the most important factors in obtaining a strong model with a quality surface. Many factors can affect the fusibility of a plastic - the quality of the raw material, the addition of dyes, the speed of printing, the thickness of the layer, etc.
In order to understand how plastic behaves at different temperatures, enthusiasts came up with a simple test turret that prints at different temperatures at different heights. There are several types of these tests. Some have overhanging elements and “bridges”. You can download the test here.
Temperature tower with bridges and overhangs
Turrets
Retract Turrets
These small turrets allow you to fine-tune the retract in your slicer settings. Due to their small size, they print very quickly. You can download the model here.
Bridge printing test
Test Bridge
Some overhanging elements can be printed without supports, the slicer even has special settings for printing such “bridges”. To find the optimal parameters, you can use this small test model.
Surface overhang
Test model
A small test that allows you to understand how the plastic will behave when printing overhanging elements. With this test, you can configure support settings in the slicer. You can download the model here.
Test All-in-one
There are printed tests - all in one, but it can be difficult for a beginner to figure out which settings need to be adjusted. Therefore, to begin with, it is better to print simple tests, and with experience, you can use universal ones.
Printed test all in one
Model can be downloaded here
Common errors
Poor first coat adhesion
This is usually due to incorrect print surface calibration or poor adhesion of the first layer.
First you need to check the correct gap between the table and the nozzle. If necessary, calibrate the plane of the printed surface and the gap between the working surface and the nozzle.
To increase adhesion, you can use special adhesives that are applied to the printed surface. Check the correct temperature of the extruder, table and thickness of the first layer in the slicer settings. The higher the temperature of the extruder, the better the adhesion. The first layer is usually thicker than subsequent ones, because the thicker layer of plastic adheres better to the work surface.
Printer does not extrude plastic
If the printer stops extruding plastic and the feed mechanism starts to click, then most likely the problem is a clogged nozzle. The nozzle can be burned or cleaned, but in 3D printing nozzles are consumables and it is better to replace it immediately.
Plastic bubbles when printed
If the plastic bubbles when exiting the nozzle, then it must be dried. Some engineering plastics, such as nylon, need to be dried before each print.
Model is printed with errors
The slicer cannot always process the model correctly if it has errors. For example, inverted normals, internal walls, or the model is not closed. Such models need to be “cured” before printing.
Model printed with error
Some slicers are able to fix simple errors on their own, but if the slicer is powerless, you can use special programs designed to work with STL files. For example, Autodesk Netfabb allows you to fix model flaws with the click of a couple of buttons.
Repairing a Model with Autodesk Netfabb
Totals
Despite the fact that a 3D printer is essentially a CNC machine, manufacturers are trying to make it as easy as possible to work with it. There are many additional options that allow the novice user not to delve into the nuances of setting up and calibrating the printer, but to start printing right out of the box.
Most slicers are also simplified as much as possible for a more comfortable acquaintance with 3D printing. Universal profiles appear, in which the user only needs to specify the type of plastic and send the file for printing. And later, you can use the advanced settings menu for finer control of print settings.
HP Jet Fusion 4200 review of 3D printer
In 2016, Hewlett Packard in Florida held a presentation of the first generation of 3D printers using Multi Jet Fusion (MJF) technology. For printing, powder thermoplastics are used, which are formed by inkjet arrays.
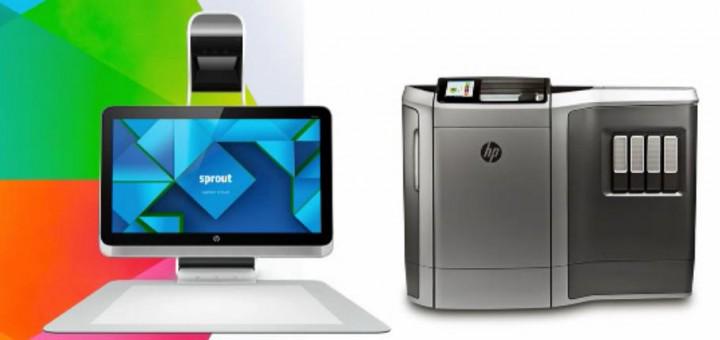
HP Jet Fusion 3D 3200 and HP Jet Fusion 3D 4200 are among the first MJF devices.0002
HP Jet Fusion is not just a 3D printer, but a complete 3D printing system. It consists of the printer itself, as well as a recycling station, which is responsible for processing the remaining consumables. Powder that was not used up during printing can be reused: according to the manufacturer, 80% of the material can be used for subsequent printing cycles.
To do this, old powder is mixed with new powder, sieved and converted into a ready mix for printing. This whole process is almost completely automated and does not require active human participation.
The performance of the HP Jet Fusion 4200 printer is reflected in its name: the device print volume is 4200 cm³/hour. Products are recreated in the classic way for 3D printers - in layers. The layer thickness in this case reaches 70–120 µm.
INFORMATION! Compared to the more modest model HP Jet Fusion 3D 3200, the printer in question is sharpened for small-scale production, has a large number of settings. This allows you to make adjustments to the current production process - to add models to fulfill emergency orders.
Recycling plant reduces production costs, including temporary costs. It incorporates an improved cooling system, thanks to which the time spent on preparing material for processing is reduced.
HP Jet Fusion 4200 3D Printer
- Energy consumption 9-11 kW
- File formats 3mf, stl
- Dimensions, mm 2300 x 1325 x 1983
- Weight 730 kg
- Max workpiece size 406 x 305 x 406 mm
- Seal MJF
- Print Resolution 1200 dpi
- Working chamber area 406 x 305 x 406 mm
- Speed 4200 cm3/h
- Layer thickness from 70 µm
Go to product
The performance of the MJF printer is far superior to that of popular SLS printers. According to HP, the HP Jet Fusion 3D 4200 model is 10 times more productive than SLS devices, and 50 times more productive than FDM printers.
At high print speeds, the printer also provides a large amount of work due to the working chamber with dimensions of 406 × 305 × 406mm. In addition, the printer can print several products at the same time.
The printer's extruder is equipped with three arrays. Each of them has 10 thousand nozzles, providing a resolution of 1200DPI. The printhead delivers 350 million drops per second with an accuracy of 21 microns. The total performance of the work reaches 1.8 teravoxels, and with each movement, up to 276 million voxels are processed.
By measuring the temperature in the working chamber in 900 points in real time, the shrinkage of printed products is minimized. If there is a temperature difference at different points, an adjustment is made.
The software was developed with the participation of experts from Materialize, Siemens and Autodesk. The system provides support for STL and 3MF formats. For management, HP offers software HP SmartStream 3D Build Manager and HP SmartStream 3D Command Center with an intuitive user-friendly interface in Russian
In the future, the manufacturer is going to focus on the more promising 3MF file format. The company also plans to develop a color MJF printer.
Main features
The main features of the device and printing on it include the following:
- the printer is equipped with a system for processing the remaining consumable powder;
- large build area for simultaneous printing of several products;
- advanced MJF printing technology for thermoplastic powder applications;
- the ability to use up to 80% of the material for the next print cycles;
- print layer variation from 70 to 120 microns;
- high print speed with maximum productivity;
- Tiered gun array for maximum print quality on precise, flexible, durable products;
- uniform heating of the product during printing;
- economical consumption of consumables and electricity;
- optimization of the printing process due to the possibility of continuous printing, closed material mixing technology and reduced operating costs;
- rapid cooling system;
- highly detailed products;
- specially designed software for easy management of HP SmartStream 3D Build Manager and HP SmartStream 3D Command Center.
Package contents
When ordering the device, the buyer receives a complete system for 3D printing, which includes:
- 3D printer;
- device for processing consumables;
- network adapter;
- instructions in Russian;
- commissioning;
- job training.
Print quality and product examples
High print quality can be considered one of the characteristics of the printer.
Patented multi-jet technology uses a multi-level nozzle array that allows multiple fluids to be applied simultaneously during the printing process. Due to this, the printing is of the highest quality, and the products are flexible and durable in all three dimensions.
INFORMATION! Multi Jet Fusion (MJF) technology delivers high strength and an order of magnitude higher detail than other 3D printing technologies. As an example, HP printed out a chain link that can withstand a load of up to 4.
5 tons. At the same time, the printing time was only 30 minutes with a layer thickness of 70 microns.
00 points and automatic temperature correction, which ensures uniform heating of the product and eliminates shrinkage.
Who will suit
The printer is too expensive and bulky for home use. The device is aimed at various industries, as well as small-scale production. It can be used to print souvenirs, prototypes and layouts for use in educational institutions, parts for cars, some household and electronic appliances, tools and accessories.
Modern polyamides such as PA 11 can be used to create shoe insoles and sporting goods. Other types of consumables allow the printer to print rigid cases and parts of tools, light and durable plastic products with increased flexibility, moisture resistance and resistance to aggressive chemicals (for example, kitchen utensils: spatulas, ladles, etc.).
What materials are used?
The printer creates products from powder thermoplastics, on which a binder is applied in layers. Its quantity can be adjusted and depends on the requirements for the quality and physical properties of the finished model.
As a consumable for the HP Jet Fusion 4200 printer, the manufacturer suggests using thermoplastics of its own production. The advantages of introducing their own materials are obvious: the company uses high-quality raw materials, carefully selects the composition and manufacturing technologies.
This results in finished models that are highly detailed, accurate, and durable, while reducing costs significantly.
Instructions for initial setup and preparation for operation
The printer is delivered assembled, but before you start you need to perform a few simple steps: install the software, correct the fusible lamp and prepare the device for printing.
The control panel is located on the front of the printer. To have extended access to printer settings, you need to install software on your computer - HP SmartStream 3D Build Manager and HP SmartStream 3D Command Center programs. Software download pages are listed in the user manual.
After activating and launching the program, click on the gear, then click "Manage Printers" > "Add Printer". Next, you need to create an HP PrintOS account and follow all further instructions on the monitor: after synchronization with the printer, you can proceed with the settings.
After installing the software, you can turn on the printer. To do this, you need to connect the network cable and plug it into the network and make sure that the device is working. This can be seen from the switched on breakers in the bottom two rows on the front of the printer on the right, as well as three green lights.
If the printer is OK, the platform and tray need to be adjusted. The calibration tray must be installed according to the printer model, but the setup process is the same for all devices.
Calibration requires the latest FW release (minimum required BD9) to be installed on the printer.
Next steps:
- place the tray on the assembly block platform as directed in the instructions for use;
- insert assembly block;
- on the front panel on the front of the printer, click on the gear icon, click "Maintenance Menu" > "Calibration of Fused Lamps with Calibration Tray" > "Adjust Calibration Tray Offset".
INFORMATION! The tray is inserted into the printer with the label facing down.
Next, the tray adjustment menu will appear as shown in the picture below.
Operate the UP (up) and DOWN (down) buttons to set the tray to the desired position. You can refer to the service kit leaflet. In case of an error, press BACK and repeat the procedure. After the calibration is completed, click OK.
Calibration instructions appear on the display, so all the necessary settings can be made without problems, even without experience. The main thing is to follow safety precautions and precautions so as not to damage printer parts and avoid injury. Calibration usually takes no more than 40 minutes.
Any desired settings can be made using the panel control: you can set the date and time, set an access password, adjust the speaker volume, select the units of measurement (imperial or metric) or restore the factory settings.
Software installation and tray calibration are the first necessary printer settings. The device can then be switched on:
- Set the main switch to the on position.
- Wait until the printer is ready to reboot message appears on the front panel.
- Visually inspect the printer.
- Press the blue reset button on the front left side of the printer. All printer subsystems with high power consumption will turn on.
- Wait for the front panel to indicate that the printer is ready. This may take several minutes. When initialization is complete, the message "Ready" will appear on the front panel.
If everything is correct, you can load the printing powder into the cartridge by following the instructions in the user manual.
Another breakthrough in the field of 3D printing was the emergence of devices using MJF technology. The consumables are polyamide powders with good physical properties, which produce strong, environmentally resistant, flexible and durable products.