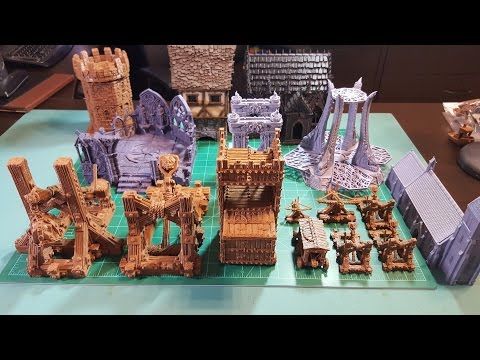
3D print landscape
How to print maps, terrains and landscapes on a 3D printer
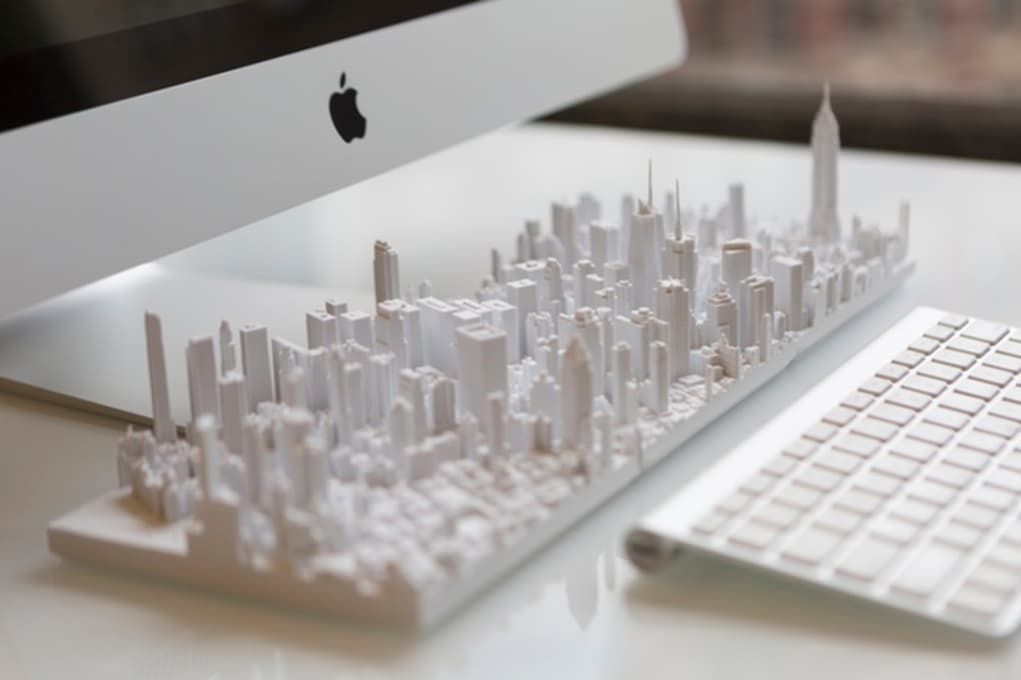
From time to time, every 3D printer owner is asked the same question: “Why is the printer really good and useful? I cannot imagine what would I use it for.” I did not find a satisfactory answer to this simple question at first, because I don’t consider printing figures and statues as the right example. That’s why every time the 3D printing technology is applied in practical use, I’m excited! Today, I’ll show you how to print a 3D map, that can serve in a number of situations not only using our Original Prusa i3 MK3 printer. How about a plastic model of terrain for school education, a small-scale version of a national park, a model that shows the overview of a real-world race track, or perhaps a tiny version of a mountain you climbed in the past. Thanks to these models, we can see the landscape from a bird’s eye view. Input data will be topographic maps that are most interesting for 3D printing purposes.
Models based on maps can be divided into two groups:
- Printing a terrain model – ideal for mountain ranges, volcanoes or abysses.
So where there are well-known elevations.
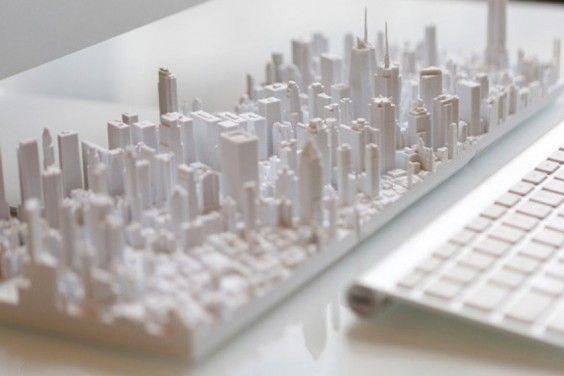
- Printing a terrain model including buildings – ideal for cities and areas with buildings.
Terrain models
A 3D terrain model (without buildings) can be obtained simply and for free with the Terrain2STL web application.
- Find a place on the map. Rugged terrain works the best.
- On the Location tab, press Center to View. This will show a selection rectangle on the map.
- On the Model Details tab, adjust the size of the selected area by moving the Box Size slider. The selection can be moved in the map. If the resulting model is very flat, it is possible to scale it on the Z axis. This is done in the Model Details by using the Vertical Scaling slider. However, keep in mind that the resulting model will differ from reality.
- On the Water and Base Settings tab, set the desired model base height.
- Press the Generate Model button. Then click the Download button and download the model.
Does a square or rectangular shape feel way too ordinary? Let’s take a look at how to work with some more complex shapes. Naturally, one of the basic ideas is to use borders of existing countries. For the sample print, I chose the Czech Republic – the home of Prusa Research. A good start is to successfully obtain the STL terrain model from the previous step. However, the disadvantage of the Terrain2STL application is that it is not possible to change the shape of the selection. So, if you want to work with a larger area, you will need to cut the STL model first using a 3D editor and then work with it. This is because the Tinkercad software we want to use limits the size of the imported file to 25MB. A better solution is to use a similar tool like Terrain2STL. The TouchTerrain project allows you to select any aspect ratio on the map. I recommend aligning the map, for example, in the upper left corner for a simpler placement of the shape for the cutout.
How to do it:
- Find and download the desired shape in .SVG format. Ideally, it should be on a white or transparent background. To make searching easier, I recommend adding the keyword “silhouette“.
- In a web browser, open the Tinkercad tool and sign in (or create a free account).
- Create a new design by pressing the Create new design button.
- Create a block (use the “Box” tool on the right) and change the dimensions so it stretches across the entire Workplane.
- Import the downloaded .SVG file with the shape using the Import button in the top right corner. When the import is complete, the image is automatically converted to a 3D object. Change the shape type to “Hole“.
- Click the object with the right mouse button and first adjust its height in the Z-axis so that it is higher than the block.
 Then, adjust the size of the model by dragging any corner to fit the block. To keep the aspect ratio hold the Shift key.
 - Now select both objects (Ctrl + A), group them with the Group button (Ctrl + G) and change to the “Hole” type. This creates a negative shape, which then cuts the terrain.
- Import the terrain model using the Import button in the top right corner and wait for it to finish.
- Adjust the size of the terrain model and place it in the right place in relation to the carved shape.
- Deselect the selection of objects by pressing the mouse outside the print area.
- Export the object using the Export button in the top right corner of the .STL format.
- The model is ready to be sliced, for example, in Slic3r, where it can be scaled in the Z-axis if needed for better terrain visualization.
Download link: The Czech Republic 3D terrain model on PrusaPrinters
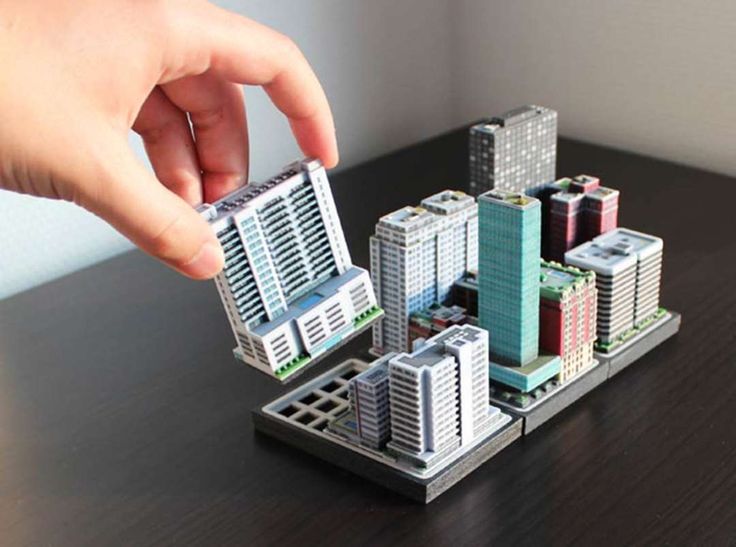
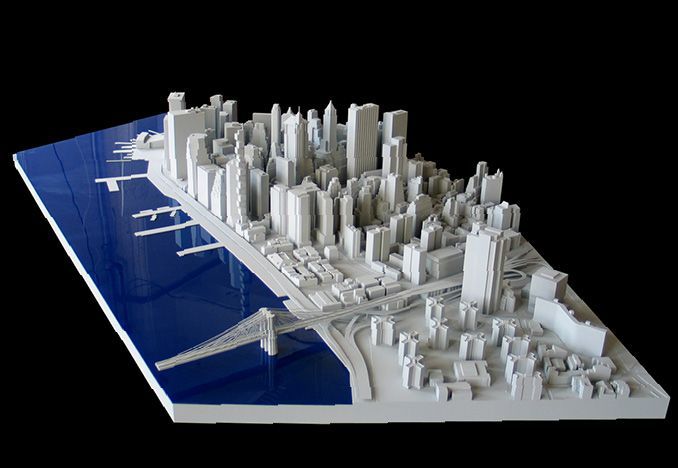
City model with terrainIn this case, the procedure is a little more complex than the terrain itself and more tools need to be used. To get the model, we use the CADMAPPER web tool, which uses freely available maps from OpenStreetMap as a source. The tool allows you to download a 3D model up to 1 km² area for free. Larger areas are paid. In most cases, 1 km² is perfectly fine. By covering the entire print area (25 x 21 cm), we get the ideal scale for the model (approximately 1: 4000 to 1: 5000).
- Open CADMAPPER tool in the browser and click Create a map.
- Select the desired area up to 1 km² (or larger and buy the model).
- Select the output format for SketchUp 2015+.
- Include Topography and 3D Buildings in the output model and choose the height of buildings for which the height in the map is not defined.
- Press the Create button to start generating.
- Press the Download button to download a generated zip file that contains the .SKP file.
The downloaded file is not yet fully prepared for slicing. What we need to do is to create an object under the terrain. In addition, we can simply change the height of buildings in this tool, especially those that have a default value from CADMAPPER. We will use SketchUp Pro for editing, which is free to download in the trial version.
Eneroth Terrain Volume extension is useful when you want to create a solid object under the terrain easily. Download this extension as well.
Add extensions using the Window -> Extension Manager. Press the Install Extension button and select the downloaded file from the previous step.
Now we have everything ready and we can start editing the model.
- Run SketchUp, open the downloaded file from CADMAPPER (File -> Open).
- On the right side of the application window, expand the Layers section and remove all layers except buildings, topography and Layer0. Press the “Delete content” icon. The content of the deleted layers is not easily printable, that’s why we’re deleting them.
 However, you can play around with the content of deleted layers and see if something interesting comes out of it – we won’t be using them in our guide, though.
 - Click anywhere on the terrain to select it. In the top menu of the app select Extensions menu -> Eneroth Terrain Volume. This creates a solid object under the terrain.
- If you want to change the height of the base or buildings, you must explode the model (select the whole model, right mouse button, Explode option), and then the Push / Pull tool to increase or decrease the height of the buildings or the base under the model.
- Export the model using File -> Export -> 3D Model.
The file is now ready for 3D printing. Open it in the Slic3r PE and adjust the size to fit the print area. For an area of 1 km², the approximately square shape of the model is reduced to about 20% of the original size. So we get the model on a scale of cca 1: 5000. We recommend a PLA material and a layer height 0. 15mm.
15mm.
1:5000
1:2500
1:1000
Download link: Prague Castle area on PrusaPrinters
Preparing the model for printing and correct orientationUse Slic3r PE or your favorite slicer tool to generate the gcode file.
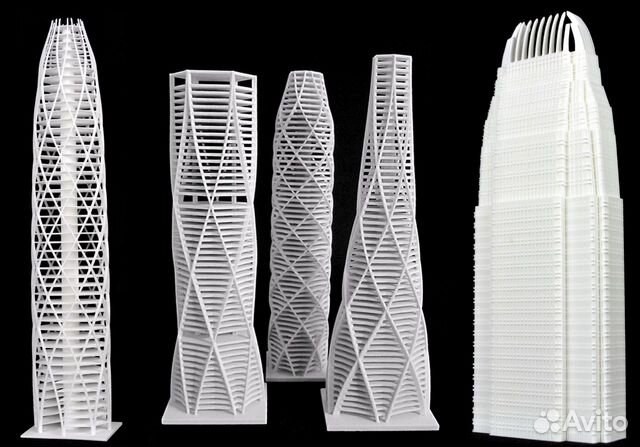
Terrain models with at least one straight edge can be printed in two ways, either horizontally or vertically. Each of these orientations has its pros and cons and for each model, it is necessary to decide which orientation to choose. Let’s look at the main differences.
The horizontal positionThis position is natural in the real world. In this position, we are able to print almost any model. In the Z-axis, however, we are limited by the height of the layer. The lowest height of the extruded material is about 0.05mm and the most commonly used nozzle diameter is 0.4mm. The relatively large diameter of the nozzle alone causes “drops” on the peaks. The nozzle diameter also affects edge sharpness.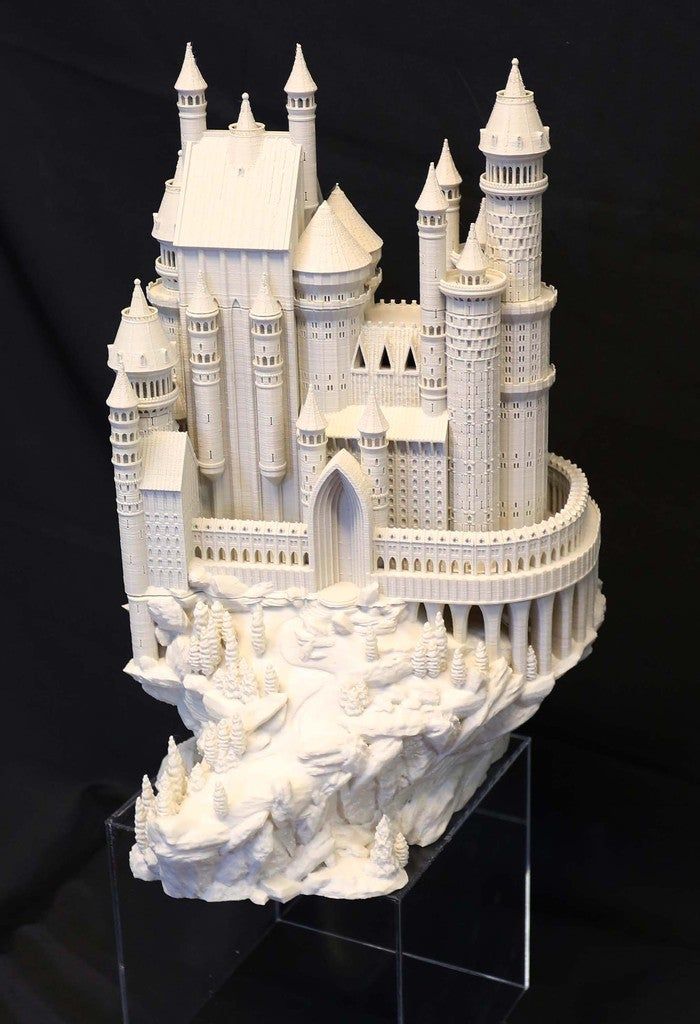
We recommend selecting a layer height of 0.15mm and a 15% to 20% infill.
Pros:
- you can print almost any model
- there are horizontal lines on the model that represent contour lines (some may consider this a con)
Cons:
- infill is necessary (longer printing time)
- drops on peaks
- there may be strings between the peaks/buildings
In the vertical position, the biggest advantage is that no “drops” of material on the peaks will be created, and the peaks will be smoother. This makes the surface more detailed and looks much better. The vertical orientation is suitable for models where there are no areas that make an angle with the print area less than about 45°. Supports for such models is not a solution we would recommend.
Vertical orientation is also not suitable for printing city-building models, because almost every building would have a perimeter wall parallel to the print surface and therefore the model would be non-printable without supports.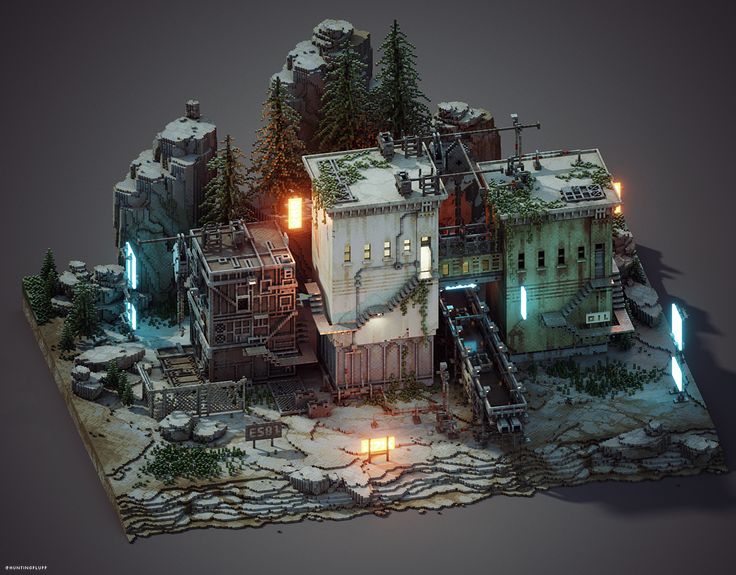
With vertical orientation, it is advisable to choose the most suitable area on which the model will be placed. Choose the one that will touch the bed with the largest possible area. Use the Place on the face button to rotate the model.
We recommend selecting a layer height of 0.15mm and a 0% infill. Infill is not needed in most cases. The printing time will be almost half and you save some material. For best results, use PLA filament.
Pros:
- print without support and infill
- there is no stringing between peaks
- the terrain looks smoother than the horizontal print position
Cons:
- can not be used to print city models
- there’s a chance that it will become loose and that the print will fail
The difference of print in horizontal and vertical orientation is shown in the pictures below.
Our tips for color models:
- Use ColorPrint to change the color of the filament depending on the altitude.
 Learn how to use ColorPrint in this article.
 - Print the model with a single filament and paint it afterward. It depends only on your imagination.
- If you already have Original Prusa Multi Material Upgrade 2.0, you can try to create a color model to distinguish terrain, buildings, waterways and roads.
Feel free to experiment, try various changes and edits, and don’t forget to share the results in our forum.
3d Printed Landscape - Etsy.de
Etsy is no longer supporting older versions of your web browser in order to ensure that user data remains secure. Please update to the latest version.
Take full advantage of our site features by enabling JavaScript.
Find something memorable, join a community doing good.
( 1,000+ relevant results, with Ads Sellers looking to grow their business and reach more interested buyers can use Etsy’s advertising platform to promote their items. You’ll see ad results based on factors like relevancy, and the amount sellers pay per click. Learn more. )
Best files for 3D printers
Passat B6 front jack cover
6 €
B6.
 2 Front hub housing support
 €4.50
AUDI A4 S4 RS4 B6 DOOR MIRROR
1.86 €
Volkswagen Passat B6 cup holder insert in tray
7€ -10% 6.30 €
Key ring for Volkswagen Passat B6
Free
VW Passat B6 | B7 speaker adapter 16.5
5 €
Audi b6/b7 4x52 mm gauge block
4.64 €
Trunk lock mechanism VOLKSWAGEN
9 €
Friction lining VW Passat B6 B7 sedan 3C0861597 3C0861598
20 €
40mm Imax B6AC+ fan adapter
Free
Seat gear Passat B6 / Seat gear Passat B6
Free
Bi-xenon retrofit Audi A4 B6
8 €
Splitter mount Team Associated SC6.
 1
1 3.36 €
Audi A4 b6 b7 52 mm pan mounting
20.84 €
Holder for Volkswagen / Passat B6/B7 Smartkey
1.86 €
Charger AAA, AA, A, C for Imax
Free
Pressure gauge holder Audi A4 B6 / B7
5 €
Silhouette VW Passat B6
0,50 €
Magsafe Retrofit for VW Passat B6 CC
10.05 €
Fan Mount Team Associated B6.3
Free
Audi A6 C5 A4 B6 Avant warning triangle compartment cover lever
0.50 €
Team Associated B6.3 Battery mount (elastic band)
Free
Audi A6
0. 60 €
60 €
Dashboard air vent audi A4 B6 2003
1.88 €
Body Mount Team Associated B6.3
Free
Ball diffuser
Free
AE B6 Wing brace
Free
Fuel tank belt Audi A4 B6
2 €
Gear Z14 (Satellite) Satellite Z 14 Volkswagen Passat Variant (B6)
2.78 €
Air Vent Gauge Pod, size 52mm, Fits Audi A4 B6 B7
10 €
Audi A4 B6/B7 front panel 1 din
2,50 €
VW Passat B6
0.52 €
VW Passat B6
0.71 €
Passat b6 privacy boot curtain
Free
VW VOLKSWAGEN PASSAT B6 3C INSTRUMENT PANEL
9 €
Audi A4 B6 B7 Sensor holder
9 €
Coins and Cup-Can-Bottle -holder for car
Free
VW Passat B6 middle compartment flash light holder
Free
RC stand
0. 84 €
84 €
imax b6 with fan and temperature sensor
Free
iMax B6 45deg. stand with M6 and DIN Rail (holder)
Free
3D painting on canvas 3d landscape № s16564 in ART-holst.com.ua
We will call you back as soon as possible
Painting
Comment
Grade
Name
e-mail (will not be displayed on the site)
Select a photo from your device
Download
Możesz przesłać zdjęcie w jednym z następujących formatów jpeg, jpg, png, gif. Rozmiar pliku nie może przekraczać 32 MB.
FAQ
We have collected questions that may arise during or after placing an order. If you did not find the answer, write to us or call us on
About our paintings
The price depends on the size of the painting and the options chosen. Prices for all available sizes of paintings can be seen in the product card.
The better the photo, the brighter and better the print will be. Our algorithm evaluates photo quality when uploading. If the photo is too small, we will write to you about it.
We sell paintings on a stretcher - a wooden frame on which the canvas is stretched. Such a picture does not have to be framed, it can be hung directly on the wall
Yes, upon request, we can make a picture without a frame. Specify in the comments when placing an order “I do not need a stretcher” or contact our manager.
We do not sell picture frames
To wrap the canvas on a stretcher and not lose part of the image, we use the mirrored part of the photo.
You can hang the picture on self-tapping screws. To do this, we add fasteners to our paintings, on which it will be convenient to hang a picture
Two types of material are available for order:
Synthetic is a dense material with a smooth, low grit surface. Canvas is a material that is as close as possible in texture to the canvases of professional artists. The image will be with soft color reproduction and a matte surface.
This is a cheaper version of the blade. It is more durable and resistant to moisture, but its surface does not have a pronounced relief, like Canvas
The thin weave of threads on this canvas makes its surface as similar as possible to the canvas of professional artists
For Premium printing, we use more expensive paints, which have deeper shades and fade resistance.
Any painting will lose its brightness in a few years. To make this happen as late as possible, we do not recommend hanging the painting in direct sunlight or in a damp room.
Varnishing adds an additional protective layer to the painting. The painting will be more resistant to minor damage, and a varnished painting can be wiped with a soft, slightly damp cloth.
Yes, you can add any text to your image in the picture builder.
The picture can be gently wiped with a dry soft cloth or sponge, it is not recommended to use wet products.
The use of a damp sponge is only permitted if the painting has been varnished.
The surface of our paintings is matte.
Lacquer gives a light satin finish.
The best photo is taken with a camera or phone.
Photo size 1 to 32 MB
At least one side of the image must be at least 1700 pixels.
Use ours if you can't decide on the size.
We wrap each painting with stretch film and pack it in a shipping carton.
You can also order a gift box for the painting.
All materials and paints that we use are completely safe for the health of people and pets.
Subframe thickness 2 cm. We send the tracking number to the e-mail that you specified in the order. Check your spam folder if you don't see our messages or email us at [email protected] .
After you have placed an order on our website, as a rule, within 2-3 days the order is made and sent for delivery.
After that, you will receive an email with a track number to track the status of your order on the New mail page . Please take into account the delivery time according to the delivery time of the carrier.
If we have exceeded the processing and delivery time of the order, please contact us by mail [email protected]
We deliver orders to all countries of the World, you can arrange delivery to any country except Russia and Belarus
In Ukraine we deliver orders by Nova Poshta, in Europe - by UPS courier delivery service.
Pickup not available during wartime.
Your order will be made and shipped within 1-3 days.
Delivery time - 2-7 working days
The cost of delivery is calculated according to the tariffs of Nova Poshta and depends on the size of the painting.
Link to tariffs of New mail
Payment for the order
On our website you can pay for the order via WayForPay:
Apple Pay
Google Pay
Payment by card details
Cash on delivery is currently unavailable
All online transactions are made over a secure internet connection and are encrypted during processing, we do not store your card details.
The promotional code is entered in the basket when placing an order.
Subscribe to the newsletter on our website. In the mailing list, we often send secret promotional codes for placing an order.
When placing an order, you can use only one promotional code.
If there are currently promotions or discounts on the site, they will work together with the use of a promotional code.
Exchanges and returns
Our exchange and returns policy can be found at this page .
Products of good quality, made to order of the Buyer, cannot be exchanged and are not subject to return, in accordance with the resolution of the Cabinet of Ministers of March 19, 1994 No.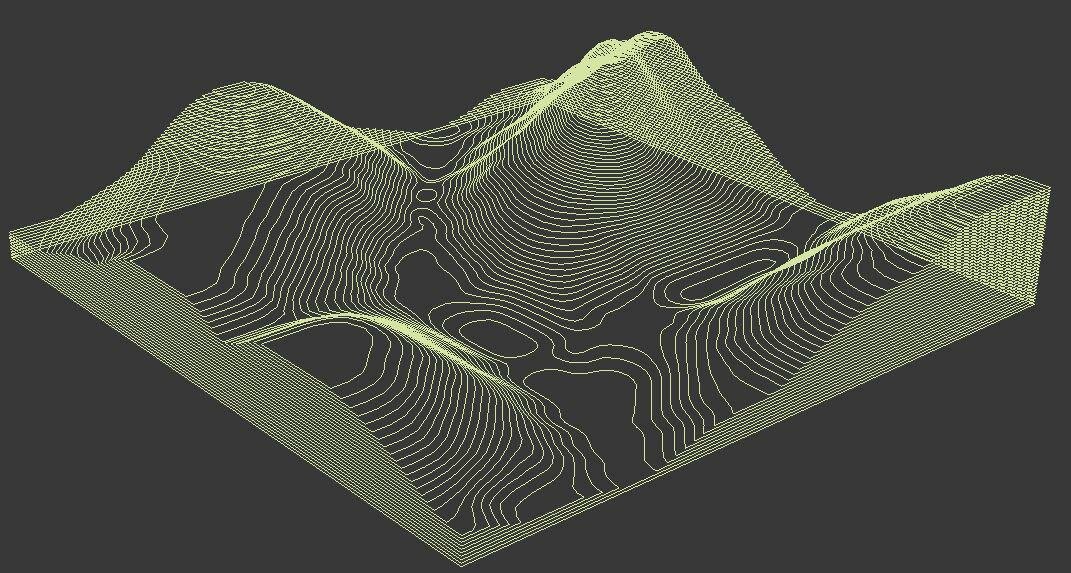 172 on the "List of goods of good quality that are not subject to exchange or return."
If you receive a product that is defective or damaged due to our fault, we can make a partial refund or produce the same painting free of charge.
You can exchange your order if you receive a defective or damaged item.
In this case, you must send the painting back to us. We will manufacture and send you a new one for free to replace the defective one.
Please remember that you have 14 days to return. After this period, the exchange is not possible.
Within 14 days after receiving the painting, you can exercise your right to an exchange. To do this, contact us by mail. Our manager will explain how to proceed in this case.
The following are considered defective:
- damaged or torn paintings;
- you have not received the image you ordered.
Attention: colors in the photo may vary slightly during printing.