Dual extruder 3d printer diy
Dual Extruder 3D Printer Built One Yourself
Dual Extruder 3D Printer: One of the most interesting and tough questions of the 3D printing world. Most of you have thought about this. We think that having a dual extruder 3d printer will solve our various problems. Problems like printing time, using two types of filaments at once, etc. So, here we are after testing and having to spend a reasonable amount of time, to guide you in the path of a dual extruder 3D printer.
Dual Extruder 3D Printer: Ways to do it.
There are mainly two ways to do this. First, you can make one yourself and second is that you can buy a pre-build dual extruder 3D printer. Well, the second one is obvious, thus we are not going to talk about it.
When our colleagues told us about an extraordinary off-the-self dual extruder kit it definitely took my interest. There is a company by the name of MAKERTECH which sells these dual extruders switching kits at the price of approximately 80 dollars. This kit uses a server to switch between both extruders.
It looked quite good so we ordered one, we have been working with it for few days. It has been working well but there were problems from time to time. There were few problems such as after installations few parts were broken. There was some bug in Merlin software and the calibration was non-ending we have to do it from time to time.
I can say one thing definitely that it is not for beginners or for peoples who don’t understand the working of the 3D printer inch-by-inch. They gave a pretty good instruction manual I’will give these instruction manuals a solid 9 out of 10.
So, now how would you know if your 3D Printer is suitable for this dual extruder addon. We have make a checklist to made it easier for you.
- 20×20 mm V slot gantry to suit the new carriage.
- Your 3D printer should have a large build volume, as using this extension takes on some printing space.
- It senses metal only so, the glass build surface won’t be any good.
- Mainboard with 5 stepper motor outputs.
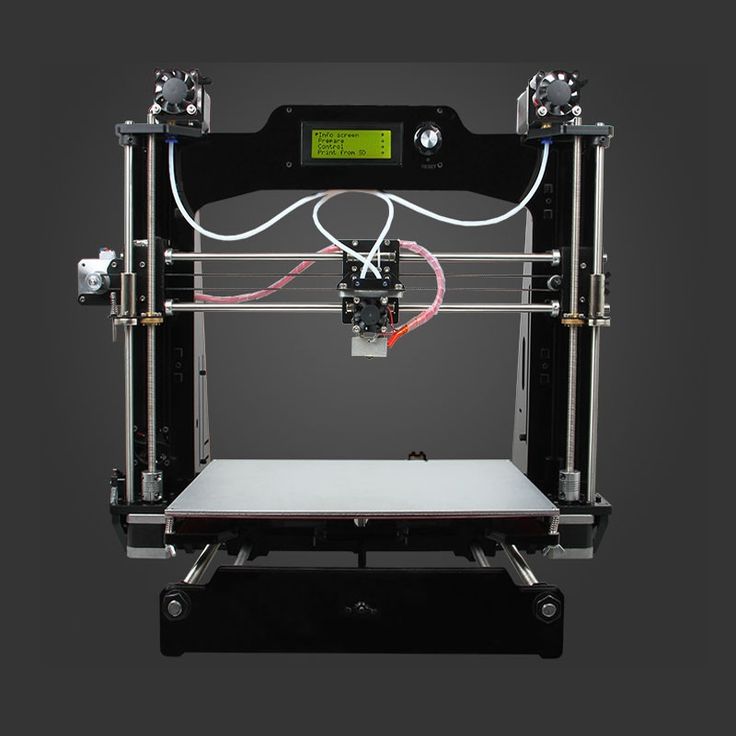
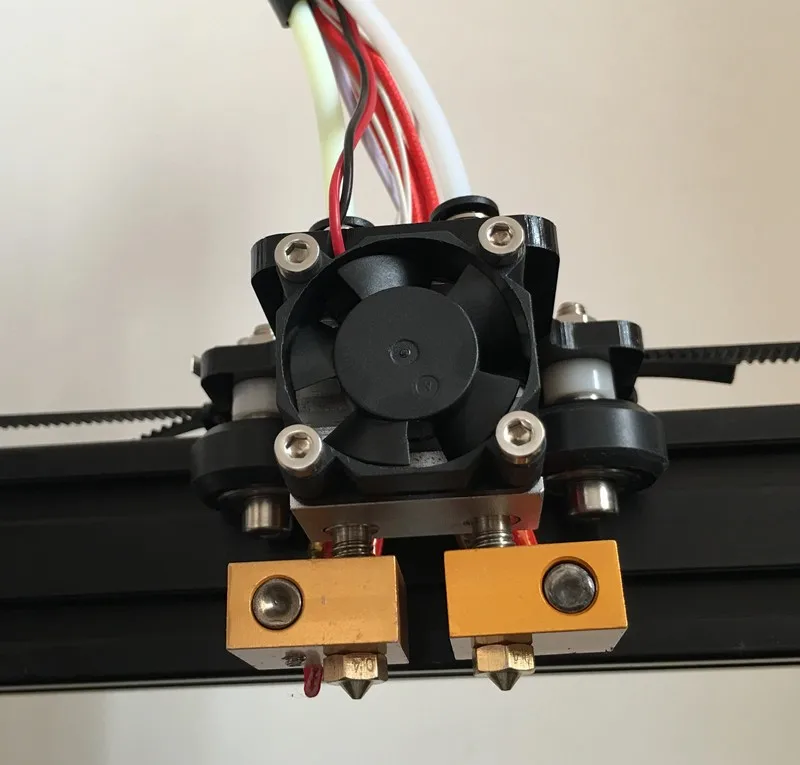
MAKERTECH Dual Extruder kit
Hardware assembly
The kit assumes that you already have one extruder and therefore comes with an additional extruder for you to fit in. Now the hot ends, come with E III D V6 clones.
This means they’re not all metal and the PTFE tube has to travel down inside all the way up to the top of the nozzle. We also noticed the included nozzles was 0.3 millimeter in the orifice. Each hot end assembles exactly the same as an e3d v6 and it wasn’t long until we had both of them together and ready for the printer.
Now for the main feature which is the mechanism for the switching extruders. We start with the servo that needs to fit in through the top, be careful not to damage the wiring. All of the mounting hardware is nicely labeled with correctly scaled images on the back for identification.
M4 nuts and bolts are used in each corner to hold the servo to the bracket. Next, we take the smaller bracket that holds the front cooling fan and we use more M4 nuts and bolts to attach it to the main plate. The two-part cooling blower fans can now be bolted to this assembly lock nuts are used throughout to stop the part from vibrating.
After this, the auto bed leveling sensor goes into the included hole. Now we prepare the bracket that holds the ooze shields and some PTFE tape is included to wrap around and coat the surface.
It’s time to open up and assemble the new carriage. Next, we have a pivoting bracket that holds the two hot ends which swivel on a thrust bearing and bolts to the main bracket. The hole for this seems fairly accessible but we fumbled for quite a while trying to get the washer and lock nut through the inside of the whole thing.
Electrical Assembly
We did our cable management for each of the two hot ends. By cable management, we mean that you need to make sure your cables are long enough to reach when it’s facing straight down, but not so long that the cables get caught when it’s wiggled out of the way.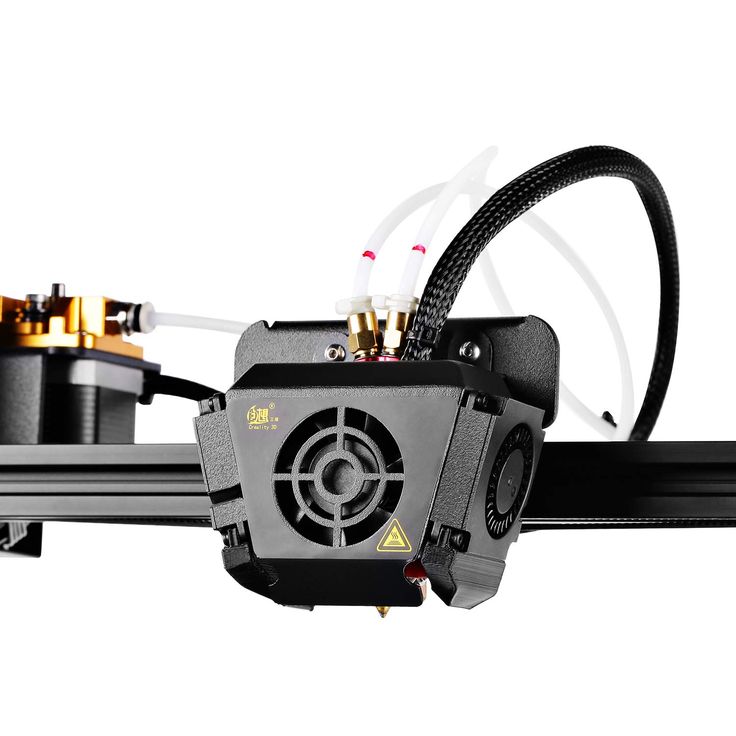 You’ll also need to provide a long enough path for all of the cables wrapped in some sort of sheathing to be secured elsewhere on the printer frame.
Now comes the more serious work the wiring. The wiring for this conversion is a big deal here are all the factory wires and then when we examine the new loom we can see that it’s exactly twice as big. You need to disassemble this box and then feed the old wiring out through the grommet. The old metal connector that used to go into the box for the hot end can no longer be used. There are not enough wires here for two hot ends so you’re going to need to come up with another solution. We used red and green heat shrink over each set of wires so we could tell which one went to the left and right extruder and hot end.
Below is our final wiring chart as per given instructions.
Preparing Dual Extruder for 1st Print
After flashing the firmware we can see that we now have two hot ends shown on the top-left of the LCD display. We can now install the little arm that switches between the two nozzles. Beyond this, there were a series of much simpler final steps like hot tighten nozzles, calibration steps, PID autotunes, spool holder, heat and load filament, and set probe z offset.
After doing all the necessary assembling we can now run a dual extrusion calibration model like the one available on their website. To download and see how close the fit is and tweak our numbers further from there. It took us a few goes to get it spot-on, but our final values were minus 20.2, 0.4, and minus 0.2.
Our final problem was that blobs were being deposited on the model despite the ooze shield. In the worst cases, these would knock the model clear when the next nozzle slammed into them. The instructions state you can bend the shields into place to make sure they’re sealing firmly but this had no effect.
We then noticed during printing that the blob was coming before the tool changes. So it had to be slicer-related MAKERTECH has a custom version of cura if you are using their printer which we were not.-kupit-v-soin-store.ru-1.png) In this case, we were using simplified 3d and we started with an inbuilt GTECH a 20M profile. We did things like removing the mixing extruder and then come to the g-code tab and input the correct build dimensions.
In this case, we were using simplified 3d and we started with an inbuilt GTECH a 20M profile. We did things like removing the mixing extruder and then come to the g-code tab and input the correct build dimensions.
But the real problem for us was in the scripts, for the tool change it doesn’t retract but then it tries to move to a new position and Prime before it actually gives the T1 or T0 command to perform the tool change. We ended up stripping out most of that so all it did was the tool change retract and then the T command to switch to the other tool. This completely fixes our problem with the blobs gone and the models no longer being dislodged.
Print Result
This model is very clean in terms of dual extrusion, and we didn’t even need a purge block. It’s satisfying to finally get this working but we’d be lying if we didn’t admit it was a nightmare at times apart from the broken servo and a BL sensor. We’re still a fan of this kit much of the problem solving we had to do was because this extra set wasn’t really intended for our printer.
But instead of a specific model, we’re just getting started on this because this setup has a lot of possibilities. You could have dual-color as we’ve seen here, you could have a big nozzle and a small nozzle, you could have multi-material maybe your PLA with the Flex you could print PLA on one extruder and dissolvable support material on another. You could even try the same material from two different nozzles at different temperatures like the foam filament.
Dual Extruder FAQ:-
How to upgrade 3d printer to dual extruder?
There are two methods to solve this. The first is to make another extruder kit by yourself which is a very hectic process, other is to assemble a prebuilt dual extruder kit on your 3D printer.
What are some common benefits of a Dual Extruder 3D printer?
Having a dual extruder 3D printer has many benefits over a single extruder 3D printer like you could print two types of material at once, print two colors of material, have different temperature settings for both the nozzles, etc.
How much a dual extruder 3D printing kit costs?
A prebuilt dual extruder 3D printing kit costs around $80 at most. We have personally used MAKERTECHs dual extruder kit which costs us around $75.
So that’s it for the dual extruder 3D printer, if you have any questions feel free to ask in the comments section below. If you liked our work then you could share it with your friends and subscribe to our newsletter. Comment your thoughts on this Dual extruder 3D printer kit by MAKERTECH in the comments section below.
How to Install a Dual Extruder on Your 3D Printer
By Talha Zahid
Bored of using a single color for your 3D Prints? Make those models a little more colorful using this dual extruder upgrade.
Image Credit: ESA/Wikimedia CommonsThe extruder is one of the most essential components of a 3D printer and is directly responsible for the quality and complexity of the 3D print. The idea behind a dual extruder system is to have a 3D printer capable of printing an object with two color schemes. Let’s take a look into how 3D printing extruders work before delving into the details of the dual extruder upgrade.
How Do 3D Printing Extruders Work?
The extruder is made up of two parts:
Cold End: The cold end consists of the stepper motor, gearing, spring-loaded idler to hold the filament, and PTFE tubing to guide the filament into the Hot End.
Hot End: The Hot End is the part where the filament is melted and extruded out of the nozzle. In a Bowden 3D printer extruder system, a filament feed tube inserts the filament directly into the heat break through the heat sink. The melted filament is then injected out of a nozzle.
The following paragraphs will guide us on how to upgrade a single extruder system to a dual Bowden extruder system by adding an extruder motor and a mixing hot-end for the filaments. The modification will give us the ability to be able to use two filaments and print unique objects with dual-color schemes.
Related: Transform Your Cheap 3D Printer Into a Maker’s Dream
What Do You Need to Start the Upgrade?
You need the following components for the modification.
- Spool Holder: For the second filament you would require an additional spool holder.
- Stepper Motor: This additional stepper motor will be used as part of the extruder assembly for feeding the second filament. To connect the stepper motor to the control board, a stepper motor driver is also needed.
- Extruder: An extruder assembly similar to the original extruder is needed to go with the stepper motor since the firmware requires both the extruders to have the same e-steps.
- Hot End: The hot-end for the modification used here is the BIGTREETECH Mixed Color 2 In 1 Out Hotend Dual Extruder kit.
 The hot-end kit comes with a thermistor, cooling fan, and PTFE tube.
- Control Board: The control board on most 3D Printers comes with four stepper motor slots. To install the extra stepper motor, an additional slot on the control board is required. BIGTREETECH SKR Pro v1.2 is our choice of control board for this upgrade but any control board with five stepper motor driver slots is suitable for the modification.
How to Set Up a Dual Extruder
The upgrade requires the following modifications to be made to the hardware, electronics, firmware, and slicer program.
Hardware Modification
Spool holder
The additional spool holder can either be printed according to the frame specifications of the 3D printer by using models available on Thingiverse or a universal spool holder can be bought online. The assembly of the spool holder is fairly simple and requires a bracket screwed to the frame on which the spool is mounted or bolted.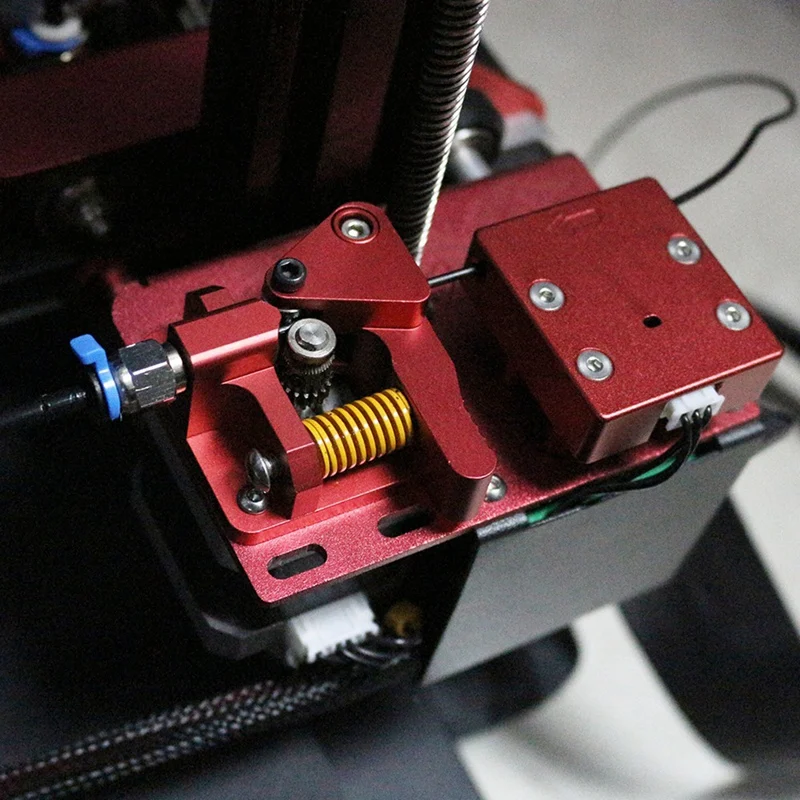 One tip to keep both the spools working efficiently is to position them parallel to mirror each other.
Extruder and stepper motor
The extruder assembly is attached to the stepper motor and is mounted on top of the frame using an extruder mount bracket. Thingiverse provides some great bracket designs for different 3D printers which can also be customized according to requirements. The extruder motor assembly should be similar to the default extruder and positioned similarly on the frame.
Image Credit: KerseyFabrications/Thingiverse.comHot-end
The default hot end of the 3D printer is to be replaced by The BIGTREETECH Mixed Color 2 Into 1 hot end. The assembly requires the hot end mount bracket, which can be downloaded from here. The fan is screwed onto the hot-end and the thermistor wire is connected from the hot end to the controller board. The PTFE tube is then coupled from the extruder to the hot-end.
Electronics Modification
Control Board
As we require a controller with five stepper motor drivers, we will replace our existing board with BIGTREETECH SKR Pro v1. 2 if the default board has only four stepper motor driver slots. Wiring from the extruder-stepper motor assembly will be connected to the control board in the fifth slot. If you are unfamiliar with how to set up a controller board, we will be covering that in detail in the future.
Firmware Modification
Marlin is the most compatible firmware for 3D printers and supports a wide variety of controller boards. The firmware configuration is fairly simple and requires only the following changes to be made to the Marlin firmware configuration.h file. The files can simply be opened using a visual studio code and the following changes are to be made:
In configuration.h:
#define MIXING_EXTRUDER (Uncomment)
#define MIXING_STEPPERS 2 (Set to 2)
#define GRADIENT MIX (Uncomment)
#E1_DRIVER_TYPE (Uncomment and set to match the stepper motor driver being used)
Check the direction of both the extruders is the same:
#define INVERT_E0_DIR true
#define INVERT_E1_DIR true
Check the current and micro-steps for the extruders:
#define E0_CURRENT
#define E0_MICROSTEPS
#define E1_CURRENT
#define E1_MICROSTEPS
After the firmware is updated, we can do a PID autotune on the new Hot-end end. This can be done by the console or if the 3D printer has an LCD interface, there is an option for PID autotune where you can set the value for the desired temperature and the number of cycles for the PID tuning.
Slicer Modification
The slicer software we will be using for our modified printer is Cura but the upgrade is compatible with all slicing softwares with minor changes in the setup. In Cura, we simply go to settings and add a 3D printer. After the printer is added go to machine settings and put in all the values for the printer dimensions. Change the number of extruders to two and then configure each extruder individually. Finally, import a dual-color model from Thingiverse and start printing with the upgraded 3D printer.
Try a Dual Extruder Today
The dual extruder upgrade is a detailed modification and requires an intermediate level of understanding of working with 3D printers. It is a great learning experience for users interested in upgrading their 3D printers and are willing to spend some time tweaking their printer settings.
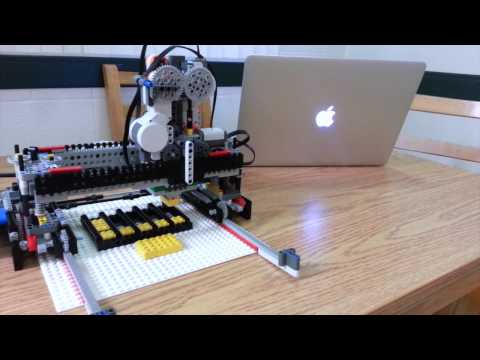
Homemade Dual Extruder (Hotend)
3D Printing
I wanted to try printing with two types of fishing line at the same time for a long time. There really wasn't much of a need.
So I didn't want to just hang two E3D type extruders, although there were three of them in stock.
Just to experiment, I decided to try to make a homemade Doublehead, especially since there was almost everything for this.
A reserve of consumables is needed in any business. And it so happened that five extruder parts are not much more expensive than two (if you know where to get it).
However, the aluminum part had to be specially ordered from Makerbot. True, it also has a 6mm hole, so the threaded tube from the E3D entered it like a native.
In addition, with the power of his crooked hands, an analogue of this part was created from improvised means.
So, let's start assembling.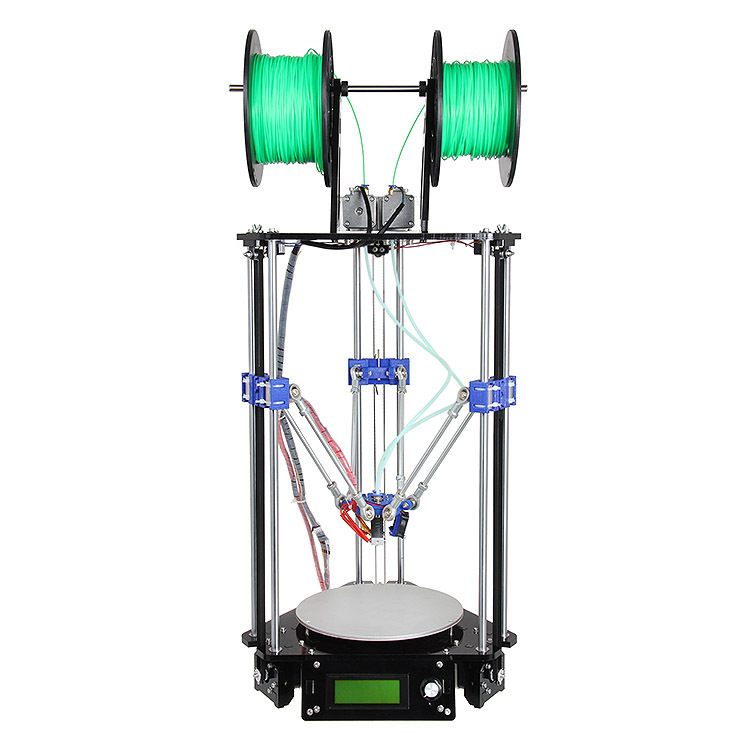
1. Screw the stainless steel tube into the workpiece:
2. Screw on the heating block with nozzle
At this stage, you can see that I drilled a crooked hole in the black part. But I think it's acceptable. As auto mechanics say: it does not affect speed.
3. Mount the mount for the line feed tube.
Actually, I bought two of these crap in household goods, but managed to break one. It was the fact that I bought them that became the decisive point that prompted the assembly. I couldn't figure out how to attach the line feed tubes to the Doublehead. This simple detail removed all questions
4. Fixing the line feeding tube
That's all. Field tests will be carried out in the near future. Still, the truth remains to attach an aluminum radiator to the bar. But these are trifles.
The only advantage of this design is the price. It is much lower than the purchase of such a finished product. If we compare the benefits of using such a system with using 2 E3Ds, then it will be easier to adjust the location of the nozzles so that they are at the same level. You can also get by with one radiator cooling fan.
That's all for now.
Follow author
Follow
Don't want
9
More interesting articles
Loading
10/16/2022
2280
9
Subscribe to the author
Subscribe
Don't want
Hello my friend! Today I decided to assemble a simple pneumohydraulic generator or Generator ...
Read more
Dima_pb
Loading
04.02.2016
74904
157
Subscribe to the author
Subscribe
Don't want to
Everyone knows about the rollback, but few understand where to start to manage it properly. ...
...
Read more
dagov
Loading
08/09/2018
34870
157
Subscribe author
Subscribe
Don't want
.
RepRap
Subscribe author
Subscribe
Don't want
69
Before that, I made and tested a double extruder of the "rocker" type. I also used a 'Y' extruder before. As you know, each of these extruders has its pros and cons. As a rule, 'Y' extruders have a large consumption of plastic and time, and "rocker" - a loss of printed volume. Then I thought about combining these two types into one, or rather their positive aspects. And so the 'revolver' type extruder was born.
Its uniqueness is that it allows you to print with two plastics from different nozzles, but the nozzles are positioned after switching at one point and the printed volume is not lost. Also, the unused nozzle rises, which prevents the model from touching.
In this type of extruder, it was possible to achieve better repeatability compared to the same "rocker". It is easier to maintain it, for its seemingly large dimensions, it actually takes up less space. The locking system I invented eliminates false switching, everything is securely locked.
This prototype does not yet have enough shutters to cover the unused nozzle, but it is quite suitable for printing in this condition. There are still a few mechanic modifications to come and more printing tests to come.
As they say, there is no limit to perfection and flight of fancy!
Well, a few photos of the printout.
Subscribe to the author
Subscribe
Don't want
69
Article comments
More interesting articles
Am0k
Loading
05. 10.2022
4998
59
Follow author
Follow
Don't want
Read more
E_ri_C
Loading
07.10.2022
2025
5
Follow the author
Subscribe
Don't want
Good day!
I'll probably start writing about building a new printer...
Read more
F32
Loading
09/08/2021
11369
168
Subscribe to the author
Subscribe
Don't want
Hello everyone! I give drawings with source codes of one more of my printers.