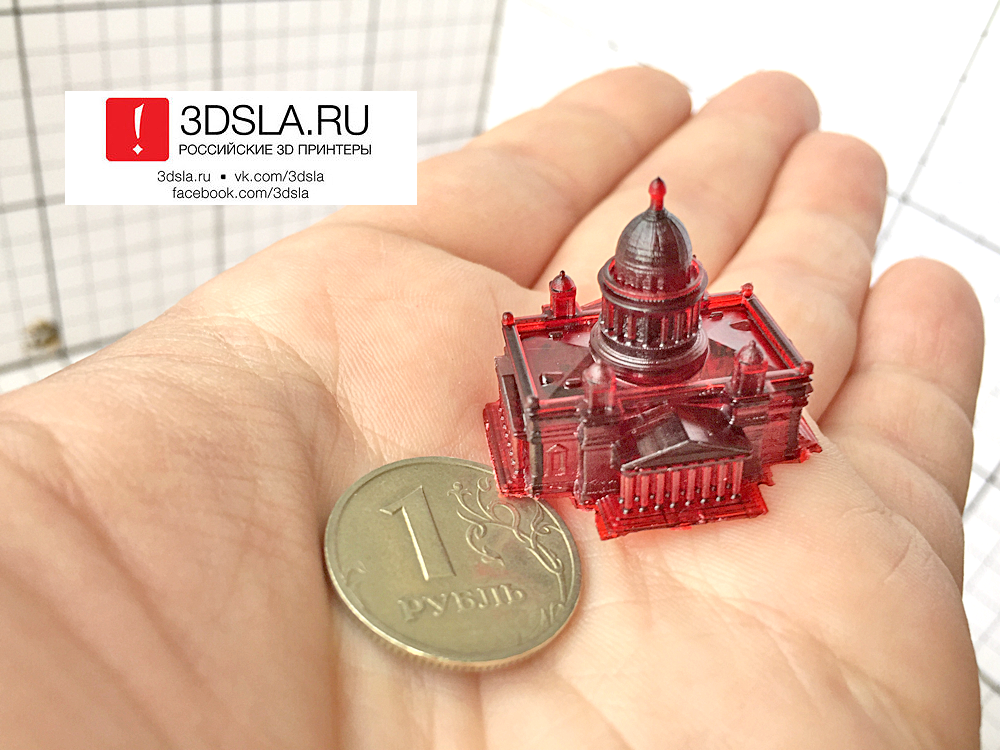
Cost per cubic inch 3d printing
How Much Does 3D Printing Cost?
There are several variables that contribute to the cost of 3D printing, including print time, the type of material used, and post-processing labor. Many 3D printing service companies will bill based on an hourly rate, while others may bill according to cubic inches or a combination of both.
For sake of clarity, this article will discuss 3D printing cost factors as they pertain to the industrial level. Below, we will discuss how the print time, type of material, and post-processing labor factor in to the cost of a 3D printed part.
Print Time
Many factors influence the time it takes to complete a 3D print. These factors primarily stem from the part’s design specifications, including its complexity, overall size, layer height, and resolution. Below, we’ll discuss what these elements are and how they can affect the build time:
Complexity
The complexity of a part’s geometry largely determines the shape of the cross-sectional layers that the 3D printer uses to create the part. If the layers are simple, such as single-island layers for a cube, the printer can complete them quickly. However, where there are small features, the printer will have to stop, move to the next location where the material continues, and start again. This creates islands that the printer must form boundaries for before continuing. Furthermore, some 3D printing technologies utilize support material for complex designs, and creating a layer made up of both model material and support material will take longer than a layer composed of only model material.
Overall Size
A part’s size can shorten or extend the print time drastically. Every 3D printer has a point of origin where the print head nozzle, laser, or light beam starts each layer. A large part requires this print head to move a farther distance from its starting point and, thus, the layer takes longer to complete than a part with a smaller footprint. Tall parts are also often time consuming because they require more layers to build them. For small parts, however, the printer can move through layer creation rapidly because the print head requires less movement from its starting position.
Z Height
In addition to overall size, your chosen Z height, or layer height, is an indicator of how long it will take to print your part. Every 3D printer will produce your part’s layers with a specified height so that all the layers are uniform in thickness. Thicker layers will allow the part to be printed more quickly than it would with thinner layers. However, thinner layers may be desired for a higher quality appearance in the part.
Resolution
A part’s quality, which is affected by the 3D printer’s resolution, is also worth considering when calculating print time. Resolution is primarily determined by the layer height used by the 3D printer, which can be adjusted for a finer resolution as desired. It is important to note, however, that a finer resolution will mean more layers, which means more time to print your part.
Furthermore, you may note that if you are planning to produce your part with a Fused Deposition Modelling (FDM) 3D printer you will also need to account for infill influencing your part’s build time. FDM printers come with automatic settings to control your part’s infill, and it may be crucial to determine which infill will best suit your part’s application requirements while still accounting for time lost or gained from the selection.
Material
In addition to how much material you are using, your cost will also depend on what type of material you select. The majority of 3D printing materials can be categorized as one of four types: thermoplastics, photopolymers, polymers, and metals. Cost will fluctuate based on the specific material and the manufacturer, but for the most part, the estimates below are what you can expect each type of material to cost.
For these cost estimates, we are using numbers for raw materials only. A 3D printing service company will typically mark up costs 2-3 times these amounts, which you should factor into your total cost if producing via that route.
Thermoplastics
Thermoplastics are rigid, widely used materials that must be melted prior to extrusion. They are used in FDM 3D printers, which is the most common type of 3D printing. Because they are so commonly used, the cost of these materials is one of the lowest available. The average cost for thermoplastic model filament will range from $3.50 to $7.50 per cubic inch. Because FDM printers require the use of support material, it is necessary to include the cost of support material filament, which will cost around the same as model filament. However, only a fraction of the part’s overall volume will be comprised of this support material.
Photopolymers
Photopolymers are liquid resin thermosets that must be cured by UV light. They are used in PolyJet, MultiJet, and Stereolithography (SLA) 3D printers. Photopolymer model material will run $0.32 to $0.36 per gram, and support material may be between $0.11 and $0.21 per gram. This cost is based on the fact that photopolymer resins are made for these specific 3D printing processes and are not as widely used as thermoplastics. Keep in mind that SLA uses the model material for support structures and, therefore, will not need any additional support material to be purchased.
Polymers
Polymers are similar to thermoplastics, but they exist in a fine powdered state and are sintered together via a laser with Selective Laser Sintering (SLS). This powdered material is very cheap, costing around $0.10 per gram. Due to the nature of the SLS process supporting the parts with a type of powder “cake” of unsintered material, other support material is not needed.
Metals
Metal 3D printing materials are essentially the same as polymers in that they exist in a powdered form and are melted together via a laser with Direct Metal Laser Sintering (DMLS). However, metal material is highly expensive, reaching around $0.60 per gram. Additionally, even though the DMLS printing process forms a powder cake like that of SLS, support structures are needed because metal is more dense than plastic.
Post-Processing Labor
After a print is done, the part will still have to go through more steps to make it ready to use. Some of these steps, such as the removal of support material, washing, sandblasting, sanding, drying, and gluing, will be mandatory for some parts and will not cost any extra fee. However, most all add-on steps, such as priming, dyeing, painting, coating, and more, will require extra time and manual labor to complete the part, which will factor into and result in a higher total cost.
3D Printing at 3 Space
Here at 3 Space, we aim to provide quality 3D printing services at an affordable price. Our expert engineers are happy to help advise you in how to get the best bang for your buck. For a personalized quote, contact us today.
How Determine 3D Printing Cost Accurately For Your Designs?
It was reinforced into our brains that 3D printing technology is ‘economical mass manufacturing’ tool and a splendid technology that can be used by startups to integrate with a creative idea. But do you really think it is economical when it is not used for ‘mass production use’ and merely used for printing small objects?
Is it really monetarily beneficial for the long run use and worth the hefty investment? Initially when people were made aware of this technology, everyone wanted to get their hands on a 3D printer and just start printing things, be it a pencil stand, a vase or a phone case.
But with time people have started questioning whether the actual ‘economic’ aspect of using a 3D printer is true or not.
If you are a businessman already into the whole 3D printing thing, you might just go ahead and press ‘print’ without thinking too much, but if you are thinking of buying a 3D printer for your office or home or if you are just starting out with the 3D printer trend that is viral right now, you would want to know the cost effectiveness that a 3D printer has.
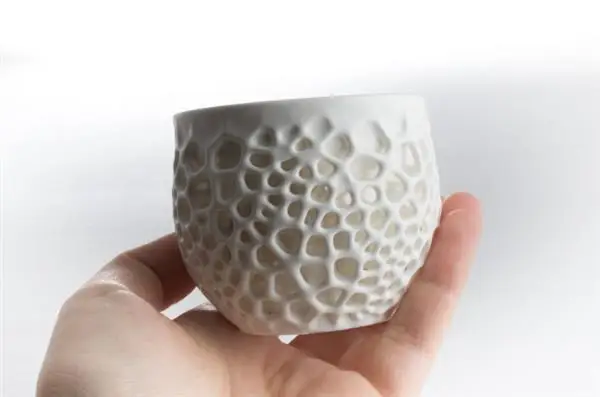
Let’s take an example of a 3D Printed Cup!
3d printed cup – how much does it cost to 3d print a cup
To get the idea from the start, 3D printing cost for even a cubic inch of any material is expensive. Starting off to calculate the cost required to 3D print anything small or large you need to keep a check on the following factors:
- Design of the Prototype. You need to have a CAD design of the prototype you want to 3D print before you can start estimating the cost that you will incur to actually 3D print it.
- Type of material to be used. Cost of 3D printing material tends to be different. In order to chalk out the cost, you need to be sure which material you want to use to 3D print your object.
- Type of technology that you will use. Even though this again has many counterparts to look into depending on your situation, you need to be sure of you are 3D printing it yourself, or outsourcing the 3D print, how is the service being charged, what type of technology is being used, what is the filament cost that is being calculated etc.
3D printing cost in India
In India, the general equation that is used by most of the 3D printing service providers is this
Startup cost(your time) + print time(electric_cost) + filament_cost*markup(profit) + average_maintenance cost_hours_of_run time_until_maintenance/hours of run time = asking_price.
Some companies charge on the basis of the weight of the design, some charge on the basis of per hour prototypes printed, some charge on the basis of per prototype printed, and so on the cost calculation of every service provider differs. But just to give an overview lets see how much does it cost to 3D print a cup.
As we know 1 customary cup size = 14.437 cubic inches.
(Please note this formula will give you an approximate costing which might deviate as much as 50%)
Step 1: Calculate the Bounding Box.
As mentioned most 3D printers, use some key parameters like bounding box, layer thickness, the orientation of the part, infill percentage, consumed material, support material etc. to calculate the costing of the part. To calculate the approximate costing, we can consider only the bounding box of the part.
Imagine the bounding box of your design in centimetres. (Generally speaking, 3D printing should be used for smaller parts) For instance consider this part which is 10 x 5 x 6 cms = 300 cubic centimetre, which is approximately 18.31 cubic inch. Which infers to approximately 1.268 customary cup size.
Step 2: Assume the actual consumed material percentage
Now, you need to think of the actual consumed material volume i. e. how much percentage of the total bounding box will be the actual consumed material.
For instance, here we are taking a customary cup size which tends to be 14.43 cubic inch.
Think of it like this: Imagine you want to 3D print a cube of the bounding box (shown below) 2 cms x 2 cms x 2 cms that will have a volume of 8 cubic centimetres or 0.49 cubic inch.
But imagine if we make it hollow with a wall thickness of 1 mm, the actual consumed material volume will be 2 cubic centimetre/ 0.122 cubic inch (approx.). So your actual consumed material percentage is 25%.
Be diligent as much as possible while assuming this percentage. IT WILL AFFECT THE COSTING SIGNIFICANTLY.
Step 3: Assuming Material Cost
To keep it simple, consider the rate of 3D printing to be INR 100 / cubic centimetre or approx. INR 1638 / cubic inch.
Which means for 1 customary cup (ie. 14.43 cubic inch) the cost is approx. INR 23,636.34. (I am assuming this cost to obtain a decent quality prototype. You will find companies quoting as low as INR 5 / cubic centimetre to INR 400 / cubic centimetre depending on quality, material, precision, timelines etc).
This price is deduced by calculating the average of all the prototypes that we did.
Step 4: The Cost
You must have figured out what needs to be done in step 4. If in case you haven’t, simply multiple Step 1 x Step 2 x Step 3.
In the above example: Approx. costing = 300 x 0.2 x 100 = INR 6,000/-
Again, this cost can vary as much as +/- 50% in cases. But for the standard quality prototype, that is the price.
There are now calculators available that enable you to calculate the cost of prototypes much easily. It provides calculations with regard to weight, volume, the material used, printer power consumed, electricity consumed, etc. Check out more information on how to calculate the cost of running a 3D printer, cost of materials- cost compare and how much to charge
Well, there is an easier way to calculate your 3D Printing Cost |
For more details on what factor 3D Printing cost is dependent on visit https://www. chizel.io/3d-printing/pricing
Upload your part here to get instant cost for your design using our cloud platform https://www.chizel.io/upload
M3D Micro
3D printer overview TheM3D Micro is a budget 3D printer with a small workspace. This model has a simple but pleasant design, it works quite quietly. From the very beginning, I would like to note the presence of an automatic calibration system for the printing table - this is a huge plus. There are also disadvantages. For example, the print speed is low, the surface of the model is not very high quality and requires additional processing if you want to bring it to the ideal. It's a strange decision not to cover the working area with acrylic, because there is a frame... However, given that the price for it is about $250, these shortcomings can be neglected. nine0003
Construction of the M3D Micro
I don't want to impose a personal opinion, but the M3D Micro is really nice to look at. This is a small 3D printer in a 7.3 inch plastic frame. The model used to write this review was blue, but black, white, green, orange, silver are also available.
Only the filament feed tube is exposed, which extends beyond the body and hides behind the back of the frame. On the front of the case is an LED M3D logo that lights up when the 3D printer is turned on. There are no buttons on the printer itself, you control the printing process from a personal computer via USB, the port for which is provided on the back of the frame. nine0003
Inside the frame is the 3D printer mechanism itself, which consists of several screws and belt drives. The print head moves in all directions: left and right, up and down, forward and backward. The print table is made of a textured plastic called BuildTak, so there will be no problem with the adhesion of the first layers. The table can be replaced.
Considering the dimensions of the M3D Micro, the maximum print size is impressive: 4. 2 x 4.4 x 4.6 inches, that is 86 cubic inches! In this case, each of the sides of the cube of the body is 7 inches. This is certainly less than printers like Polar 3D (which works in the polar coordinate system and reaches 400 cubic inches) or LulzBot Mini (223 cubic inches), but still enough to print many useful and simply beautiful 3D models. . nine0003
M3D Micro 3D Printing Materials
M3D Micro uses a special 5" filament drum called 3D Ink. These drums are supplied by the company itself. Drum prices range from $14 (PLA and ABS) to $28 (special ABS plastics that change color depending on the temperature of the 3D printer's print head). That is, 1 kilogram of plastic will cost from $56 to $112, which is slightly more expensive than most 3D printing materials that are available in online stores. nine0003
Fortunately, everything is not as sad as it might seem at first glance. Micro works with 1.75 mm materials from any manufacturer. The only thing you will have to figure out is how to install a larger reel. Most likely, it can simply be placed next to the printer. Everything will not look so refined and aesthetically pleasing compared to the original version, when the material is hidden in a case under the table, but this will not affect the quality of 3D printing.
With a heated bed, the M3D Micro can print on a wide range of materials including PLA, ABS, nylon and more. During the tests, PLA and ABS were used. The result of printing with PLA plastic was better. It was with 3D printing with PLA plastic that it was possible to make models that covered most of the table and at the same time gripped perfectly with it. ABS, of course, behaved worse. If the area of the first layer exceeded a few square inches, the material began to come off the table as it cooled. nine0003
Setting up the M3D Micro
3D printer In fact, setting up the M3D Micro is to take it out of the box, remove the protective films, plastic, install the supplied software on your Mac or PC, turn on the power and connect the USB cable.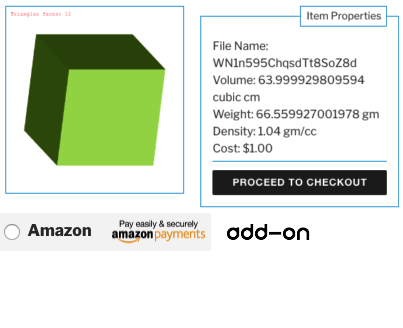 Our 3D printer came with a reel of PLA filament and was ready to print.
All I had to do was start the automatic calibration process in the M3D application. As a result, the print head is positioned exactly in relation to the print table. Very handy and useful feature. Those who have, for example, Anet A8, know how painful the manual process of calibrating a 3D printer table can be. nine0003
M3D Micro control software
The M3D Micro is only controlled by the supplied application. The application can be downloaded for free on Mac or Windows. There is no mobile version or app for a smartphone / tablet, as a USB cable is required for connection.
The program is easy to use. There are several options for loading a 3D model or reloading recently used ones. After loading the model, you will see a print preview with the ability to move, scale and rotate the model. There is no way to create a new model or modify an existing one. To do this, you will need a separate program. nine0003
Once the model is ready, press "print" and the program will process the model and start 3D printing. You have several options to control the 3D printing process: you can define the print quality and the fullness of the 3D model. More detailed settings, including adding support material, are available in the More Options section. But these possibilities are still quite limited. For example, you will not be able to select the number of calipers or specify the type of filling. It's a pity, as these two options, when properly matched, can provide better quality as well as speed up the 3D printing process. nine0003
3D printing process on M3D Micro
While the 3D printing process is in progress, a simple dialog box displays percentages. There is no information about how much time is left until the end of 3D printing, and a preliminary estimate of the time before starting work was too "optimistic". According to preliminary estimates, printing was supposed to take 16 hours, but in practice it lasted 25 hours. While 3D printing is in progress, you cannot use the program: it must continue to work in the same mode until the end of printing. nine0003
M3D Micro is quiet. You will only hear a slight hum from the cooler and motors. Since the frame of the printer is not closed, you will feel fumes. So do not get carried away printing ABS plastic in a poorly ventilated area.
There were several failed tests. In particular, there were problems with the nozzle, which was clogged or the motor did not supply enough material, and the print head still continued to move. This happened rarely and in general the model was not damaged, but it is very unpleasant when 3D printing lasts 24 hours and because of such a trifle it may not be printed. nine0003
Most 3D printers use a heated bed to improve material adhesion. This is not the case with the M3D Micro. A BuildTalk table is used here as an analogue of heating, which, unfortunately, does not perform very well during 3D printing with ABS plastics with a large contact area of the first layer. So blue tape or a solution of ABS plastic in acetone will come in handy. True, here, too, not everything is as smooth as we would like. Residual melted coating can get under the table onto the material spool or the mechanism itself. In general, there are some disadvantages. nine0003
3D print speed M3D Micro
The M3D is a very, very slow 3D printer. We have tested on standard models with standard settings and can summarize that the M3D is one of the slowest 3D printers we have ever encountered.
It took 14 hours and 54 minutes to 3D print a Thinker PLA model with low quality settings (layer height 0.3 mm). The high quality version (layer height 0.1 mm) took 25 hours and 34 minutes to print. This is twice as long as, for example, Polar 3D, which took 5 hours and 19minutes for draft 3D printing and 6 hours 51 minutes for 3D printing at medium quality settings.
3D print quality M3D Micro
The print result on M3D Micro is decent, but there is an obvious, recurring flaw: threads of material remain on the model when the nozzle changes direction (this is especially noticeable on the side surfaces of finished products). To test the possibilities of reproducing sharp and right angles, a three-dimensional star model was used. The result is good: even at medium settings, almost perfect angles and minimal layer shifts were obtained. However, this model also shows material residues when changing direction. In principle, the disadvantage is not critical and can be easily corrected by minimal surface processing of the model. nine0003
I would like to note once again that the Thinker model showed the strengths of M3D. The model has a large number of smooth transitions and smoothed corners, which show how well the 3D printer works out the given coordinates and how the melted material is applied. The enlarged photo below shows that the quality is good.
Conclusions
The M3D Micro is a nice little 3D printer that has a lot of positives. Good, convenient software and decent print quality. At the same time, let's not forget that it costs about $250. nine0003
One of the shortcomings is the low print speed.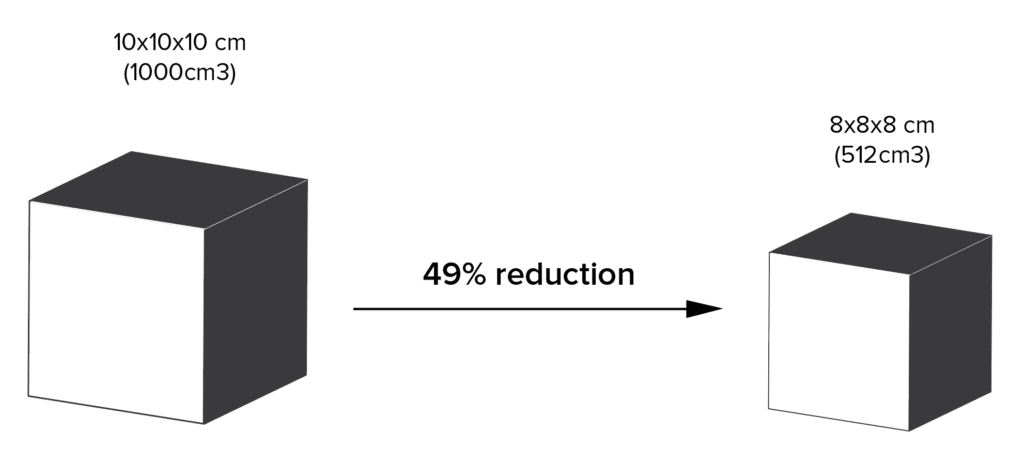 ABS plastic can be used, but problems can arise, especially if the area of the first base layer of the model is large. But if you don't mind using PLA, then the M3D Micro is a great option to get started with 3D printing. Definitely recommend for beginners.
How to calculate the cost of printing on a 3D printer
For some ideas, 3D printing is the fastest and easiest solution. In some situations, purchasing your own 3D printer can be a good solution, but sometimes it is much more profitable and faster to order the necessary product from a company specializing in 3D printing. Yes, and many owners of a 3D printer are thinking about how to “monetize” their hobby, but how to correctly calculate their costs? nine0003
Despite the fact that it is customary to indicate the price per gram of working material, simply multiplying the weight of the model by the cost of 1 gram will be wrong. In addition to the cost of consumables, many more, at first glance, non-obvious costs are added to the price of the product.
Each 3D printing technology uses its own consumables. Let's analyze the most popular and affordable of them.
Available technologies and key differences
Currently, a huge number of 3D devices have appeared, from small desktop ones that fit on the desktop to huge industrial machines. Among the most affordable, 2 technologies can be distinguished - FDM and photopolymer printers (LCD / DLP / SLA). nine0003
FDM 3D printing
Today, the most affordable 3D printing technology is FDM. A variety of materials and 3D printers allow FDM to be applied to a wide range of applications.
Schematic operation of FDM printer
A large selection makes it easy to choose a 3D printer for a specific task or find a universal device.
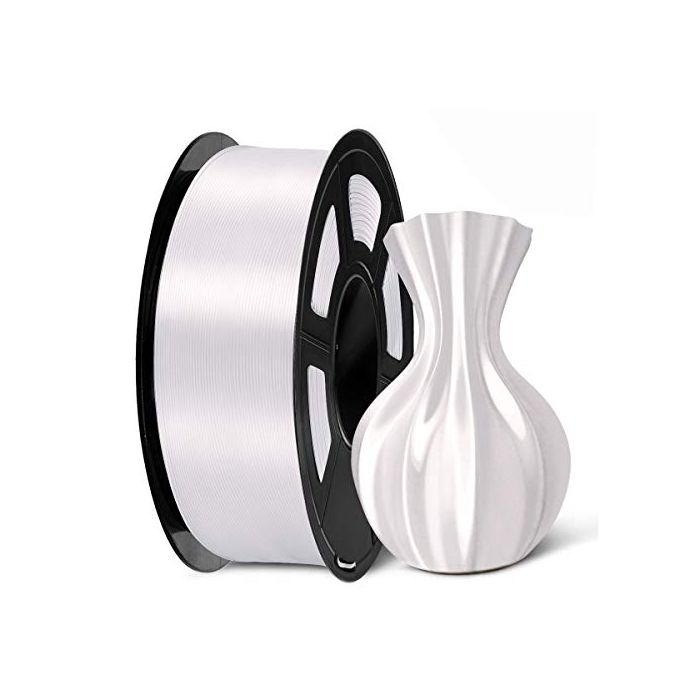
The material for printing is a plastic thread - filament. On the market you can find filament for various tasks, for every “taste” and budget. These can be very inexpensive ABS and PLA plastics or specific ones - conductive, burnable, etc. nine0003
Pros:
Cons:
Despite the fact that FDM allows you to print a wide range of plastics with different properties, the technology has some limitations. For example, it is impossible to obtain a perfectly smooth surface, to produce miniature and very thin elements, or to produce parts with very complex internal geometry with high accuracy.
Photopolymer printing
Photopolymer printers can work on one of 3 technologies - SLA, DLP or LCD. These devices will come to the rescue if you need to make a small but very detailed model with many small details. nine0003
How photopolymer printers work
As a consumable material, a photopolymer resin hardened by UV radiation is used. Now there is a wide variety of photopolymer resins for every taste. From particularly strong and precise engineering or jewelry resins to soft flexes.
Pros:
-
High print precision
nine0144 -
Good surface quality
-
A wide variety of printers and consumables
Minuses:
Photopolymer printers have shown themselves well in a variety of industries that require a perfectly smooth surface and high accuracy. They are used in dentistry, the jewelry industry, for making miniature master models for casting, and much more. nine0003
Industrial printers
These are already industrial machines, which require a separate room and sometimes certain requirements for ventilation, etc. In this article, we will not analyze these devices in detail, but briefly consider the most popular technologies.
FDM
In addition to desktop devices using FDM technology, industrial printers that work on the same principle are common.
This category includes devices with a large print area (from 30x30x30 cm and more). For example, Raise Pro2 with a print area of 30x30x30 cm.
Raise Pro2
Or machines designed for printing with refractory materials (eg PEEK). Such 3D printers usually have an active thermal chamber, and the extruder can be heated above 400 degrees.
nine0105 CreatBot F160-PEEK for use with refractory plastics
Photopolymer printers
Industrial photopolymer devices usually have a much larger working area, compared to their "home" brothers. In addition, many processes have been optimized and automated for faster operation. On such printers, you can quickly and accurately produce a small batch of models, a large prototype or a master model. nine0003
Prismlab Large Area Industrial Resin Printer Family
3DP
3DP - Three-Dimensional Printing (translated as three-dimensional printing) is a logical continuation of conventional two-dimensional printers. Printing is done using nozzles that selectively apply a binder to the material (usually gypsum). A dye can be added to the binder and the model will be colored. nine0003
Colored plaster model
Since the plaster model is fragile, a similar principle is used for printing with metals. Only the finished product needs to be treated in an oven to remove the binder and improve strength. But despite the processing, such metal prints will still be inferior in strength to cast products.
MJM
This is a proprietary technology of 3D Systems. MJM is a mix of FDM, 3DP and sometimes SLA (depending on material chosen). Printing is done using a variety of small nozzles (from 96 to 488) located on the head of the machine. The accuracy and quality of the surface of models made in this way is in no way inferior to photopolymer printers.
Models made with MJM technology
Such devices can work with photopolymer resins, wax or thermoplastics. You can combine several materials at once - for example, for complex models, you can use wax as a support. nine0003
SLM
SLM is the layer-by-layer sintering of metal powder using a powerful laser. There are several similar technologies - SHS/SLS. The principle of operation is the same, only a thermal print head is used instead of a laser beam.
SLM Turbine
As a material for printing, you can use powders of various metals - gold, stainless steel, aluminum, various alloys, etc. nine0003
During printing, the working chamber is filled with an inert gas to prevent oxidation of metals. This allows printing even with titanium powder.
Models made by this method are in no way inferior, and sometimes even superior, to cast products. SLM allows you to produce models with complex internal geometry that cannot be produced by another method (casting or milling).
Cost of 3D printing
The cost of a model usually consists of several factors.
-
Equipment depreciation. The printer, like any machine, requires maintenance and periodic replacement of some parts. During operation, belts gradually stretch, bushings or linear bearings wear out. For example, when bushings or linear bearings are worn; shafts may wear out and need to be replaced.
Cost of materials
The main cost item for a 3D printer is, of course, the printed material.;
FDM (plastic filament)
Since FDM technology is by far the most common, the choice of filaments is very diverse.
-
Engineering plastics are usually nylon with various fillers added to improve the physical characteristics of the finished model. Special cost. plastics starts from 2000r per coil and above. It all depends on the manufacturer and filler (carbon fiber, fiberglass, etc.). nine0003
-
Decorative plastics are used to imitate various materials. Plastic can simply be unusually colored (luminous, transparent plastics) or a special filler is added to it (plastics with metal powder). The cost of decorative plastics starts from 1500 rubles per coil and more, depending on the filler.
A big advantage of FDM is the diverse choice of materials to work with. This allows, having one printer, to produce almost any product - from a child's toy to a complex engineering prototype. nine0003
Photopolymers (resin)
Photopolymer resin printing technology is becoming more and more accessible. There are many different resins.
-
The cost of ordinary colored resin starts from 2500 rubles per 0.5 kg (volume +/- 0.5 l). You can find a smaller volume of resin (250 gr) on sale. You can buy several different resins in small containers and find out in practice which one is best for a particular model. nine0003
-
Engineering resins are resins with increased strength. They can be used not only for printing decorative items, but also for making functional prototypes and models. The cost for 0.5 kg starts from 5900r and above.
-
Special resins - burnable, dental, soft flexes, etc. Depending on the resin, the price for 0.5 kg can start from 4800 rubles and more. It all depends on the characteristics of the resin. nine0003
Photopolymer resins have not yet reached such a variety as FDM filaments, but they are surely catching up. Although due to the fact that a liter of resin costs significantly more than a spool of filament, the cost of the product is much higher.
Print examples
FDM
Mag Pull (quick release loop) for G3 magazines.
The model was downloaded for free from an open source (the file can be downloaded here). Printing with engineering carbon-filled plastic (price per spool from 4700 rubles). The weight of the model with support is about 25 grams. Post-processing was not needed. The cost of the finished model is 250 rubles. nine0099
Plastic fastener
The file was downloaded from an open source (can be downloaded here). Plastic - carbon-filled nylon (price per coil from 4700r). The weight of the finished product is about 20 grams. Print without post-processing. The total cost is 200 rubles.
Model watch
The model is modeled to order (the cost of modeling is from 1000 rubles). The product is printed on an industrial printer using soluble support. Print without post-processing. The cost of the finished product - from 700 rubles per piece (depends on the number of required products). nine0003
Traction prosthesis
The model is taken from an open source (you can download the modified version of the prosthesis here). The weight of the used material is about 600 gr, printed with ABS plastic (the cost of the coil is from 800 r). After printing, post-processing and assembly took place. The total cost of the product - from 3000 r (depends on the print material, support material, filling, etc.).
nine0003
Pedal layout
Production of a 3D model according to the drawing (from 1000 r). The weight of the finished model is about 200 gr. The product was printed with engineering carbon-filled plastic (the cost of the coil is from 4700 r). Post-processing was not needed. The cost of the finished product is about 3000 rubles.
Photopolymer printers
Model jaws for crowns
Files for printing were obtained using a 3D scanner and finalized in a 3D editor (the cost of scanning is from 3000 r, the cost of manual revision is from 1000 r). Printing on an industrial photopolymer printer. Post-processing is not needed. The cost of the finished product is from 80 r per gram.
Burnout resin rings
The model is made to order. Printing on a desktop SLA printer with a burnable polymer. Post-processing is not needed. The cost of the finished product is 200 rubles per product. nine0003
Miniatures
The models were bought on the myminifactory website (the cost of the model is from $2). Made with a desktop DLP printer. Post-processing was not required. The cost of the finished figurine is from 70 r per gram.
Custom 3D printing
Many owners of 3D printers are thinking about monetizing their hobby. But you should understand that the price of 3D printing “for yourself” and the price of commercial printing are very different. nine0003
When starting to print to order, it is better to have several printers working on different technologies.
Cost of commercial 3D printing
In addition to the cost of the model, to the commercial production of products, you can add:
-
Modeling. Often the client needs not only to make a part, but to pre-model it. It can be a simple cogwheel that doesn't take long to model, or it can be a complex sculpture that takes more time to model than it does to make. nine0003
-
Model post-processing. This can be simply the removal of supports, with cleaning of the place of their contact with the product, or a complete processing cycle (puttying, surface grinding, painting, etc.).
It should be borne in mind that it is not always possible to print the model the first time. Sometimes it may take several attempts. And these are additional costs.
nine0251What is unprofitable to print
Despite the wide possibilities of 3D printing, there are models that are unprofitable to make on a 3D printer.
For such models, it is better to use other manufacturing methods.
Commercial print examples
Jewelry for further casting
Manufacture of promotional items and souvenirs
Piece miniatures or master model for further casting
3D printed model
Profitable to print on a 3D printer:
If the item is only sold as an assembly. For example, a small gear broke in the mechanism, but the mechanism is sold only “assembly”. It is much cheaper to make the desired gear on a 3D printer than to buy the entire mechanism. nine0003
A small batch of parts. Small batches, especially models with complex geometry, are more profitable to produce on a 3D printer than by casting or other methods.
Totals
If you need several models or a small project, sometimes it will be more expedient to outsource manufacturing.
Learn more