Borlee 3d printer
Borlee Mini 01 3D Printer Review
For as long as I can remember, I have wanted a 3D printer. I did not know what I would do with one, but I wanted one. Borlee has provided me with their Borlee Mini 01 to review, and I am excited to share with you, the results.
When the box arrived, and I began the unboxing, I honestly did not know what I would do with it. I imagined that I would need to know some complex computer language just to be able to make a blob of plastic come out of the machine, but as I discovered, it was much easier than I had imagined.
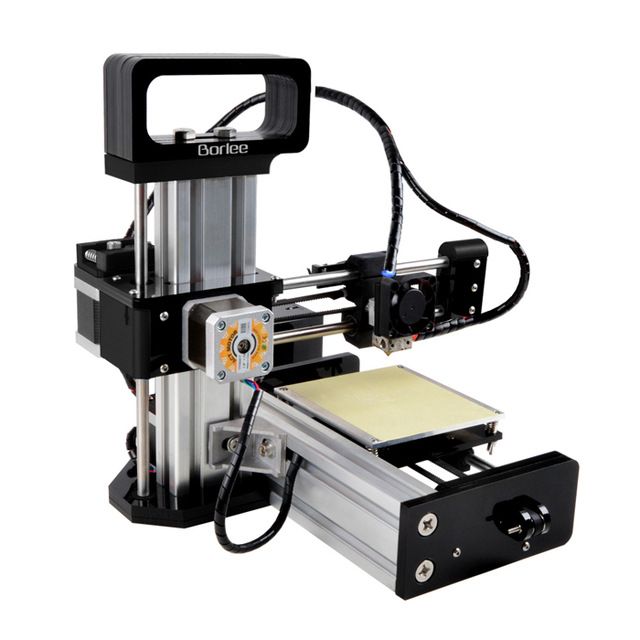
Everything you need, including the plastic, is provided. The printer itself comes mostly fully assembled, and ready to use right out of the box. The only thing I needed to put together was the control box where the computer controls are housed. That took me only about an hour. I did have a few setbacks where I accidently unplugged a connection and had to take it back apart, to fix, so please be careful. To see the initial look at the 3D printer prior to use, look here.
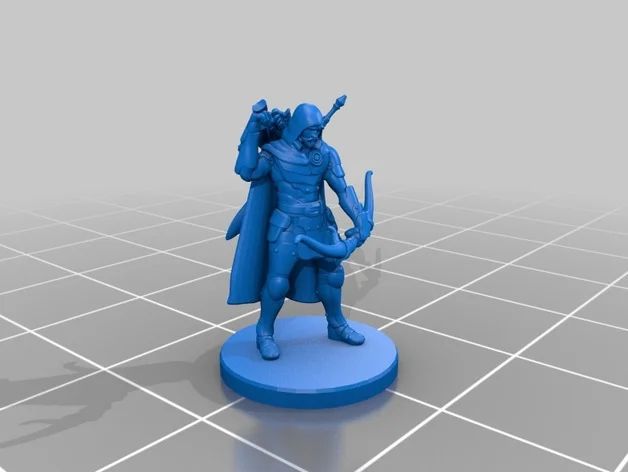
I decided to do my first print project using a model I located on a website dedicated to showcasing user’s projects. Some are clearly homemade and unfinished while others and polished and complete. For my project I chose a dragon, keeping with the dragonblogger.com symbol theme. I did have only one problem. My box did not contain the SD card with the software on it. I contacted the manufacturers through customer service, and in less than 24 hours, I was in possession of a detailed file with everything I needed and more.
The preferred program for running the prints is Cura 14.12, which is not the latest version. I did ask if I was able to use the updated version and was simply told that the printer was designed around this older version and that they could not say if it would work with the newer one. I have not tested any print using the updated software. Once I do, which I will soon, I will share the results in a follow-up post. For now, please take a look at this video about the Cura software. Please keep in mind that I have only used the program to the point that I needed to for the printing I have done. It is possible that there are a few features I have not explored and am unfamiliar with at this time.
As mentioned before, I chose a dragon to print. I did this for several reasons. For one, I thought that it would be nice to print a dragon since it is a big part of our blog design. I also chose it because of the details. The neck had nice ridges on it, and the wings were fairly detailed. In addition, the mouth was open and for some way, hollow. I also noted that the wings were not supported, and I wondered if they would droop when printed. I was pleased by the results.
All it needs is a little paint.
Before I speak to the results, I needed to say something about the print bed. That is the aluminum square that the final print rests on. If you notice in the video, there is a yellowish colored tape on the bed. My son wondered why it was there and thought it was strange to have tape on the bed when printing. What was strange is I took advice from someone who had never used a 3D printer and removed the tape. The tape in this case and probably all others serves to hold the project into place. When I attempted to print something with the tape removed, the plastic shifted around and nothing of any substance formed. Once the tape was placed back on the bed, the plastic stuck to it fast and remained in place. What I do not know yet, is do I need to cover the whole bed in tape or just a strip in the middle.
When using the tape, I noticed a few things as well. The project can feel fused to the print bed. I was concerned as it seemed to take a great deal of force to remove the dragon, and I was afraid I would break something. I did a google search and discovered a few things I wish to share. One tip was to use blue painters tape. I grabbed a roll and tried it out. I, in fact, tried it on two print jobs. On the first, I noticed that the tape became unstuck from the bed, and curled upwards. The plastic followed the curl and the final results were a disaster. Also, I noticed that the tape had some green print on it and that stained the bottom of the print job.
I switched back to the regular masking tape and tried the second technique for unsticking the project, and that involved using a bit of alcohol. I suggest getting a bottle with a long tip so you do not waste any when applying it. What is does is loosen the glue on the tape, making it easier to remove. I still needed to apply some force with the scraper, but a lot less force was needed. The alcohol also serves another purpose. It removed oils from the bed, along with any excess glue from repeated use of the tape. Which makes tape adhesion better. I am getting ready to test one other type of tape, and while it is still masking tape, it is considerably wider, not as thick but wider. It seems that the bottom of my print projects takes on a seam from the width of the tape as well. I am attempting to minimize this in future prints. I could also as a side note, possibly use a product that replaces the tape altogether and might eliminate the need for tape, but I have not yet even looked into it enough to fully vet its use.
When I printed the dragon, I noticed a few things that I did have concerns over, the biggest of which were strings. When 3D printer prints, it has hot ready to use plastic in the nozzle. When the nozzle stops printing to move to another location on the project, sometimes the hot plastic seeps out and trails along as the nozzle is in motion. this causes strings. the means to reduce the strings is a function of the settings in Cura dealing with retraction of the plastic while traveling and not actively printing. this simply means that when the nozzle is in motion to a new location, the plastic is withdrawn back into the printer to lessen the amount of plastic that seeps out while the nozzle moves to a new location. I made changes to this setting and in future projects did not have as many strings as before.
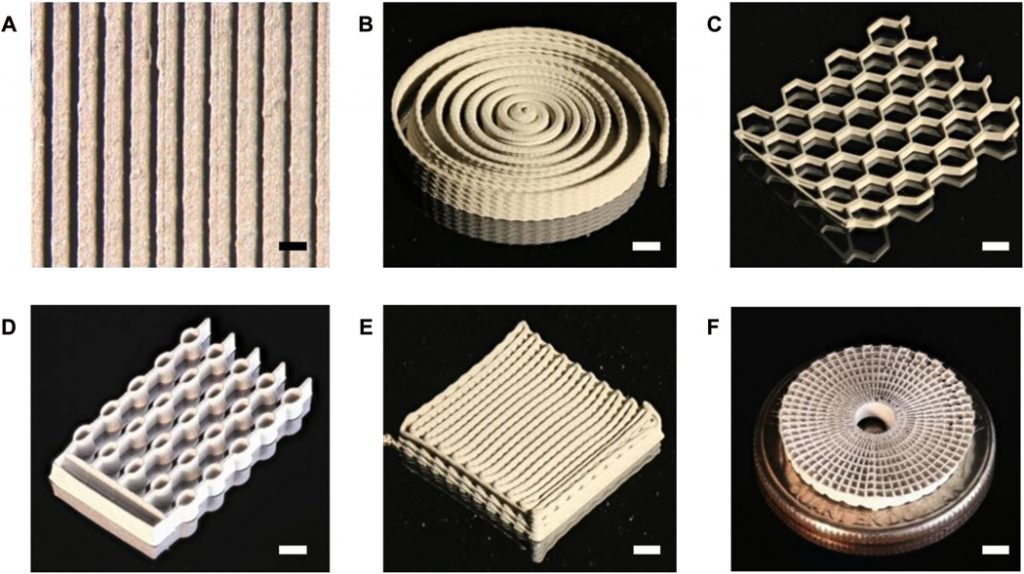
Ok, so enough about all that. I might not have mentioned earlier but there are a number of components included with the printer that was not fully understood when I first opened the box. Once I received the software file, it was more obvious what they were. I will insert the diagram of the included supplies so that just in case it is not available for you, you will know what is what.
The adaptor threw me at first. I honestly thought it was for the wrong country and the plug from the power supply was not the kind I expected for the United States. But have no fear, there is the proper type of connector on the adapter it just needs to be pulled out from the body of the adaptor on the back.
Ok, so what can we print? Well, just about anything that fits within a 90*90*90 mm size constraint. It is possible to also work on larger projects, providing that the individual pieces are no larger than the available print size. One designer created a print model for a recorder, you might remember them from elementary school music class. The project was made to be printed in a number of smaller parts, but when I looked at the possibility of printing it on the Borlee, I discovered that any one part was too large.
My option was to make the parts smaller, but that would make the instrument sound different and might not allow it to play the way it should. So for some things, I simply cannot print the project at all. For others, if size is not important, then I can simply resize to the max or any size below that. You must think within the limitations of your device.
118 DB whistle that really works. Very loud, and very sturdy.I made more than one project with this printer. A few turned out well, while others did not. Some turned out great with a few minor exceptions such as clarity in lettering. Rather than describe all of that here, watch this video for more details. It will explain more about each project, and give you my thoughts.
Ok, so I have probably just about taken up enough of your time for today, but I wanted to review my review a little more and tell you my final thoughts.
I know that this is probably not the most powerful printer out there. It has some limitations that I wish I could overcome, but for a starter printer, or simply one you might want to use for smaller jobs, I think it is great. It would have been terrible for me if I had spent more for a printer, my first time out, and gotten discouraged having to put it all together myself.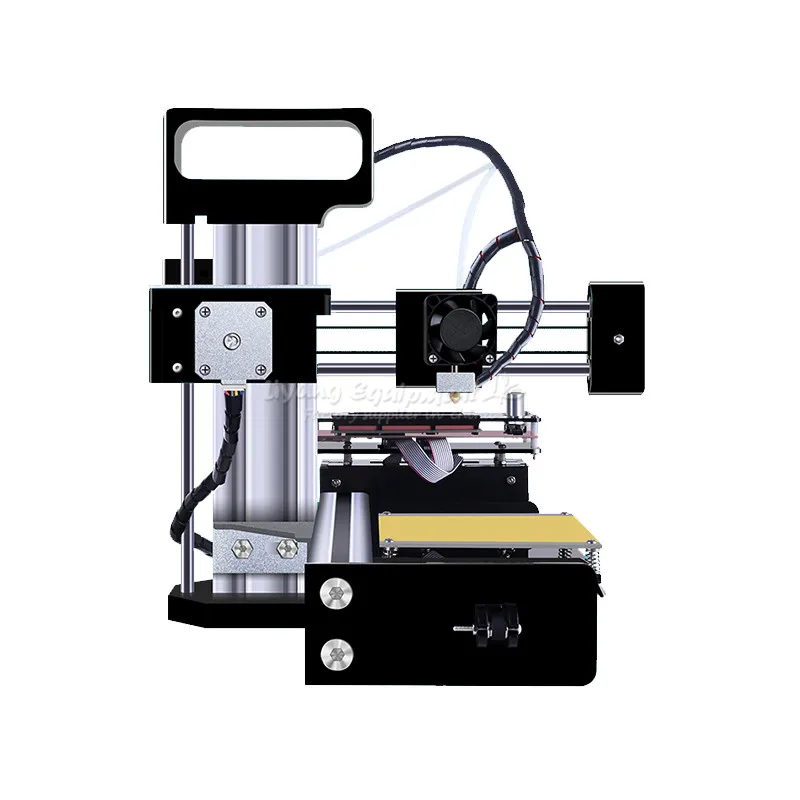 Mechanics is not my strong suit.
This printer comes nearly all put together for you and that is a good thing. In addition, as you can see, for the most part, all of the projects I printed came out pretty good. Sure they need to be completed a bit with cleanup work which honestly is a whole other discussion and one I have not completely figured out yet, but for the price, and for the first time 3D printer user, you cannot find a better printer.
Links to outside sources of information. Use at your own risk. Neither dragonblogger.com or I, are responsible for any issues that might result from using any of the models shown on any of the sites, or any advice found on the websites listed. Please use at your own discretion.
Find 3D models to print. free
When things don’t go as planned. this is also a paid software, not sure of compatibility.
Create your own 3D image to print
Lowest cost, for greatest quantity printer plastic I have found on Amazon.
One last project that I printed to me shows just how great this printer is. Enjoy.
Original picture used to make….The same image now in plastic.
Disclaimer: Borlee provided me with their 3D printer for review. All opinions are 100% mine and mine alone.
Wireless 3D Printing Using Your Smartphone With Borlee Box (video)
By Julian Horsey
Those of you lucky enough to already own a 3D printer might be interested in a new piece of hardware which has been specifically designed for the 3D printer industry and easily adds wireless 3D printing control to already existing 3D printer.
Allowing you to enjoy the ability to control your 3D printer directly from your smart phone using a companion application. Watch the video below to learn more about the Borlee 3D Printing Box which supports a wide range of different 3D printers.
The developers of the Borlee Box and its companion wireless 3D printing smartphone application, explain a little more about the hardware’s design and functionality.
As well as everything you can accomplish directly from your smartphone wirelessly.
3D printing has witnessed significant advancement over the last few years. Now we can print bigger, faster, and with a much wider choice of materials. However, one challenge still remains unsolved even today, which is the complicated procedures required for 3D printing. And now that’s about to change…
At Borlee we’re always looking for ways to make 3D printing easier and more convenient. We want 3D printing to be something available to everyone and not just the select few designers and engineers. This has always been our core mission. So we challenged ourselves to solve this difficult problem. Today we are here with an affirmative answer, and we’re excited to introduce to you our latest innovation- The Borlee 3D Box- an entirely new solution to dramatically improve the use of 3d printers.
Easy 3D printing set at the press of a button, all on the comfort of your smart phone. Click the “ok” button on the app, and the 3d box will control the printer automatically slicing, heating and printing the model is selected.
Also you can adjust the printing size of any of the models.
GET FULL CONTROL: Get real time to control movement of X, Y, Z axis, the hot bed, heating of the extruder and material out from extruder. Real time to monitor temperature of printer and hot bed. Check the printer if in printing, or in slicing etc. any state. When it is printing any online model, it will be show how long the printing time is and how much weight of material is needed. After the printing is finished, it will send you a tip to remind you.
For more information on the new wireless 3d printing box and application jump over to the Kickstarter website for details by following the link below.
Source: Kickstarter
Filed Under: Hardware, Top News
Latest Geeky Gadgets Deals
Disclosure: Some of our articles include affiliate links. If you buy something through one of these links, Geeky Gadgets may earn an affiliate commission. Learn more.
3DBenchy - 3D Printer Calibration Boat, detailed description
There are probably 100,500 reference samples that can be used to verify that the part measures exactly 20 × 20 × 10 mm. Or doesn't. Measuring objects coming out of a 3D printer and calibrating the settings accordingly is a tedious task. However, it could be made more fun.
Most 3D printer owners spend a lot of time adjusting hardware and software to make the printed objects as accurate as possible in size. To achieve this, STL files are usually created or downloaded with various measured areas and parts, such as round and square holes, overhanging surfaces at different angles, etc.
These abstract pieces are great for sizing, but once printed and done, they usually end up in the wastebasket.
There is a slightly different 3D calibration model with preset parameters that you can download and use to calibrate your printer. The object that looks suspiciously like a boat is called #3DBenchy. When you print it and take all the necessary dimensions with a caliper, do not throw it away - let the children play with it :) Well, or adults!
The #3DBenchy is designed to offer the maximum amount of measurable parameters possible - all in one model. It's just a small boat, but don't let its modest size fool you! :) Immaculately printing such an STL file is quite difficult - it has several complex surfaces that clearly demonstrate the problems that various 3D printing technologies still face.
The recognizable shape, symmetry, and smooth overhanging curved surfaces of the case make #3DBenchy printed models very useful for identifying what needs to be improved in a 3D printer or slicer.
Some of the features of this boat:
- Symmetry
- Large overhangs
- Horizontal and vertical holes
- Easy to measure
- Troubleshooting Overhangs and Bridging Fragments
- See the full list below the pictures above
- See pictures below for dimensions
Since this object is small, it prints quickly and easily and is very inexpensive. You can easily print these boats one by one, changing the settings step by step to get the desired result. In the end, you will have a whole fleet of ships. And how happy the kids will be when they play their own version of naval combat right on the table! :)
The #3DBenchy.stl file is published under a Creative Commons license, which allows it to be printed, distributed, and sold to your heart's content.
Despite the fact that the authors of the model tried to make something like a Swiss knife for 3D printing calibration out of #3DBenchy, it is not able to replace all calibration STLs. These files should be used in accordance with common practice. #3DBenchy is just an addition to an extensive set of tricky STL files designed for calibration and benchmarking. Use this ship however you like.
#3DBenchy has its own home port, www.3DBenchy.com, where you can download the file and read a lot of useful information about how this boat helps to improve the quality of printouts.
You can download files from Thingiverse and Sketchfab.
Kensington Ghost Bus | World of Secrets
Published:
England has long been considered the country with the most ghosts, and not all of them look like people. And the best example of such a ghost is the mysterious bus, which for a long time was a thunderstorm for motorists who found themselves at night in the Kensington area.
The red double-decker, the famous double-decker bus, has long become a real symbol of the British capital. Therefore, it is not surprising that over time he became the hero of many stories, including mystical ones. The most famous of them says that in June 1934 a strange car accident occurred in Kensington - moving at night, on an empty road, the driver of one car suddenly turned the steering wheel sharply, drove off the road and crashed into a lamppost.
Unfortunately, the car exploded on impact and the driver died. However, there was a witness who claimed that a bus of route No. 7 was rushing straight towards the car at full speed. Where he went immediately after the incident, the eyewitness could not remember.
After this incident, the police repeatedly received reports of a strange bus without a driver, which was driving at high speed into the oncoming lane, forcing motorists to swerve in horror from the road. According to eyewitnesses, it was always a route number 7 bus, on board of which the logo of the London General Omnibus Company flaunted. This company went out of business in 1933.
The bus always appears at the same junction of St Mark's Road and Cambridge Gardens in Kengsinton. This place has long been considered bad among drivers, since there was a “blind section” of the road, which in itself was a great danger, and if at the same time a huge bus rushed at you, flashing headlights, even more so.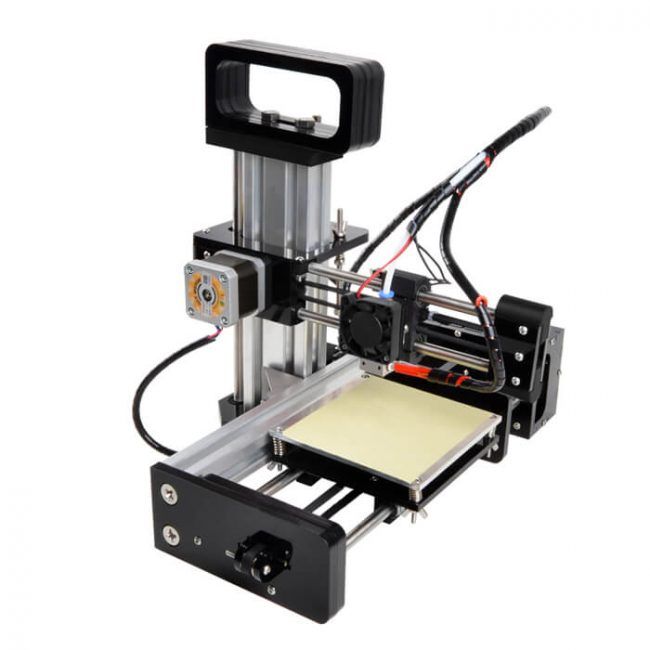
A typical report to the Kensington Police Department was:
I turned a corner and suddenly saw a bus coming towards me. Both of his salons were brightly lit, but I did not see the driver or passengers. In a panic, twisting the steering wheel to the side, I jumped onto the sidewalk and crashed into the wall. The bus just disappeared.
After yet another tragic incident, when a driver who flew out of the impact crashed his head against the wall, there was another witness who reported that the bus that suddenly appeared in front of the car a moment before the accident was the cause of the accident. It is interesting that the accidents always happened at the same time - at 1.15 am, and not a single eyewitness noticed the driver on the bus.
When there were too many reports about the bus, the police launched an investigation and interviewed many volunteer witnesses. There was even one transport worker who one early morning saw a very old bus pull into the bus depot.