Cura 3d print settings
Best Cura Settings for Your 3D Printer – Ender 3 & More – 3D Printerly
Trying to get the best settings in Cura for the Ender 3 can be quite challenging, especially if you don’t have a lot of experience with 3D printing.
I decided to write this article to help people who are a little confused on what settings they should be using for their 3D printer, whether they have an Ender 3, Ender 3 Pro, or Ender 3 V2.
Keep reading through this article for some guidance on getting the best Cura settings for your 3D printer.
What is a Good Print Speed for a 3D Printer (Ender 3)?
A good print speed for decent quality and speed usually ranges between 40mm/s and 60mm/s depending on your 3D printer. For the best quality, going down to 30mm/s works well, while for faster 3D prints, you can use a print speed of 100mm/s. Print speeds can differ depending on what material you are using.
Print speed is an important setting in 3D printing that factors in with how long your 3D prints will take overall. It consists of a many speeds of specific sections of your print such as:
- Infill Speed
- Wall Speed
- Top/Bottom Speed
- Support Speed
- Travel Speed
- Initial Layer Speed
- Skirt/Brim Speed
There are also a few more speeds sections under some of these settings where you can get even more precise in controlling print speeds of your parts.
Cura gives you a default Print Speed of 50mm/s and it doesn’t really need to be changed, though when you want to start tweaking settings and get faster prints, this is one that many will adjust.
When you adjust your main Print Speed setting, these other settings will change according to Cura calculations:
- Infill Speed – stays the same as the Print Speed.
- Wall Speed, Top/Bottom Speed, Support Speed – half of your Print Speed
- Travel Speed – defaults at 150mm/s until you go past a Print Speed of 60mm/s. Then goes up by 2.
 5mm/s for every increase of 1mm/s in Print Speed until it caps out at 250mm/s.
 - Initial Layer Speed, Skirt/Brim Speed – defaults at 20mm/s and is not affected by changes in Print Speed
Generally speaking, the slower your print speed, the better the quality of your 3D prints will be.
If you are looking for a 3D print to be higher quality, you can go down to a Print Speed of around 30mm/s, while for a 3D print that you want as quick as possible, you can go up to 100mm/s and beyond in some cases.
When you do increase your print speed to 100mm/s, the quality of your 3D prints can quickly decrease mainly based on vibrations from the movement and weight of the 3D printer parts.
The lighter your printer is, the fewer vibrations (ringing) you’ll get, so even having a heavy glass bed can increase print imperfections from speed.
The way your Print Speed translates to quality definitely depends on your specific 3D printer, your setup, the stability of the frame and surface it’s sitting on, and the type of 3D printer itself.
Delta 3D printers like the FLSUN Q5 (Amazon) can handle higher speeds a lot easier than let’s say an Ender 3 V2.
If you do 3D print at lower speeds, you want to lower your printing temperature accordingly since the material will be under the heat for a longer time. It shouldn’t need too much of an adjustment, but it’s something to keep in mind as you adjust your print speeds.
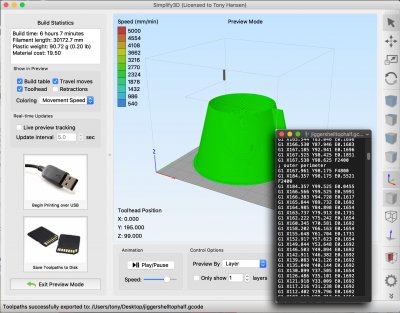
One test that people do to see the impact of higher speeds on print quality is a Speed Test Tower from Thingiverse.
Here is how the Speed Test Tower looks in Cura.
The cool thing about this is how you can insert scripts after each tower to automatically adjust print speeds as the object prints, so you don’t have to do it manually. It’s a great way to calibrate your speed and see what level of quality you’d be happy with.
Although the values are 20, 40, 60, 80, 100, you can set your own values within the Cura script. The instructions are shown on the Thingiverse page.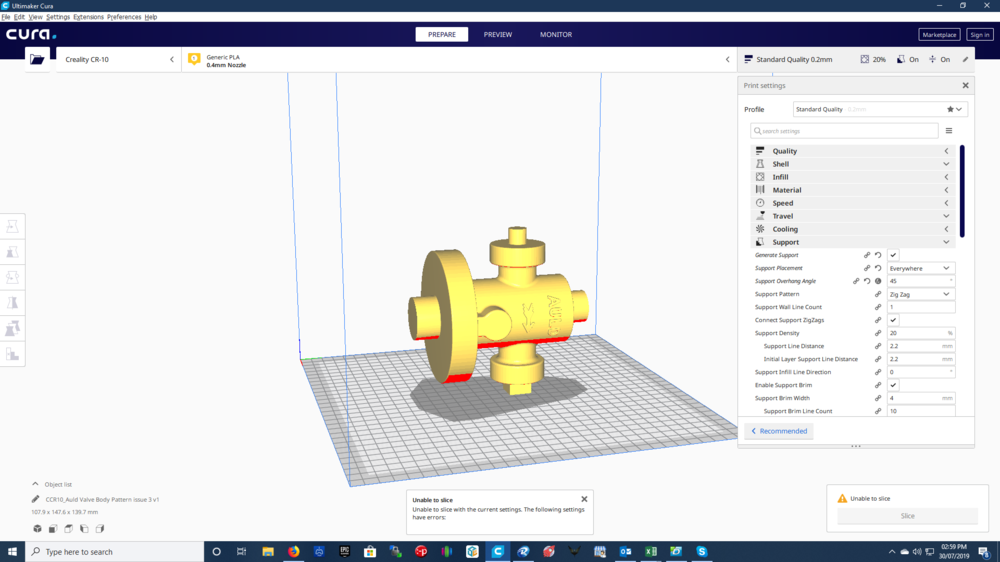
What is the Best Printing Temperature for 3D Printing?
The best temperature for 3D printing is based on the filament you are using, which tends to be between 180-220°C for PLA, 230-250°C for ABS and PETG, and between 250-270°C for Nylon. Within these temperature ranges, we can narrow down the best printing temperature by using a temperature tower and comparing quality.
When you purchase your roll of filament, the manufacturer makes our jobs easier by giving us a specific printing temperature range on the box. This means we can find the best printing temperature for our specific material pretty easily.
Some examples below of manufacture printing recommendations are:
- Hatchbox PLA – 180 – 220°C
- Geeetech PLA – 185 – 215°C
- SUNLU ABS – 230 – 240°C
- Overture Nylon – 250 – 270°C
- Priline Carbon Fiber Polycarbonate – 240 – 260°C
- ThermaX PEEK – 375 – 410°C
Do keep in mind that the type of nozzle you are using has an effect on the real temperature that is being produced.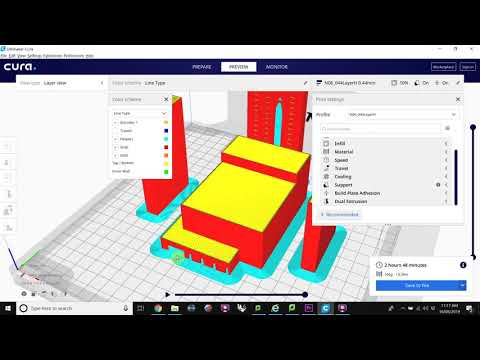 For example, a brass nozzle which is the standard for 3D printers is a great conductor of heat, meaning it transfers heat better.
If you switch to a nozzle like a hardened steel nozzle, you’d want to increase your printing temperature by 5-10°C because hardened steel doesn’t transfer heat as well as brass.
Hardened steel is better used for abrasive filaments like Carbon Fiber or glow-in-the-dark filament since it has better durability than brass. For standard filaments like PLA, ABS, and PETG, brass works great.
Once you get that perfect printing temperature for your 3D prints, you should notice a lot more successful 3D prints and fewer print imperfections.
We avoid issues like oozing in 3D prints when using a temperature too high, as well as issues like under-extrusion when you use low temperatures.
Once you get that range, it’s usually a good idea to go right in the middle and start printing, but there is an even better option.
To find the best printing temperature with more accuracy, there is a thing called a temperature tower which allows us to easily compare quality from different printing temperatures.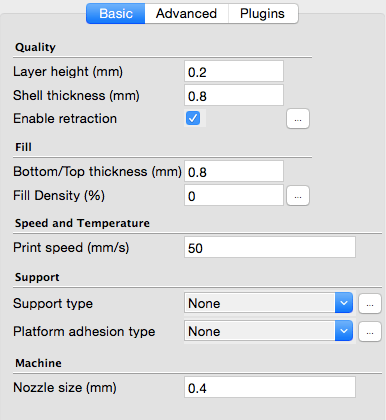
It looks something like this:
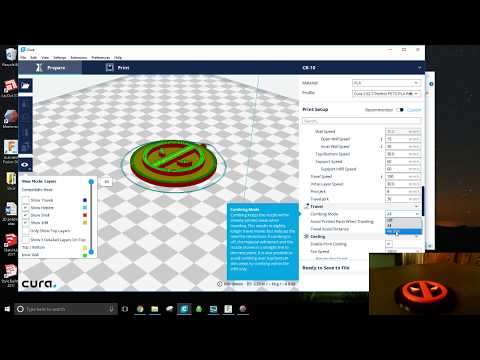
I’d recommend printing the temperature tower directly in Cura, though you can still use a temperature tower from Thingiverse if you want.
Follow the video below by CHEP to get the Cura temperature tower. The title refers to retraction settings in Cura but also goes through the temperature tower part of things.
What is the Best Bed Temperature for 3D Printing?
The best bed temperature for 3D printing is according to the filament you’re using. For PLA, anywhere from 20-60°C works best, while 80-110°C is recommended for ABS as it is a more heat-resistant material. For PETG, a bed temperature between 70-90°C is a great choice.
A heated bed is important for a number of reasons in 3D printing. For starters, it promotes bed adhesion and improves the quality of prints, allowing them to have a better chance of success with printing and even being removed from the build platform better.
In terms of finding the best heat bed temperature, you’ll want to turn to your material and its manufacturer. Let’s take a look at some top-rated filaments on Amazon and their recommended bed temperature.
- Overture PLA – 40 – 55°C
- Hatchbox ABS – 90 – 110°C
- Geeetech PETG – 80 – 90°C
- Overture Nylon – 25 – 50°C
- ThermaX PEEK – 130 – 145°C
Apart from enhancing the quality of your prints, a good bed temperature can take away many print imperfections as well that cause some print failures.
It can help with common print imperfections like elephant’s foot, which is when the first few layers of your 3D print are squashed down.
Decreasing your bed temperature when it is too high is a great solution to this issue, leading to better print quality and more successful prints.
You want to make sure you don’t have your bed temperature too high though because it can cause your filament to not cool down fast enough, leading to a layer that isn’t so sturdy. The next layers ideally want to have a good foundation beneath it.
Sticking within the range of what your manufacturer advises should set you on the path of getting the bed temperature for your 3D prints.
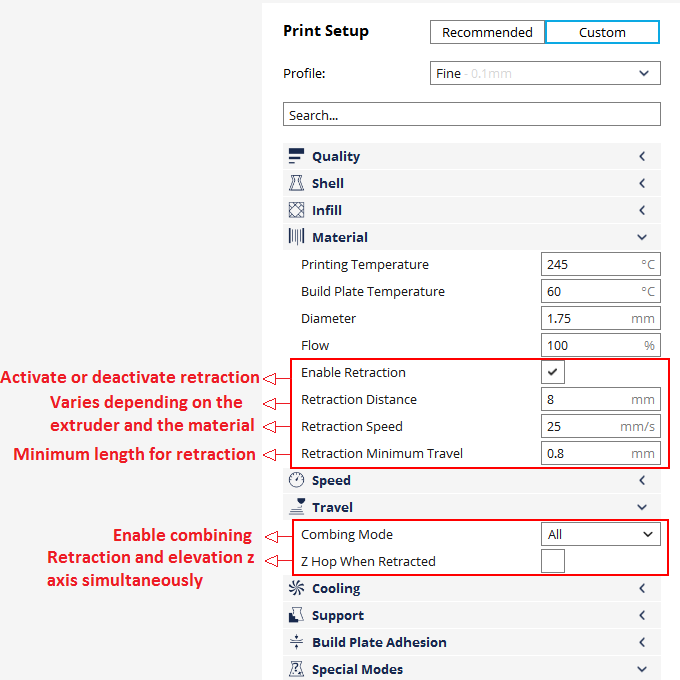
What Are the Best Retraction Distance & Speed Settings?
Retraction settings are when your 3D printer pulls filament back inside the extruder to avoid the melted filament moving out of the nozzle while the print head is moving.
Retraction settings are useful for increasing the quality of prints and to reduce the occurrence of print imperfections like stringing, oozing, blobs, and zits.
Found under the “Travel” section in Cura, Retraction has to be enabled first. After doing so, you’ll be able to adjust Retraction Distance and Retraction Speed.
Best Retraction Distance Setting
Retraction Distance or Length is how far the filament is pulled back in the hot end within the extrusion path. The best retraction setting depends on your specific 3D printer and whether you have a Bowden-style or a Direct Drive extruder.
For Bowden extruders, the Retraction Distance is best set between 4mm-7mm. For 3D printers that use a Direct Drive setup, the recommended Retraction Length range is 1mm-4mm.
The default Retraction Distance value in Cura is 5mm. Reducing this setting would mean that you’re pulling the filament back in the hot end less, while increasing it would simply lengthen how far the filament is pulled back.
An extremely small Retraction Distance would mean that the filament isn’t pushed back enough and would cause string. Similarly, a too high value of this setting could jam or clog your extruder nozzle.
What you can do is begin at the middle of these ranges, depending on what extrusion system you have. For Bowden-style extruders, you can test your prints at a Retraction Distance of 5mm and check how the quality turns out.
An even better way to calibrate your Retraction Distance is by printing a retraction tower in Cura as shown in the video in the previous section. Doing so would drastically increase your chances of getting the best Retraction Distance value for your 3D printer.
Here is the video again so you can follow the retraction calibration steps.
The retraction tower is composed of 5 blocks, each indicating a specific Retraction Distance or Speed value that you set. You can begin printing the tower at 2mm and work your way up with 1mm increments.
After finishing, check yourself which parts of the tower look the highest quality. You can also choose to determine the top 3 and print a retraction tower one more time using those 3 best values, then using more precise increments.
Best Retraction Speed Setting
Retraction Speed is simply the speed at which the filament is pulled back in the hot end.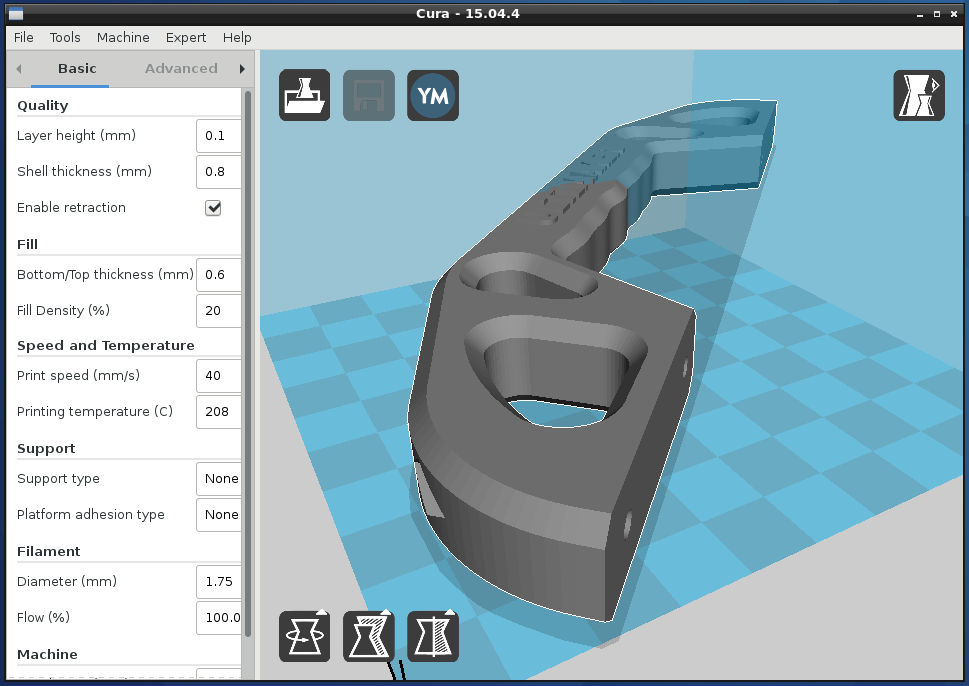 Right alongside Retraction Length, Retraction Speed is a fairly important setting that’s needed to be looked at.
For Bowden extruders, the best Retraction Speed is between 40-70mm/s. If you have a Direct Drive extruder setup, the recommended Retraction Speed range is 20-50mm/s.
Generally speaking, you want to have a Retraction Speed as high as possible without grinding the filament in the feeder. When you move the filament at a higher speed, your nozzle stays still for less time, resulting in smaller blobs/zits and print imperfections.
When you set your Retraction Speed too high though, the force that is produced by your feeder is so high that the feeder wheel can grind into the filament, reducing the success rate of your 3D prints.
The default Retraction Speed value in Cura is 45mm/s. This is a good place to start, but you can get the best Retraction Speed for your 3D printer by printing a retraction tower, just like in Retraction Distance.
Only this time, you would be optimizing the speed instead of distance. You can start at 30mm/s and go up using 5mm/s increments to print the tower.
After finishing the print, you would again get the 3 best-looking Retraction Speed values and print another tower using those values. After proper inspection, you’ll find the best Retraction Speed for your 3D printer.
What is the Best Layer Height for a 3D Printer?
The best layer height for a 3D printer is between 25% to 75% of your nozzle diameter. For a balance between speed and detail, you want to go with the default 0.2mm Layer Height in Cura. For increased resolution and detail, you can use a 0.1mm Layer Height for quality results.
Layer height is simply the thickness of each layer of filament in millimeters. It is the setting which is most important when balancing the quality of your 3D models with the printing time.
The thinner each layer of your model is, the more detail and accuracy the model will have. With filament 3D printers, you tend to have a maximum layer height of either 0.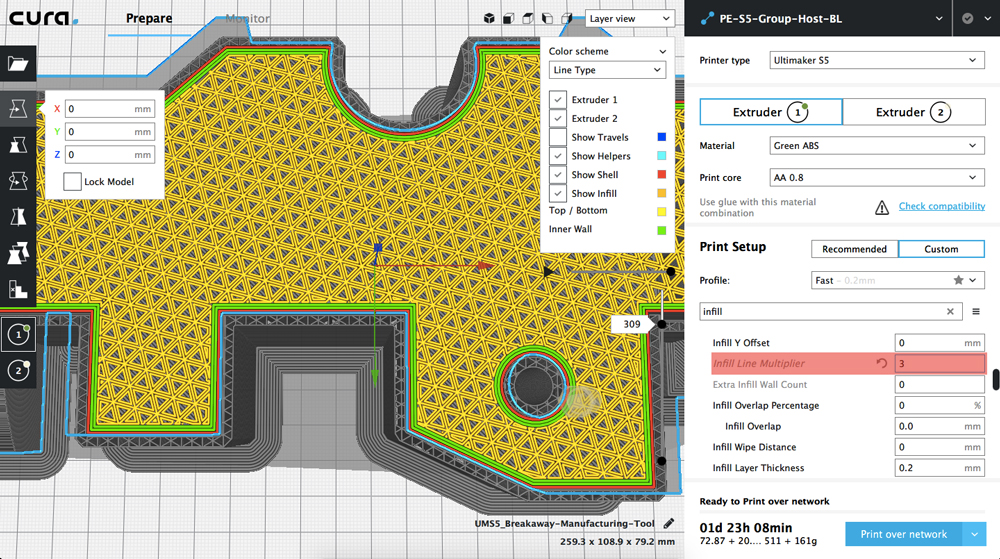 05mm or 0.1mm for resolution.
Since we tend to use a range of 25-75% of our nozzle diameter for layer height, we would need to change out the standard 0.4mm nozzle if you want to go down to those 0.05mm layer heights, to a 0.2mm nozzle.
If you do choose to use such a small layer height, you should expect a 3D print to take several times longer than usual.
When you think about how many layers are extruded for a 0.2mm Layer Height vs a 0.05mm Layer Height, it would need 4 times as many layers, which means 4 times the overall printing time.
Cura has a default Layer Height of 0.2mm for a 0.4mm nozzle diameter which is a safe 50%. This layer height offers a great balance of good detail and fairly fast 3D prints, though you can adjust it depending on your desired outcome.
For models like statues, busts, characters, and figures, it makes sense to use a lower layer height to capture the vital details that make these models look realistic.
For models like a headphone stand, a wall mount, a vase, holders of some kind, a 3D printed clamp, and so on, you are better off using a larger layer height like 0.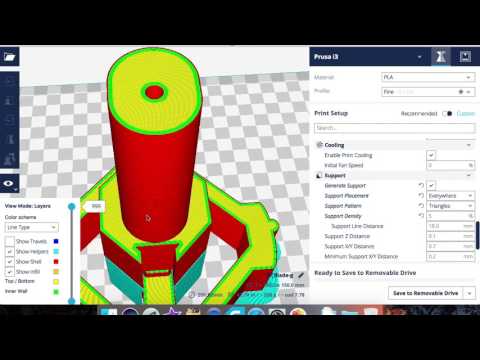 3mm and above to improve printing time rather than unnecessary details.
What is a Good Line Width for 3D Printing?
A good Line Width for 3D printing is between 0.3-0.8mm for a standard 0.4mm nozzle. For improved part quality and high details, a low Line Width value such as 0.3mm is the one to go for. For better bed adhesion, thicker extrusions, and strength, a large Line Width value like 0.8mm works well.
Line Width is simply how wide your 3D printer prints each line of filament. It is dependent on the diameter of the nozzle and dictates how high quality your part will be in the X and Y direction.
Most people use a 0.4mm nozzle diameter and subsequently set their Line Width to 0.4mm, which also happens to be the default value in Cura.
The minimum Line Width value you can use is 60% while the maximum is around 200% of your nozzle diameter. A smaller Line Width value of 60-100% makes thinner extrusions and possibly produces parts with better accuracy.
However, such parts may not have the most strength. For that, you can try increasing your Line Width to around 150-200% of your nozzle for models that will play a more mechanical and functional role.
You can tweak your Line Width according to your use case to get better results in terms of either strength or quality. Another situation where increasing the Line Width helps is when there are gaps in your thin walls.
This is definitely a trial and error type of setting where you’ll want to try printing out the same model a few times while adjusting the Line Width. It’s always good to understand what changes in your print settings actually make in the final models.
What is a Good Flow Rate for 3D Printing?
You want your Flow rate to stay at 100% in most cases because an adjustment in this setting is usually compensation for an underlying problem that needs to be fixed. An increase in Flow rate is usually for a short-term fix like a clogged nozzle, as well as under or over extrusion.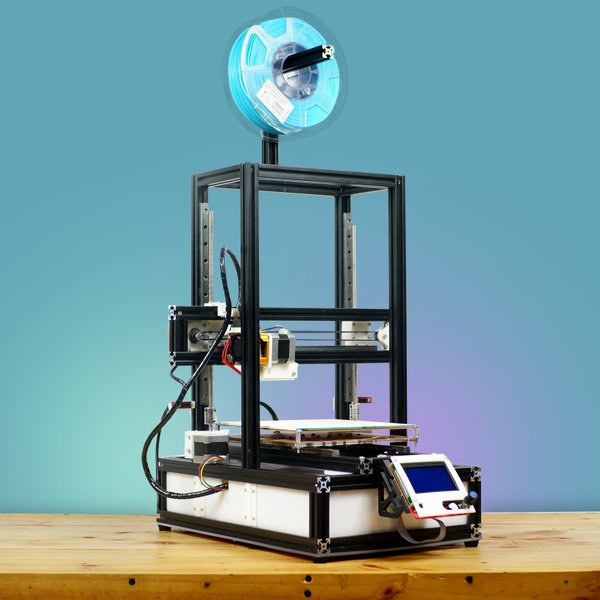 A usual range of 90-110% is used.
Flow or Flow Compensation in Cura is depicted by a percentage and is the actual amount of filament that is extruded from the nozzle. A good Flow rate is 100% which is the same as the default Cura value.
The main reason one would adjust the flow rate is to make up for an issue in the extrusion train. An example here would be a clogged nozzle.
Increasing the Flow Rate to about 110% could help if you’re experiencing under-extrusion. If there’s some sort of a block in the extruder nozzle, you can get more filament to push out and penetrate the clog with a higher Flow value.
On the other side, decreasing your Flow Rate to about 90% can help with over-extrusion which is when an excessive amount of filament is extruded from the nozzle, leading to a host of print imperfections.
The video below shows a fairly simple way to calibrate your Flow Rate, which consists of 3D printing a simple open cube and measuring the walls with a pair of Digital Calipers.
I’d recommend going with a simple option like the Neiko Electronic Caliper with 0.01mm precision.
Under Shell settings in Cura, you should set a Wall Thickness of 0.8mm and a Wall Line Count of 2, as well as a Flow of 100%.
Another thing you can do you calibrate your Flow is to print a Flow Test tower in Cura. You can print it under 10 minutes so it’s a pretty easy test to find the best Flow Rate for your 3D printer.
You can start at 90% Flow and work your way up to 110% using 5% increments. Here’s what the Flow Test tower in Cura looks like.
All things considered, Flow is more of a temporary fix to print problems rather than a permanent one. This is why it’s important to deal with the actual cause behind under or over-extrusion.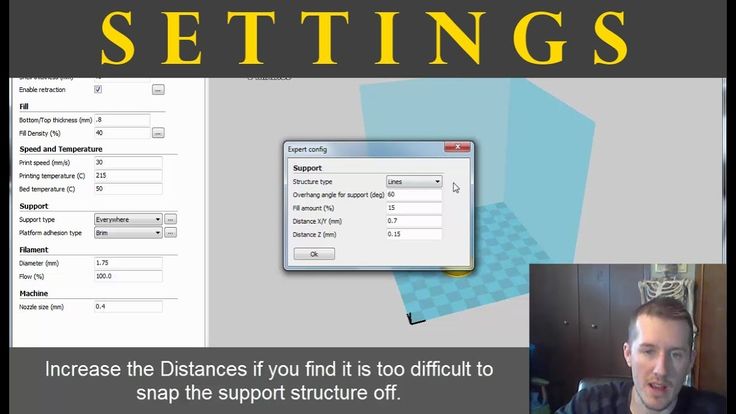
In that case, you might want to calibrate your extruder altogether.
I’ve written a complete guide on How to Calibrate Your 3D Printer so be sure to check that out to read all about adjusting your E-steps, and much more.
What are the Best Infill Settings for a 3D Printer?
The best Infill Settings are based on your use case. For strength, high durability, and mechanical function, I recommend an Infill Density between 50-80%. For improved printing speed and not much strength, people usually go with 8-20% Infill Density, though some prints can handle 0% infill.
Infill Density is simply how much material and volume is inside of your prints. It’s one of the key components for improved strength and printing time that you can adjust, so it’s a good idea to learn about this setting.
The higher your infill Density, the stronger your 3D prints will be, though it brings diminishing returns in strength the higher the percentage used. For example, an Infill Density of 20% to 50% won’t bring the same strength improvements as 50% to 80%.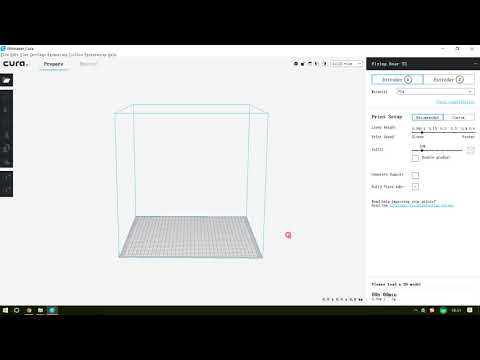
You can save plenty of material by using the optimal amount of infill, as well as decrease printing time.
It’s important to keep in mind that Infill Densities work very differently depending on the Infill Pattern you are using. A 10% Infill Density with the Cubic pattern is going to be a lot different from 10% Infill Density with the Gyroid Pattern.
As you can see with this Superman model, a 10% Infill Density with the Cubic pattern takes 14 hours and 10 minutes to print, while the Gyroid pattern at 10% takes 15 hours and 18 minutes.
Superman with 10% Cubic InfillSuperman with 10% Gyroid InfillAs you can see, the Gyroid infill pattern looks denser than the Cubic pattern. You can see how dense your model’s infill will be by clicking on the “Preview” tab after you slice your model.
There will also be a “Preview” button next to the “Save to Disk” button on the bottom right.
When you use too little infill though, the structure of the model can suffer because above layers don’t get the best support from below.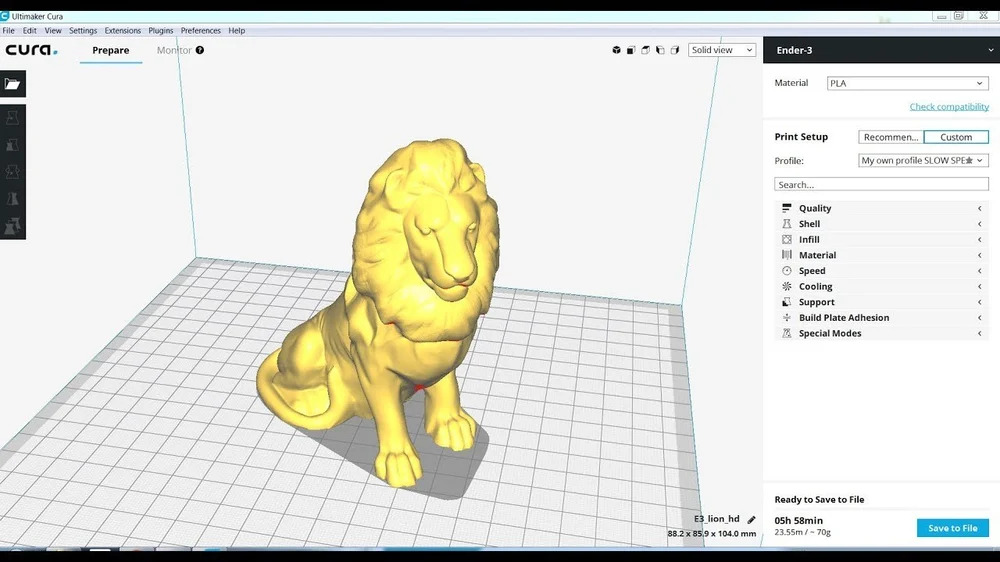 When you think of your infill, it is technically a supporting structure for layers above.
If your Infill Density creates many gaps in the model when you see the preview of the model, you can get print failures, so make sure your model is well-supported from the inside if needed.
If you’re printing thin walls or spherical shapes, you can even use 0% Infill Density since there will be no gaps to bridge.
What is the Best Infill Pattern in 3D Printing?
The best Infill Pattern for strength is the Cubic or Triangle Infill Pattern since they provide great strength in multiple directions. For quicker 3D prints, the best Infill Pattern would be Lines. Flexible 3D prints can benefit from using the Gyroid Infill Pattern.
Infill Patterns are a way to define the structure which fills up your 3D printed objects. There are specific use cases for different patterns out there, whether for flexibility, strength, speed, a smooth top surface, and so on.
The default Infill Pattern in Cura is the Cubic pattern which is a great balance of strength, speed, and overall print quality. It is considered the best infill pattern by many 3D printer users.
Let’s now take a look at some of the best Infill Patterns in Cura.
Grid
Grid produces two sets of lines that are perpendicular to each other. It’s one of the most commonly used Infill Pattern right alongside Lines and has impressive traits such as great strength and giving you a smoother top surface finish.
Lines
Being one of the best Infill Patterns, Lines forms parallel lines and creates a decent top surface finish with satisfactory strength. You can use this Infill Pattern for an all-rounder use case.
It does happen to be weaker in the vertical direction for strength but is great for faster printing.
Triangles
The Triangles pattern is a good option if you’re looking for high strength and shear resistance in your models. However, at a higher Infill Density, the level of strength does drop since the flow gets interrupted due to intersections.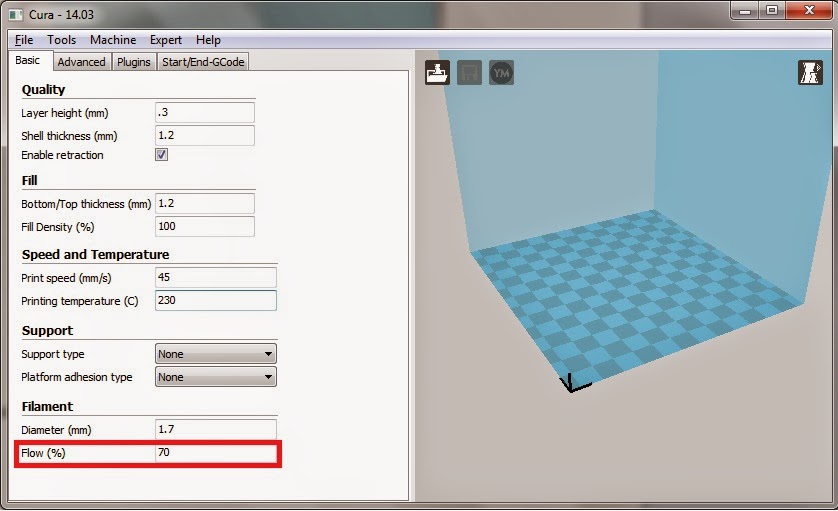
One of the best qualities of this Infill Pattern is that it has equal strength in every horizontal direction, but it does require more top layers for an even top surface since the top lines have relatively long bridges.
Cubic
The Cubic pattern is a great structure that creates cubes and is a 3-dimensional pattern. They generally have equal strength in all directions and have a good amount of strength overall. You can get pretty good top layers with this pattern, which is great for quality.
Concentric
The Concentric pattern forms a ring-type pattern that’s closely parallel to the walls of your prints. You can use this pattern when printing flexible models to create fairly strong prints.
Gyroid
The Gyroid pattern forms wave-like shapes throughout the Infill of your model and is highly recommended when printing flexible objects. Another great use for the Gyroid pattern is with water-soluble support materials.
Additionally, Gyroid has a good balance of strength and shear resistance.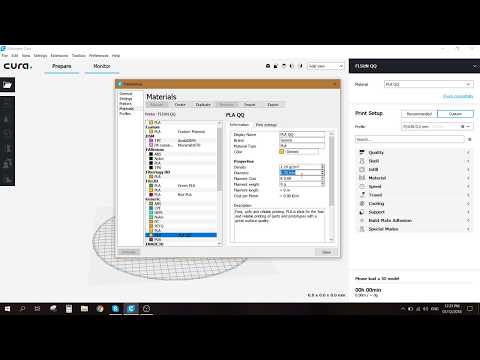
What is the Best Shell/Wall Settings for 3D Printing?
Wall settings or Wall Thickness is simply how thick the outer layers of a 3D printed object will be in millimeters. It doesn’t just mean the exterior of the whole 3D print, but every part of the print in general.
Wall settings are one of the most crucial factors for how strong your prints will be, even more so then infill in many cases. Larger objects benefit the most by having a higher Wall Line Count and overall Wall Thickness.
The best wall settings for 3D printing is to have a Wall Thickness of at least 1.6mm for reliable strength performance. Wall Thickness is rounded up or down to the nearest multiple of the Wall Line Width. Using a higher Wall Thickness will improve the strength of your 3D prints significantly.
With the Wall Line Width, it is known that slightly reducing it to below your nozzle diameter can benefit the strength of your 3D prints.
Although you will be printing thinner lines on the wall, there is an overlapping aspect with adjacent wall lines which pushes aside the other walls to the optimal location.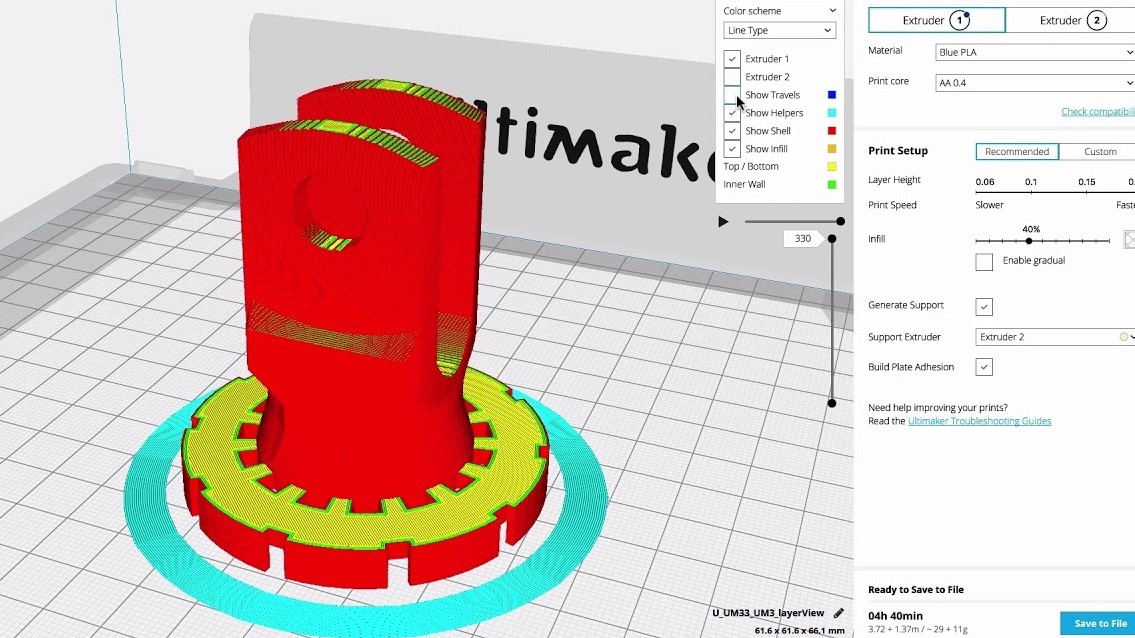 It has an effect of making the walls fuse together better, leading to more strength in your prints.
Another benefit of reducing your Wall Line Width is allowing your nozzle to produce more accurate details, especially on the outer walls.
What Are the Best Initial Layer Settings in 3D Printing?
There are many initial layer settings that are adjusted specifically to improve your first layers, which are the foundation of your model.
Some of these settings are:
- Initial Layer Height
- Initial Layer Line Width
- Printing Temperature Initial Layer
- Initial Layer Flow
- Initial Fan Speed
- Top/Bottom Pattern or Bottom Pattern Initial Layer
For the most part, your initial layer settings should be done to a pretty good standard by just using the default settings in your slicer, but you can definitely make some adjustments to slightly improve your success rate when it comes to 3D printing.
Whether you have an Ender 3, Prusa i3 MK3S+, Anet A8, Artillery Sidewinder and so on, you can benefit from getting this right.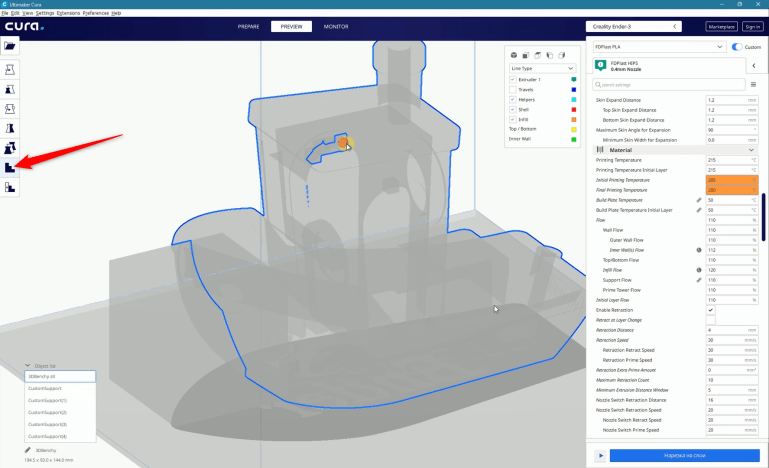
The first thing you want to do before even getting the best initial layer settings is to make sure you have a nice flat bed and it is leveled correctly. Remember to always level your bed when it is hot because beds tend to warp when heated.
Follow the video below for some good bed leveling practices.
Regardless of whether you get these settings perfect, if you don’t have those two things done properly you significantly reduce the chances of print success at the start of your prints and even during, since prints can get knocked off a few hours in.
Initial Layer Height
The Initial Layer Height setting is simply the Layer Height your printer uses for the very first layer of your print. Cura defaults this to 0. 2mm for a 0.4mm nozzle which works well in most cases.
The best Initial Layer Height ranges from 100-200% of your Layer Height. For a standard 0.4mm nozzle, an Initial Layer Height of 0.2mm is good, but if you need some extra adhesion, you can go up to 0.4mm. You may have to adjust your Z-offset accordingly, to account for the increase in material extruded.
When you do use a larger Initial Layer Height, how accurate you were with your bed leveling isn’t as important because you have more room for error. It can be a good move for beginners to use these larger Initial Layer Heights to get great adhesion.
Another benefit of doing this is assisting in reducing the presence of any defects that you may have on your build plate such as indents or marks, so it can actually improve the quality of the bottom of your prints.
Initial Layer Line Width
The best Initial Layer Width is around 200% of your nozzle diameter to give you increased bed adhesion.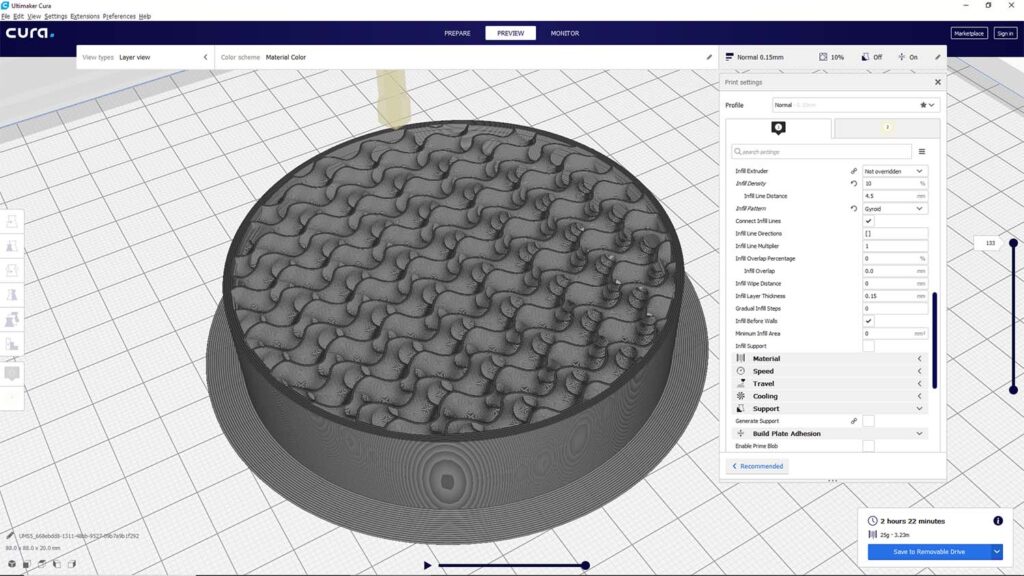 A high Initial Layer Width value helps compensate for any bumps and pits on the print bed and provides you a solid initial layer.
The default Initial Layer Line Width in Cura is 100% and this works just fine in many cases, but if you are having adhesion problems, it is a good setting to try adjusting.
Many 3D printer users do use a higher Initial Layer Line Width with good success so it’s definitely worth trying.
You don’t want this percentage to be too thick though because it can cause an overlap with the next set of extruded layers.
This is why you should keep your Initial Line Width between 100-200% for increased bed adhesion. These numbers have seemed to work great for people.
Printing Temperature Initial Layer
The best Printing Temperature Initial Layer is usually higher than the rest of the layers’ temperature and can be achieved by increasing the nozzle temperature by 5°C increments according to the filament you have. A high temperature for the first layer makes the material stick to the build platform much better.
Depending on what material you are using, you’ll be using a different set of temperatures, though the Printing Temperature Initial Layer will default as the same as your Printing Temperature setting.
Similar to the above settings, you don’t usually have to adjust this setting to get successful 3D prints, but it can be useful to have that extra control on the first layer of a print.
Initial Layer Speed
The best Initial Layer Speed is around 20-25mm/s since printing the initial layer slowly will give more time to your filament to melt thereby providing you a great first layer. The default value in Cura is 20mm/s and this works great for most 3D printing situations.
Speed has a relation with temperature in 3D printing. When you’ve properly dialed in the settings of both, especially for the first layer, your prints are bound to come out exceptionally well.
Bottom Layer Pattern
You can actually change the bottom layer pattern to create a lovely looking bottom surface on your models. The picture below from Reddit shows the Concentric infill pattern on an Ender 3 and a glass bed.
The specific setting in Cura is called the Top/Bottom Pattern, as well as the Bottom Pattern Initial Layer, but you’ll have to either search for it or enable it in your visibility settings.
[deleted by user] from 3Dprinting
How High Can the Ender 3 Print?
The Creality Ender 3 has a build volume of 235 x 235 x 250, which is a Z-axis measurement of 250mm so that is the highest in can print in terms of Z-height. The dimensions for the Ender 3 including the spool holder is 440 x 420 x 680mm. The enclosure dimensions for the Ender 3 are 480 x 600 x 720mm.
How Do You Set Up Cura on a 3D Printer (Ender 3)?
Setting up Cura is fairly easy on a 3D printer. The famous slicer software even has an Ender 3 profile on it among many other 3D printers to get users started with their machine as soon as possible.
After installing it on your PC from the official Ultimaker Cura website, you’ll go straight to the interface, and click on “Settings” near the top of the window.
As more options are revealed, you’ll have to click on “Printer,” and follow up by clicking on “Add Printer.”
A window will appear as soon as you click on “Add Printer.” You’ll now have to select “Add a non-networked printer” since the Ender 3 does support have Wi-Fi connectivity. After that, you’ll have to scroll down, click on “Other,” find Creality, and click on Ender 3.
After choosing the Ender as your 3D printer, you’ll click on “Add” and continue to the next step where you can adjust the machine settings. Make sure the build volume (220 x 220 x 250mm) is entered correctly in the stock Ender 3 profile.
The default values are bang on for this popular 3D printer, but if you see something you’d like to change, do it, and then click on “Next.” That should finalize setting up Cura for you.
The rest of the work is nothing but a breeze. All you have to do is choose an STL file off of Thingiverse that you want to print, and slice it using Cura.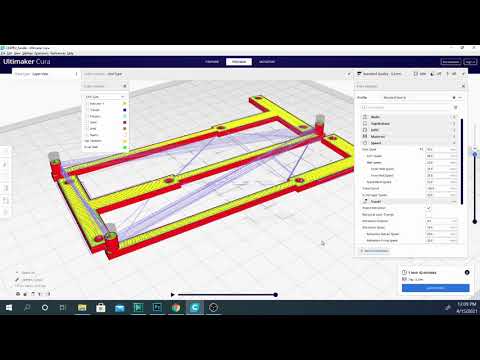
By slicing the model, you’re getting instructions for your 3D printer in the form of G-Code. A 3D printer reads this format and starts to print right away.
After you’ve sliced the model and have dialed in the settings, you’ll need to insert the MicroSD card that comes with your 3D printer into your PC.
The next step is to grab your sliced model and get it on your MicroSD card. The option to do that appears after you’ve sliced your model.
After getting the G-Code file onto your MicroSD card, insert the card into your Ender 3, rotate the control knob to find “Print from SD” and begin your print.
Before beginning, do make sure that you’re giving your nozzle and print bed enough time to heat up. Otherwise, you’ll run into loads of print imperfections and related issues.
Best Cura Settings & Profile for Ender 3
- Author
- Recent Posts
Martin
Martin has a M.Sc. in physics and has gained many years of experience in industry as a lab manager and quality assurance manager.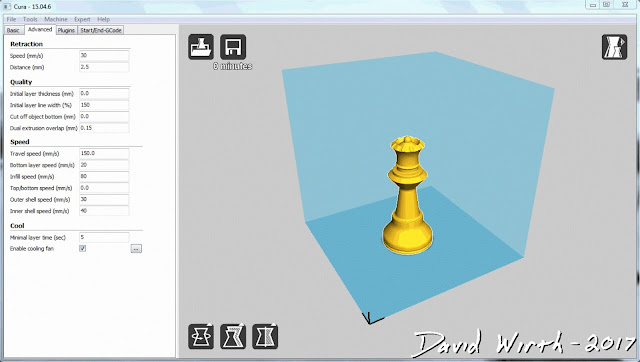 He has now tested dozens of 3D printers and is happy to share the collected experience with each new article.
Latest posts by Martin (see all)
- BQ-Hurakan vs. Ender-3 V2 Neo | Comparison, Pros & Cons - November 10, 2022
- Mouse Ears (Brim Ears) vs. Warping in 3D Printing – Guide - November 10, 2022
- Ender-5 S1 vs. Ender-5 Pro | Comparison, Specs, Pros & Cons - November 9, 2022
Disclosure: Links marked with * are Affiliate Links. I earn from qualifying purchases if you decide to make a purchase through these links – at no additional cost for you!
There is no doubt that the Ender 3 from Creality is a popular printer. It is not only easy to use but also affordable. It also offers users many editing options. With its awesome price-performance-ratio, it can compete against more expensive models.
However, users who want to take full advantage of the 3D printer need to look at the available Ender 3 settings and profiles in Cura.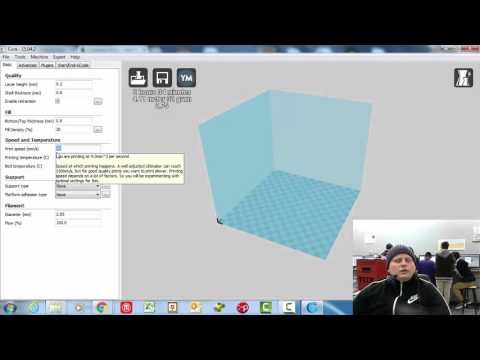 In this article, you’ll learn how to get the most out of your device.
To find the best Cura setting for your Ender 3, start with the default profile and test each setting until it is perfect.
The perfect Ender 3 profile is characterized by the following features:
- Printing speed: 50 mm/s
- Layer height: 0.12 mm
- Print temperature: 200 °C
- Printing bed temperature: 50 °C
- Retraction: 6 mm at 25 mm/s
- Infill: 20 %
- Initial fan speed: 0
- Speed of the first layer: 20 mm/s
However, some of these settings depend on the filament used. The above-mentioned temperatures apply to PLA*. For other common filaments such as ABS* or PETG*, we explain the best parameters below.
Table of Contents:
- 1 Which Cura Setting is Best for the Ender 3?
- 1.
 1 The Standard Profile as a Basis
 - 1.2 The Temperature is What Counts
- 1.3 Why the Printing Bed Temperature is Important
- 1.4 How to Set the Speed
- 1.5 Layer Height and its Influence on Resolution
- 1.6 The Best Retraction and its Benefits
- 1.7 Infill for More Stability
- 1.8 The Importance of the First Layer
- 1.
- 2 Further Information
- 2.1 The Ender 3 is Also a Good Choice for Beginners
- 2.2 The Properties of the Materials at a Glance
- 3 Related Questions
- 3.1 When Should I do Test Prints?
- 3.2 Is High Speed Always at the Expense of Quality?
- 3.3 Are Upgrades Available for the Ender 3?
- 4 Conclusion – the Best Settings Depend on the Printer
Which Cura Setting is Best for the Ender 3?
The choice of the Cura setting depends on the desired result and the material used. It’s best to use the default Ender 3 3D printer profile as a starting point for customizing your options. This allows you to create a custom profile that fully meets your needs.
If you would like to know how to proceed in detail in this process, the following article will help you. Here’s a detailed tutorial of the best Cura settings for the Ender 3 3D printer, making sure that even a beginner can get up to speed quickly.
The Standard Profile as a Basis
First of all, it should be noted that users with the standard profile of the model are well-advised to start with. For all further modifications, you can use this as a basis. You can activate this as follows:
- First, you click on “Settings” and then on “Printers” and “Manage Printers”.
- In the settings box, click on “Add”, then select “Add a non-networked printer”.
- Now scroll to “Creality 3D”, expand the sector and select “Ender 3”.
Now the default settings should be enabled so that you are able to create your own profile. However, you need to make sure that the resolution and filaments are adjusted accordingly.
In the following, we will go into the individual settings and how you can optimize them.
To get perfect results you should print test objects. There are general objects, like calibration cubes or objects to test special settings like a temperature tower, stringing columns, etc.
The Temperature is What Counts
There is no doubt that temperature is a key factor in 3D printing. If not properly adjusted, it can lead to over- or under-extrusion, blobs and zits.
For a smooth extrusion of the filaments, at least 180°C are required. An overextrusion is generally only likely from 220°C. It is therefore not worth setting the temperature too low.
The choice of temperature for Ender 3 also depends on the material. For ABS*, a temperature range between 220 and 250°C and for PETG*, values between 220 and 245°C are ideal.
Similarly, attention must be paid to the brand of the filament.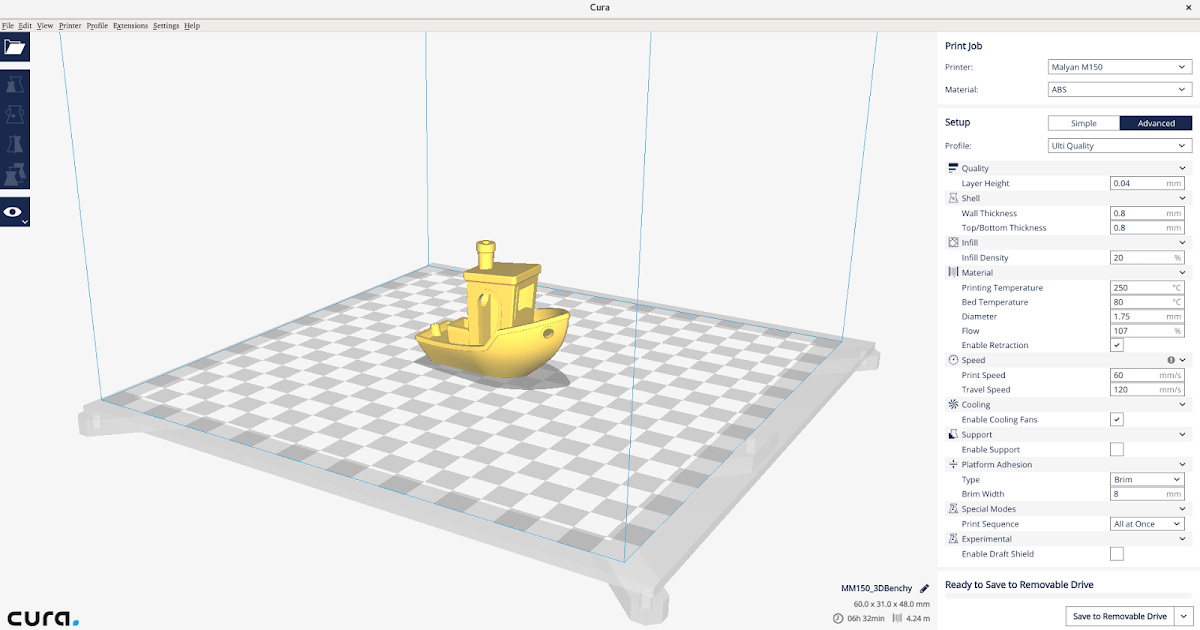 If you are not sure about the temperature, you should make a test print. A small temperature tower will give you an idea of the compatibility of your settings. In general, 200°C is a solid average temperature for PLA*.
If you calibrate your device, you may only make one setting at a time.
Temperature Settings for PLA. (source: Ultimaker Cura)Why the Printing Bed Temperature is Important
Attention must also be paid to the material with regard to the printing bed temperature. No heating is needed with PLA. However, the material can still benefit from a little heat – as a guideline you should remember 50°C.
You can do without heating the printing bed even if you already use an additive for adhesion such as glue, painter’s tape or hairspray. As a guideline, you should remember that the temperature of the printing bed should always be higher than room temperature.
The situation is different if you use ABS. In this case, it is recommended to set the printing bed temperature at 110°C.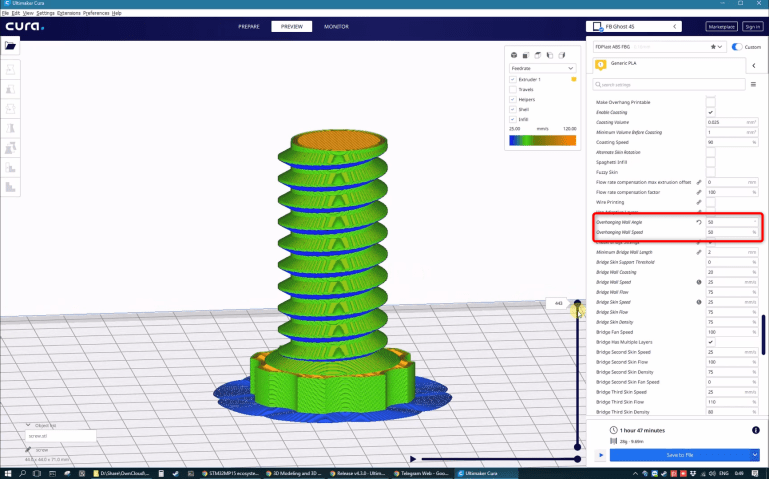 You should also consider building an enclosure. On the one hand, this will counteract excessive cooling and prevent layer splitting and warping.
A slightly higher temperature should be selected for PETG than for PLA. However, it should be below that of ABS. An average temperature of 70°C has proven to be best.
How to Set the Speed
Without a doubt, speed is an important factor for a respectable result. The challenge in this case is to balance print quality with the processing time per job.
Keep in mind that with increasing speed you will have to expect losses in terms of quality. If the hot end moves slower, it will be able to work with more detail. However, it is important to keep an eye on the right dimensions. After all, very few users want to wait several weeks for a print.
The average speed of Ender 3 has proven to be between 45 and 65 mm/s. The print speed can be increased with OctoPrint together with alternative firmware such as Marlin and Klipper.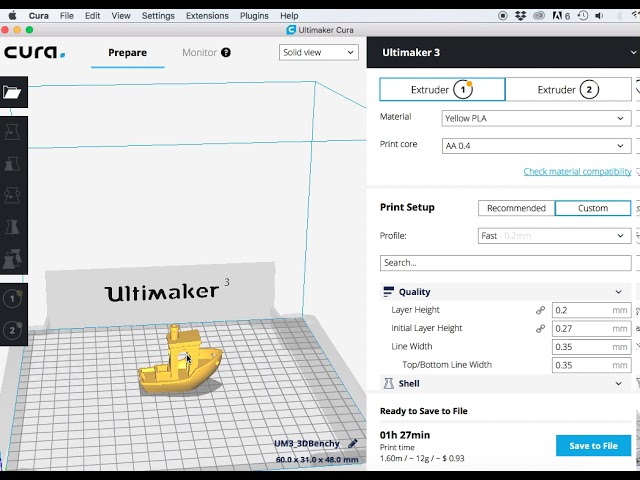 A suitable starting speed is 60 mm/s. However, if your printout requires high accuracy, you should reduce this value.
A slow speed should be chosen for flexible materials. You should use speeds between 20 and 40 mm/s. This will ensure that the result is what you want and that there are no mistakes.
It is generally recommended to make test prints in advance. This will show you whether the setting is appropriate for the material in question.
PETG is one of the viscous substances. So to counteract an unclean result, you should reduce the speed by 20 mm/s. If you want to be on the safe side, a value between 30 and 55 mm/s is recommended. But it is best to start at the bottom end of the scale and work your way up slowly.
Print Speed Settings in Cura. (source: Ultimaker Cura)With ABS, the print speed should be selected similarly to PLA. In this case, a value between 45 and 65 mm/s is just right. However, if it is a large print with less detail, you can even increase the speed up to 120 mm/s.![]() The maximum speed for the Ender 3 is 150 mm/s. The printer should have no problems with this.
The maximum speed for the Ender 3 is 150 mm/s. The printer should have no problems with this.
Layer Height and its Influence on Resolution
If you halve the layer height, the print resolution is doubled. In concrete terms, this means that you get twice as many layers in one print. However, this also has negative effects on the printing speed. The challenge here is to produce the highest possible quality prints in a relatively short time.
With the Ender 3 there are values, which give the best results. Keep the following numbers in mind:
- 0,08 mm
- 0.12 mm
- 0,16 mm
- 0,20 mm
- 0,24 mm
These values are multiples of 0.04 mm. With the Ender 3, this is simply because the system raises the hotend with the Z-axis stepper motor by 0.04 mm per step. For fine details that require rather slow printing, the 0.12 mm setting proves to be ideal. For faster printing with slightly less detail, 0.20 mm should be selected.
The Best Retraction and its Benefits
If you want to counteract oozing and stringing during printing, you should make use of retraction.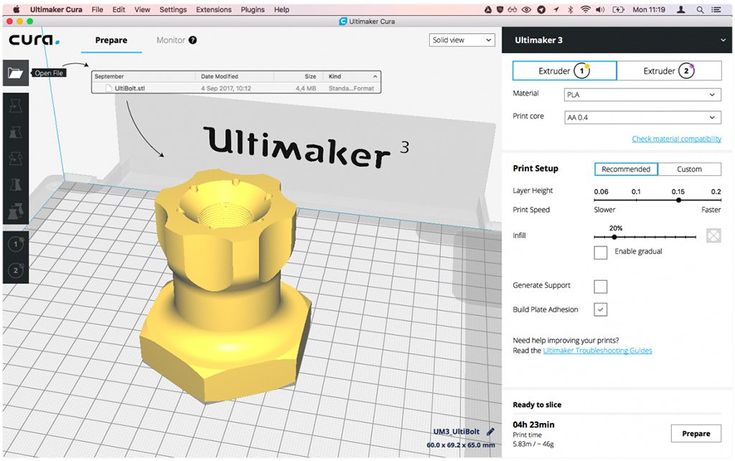 There are two main settings to choose from:
- Retraction Retract Speed
- Retraction Minimum Travel
With this, you reverse the extruder motor. This relieves the pressure on the nozzle during transport. There is no extrusion of excess material, which ultimately contributes to a better result.
With the Ender 3, it is not easy to find the best setting for retraction at the beginning. After all, the 3D printer is known for strong stringing. Thanks to online users, this problem is now a thing of the past. At least for PLA, they have been able to find an optimal retraction setting. At a speed of 25 mm/s, a 6 mm travel should be selected.
For PETG you should choose a shorter retraction of 4 mm, while for ABS you should choose 6, mm with a faster retraction speed of 40 mm/s. However, it may take a few tries before you find the best setting for you and your print. Again, it is recommended to make test prints.
Infill for More Stability
If you want to optimize the strength and weight of your print, you should consider infill. It should be mentioned right at the beginning that there is no such thing as the perfect setting. It always depends on the purpose of the print and the object, how much infill you should use.
If it is a light, decorative figure, an infill between 5 and 10 percent is sufficient. The result is then much lighter, and you will also reduce the printing time.
For an item with a functional character, however, an infill between 20 and 60 percent proves to be a better choice. It is sometimes necessary to experiment with this. Prints that require particularly high stability sometimes even need to be filled up to 100 percent.
The Importance of the First Layer
The first layer is very important for printing. To ensure a good quality result, it has to adhere well to the printing bed. If this is not the case, the print may fail.
It is therefore absolutely necessary to adjust the settings for the first layer. This will ensure that the result does not become loose during the printing process. This is not only frustrating but also wastes a lot of time and filament.
You should make the following settings to avoid bad adhesion:
- If the thickness of the first layer is concerned, a value between 0.20 and 0.24 mm should be selected. This is because a slightly thicker first layer results in improved adhesion.
- The speed needs to be adjusted accordingly for the first layer. This should be slightly slower than the rest of the print. This gives the material more time to bond with the printing bed.
The positive thing is that reducing the printing speed of the first layer does not affect the total printing time too much. Ideally, you should choose 30 mm/s for this. If this value still causes problems with print adhesion, you can reduce the speed further.
- In advance you should determine how many layers you want to print slower. Usually five is quite sufficient. The same speed is used as for the first layer.
 If there are still problems with adhesion, add another layer of material.
 - You should set the fan speed to 0 percent at the beginning. If the first layers cool down too much or too fast, this can cause the print to shrink in the lower area.
You may then have to deal with a warped result. The model will also jump off the printing bed as a result. For this reason, you should deactivate the fan at the beginning of the printing process.
Further Information
The Ender 3 is Also a Good Choice for Beginners
In general, the Ender 3 is a device that is easy to handle. With it, you can easily make all settings. The user interface is clearly arranged so that you can usually find your way around quickly. That’s why the 3D printer is a good choice for beginners.
But before you dive into printing, you should familiarize yourself with all functions and profiles. Be sure to take a look at the basic settings and activate the default profile beforehand.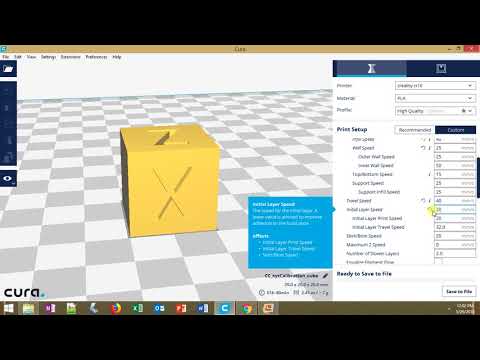 Because with it you have a good basis for all further measures.
Also, keep an eye on your model and its field of application. Because which option you choose always depends on the purpose the result has to serve. If you follow the advice given above, you should be on the safe side.
If you are unsure, you can contact experienced users. They will help you to handle Ender 3 correctly.
The Properties of the Materials at a Glance
As you can see in the article, 3D printing with the Ender 3 is primarily PLA*, PETG* and ABS*. Which material you choose depends on your model and its application.
PLA has the advantage that it is easy to process. It also forgives minor mistakes. Furthermore, the material is characterized by a more stable surface. However, PETG has a longer durability. In addition, it is more stable and can withstand higher loads. It is therefore particularly suitable for functional models that are frequently in use.
However, PETG is more expensive and requires detailed printing.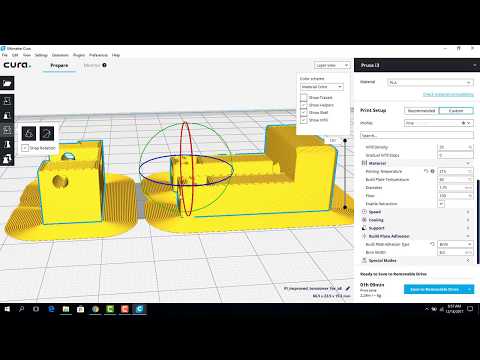 You should not make mistakes during this process. If, on the other hand, you want a softer material, ABS is the right choice. It can be plastically deformed more easily, which means that you can also correct mistakes later on.
Drilling and milling should therefore be possible without problems. You can also use models made of ABS outdoors without any problems – the material has a comparatively high resistance to weathering. However, you should not leave it out in the sun for too long.
Related Questions
When Should I do Test Prints?
In general, it is recommended to perform a test print after making a new setting. In this case, you simply make a small tower of several layers. This way you can see whether the new option will convince you in terms of speed and quality.
Test prints also prove to be practical when it comes to adhesion to the printing bed. You can use them to counteract later breakdowns and distortion of models. In the long run, you save time and money.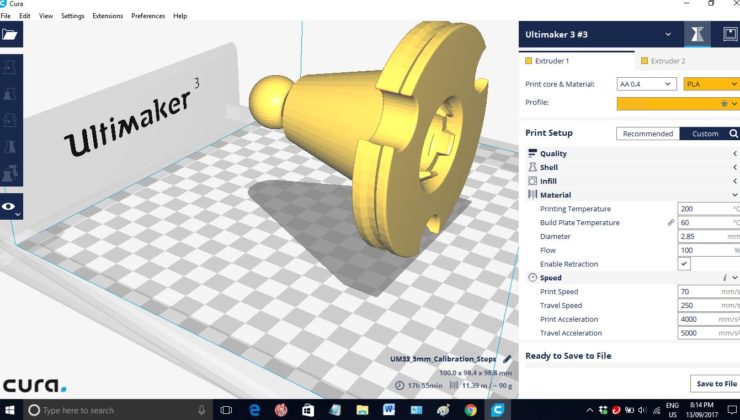
Is High Speed Always at the Expense of Quality?
If you set the printing speed very high – over 100 mm/s – the printer cannot process the details of your model too accurately. But if the print is rather straight, you don’t have to worry about that.
This is all the more true if your primary goal is stability. But regardless of the model, it is recommended to reduce the speed during the first few layers. This will not have too much effect on the overall duration of the print and ensures a solid construction.
Quality as a Function of Printing Speed (source: 3dprintingindustry)Are Upgrades Available for the Ender 3?
If you want to expand the capabilities of the 3D printer, you should look for upgrades. You now have a wide range of mods to choose from. This gives you the ability to personalize your models with even more detail and customization.
Conclusion – the Best Settings Depend on the Printer
With these settings, you should have no problems when 3D printing with your Ender 3. However, you may need to do some experimentation before you find the option that’s right for you.
Make use of test prints. Also, keep in mind that the appropriate setting can vary from model to model. After all, a decorative item has to meet other requirements than a functional product.
If in doubt, check with other users for the best printing options to get the best results. Never be impatient when making prints. Make sure that speed is not at the expense of quality.
If in doubt, select a slow printing speed. It is also not always easy for beginners to find the right balance between stability and material consumption. Here, too, you may need to try a few things until you find the right value for you.
Disclosure: This website is the property of Martin Lütkemeyer and is operated by Martin Lütkemeyer. Martin Lütkemeyer is a member of the Amazon Services LLC and other Affiliate Programs. These are affiliate advertising programs designed to enable websites to earn advertising revenue through advertising and linking to Amazon. com and others. Links marked with * are affiliate links.
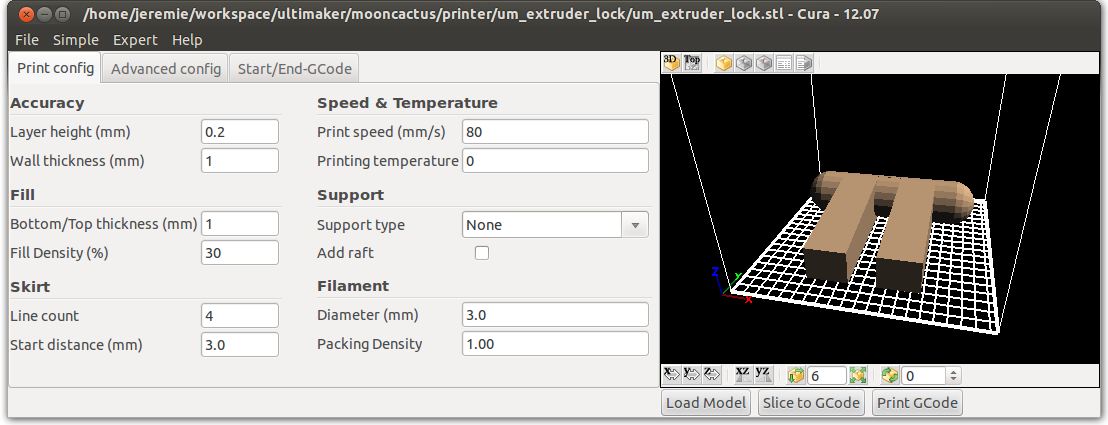
Optimal Cura settings for PLA 3D printing
3DPrintStory 3D printing process Optimal Cura settings for 3D printing with PLA plastic
Through trial and error, you can gradually fine-tune your Cura settings for 3D printing with PLA (as well as many other 3D printing materials). The article below provides recommendations from personal experience that may be helpful if you are using PLA plastic on your 3D printer and Cura to slice and prepare your 3D print modes.
In addition to explaining preferred temperature settings, advanced support and infill settings are detailed, along with many other factors that affect 3D printing without defects or issues.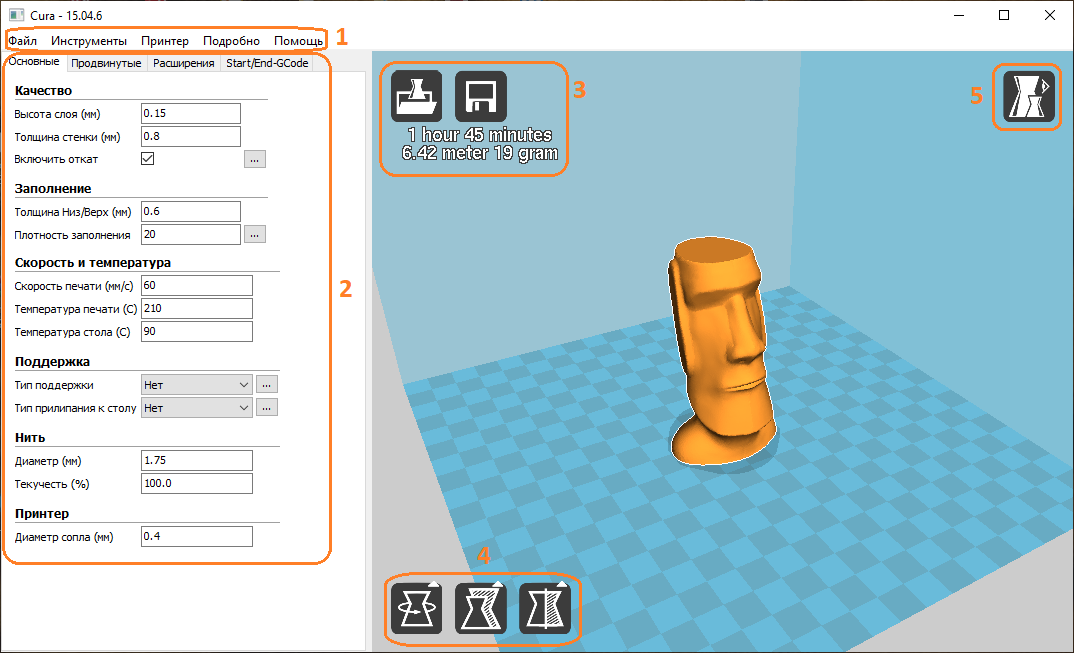
*** The following settings are for Cura and tested on Lulzbot TAZ 3D printers with an E3D host. We have successfully used these settings on our TAZ3 and TAZ5 printers as well as the HATCHBOX 3.0mm PLA. Simplify 3D uses very similar profiles. Environmental conditions and material manufacturer can also greatly affect these settings
3D print quality settings
The height of the 3D print layer is very dependent on the nozzle size of your 3D printer, as well as the quality you want to achieve. A 3D printer with a 0.6mm nozzle can achieve layer thicknesses of up to 0.4mm, and a part with a layer height of 0.1mm will take twice as long to produce as one with a 0.2mm nozzle, so these factors are important to consider.
Our default 3D print quality setting is 0.25mm layer height. Then we fine-tune the retract settings for the PLA. The resulting profile for Cura will be:
- Minimum Travel: 1.5mm
- Enable Combing: All
- Minimal Extrusion Before Retracting: 0.
 005mm
005mm - Z Hop When Retracting: .1mm
trying to eliminate gaps. This will help prevent "burrs" from appearing on the sides of the 3D model. "Z Hop" is set to 0.1mm when retracted, so thin sections of 3D models are less likely to be damaged.
When we click on the "Advanced Settings" tab in Cura, we look at the "Retraction" and "Quality" sections. We set the retraction speed to 10 mm/s and the distance to 1.5 mm. In the "Quality" menu in the "Advanced section" we do not increase the initial layer thickness, but increase the initial line width to 115%. We have found that this helps improve adhesion to the table without compromising the quality of the 3D print.
The pictures below show examples of 3D printing. From left to right, 100 micron layer height (high quality), 250 micron layer height (standard quality), and 380 micron layer height (draft quality).
Infill settings
To get a clean PLA print, we always try to include at least 4 bottom/top layers (i. e. you have to multiply the layer height by at least 4). It can increase depending on how flat the object is, how high the fill density is set, and how thick your layer is. A long rectangular piece with a layer height of 0.1mm will require more than 10% infill and at least 7 bottom/top layers to avoid pitting. The print below had just such a problem: too little infill and too few bottom/top layers, spoiling the 3D print result.
The preferred infill density percentage is unique to your particular 3D model, as are the quality settings. Infill overlap settings are something to focus on to improve the surface quality of a 3D model.
This 3D model had 10% infill and 3 bottom/top layers at a layer height of 0.25mm, which was not enough for a smooth top surface.
This 3D model had 20% infill and 5 bottom/top layers at a layer height of 0.25mm, which was enough for a beautiful outer surface.
Infill Overlap
Infill Overlap refers to the percentage of infill overlap on the shells.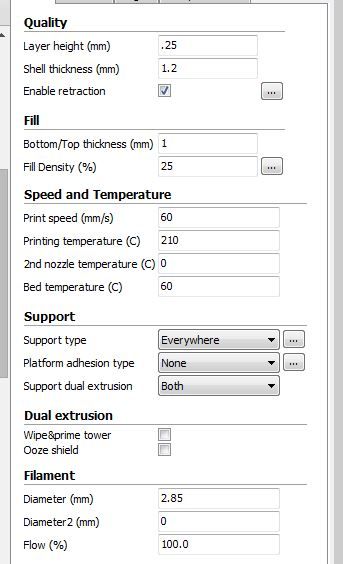 When the number of shells is low and the percentage of infill overlap is set above 12%, we notice "veining" on the surface of finished 3D models, especially on large translucent PLA parts. We prefer almost all of our PLA models to have an 8% overlap. The photo below shows an example of two shells with a 15% overlap of translucent blue PLA. While the effect looks pretty cool, we needed to reduce the fill overlap to get this veining defect to disappear.
Speed and temperature
As we warned above, these PLA settings work well with E3D enabled Lulzbot TAZ printers. These temperatures (and speeds) may vary depending on the 3D printer and how long it has been used.
Our nozzle operates at a comfortable (but slightly higher than average) temperature of 205-210°C for PLA. We usually preheat the table to 60°C, but since we added a thicker 1/4 inch glass, we increased it to 65°C. This thicker glass makes the table process easier and also prevents cracks and chips.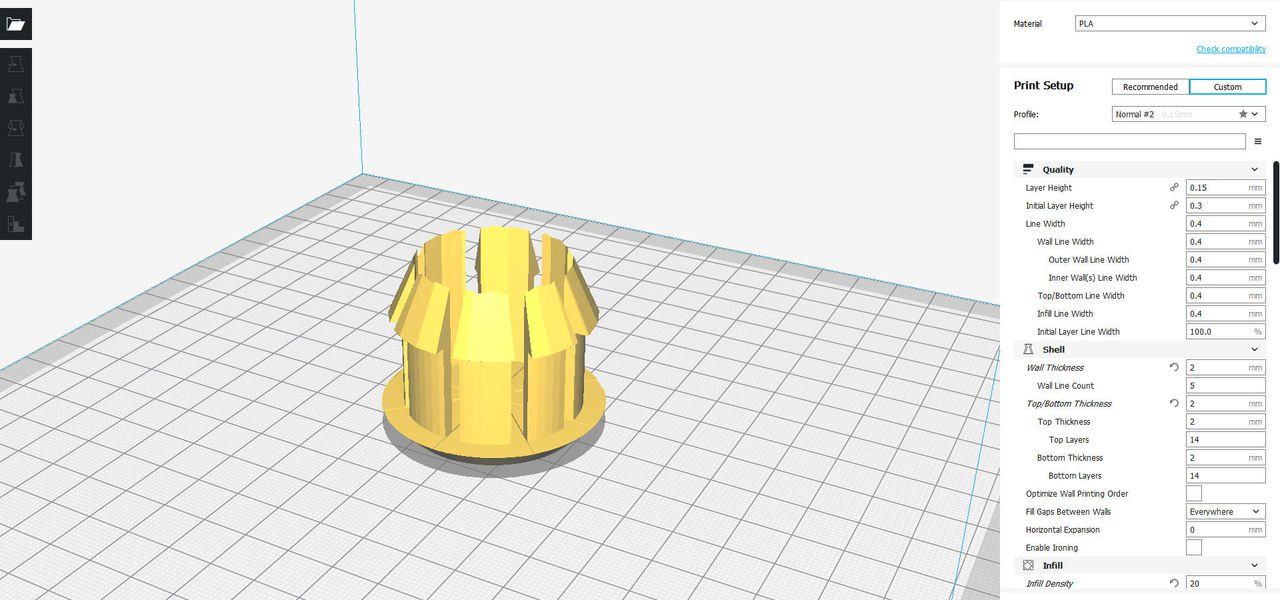 We've used PLA on tables that don't have a heating option, but it's definitely better to have a heated table. The glass stage heated to 65° helps prevent warping and prevents parts from being torn off during the 3D printing process.
We run our printers a little slower to ensure the best surface quality. We usually set our average speed to 60mm/s, with slower settings for the outer and top/bottom layers. In advanced mode we have the following speed settings:
- Travel Speed: 150 mm/s
- Bottom Layer Speed: 25 mm/s
- Infill Speed: 60 mm/s
- Top/Bottom Speed: 40 mm/s
- Outer Shell Speed: 40 mm/s
- Inner Shell Speed: 60mm/s
Support Material Settings
We found the support settings to be one of the hardest things to change. Each material requires a different infill percentage and angle. Each one also requires a unique distance from the 3D model for easy removal.
Anyone who has been typing long enough probably doesn't like working with caliper settings. Our recommendations for support material settings are as follows:
- Structure Type: Lines
- Overhang Angle for Support: 50°
- Fill Amount: 15%
- Distance X/Y: 0.8mm settings
- Distance Z: 0.16mm
support, you will also find a type of base to grip with the table. While "brim" settings are not usually needed for PLA parts, large 3D models can warp and narrow parts have a hard time sticking to the table without tipping over. In our PLA settings, this option is usually disabled by default, and we enable it manually for such special cases.
The problem with base coats, especially on PLA, is that they are difficult to remove. We've had parts where the edge is much harder to remove than the base backing material. This forced us to switch to the narrower "skirt" version instead of "brim".
With "None" selected as the first layer type, click "…" to see more options. Then we change the number of lines to 10-15, the initial distance to 0. 01mm and the minimum length to 250mm. This allows the first layer to form only on the outside of the 3D model. Although the outer side will still require additional processing, this saves a lot of time removing margins from the inner thin parts of the 3D model.
Cooling
And finally, the last section on the advanced settings tab is the ability to activate the active cooling fan. The fan for PLA plastic should always be kept on. If you try to turn off the cooling fan, you may get unpleasant defects (for example, in the photo below).
The resulting cooling settings for Cura using PLA plastic are as follows:
- Fan Full on at Height: .5mm
- Speed Min: 35%
- Speed Max: 75%
- Minimum Speed: 10mm/s
- Cool Head Lift: off
Conclusions models require minor changes. Certain 3D printing angles may require your support settings to be slightly closer in the Z or X/Y axis. As with any 3D print media settings, these PLA settings need to be adjusted for each make/model of 3D printer.
PrintScreen with our basic and advanced settings are shown below:
Cura settings profile for PLA you can download here.
Cura 3D tutorial for beginners
3DPrintStory 3D printing process Cura 3D tutorial for beginners
Cura 3D is such a handy slicing program that many users don't even realize what they are doing. Simply upload your model, select the 3D print quality and start printing. It's as easy as printing with a regular 2D printer.
Intro
Basically, Cura 3D is a 3D printing program - a method of transferring a digital file from your personal computer to a 3D printer so that the latter can process the data and start printing.
Compared to many other slicing programs, Cura 3D seems extremely simple. But if you need more flexible settings, they are also there. It's just that the user interface is implemented really competently and conveniently.
Cura 3D is developed and maintained by Ultimaker, a 3D printer manufacturer known for its perfectionism and strong support for the open source movement. There are a lot of manual settings, but they are hidden from the user (not really that deep), so if you are one of those who are interested in experimenting or need certain non-standard 3D printing settings, you can implement them.
For those who just want to print a part, just adjust the speed and quality.
This tutorial is aimed at those who are just getting started with their 3D printer. We assume that you have just turned on the printer and loaded the media. From now on, we will look at the necessary steps in Cura 3D to start 3D printing.
What is Cura 3D?
Cura 3D is a slicing software for 3D printers. Cura takes a 3D model as input and forms separate vertical layers to create a G-coded file that your 3D printer understands.
Before getting started with Cura, it's worth understanding the entire process of preparing a 3D model file. Even if you use ready-made 3D models, there should be a general understanding.
Three main steps in preparing files for 3D printing:
- Modeling. Modeling (formation of a virtual solid 3D model) is implemented in special applications like 123D Design or SketchUp, etc. These applications support their own specific file formats and allow you to open, edit, save, and export these files.
- Export 3D model file. After you have created your model, it must be exported to an STL or OBJ file. These formats are supported by Cura 3D. They differ from native 3D modeling application formats in that they only contain information about the final geometry, without separate nodes and editable content.
- Slicing file export. STL or OBJ file can be imported into Cura 3D, where it is processed and G-code is generated as output. G-code is just a text document, with commands that a 3D printer follows. For example, the temperature of the extruder, movement to the left, right, etc. are indicated.
At the first stage, a solid model is developed, but if you have no such experience, don't worry, on Thingiverse, Youmagine you will find a huge number of finished models. There are other sites where you can download models for free 3D printing. As a rule, in such repositories, models are already exported in STL format, so you can immediately import them into Cura 3D.
What exactly does Cura3D do?
Cura 3D converts a .stl or .obj file of a 3D model into a format that the 3D Printer can process. FFF 3D printers form each new layer on top of the previous one. Cura 3D takes a 3D model, cuts it into layers, and feeds those instructions to the 3D printer, layer by layer.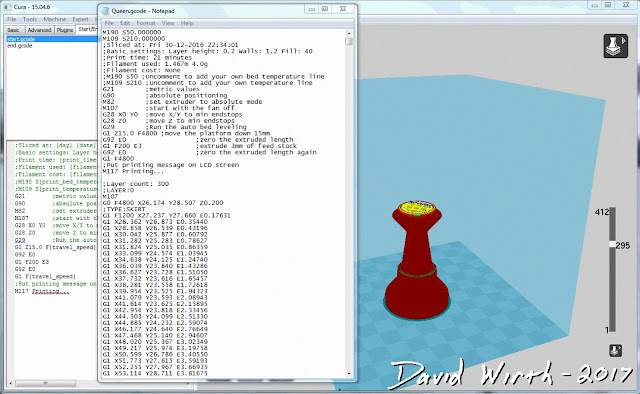
These instructions are transmitted as a G-code, a text document with a .gcode extension. If you open the file, you can view the code itself and even understand the commands.
For example, here is a small piece of code:
G0 F7200 X19.698 Y28.262 Z.36 G1 F1500 E0 G1 F1350 X22.467 Y26.175 E0.15654 G1 X23.338 Y25.568 E0.20447 G1 X24.246 Y25.027 E0.25218
Over time, as you become more familiar with 3D printing, you will be able to adjust the speed of the coolers, the height of the layers, the temperature of the extruder at different points. This is a very useful skill for troubleshooting some 3D printing issues.
Since each 3D printer has its own characteristics: print volume, table area and nozzle diameter, Cura 3D needs to know these parameters in order to correctly generate the G-code.
After you specify the design features of your 3D printer model, you can proceed to the settings for the height and layer thickness. Only then will Cura 3D be able to generate a valid G-code with motion path calculations.
The resulting G-code can be saved to an SD card or transferred to 3D printing via WiFi (depending on the interface that your 3D printer supports).
Getting Started with Cura 3D
In this part of the article, we will explain how to get started with Cura 3D. Namely - downloading and installing, optimizing your .stl and .obj files for further export to G-code.
Step 1: Install Cura 3D
Cura 3D is a multi-platform program that is available for Linux, Mac and Windows OS. All versions can be downloaded free of charge from the Ultimaker website.
You will download a file that will install Cura 3D. The installation procedure may differ slightly depending on your OS. In this tutorial, we used Cura 3D version 2.3.1.
- Launch Cura 3D.
- Select your 3D printer model. The first time you launch Cura 3D, it will ask you to select your printer model. If you have Ultimaker or Lulzbot, then they come with a special version of Cura 3D with ready-made settings.
 If not, or if you want to set up a new 3D printer, then after loading the program select ' Select -> Printer '.
The 3D printer selection menu will load. If you downloaded the program from the link above, then all available printers will be Ultimaker. To select another model, press Other . If you're lucky, your 3D printer will be on the list.
If not, you can go to your printer manufacturer's website and look for a custom version of Cura 3D to download. If it is not there, then select Custom -> Add Printer .
A window will open with the option to add 3D printer settings. At this point, you will need information about your model. Again, you can probably find this information on the manufacturer's website. And if you assembled a 3D printer yourself, then you probably remember all the parameters!
Enter all required parameters and click Finish .
Step 2: Overview of the Cura 3D interface
The screenshot below shows the main blocks of the Cura 3D interface.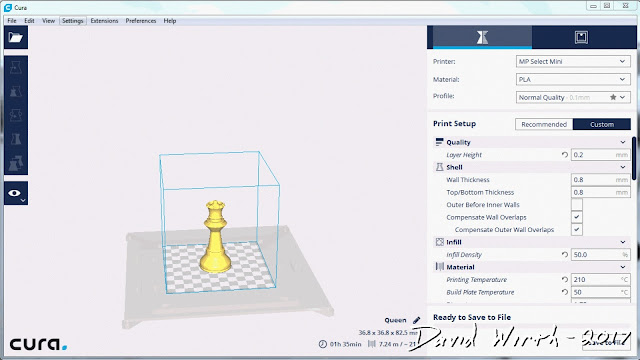
Block
Top Navigation- Open File : Use the button in the top left corner of the menu or the option File -> Open File to open your .stl or .obj file.
- Edit : Use to select all models, delete or merge 3D models. Standard, useful commands.
- View Mode : This button allows you to switch between Solid, X-Ray and Layers views of the model.
- Settings : Opens the media and 3D printer settings.
- Extensions : This is for more advanced users. Allows you to install Cura 3D Extensions, which, for example, activate the ability to manually edit the G-code.
- Help : If you have questions, you can't figure something out - this is a great place for
Block
Tool bar (left)- Open File : Allows you to open the .
 stl or .obj file you want to print.
 - Move : When clicked, arrows will appear around the selected model. Using the arrows you can move the model on the desktop.
- Scale : Increase or decrease the size of your 3D model.
- Rotate : Handy tool for adjusting model orientation, rotation.
- Mirror : When clicked, arrows appear around the selected model. Click to mirror the position of your model.
- Select Settings : A handy feature for adding frequently used settings to the sidebar. For example, you can display the wall thickness ( wall thickness ), model infill ( infill ) and speed ( speed ). Active only for loaded 3D model.
- View Mode . Solid X Ray and Layers . If Layers is selected, a slider will appear that allows you to "cut" the model into layers.
Settings Palette box (right)
In this box, you can adjust the print quality and select media.
Printer . This is the 3D printer you chose in the first step. If you have more than one 3D printer, they can be configured and selected from this list.
Material . Quick selection of the material that is used for 3D printing.
Profile . There are three 3D print qualities available: Low , Normal and High . Selected from dropdown. At the first stages, it is recommended to use the provided blanks. Over time, as you get comfortable with your 3D printer and printing, you can experiment and create your own profiles that suit you best.
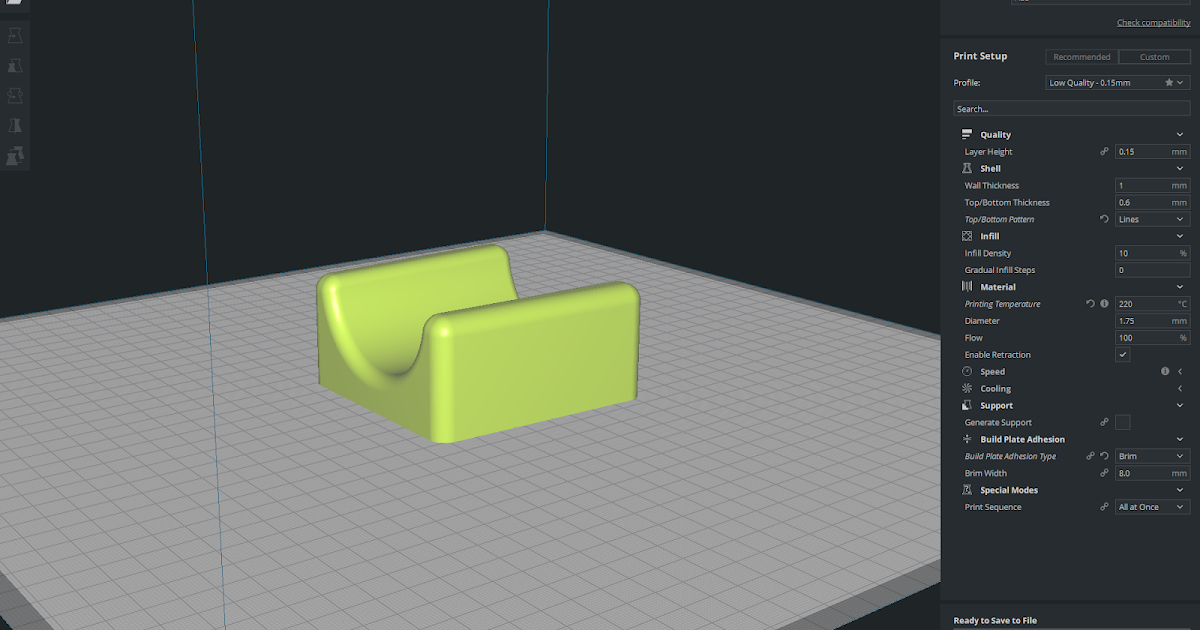
Print Setup . There are two options - Simple (Recommended) and Advanced (Custom)
- Simple (Recommended) .
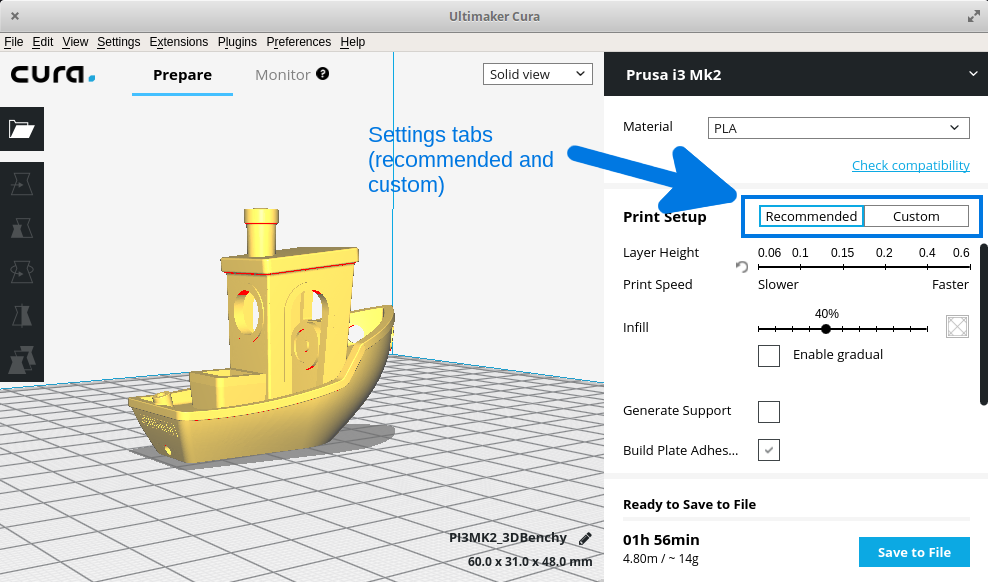 The settings Simple (Recommended) are pulled from the 3D printer settings you enter when you first start Cura 3D. This option is a great option for beginners or for the first launches of a new 3D printer model to see if the connection between the printer and the software is established. The number of settings is limited, but you can still quickly adjust the infill percentage of the 3D model, print table adhesion and add support material.
 - Advanced (Custom) . This is where the main fan begins. With custom advanced settings, you can customize everything from quality to 3D print speed. We will explore this section and its capabilities later in the article.
Step 3: Processing the model in Cura 3D
Now that you are familiar with the Curs 3D interface, you can get to work. The first step is to upload the 3D model file. You can export your own model to STL or OBJ file or download from one of the sites with models for 3D printing.
Loading a 3D file into Cura 3D:
- Click on the "Open File" icon or use the menu File -> Open File and select the desired STL or OBJ file. For this tutorial, a 3DBenchy 3D model was used. This is a great model for testing new 3D printers or software.
- When the model has loaded, you can check if it is positioned correctly. If everything is OK, then the model will be highlighted in yellow. If there is a problem, it will turn gray and Cura 3D will tell you exactly why it is not possible to start printing.
It is also useful to learn the navigation options in the Cura 3D workspace.
Travel . Hold Shift and the left mouse button to move the workspace along the coordinate axes. This is a useful option when you are zooming in to check small details of a model.
Rotation . Hold Ctrl and left mouse button to rotate around the workspace. This is useful for checking the model from different angles.
Zoom (zoom) . If your mouse has a wheel on the middle key, use it to zoom. If not, then we recommend to buy :).
Different 3D model display options
Cura 3D has three basic model display options. Each option is useful in its own way, and if you're having trouble with 3D printing, one or the other option can help you sort it out.
Solid . This display is used by default and makes it possible to evaluate how the model will look after 3D printing. The dimensions and shape of the model are shown relative to your print table. As a general rule, if you have looked at the model from all angles and it looks good, 3D printing will be successful.
X-Ray . If you encounter problems during 3D printing, this display option will help you evaluate the internal structure of the model. Perhaps you will see what exactly needs to be reworked into details (for example, intersecting planes may appear inside).
Layers . If you have a problem with 3D printing at the same point, or you just want to see a specific cut across a layer, you can use this option. The most accurate way to move between layers is to use the up/down buttons on the keyboard. There is a second option - to use the slider for a quick view. Over time, as you gain experience with 3D printing, this display option will help you to change settings in the G-code (for example, increase the speed of the cooler, adjust the height of the layer or the amount of material fed to the extruder) at the level of certain layers.
3D model setup for Cura 3D . If you need to tweak the model, all you have to do is click on it to highlight it and select one of the options from the toolbar on the left. Here you can quickly move, rotate and scale the model.
When you click on one of the options provided, arrows will appear around the model. Just grab the arrow or ring to apply changes in the direction you want. If you make a mistake right click and select R eset .
If you need to print more than one model, right-click on the base surface and select Duplicate . Cura 3D will automatically try to place the models as well as possible. If there is enough space to print two or more models, the platform will be yellow. If there is not enough space, the print space will be highlighted in gray.
Step 4: Simple (Recommended) 3D printing settings
The easiest 3D printing option is to let Cura 3D apply settings Simple (Recommended) . Although most of the settings will already be specified, you will be able to select the 3D print quality and specify the support material settings.
- Printer . Make sure your 3D printer is selected.
- Material . Make sure the 3D printing material is up to date.
- Profile . Select the 3D print quality.
- Infill . Hollow - printing will be as fast as possible, but inside the model will not be filled with material. Solid (Full filling) - the model will be with maximum rigidity due to full filling, but printing will take a lot of time and material. For starters, it is better to use the most versatile setting Light (Low filling) .
- Helper Parts These are the settings for the support material and adhesion. If you are typing for the first time, it is best to enable both options. If the contact area of your model with the print table is large, then you can disable option Print Build Paste Adhesion . If the model does not have sharp changes in angles and peculiar "canopies" (for example, arms spaced at 90 degrees in a human model), then you can disable the option Print Support Structure .
Step 5. G-code Generation
At this point your model is ready to be 3D printed and all you have to do is export the file from Cura 3D to an SD card or send it directly to your 3D printer.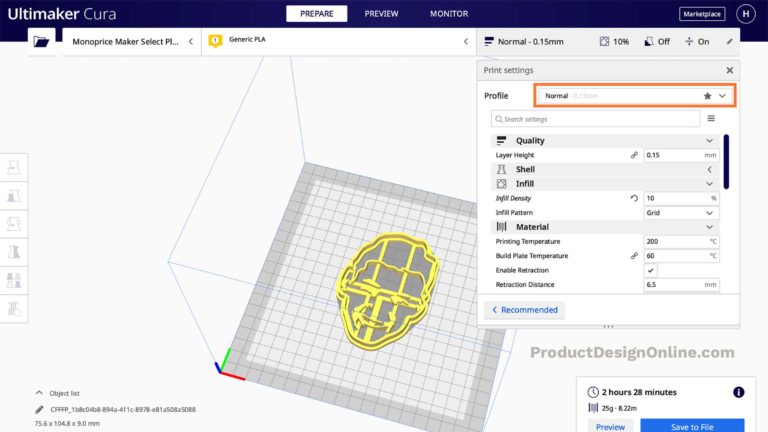 Cura 3D will take care of all the necessary steps to convert an STL or OBJ file into a G-code that your 3D printer will understand.
- Save the 3D model file . In Cura, press Save to file , Save to SD or Send to Printer .
- Estimate 3D printing time . Cura 3D will provide you with an estimate of the time it will take to print your model.
- Start 3D printing . If you transmitted the G-code directly, sit back and relax while your printer prints. If you are using an SD card, install it in your 3D printer and start printing.
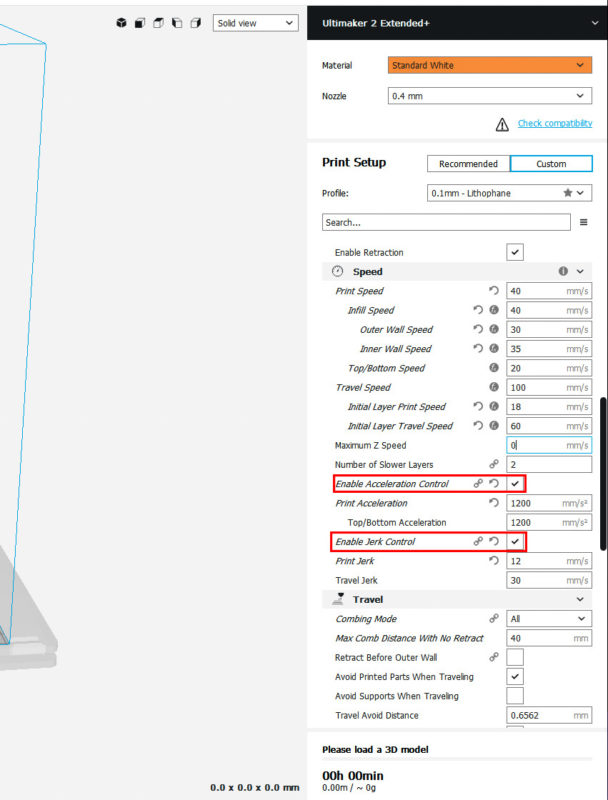
Cura 3D Settings
Using Simple (Recommended) settings is just the beginning. Over time, you will want to implement more flexible settings. You can find these settings in the Advanced tab . We will review them below.
Select Advanced (Custom) in the print preferences panel on the right.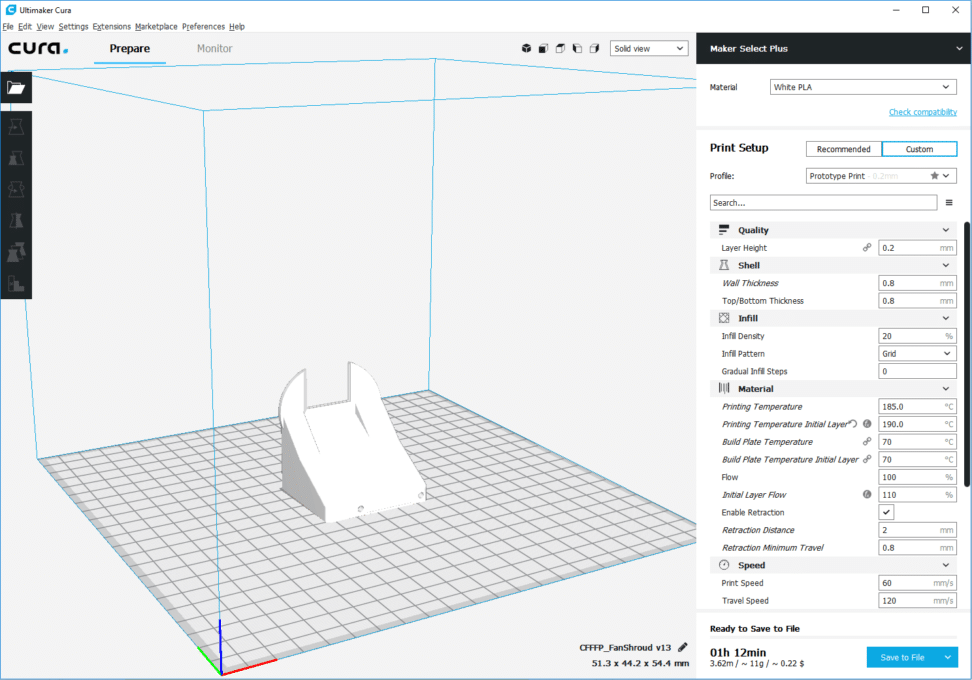
- Quality . This is related to Layer Height (Layer height) . This setting depends on the capabilities of your 3D printer. The lower the layer height, the better the quality, and increasing the layer height will increase the print speed. By default, the layer height is set to 0.1mm for Ultimaker 2 Extended.
- Shell . This parameter controls the thickness of the walls of your model, as well as the thickness of the bottom and top layers. This parameter must be proportional (1x, 2x, 3x, etc.) to the nozzle diameter. For example, a wall thickness of 0.8, if you are printing on an Ultimaker 2 3D printer, will mean that the wall will consist of two lines, since this model has a nozzle diameter of 0.4 mm.
- Speed . Generally speaking, the lower the speed, the better the 3D printing.
- Cooling . An important component of any 3D printer and you definitely need to activate this option.
 As a rule, coolers do not operate at full capacity until the end of the 5th layer.
 - Support . Allows you to add support structures.
- Build Plate Adhesion . Not all models have sufficient footprint to make good contact with the print bed. If so, this setting will help you make good contact with the substrate.
- Special Modes . If you are printing more than one model, this option will allow you to specify that they will be printed one by one.
3D Print Quality Settings
- Quality . Every 3D printer has a maximum and minimum material layer height. In this window, you can specify the desired layer height. 0.02 mm is high quality and slow 3D printing speed, and 0.6 mm is the opposite, low quality and high printing speed.
- Shell . Choice of wall thickness. Thicker walls will allow you to print a more rigid model with a better surface.
 If a nozzle with a diameter of 0.4 mm is used, then the wall thickness must be set proportionally: 0.4, 0.8, 1.2 mm, etc.
 - Top/Bottom Thickness . Again, as a rule, it is set in proportion to the size of the nozzle. One recommended practice is to start with twice the size of the nozzle diameter.
Material settings
- Material . Each material for 3D printing has its own characteristics. In most cases, the ability to use a particular material is determined by the structural components of a 3D printer, and not by software. So this setting is unlikely to be useful to you.
- Enable Retraction . It is recommended to always enable this option. Thanks to it, the material is fed in the opposite direction during the idle movements of the extruder.
Speed settings
- Print Speed . This is the overall speed of 3D printing during direct feed. Generally speaking, the lower the speed, the better the print quality.
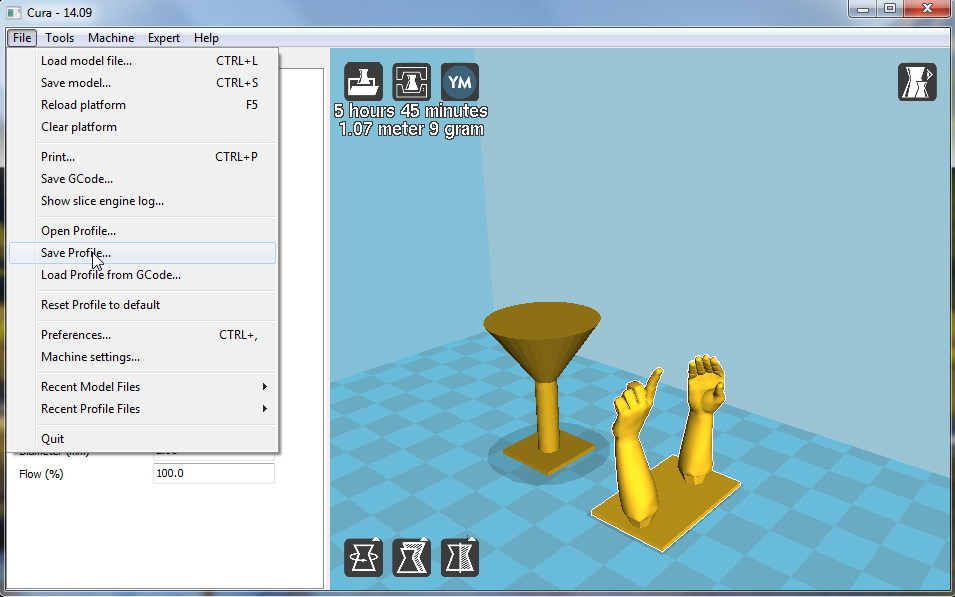 The recommended 3D printing speed is 60mm/s. If you want to increase this speed, it is recommended to increase the printing temperature at the same time ( Printing Temperature ).
 - Travel Speed . This is the speed at which the print head moves when no media is being fed. On the Ultimaker 2, this speed is set to 120 mm/s by default. This speed is recommended to be set depending on the speed of direct printing. And to be more precise, it is 2 times more. In this case, acceleration and deceleration will occur smoothly enough to provide high-quality and at the same time fast printing.
Infill settings
Infill Density . This is the amount of material that is fed to the inside of the model. The higher the filling, the greater the rigidity of the model. As a rule, this parameter is set to 20%.
Cooling
Enable Fan Cooling . Disabling this option is not recommended. As a rule, no matter what material you use, cooling is necessary for high-quality 3D printing.
Support material settings
- Option Enable Support (Enable support material) is best not to disable unless you are 100% sure that you do not have nodes with sharp changes in angles.
- Option Placement allows you to choose where exactly the calipers will be located: Touching Build Plate means that the calipers will be located only on the print table. Everywhere means that support structures can also be based on the part.
Bed adhesion settings
One of the most common 3D printing problems is when the model comes off the print bed. Buil Plate Adhision are just the settings that help improve the contact between model and bed. There are three options for improved contact - Skirt , Brim or Raft .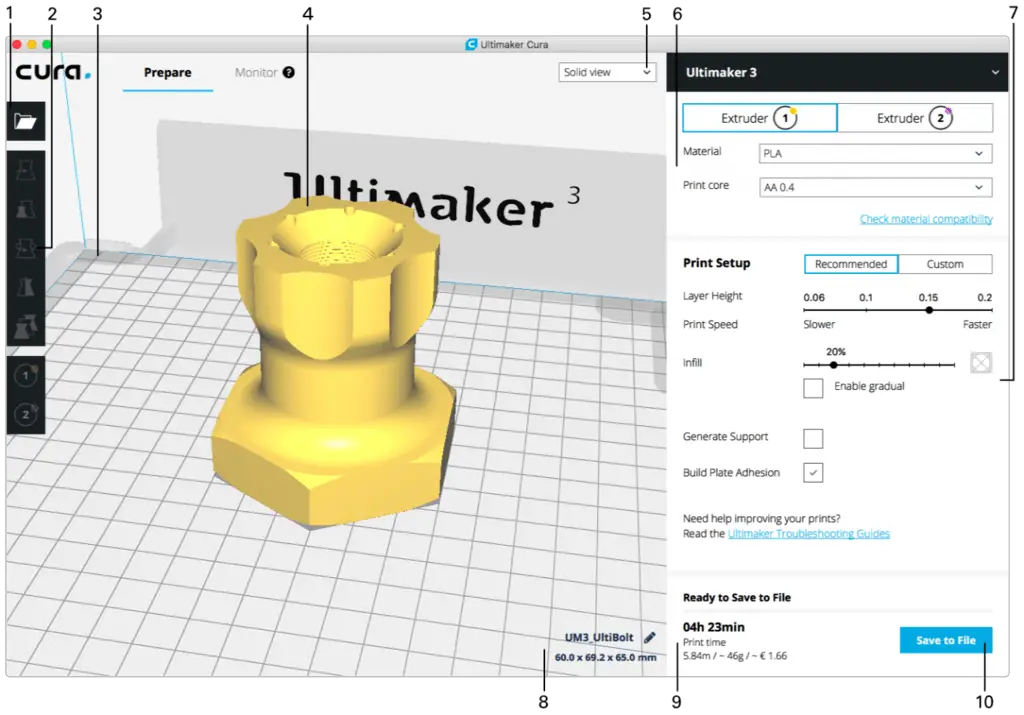
Skirt . This is the setting that is best used at all times. This is the line around the 3D model during the first layer printing that helps clear the nozzle when the 3D print starts.
Brim . These are a few additional lines that are printed before the first layer of the model and provide better adhesion of the bottom layer of the model and the table.
Raft . Grid under the first layer of the 3D model, thanks to which the contact between the model and the table is significantly improved.
Each of the listed settings has additional options that will allow you to more flexibly adjust the quality of the contact between the 3D model and the print table.
G-code file generation
Once you have defined these settings, the model will be ready to print. All that's left is to export the file from Cura 3D to a card or directly to a printer. Cura 3D will convert the OBJ or STL file into a G-code that your 3D printer understands, just like when exporting in Simple (Recommended) mode.