3D printing better layer adhesion
How to Fix 3D Printing Layer Separation
If you notice that there are horizontal cracks in your 3D print or that layers are coming apart, particularly in the middle of the build, you are likely dealing with a problem known as 3D printing layer separation (aka delamination). In the 3D printing process, this is caused by poor adhesion between the layers. In other words, as each new layer is deposited it is prevented from fusing properly with the preceding layer, which causes it to pull apart and crack as it dries.
3D printing layer separation has similarities to first layer adhesion problems (when the first layers of a build do not stick to the print bed resulting in warping). For example, some of the primary causes of 3D printing layer separation are incorrect print temperature and under-extrusion. But there are also important differences between the two. In this article, we are diving into the common 3D printing problem and troubleshooting delamination.
How to Improve Layer Adhesion
There are a number of solutions for improving layer adhesion and eliminating the risk of 3D printing layer separation, from adjusting print temperature and speed settings, to cleaning or changing nozzles, to playing with cooling settings. We outline each of these potential fixes below.
Increase Print Temperature
One of the first steps to fixing delamination is to increase the print head temperature. If the print head isn’t hot enough, filament won’t melt consistently, which can lead to under-extrusion and weak bonding between layers. A higher temperature will cause the filament to melt faster and result in a stronger filament flow through the nozzle. This in turn will encourage the filament layers to fuse together and create a stronger part.
Finding the correct print temperature depends entirely on the type of filament you are using. For example, PLA has a relatively low melting point and prints at a lower temperature than ABS. For PLA, we recommend starting off with a print temperature of about 210 °C. If layer separation is occurring at this temperature, try increasing the hot end temperature by 5-10 degrees at a time. For ABS, the recommended range for nozzle temperature is 220–250 °C. If you are still seeing delamination within this range, gradually increase the nozzle temperature to see if layer adhesion improves.
If layers don't bond properly, it can result in cracking and structural weaknesses.
Clean the Nozzle
As we saw, 3D printing layer separation occurs when layers of filament do not properly bond to each other. This could be due to incorrect printing temperatures, but it can also be caused by inconsistencies in extrusion. If your nozzle is under-extruding, there won’t be enough thermoplastic filament to create strong adhesion between the layers. We therefore recommend checking your 3D printer’s hot end to make sure there isn’t any plastic or dust clogging the nozzle. If there is, unclog the nozzle and remove the blockage.
There are a number of ways to clean your printer’s clogged nozzle. One of the simplest methods involves inserting a fine needle or wire (smaller than the nozzle’s diameter) into the heated nozzle tip to break up any debris. You can also purchase dedicated cleaning filament, which catches any blockages and pulls them through the hot end. Other cleaning methods include the cold pull and atomic pull techniques. If these methods are insufficient, it could be time to replace the nozzle entirely. Ultimately, a clean nozzle won’t just help solve layer separation, it can also improve other 3D printing issues, such as stringing.
Recommended reading: How to Clean 3D Printer Nozzles and Prevent Clogs
Decrease Print Speed
Print speed, which refers to how quickly the printhead moves along the X and Y axes while depositing filament, has a significant impact on the quality of 3D printing. [1] While a fast print speed is often desirable, it also comes with an increased risk of issues like ringing, under-extrusion, and poor layer adhesion. These problems happen when the melting and extrusion rate of the filament can’t quite keep up with the printhead’s movement.
Decreasing the print speed can thus improve your 3D print outcomes. For regular prints, we recommend a print speed within the range of 50–60 mm/s. If you are experiencing delamination within this range, decrease the print speed by about 5 mm/s at a time. In general, the slower the print speed you use, the better the adhesion between layers and the stronger the final part will be. Additionally, the optimal print speed is highly dependent on the type of filament you are printing: PLA can handle faster printing speeds, while a material like TPU needs to be printed slowly (20 mm/s).
Recommended reading: 3D print speed: What it is and why it matters
Adjust Flow Rate
Another setting that can influence inter-layer adhesion is the flow rate, or extrusion multiplier. Found in slicer programs like Cura, flow rate controls how quickly filament is fed into the hot end. In general, the flow rate is linked to the print speed, so if you increase or decrease the print speed, the flow rate should adjust automatically.
If you’ve cleaned your 3D printer’s nozzle and have adjusted the print temperature and speed but are still seeing the signs of under-extrusion and poor layer adhesion, you can try adjusting the flow rate incrementally. With under-extrusion, you want to gradually increase the flow rate so that more material will flow through the nozzle. We should note, however, that increasing the flow rate too much can lead to other problems, namely over-extrusion and blobs.
Decrease Cooling Rate
Layer delamination or layer splitting can also occur if the thermoplastic layers cool too quickly and don’t have enough time to bond before the plastic solidifies. There are a couple strategies for slowing the cooling process down. For starters, using an enclosed build chamber will help ensure a more consistent print environment and slow down the filament’s rate of solidification. This not only gives each new filament layer more time to fuse with the previous layer, it can also reduce the risk of shrinking and warping. If your printer does not have an enclosure, you can make or buy one.
If you are still seeing the signs of delamination, you can further decrease the cooling rate by lowering the printer’s cooling fan speed. We suggest doing this in increments—by 5 to 10% at a time—to see if it improves layer bonding. We should also point out that certain materials benefit from lower fan speeds, including ABS and PETG, while other materials, like PLA, can print well with a fan speed of 100%.
Adjust Layer Height
Decreasing the layer thickness in your slicer software can also help to improve layer adhesion and solve delamination. In general, the layer height measurement should be smaller than the nozzle diameter. [2] This difference ensures that the nozzle puts a bit of pressure on each layer it deposits, gently squishing it and encouraging the thermoplastic to stick to the layer under it. If the layer height is too big, the surface area between the two layers will be smaller and have a weaker bond.
When setting your layer height, it should be a maximum 80% of the nozzle diameter size. For example, if you are using a 0.4 mm nozzle, the maximum layer height should be 0.32 mm.[2] With this size of nozzle, 0.2 mm is a fairly standard layer height. If this layer height isn’t solving delamination, you can try decreasing it, but if you set your layer height too small you risk other problems, like thin layers and clogged nozzles.
Increasing the nozzle diameter can improve inter-layer adhesion and reduce the risk of delamination.
Increase Nozzle Diameter
Another effective tactic for combatting layer separation is to swap out your nozzle for one with a larger diameter. A wider nozzle diameter will allow more material to flow through onto the print bed, and will result in layers with a thicker width. The wider layers can improve layer adhesion thanks to the simple fact that there is a greater surface area for the next layers to stick to..
Most FDM 3D printers come equipped with a 0.4 mm nozzle, so that’s likely what you’re working with. It is possible to purchase and install smaller and larger nozzles: a smaller diameter nozzle (0.2 mm) will enable you to print finer details, while a larger diameter will encourage layer adhesion and strength and can increase print speeds (this will inevitably compromise precision and the quality of details). Larger nozzles are also less prone to clogging and are suitable for specialty filaments, like fiber-reinforced materials.
Recommended reading: Nozzle diameter and layer height explained
Key Takeaways
By following these various steps (one by one because sometimes a single adjustment will solve the problem!) you should be able to overcome delamination and ensure that your prints benefit from strong bonds between layers. Here’s a rapid summary of what we covered:
3D printing layer separation occurs when printed layers of plastic do not fuse together properly during the printing process, causing weaknesses in the 3D printed structure.
Increasing the print temperature can fix delamination by improving filament flow and ensuring that layers are sufficiently melted to bond together.
Build up in the 3D printer nozzle can cause under-extrusion and lead to delamination. Clean your nozzle regularly to avoid this problem.
Adjusting the print speed can also improve delamination: a slower print speed will result in stronger adhesion between layers and a stronger final part.
Other factors, like flow rate, fan speed, and nozzle size can also impact the quality of inter-layer bonding.
References
[1] Agarwal KM, Shubham P, Bhatia D, Sharma P, Vaid H, Vajpeyi R. Analyzing the impact of print parameters on dimensional variation of ABS specimens printed using fused deposition modelling (FDM). Sensors International. 2022 Jan 1;3:100149
[2] Layer Separation and Splitting [Internet] Simplify 3D, 2022. [Accessed October 6, 2022] https://www.simplify3d.com/support/print-quality-troubleshooting/layer-separation-and-splitting/
How to Get Stronger FDM 3D Prints
There are lots of 3D printing videos on Youtube. Some of the Youtubers take their research very seriously and therefore run rather scientifically-rigorous experiments. They’ve created countless hours of videos dedicated to testing different print settings to determine how to get the strongest parts. Oh, you don’t have countless hours to spend sorting and watching dozens of videos on Youtube? Not to worry my time-pressed friend, we’ve done that for you.
Slice Settings for Strength
Note: All of these settings are based on a 0.4mm nozzle diameter; ideal layer heights and widths are ratios of nozzle diameter so you’ll need to adjust your numbers based on the size of your nozzle.
Basic Settings
In this video from Maker’s Muse, the basics of getting stronger prints are covered. There are several slice settings that can be changed for strength, including infill percentage, surface thickness, layer height, and extrusion width. But one setting that often gets overlooked is infill overlap, which affects how well the perimeters are bonded to the infill; usually, only a small increase is needed. These are all great recommendations but they aren’t tested, so let’s have a look at some experiments.
Disable or Reduce Cooling
Not all materials can be printed with cooling but it’s a very useful feature for those that can, such as PLA. Cooling is great for increasing surface quality, especially for parts with overhangs, but it turns out that it’s detrimental to part strength. Good layer adhesion requires that the printing layer and the previous layer fully melt together and that’s harder to achieve when every layer is being actively cooled. If a part’s geometry allows for zero cooling, then turn the fan off to attain the best level of adhesion between layers. If cooling is necessary, set it to the lowest power possible that still results in the desired surface quality. The video below from CNC Kitchen contains PLA and PETG strength tests for when cooling is decreased.
Increase Extrusion Width
Higher extrusion width increases strength up until 150% – 200% of the nozzle diameter. Adjusting this setting increases the flow rate to achieve the desired width, which results in two things:
- More material being deposited per pass.
- More downward extrusion pressure to help the printing layer bond with the previous layer.
As the video below from CNC Kitchen indicates, increasing extrusion width makes parts stronger while using less material and taking less time to print. That’s three upgrades with a single parameter adjustment.
Use Rectilinear Infill and Increase the Number of Perimeters
For parts printed with less than 50% infill, the honeycomb pattern is a bit stronger than most other patterns. However, when printing more dense parts with over 50% infill, rectilinear patterns achieve more strength while taking much less time to print than do honeycomb patterns.
I love this chart because it settles a long-standing debate among 3D printing enthusiasts: what has a greater impact on part strength, infill density or number of perimeters?
CNC Kitchen printed and tested dozens of hooks to create this one chart but the answer is clear: perimeters.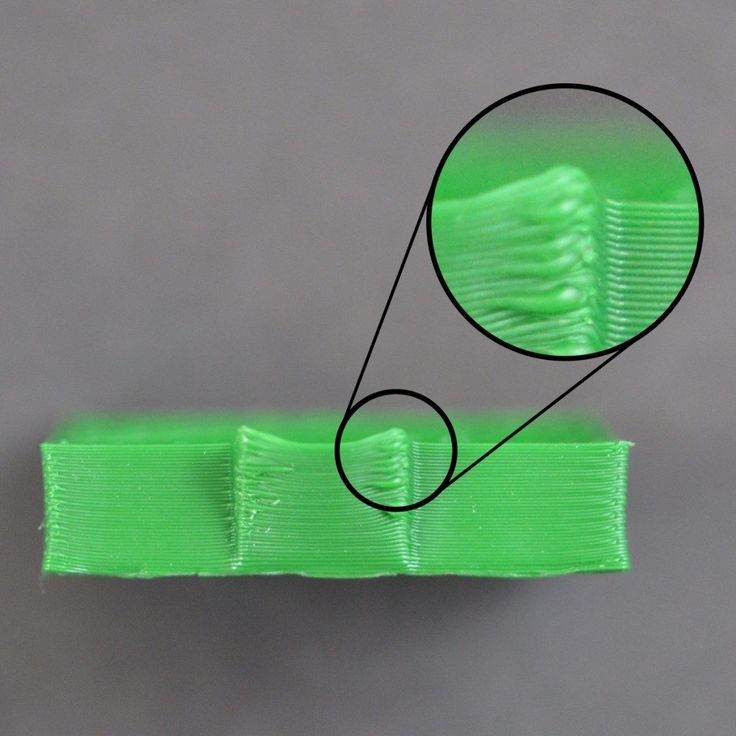 Increasing the number of perimeters has a greater impact on strength than does increasing infill density. This is because parts will always experience more strain on the outside than on the inside, making thicker walls more useful than higher internal density. Printing with 100% infill will always achieve the highest absolute strength but getting the highest specific strength, which is a strength-to-weight ratio, requires reducing infill and using more perimeters.
Use Thinner Layers
Thinner layers lead to improved layer adhesion and denser parts (likely) because the rounder shape of thicker layers presents more gaps where adjacent layers meet. It’s also possible that the heat from the nozzle being closer to the previous layer helps the layers bond together better.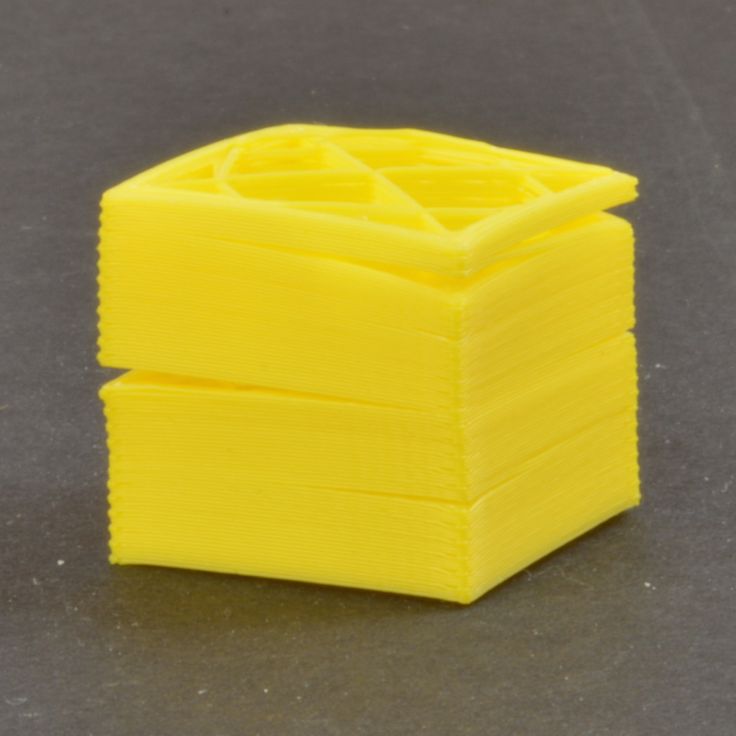 Either way, going as low as 0.1mm (100 microns) will maximize strength, though the strength dropoff associated with going to 0.2mm (200 microns) is minimal so it’s a worthwhile tradeoff to cut print time by 25%. Recall that the first video recommended using thicker layers for more strength, so why the disagreement? Well, the first video didn’t run any tests so that’s important to note, but the disagreement relates to making other slicing changes when increasing layer height, such as also increasing print temperature and the extrusion multiplier to accommodate that thicker stream of plastic that’s being deposited. In short, some believe that CNC Kitchen’s thicker-layer prints were under-extruded and that that’s why they’re weaker. Knowing whether that’s true or not will require more testing.
Recap
To improve the strength of FDM 3D prints: reduce cooling, increase extrusion width, use rectilinear infill, increase the number of perimeters, and use thinner layers. By implementing these tips and tricks, you’ll be on your way to significantly stronger 3D prints. Just remember to say a silent ‘thank you’ to the Youtubers who have poured heir blood, sweat, and tears into these experiments for our benefit.
Featured image courtesy of CNC Kitchen.
everything you need to know
Many 3D printer owners experience parts coming off the table during 3D printing. Let's take a look at the causes and solutions.
What is adhesion?
The very concept of "adhesion" means the adhesion of surfaces of dissimilar bodies. In 3D printing, platform adhesion is the ability of the plastic that a part is made of to adhere to the surface of the stage during printing.
If the adhesion is insufficient, then the manufactured parts may be deformed or even come off the table. During 3D printing, the part must be firmly attached to the platform, and after completion, it should be easy to remove. Filament manufacturers typically recommend adhesives for their filaments, and 3D printer manufacturers offer worktables in aluminium, glass, stainless steel, or even with specialty coatings. All this helps the plastics stick better during printing, but there are no working surfaces that are equally well suited for all types of plastics.
Also, do not forget about thermal expansion, which causes a change in the dimensions of manufactured parts at different temperatures. The difference in temperature between the bottom and top of a part can cause the edges of the part to peel off during 3D printing. This mainly applies to materials such as ABS, which require a heated worktable to work with. When printing with these materials, the layers need to cool down a bit to be able to build a 3D object at all, but not so much as to cause peeling at the edges.
In this article we will look at what affects adhesion and how to solve many problems in terms of adhesion of products to work surfaces.
3D Printer Enclosed Chamber
For printing on materials with high heat shrinkage, the best option is to use 3D printers with an enclosed chamber that prevents drafts and retains heat. Many printers are equipped with an active chamber heater that maintains the desired temperature and does not allow the parts to cool. A uniform background temperature during 3D printing reduces warping and ensures better adhesion.
Owners of open printers are left to come up with various devices (for example, boxes) that cover the 3D printer to keep heat, or build heat-retaining walls around the printed model, which increases printing time and filament consumption.
First coat adhesion
The first thing you should pay attention to is the adhesion of the first layer. This is one of the most common problems faced by almost all printers. If the first layer is laid unevenly, then the percentage of rejects for the rest of the part increases very much, so it is very important to solve the issue of adhesion of the first layer before 3D printing. In most cases, the problem is solved by calibrating the work table and adjusting the distance between the nozzle and the work surface.
It is important to correctly set the distance between the nozzle and the stage surface
Brim and Raft methods
For better adhesion of the product to the working surface of the table, in the print settings it is often necessary to create additional elements - the substrate or the frame of the model, which help to keep the manufactured part on the table. Brim or Raft increase the contact surface of the plastic with the work surface around the lower layers and thereby increase traction.
Underlays or Rafts consist of several layers and are horizontal grids of filament located under the model. The raft is used as a base for the first layers of the product and is designed to increase the level of adhesion. In addition, the raft helps to level the surface of the table: if there are irregularities on the surface, they are leveled to a certain extent by the substrate, and the model is printed already on a flat base. Another advantage of rafting is that it reduces the chance of problems due to too much or too little gap between the nozzle and the table when laying the first layer.
Brim is used to stabilize small patterns or "islands" (separated areas of the printed product). Brims increase the contact area and help the model stay on the table if it comes into contact with the surface in small areas.
Worktable temperature and adhesion promoters
After calibrating the platform and adjusting the gap between the nozzle and the surface of the table, let's move on to the next question. The next reasons for poor adhesion may be the wrong stage temperature (if the 3D printer has a heating option) and the wrong selection of adhesion promoters for a particular filament.
Working stage temperature selection
One of the common causes of poor adhesion is the wrong stage temperature selection for a particular material. When the molten filament is applied to the table and then cools, deformation occurs.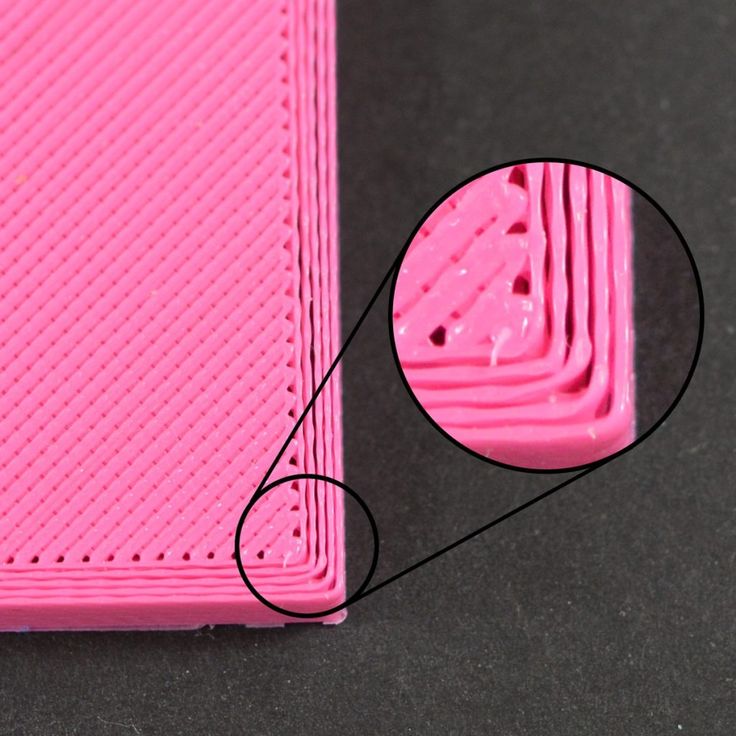 If the temperature of the stage is incorrectly selected, the outer edges of the printed product are compressed, and we get warpage: the edge of the product comes off, clings to the nozzle, and the product completely comes off the platform.
Usually, 3D printing filament manufacturers list the recommended heating temperature for the stage on their website or boxes. For the most common materials, you can use average values.
Examples of worktable temperatures for some materials:
- PLA: 60°C
- ABS: 100-110°C
- PETG: 85°C
- Nylon: 100°C (depending on material composition) )
- Polycarbonate: 110°C (the higher the temperature, the better)
Worktable temperatures for each manufacturer's plastic may vary. You can choose the optimal temperature only empirically.
Adhesion agents
To increase adhesive properties and reduce the risk of damage to the glass surface of the desktop, additional agents are often used, such as varnish or glue for 3D printing, PVA glue, stationery glue stick, dissolved ABS plastic (so-called "ABS juice" ), blue tape, etc. One tool for printing all types of plastics will not be enough. In our article, we will not consider such folk remedies as beer or sugar syrup, but will focus on more traditional methods.
Basic adhesives:
Varnish or adhesive for 3D printing
The days of hair sprays are long gone, and now almost no one uses them due to low efficiency. More effective adhesives for 3D printing have come to replace.
Typically, 3D printing lacquers and adhesives are formulated to take into account the properties of different filaments and allow the first layer of the printed model to be reliably adhered to the worktable. Simply put, these are universal tools suitable for working with multiple types of filaments.
There are already quite a few manufacturers of 3D printing varnishes and adhesives on the market in various volumes and for any budget. It's not worth saving - one bottle will be enough for several months of printing, and you will save your nerves and time spent on reprinting damaged parts.
Easy to use: spray varnish or glue on the platform and spread it evenly over the surface with a clean, soft cloth.
ABS juice
Composition for those who like to save money or who do not have glue or varnish on hand. It is made simply: finely chopped ABS rod or the remnants of a previous printing with ABS plastic are immersed in acetone and after a few hours a thick solution is obtained that can be applied with a brush even on a cold platform.
This method is very reliable as an additional adhesive, but acetone evaporates during 3D printing and creates an unpleasant odor.
PVA glue, stationery glue stick
PVA glue is applied to the work surface with a brush and rubbed until a uniform thin layer is obtained. As a rule, when hardening, the glue becomes transparent. After drying, you can start 3D printing. The method is not bad, but the reliability of such a method is doubtful due to the fact that not all PVAs work well.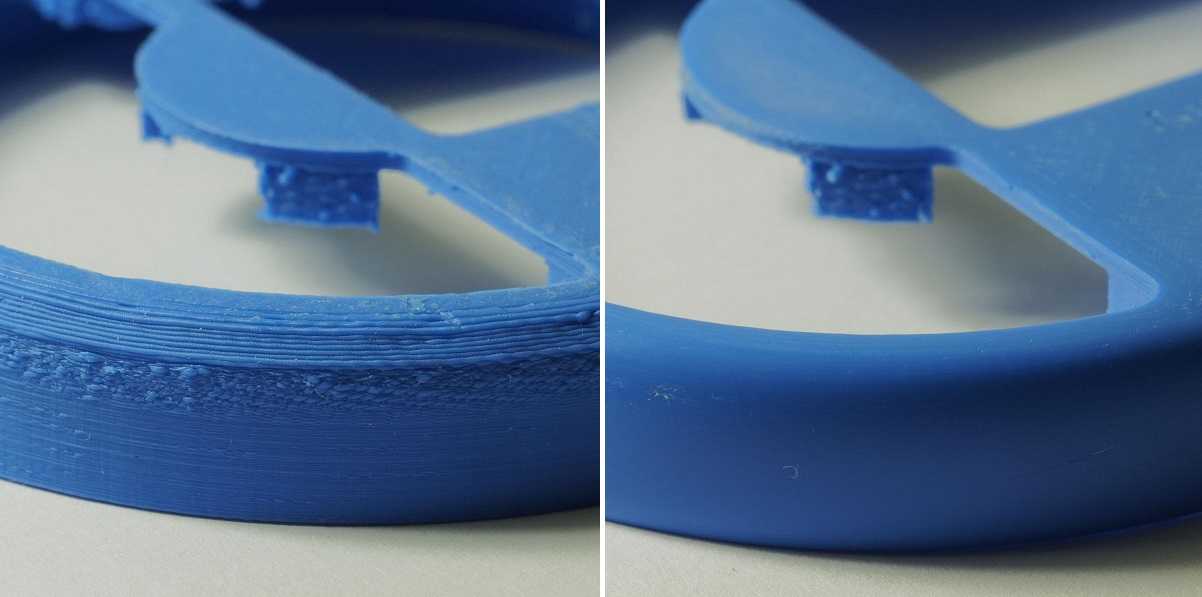
Stationery glue stick is mainly used when there is nothing else at hand. The most popular option is Kalyaka-Malyaka glue. The glue is applied in one layer, after the platform cools down, the part is easily separated, and the glue itself is easily washed off the glass and from the printed part.
Kapton film, blue masking tape and Lomond film
Masking tape is more suitable for 3D printers without platform heating. The adhesive tape is carefully glued to the entire area of the table and allows you to print small details without heating the table. This option is especially suitable when working with PLA plastic, however, with an increase in the area of \u200b\u200bproducts, the edges of the parts can come off along with the adhesive tape, so the relevance of this method is limited. Kapton tape or Lomond film is more commonly used.
On Kapton tape, the lower surface (the sole of the product) is very smooth, the parts are well separated after cooling, but you can’t leave the product on the cooled table, as the plastic pulls the tape together, and air bubbles form under it. When 3D printing on Kapton tape, it is necessary to heat the platform and additionally smear the adhesive tape with glue. Suitable for 3D printing of medium-sized products.
Lomond film was popular until various adhesives appeared. After gluing, the top layer on the film itself must be washed off for better adhesion. Details after printing on such a film are quite difficult to tear off. Over time, bubbles also form under the film, so the film must be changed regularly. Suitable for 3D printing large items.
Additional Points to Remember
PLA is the least demanding polymer. For stable printing with polylactide, it is not necessary to treat the surface of the table with additional adhesives, a clean glass surface is sufficient. A prerequisite is that the platform is heated to 60°C. If the platform is not heated, then it is better to print using adhesive agents - varnish, 3D printing glue or blue tape for small parts.
PLA also loves airflow, so keep the fans on full.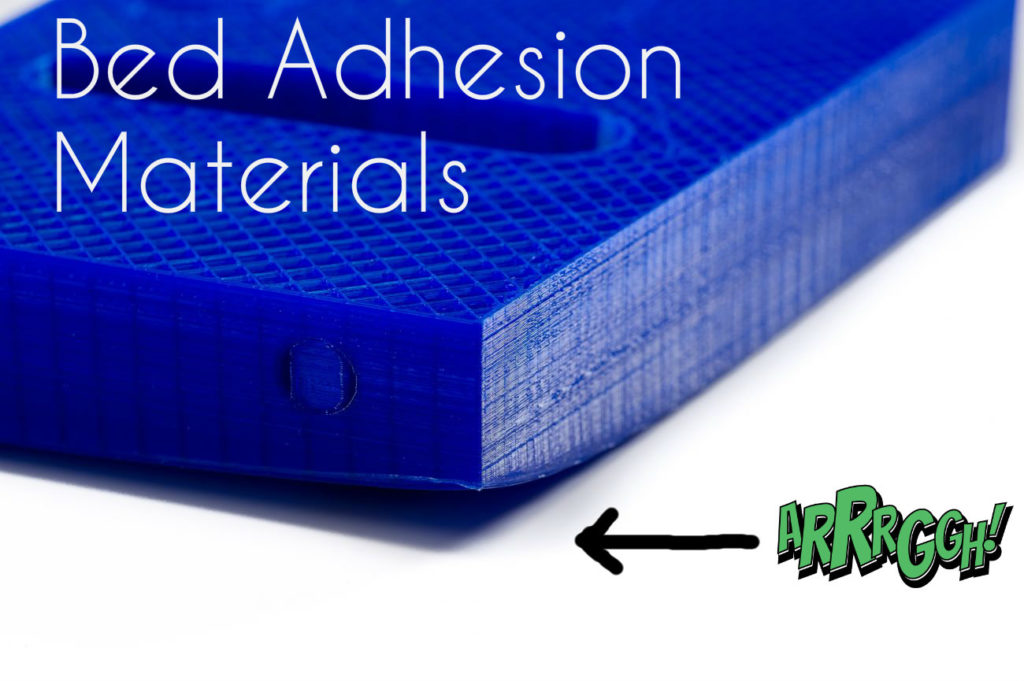
ABS is highly shrinkable and needs help to better adhere to the surface. The main types of additional tools are varnish or glue for 3D printing, ABS glue, stationery glue stick, PVA glue.
When working with ABS, the platform must be heated to 100-110°C. It is advisable to use 3D printers with closed cameras that support high background temperatures. When 3D printing on open printers, it is necessary to use a heat-retaining cocoon around the model. Many slicers already offer this feature. Blowing of products made of ABS plastic is highly undesirable, as cracking of parts in layers and detachment from the working surface due to shrinkage can occur.
PETG is a very easy to work material that does not require high temperatures or fine print settings. Plastic has excellent adhesive properties and adheres very strongly to clean surfaces. On the other hand, high adhesion can lead to separation of pieces from glass tables when products are separated, so it is advisable to apply separating layers on the work surface - the same glue or varnish for 3D printing. This will help both separate products and prevent damage to the glass.
Flex has high adhesive properties, bonding well not only between coats, but also to work surfaces. Again, it is advisable to use 3D printing varnish or glue to avoid damaging the glass. Film coatings are not recommended.
In the case of composite materials , the choice of adhesive agents is mainly determined by the type of material serving as the basis. Usually recommendations for preparing for 3D printing with composites can be found on the manufacturer's website. If not, please contact technical support for advice.
For example, the FormaX composite from the X-line range is based on ABS plastic, but the properties of the composite material differ from pure ABS due to the presence of carbon fiber filler. Formax is not characterized by cracking in layers, but the composite requires the use of additional adhesive agents, so the manufacturer recommends using varnish or glue for 3D printing
Material storage and drying
The effect of moisture on filaments can be both cosmetic and functional.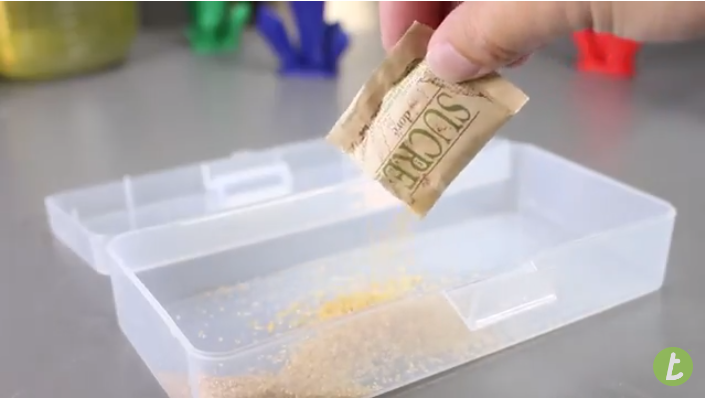 The most innocuous result of high humidity is a change in the textures of 3D printed products, although this is rarely limited to roughness alone (and haze when it comes to transparent plastics) and is usually accompanied by a decrease in interlayer adhesion and adhesion to the substrate. A more serious effect can be an uneven supply of plastic: water in a sufficiently wet filament boils when passing through the hot end, and the resulting steam leads to the appearance of bubbles in the material being laid and even to jerky extrusion with all the ensuing consequences in terms of quality and poor adhesion. Detailed instructions for storing plastics are available at this link, and for drying plastics - here.
That's all for now.
The Wiki on our site has separate, detailed articles about each of the filaments. How to print and with what settings. Come read here.
If you have additions or comments - we are waiting for your answers.
Regards, REC3D team.
Photos from the blogs of Sergey and akdzg are published in the article.
Optimum temperatures for 3D printing PLA, PETG, Nylon and TPU plastics
3DPrintStory 3D printing process Optimal temperatures for 3D printing with PLA, PETG, Nylon and TPU plastics
Although almost all 3D printing materials are thermoplastics, each has its own temperature requirements. The specificity arises from the fact that individual fibers differ greatly from each other in chemical composition. Some, like PLA, are made from starches, while others, like ABS, are oil-based.
The chemical composition of a thermoplastic directly affects its glass transition temperature, the temperature at which the material changes from a brittle filament to an elastic substance that can be extruded. It is this temperature that must be maintained for high-quality 3D printing. And since each material has a different glass transition temperature, each plastic must be used for 3D printing at a different extruder temperature.
In addition to a specific extrusion temperature, some materials require a specific hotbed temperature. When some fibers cool, they shrink and deform. The heated bed allows these plastics to cool more slowly during extrusion so that bending is minimized.
The heated layer also provides additional adhesion, ensuring that the first layer adheres well and the part does not separate from the base during 3D printing.
So 3D printing temperature is a very important parameter that differs depending on the material that is used.
Recommended temperature for 3D printing with PLA plastic
PLA is the most popular plastic in the world today. One of the reasons is undemanding to the conditions of 3D printing.
PLA prints best around 210°C, although it is very versatile and can work between 180 and 230°C. It doesn't require a heated bed to print, but if your 3D printer has one, set the bed temperature somewhere between 20 and 60° C.
When printing with PLA, make sure the cooling fans are on. PLA produces the best results when cooled properly.
Overall, PLA is very easy to use and doesn't require much tambourine dancing to be successful.
Recommended temperature for 3D printing with ABS
Until recently, ABS was the most widely used material for 3D printing. Then ABS lost to PLA in the battle for the lead. The main reason is the great difficulty during 3D printing.
ABS requires a slightly higher temperature to print successfully. Recommended nozzle temperature is 210 to 250°C. Requires a heated bed set to 80 to 110°C.
In addition, ABS should be printed on a closed 3D printer so that the plastic cools down more slowly. This is because the ABS shrinks as it cools, and if the model cools too quickly, it deforms. For the same reason, the cooling fans must be turned off when printing ABS.
Recommended temperature for 3D printing PETG plastic
PETG is a relative newcomer to the 3D printing media market, combining many aspects of PLA and ABS.
It requires very high nozzle temperatures of 220 to 250°C. However, unlike ABS, PETG does not require a heated bed.
PETG prints best with blue masking tape on the table. Without it, the table must be heated to 50-75°C so that the extruded material will adhere well to the table on the first layer. And because this material doesn't flex like ABS, cooling fans can be turned on during 3D printing.
Although PETG is not as easy to use as PLA, it is far less demanding than ABS and is now the top of the list in popularity.
Recommended temperature for 3D printing Nylon with plastic
Nylon is another popular and interesting material, although it is more difficult to work with.
It requires a higher temperature than any of the other materials on the current list: 240 to 260° C is recommended. Required table temperature is 70 to 100° C. However, the glue stick layer is very important as Nylon suffers from adhesion quality problems first layer.
Nylon should not be printed with cooling fans as this will cause layer adhesion problems.
This material is also very hygroscopic, meaning it absorbs moisture from the air very actively. This significantly reduces the quality of 3D printing, so the nylon must be dried before printing or a quality thermal box must be used.
Nylon can be problematic at first, but once you learn how to print properly with this material, it will cover many of your questions and needs.
Recommended temperature for 3D printing TPU plastic
The flexible materials known as TPU are an unusual and sometimes very useful material, but very difficult to work with.
TPU is used at the same temperatures as PLA. Works best between 210 and 230°C with table temperatures between 30 and 60°C.
Because this material is very flexible, it can bend and stretch from the extruder gear to the nozzle itself.