3D printing tips and tricks google group
The Top Ten Tips For Getting Started With 3D Printing
We were all noobs at one point! Here the ten best tips for getting started with 3D printing - whether it's your first time 3D printing or you need to brush up on the basics, this guide will help you out!
Posted on December 7, 2017
by
Alec Richter
When I bought my first 3D printer, I didn’t have any clue what I was doing. The best example of that is I couldn’t get my nozzle to fit over the PTFE tube in the hotend, so I beat it with a wrench to get it to fit, and in doing so flattened the end of the nozzle and blocked the opening. Oops. Common sense would say that was a dumb idea, but having no clue how any of it works, my resources at the time were limited to what people had made videos of on YouTube, or searching through dozens of various forums with varying levels of organization.
As such, I’ve compiled a list of ten things that are second nature now, would have been really helpful to know when I first started printing.
1. Leveling the Bed and Z Offset
Nowadays, automatic bed leveling is a lot more common than it used to be, with several different sensors or methods to level the bed, but many printers still use manual leveling, which is completely fine and still easy to take care of. If it’s automatic, just follow the instructions or wizards that your printer uses to level, but if it’s manual, here’s a good method to follow:
- Three points define a plane, but many printers still use four screws to level the bed, with one at each corner. This can still work, it’s just a little bit more difficult to get it perfect.
- Tighten down all the screws at each corner, so you have enough room to loosen them later.
- Home the Z axis. On some printers, Z0 may be too far from the bed, even when all the screws are loose and in that case, you’ll need to move the Z-minimum endstop just a tad lower.
- Power down the printer or select “Release motors” or “Motors off.
 ” Most printers have something to this effect within the LCD menus, and all this does is allow you to move the print head without having the motors locked in place.
 - Move the printhead over each screw that levels the bed, insert a piece of paper between the nozzle and the bed, and loosen the screw until there’s a very slight resistance when you pull on the paper. You don’t want it to be locked in there, just enough pressure to feel the drag when you move the paper.
- Repeat this for the other screws. You want to make sure each screw has an even pressure as the last one, because that’s what makes a level bed.
- Start a print with a skirt that covers the bed. If you notice the skirt has gaps between each pass, the bed is too low and your print runs the risk of separating from the bed mid print. If the lines are completely squished together and you can't really tell them apart, you may have to beat the print with a hammer to get it off (figuratively of course, don’t do that).
- Once you’ve got it leveled, it should stay leveled for a good while, but every now and then you may need to adjust a screw just slightly to bring it back to level.
Sticky notes are easy to have on hand to use for leveling
2. Changing Filament
I used to think you could just remove filament from a cold nozzle like you would unload an ink cartridge from a printer. Not so. You need to heat up the nozzle to melt the filament that has formed a plug, locking it into the tip of the nozzle.
- Start by heating up your printer to the print temperature of the material that you have in it. If you’re trying to remove PLA, set it to 200C or so, ABS at 230C etc.
- Once it’s at temperature, release the tension on the filament by pressing down on the lever, and push down on the filament slightly until it comes out the nozzle.
- Once you see filament come out, gently pull on it to remove it.
- This removes most of the filament, but there will likely be some leftover when you put in the new filament.
- Insert the new filament, making sure it feeds properly through the extruder and into the nozzle. If it’s a different material than was previously loaded, then have the temperature set to whichever print temperature is higher.
- Either manually push it through, or control the extruder from the menu to feed the filament through.
- Once you see the new material come through cleanly (as in not mixed with the previous color, or flecks of burnt old material in it), then you’re all set!
Changing filament is easy, you just need some practice.
3. Change a Nozzle
Sometimes you clog a nozzle and you’re in a time crunch or maybe you don’t care about surface quality, you just need big parts fast, in either case, swapping out your nozzle for a different sized one is a great solution to get things running as you want.
- We’ve discussed this in a previous video, so if you want a more in-depth look at how to change a nozzle, click here.
- The gist of it is: heat up the hot end, use grips to hold the heater block, use a wrench to unscrew the nozzle, and reverse the steps with the new nozzle.
Nozzles come in a variety of sizes, from small nozzles for detailed prints to large nozzles for fast and strong prints. There are even nozzles designed for any abrasive material you can throw at it. You can find all of these here.
Nozzles come in a variety of sizes, so knowing how to change them is invaluable
4. When to Use Support
Some models are unprintable without support, and others lose important features by including them. It’s important to be able to identify when a model fits within either of these categories to better your chances at a successful print.
- Don’t use support
- Just because a model has overhangs, doesn’t mean it needs support; the general rule is if the angle is greater than 45 degrees, consider adding support, but some models don’t follow that rule.
 Bridging, which is where there is a 90 degree overhang but it’s supported on either side, doesn’t usually need supports.
 - Cylindrical holes through the side of a model don’t usually need support either, despite having sections of it at angles greater than 45 degrees. If you don’t have adequate layer cooling, you might notice some drooping along the ceiling, but otherwise it will successfully print.
45 degree overhangs don't need support, and sometimes even larger overhangs won't need it either.
Internal features may be filled in by supports and be impossible to remove. Take the Phoenix prosthetic hands, for example. These, and most other eNABLE hands, have internal channels to run elastic thread and fishing line through it to move the hand. By using support, these would be filled and create useless prints.
Inner features and channels can get filled in by support.
Using Support
Most models will need some form of support. This part from the jet engine casing was printed without support on accident, and while it worked it is clearly not as pretty as the other parts that were printed with support. If any part of the model juts out from the side of the model like these attachment points, you will need to use support.
On the left, supports were used and on the right they were turned off. While the print succeeded, the underside is uglier without support.
5. Bed Adhesive
There are several different methods to help prints stick to the bed, and everyone ends up finding what their go-to is and stick with it.
- PVA glue sticks are great for PLA, Nylon, and TPU
- Aquanet Hairspray is great for ABS, but can also work for PLA and PETG
- Blue Painter’s Tape works well for PLA and PETG, even if your bed is unheated
- Kapton Tape is a great all-purpose bed adhesive, but works really well in tandem with hairspray
- PEI holds onto prints when it’s hot and releases when it’s cool, however PETG and TPU/TPE stick too well, so you’ll want to use glue stick to act as a release agent between the PEI and print.

- BuildTak works really well for almost all materials, and with a Flexplate you can get a good grip and an easy release.
There is a huge variety of bed adhesives for 3D printing, and everyone has their favorite.
6. Have the Right Tools
There are a variety of tools that I have amassed over the years that at some point has come in handy and necessary. I’ve organized these all on my Spool Tool, which you can find here, but to start off there are a couple that everyone should have.
- A spatula. The BuildTak spatula works really well because you can get it flat to the buildplate because of the angle the handle is at, and it doesn’t have a really thick blade.
- A bed adhesive. Like I’ve said previously, find what works best for you and stick with it.
- Flush cutters. These are immensely helpful for removing support material and makes a nice, clean cut when trimming filament before loading.
- A brass brush.
 Soft enough to not mar your nozzle when it gets a nice and thick coating of burnt filament.
 - Calipers. Absolutely necessary when trying to model parts that have to fit in specific places, or when you just need an idea of how big a model actually is.
- Hex Key Set. When you need to open up your printer or assemble multi-part models, then you’ll need a variety of hex wrenches. You can get them super cheap, but ball ended wrenches are super nice if you can find them.
While there are many tools that you will find helpful, these few are a great starting point for any 3D printing tool set.
7. Scrape Away From Yourself
This week, two different people in the office have cut themselves on their printers. I’ve done it myself too, so do as I say and not as I’ve done: aim your spatula away from yourself. It may not seem as sharp as a knife, but once that spatula slips, it’s thirsty for blood. Try to gently work up a corner of your print and slide the spatula under it. If it’s taking too much force, don’t force it by hand, at worst you can give the handle a gentle tap with the handle of a screwdriver to try and get some wiggle room, but at least that way it’s a controlled use of force and you are much less likely to slip.
8. Ask Questions
We were all beginners at one point, and being bad at something is the first step to being sort of good at something. Don’t be afraid to ask questions when you don’t understand what’s going wrong. In general the 3D printing community is very open to helping newcomers, so here are some helpful tips when looking for help
- Be descriptive. Even if you don’t think it’s part of the problem, explain it anyway. It’s much better to over inform than under, because maybe that one setting that seems unimportant to you is actually the whole reason your print isn’t coming out right. Including what printer you have, any mods to it, the print settings, material and brand, bed adhesive, pictures or video, anything you can provide will just better inform someone reading.
- Use Reddit, forums for your printer, Google Plus groups, or anywhere applicable to ask for help.
- Once you’ve figured out how to fix what was going wrong, be sure to report back to your original thread and update with what fixed it. You may end up helping someone else who comes along with the exact same problem and finds your thread when searching.
9. Be a Knowledge Sponge
I don’t know how many times I read something that wasn’t applicable to anything I was doing or working on at the time, but later proved to be immensely helpful in diagnosing a problem. The best example I have of that is I read an article describing Z-banding and Z artifacts, which is where there is a clear ribbing along the Z-axis of a print due to some irregularity in the Z-axis assembly. It described some of the reasons behind Z-banding, how some users attempt to solve this, and how to actually fix it. Sure enough, a week later when I finally fired up the printer I had been building, I noticed those same issues, and remembering that article I was able to diagnose it down to the Z-axis lead screw not being perpendicular to the guide rails.
10. Don’t Be Afraid to Reprint
When I first started printing, I treated prints like they were worth their weight in gold, even if they were pretty bad looking prints. Since I knew I was going to finish them with sandpaper anyway, I didn’t mind it. But it’s really not that hard or expensive to reprint a part and try again. I've been printing 3D Phil in a variety of filaments, and occasionally I get a print that's not terrible, but only okay. In that case, I throw them away. They take 35g of filament to print, or $1.07 to be exact, so it really doesn't cost much to reprint him again and have a really great looking print.
BONUS 11. Call or Email MatterHackers Support for More Help
If you have a time crunch or just can’t figure out what’s wrong with your prints or printer, give us a call or email. We have a team in the office dedicated to providing support and walking you through the troubleshooting steps and procedures to get you back up and running.
This article was a lot longer than I intended it to be, but I think it is a good jumping off point for someone just getting started and looking for some guidance into their new hobby or toolset. If you have any questions more specifically about some of the tips I’ve described, leave it in the comments down below and we’ll be happy to help.
Thanks for reading!
Article Tags
- 3D Printing
- Firmware
- 3D Design
- MatterControl
- Press Releases
- Small Business
- Automotive
- E3D
- Jewelry Making
- Engineering
- Entertainment Industry
- MatterControl Touch
- ESD Materials
- NylonX
- BCN3D
- Open Source
- Crafty Pen
- Digital Fabrication Anatomy
- How To
- Hardware and Upgrades
- Tips and Tricks
- Weekend Builds
- Top Ten
- Education
- Tech Breakdown
- Women in 3D Printing
- Project Ideas
- Advanced Materials
- Reference
- Pulse Dual Extrusion
- Product Spotlight
- Aerospace
- Jobs
- Military & Government
- Multi-Tool Machines
- Getting Started
- Healthcare
- How To Succeed With Any 3D Printing Material
- Creality3D
- Architecture
- 3D Printer Reviews
- Hacker of the Month
Related Products
View all related productsThu, 1 December 2022 3D Printing Today #460 News: Good news from SSYS https://3dprint. Segments: Looking Back 8 Years, Formlabs Serial Names, Tenlog Pricing
Thing of the Week: Splaty Outlet Cover Plate https://www.thingiverse.com/thing:5586448
threedprintingtoday.libsyn.com or Search for 3D Printing Today wherever you get your podcasts Direct download: 3D_Printing_Today_460-mp3.mp3 |
Thu, 24 November 2022 3D Printing Today #459 Printing to tolerance, Printing Formlabs Clear Resin, Start and end gcode changes Direct download: 3D_Printing_Today_459.mp3 |
Thu, 17 November 2022 3D Printing Today #458 Formlabs Form3+ Prints Legos, 3D Coat Pain, Plastic Repellent Paint, Object orientation in SLA Direct download: 3D_Printing_Today_458. |
Thu, 10 November 2022 3D Printing Today #457 Installing nozzles, SLA hollow or not hollow, Formlabs Support Rafts Direct download: 3D_Printing_Today_457.mp3 |
Thu, 3 November 2022 3D Printing Today #456 Disposing of old printers, Flat on the SLA Build plate, Formlabs Curing Direct download: 3D_Printing_Today_456.mp3 |
Thu, 27 October 2022 3D Printing Today #455 PrusaSlicer and the Toolchanger , Changing Resins on the Formlabs Form3+, Updating the Toolchanger Firmware Direct download: 3D_Printing_Today_455.mp3 |
Thu, 20 October 2022 3D Printing Today #454 Input Shaping with RepRap FW, Formlabs Optical System Direct download: 3D_Printing_Today_454. |
Thu, 13 October 2022 3D Printing Today #453 Installing an accelerometer for Input Shaping , Limitations of our materials, Formlabs Resin Handling and washing Direct download: 3D_Printing_Today_453.mp3 |
Thu, 6 October 2022 3D Printing Today #452 An Experiment to Eliminate Priming, Ghost guns close to home, Disposing uncurred resin Direct download: 3D_Printing_Today_452.mp3 |
Thu, 29 September 2022 3D Printing Today #351 News: Nikon attempts buy of SLM Solutions https://3dprintingindustry.com/news/nikon-launches-takeover-bid-for-slm-solutions-214344/ Segments: Recycled PETG, What printer should I buy?, The Master Spool still lives Thing of the Week: HHGTTG Marvin the Paranoid Android https://www. threedprintingtoday.libsyn.com or Search for 3D Printing Today wherever you get your podcasts Direct download: 3D_Printing_Today_451.mp3 |
Thu, 22 September 2022 3D Printing Today #450 News: Cyborg Roaches https://3dprintingindustry.com/news/tiny-3d-printed-backpack-turns-insects-into-bluetooth-controlled-cyborgs-214442/ Segments: Managing the cables, Formlabs3+ first prints
Thing of the Week: Fancy Decorative Filigree Scrollwork opera masquerade ball Halloween face mask https://www.thingiverse.com/thing:5500064 threedprintingtoday.libsyn.com or Search for 3D Printing Today wherever you get your podcasts Direct download: 3D_Printing_Today_450.mp3 |
Thu, 8 September 2022 3D Printing Today #448 Latest from the iFactory KS, Printing PLA on to PETG, Gun Parts b Direct download: 3D_Printing_Today_448. |
Thu, 8 September 2022 3D Printing Today #449 Smart FIll Painting with PrusaSlicer, Petamentor, Formlabs3+ Unbox Direct download: 3D_Printing_Today_449.mp3 |
Thu, 1 September 2022 3D Printing Today #447 How to do multi-material design, Positron version 3, Bambu X1 KS Campaign Direct download: 3D_Printing_Today_447.mp3 |
Thu, 25 August 2022 3D Printing Today #446 Systems Talk, AM Forward, Priming on an XL Direct download: 3D_Printing_Today_446.mp3 |
Thu, 18 August 2022 3D Printing Today #445 News: Stratasys boasts 13% growth. https://3dprintingindustry.com/news/3d-printer-sales-boom-sees-stratasys-achieve-13-growth-but-guidance-takes-exchange-rate-hit-213321/
10 Years of E3D https://www.tctmagazine.com/additive-manufacturing-3d-printing-industry-insights/technology-insights/ten-years-of-e3d-interview-co-founder-joshua-rowley/ https://zodiac3d.com Segments: PrusaSlicer Painting, How would LiDAR work for leveling
Thing of the Week: Rat Rig V-Core 3.1 https://www.thingiverse.com/thing:5430377
threedprintingtoday.libsyn.com or Search for 3D Printing Today wherever you get your podcasts Direct download: 3D_Printing_Today_445.mp3 |
Thu, 11 August 2022 3D Printing Today #444 Designing Wall Thickness, Setting Extrusion Temperature, Hemera Issues Direct download: 3D_Printing_Today_444. |
Thu, 4 August 2022 3D Printing Today #443 Lubing, Buying Filament these days, Iterate Efficiently Direct download: 3D_Printing_Today_443.mp3 |
Thu, 28 July 2022 3D Printing Today #442 Time lapse projects, The problem with 3D Scanning, Lighter Holder Direct download: 3D_Printing_Today_442.mp3 |
Thu, 7 July 2022 3D Printing Today #441 Octolapse warning, Getting Ready for Input Shaping in Duet , Capturing Time Lapse on the Ender 3 Direct download: 3D_Printing_Today_441.mp3 |
Thu, 30 June 2022 3D Printing Today #440 Time Lapse recording update 2, EMI in 3D printers, TikTac Hacks Direct download: 3D_Printing_Today_440. |
Thu, 23 June 2022 3D Printing Today #439 Octolapse, Sources of distortion, Favorite Toolchanger Use Case Direct download: 3D_Printing_Today_439.mp3 |
Thu, 16 June 2022 3D Printing Today #438 News: Color 3D Printing using temperature https://3dprintingindustry.com/news/scientists-come-up-with-new-method-of-creating-safer-colored-3d-printed-parts-210046/ Segments: A look back at the Rep2, Creator 4, Printing Tourniquets Thing of the Week: 3D Printed Linear Actuator https://www.thingiverse.com/thing:5382992
threedprintingtoday.libsyn.com or Search for 3D Printing Today wherever you get your podcasts Direct download: 3D_Printing_Today_438. |
Thu, 9 June 2022 3D Printing Today #437 Multi-Material Options, Meltio, Printing for around the house Direct download: 3D_Printing_Today_437.mp3 |
Thu, 2 June 2022 3D Printing Today #436 stl-thumb, Trying Variable Layer height in PrusaSlicer, Time Lapse Options Direct download: 3D_Printing_Today_436.mp3 |
Thu, 26 May 2022 3D Printing Today #435 A trail of fails, Is it a HW fail or SW?, Thangs.com Direct download: 3D_Printing_Today_435.mp3 |
Thu, 19 May 2022 3D Printing Today #434 Minimizing Tool changes, Printing Analinda, Getting off of S3D for the Toolchanger Direct download: 3D_Printing_Today_434. |
Thu, 12 May 2022 3D Printing Today #433 Single tool Vs Multi-Tool problems, Revisitng the Thingiverse Hack, Little You Direct download: 3D_Printing_Today_433.mp3 |
Thu, 5 May 2022 3D Printing Today #432 E3D Revo First Look, Printing a Color 3DBenchy, PrusaPrinters.org(Printables) Direct download: 3D_Printing_Today_432.mp3 |
Thu, 28 April 2022 3D Printing Today #431 How to tell if a3Dprinter is selling well., Tuning Retraction, Orbitor update Direct download: 3D_Printing_Today_431.mp3 |
Thu, 21 April 2022 3D Printing Today #430 Advanced Tuning, Installing Orbitor V2s on the TC, Open Builds Direct download: 3D_Printing_Today_430. |
Thu, 14 April 2022 3D Printing Today #429 Updating ReprapFirmware, Orbitor 1.5 on the TC Direct download: 3D_Printing_Today_429.mp3 |
Thu, 7 April 2022 3D Printing Today #428 Hybrid kits, More on gaming, Getting the first layer right Direct download: 3D_Printing_Today_428.mp3 |
Thu, 31 March 2022 3D Printing Today #427 Light weight extruder feeders, Prusa XL Posts on FB, Questioning design quality Direct download: 3D_Printing_Today_427.mp3 |
Thu, 24 March 2022 3D Printing Today #426 To MP3 Converter Free (amvidia. Direct download: 3D_Printing_Today_426.mp3 |
Thu, 17 March 2022 3D Printing Today #425 Polypropylene, Pi Opinions, The Gaming Market Direct download: 3D_Printing_Today_425.mp3 |
Thu, 10 March 2022 3D Printing Today #424 To MP3 Converter Free (amvidia.com) Direct download: 3D_Printing_Today_424.mp3 |
Thu, 3 March 2022 3D Printing Today #423 Pellet Extruders, Enraged Rabbit Material Switcher, Fixing the massively nonmanifold Direct download: 3D_Printing_Today_423.mp3 |
Thu, 24 February 2022 3D Printing Today #422 3DShook. Direct download: 3D_Printing_Today_422.mp3 |
Thu, 17 February 2022 3D Printing Today #421 More Prusa XL, Musing over Thingiverse, Knife jig for USB Microscope Direct download: 3D_Printing_Today_421.mp3 |
Thu, 10 February 2022 3D Printing Today #420 Prusa XL Vs E3D TC, Predator Extrusions, Good practice for sizing tolerances Direct download: 3D_Printing_Today_420.mp3 |
Thu, 3 February 2022 3D Printing Today #419 US Manufacturing Inflection Point, Prusa XL Announcement, Thingiverse break Direct download: 3D_Printing_Today_419. |
Thu, 27 January 2022 3D Printing Today #418 Mixing Abstractions, Repeat Markers for Belt Printers, Pi Power Supply Direct download: 3D_Printing_Today_418.mp3 |
Thu, 20 January 2022 3D Printing Today #417 Non -planer 3D Printing, The Challenge of Sloping Surfaces, Tripped up on SSH Direct download: 3D_Printing_Today_417.mp3 |
Thu, 13 January 2022 3D Printing Today #416 Hard to ID reasons for clogs, Marionettes, Blender GIS Direct download: 3D_Printing_Today_416.mp3 |
Thu, 6 January 2022 3D Printing Today #415 Newbie CAD Mistakes, Klipper Feedback, Pi Woes Direct download: 3D_Printing_Today_415. |
Thu, 30 December 2021 3D Printing Today #414 Orbiter Extruder feeder, Belt printer roller extensions, Mesh fixing in Fusion360 Direct download: 3D_Printing_Today_414.mp3 |
Thu, 23 December 2021 3D Printing Today #413 Ender 5 Upgrading, Raise3D Decadence, Project Boxes Direct download: 3D_Printing_Today_413.mp3 |
Thu, 16 December 2021 3D Printing Today #412 E3D’s stand on patents, Tverse Hack, Printing Ornaments Direct download: 3D_Printing_Today_412.mp3 |
Thu, 9 December 2021 3D Printing Today #411 MultiMaterial Brainstorms, JPEG to STL, Production with a Belt Printer Direct download: 3D_Printing_Today_411. |
Thu, 2 December 2021 3D Printing Today #410 Managing Client Expectations, Things to know about using Deltas, Review of unclogging Direct download: 3D_Printing_Today_410.mp3 |
Thu, 18 November 2021 3D Printing Today #409 Upside Down 3D Printer, Run Out Sensors, Printing hollow Direct download: 3D_Printing_Today_409.mp3 |
Thu, 11 November 2021 3D Printing Today #408 Automated Brick Laying, RepKord CR30 Upgrades, Are 3DPrinters Illegal? Direct download: 3D_Printing_Today_408.mp3 |
Thu, 4 November 2021 3D Printing Today #407 Replacing the CR30 Bowden, 3DCoat 2021, Materials review Direct download: 3D_Printing_Today_407. |
Thu, 28 October 2021 3D Printing Today #406 What happened to 3DCPrinting?, CR30 print issues, Terrain Trails Direct download: 3D_Printing_Today_406.mp3 |
Fri, 22 October 2021 3D Printing Today #405 Revisiting the Bungalow Birdhouse, How to get rid of a 3D Printer, More Belt printer experiences Direct download: 3D_Printing_Today_405.mp3 |
Thu, 14 October 2021 3D Printing Today #404 Klipper, Speed Limit, Tool Changer reliability Direct download: 3D_Printing_Today_404.mp3 |
Thu, 7 October 2021 3D Printing Today #403 Do 3D Printers die?, Input Shaping, The Rat Rig Direct download: 3D_Printing_Today_403. |
Thu, 30 September 2021 3D Printing Today #402 RTP Biz model, Latest lessons learned with CR30, Triangulatica Direct download: 3D_Printing_Today_402.mp3 |
Thu, 23 September 2021 3D Printing Today #401 RepRap Wally, Replacing the 4010 box fan, PVB Direct download: 3D_Printing_Today_401.mp3 |
Thu, 16 September 2021 3D Printing Today #400 Predator Mod Pt1, S3D EOL?, Silver Belt Belt Printer Direct download: 3D_Printing_Today_400.mp3 |
Thu, 9 September 2021 3D Printing Today #399 Where to put the CR30, A Challenging Print, Silk PLA revisit Direct download: 3D_Printing_Today_399. |
Thu, 2 September 2021 3D printing Today #398 Problem with Silks, Zebedee Scanner, Retiring the Flashforge Direct download: 3D_Printing_Today_398.mp3 |
Thu, 26 August 2021 3D Printing Today #397 Proforge Toolchanger, DIY LIDAR Part 4, Predator Defect Fix Direct download: 3D_Printing_Today_397.mp3 |
Fri, 20 August 2021 3D Printing Today #396 The problem with Youtube 3DPrinter Reviews, A filament cutter, Multi Materials Dense support lessons Direct download: 3D_Printing_Today_396.mp3 |
Thu, 12 August 2021 3D Printing Today #395 Sainsmart Nylon + Carbon Fiber, LIDAR in a cave, A common mistake Direct download: 3D_Printing_Today_395. |
Thu, 5 August 2021 3D Printing Today #394 Goin Fast, MMU on non-Prusas, Sainsmart Nylon + Carbon Fiber Direct download: 3D_Printing_Today_394.mp3 |
Thu, 22 July 2021 3D Printing Today #393 Printing a sink, MIrageC Vids, Kiri:Moto Direct download: 3D_Printing_Today_393.mp3 |
Thu, 15 July 2021 3D Printing Today #392 Making a Paw Cuff, The Five Main Open Source Designs, Should We Build a HevORT? Direct download: 3D_Printing_Today_392.mp3 |
Thu, 8 July 2021 3D Printing Today #391 PrusaSlicer, Tuning for Print in Place, Clues to if its a good 3D Printer Direct download: 3D_Printing_Today_391. |
Thu, 1 July 2021 3D Printing Today#390 Slicer Variable Names, Ironing in PrusaSlicer, Ender 3 Cable Chain Revisit Direct download: 3D_Printing_Today_390.mp3 |
Thu, 24 June 2021 3D Printing Today #389 Delrin Roller problem, A better T-nut, Ender 3 Cable chains Direct download: 3D_Printing_Today_389.mp3 |
Thu, 17 June 2021 3D Printing Today #388 Knockturn Alley Booknook, Printing a mask, Ender 3 Hemera Mounts Direct download: 3D_Printing_Today_388.mp3 |
Thu, 10 June 2021 3D Printing Today #387 CR30 Eval, CR30 Build, CR30 Should you buy now? Direct download: 3D_Printing_Today_387. |
Thu, 3 June 2021 3D Printing Today #386 3D Chameleon Update, Belt Printing Challenges, SeeMeCnC DeltaBOSS Direct download: 3D_Printing_Today_386.mp3 |
Thu, 27 May 2021 3D Printing Today #385 Better Belts, How the Chinese won, 3DSets Direct download: 3D_Printing_Today_385.mp3 |
Thu, 20 May 2021 3D Printing Today #384 Foam Nozzle, DIY LIDAR part3, Toolchanger Advice Direct download: 3D_Printing_Today_384.mp3 |
Thu, 13 May 2021 3D Printing Today #383 Crowd Funding Fails, Getting a clean bottom with the belt Direct download: 3D_Printing_Today_383. |
Thu, 6 May 2021 3D Printing Today #382 The last 18 months, Purge, Prime and Wipe, Scan the van Direct download: 3D_Printing_Today_382.mp3 |
Thu, 29 April 2021 3D Printing Today #381 Shrinkage on the belt, New Extruders we want to try, Zesty Nimble V3 Direct download: 3D_Printing_Today_381.mp3 |
Thu, 22 April 2021 3D Printing Today #380 Do we really need bed heaters? Three main types of FDM hobby machines, Obsolete approaches Direct download: 3D_Printing_Today_380.mp3 |
Thu, 15 April 2021 3D Printing Today #379 3D Chameleon V1 Vs V2 Vs MMU, 3D Printing for drones, Best we're seeing with the belt Direct download: 3D_Printing_Today_379. |
Thu, 8 April 2021 3D Printing Today #378 3D Printing Taskflows, T-Nut tips, iFactory Gotchyas Direct download: 3D_Printing_Today_378.mp3 |
Thu, 1 April 2021 3D Printing Today #377 Attaching the plate, Bed Heaters, 3D Chameleon Direct download: 3D_Printing_Today_377.mp3 |
Thu, 25 March 2021 3D Printing Today #376 Lithophane Generators, Comparing the Cr6 to the Ender3 V2, Touchterrain Direct download: 3D_Printing_Today_376.mp3 |
Thu, 18 March 2021 3D Printing Today #375 Silk Filaments, Going Open Source, Printing at 45 degrees Direct download: 3D_Printing_Today_375. |
Thu, 11 March 2021 3D Printing Today #374 Retiring the Rhumba, LIDAR Scanner Update, Printing with PVA 1 Direct download: 3D_Printing_Today_374.mp3 |
Thu, 4 March 2021 3D Printing Today #373 iPhone LIDAR, Full Control GCODE task flow, iFactory One Printing Direct download: 3D_Printing_Today_373.mp3 |
Thu, 25 February 2021 3D Printing Today #372 diy Lidar part 2, Toolchanger accidents, Full Control GCODE Direct download: 3D_Printing_Today_372.mp3 |
Thu, 18 February 2021 3D Printing Today #371 Enclosures, Delrin rollers, Shapr3D Direct download: 3D_Printing_Today_371. |
Thu, 11 February 2021 3D Printing Today #370 Looking at IDEX printers, DIY LIDAR Scanner Pt1, Building the iFactory Part 3 Direct download: 3D_Printing_Today_370.mp3 |
Thu, 4 February 2021 3D Printing Today #369 WoodFill, Building the iFactory One Part 1, The Demise of Dual Extruders Direct download: 3D_Printing_Today_369.mp3 |
Thu, 28 January 2021 3D Printing Today #368 WoodFill, Building the iFactory One Part 1, The Demise of Dual Extruders Direct download: 3D_Printing_Today_368.mp3 |
Thu, 21 January 2021 3D Printing Today #367 HIPS, SimplyColor3D 2. Direct download: 3D_Printing_Today_367.mp3 |
Thu, 14 January 2021 3D Printing Today #366 Taulman 910 Nylon, Giving credit where credit is due, 3Devo Direct download: 3D_Printing_Today_366.mp3 |
Thu, 24 December 2020 3D Printing Today #365 Unboxing your 1st Print, Your first print, CR6 update Direct download: 3D_Printing_Today_365.mp3 |
Thu, 17 December 2020 3D Printing Today #364 News: Stratsys gets into SLA https://3dprintingindustry.com/news/stratasys-to-acquire-sla-3d-printing-start-up-origin-in-deal-worth-up-to-100m-180910/
3DSystems sells off CAM https://www. Segments: CR6 first review, Three in one out hotend, Battle of the Belts
Thing of the Week: Baby Yoda Toothpaste Vomit https://www.thingiverse.com/thing:4670686 threedprintingtoday.libsyn.com or Search for 3D Printing Today wherever you get your podcasts Direct download: 3D_Printing_Today_364.mp3 |
Thu, 10 December 2020 3D Printing Today #363 Masterspool refills, Anycubic Predator 4, First scans with Cavetron Direct download: 3D_Printing_Today_363.mp3 |
Thu, 3 December 2020 3D Printing Today #362 Changing configuration on Tri-gorilla board. Direct download: 3D_Printing_Today_362.mp3 |
Thu, 26 November 2020 3D Printing Today #361 Anycubic Predator Review 3, Converting from CAD, Printing in color Direct download: 3D_Printing_Today_361.mp3 |
 com/295746/3d-printing-financials-stratasys-delivers-highest-q3-revenue-in-7-years-adjusts-outlook/
 mp3
mp3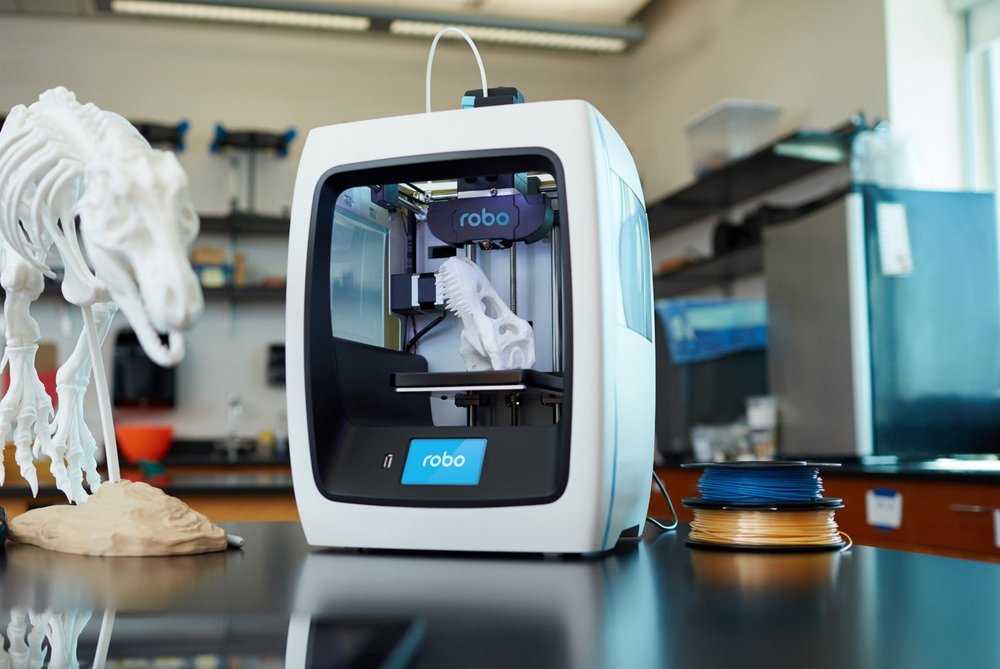 mp3
mp3 thingiverse.com/thing:5488540
 mp3
mp3 .. but...
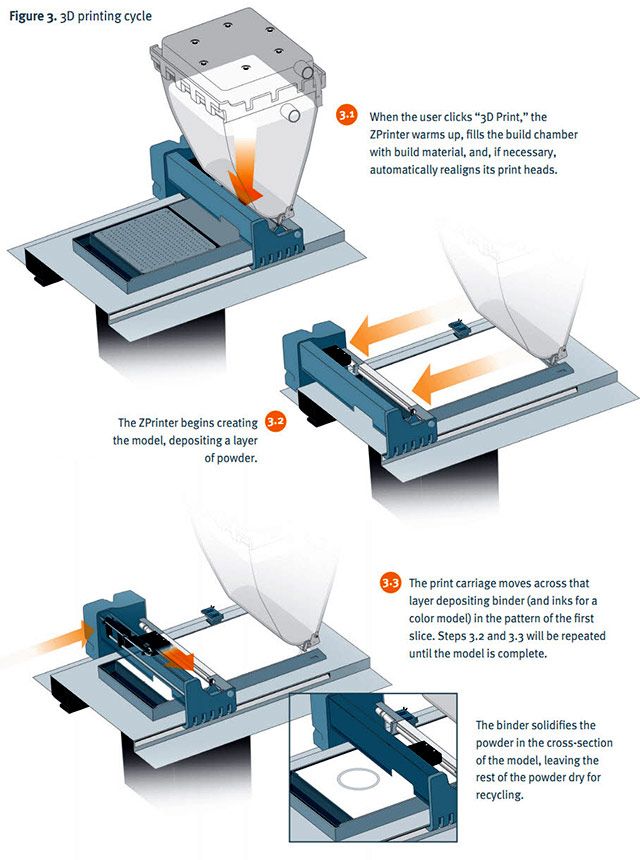 mp3
mp3 mp3
mp3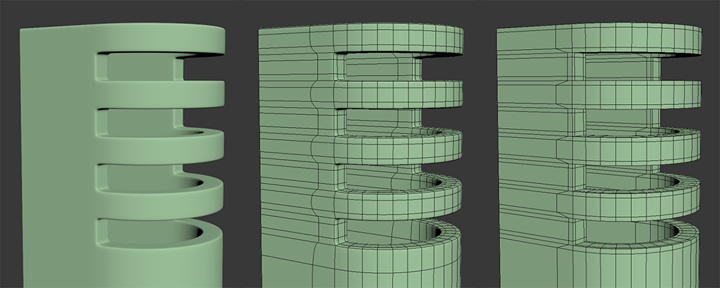 mp3
mp3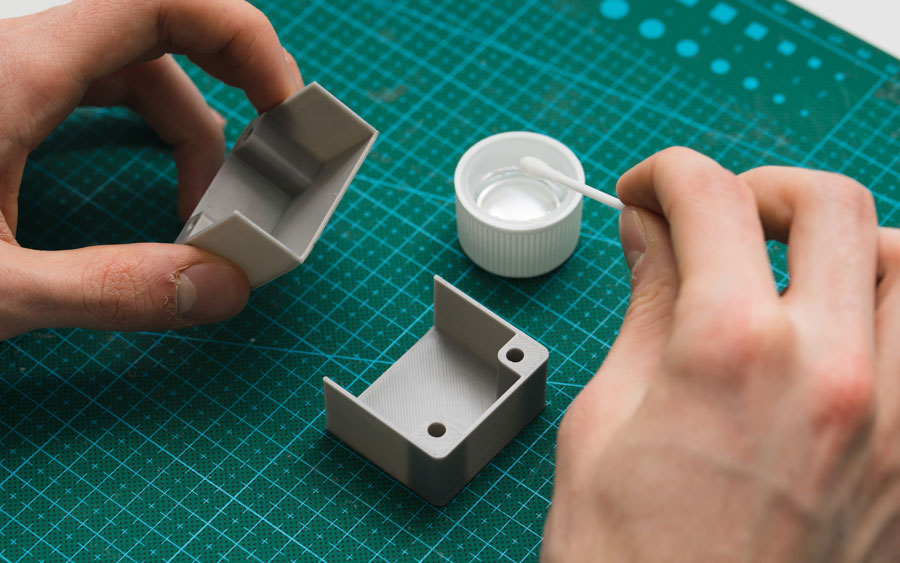 mp3
mp3 mp3
mp3 com)
com) com, Changing settings old Marlin, More Materials we forgot to mention
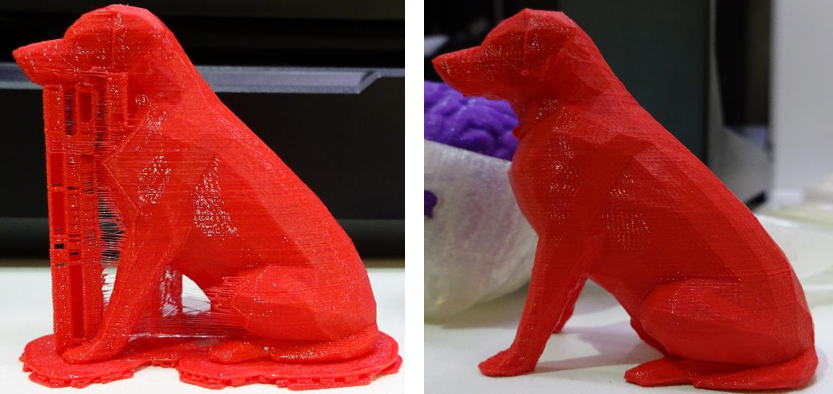 mp3
mp3 mp3
mp3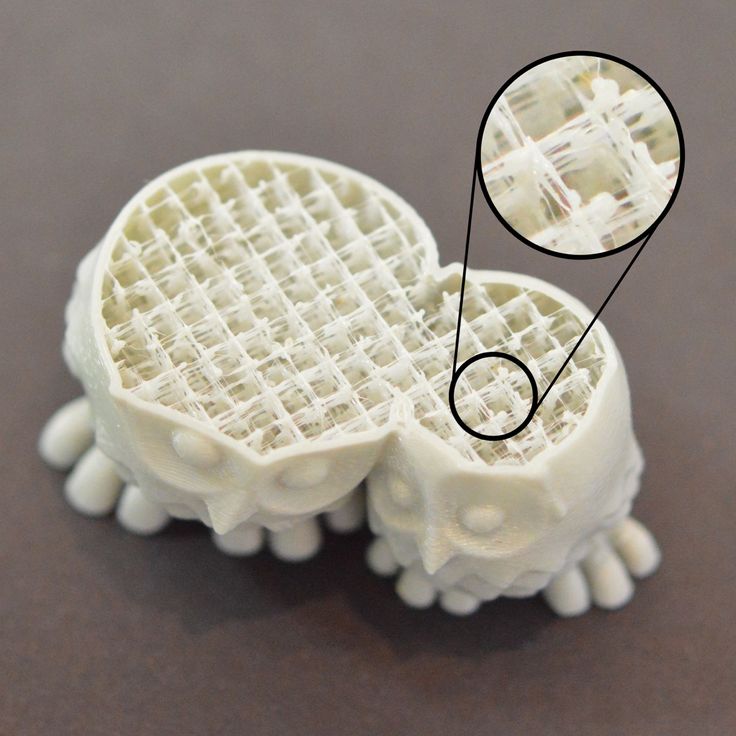 mp3
mp3 mp3
mp3 mp3
mp3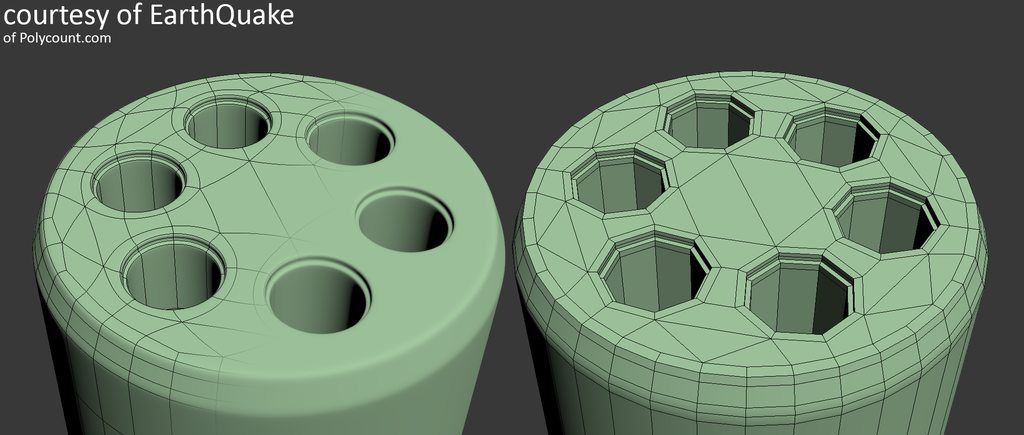 mp3
mp3 mp3
mp3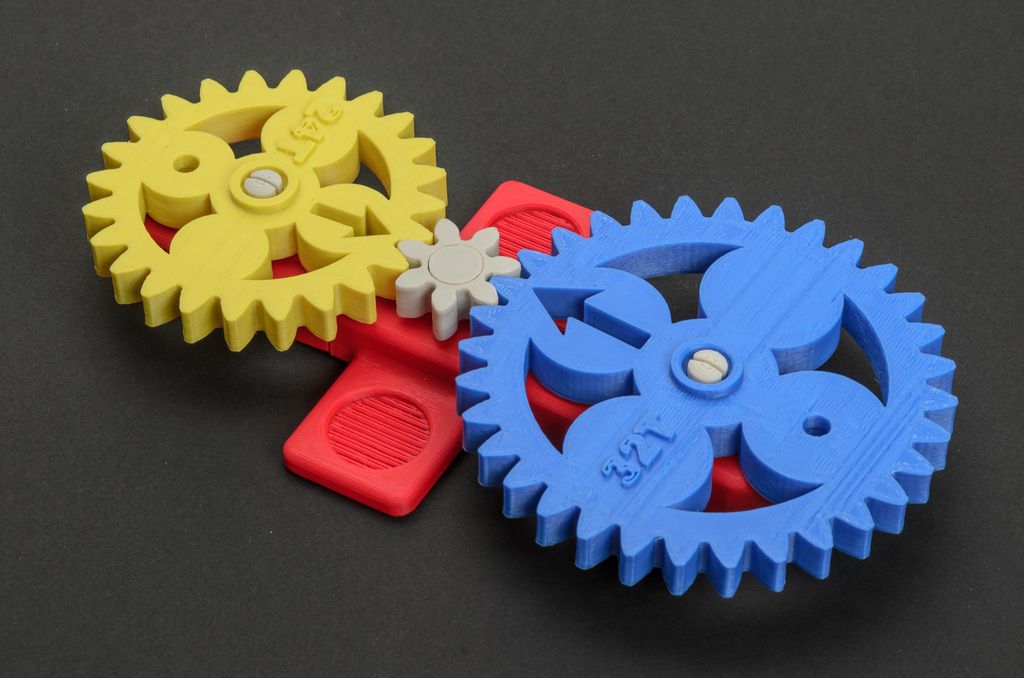 mp3
mp3 mp3
mp3 mp3
mp3 mp3
mp3 mp3
mp3 mp3
mp3 0, Business models
 engineering.com/3DPrinting/3DPrintingArticles/ArticleID/21009/3D-Systems-is-Getting-Out-of-the-CAM-Business.aspx
 , Glueing PETG, Plastic Paradox
short tips for the transition from a CAD model to a printed object / Sudo Null IT News
was withdrawn from publication due to a technical error. Please be understanding. Thank you!
Whether it's just a hobby or a source of income, 3D printing is always based on product design. Those accustomed to traditional technologies will have to rethink the entire approach to product design and manufacture.
When the project is ready, a number of additional operations are performed: setting the orientation of the model and other parameters that ensure the proper printing process.![]() In addition, it is necessary to take into account the fact that most 3D printers allow you to choose the degree of filling the model with cellular structures. The correct choice of this parameter provides protection of the object from deformation and destruction during the printing process, as well as significant savings in material and reduction in production time.
In addition, it is necessary to take into account the fact that most 3D printers allow you to choose the degree of filling the model with cellular structures. The correct choice of this parameter provides protection of the object from deformation and destruction during the printing process, as well as significant savings in material and reduction in production time.
Finally, the last factor influencing the success or failure of the 3D printing process is the strength of the connection between the model and the table. If the workpiece is separated from the table during printing, then all the work will go down the drain.
Here, we'll walk you through the 3D printing process and give you some simple tips on how to use additive manufacturing in the design phase. In addition, we will dwell on the methods of preparing a finished project for printing, and also consider ways to securely fasten the workpiece to the table.
These guidelines apply primarily to Fused Deposition Printers (FDM) printers, but may apply to other types of printers as well.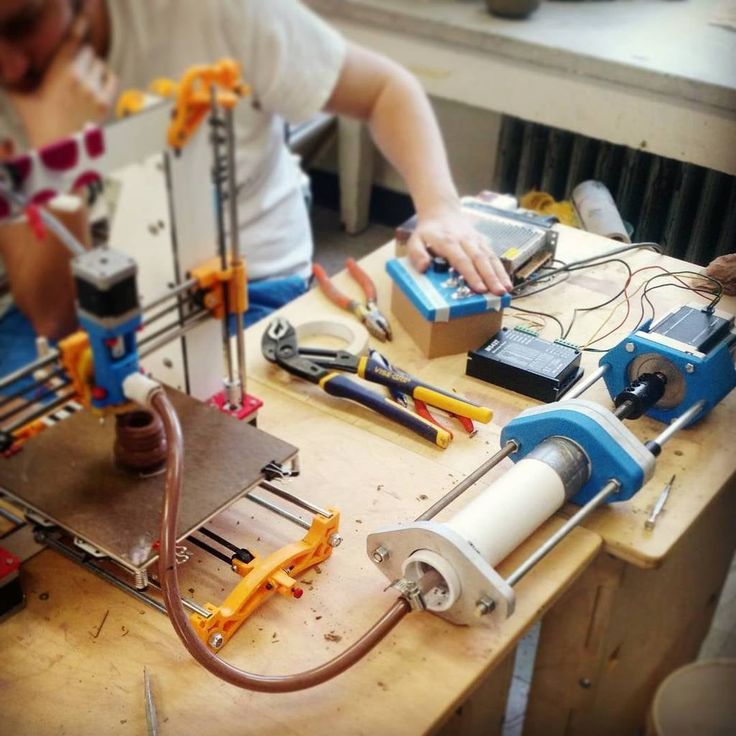 The process of obtaining a finished part by 3D printing is basically the same regardless of the method used.
Designing an object
Any 3D printing starts with construction. If you are developing a product yourself, then you need to build a 3D model of it in a computer-aided design (CAD) system to turn the designer's idea into reality. In this case, the object can be both very simple and very complex. However, too thin and too small models should be avoided.
3D-CAD from Siemens from this article for 49900r (90% discount), the promotion is valid until March 20, 2020. Read more>>
Saving the file in a special format for printing
To print an object, its model must be saved in a special file format - for example, STL, which has become the de facto standard in the world of 3D printing. In this format, model surfaces are represented as a grid of triangles. Simple surfaces are broken down into a small number of triangles.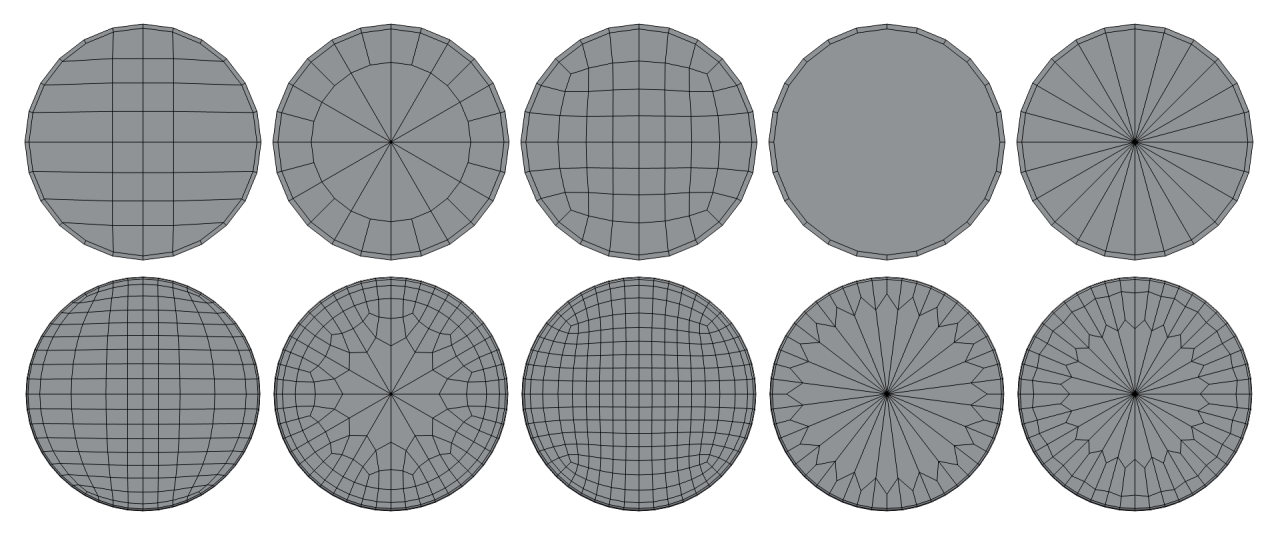 The more complex the surface, the more triangles you will need. Today, other formats are used in 3D printing, in particular, the 3MF format developed by Microsoft. But the most common is still STL.
CAD systems make it very easy to save the model in the desired format: just click the Save As command. To improve print quality, it is desirable to set a number of settings for saving to the STL format - for example, the tolerance during transformation and the angle of the plane. The lower the conversion factor and the better the angle, the smoother the printed part will be.
Opening the file in the slicer program
Most, if not all, 3D printers come with their own slicer software. The slicer loads the STL file created in the CAD system and cuts it into layers, and then creates a control program for the printer.
Place the model correctly in the print space
After entering the print settings, the model (or several models) needs to be placed on the printer table.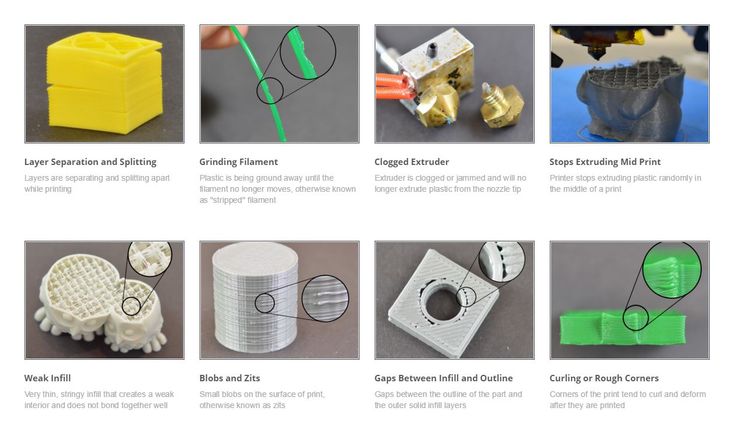 You can print many objects on one table at once. At the same time, compared to printing a single object, the time slightly increases, but in general it still turns out to be less. Here are some tips for choosing the right model orientation.
Set parameters
In the slicer program, the user sets parameters such as print speed, material consumption, nozzle and desktop temperatures. Most slicers have simple settings for beginners. In this case, most often there are also advanced settings so that experienced professionals can achieve optimal results. Advanced settings include percentage infill, amount of backing material, and type of backing or raft (this is a small, thin base that keeps the printed part stable. The backing is removed when it's finished). The number of options is truly endless. Specific settings vary depending on the brand of printer. It's easy enough to set them up.
Sending the control program to the printer
After setting the print settings, the placement of future objects on the table, their orientation and quality, it's time to finally start the printer.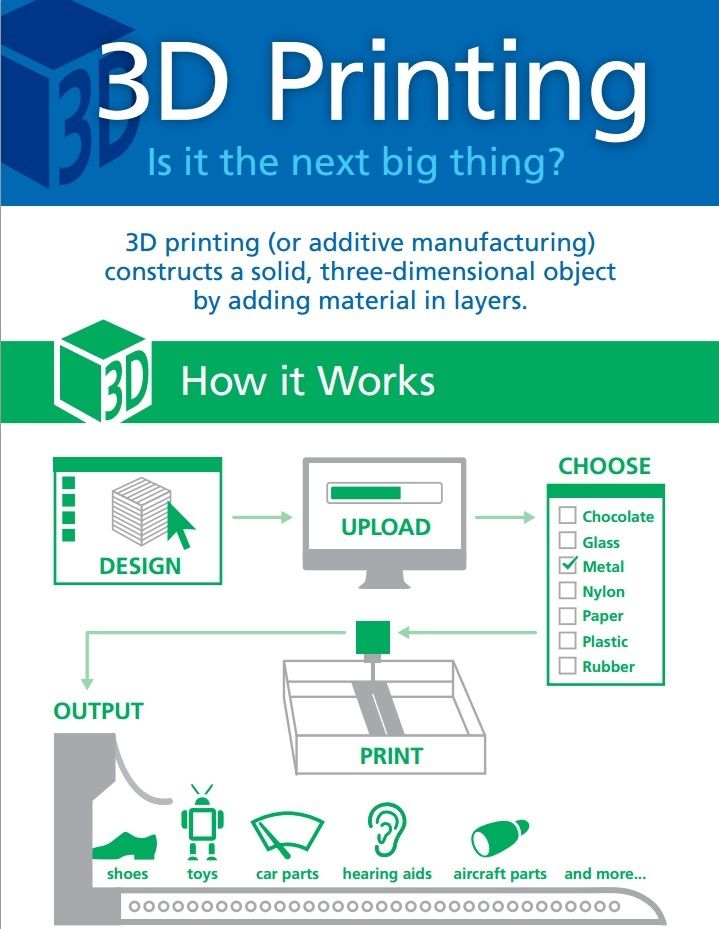 It is enough to press the Print button and find something to do while the production is in progress. Depending on the complexity of the design, the process takes from several minutes to several hours.
Finishing
Finishing includes removing the printed part from the table, as well as removing the support material by melting, mechanical separation or dissolution (depending on the design of the printer). The part may require some light sanding or polishing, but overall a properly printed object looks good from the start. Other types of finishing are placing plastic parts in a container with acetone to smooth out surface roughness, gluing (if the dimensions of the structure exceed the dimensions of the 3D printer or individual elements of the object must have different orientations), drilling holes and painting.
3D printing process
3D printer design considerations
Eliminate sharp corners
If the direction of the surfaces changes abruptly (for example, a vertical wall intersects with a horizontal overlap), then such a model is difficult to print. The printer will build excessive inner surfaces, wasting too much material. There are two easy ways to prevent this: add chamfers to smooth out where the surfaces meet, or round the corners so the printer gradually builds a vertical surface. In addition, rounding will increase strength, since destruction most often occurs at sharp corners.
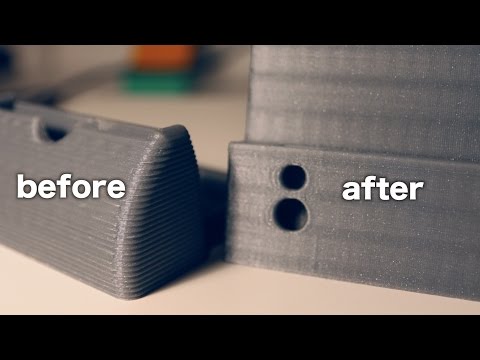
Elimination of thin walls and small geometries
Layer by layer fusing technology consists in supplying hot plastic through a nozzle with the formation of a printed object layer by layer. The thickness of the extruded plastic layer cannot be made smaller than a certain limit, depending on the diameter of the nozzle and the speed of the print head. Excessively thin-walled details are difficult to print - often the result is a chaotic weave of fibers. If the part can be printed, it is very fragile and breaks easily.
Too thick walls - also bad
On the other hand, if the walls are too thick, they become brittle and crack easily.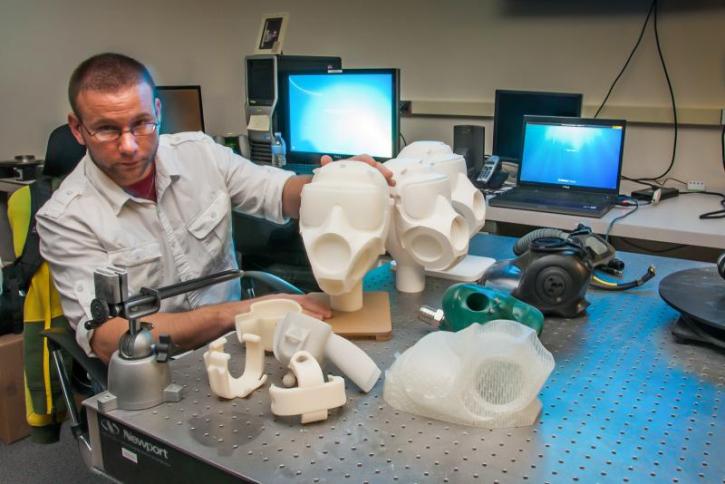 This is especially important when printing from materials other than resins, as excess thickness during the manufacturing process leads to internal stresses in the part. Even when printing from plastics, material is wasted on walls that are too thick and time is wasted.
Removing large overhangs
3D printers allow you to create amazing shapes and surfaces, but they are not capable of printing directly in the air. If there is a void in the part with material above it, additional support material must be used. Most slicers add material automatically, but require you to specify the orientation and volume of the support structure. Printers with a single nozzle create an array of thin columns, which then have to be broken off. The result is an uneven surface. Therefore, it is recommended to avoid large overhanging elements whenever possible in order to reduce the need for support material.
If such an element is unavoidable, you can try to flip the object.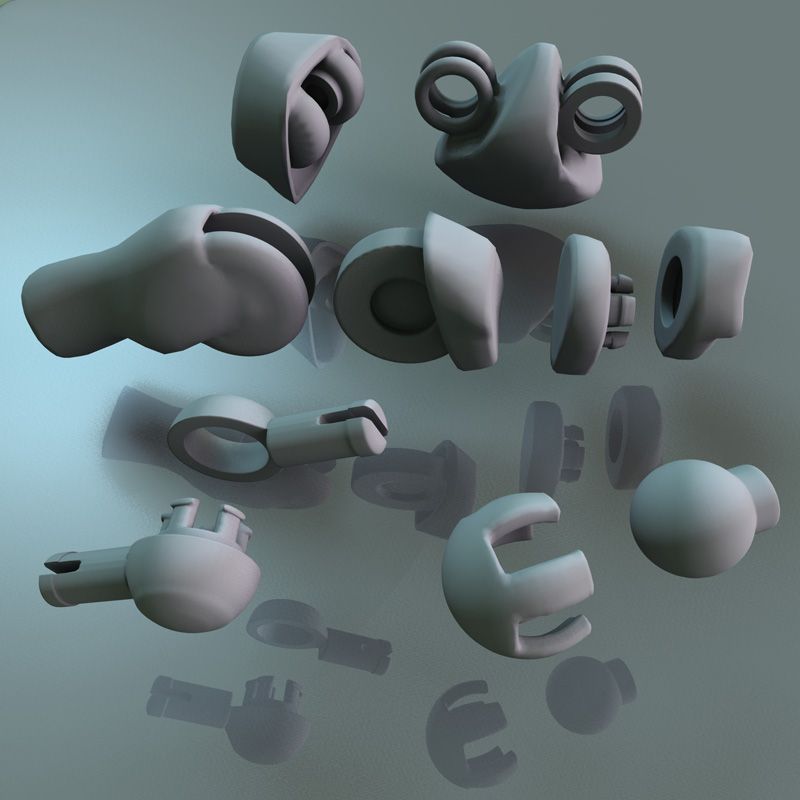 Most printers are capable of printing overhanging elements with an angle of about 45 degrees. At a certain height, the edge of such an element may sag somewhat. The actual capabilities of a particular printer are determined by trial and error.
Holes shrink
Remember that the part is made of heated plastic. As it cools, it inevitably shrinks. Therefore, holes and other critical structural elements have to be made larger so that after shrinkage their size is as close as possible to the required one.
However, if you need to make a tight tolerance hole, it is better to print it with a smaller diameter and then ream it with a suitable tool. This is especially true for holes whose axis is parallel to the printer table.
Increasing the footprint
If the area of contact between the object and the base is small, the part may separate from the table during printing. To prevent this from happening, wide bases are added to the model legs, which are installed on the printer table. In general, the closer to the table, the more material must be added to the support. There are other ways to securely fasten the part to the table, which we will discuss a little later.
Special moves
The right approach to design makes printing easier. In addition, there are special post-processing techniques that are important to be aware of.
Place round surfaces vertically
The model should be oriented so that the minimum amount of support material is used. Ideally, it should rest on the table with a large flat edge. In addition, circular geometry must be placed so that the circular faces are vertical. If we look at the printer table from above, we should see a round silhouette of the object. In this case, the part comes out as symmetrical as possible with the formation of a solid round structure.
Place voids and holes vertically
If there are voids in the model (for example, it is a rectangular pipe), it is desirable to place such voids vertically in order to reduce the volume of the support material. If you print the pipe in a horizontal position, you will have to provide support for the entire inside. If you put the pipe on the end, then no support is required at all.
The same is true for holes: to get a hole with a straight axis, it is best to print it vertically - in the form of a stack of rings, which avoids warping or deforming a round hole into an oval one.
Set print quality settings
Proper selection of print parameters, such as STL conversion tolerance and slicer software settings, allows parts to be produced with a surface quality that matches that of cutting. However, this entails an increase in print time. When choosing quality parameters, one should proceed from the purpose of the object: is it a finished product or a prototype? Will the part be visible or hidden?
The quality parameters also affect the shape of the holes in the part. In CAD files, holes are represented as a set of straight lines at an angle to each other. The higher the quality of the model in the saved STL file, the less the circle looks like a polygon.
Reducing the layer thickness
To obtain the best quality, especially when using layer-by-layer deposition technology, it is necessary to reduce the thickness of the layers. It does increase the print time, but the end result is worth it!
Optimizing the filling with honeycomb structures
In terms of strength, objects do not have to be solid. Similar to a honeycomb, printers can create a honeycomb infill that balances strength and saves expensive polymer material. However, if the printed part serves as a prototype for strength testing, and the serial product will be manufactured by traditional methods, and also if the part is subjected to certain types of mechanical stresses and pressures, a solid design will be preferable.
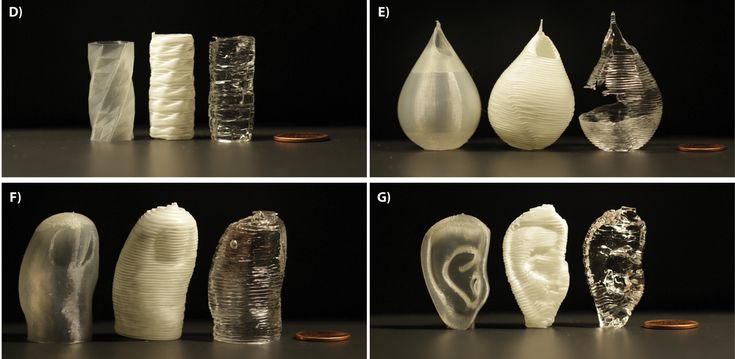
Choosing a material
The success of printing largely depends on the correct choice of material. Materials have different properties. For example, the melting point of thermoplastic polyurethane (TPU) and polylactic acid (PLA) is lower than that of acrylonitrile butadiene styrene (ABS). In addition, the material is taken into account when choosing the type of support structures. For an object made of polylactic acid, supporting elements can be made from the same polylactic acid, since it will be quite easy to separate them from the finished part. If the part is printed from ABS plastic, then the support elements must be made from a different material, and it is better not to use such elements at all in thermoplastic polyurethane parts.
Cellular filling
A solid body is not always the best choice for 3D printing. Printing solid parts has its advantages, but the internal honeycomb structure saves both expensive material and time.
Creating objects with a specified degree of filling with honeycomb structures is a unique opportunity for 3D printing.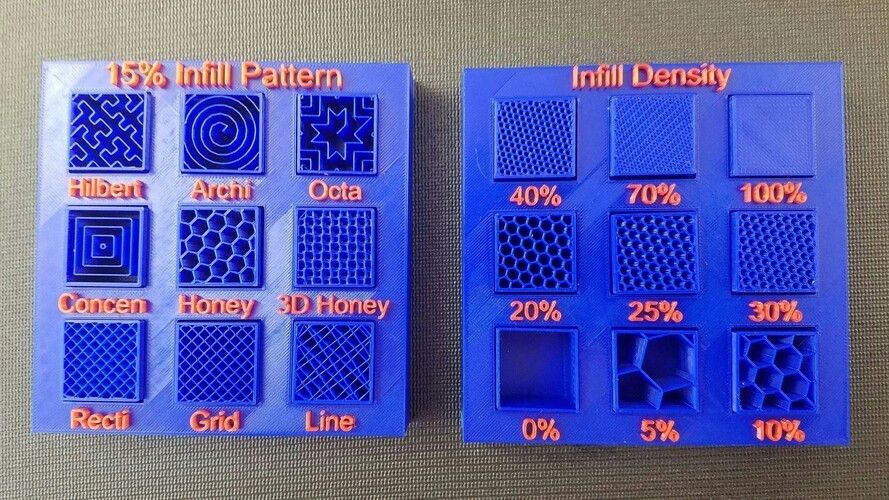 Moreover, it is not required to design such a structure: this is done by the slicer program. As a rule, it is enough to set only the percentage of filling (the closer it is to 100, the more solid the object will turn out) and select the type of cells, if the printer has such an opportunity.
In addition to saving time and material, the internal honeycomb structure has many other advantages.
Cellular filling prevents warpage
Printing large objects as a single piece introduces a danger of warpage. By reducing the infill percentage, the air during printing passes through the part, providing more uniform cooling and eliminating warping.
Cellular filling does not lead to loss of strength
Printing cells instead of solid material does not reduce the strength of the part. In many cases, a honeycomb part is strong enough for the chosen application, but lighter and less material intensive.
The function determines the choice of cell geometry
Most slicers support a wide variety of cell geometries. The optimal option is determined by the functional purpose of the object. Standard box padding simplifies printing, while hexagonal and triangular boxes add strength. Wave fill allows the object to bend or twist.
How to choose the right filling percentage?
In general, the strength of an object increases as the percentage of infill increases. Most printers have a default infill percentage of 20, which is optimal in some cases but too high or too low in others. Consider mechanical stresses in the printed object and increase the percentage of infill in areas where greater strength is required. If high strength is not required, choose the lowest possible filling. This saves material and speeds up printing. Most often, the selection of the optimal percentage of filling is done by trial and error.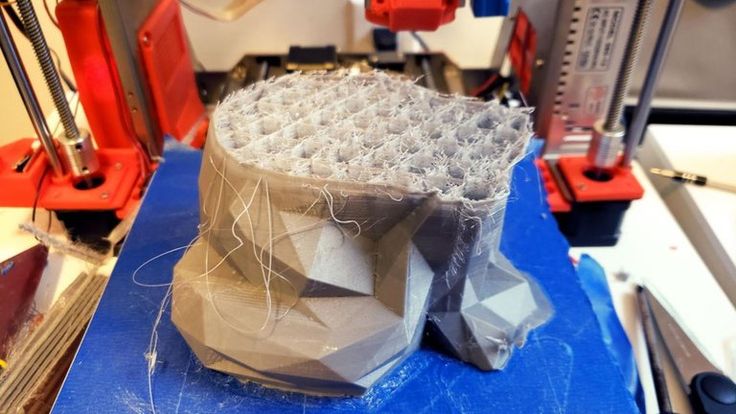
Ways of fastening the workpiece to the table
“Rafts”, “brims”, “skirts” – these terms sound funny, but they just refer to the three main ways of attaching a 3D printed part to a printer table. Let's take a look at each of these methods and their areas of application.
Skirt
The skirt involves creating a few rings around the object at the beginning of the print to make sure the plastic is extruded normally. The skirt is not in contact with the object at all. It surrounds the printable area and helps start the fusing process. When creating a skirt, a large volume of hot thermoplastic polymer passes through the nozzle. This prepares the printer for printing the part itself. This guarantees good adhesion to the table and obtaining smooth surfaces of the object.
Brim
The brim is a wide, flat area connected to the main object as a support base (think of a brim of a hat).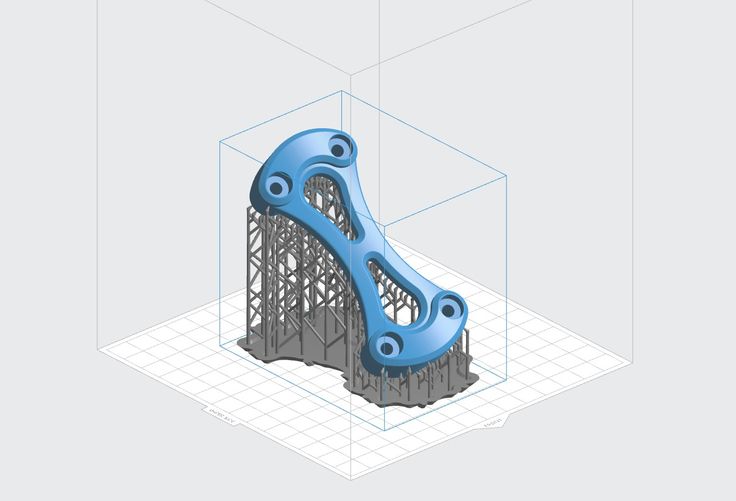 It is very similar to a skirt, but connected to the model. In addition to all the advantages of a skirt, the brim keeps the edges of the object being made on the table.
When printing, the outside of an object often cools faster than the middle, causing the edges to curl. Brim prevents this phenomenon by holding the edges.
Raft
A raft is a detachable base, made in the form of a thin mesh platform, located under the entire object (which lies on the raft). To create a raft, the printer first prints a flat plate in two or three layers, and then begins to manufacture the object.
The rafts provide excellent adhesion to the table surface and also provide a strong print base. This is especially useful when making small and oddly shaped parts that do not fit well on the table, as well as thin-walled objects.
After printing is completed, in most cases the raft will separate easily from the part.
If the printer does not have a heated desktop function
Rafts are used if the printer does not have desktop heating. In this case, excessive adhesion becomes a problem.
An alternative method is to apply adhesive paper tape to the printer bed, with the edges down if possible (this also protects the bed). You can also use packing tape, but it is usually more expensive.
If buckling does occur or the object separates from the table, apply a dissolvable glue stick to the adhesive tape. This will enhance adhesion.
Find out the features of a specific 3D printer and take them into account when preparing a model
3D printing is not only a science, but also an art. Effective design for subsequent 3D printing requires an understanding of the technological process, taking into account its features and the purpose of the future object. This will greatly improve print performance.
Using Solid Edge in 3D printing
Not all CAD systems are suitable for 3D printing
The capabilities of the applied system should not limit the designers. Our Solid Edge system is designed with the latest 3D printing technologies in mind. Various 3D printers and 3D printing services are supported.
Take it to the next level with specific techniques for designing 3D printed parts
Generative modeling in Solid Edge opens up new possibilities: the designer selects a specific material, sets the design space, allowable loads, restrictions and target mass of the part, and the system automatically calculates the desired geometry. As a result, 3D printing methods can produce the most complex shapes.
In addition, when building models, the use of the results of three-dimensional scanning is provided. Solid Edge successfully combines the traditional boundary representation of solid models (B-Rep) and the representation of surfaces in the form of a grid of triangles, which avoids time-consuming transformations that are fraught with errors.
If you've already downloaded an STL file for printing, our unique synchronous technology makes it quick and easy to edit your imported models in Solid Edge in preparation for the process.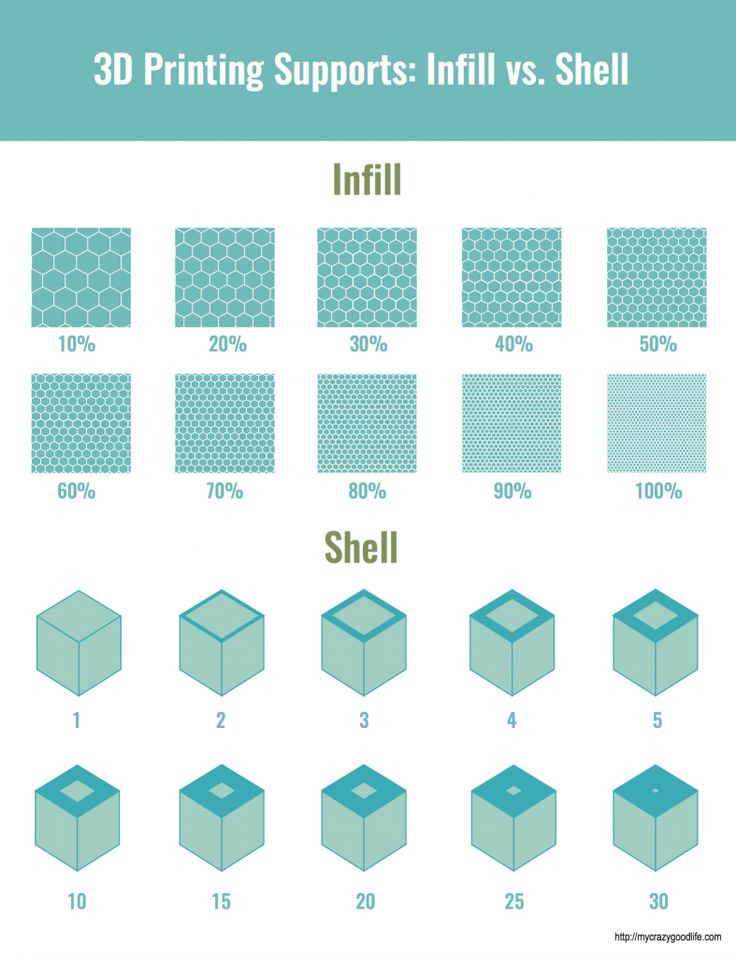
Printing with your own printer or submitting an order to a 3D printing service provider
Printing in Solid Edge on a local 3D printer is done using the 3D print command. Models can be saved in STL and 3MF formats, or sent directly to Microsoft 3D Builder. If you don't have your own 3D printer or need to try out different materials and surface finishes, Solid Edge allows you to directly submit your models to cloud-based 3D printing services (such as 3YOURMIND). You immediately receive quotes for the production of parts from various materials with its subsequent delivery directly to your door.
3D-CAD from Siemens from this article for 49900r (90% discount), the promotion is valid until March 20, 2020. Read more >>
3D modeling
Subscribe to
Subscribe
3D modeling without taking into account the features of 3D printing. When downloading models from common free-sharing sites like Thingiverse. com and others, you are simply amazed at how some models are not optimized for 3D printing.
In this article I would like to share my experience of modeling parts, taking into account the features of 3D printing.
Tip 1.
During the modeling phase, position the product along the XYZ axes as it will be on the 3D printer table.
Tip 2.
The vector of the force applied to the part along the Z axis should only be directed to the origin along the Z axis. If the force vector is directed from zero, this will eventually lead to delamination (rupture) of the layers. For example, as in the photo:
Tip 3.
The vectors of the main forces acting on the tension / bending of the part should be located in the XY planes, as in the picture below:
Tip 4.
. To do this, remember that a 3D printer prints bridges perfectly, but any bridge must have two supports. As an example, I will give the design of a vertical groove in the figure below.
If this groove is designed as it would look in nature, then the slicer will not be able to select the bridge and an overhang will result. If, when designing in this place, a bridge with a thickness of 1-2 layers is foreseen in advance, then the slicer will easily provide it:
After printing, the technological bridge is simply cut out with a clerical knife.
Tip 5.
If it is not possible to make a second leg of the bridge and an overhang cannot be avoided, then try not to make overhangs at right angles. 3D printers allow you to print the outer wall at an angle of up to 50-60 degrees. For example, in this way, the protrusions for the M6 cage nuts are made in the photo below:
Tip 6.
Hole sizes up to 10-20 mm. design more than the required diameter by 0.3-0.5mm. (selected empirically, depending on the nozzle and slicer). Moreover, the smaller the hole, the greater the difference.
Tip 7.
When designing complex parts, consider cutting the part into separate fragments for ease of printing, followed by gluing/screwing. For example, the front panel of the device in the figure below consists of 3 parts printed separately - the panel itself and two parts attached to it with M3 screws. In this case, all parts are printed in a comfortable position without supports:
Tip 8.
When converting parts to STL, use sufficient resolution to avoid rough faceting of holes and other complex surfaces.
Dear friends, I invite you to share your advice to a 3D printer in the comments.
If you like it - upvote.
3D modeling helpful tips 3Dsummer
Follow author
Follow
Don't want
71
More interesting articles
grin
Loading
11/13/2022
7345
114
Subscribe to the author
Subscribe
Don't want
Hi all!
As a big (avid) fan of the cartoon "Treasure Island", I have long wanted .