3D printing procedure
How to 3D print? The Beginner’s Guide to 3D Printing
Learning how to 3D print has never been easier!3D printing is an ever-evolving and expanding field. If you’re a beginner at 3D printing, the number of possibilities and applications can seem so vast, it can be a bit overwhelming when you’re just starting to know how to 3D print and how to use a 3D printer.
In this beginner’s guide to 3D printing, we’ll explain what exactly 3D printing is, how it works, how to 3D print, the best materials for beginners, and what you need to get started.
What is 3D Printing?3D printing is the process of creating a three-dimensional object, usually done by systematically layering material on top of itself. The printer reads a digital file from the computer which dictates how to layer the material to build the object.
This is why 3D printing is also known as additive manufacturing. 3D printing and additive manufacturing are mostly synonymous, although you may hear additive manufacturing used more frequently in the context of mass consumption or mass manufacturing.
Depending on the specific print you are planning to do there could be more or fewer steps in your process. But in general, 3D printing involves the following actions:
Step 1: Create or Find a DesignThe first step of 3D printing typically starts on a computer. You must create your design using a 3D design software, typically a CAD (computer-aided design) software. If you are unable to create the design yourself, you can also find many free resources online with free designs.
Step 2: Export the STL FileOnce you have created or chosen a design, you must either export or download the STL file. The STL file is what stores the information about your conceptual 3D object.
Step 3: Choose Your Materials Typically you may have an idea about what kind of material you will use before you print. There are many different 3D printing materials available, and you can choose them based on the properties that you want your object to have.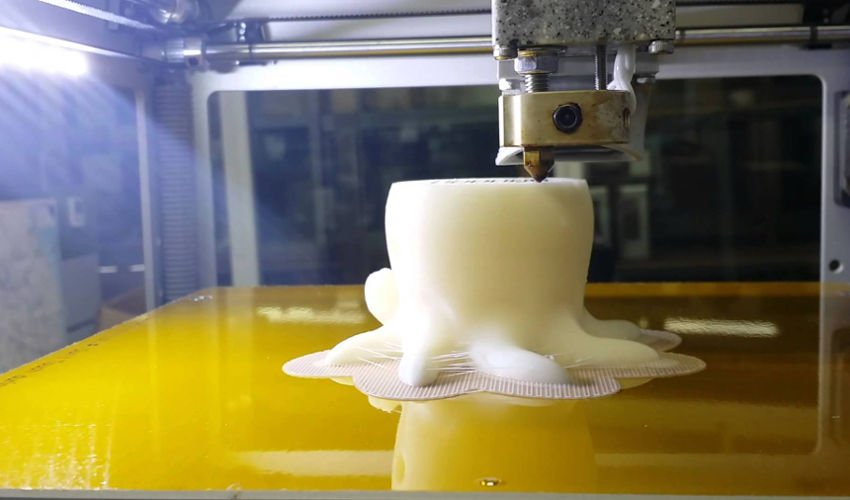 We will discuss this more in-depth below.
The next step is then deciding on the different parameters of your object and the printing process. This includes deciding on the size and placement of your print.
Step 5: Create the GcodeYou will then import the STL file into a slicing software, like BCN3D Cura. The slicing software will convert the information from the STL file into a Gcode, which is a specific code containing exact instructions for the printer.
Step 6: PrintThis is when the magic happens! The printer will create the object layer by layer. Depending on the size of your object, your printer, and the materials used, the job can be done in a matter of minutes or over several hours.
Depending on what you want your final product to be or the material you used, there may be additional post-processing steps after printing, like painting, brushing off powder, etc.
What is 3D Printing Used For?3D printing can be used both recreationally and professionally, across various industries. It has applications in many different fields and sectors, from the healthcare industry to engineering, and even fashion.
Increasingly, 3D printing is seen as a sustainable and cost-friendly solution for creating prototypes and tools for different manufacturing projects and processes. Traditionally, acquiring prototypes can be time-consuming and costly, requiring companies to depend on outside manufacturers. 3D printing allows companies to quickly make units of an object, tool, or prototype, all in-house.
A great example of this is shoe company Camper. In-house 3D printing has allowed them to transform their nearly month and a half long modeling and designing process into an operation that takes only several days.
3D Printing For Beginners: How To Get Started
So, what do you need to get started with 3D printing? Your specific needs will depend on why and what you want to print, but in general, there are three considerations for getting started:
- A 3D printer
- Filament
- Slicing software
If you plan on creating your own designs you will also need the appropriate designing software.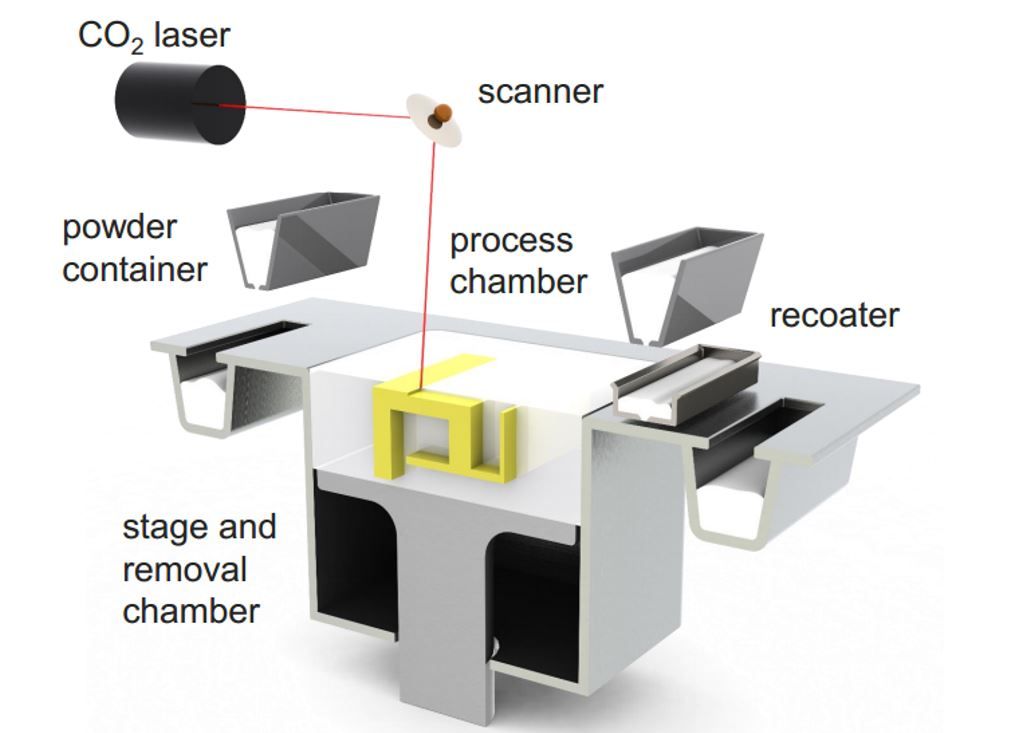 But, as we mentioned earlier, you can also find many free resources online to download designs.
If you have not yet purchased a 3D printer, we have a guide that can help steer you through the most important considerations.
3D printer FilamentsThe material also called filament, you choose for your print will depend on many different factors:
- Do you want your object to be flexible?
- Heat resistant?
- Does it need to be very durable?
These are just some of the factors to consider when choosing your filament.
In general, most beginners start with PLA. This is because PLA is cost-effective and typically easy to print with a standard configuration. Depending on your specific project, PLA could be good starter material.
PET-G is also considered a beginner-friendly material, although it is a bit more technical than PLA. However, it is great for industries like engineering and manufacturing. It is a good material for functional prototypes because it can withstand higher temperatures and has a different chemical makeup that is ideal for these uses.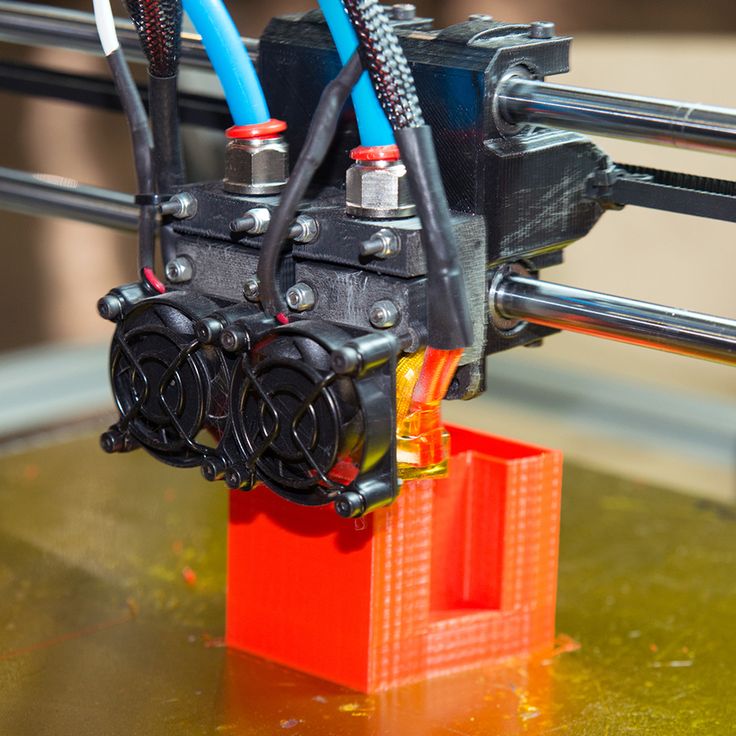
There are two important pieces of software for 3D printing: CAD and slicing software.
Typically, you can use any CAD system that can create a functional model. CAD is essential if you want to create your own models and objects. You must be able to export an STL file from your CAD software.
The slicing software is the second part of the equation. This software translates the STL file into a language that the printer can understand. The Gcode contains movement information that tells the printer how and where to move its axis, as well as how much material to deposit. The Gcode is sent to the printer via an SD card or wifi.
Final Thoughts3D printing is now more beginner-friendly than it has ever been. In the beginning, many people saw 3D printing as something inaccessible to the major public, but this sentiment is changing, and for good reason. While it takes practice to perfect your prints and technique, learning how to 3D print is an attainable skill.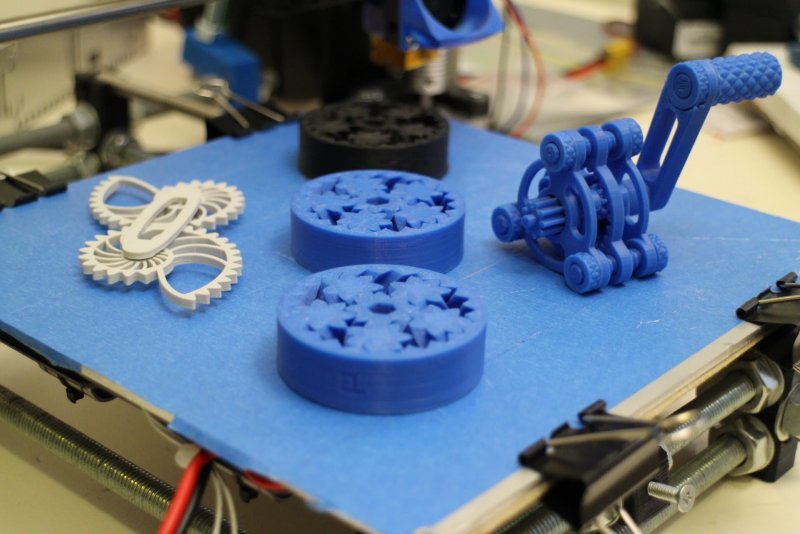
A Step-By-Step Guide of 3D Printing
For many people, 3D printing seems to be a manufacturing technology that exists in the future world. 3D printing technology has been popularized and widely used today. 3D printing was born in the late 1980s. The world’s first 3D printer was born in 1986. However, due to its high price and immature technology, it was not popularized in the early days. After more than 30 years of development, 3D printing technology has become more skilled, accurate, and the price has been reduced.
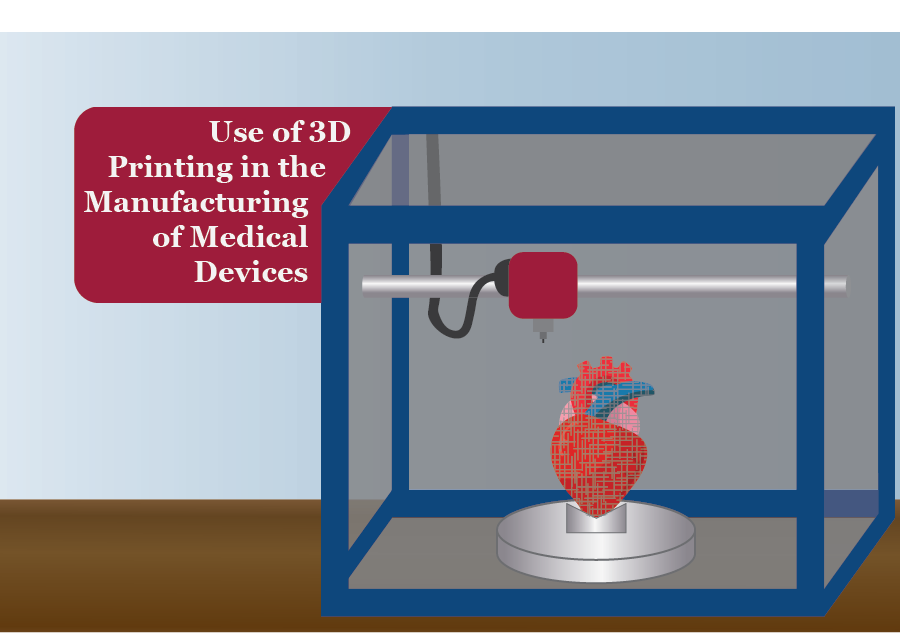
At present, 3D printing technology is widely used in manufacturing, medical, education, design, and other industries. For example, Surgeons at the Albany Medical Center in the United States use 3D printing to produce organ models; archaeologists of the Italian Agency for Cultural Heritage Restoration (ISCR) applied the 3D printing technology to make copies of precious cultural relics. Now, it is no longer an unattainable dream for ordinary people to own a 3D printer.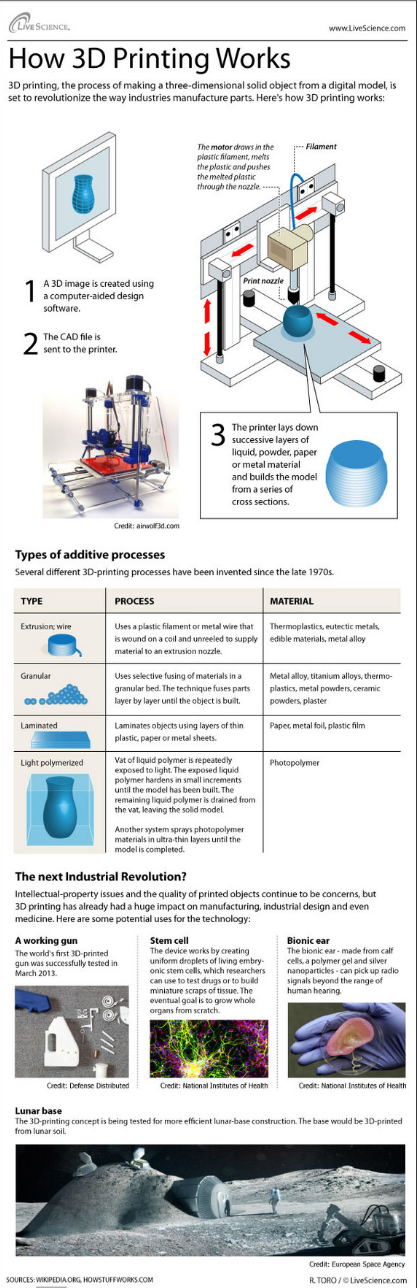 Makers around the world can use 3D printing technology to create all kinds of models. It can be said that whether for a company or an individual, 3D printing technology can easily realize their desire to print independently at anytime and anywhere.
Italian Cultural Heritage Restoration Agency (ISCR) used 3D printing to make cultural relics
How does 3D Printing Work?
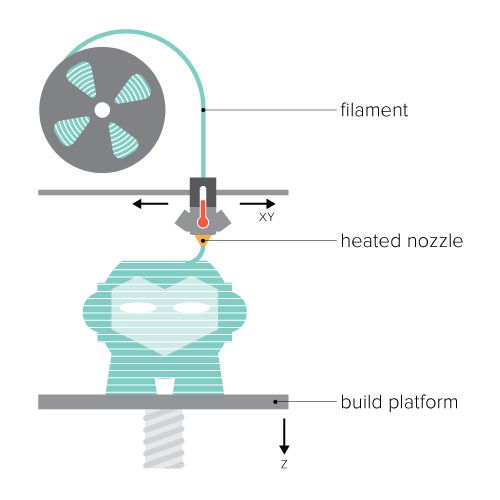
3D printing is a new type of manufacturing and processing technology. Visually speaking, ordinary printers print graphics and text on 2D paper with ink, while 3D printers convert raw materials (such as metals, ceramics, plastics, etc.) into thin layers by heating, light, laser, etc. Then, like building a house, the layers are added up to form an entity in the space. Mainstream 3D printing technologies are FFF, SLA, SLM, etc. The FFF is the most common technology, which will be focused on in this article.
FFF (Fused Filament Fabrication) is a 3D printing technology using PLA, ABS and other thermoplastic filaments, which will be heated and extruded by an extrusion head, and then stacked layer by layer under the control of a computer to finally construct a shaped three-dimensional model.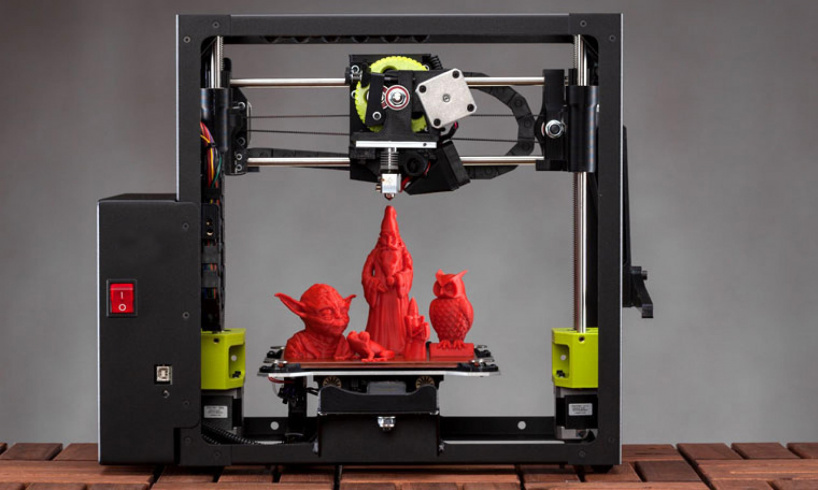 It is the most common and widely used 3D printing technology, with higher precision and lower cost.
The printing process of Raise3D’s 3D printer
Choose a Suitable 3D PrinterAt present, there are various brands and printers on the market, you can choose the most suitable 3D printer according to your needs. It is a good choice for you to choose a Raise3D Pro2 Series printer that is easy to operate!
Raise3D Pro2 Series printer components
The easiest way to understand FFF printing technology is to learn the components of a 3D printer that applies the FFF technology. A 3D printer mainly contains components such as printing bed, extruder, moving parts, touch screen, etc.
Printing bed: The printing bed is the platform for printing models, and usually the print bed is heated to help layers adhere to each other firmly.
Extruder: The extruder is the core component of a 3D printer, which will melt and stretch the filaments to build the model.
Moving parts: The parts of the printer will move on three axes, which are X, Y, and Z-axis. The X-axis and Y-axis are responsible for forwarding and backward movements, and the Z-axis is responsible for vertical movements.
Touch screen: Users can operate the printer and complete various settings by clicking the built-in RaiseTouch on the LED touch screen.
How to 3D Print a Model?
Unlike traditional processes, 3D printing requires very few steps, allowing you to print more easily. Generally speaking, to print a model through 3D printing needs to go through the following four steps: modeling, slicing, printing, and post-processing.
ModelingIf you want to print a 3D object, you naturally need to obtain a digital model of the object. Modeling will turn the object you want to print into a digital model that can be printed on a 3D printer. You can create 3D models with 3D modeling software (such as CAD software). Of course, you can also download the model files other users create. The STL files are widely used in rapid prototyping, 3D printing, and computer-aided manufacturing (CAM). The ideaMaker Library of Raise3D will also provide you with a platform where you can share and obtain 3D modeling models and settings files.
3D Rabbit Model
SlicingWhen you have a designed model, you can use specific slicing software such as ideaMaker to slice the model. The purpose of slicing is to allow the 3D printer to calculate the route and the amount of filament required when printing the model. Just like building a house, you need to calculate the steps to build and the amount of wood needed. ideaMaker will generate a GCode file, which is essentially a long list of instructions, and then the 3D printer will read the GCode instruction to build the model. ideaMaker is a powerful slicing software, which can create personalized configurations according to different printers, filaments, and models, it can also automatically create precise support structures. Therefore, ideaMaker will provide you with more possibilities for creativity.
Sliced Rabbit Model
PrintingAfter slicing is complete, you can upload the slice file to the printer, and calibrate the printer to prepare for printing. The extruders and the printing base need to be calibrated, to improve the accuracy of printing. During the printing process, you can observe the printing process through the transparent panel of a Raise3D Pro2 Series printer, or you can also monitor the printing progress remotely through our APP RaiseCloud in real-time. You will have a more intuitive and deeper understanding of the principles of 3D printing in this way. It will be a wonderful thing to observe the process of filaments accumulate layer by layer and monitor the printing progress!
Printing the model
RaiseCloud Mobile App.
Post-processingPost-processing is the final stage of 3D printing. The post-processing of FFF 3D printing has the following steps (not all steps must be completed):
Removing support: After printing, you need to remove the support (if the model contains). Filament will remain on the surface of the model.
Sanding: You can use some sandpapers to make the model smoother.
Coloring: You can color the model according to your preference and add more details.
Polishing: You can use apply a specific coating or other processes to make the model surface smoother and brighter.
Welding / Assembling: When you print a multi-part model or a large model, you can divide it into multiple parts, and then assemble the parts to form a complete model.
Post Processing
Advantages and Development of 3D printingAlthough it is a novel manufacturing technology, with its unique additive manufacturing method, 3D printing will surpass the traditional manufacturing process and become a new choice for future production.
Shortening the production cycle: 3D printing greatly shortens the product production cycle. By using a 3D printer, the company can more quickly produce the prototypes of the product and enable customers to make detailed and rapid feedback.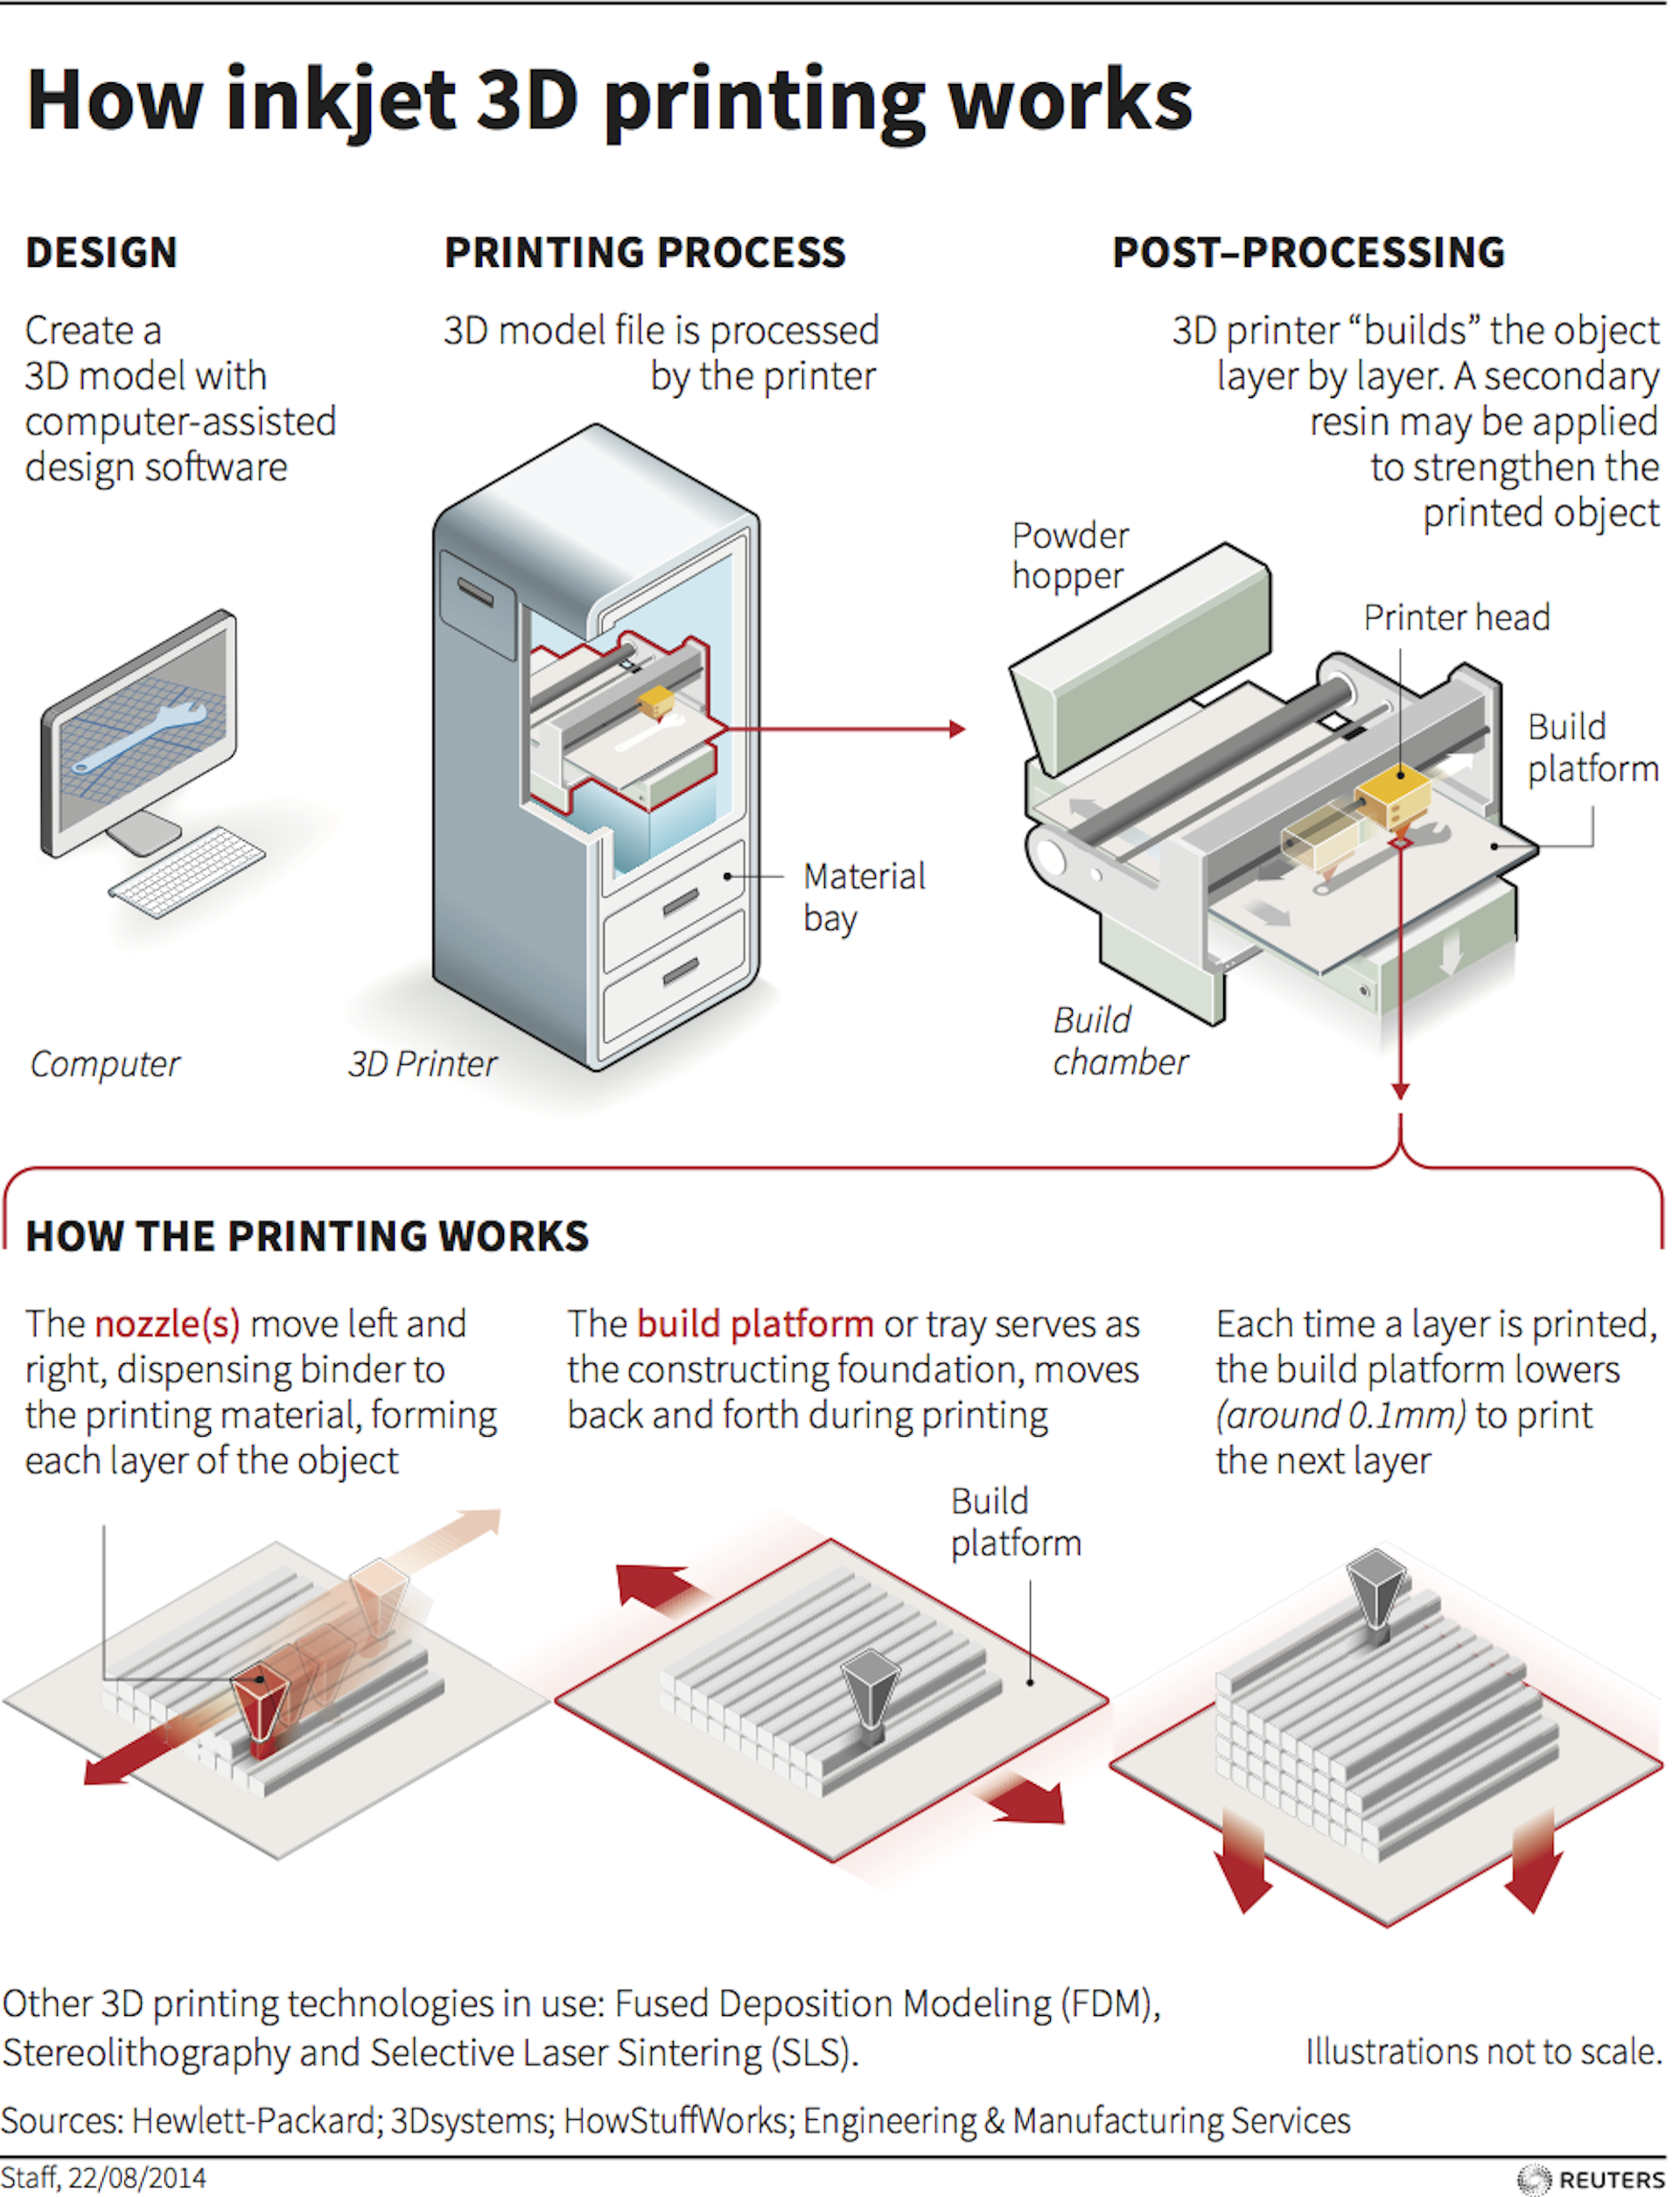 The application of 3D printers in prototyping and small-scale production will continue to expand.
Manufacturing complex parts: 3D printing has powerful forming capabilities and will not be restricted by complex curved surfaces and precise structures so that 3D printing can produce very complex parts.
Unlimited design and manufacturing space: 3D printers can print everything as long as you create a 3D model on the computer. Different filaments can be combined to create more possibilities.
In the future, 3D printing will have higher precision and faster speed, and more multi-materials with excellent comprehensive performance will develop. Therefore, 3D printing will be applied in more sophisticated and high-end industries such as aviation, aerospace, military, etc. to create a new industry format.
Connect with Raise3D:
Have you had a great experience with Raise3D that you would like to share? Please contact us at inquiry@raise3d. com. We look forward to hearing from you.
For more information about Raise3D printers and services, browse our website, or schedule a demo with one of our 3D printing experts.
Technologies and methods of 3D printing - ANRO technology
The active introduction of 3D technologies contributed to the creation of progressive 3D printers with a rich set of options. 's high-performance 3 D-printing technologies have produced original designs for marketing, catering, industry and landscaping.
3D printing is a procedure for designing three-dimensional compositions of a given geometric shape. The process of obtaining the original model is based on the phased construction of the object with clear applied layers, clearly demonstrating the edges of the product.
Innovative 3D printing methods are in high demand in the construction industry, architecture, education, medicine, bioengineering and many other fields. Unlike traditional methods of obtaining parts - milling, turning, they allow you to achieve high accuracy, the greatest savings in materials and time.
Features of 3D printing
Designed models are reproduced using special computer graphics programs , which are designed specifically for this purpose. Building one model can take from a couple of hours to two or more days, depending on the specifics of the project. The desktop device allows designers and design professionals to turn original prototypes into reality.
The advantage of modern technology is the efficiency and cost-effectiveness of modeling objects, for example, in the manufacture of products in production. 3D printers are indispensable for creating unique products in preschool educational institutions, building more complex samples in schools and specialized institutions. Modern technologies make it much easier to work with 3D models, so this technology becomes accessible to children. 3D modeling allows you to create objects of unique geometric shapes of varying degrees of complexity.
Basic 3D printing
- Fused deposition prototyping (FDM).
 An accessible modeling method, which consists in the layer-by-layer application of a hot thread from a fusible working product (wax, metal, plastic). Most often used for rapid prototyping of various models, for example, mass production of jewelry, souvenirs and toys;
 - Selective Laser Sintering (SLS). One of the famous prototyping methods. The product is formed from a powder product (ceramics, metal-plastic) by melting under the influence of a laser. The advantage of SLS is that you don't have to use a special structure to support floating elements;
- Laser stereolithography (SLA). The most famous modeling method using a special liquid polymer that hardens under the influence of mercury radiation. The advantages include high print resolution, the least amount of waste and ease of finishing the product;
- Electron Beam Melting (EBM). Advanced adaptive manufacturing method using special electron beams.
 Widely used in the production of various titanium products. Unlike models produced by SLS, blanks are solid and highly durable;
 - Production of models using lamination (LOM). Progressive way of forming various models using layer-by-layer gluing. The resulting objects can be upgraded by machining. The advantage of this technology is the availability of the main consumable material - paper;
- Multi-jet simulation (MJM). A popular type of printing based on multi-jet modeling of a photopolymer product. It is used in various industries. The advantages include the possibility of multi-color printing and the interaction of materials of different properties and characteristics.
Other 3D modeling technologies are common in adaptive and industrial manufacturing. All of them have their own characteristics and nuances. However, the simplest and most popular 3 D-printing method for is Fused Deposition Modeling (FDM).
3 reasons to choose FDM technology
- Simplicity. Printing technology is accessible even to small children. Therefore, it can be used both in schools and offices, and in preschool institutions;
- Originality. FDM technology allows you to design objects with unusual geometry and cavities, which is beyond the power of other types of modeling;
- Variety. When working with FDM technology, a wide variety of plastics can be used, which makes it possible to obtain a fairly wide range of models with different physical and chemical properties. 3D objects can be durable, flexible, luminous, soluble in water, and with many other properties.
FDM technology uses time-tested thermoplastics that are used in traditional manufacturing of various products.
Advantages of modern 3D printing technology from ANRO-technology
- High speed. Modern technologies provide short terms of product prototype development;
- Minimum material consumption.
 Progressive 3D printers allow you to produce objects with the lowest waste rates;
 - Robust internal structure. Innovative devices help to design large objects with minimal weight;
- Environmentally friendly. The materials used in prototyping are completely safe and do not pose any harm to the user.
Additional advantages of creating a 3D object include durable and convenient storage of materials that does not require special conditions.
3D technology is the future of prototyping, because thanks to them today the most non-standard design projects are being implemented both in everyday life and in the industrial sphere.
Our company is engaged in the development and supply of 3D printers based on FDM technology. Our 3D printers with specialized software are suitable for children from 6 years old. Small 3D prints can fit at home and delight children and adults with the opportunity to print their own 3D models of objects and toys.
[/mk_custom_list]
VIEW 3D PRINTERS
10 rules for preparing a model for 3D printing But, if we talk about FDM 3D printers, then not every model can be printed, and almost every model (not prepared for 3D printing) has to be prepared, and for this it is necessary to imagine how this 3D printing goes.
First, a couple of definitions:
Slicer is a program for converting a 3D model into a control code for a 3D printer. (There are plenty to choose from: Kisslacer, Slic3r, Skineforge, etc.). It is necessary, because the printer will not be able to immediately eat the 3D model (at least not the printer in question).
Slicing (slicing) is the process of translating a 3D model into a control code.
The model is cut (sliced) in layers. Each layer consists of a perimeter and/or fill. The model may have a different percentage of filling with a fill, and there may not be a fill (hollow model).
On each layer, movements occur along the XY axes with the application of a plastic melt.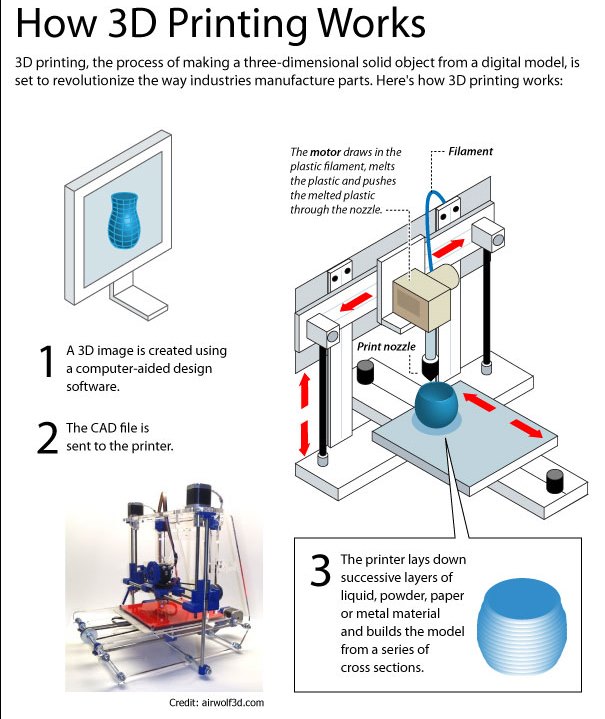 After printing one layer, it moves along the Z axis to the layer above, the next layer is printed, and so on.
1. Mesh
Intersecting faces and edges can lead to funny slicing artifacts. Therefore, if the model consists of several objects, then they must be reduced to one.
But it must be said that not all slicers are mesh sensitive (eg Slic3er).
And even if the grid is crooked, and it’s too lazy to fix it manually, then there is an excellent free cloud service cloud.nettfab.com that will help in most cases.
2. Flat base
Desirable, but not mandatory. A flat base will help the model stay on the printer table better. If the model peels off (this process is called delamination), then the geometry of the base of the model will be broken, and this can lead to a shift in the XY coordinates, which is even worse.
If the model does not have a flat base or the base area is small, then it is printed on a raft - a printed substrate. The raft damages the surface of the model it comes into contact with. Therefore, if possible, it is better to do without it.
3. Wall thickness
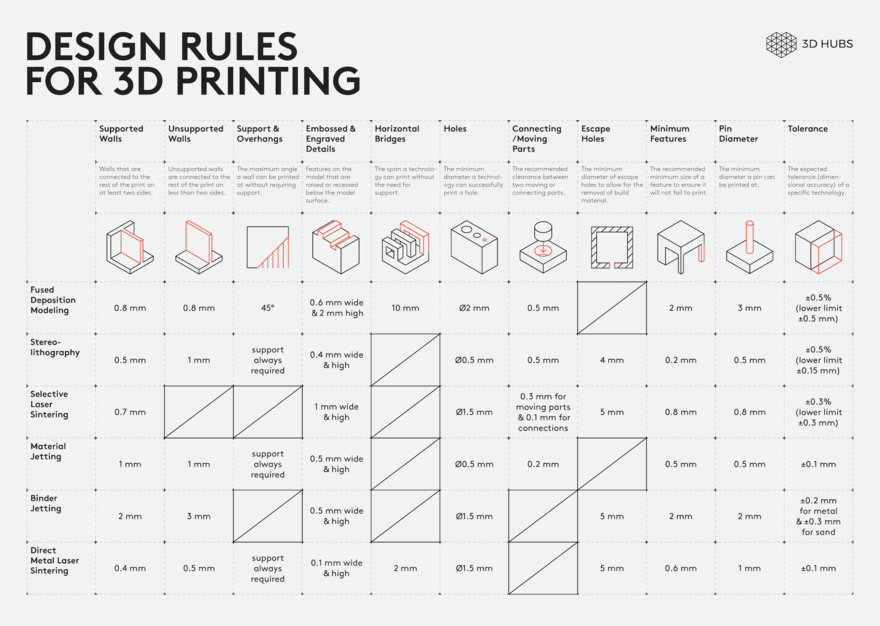
The walls must be equal to or thicker than the nozzle diameter. Otherwise, the printer simply will not be able to print them. The wall thickness depends on how many perimeters will be printed. So with 3 perimeters and a 0.5mm nozzle, the wall thickness should be from 0.5, 1, 1.5, 2, 2.5, 3mm, and above it can be any. That is, the wall thickness should be a multiple of the nozzle diameter if it is less than N * d, where N is the number of perimeters, d is the nozzle diameter.
4. Minimum overhangs
Each overhanging element requires a supporting structure - support. The fewer overhanging elements, the less supports you need, the less material and printing time you need to spend on them, and the cheaper the print will be.
In addition, the support spoils the surface in contact with it.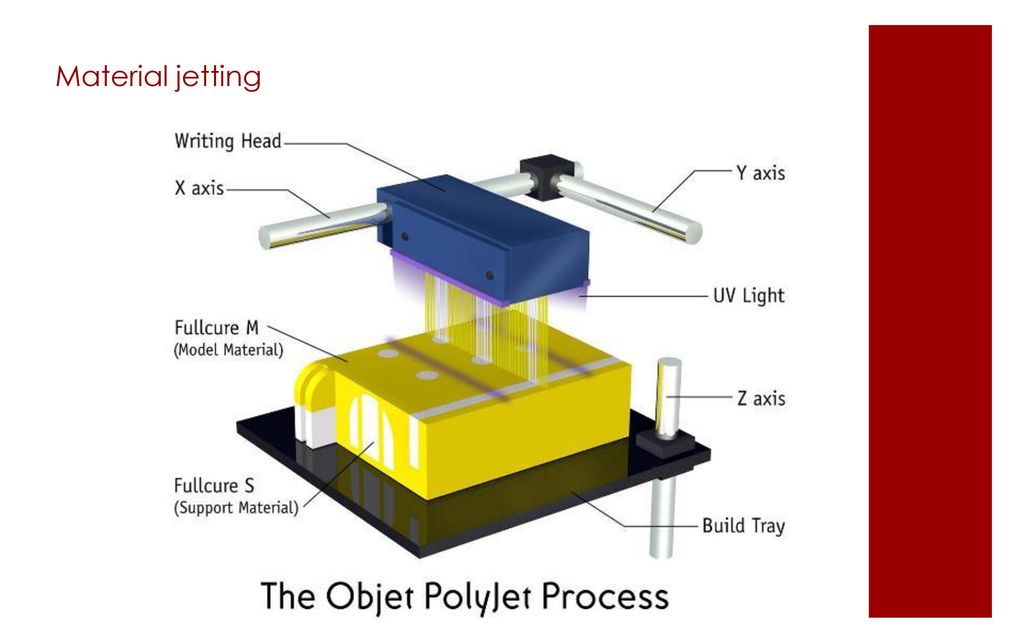
It is allowed to print without wall supports, which have an inclination angle of not more than 70 degrees.
5. Precision
Accuracy along the XY axes depends on backlash, structural rigidity, belts, in general, on the mechanics of the printer. And it is about 0.3 mm for hobby printers.
The Z-axis accuracy is determined by the layer height ( 0.1-0.4 mm). Hence, the height of the model will be a multiple of the height of the layer.
It should also be taken into account that after cooling, the material shrinks, and at the same time the geometry of the object changes.
There is also a software side of the problem - not every slicer correctly processes internal dimensions, so it is better to increase the diameter of the holes by 0.1-0.2 mm.
6. Small parts
Small details are quite difficult to reproduce on an FDM printer. They cannot be reproduced at all if they are smaller than the nozzle diameter.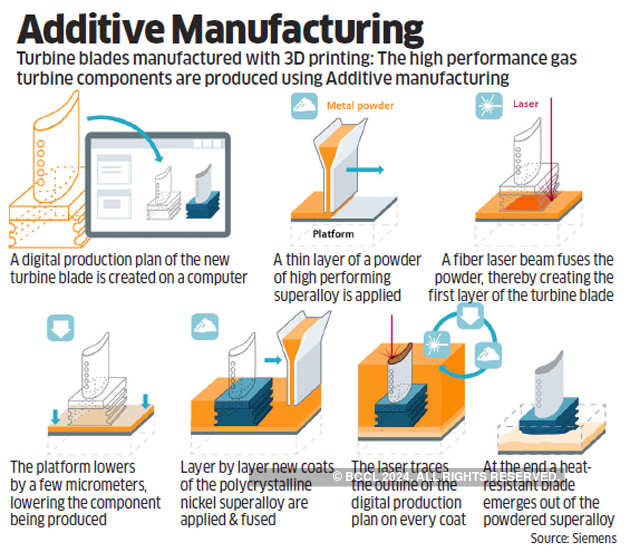 In addition, when processing the surface, small details will become less noticeable or disappear altogether.
7. Bottlenecks
Bottlenecks are very difficult to handle. If possible, it is necessary to avoid such places that require processing, which cannot be approached with a sandpaper or a microdrill. Of course, you can treat the surface in a solvent bath, but then small elements will melt.
8. Large models
When modeling, it is necessary to take into account the maximum possible dimensions of the print. If the model is larger than these dimensions, then it must be cut in order to print in parts. And since these parts will stick together, it would be nice to immediately provide connections, for example, a dovetail.
9. Desktop location
How to place the model on the desktop depends on its strength.
The load should be distributed across the print layers, not lengthwise.