3D printing overhangs curling up
3D Printing Overhang Curling - Settings & How to Prevent It
- Author
- Recent Posts
Martin
Martin has a M.Sc. in physics and has gained many years of experience in industry as a lab manager and quality assurance manager. He has now tested dozens of 3D printers and is happy to share the collected experience with each new article.
Latest posts by Martin (see all)
Disclosure: Links marked with * are Affiliate Links. I earn from qualifying purchases if you decide to make a purchase through these links – at no additional cost for you!
Overhangs and bridges are one of the print defects in 3D printing that make the difference between an excellent print and a poor print. By choosing the appropriate settings, you can prevent your overhangs and bridges from curling up.
Here are our tips for avoiding bulges, warping, curling and other flaws in overhangs:
- Smaller layer thickness
- Lower temperatures
- Experiment with print speed
- Larger extrusion width
- PLA* makes the most beautiful overhangs
- Increase density
- Cool faster
- Support structures
We will go into the individual points in more detail in this article.
To test your measures, you will find suitable test objects in this article. And here you will find general tips for better overhangs.
Table of Contents:
- 1 Layer Thickness
- 2 Temperature
- 3 Print Speed
- 4 Extrusion and Nozzle Width
- 5 Skin Print Sequence
- 6 Quality of the Filament
- 7 What to Do Against Curling and Warping in Overhangs
- 7.1 Slicer Settings Against Head Collision
- 7.2 New Ways Around the Outer Layer
- 8 Prevent Curling With the Right Slicer Settings
- 8.1 Increase Density
- 8.2 Maximize Fan Speed
- 8.3 Support Structures
- 8.4 Rotation of the Print Object
- 9 Which Angles are Printable?
- 10 Bridges
- 10.1 Bridge Settings in the Slicer
Layer Thickness
The layer height has a great influence on the stability of overhangs.If you want to print overhangs cleanly, you should play with some parameters. Unfortunately, only a few users have the factor of the layer thickness on the radar.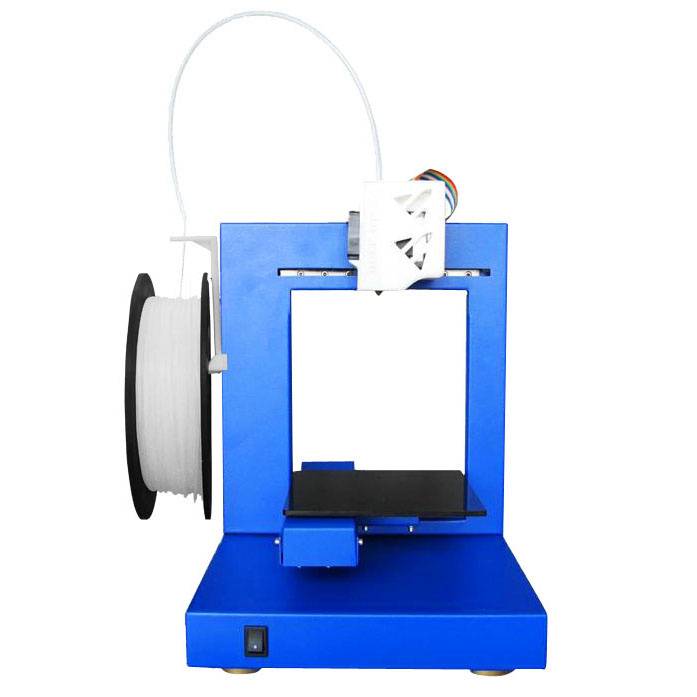
Remember that the ideal layer thickness for a clean overhang is essential. A generous layer thickness provides more contact surface, while a thinner layer thickness means less void space. Less void space means cleaner overhangs and you can increase the angle at which you print overhangs with a thinner film thickness.
This is because the printed material is a slightly squashed round layer. Remember that several small lines make a cleaner image than a few large filament strands.
Temperature
The printing temperature is crucial for good overhangs.Another factor for beautiful overhangs is the right temperature.
If you set the temperature too high, the material will start to hang easily at more extreme angles.
If the temperature is too low, there is a risk that the material will not bond nicely with the underlying layer.
In general, you should set the temperature for overhang 3D printing as cold as possible. The hotter the material is, the more fluid the filament becomes and the sooner it starts to hang down.
The problem here is that the behavior of the transition and the bridge depends very much on the filament used.
Note that not only do different filament types such as PLA, ABS, PETG and TPU require different printing temperatures, but also the same materials from different manufacturers.
Tip for the Ideal print temperature:
Temperature towers prove to be particularly helpful. You can use them to test the printing behavior of materials when 3D printing overhangs at different temperatures.
For perfect results, you should use the temperature tower for each filament of a new material or manufacturer so that you find the ideal setting for your overhangs and bridges.
Print Speed
The print speed has a great influence on the print quality.Speed is also an important criterion for the print quality of the overhang or bridge. Unfortunately, we cannot help you with a general recommendation for the printing speed. Some materials will give better print results if you print slowly, while with other filaments a higher printing speed is recommended.
You can only find out the appropriate printing speed by experimenting.
Even if your slicer has no own value for the speed for bridges and overhangs, some cheats offer the possibility to play with this parameter. If you have a Slic3r, you can use the option “Detect bridging perimeters” to set the appropriate settings for printing bridges.
Extrusion and Nozzle Width
A wider line width can be helpful for extreme overhangs. The wider the lines are printed, the easier it is to print a stable structure for overhangs or bridges.
The extrusion width can be a maximum of 200% of the nozzle diameter. With a normal 0.4 mm nozzle, this would give a maximum line width of 0.8 mm.
If you want to extrude the filament wider, you should go for a larger nozzle. If the filament is printed even wider, a stronger overhang angle can be achieved. This is because the contact surface is larger.
Skin Print Sequence
You should always print the outer layers from the inside out.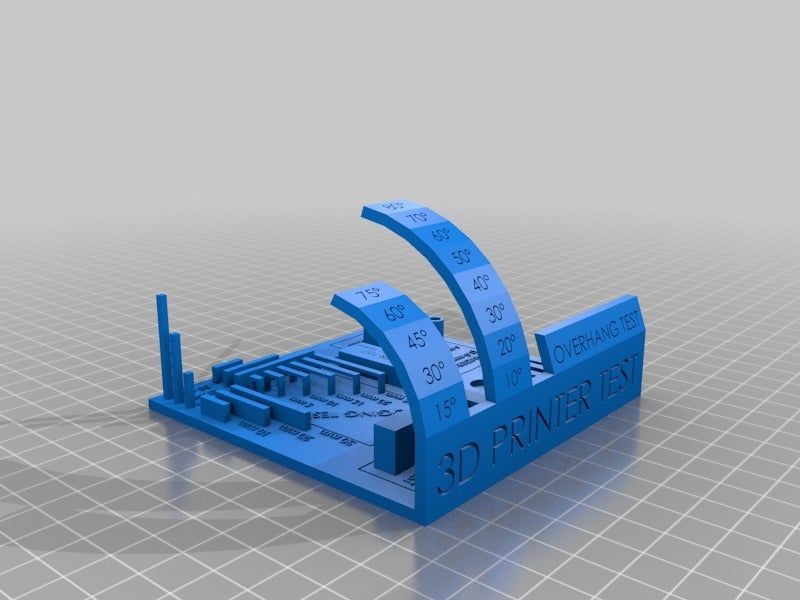 Make sure that the outermost layer is printed particularly slowly.
If you print overhangs, it is advisable to print from the inside out. The outermost layer should be printed very slowly.
Especially for steep overhangs, printing from the inside to the outside is recommended. The reason for this is that the critical outer layer can adhere to the layer underneath as well as to the infill.
Quality of the Filament
Fresh and flexible PLA filament.The quality of the material used plays a decisive role in 3D printing. Some filaments and brands have better printing results on overhangs and bridges than others.
PLA is known for being a high-precision filament. If you print overhangs and bridges with PLA, this material shines!
The HIPS and ABS filaments are less suitable for overhangs and bridges. Both materials produce unsightly hanging loops and ugly overhangs with the same layer thickness and lower angles.
Some materials tend to bulge or curl upwards during 3D printing of overhangs during printing. This warping or curling has a negative effect on the print quality and appearance of the object.
The print result will also deteriorate if the print head presses from the inside against the bulging area and the print is thus pressed down again to the appropriate height.
The absolute death of quality is a print head that moves onto the highly curved material from the outside. Depending on the filament, you may even hear an unpleasant noise. Remember that in the worst case, your print object can even come loose from the print bed and thus ruin your print object.
In the best case, simply the appearance of the overhang or bridge is ugly or has holes in the areas where the print head has gone.
What to Do Against Curling and Warping in Overhangs
We would like to give you an idea of some of the measures that can be taken when the printed overhangs curl upwards.
Slicer Settings Against Head Collision
You can counteract this catastrophe by activating the “Z-Hop” function. This setting causes the print head to be raised a little at first for all empty movements and lowered a little before the following extrusion. When you have made the ideal setting, the print head will float over the curved overhang in case of empty movements.
If you have a Slic3r, select the option “Lift Z” in the printer settings. As a rule of thumb, a value between 0.3 and 0.8 mm is recommended. The exact setting can only be found by experimenting.
Remember that the “Z-Hop” setting extends the printing time slightly. The loss of time is limited, however, because the majority of the objects to be printed only require a few empty movements.
New Ways Around the Outer Layer
Another helpful feature of Slic3r is the setting “avoid crossing perimeters. As an owner of a Slic3r you can find this feature in the print settings at “Layers and perimeters”.
If you make this setting, your slicer will try to find a new path around the outer layers. This is especially advantageous when the outer layers curl outwards.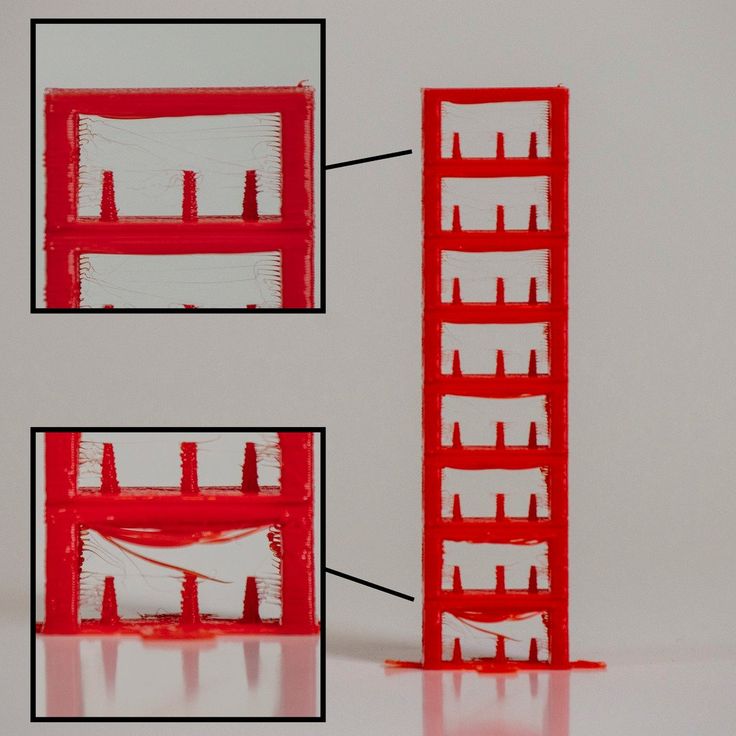
You have to expect that the printing time will be a little longer. However, you should accept the small loss of time to improve the printing result.
Prevent Curling With the Right Slicer Settings
It makes more sense to change the slicer settings so that an upward curvature does not occur at all.
Curling overhangs always look ugly, even in a successful printing process.
You can prevent warping by using four slicer settings.
Increase Density
2% and 30% Infill.Increase the internal density, which maximizes object stability.
You can increase the density by using more infill. Alternatively or in addition, you can print more outer layers, which makes for thicker walls.
The denser your print object is, the lower the risk of the layers curling outwards.
The infill pattern also influences the density. The “gyroid” pattern offers a high density, while the “rectilinear” infill pattern offers less density.
Maximize Fan Speed
Effect of fan speed on overhang curling (source: imgur. com)
com)The second option, relevant for curling, is the fan speed.
If the fan blows against the extruded material, the filament can cool and harden more quickly. As a result, the extruded filament has less time to drop, curl and warp. The material already solidifies in the air due to the ventilation.
Therefore, make sure that when printing bridges and overhangs, you run the object fan up to the maximum for the respective filament.
Respect the fact that each filament has specific requirements.
If you run prints with ABS, you should never set your fan to 100 percent. With ABS, a fan running at 100 percent will cause cracks to form due to shrinkage as it cools. When printing with ABS, you should set the fan for overhangs and bridges to only about 50 percent.
Adjust the fan so that the overhang is directly in the airflow of the object fan. Only if you position the fan accordingly, ideal cooling can be guaranteed. Even a slight rotation of your print object can work wonders. An overhang that is blown directly by the fan will print much cleaner than an overhang that is in the slipstream.
Support Structures
The third setting you can make with the slicer is to create support structures directly under the overhang. Supporting structures are excellent for counteracting the curling of the overhang or a bridge. The reason for this is that the printed overhangs and bridges stick to the supporting structures, so you can prevent an ugly bulge.
Make sure that you do not plan the supporting structures too far away from the overhangs and bridges, as a connection to the supporting structure is required.
With the Slic3r you can reduce the setting “Contact Z Distance”. Another setting of Slic3r is the function ” XY separation between an object and its support”. You can find this setting in “Print Settings” under “Support Material”.
Rotation of the Print Object
The fourth setting option represents a rotation of your print object in the slicer. Especially if your printer is equipped with a simple fan nozzle with an air outlet slot. The cooling is much more efficient if the overhang or bridge is directly blown on by the fan.
Which Angles are Printable?
When you print overhangs, as the angle increases, they first become dirty and ugly before the printed loops bend. Most 3D printers are capable of printing overhangs up to 45 degrees.
If you aim for overhangs up to 70 degrees, the right settings and the right material are basic requirements.
Remember that printing linear and concave overhangs is easier than printing convex overhangs.
The size of your print object is also a decisive factor. For large and solid objects, you can print at more extreme angles than for very fine structures, such as sloping struts like the Eiffel Tower.
Invest time in overhang test objects, which allow you to find out which settings are suitable for which angles.
Bridges
Bridges are a special case, as they have a 90-degree overhang.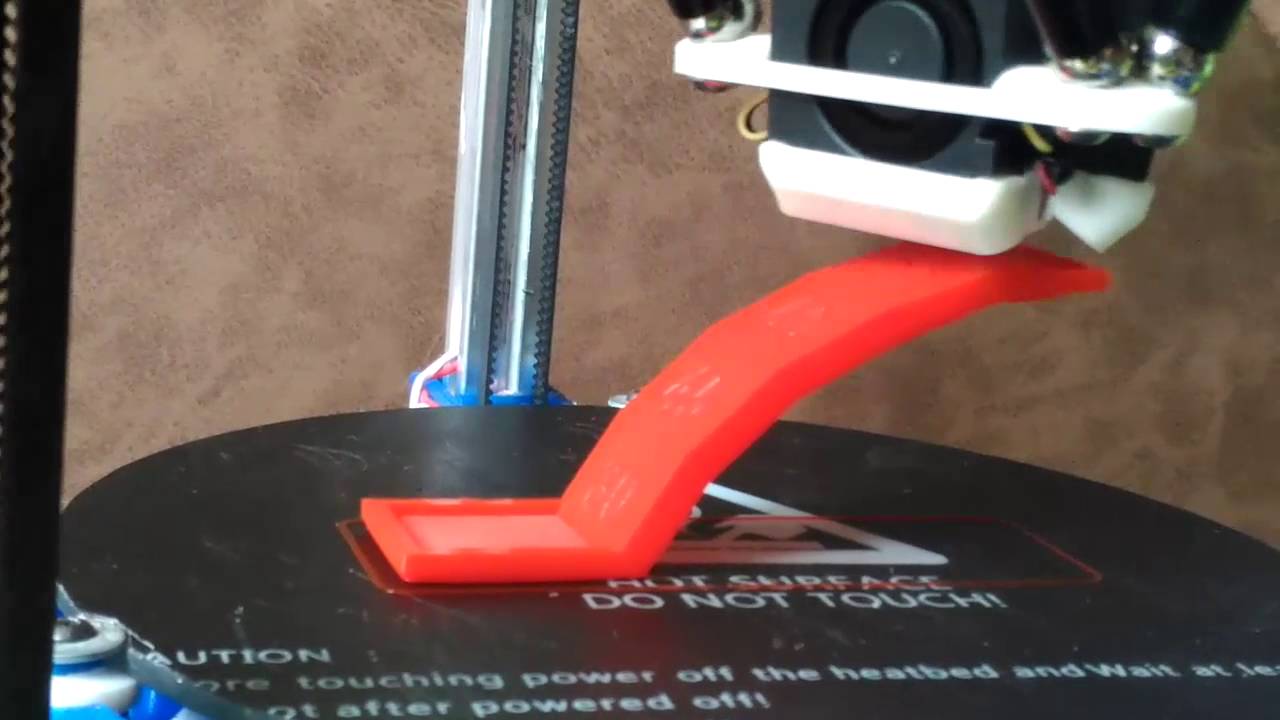 Remember that the filament must dock at the other end.
Good 3D printers are able to bridge between eight and ten centimeters with the appropriate settings and high-quality materials without the material hanging down.
Bridge Settings in the Slicer
Without and with Bridge SettingsWith Slic3r you can play with several values at once to make decent bridges.
You control the speed of the fan when printing bridges by optimizing the Bridges Fan Speed setting under Filament Settings and Cooling.
If you want to print a bridge with PLA, the value of 100 percent is recommended, while you should only set 30 percent for ABS printing.
Change the extrusion rate when printing bridges under “Advanced”. This setting can be found under “Print Settings”. Now click on “Bridge Flow Ratios” and change the filament flow rate. Make sure that the value is less than one so that as little material as possible is extruded. Start with 0.8 and make changes in tiny steps.
Also under “Print Settings” you will find the setting “Bridges Speed” under “Speed”. Here you can set the speed for printing the bridge.
For a print with PLA, a setting between 30 and 40 millimeters per second is recommended.
The “Bridges Acceleration” setting refers to the print head acceleration for bridges.
Prevent the printing of support material under bridges under “Support material” and “Don’t support Bridges”.
If you want to set a fixed angle at which your 3D printer prints the infill of the bridges, you should select the Bridging Angle option under Infill.
Only if the value 0 is entered, your Slic3r tries to find the ideal angle for the bridge to be printed.
As a Simplify3D user, you choose the option “Use fixed Bridging Angle”.
A recommended experimental option can be found at Slic3r under “Layers and perimeters”. Click on “Detect bridging perimeters”. Only with this setting, your Slic3r will treat all outer layers like an infill.
If you use the Simplify3D, this option is called “Apply Bridging to Perimeters”.
You should always enable this option when printing bridges with problematic filaments such as ABS.
In Cura there are also special bridge settings that allow you to avoid overhangs curling up.
Disclosure: This website is the property of Martin Lütkemeyer and is operated by Martin Lütkemeyer. Martin Lütkemeyer is a member of the Amazon Services LLC and other Affiliate Programs. These are affiliate advertising programs designed to enable websites to earn advertising revenue through advertising and linking to Amazon.com and others. Links marked with * are affiliate links.
Reddit - Dive into anything
So overhang curling is an awful thing that we as 3d printers encounter that is probably the toughest thing to resolve. Especially difficult with the vast amount of variants between filaments. Heck, two different color PETG from the same company can perform completely different. So I wanted to open this thread to see if we can solve this together or even provide tips that can be helpful to others. Not easy to find recent information.
So I've been working with PETG from Atomic. Excellent stuff. The models I'm printing for my business have a rounded base. So as it prints the first 10-15% of the model I suffer from curling. I've done a lot of different things. So I'll let you know what I've got so far.
For one particular PETG filament, I started with your standard temp tower. 225-265C. I did 5 towers with varying fan speeds.; 0%, 25%, 50%, 75% 100% . for overhangs it liked the 225-240 range with 100% fan. For this particular filament all the towers looked like garbage until 100%. It wasn't perfect but it was the best and I understand that it could be different on an actual model.
The printer I'm using is a Qidi X Max. I**'m going to refer to "Model 1" which has a 10mm Fillet Radius. Also printing at 0.2mm layer height.**
Temps - I found that temperatures are a huge factor when it comes to overhangs. Especially cooling. I found that going as low as I can with 100% fan was an okay start but my extruder motor would skip sometimes. So I bumped up the temp from 225 to 230. Much better. With other colors of this brand I would have to go a higher temp.
Speed - Lots of trial and error here. So I would have my inner wall speed to 40mm/s and outer wall either at 20-30 mm/s. Neat thing about the slicers I am using is that there is an Overhang Wall Speed setting. Be sure to set Overhang Wall Angle. I set the angle to 45 degrees so anything beyond that would be printed at the Overhang Wall speed that I set. I found that if I set the percentage to 75% or have the overhang speeds range from 15-23 mm/s seemed to work the best. I did try to set the overhang speed percentage lower but then I got drooping.
Variable print layer heights - I did try this with mixed results. For the layers with overhangs, it actually helped. Having thinner layer lines did seem to help. The amount of overlap with the extrusion on top of the previous layer would help with curling by giving the filament something to press on to. Also, the thinner layer would be able to cool quicker to provide a better base for the next layer, regarding overhangs.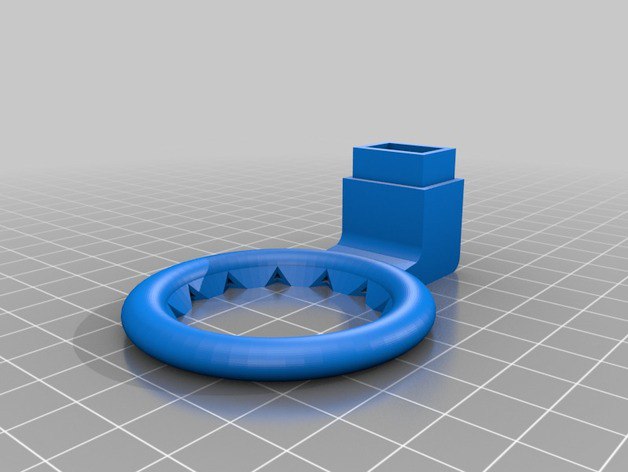 But with the filament I'm using, the change in the layer thickness would effect the color and I needed to have a consistent look to my model.
Walls and printing order - I'm using a .6 nozzle and was using 4 walls for this model. With Cura I would get lots of curling. The nozzle would pass over the same area and essentially reheat a spot that is trying to cool, making it soft. Filament would try to be extruded on that spot but it would not have a solid base to spread evenly. Once the nozzle leaves, that spot would curl up with the extra extruded filiament.
Walls and printing order things I tried and the results:
Increased walls to 5. Not good, made curling worse. At that print speeds I was doing the nozzle would just spend more time heating up a general area. -OR- because there is more materials there trying to cool in that area, the cooling caused the material to retract and pull the filament up. Perhaps someone can give more insight.
Changing infill amount - no significant changes.
 must be because of my model.
So I decreased walls to 3. I noticed that this helped a lot more. less curling. I couldn't go less because I needed structural integrity. More info in this below
Tried different slicers. Whoa, very interesting results.
Slicer - This was a factor that I didn't think would actually be one. For model 1 I tried, Cura, Qidi Slicer(basically reskinned cura), and Prusa. All with the same parameters except for supports. Prusa doesn't offer tree supports
Prusa Slicer - 4 walls - this was my first time really trying to use Prusa Slicer, honestly I like the interface a whole lot more than Cura. So after putting in the settings and supports I hit print and to my surprise ALMOST ZERO CURLING. Holy crap! I thought I just found the holy grail! But for some reason I would have color distortion and the color distortion would be visible. Nonetheless, My confidence was up. There was more support material printed.
 This was probably a contributor to allowing the layers to cool down. My model had to be oriented vertically and there are some letters that are in it that drooped a little.
Cura 4 walls - I tried to mimic the exact settings as in prusa. No luck. Curls curls curls.
Qidi 4 walls - tried to mimic prusa and almost got the exact result from cura(almost to be expected).
In Qidi Slicer I dropped to 3 walls and I clicked on "Infill before walls" just for kicks and giggles and I ended up with the best results with a very tiny amount of curling. enough that the subsequent layers ended up smoothing it out.
I'm not so sure why but works. You would think it would not matter because printing walls and infill would alternate anyway. but it seemed to do something. Perhaps someone can shed some light on this one.
Anyways Model 2 a cylinder with a rounded base(overhang) I went with the prusa slicer on this one. Same filament just higher temp of 240. Super clean print. Cura can sometimes shred the cylinder at the seam but Prusa handles like a boss and handles small holes better. Now Model 2 takes up more space on the print bed and a different fillet radius(shorter radius). This probably why I could print at a higher temp. Sometimes with Cura I would get bubbling around the overhang. I didn't want to mess with flow, honestly. Tried in Prusa and had success right away and didn't look back.
To wrap things up, slower speeds on overhangs help. Definitely utilize the overhang speed setting so you don't have to slow down your entire print. Depending on your model, you may have to use lower temps on overhangs. Don't be afraid to change the temps in certain sections using the post processing feature in Cura/Qidi. Do a bunch of tests to see what fan speed would work. Cooling seems to be necessary with overhangs. Flow can be a thing, sometimes a lower flow rate helps with the curling. Again, try the post processing feature in cura for this if you want it for a certain section.
I'm sorry for the long read but I hope this helps some folks out there. If it didn't help you because you already have a great method, please share with us.
Troubleshooting 3D Printing・Cults
This article should help you identify various 3D printing related issues. Find the image or description in this list that best describes the problem you're experiencing. We offer some tips that should help you solve this problem.
As you know, 3D printing is an empirical process and it is through mistakes that you learn to understand, set up and use your machine. With the help of this list, you should be able to resolve the major bugs. If you are still experiencing issues or have additional tips to add to this list, feel free to contact us and let us know!
#1 Drooling
Symptom
Thin threads are woven into gaps between different parts of a 3D printed part.
Common Name: oozing
Possible Cause
Plastic continues to leak out of the head as it moves due to residual pressure in the heater and fluidity of the molten plastic.
Suggested remedies
Increase filament retraction length in Slic3r, retraction distance in CuraEngine. Retracting the filament will cause the pressure in the print head heater to drop. The effect can be modulated by adjusting the retraction speed directly in the slicer.
Increase print head speed. This allows the melted plastic to spread less time and leave marks between the printed parts.
Reduce the extrusion temperature of your plastic. If it is too high, the plastic becomes more fluid and flows out of the extruder faster.
#2 It is collapsing
Symptom
Collapse or poor quality of the overhanging surface, leaving small bumps.
Common name: overhang
Possible cause
The plastic deposited on the periphery of the protrusion does not solidify fast enough, so the deposited filament moves before it solidifies. The phenomenon is repeated or emphasized from one layer to another.
Suggested fixes
Vent the deposited plastic more efficiently, for example by adding a fan to the extruder or directly with a portable fan.
Create print supports under the overhangs.
Change part orientation to avoid overhangs.
#3 Flaking on the sides or top
Symptoms
Contours not bonded enough.
Flat surfaces are not completely covered.
Possible cause
Not enough material is deposited. Too narrow, the deposited wires do not touch each other enough and therefore do not stick to the adjacent wire.
There is dirt in the nozzle, which prevents the passage of the melt.
The extrusion temperature is too low, the wire dries out too quickly or shrinks and therefore does not stick to the adjacent wire.
Suggested Tools
Calibrate the extruder to obtain material flow according to data received from the slicer.
Unlock the extrusion nozzle.
Increase extrusion temperature.
Increase the blending speed in your slicer.
#4 There is not enough material on thin parts
Symptom
The edges of a very thin area are not strong enough, there is not enough material.
Possible cause
Recycling or reworking is not effective enough.
Incorrect filament solidification.
Thread drive slippage during retraction.
Suggested remedies
Reduce the retraction speed and length while printing.
Increase "extra leg length when retracting" when using Slic3r.
Increase the spring pressure on the driven gear.
#5 Blisters
Symptom
Blisters, mismatched geometry, such as small bumps that are seen mostly in areas with a small surface area.
Possible cause
The filament is too hot during extrusion or the filament cooling system is not effective enough.
Suggested media
Place more parts on the plate while printing. In this case, the nozzle will print more objects and therefore allow more time for the part to cool before passing over it again.
Improve the cooling of your 3D printed object by adding cooling systems.
#6 Thin walls delaminate
Symptom
At a thin wall without filler, the threads diverge, they are not glued together on the sides.
Possible Cause
The walls of your 3D print are too thin or not adapted to such a small size.
Suggested remedies
Draw thicker walls to adapt to the thread thickness.
In the slicer settings, set a sludge width that is a sub-multiple of the wall width while remaining consistent with the extrusion diameter and layer height.
Change slicer.
#7 Layer shifts horizontally
Symptom
The layer is shifted in the X or Y axis (or both).
Possible Cause
Print head or plate movement problem.
Suggested fix
Reduce the acceleration on the axis that has the problem.
#8 Layers shift evenly
Symptom
Layers almost always shift along the X and/or Y axis after a certain print height.
Possible Cause
Head or plate offset failure due to overheating of motors going into safe mode.
Suggested fix
Cool engines with cooling systems (fans).
#9 Corners curl up
Symptom
Deformation in the Z direction during 3D printing. This figure increases in case of a strong overhang.
Common name: curling
Possible cause
Poor solidification, shrinkage effect due to temperature difference of the wire deposited on the previous cooled layer.
Suggested remedies
Increase the slope in the 3D part to reduce overhang.
Further cooling of the deposited plastic using a ventilation system.
Add print supports to affected areas.
#10 Corners fall off
Symptom
The corners of the printed object are peeling off the plate, creating an uneven base.
Common name: warping
Possible cause
Poor fit between the workpiece and the insert.
Material shrinkage factor too high.
The first layer is not pressed enough against the board.
Suggested remedies
Change media as PLA is less likely to warp.
Apply adhesive to the printing plate (glue, tape, varnish, etc.).
Correctly adjust the plate height before printing.
Apply a thinner first coat to further crush the deposited wire.
Add a bezel under the first layer.
Heat up the stove.
Clean and degrease the base.
Change the filling strategy. Fill the bottom concentrically instead of linearly, then fill the inside in a honeycomb pattern to avoid any shrinkage effect.
Reduce the internal fill density of your 3D printed object.
#11 Extrusion density too low
Symptom
Incorrect material density.
Possible cause
Material consumption too low
Suggested remedies
Unlock the extrusion nozzle.
Filament blocked upstream of extruder (e.g. knot in spool)
Check thread drive (e.g. knurled screw problem)
Corners #12 not forming correctly
Symptom
The corners are not straight enough, they can even stick out and increase the size of the part.
Possible cause
Too much material is deposited in the corner due to the nozzle slowing down too much as it passes through the corner.
Suggested remedies
Intentionally soften the corner of the part in the 3D modeling software.
Increase the "jerk" on your 3D printer's axis controller.
#13 There are black drops
Symptom
Burnt (blackened) plastic in some areas of the printed object.
Possible Cause
Poor nozzle seal causing burnt PLA or ABS to drip around the nozzle.
Suggested fix
Remove the nozzle and close it again.
#14 Layers poorly welded
Symptom
Part breaks at the attachment point between two printed layers.
Possible cause
Too much cooling, the deposited layer does not adhere well to the previous layer, because it was not hot enough during the deposition.
Suggested remedies
Reduce fan speed during printing.
Increase the minimum print speed in the slicer.
#15 Bubbles form on the first layer
Symptom
The first layer comes off the plate locally in the form of bubbles.
Possible Causes
Moisture in the material which gradually evaporates on contact with the heating plate.
Insufficient heating plate temperature for the material being used.
Suggested products
Store raw material rolls in a dry place, in closed packaging, with a desiccant bag.
Dry damaged material: place in a rotary oven at 40°C for approximately 3 hours. Be careful not to heat above 45°C or 50°C as this may cause the threads to stick together in the bobbin and even lose their cylindrical shape.
Increase the temperature of the heating plate.
Printing on tape or special adhesive.
#16 Fragile top and bottom
Symptom
Horizontal sides too thin and brittle.
Possible Causes
Insufficient material thickness above and below thin fill print. The laid threads have too few support points and break between the threading ribs.
Suggested remedies
Place at least 2 or 3 fully filled layers ("Solid layers" option in Slic3r) for the "top" and "bottom" faces.
Increase the fill of your object.
#17 Hole tops collapse
Symptom
Horizontal center hole top wires collapse during construction.
Possible causes
Plumb line too horizontal.
Mismatch between nozzle temperature, wire cooling and speed.
Suggested fixes
Reduce or eliminate this overhang area by modifying the 3D file geometry. An example is in the large hole in the photo, shaped like a drop of water, not a cylinder.
Add print supports below this area if the overhang is too difficult for the 3D printer.
Avoid too much slowdown in this area, even if the layer print time is short.
#18 Color or transparency varies
Symptom
The color or transparency of the material changes in different areas during 3D printing.
Possible causes
Different crystallization of the material due to different cooling rates. This may be due, for example, to the printing time of individual parts of the object or to the power of the fan.
Radiation from the nozzle can affect the thermal cycle of the previous layer and thereby change its appearance.
The applied layer is too hot because the underlying layer has not cooled down.
Be careful, the physical-mechanical properties of the part may change due to these differences in crystallization!
Suggested fixes
Better control of cooling with slicer settings: change fan power based on plate cooling time or slow print speed in proportion to plate surface.
Reduce extrusion temperature for faster and more uniform phase transition.
#19 Layers are delaminating
Symptom
Some layers are bent and cracks appear between the different printed layers.
Possible causes
Twisting phenomenon due to the effect mentioned in #9 the above happens between layers.
The wire cools too quickly at the exit of the nozzle, it does not weld properly with the previous layer.
Severe contraction of the material during cooling or phase change.
Some materials extruded at high temperature (ABS, PC...) may present a significant shrinkage phenomenon.
Suggested remedies
Change the extrusion temperature.
Change the media.
Avoid blowing on a wire that has been set aside, reducing fan power, or placing the printer in a draughty room.
Close the assembly area in a controlled cabinet at a temperature close to the glass transition temperature of the material.
#20 Drops appear
Symptom
Drops of material are deposited at various points on the side of the 3D printed object.
Possible Causes
Excessive extrusion when resuming extrusion after stopping extrusion when moving from one point of the part to another or when changing layers.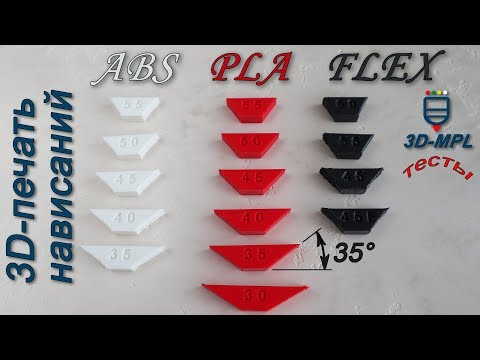
Suggested Remedies
Some slicers have a setting that after a pause in printing, request that more be pushed in before resuming normal printing than was removed by retraction.
#21 Bowden extruder salivation
Symptom
The Bowden extruder is either running too hard or not running enough. First impressions of your extruder are not great, too much extruded material, bridges between different areas in motion where extrusion should stop.
Possible cause
Insufficient thread shrinkage to compensate for the gap in the Bowden tube. Depending on the diameter of the tube and filament, as well as the length of the body, the motor must draw a certain length of filament through the bends of the tube before the filament is drawn out of the heating head.
Suggested fixes
Increase the "pull" distance in the slicer. The detail on the left was printed with 1. 5 mm of indentation, which was clearly not enough. When the pull-in distance was increased to 6mm, the center part was printed. Too much shrinkage causes hot material to enter the thermal break, the temperature of the thermal break gradually rises, and the melting thread eventually gets stuck in the thermal break. The engine is no longer able to effectively push it. Reducing the retraction distance to 4 mm results in the part shown on the right.
#22 Streaks or regular patterns on extrusion
Symptom
Repeating patterns appear on the walls of 3D prints.
The pattern may change depending on the direction of movement of the motors.
Possible cause
Incorrect extruder drive setting
This problem can occur if the extruder is set to the wrong current. If the extruder has insufficient power, the extrusion will not be constant.
Suggested remedies
Adjust the extruder driver with a multimeter. Be careful not to short circuit during the measurement, use a ceramic screwdriver.
Artwork by Philippe, Pierrot and Franck and originally posted on LOGre
This page has been translated using machine translation. Suggest the best translation
How to avoid deformation of models when 3D printing
There is nothing “better” than walking away from the printer for a couple of hours and taking a nap, and returning to find this:
Vermicelli. Plastic
Sound familiar? Yes, these are the same “angel hair”, “spaghetti” or “vermicelli” obtained by tearing the model off the desktop. The cause of such a disaster is often the deformation of the layers. Twisting the edges of the model up causes the extruder to catch on the model and simply break or tear it off the platform. Then begins the artistic filling of the environment with plastic thread in the artistic style of Jackson Pollock.
Left: No. 5, 1948. Author: Jackson Pollock. Fiberboard, oil. Price: $140 million
Right: Angel hair, 2013. Author: Ravix. Prusa Mendel printer, ABS plastic. Price: $0
But the charms of deformation don't stop there. What is the easiest way to quarrel two "makers"? Correct answer: ask them which is better - PLA (polylactide) or ABS (acrylonitrile butadiene styrene). ABS - a thing, of course, tempting. This plastic is strong, durable and inexpensive. Polylactide, in general, is also relatively inexpensive, but relatively soft and biodegradable - with all the ensuing consequences. So why are popular devices like the Makerbot Replicator built to print with only polylactide? The environmental friendliness of PLA is a secondary reason, rather a bonus. And the main reason is the low glass transition temperature and minimal shrinkage. It does not require heating to ultra-high temperatures for melting, and when cooled, although it shrinks, losing volume, but not much. In other words, printing with polylactide is easier. But ABS “shrinks” quite noticeably, losing up to 8% of its volume. If you do not control the temperature regime, then you can get curvature and even cracks.
In our article, we propose to consider methods for eliminating deformation.
- 1 Use heated platform
- 2 Choose the right adhesion
- 3 Cleanliness is key to good printing
- 4 Height calibration
- 5 You go quieter - you will continue
- 6 Don't catch cold on your model
- 7 Turn down the heat
- 8 Reduce the density of model
- 9 Print with liner
- 10 Lugs
- 11 Thresholds
- 12 Thermowalls
Use Heated Bed
Heated Build Bed
This option is offered with many modern 3D printers, and in the case of the RepRap, you can modify it yourself. Let the heating add to the cost of the printer, but it's worth it. Heating the model from below allows you to slow down and even out the cooling process. If small PLA models can be printed without heating, then when printing large objects, a heating element is no longer necessary, since even a slight shrinkage of PLA has a cumulative effect with increasing model dimensions. When printing with ABS plastic, heating is simply necessary, otherwise the rapid shrinkage of the lower layers will lead to deformation of the upper, still hot parts of the model. It is worth paying attention to the uniformity of the platform heating. If the heating is not uniform, then the very first layers, cooling unevenly, can “twist”. Often the glue or tape used to hold the model in place won't even help. The edges will rise, the extruder will hook on the applied layers, and then - "vermicelli".
Choose the Right Adhesion
Kapton is a Great Platform Coating
If the plastic won't adhere to the platform, you're in trouble. Which one is the best - there is no consensus. There are tables made of aluminum, glass (even basalt), steel, titanium. Seasoned RepRapers pray for Kapton, a polyimide film applied to the surface of the platform. By the way, the film can be processed with a fine-grained emery cloth - a rough surface will contribute to the "seizure" with the plastic. Some users spray the surface of the platform with a spray adhesive containing acetone (to set the ABS), or even hairspray!
Cleanliness is the key to good printing
If the build platform is covered in dust, plastic will stick to the dust. How this will affect the adhesion of the model to the platform itself hardly needs to be explained. If you are printing with ABS, you can wipe the platform with acetone to dissolve the small pieces left from previous models. Acetone has no effect on polylactide, but you can try Limonene. By the way, the thread should also be kept clean, because the accumulation of dust in the extruder is fraught with all sorts of interesting, but unpleasant consequences. One simple method to clean the filament (if it's already dusty) is to use a foam filter before feeding it into the extruder.
Height calibration
Trying to print a cube with too much initial distance between nozzle and bed
A correctly applied first layer is the cornerstone of successful printing. If the head sits too high above the platform when applying the first coat, the adhesion may be too weak. This problem is solved experimentally: if your model breaks off the platform, try lowering the initial head height in small steps. If the platform is heated, then it makes sense to carry out the calibration in a heated state, because the deformation of the platform during heating can make the “cold” calibration inaccurate.
Ride slower, get further
Reducing print speed can reduce model distortion
Yes, unfortunately, 3D printing even small objects takes a lot of time.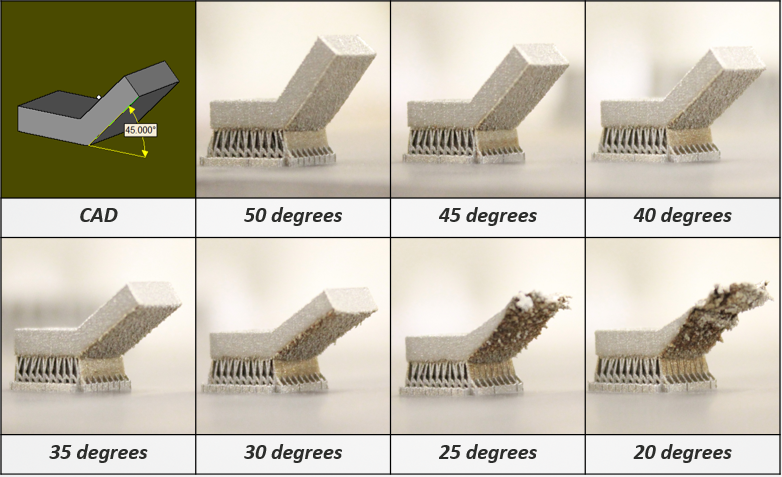 But in order to increase adhesion to the platform and give the layers extra time to cool evenly, it may be necessary to slow down the printing process. This is especially important when working with PLA, because the polylactide takes a long time to cool down, and the lower layers can undergo deformation under the pressure of the upper layers if they do not have time to pass the glass transition point.
Don't catch cold on your model
Maker Case - a cabinet for 3D printers that prevents drafts
Drafts can have negative consequences not only for real people, but also for plastic ones. A banal draft can lead to uneven cooling of the model - hypothermia on one side, followed by one-sided shrinkage and lopsidedness. No wonder many manufacturers prefer to make closed cases for their printers. In addition, the tightly closed housing helps maintain a high background temperature in the working chamber, which is good when working with ABS plastic. But when printing PLA, you may have to remove one of the panels or open the door (depending on how the case is arranged) to help cool the model faster. Many manufacturers install additional fans on their extruders to blow off the fresh layers of polylactide (we counted three on the PrintBox3D One!). Although, in general, this is a sound idea, it often has the opposite effect, since only one side of the model is blown. In the case of PrintBox3D One, the calculation was made to quickly cool fresh layers - before subsequent layers become a barrier to airflow. And Picaso Builder uses a tricky system of channels built into the extruder to evenly blow the model from above.
Turn down the heat
Not yours personally. This refers to the temperature of the extruder. The ideal option is to heat the extruder to a temperature slightly above the glass transition temperature of the plastic, so long as the extrusion proceeds normally and the layers “seize” among themselves.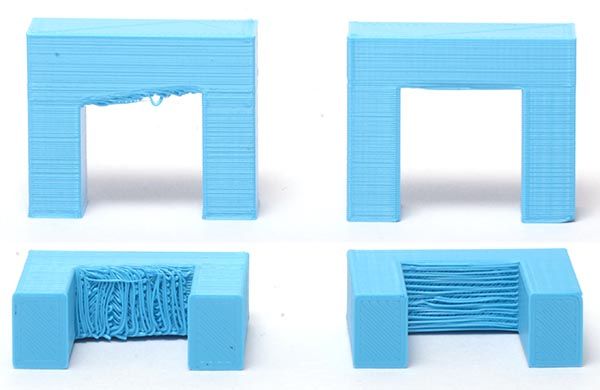 After all, the stronger the plastic is heated, the longer it will cool down, and the more noticeable the shrinkage will be. But keep in mind that such experiments can bring additional stress on the extruder mechanism, up to and including damage to it. Yes, the nozzle can get clogged. Be careful.
Decrease the density of the model
Various degrees of filling
The model can be homogeneous (solid piece of plastic), hollow (walls on the outside, absolutely nothing inside), or lightweight (seemingly solid, but inside filled with plastic mesh or honeycombs) . The last option has a lot of advantages. This includes savings in materials compared to solid models, good strength compared to brittle hollow models, and, finally, a reduced likelihood of deformation. The logic is quite simple: the larger the surface of the layer in contact (i.e., sticking together) with the platform, and the smaller the volume of plastic in the following layers, the less likely the lower layer is to twist when the upper layers shrink. Add the already described substrates here, and the chances of successful printing increase many times over.
Print with a backing
Printing a wheel on a backing
A backing or "raft" is the base of the model, made in the form of a grid. Due to the high porosity, such structures cool quickly and evenly, and then serve as a reliable basis for the present model. The larger and thicker the substrate, the stronger and more reliable it is. Here you already have to find the perfect balance between functionality and material consumption. Many digital modeling programs (such as Skeinforge or ReplicatorG) have built-in underlays.
Lugs
Model with lugs
The problem with underlays is that they can seriously degrade the quality of the bottom layer of the model. After all, all this extra plastic will have to be removed, right? Alternatively, you can print the extensions of the bottom layer (the so-called "lugs") in the most vulnerable places for twisting - for example, in the corners.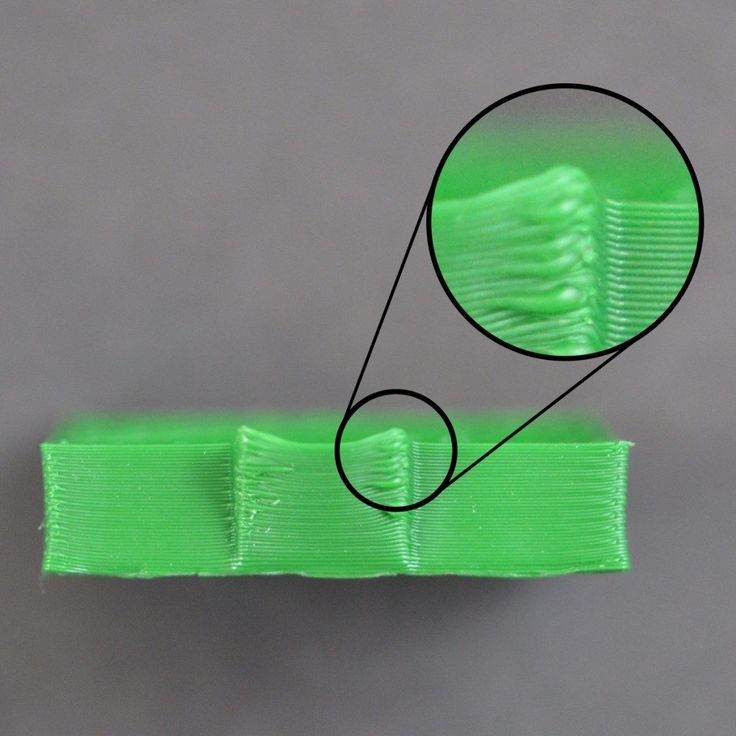 The lugs will help hold the edges in place until the bottom of the model hardens. After printing, they will be much easier to remove than the backing. The disadvantage of this technique is the need for an additional work surface.
Thresholds
Threshold Model
Essentially it is a combination of lining and lugs. The oversized lining is built on with additional objects (“thresholds” or “visors”) whose sole purpose is to hold the lining in place. The most effective method of preventing deformation of the lower layers, but also the most costly in terms of materials. The advantage is the fact that the “thresholds” themselves do not touch the model, and therefore, at the end of printing, only the substrate itself will have to be cleaned from the model.
Thermal walls
A kind of draft control. The idea is based on the construction of thin walls around the model, which keep warm air inside and contribute to a more uniform cooling of the model.