3D printing overhang tips
10 Ways How to Improve Overhangs in Your 3D Printing – 3D Printerly
Learning how to improve overhangs in your 3D prints is a skill that your print quality will really appreciate. I’ve had some pretty poor overhangs in the past, so I decided to set out and figure out the best methods to improve them. It actually isn’t as hard as I thought.
To improve overhangs you should improve your cooling with a fan upgrade and fan duct to direct cool air to melted filament. Reducing model angles to be 45° or less is a great way to reduce bad overhangs. You can also decrease layer height, printing speed and printing temperature so filament isn’t as melted, allowing it to cool quicker.
This is a good starting point to improve overhangs. The rest of this article goes into some pretty key details to help you understand the problem and how each method assists in improving your overhang (with videos), so keep reading to find out more.
What Are Overhangs in 3D Printing?
Overhangs in 3D printing are where the filament your nozzle extrudes ‘hangs over’ the previous layer too far, to a point where it is in mid-air and cannot be adequately supported. This results in that extruded layer ‘overhanging’ and producing poor print quality, since it cannot form a good foundation underneath.
A good overhang is one where you can actually 3D print at an angle above the 45° mark which is diagonal angle. To put this into perspective, you can picture the letter T trying to be 3D printed.
You would do fine up to the middle part of the letter because it is nicely supported, but when you get to the top line, this 90° angle is far too sharp to have any support underneath.
That is what we call overhang.
There are overhang tests which you can try which have angles going anywhere from 10° up to 80° to see just how well your 3D printer handles overhangs, and they can perform pretty well as long as you take the right steps.
The most popular overhang test on Thingiverse is the Mini All in One 3D Printer Test by majda107, which tests several important features on a 3D printer. It is printed with no supports and 100% infill to really test your printer’s abilities.
Its difficult to print overhangs at sharp angles because there isn’t enough of a supporting surface below your next extruded layer for it to stay in place. It will practically be printing in mid-air.
In 3D printing, the general rule to combat overhangs is to print angles that at 45° or less, where angles above this will start to be negatively affected by overhang.
The physics behind this angle is that, when you picture a 45° angle, it is right in the middle of a 90° angle, meaning that 50% of the layer is support, and 50% of the layer is unsupported.
Going past that 50% point really outweighs the support needed for a solid enough foundation, and the further out the angle, the worse. You want your layers to have more surface area to have adhesion for successful, strong 3D prints.
Some models are complex, making it pretty hard to avoid overhangs in the first place.
Luckily, there are many methods to improve just how much overhang our 3D printers can deliver, so stay tuned to find out these tips and tricks.
How To Improve Overhangs in Your 3D Prints
As previously mentioned, making sure your models don’t have angles higher than 45° is a great solution to overhangs, but there are a lot more ways to improve overhangs that you can be implementing in your 3D printing.
Here’s how to improve overhangs in your 3D prints
- Increase fan cooling of parts
- Decrease layer height
- Change the orientation of your model
- Reduce your printing speed
- Reduce your printing temperature
- Decrease layer width
- Split your model into multiple parts
- Use support structures
- Integrate a chamfer into model
- Tune up your 3D printer
1. Increase Fan Cooling of Parts
The first thing I would do to improve my overhangs is increase the efficiency of my layer cooling. This comes down to either replacing the fan for a higher quality one, or using a fan duct which properly directs the cool air to your 3D prints.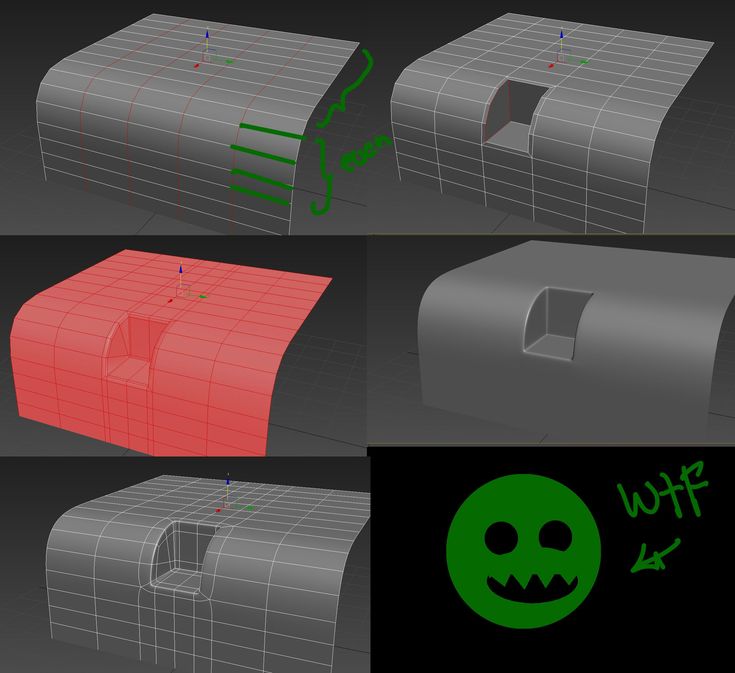
Many times, your 3D prints will be cooled on one side, while the other side is struggling with overhangs because it doesn’t have adequate cooling. If this is your situation, you can correct the problem pretty easily.
The reason fans and cooling works so well is because, as soon as the material is extruded through the nozzle, it gets cooled to a temperature well below the melting temperature, leaving it to quickly harden.
The hardening of your filament as it get extruded means it can build a good foundation regardless of little support underneath. It’s similar to bridges, which is extruded lines of material between two raised points.
If you can get good bridges, you can get great overhangs, so most of these overhang improvement tips also translates to bridging.
- Get a high quality fan – the Noctua fan is a great upgrade that thousands of users love
- 3D print yourself a Petsfang Duct (Thingiverse) or another type of duct (Ender 3) which is proven to work very well
2. Decrease Layer Height
The next thing you can do is decreasing the layer height, which works because it reduces the angle at which your extruded layers are working at.
When you picture your extruded layers like a staircase, the larger the staircase, the more material is off the edge of the previous layer, which in other words is overhang.
On the other side of this scenario, a smaller staircase (layer height) means that each layer has a closer foundation and supporting surface to build upon for the next layer.
Although it will increase printing time, sometimes its necessary to get those awesome overhangs, and sweet print quality. The results are usually better than the sacrifice in time!
The video below by the 3D Printing Professor illustrates this really well.
The default layer height in Cura for a 0.4mm nozzle is a comfortable 0.2mm which is 50%. The general rule for layer height relative to nozzle diameter is anywhere from 25% to 75%.
This means you can use a range of a 0.01mm layer height up to 0.03mm.
- I would try using a layer height of 0.16mm or 0.12mm for your 3D printer
- Make sure you are implementing ‘Magic Numbers‘ for your layer height so you aren’t micro-stepping.
3. Change the Orientation of Your Model
The orientation of your model is another trick you can use to your advantage to reduce overhangs. What this means is, you can rotate and adjust your 3D print model to decrease the angles at which the model is printing.
This may not always work, but in some cases it can work perfectly.
You might not be able to decrease angle below 45°, but you can get pretty close.
For resin 3D printing, its advised that you orient your 3D prints to be 45° to the build plate for better adhesion.
- Rotate your models to reduce overhang
- Use software to automatically orient your 3D print models.
Makers Muse has a great video describing the details behind print orientation in terms of strength & resolution, giving you a better understanding of how important print orientation is.
He describes how there is always a trade-off when it comes to orientation, and in some cases you can get the best of both worlds. It takes a little bit of thought and knowledge of how layers make up parts to get things right.
4. Reduce Your Printing Speed
This tip is somewhat related to the cooling aspect of things, as well as better layer adhesion. When you reduce your printing speed, it means your extruded layers have more time to benefit from cooling, so it can create a good foundation.
When you combine a reduced printing speed, with improved cooling, a decrease layer height, and some great part orientation, you can significantly decrease the presence of overhangs in your 3D prints.
5. Reduce Your Printing Temperature
The optimal temperature for your 3D printer is one which extrudes nicely at the lowest possible temperature. You don’t want to use a nozzle temperature higher than you actually need, unless you have other goals in mind.
The reason behind this is that your filament will be more liquid and hotter than it needs to be, so cooling won’t be as effective with a more melted filament, thereby contributing to decreased overhangs.
A higher print temperature can help out with increasing part strength or reducing under-extrusion issues, but if you fine-tune your 3D printer, you can usually fix many issues without using temperature as a solution.
I would do some trial and error by using a temperature tower, calibrated to test several temperatures within the range of your filament.
For example, a 10 part temperature tower and a filament temperature range of 195 – 225°C can have a starting temperature of 195°C then increase in 3°C increments up to 225°C.
You can really dial in a perfect temperature using this method, then seeing the lowest temperature where your print quality looks great.
GaaZolee created an awesome Smart Compact Temperature Calibration Tower on Thingiverse.
- Find your optimal printing temperature
- Make sure your not using a higher temperature than you need as it can lead to high flow of material
6. Decrease Layer Width
This method works somewhat because it decreases the weight of each extruded layer of material. The less weight your layer is, the less mass or force behind it hanging over the previous layer.
When you think about the physics of overhangs, it relates back to the decreased layer height and being able to better support its own weight at the overhang angle.
Another benefit with decreasing your layer width is having less material to cool down, resulting in a faster cooling of the extruded material.
Decreasing your layer width may unfortunately increase your overall printing time because you are going to be extruding less material.
7. Split Your Model Into Multiple Parts
This is a method that is a little more intrusive than the others, but it can work wonders with troublesome prints.
The technique here is to split your models into sections that reduce those 45°. Check out the video by Josef Prusa below for a simple tutorial within the Meshmixer software.
3D printer users also do this when they have a large project and a relatively small 3D printer which can’t fit the whole piece. Some prints are split into several parts to make one object, such as a Stormtrooper helmet which takes over 20 pieces.
8. Use Support Structures
Using support structures is kind of the easy way out for improving overhangs, because it is creating that supporting foundation rather than letting the overhang work its magic.
In many cases you will find it hard to completely avoid support material, no matter your orientation, layer height, level of cooling and so on.
Sometimes you’ll just have to go ahead and add in your support structures via your slicer. There are some slicers out there which allow you to closely customize your supports
The video below by CHEP shows you how to add custom supports using a special plugin, so feel free to check that out to reduce your supports.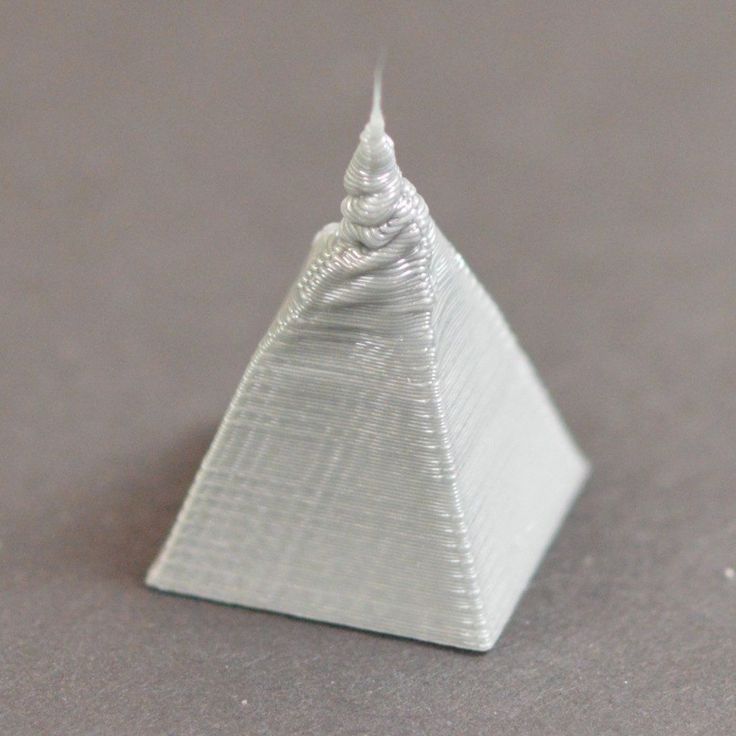
9. Integrate a Chamfer Into Your Model
Integrating a chamfer into your model is a pretty good method to reduce overhangs because you are reducing the actual angles of your model. It’s described as a transitional edge between two faces of an object.
In other words, rather than have a sharp 90° turn between two sides of an object, you can add a curvature which cuts away at a right-angled edge or corner to create a symmetrical sloping edge.
It’s usually used in carpentry, but it definitely has great uses in 3D printing, especially when it comes to overhangs.
Since overhangs follow the 45° rule, a chamfer is perfect for improving overhangs when it can be used. In some cases a chamfer won’t be practical, but in others, they work out nicely.
Chamfers do significantly change the look of models, so keep this in mind.
10. Tune Up Your 3D Printer
The last thing to do which doesn’t specifically relate to overhangs, but to overall 3D printer quality and performance is to simply tune up your 3D printer.
Most people neglect their 3D printer over time, and don’t realize that regular maintenance is a good idea for your print quality. 3D printers are very durable, but they do consist of parts which need some extra care such as belts, rollers, the print nozzle and rods.
- Check over your parts & make sure you replace parts that are noticeable worn out
- Tighten up screws around your 3D printer as well as your belts
- Regularly apply some light machine or sewing oil to your rods to help them move smoother
- Clean out your extruder and fans since they can easily build up dust and residue
- Ensure your build surface is clean and durable
- Run a cold pull every so often – heat up the nozzle to 200°C, insert filament, reduce heat to 100°C then give filament a firm pull.
There are many methods to improve your overhang which work pretty well. Hopefully this article has steered you in the right direction to finally get some overhangs that you can be proud of.
How to Print Overhangs, Bridges (& Exceeding the 45° Rule)
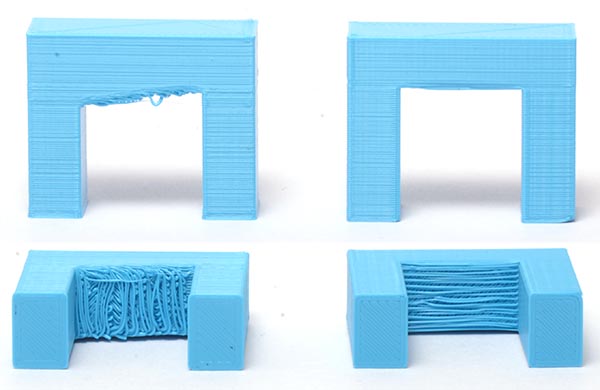
The difference? Bridges on the left, and the right is an increasingly proportionate overhang
In this guide, we’ll explain how to defy gravity and pull off those hard-to-print objects without resorting to needing hard-to-remove support structures.
Read on to learn our best 3D printing overhang tips and experience-based advice on solid bridging. You’ll be printing the 8th wonder of the (3D printing) world in no time.
In order to get the most out of your 3D printing experience, you’re going to want to produce objects that are more complex. This means that there are going to be times when you will need to push past self-imposed design limits in order to see what’s really possible.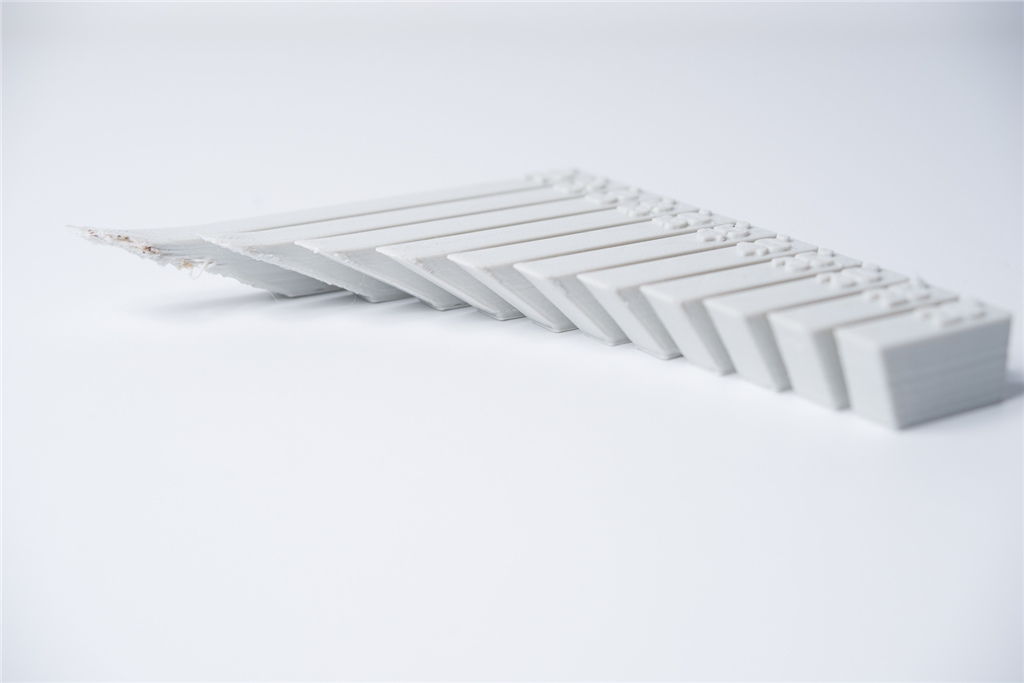
Note: In order to print more complex objects, you will likely need to have to deal with overhangs, bridges and angles in excess of 45°.
Getting that crisp, clean, 3D printing overhang or some sharp ABS bridges can be a bit of a dark art. Essentially 3D printing without support material.
Why Would You 3D Print An Overhang?
Let’s start with an overview of the basics to this type of 3D printing ‘problems and solutions’ guide. As you know, a 3D printer starts printing an object from the bottom up. Theoretically, every layer of extruded material is either supported by the print surface or the previous layer of material.
However, with objects that have more complex designs, there can be upper areas that are not supported by underlying material. These areas are known as overhangs or bridges, depending on the shape of the design.
Think of the letters Y, H, and T. The letter arms of the letter Y consist of two overhangs at a 45° angle. The crossbar of the letter T consists of two overhangs at a 90° angle.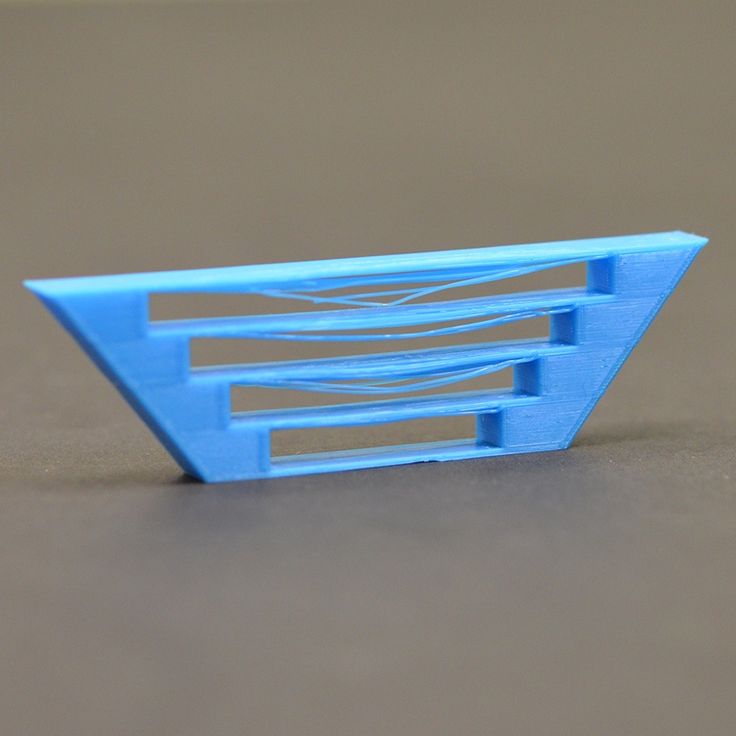 The letter H, on the other hand, contains no overhangs at all, but does include a bridge that is supported at either end by two uprights.
The different overhangs and the bridge in these objects all present the same basic problem. Your printer filament is subject to the law of gravity. It can’t be extruded onto thin air. So, what’s the solution?
Well, even though all three objects present the same basic problem, the solution to that problem depends on the shape of the object itself. So let’s take a look at what type of solutions exist for the problems presented when printing overhangs and bridges.
The 3D Printing Overhang
Rather than thinking about how to add support for 3D printing, let us open your mind to the possibility of extreme overhangs.
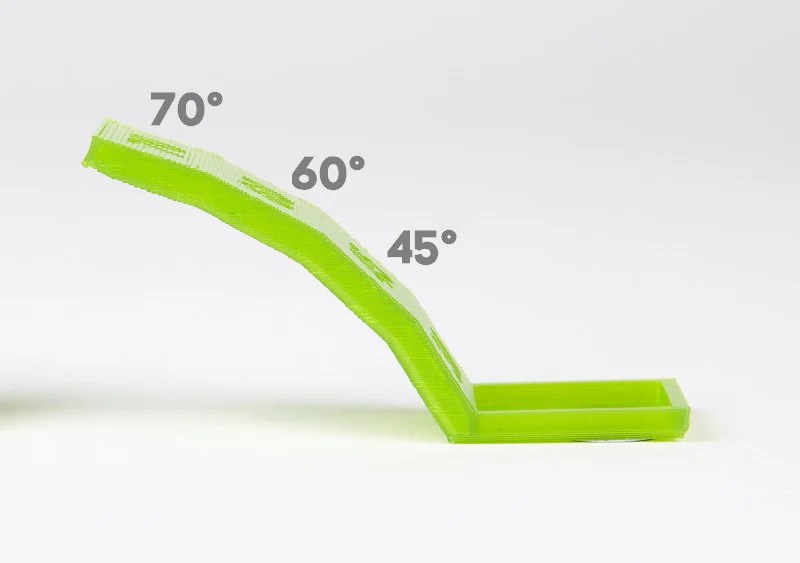
Basically, in order to create an overhang at any angle less than vertical, your printer offsets each successive layer. The lower the angle gets to horizontal, or 90°, the more each successive layer is offset.
So, for example, with a 45° angle, each successive layer is offset by 50%. In other words, 50% of the new layer remains in contact with the layer below.
This type of contact provides fairly substantial stability, as each new layer has enough foundational material to grab onto and stay put.
However, when we begin to get closer to horizontal, the amount of offset becomes more and more extreme. For example, with a 75° angle, each successive layer is offset by nearly 80%.
In other words, less than 20% of each new layer remains in contact with the layer below.
It’s readily apparent that this type of contact is much less stable than the contact which occurred at 45°. Every new layer has much less surface area to bond with.
Very often, the result is delamination of layers or sagging of the overhang and even collapse. So what’s to be done to prevent this from happening? Let’s take a look at a couple of solutions.
Avoidance, or the 45° Rule
This is typically the safe bet – but we’re here to talk about ways beyond this.
You could avoid the entire problem by following the 45° rule.
The 45 degree rule in 3D printing is a general rule used in 3D modeling that advises against designing objects that contain angles greater than 45°.
But who cares about general rules. You know a better way.
By eliminating angles greater than 45° in your designs, you also limit the scope of what you are able to create. So, in some sense, the 45° rule isn’t always a viable solution to the problems presented by overhangs.
Some beautiful and functional objects require difficult overhangs to obtain their beauty or functionality. So let’s keep looking.
Use a Chamfer
A chamfer is one of those ‘cheat’ 3D printing techniques – a symmetrical, sloping surface at an edge or corner that is used to avoid violating the 45° rule.
In other words, a chamfer essentially makes an angle that is greater than 45° and turns it into an angle that is 45° or less. Here again, we have a solution that solves the problem of difficult overhangs by delimiting design.
In some cases, the use of a chamfer might work fine. In other cases, a chamfer could destroy the integrity of the object that you were trying to produce. So, a chamfer isn’t so much a solution to printing difficult overhangs as it is a way to avoid them.
How to 3D print a support structure or material
So if you must cheat, here’s how it’s done…
A support material, as the name implies, is a printing material used to support overhangs on a designed object. Your printer first lays down a layer of support material underneath the area where the overhang will be.
Once the supporting printing filament is in place, your printer is able to continue laying down the upper levels of your model. Once printing is completed, the support material is removed.
Most support materials are soluble because they need to be removed after printing. For example, PVA is soluble in water, while HIPS is soluble in Limonene. After printing is finished, the object is submerged in a container containing the solvent in question.
After a certain amount of time and some gentle and occasional agitation, the support material dissolves, leaving the object and its difficult overhangs intact.
Not all support materials are soluble. Some printing materials are compatible for use with a breakaway support material. A breakaway support material is printed underneath the area where the overhang will be, just like a soluble material.
However, unlike a soluble material, once printing has finished and the object has cooled, the breakaway material simply and cleanly snaps off the object, leaving the difficult overhang intact.
Hide Your Support Material
Another solution is to design your object so that difficult overhangs are supported but, because of the design, the eye is fooled into thinking that no support was used.
This is a trick that sculptors have been using for the last two thousand years. For example, take a look at “Venus Victrix” by the Italian sculptor Antonio Canova.
The right arm is an overhang, but the pillows act as a support. Likewise, the left leg is another overhang, but this time the bunched toga underneath does the necessary supporting.
The point is, with careful design, support for overhangs can be incorporated into an object in such a way that it doesn’t look like support. Instead, the object retains an organic look that naturally incorporates what otherwise would be difficult overhangs.
How To Exceed 45° Without the Use of Support Materials
45° is often the steepest angle that can be achieved without utilizing support materials. However, under the right circumstances, steeper angles are possible.
Let’s take a look at how.
Dial In Your Printer
In order to print overhangs that contain angles steeper than 45°, you have to make sure that your printer is in tip-top shape. Make sure that your bed is level. Replace your build surface if needed.
Check that the print nozzle is clean and clear of any debris or carbonized build-up. We recommend using Floss cleaning filament for an effortless, fast and thorough nozzle clean.
In general, perform all necessary routine maintenance so that you have the most precise build space possible. You’re going to be doing some very precise printing, you want to make sure that your machine is up for the challenge.
Solidify Your Print Material Quickly
Cooling is always important. Here on the left, cooling has not been sufficient. On the right, you notice the crisp 45-degree overhang, with sufficient cooling.As we saw above, angles above 45° mean less contact between each successive layer in your overhang. This increasingly minimal contact means that the longer the material takes to cool, the greater the chances are that sagging, delamination or collapse will occur.
Because time is of the essence, make sure that you are doing everything that you can to solidify your print material quickly. Make sure that you are making good use of your layer cooling fan.
Your material needs to shed quite a lot of heat in a short period of time. Consider using a radial fan setup with a ducted blower which displaces more air than an axial fan.
Also, try printing at a slightly lower temperature than normal. You want to find the sweet spot that is slightly above the material’s melting point but still hot enough to prevent clogging of the print nozzle.
This will not only help with cooling, but it will also prevent potential over extrusion of the print material which, as we will see in a moment, can be catastrophic when printing extreme angles.
Make sure you’re using high-quality filament, good quality PLA can be printed at lower temperatures while maintaining excellent layer adhesion. This means you can span those distances neatly, without compromising strength or the finish of your print.
This is also the trick to minimizing stringing, which can plague overhangs and bridges. Better quality filament maintains its viscosity consistently and won’t leave stringing.
Using lower temps, better cooling and increasing retraction settings will also prevent stringy 3D prints which could make your bridges look messy.
Adjust Your Slicer Settings
First, adjust your slicer settings to use the lowest layer thickness possible. This is effective when printing a difficult 3D printer overhang because there is less material being deposited with each pass of your print head.
Less mass equals quicker cooling time.
Second, change your shell settings/perimeters so that you printing from the inside out instead of the outside in. This will help anchor your topmost layer to the layer underneath as you print.
Reduce Your Speed
Again, rapid cooling is essential for successfully printing angles above 45°. Reducing your print speed can help you speed up this essential cooling. The slower the speed of your print head, the longer that it takes for your material to get from the print nozzle to the object.
In addition, slower print speeds mean that your layer cooling fan spends more time directing air flow over a particular section of your object.
Once you’ve got your printer up to speed and you’ve dialed in your settings, it’s a good idea to print a calibration object. A calibration object will allow you to test your settings before you pull the trigger on printing an object that you’re going to use.
When it comes to overhangs, there are a lot of designs out there, like this one on Thingverse, that will push your printer and your printing skills to the limit.
3D Printing Bridges
Bridges present much of the same printing problems as overhang 3D printing. The difference is that bridges, by definition, are 90° surfaces supported by nothing more than two vertical structures at either end.
Like any bridge, it is the tension on both ends of the string of print material that prevents the middle of the string from collapsing. In some sense, because of the angle involved, you could describe bridging 3D printing as the most difficult overhang of all.
In general, the shorter the length of the bridge, the greater the chance that the bridge will succeed structurally. Conversely, the longer the bridge, the greater the chance that it will succumb to structural stress.
As a result, just as you are generally in safe territory with overhangs containing angles less than 45°, you are also generally ok with bridge lengths of 5mm or less.
However, as was the case with overhangs, in order to create truly beautiful and functional objects, you’ve got to be able to stretch the limits of what you, your printer and the filament you’re using can do.
After all, at least with bridges you don’t need to worry about 3D printing support material removal. Let’s take a look at some of the techniques that will help you bridge the gap in your designs like never before.
Luckily, bridges are just a variant of overhangs. This means that, by and large, the same techniques that help you print angles over 45° will also help you lengthen the distance that you can cross with your bridges.
Learn to 3D print without support
Our 3D printing bridging tips are, firstly, to make sure that your printer is operating at optimal levels. You also want to make sure that you are cooling your printing material as rapidly as possible.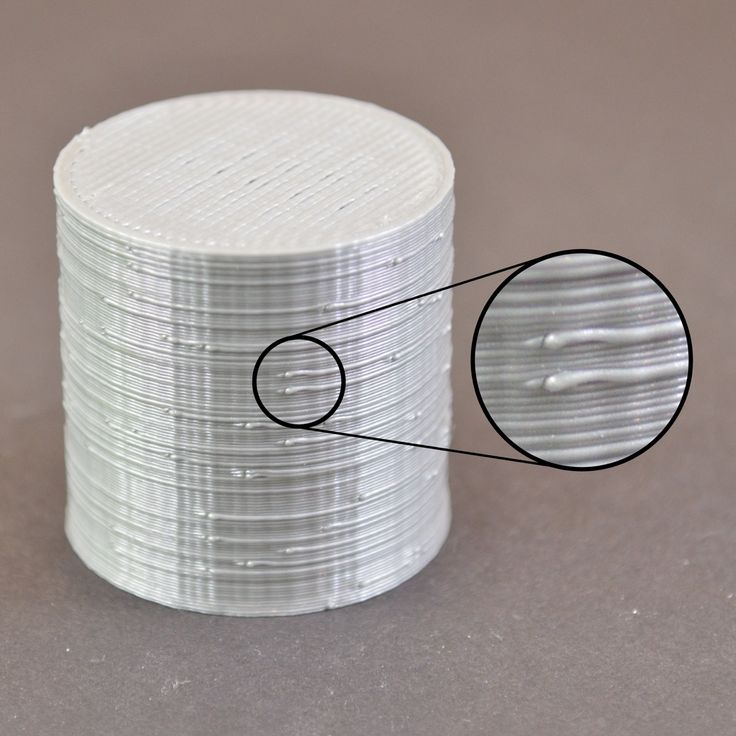
Just as with overhangs, the longer it takes for your material to cool, the more likely it is that your bridge will deform or fail. Therefore, use your layer cooling fans aggressively.
Also, lower your printing temperatures as much as possible. Adjust your slicer settings and reduce your printing speed to facilitate the cooling that will let your bridge the largest possible distance.
It helps to use a good quality, low-temperature grade material to begin with.
Print slower! Get from one end to the other in nice and smooth way; there’s no need to rush. The extra time will allow for better adhesion of the layers, resulting in a stronger, neater bridge.
In addition, there are one or two other tricks that you can try to make printing bridges easier. First, if you’re faced with an extreme bridge distance, try changing the orientation of the object that you’re printing.
A difficult bridge may be impossible when the object is viewed vertically. However, the impossible bridge is a piece of cake if the object is rotated 90° and printed on its back.
In some respects, printing a bridge is more likely to succeed than printing an overhang, because you have two anchor points for a bridge – one at each end.
However, it’s worth bearing in mind that this only works well as long as the bridge is perfectly level, spanning only one layer. If it’s tilting upwards just slightly, spanning a few layers, the bridge will not complete quickly (or neatly) in a single layer.
You can also make difficult bridging situations easier by slightly altering the shape of the bridge. A flat bottomed bridge enforces the 90° angle that is so difficult to print.
By altering that angle slightly, say with a slight arch, you reduce the difficulty of the print angle. A straight 90° angle suddenly becomes a much more forgiving 60° to 70° angle due to the added arch. Much more achievable in the long run.
Finally, choose a printing material that is of high quality to get those overhangs with the minimum of fuss.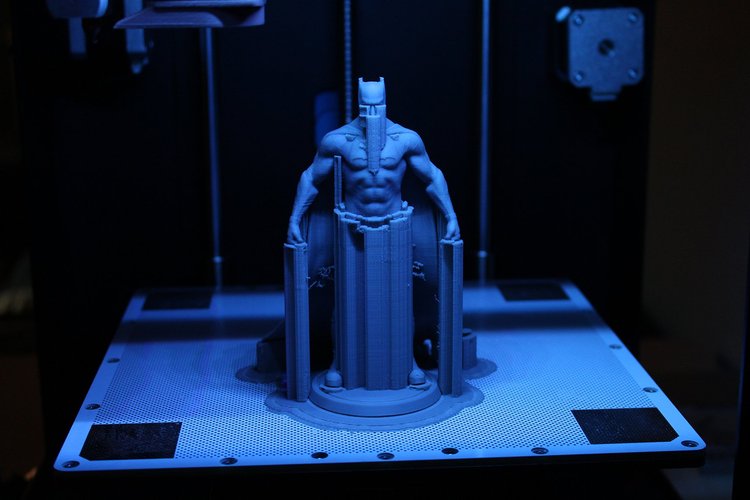 The quality of any print is surprisingly dependent on the quality of your filament, and bridging is no different.
Related articles:
- How to fix poor quality bridging in 3D printing
- How to fix rough surfaces and poor quality above supports
- 3D printer troubleshooting – all problems solved
- Optimum infill settings for 3D printing
- 3D printer nozzle size pros and cons
3D Printing Tips and Tricks
Blog navigation
Search articles
Categories
Latest articles
Popular articles
-
How to draw with a 3D pen?
12/16/2015
16233 views
Connect the 3D pen and let it warm up for a few seconds. Insert ABS or PLA filament into feed hole...
Read more
-
10 upgrades for your Ender-3
Posted in: Basics of 3D printing, 3D Printing Tips and Tricks
09/22/2021
10896 views
10 inexpensive upgrades to improve the stability, performance and security of the most popular Ender 3.
 ..
.. Read more
-
3D Printing Delamination - 5 Tips and Tricks to Avoid Delamination
Posted in: 3D printing tips and tricks, 3D printing
05/14/2019
10890 views
If you have owned a 3D printer for a while, then you are probably used to solving many problems. Delamination is...
Read more
-
Top 20 interesting toys for children on a 3D printer.
Posted in: 3D printing
02/15/2022
9894 views
What kind of toys can be created on a 3d printer? What are the advantages of 3d printing toys at home? In this article you will find...
Read more
-
History of 3D pen
Posted in: Basics of 3D printing, Draw 3D
03/21/2019
9537 views
The advent of the 3D pen has led to some areas of art that were previously impossible.
 In this article we...
 Read more
Read all articles
Recommended articles
Article archive
3D printing tips and tricks. Articles, surveys. Materials, technologies, 3D equipment, 3D scanning, 3D modeling.
-
12 common 3D printing mistakes to avoid.
As an industry, 3D printing is evolving every day, so it's important to know all aspects of this technology today. In this article, we've rounded up 12 of the most common 3D printing mistakes and how to fix them.
-
3D printed elephant leg. How to get rid of?
Posted in: Basics of 3D printing, 3D Printing Tips and Tricks
When it comes to practical 3D printing applications, the elephant's foot can present serious problems. In this post, we will introduce you to ways to eliminate this defect from your prints.
-
How to calibrate the extruder steps (E-steps)?
Posted in: 3D Printing Tips and Tricks
One of the most overlooked tasks is calibrating extruder pitches.
 In this guide, we will go through all these points and tell you step by step what needs to be done at each stage.
 -
How to eliminate sticking of PLA, ABS, PETG filament on a 3D printer nozzle.
Posted in: 3D Printing Tips and Tricks
Tips for cleaning 3D printer nozzles and preventing them from clogging. Causes of sticking plastic and methods for their elimination.
-
How to set up your new 3D printer?
Posted in: Basics of 3D printing, 3D Printing Tips and Tricks
To get the most out of your new 3D printer, you need to set it up properly. Read this guide to find out what you need to do and how.
-
X axis offset on Ender 3. How to fix?
Posted in: 3D Printing Tips and Tricks
X-Axis Offset, Skew, Bent and Sag Ender-3. How to solve a problem? Tips for setting the geometric and mechanical parameters of a 3D printer.
-
10 reasons to buy a 3D printer for home use.
Posted in: 3D Printing Tips and Tricks
There are many uses for 3D printers around the world. In this article, we have listed 10 reasons why you should buy a 3D printer and get to know the world of 3D printing.
-
Is it worth buying a 3D printer? Pros and cons. Pros and cons.
Like any other hobby, 3D printing is fun, but not for everyone. Before buying a 3D printer, you should consider a few pros and cons and take into account the nuances.
-
10 improvements for your Ender-3
Posted in: Basics of 3D printing, 3D Printing Tips and Tricks
10 inexpensive upgrades to improve the stability, performance and security of the Ender 3, the world's most popular desktop 3D printer.
-
3D Printing for Beginners: Getting Started with 3D Printing
Posted in: Basics of 3D printing, 3D Printing Tips and Tricks
Getting started with 3D printers doesn't have to be intimidating. We have created this simple 3D printing guide for beginners to help all beginners understand the basic terms.
 In reality, there are many different 3D printing technologies, but the most common for beginners is the layer-by-layer modeling method (FDM or FFF), which this article focuses on.
 -
Ender 3 belt tensioner (Pro/V2). How tight should they be?
Posted in: 3D Printing Tips and Tricks
In this article, we're going to look at some pretty important and useful information about belts on Ender 3 (Pro/V2) 3D printers and how tight they should be. Of course, we will also tell you how to properly tension the belts, as well as where to find convenient tensioners for Ender 3 and Ender 3 Pro (Ender 3 V2 already comes with tensioners) to make the whole process easier.
-
Top Ender-3 (Pro/V2) 3D Printing Test Models
Posted in: 3D printing tips and tricks, 3D Printing
Want to see how your Ender 3 really works? Try a few of these Ender 3 3D Print Test Models today to adjust and fine-tune your printer settings!
1 2 > >|
Showing 1 to 12 of 23 (2 Pages)
Product added to wishlist
The goods were added to comparison
Useful Modeling Tips for 3D Press
3D-Modeling
Subscribe to
Subscribe
details in various programs for 3D modeling, not taking into account the features of 3D printing.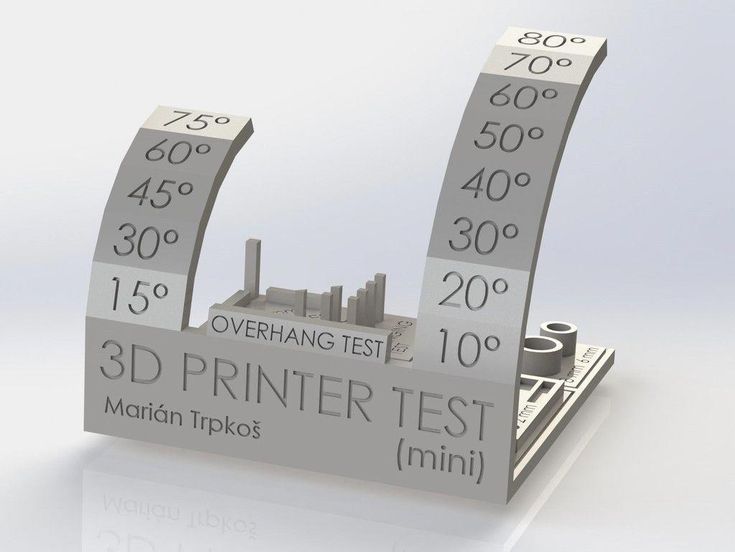 When downloading models from common free-sharing sites like Thingiverse.com and others, you are simply amazed at how some models are not optimized for 3D printing.
In this article, I would like to share my experience in modeling parts, taking into account the features of 3D printing.
Tip 1.
During the modeling stage, position the product in the XYZ axes as it will be on the 3D printer table.
Tip 2.
The force vector applied to the part along the Z axis should only be directed to the origin along the Z axis. If the force vector is directed from zero, this will lead over time to delamination (rupture) of the layers. For example, as in the photo:
Tip 3.
The vectors of the main forces acting on the tension / bending of the part should be located in the XY planes, as in the picture below:
Tip 4.
. To do this, remember that a 3D printer prints bridges perfectly, but any bridge must have two supports. As an example, I will give the design of a vertical groove in the figure below.
If this groove is designed as it would look in nature, then the slicer will not be able to select the bridge and an overhang will result. If, when designing in this place, a bridge with a thickness of 1-2 layers is foreseen in advance, then the slicer will easily provide it:
After printing, the technological bridge is simply cut out with a clerical knife.
Tip 5.
If it is not possible to make a second leg of the bridge and the overhang cannot be avoided, try not to make the overhangs at a right angle. 3D printers allow you to print the outer wall at an angle of up to 50-60 degrees. For example, in this way, the protrusions for the M6 cage nuts are made in the photo below:
Tip 6.
Hole sizes up to 10-20 mm. design more than the required diameter by 0.3-0.5mm. (selected empirically, depending on the nozzle and slicer).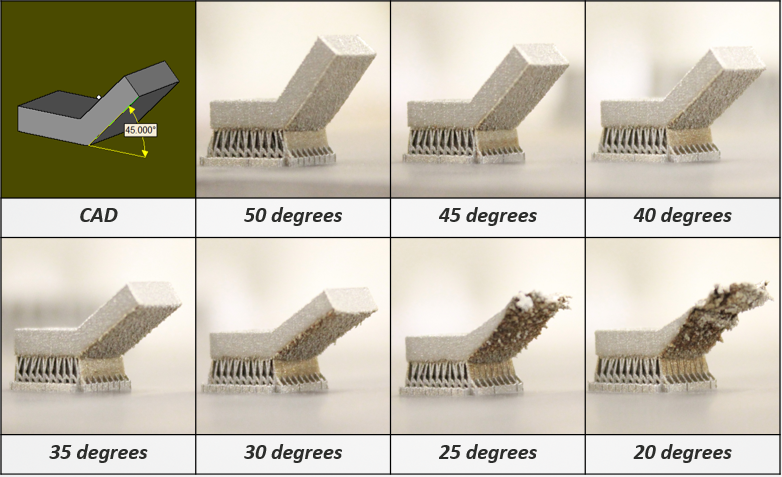 Moreover, the smaller the hole, the greater the difference.
Tip 7.
When designing complex parts, allow for the ability to cut the part into separate fragments for ease of printing, followed by gluing / screwing. For example, the front panel of the device in the figure below consists of 3 parts printed separately - the panel itself and two parts attached to it with M3 screws. In this case, all parts are printed in a comfortable position without supports:
Tip 8.
When converting parts to STL, use sufficient resolution to avoid rough faceting of holes and other complex surfaces.
Dear friends, I suggest you share your advice to a modeler - 3D printer in the comments.
If you like it - upvote.
3D modeling helpful tips 3Dsummer
Follow author
Follow
Don't want
71
More interesting articles
2
Subscribe to the author
Subscribe
Don't want
A friend turned to me with a request to model something interesting, in the style of councilpunk or cybercom.