3D printing abs warping
7 Easy Solutions to Avoid ABS Warping while 3D Printing » 3Deometry Innovations
by deom | Apr 1, 2018 | Blog | 0 comments
We get this a lot and you might as well have the same query. Why Does ABS Warp ? How can I print flawless prints without worrying about warping.
Here are Seven tips that might help out with the issue –
1. HeatBed is a Must to Avoid Warping
ABS has a lot of tendency to warp and a heatbed is a must to reduce the temperature difference between the printing surface and the nozzle. While printing on glass a temperature between 85 to 105 Degrees is ideal. You will need to do quite a few of iterations, to find your ideal temperature. Try experimenting by increasing you temperature 5 Degrees at a time.
2. Use of Stick Glue.
If you using glass plate than this may help you up to a certain extent. The process is simple, first clean the glass plate thoroughly and apply glue stick in the expected print area. Just a single layer should do. Note – This should be done when the temperatures are at room temperature and not after heating the heatbed.
3. Use Fevicol
This is another possible solution for those who are patient enough to undergo through this process. You need to clear the glass plate, you will need a separate container where you can mix this fevicol glue with water in a 1:1 Ratio. Now apply this solution on to your print surface at room temperature. At times directly applying fevicol may also work, do find your ideal technique
4. ABS Juice Helps Parts Stick to the Bed
This is the best solution till date that will make your prints to stick for sure. Take in a bottle of acetone and throw in small chunks of abs filament. This could be the brim or support of your previous print and even the excessive filament strands from your previous spool. Add this chunk gradually until you get a thick solution of abs juice.
Apply this solution on your glass bed and you good to print. As we are too lazy we avoid this method as it’s too hectic to get through this process. We prefer using Step 1,2,5,6 and 7 instead, but when the parts get too tricky and we have failed twice or thrice in the easy steps, we end up using this method after all.
5. Brim Settings
Another possible alternative to make your abs prints to stick would be using the brim feature of your slicing software. We have been using this feature on simplify3d. Add approximately 10-15 layers of brim to make the part stayed glue to the print surface.
6. Nozzle Offset
Many prints fail as it does not have a gap free first layer. You can try pushing the nozzle a bit lower by giving it a 0.02-0.05 Offset in the slicing software, this will squeeze the material through and may lead to over oozing of material, but as the part progresses layer wise it tends to compensate.
7. Enclosed Chamber
A sudden breeze of cool air over the print surface in an open machine may lead to make the part warp. Using an enclosed chamber helps maintaining the heat within the printing environment thus avoiding layer separation. When parts are large and have more surface contact on the print surface we usually recommend this.
Do like and share this post if you have found this helpful. If you have any other better solution please feel free to share it in the comments section below or shoot us a mail here.
Prevent Warping - You Can Do It
In particular, if you frequently print with materials like ABS and HIPS, over time you will get annoyed by what is known as “warping”. This is an unsightly misprint in which part of the model bulges or warps. In the worst case, the print is completely detached from the bed.
Especially with functional parts, the accuracy of which is of great importance, warping can quickly mess up the entire print. Mostly, models with a large contact surface on the print bed are affected. In this article, you will find out what causes warping and how you can avoid the “warp effect”.
Causes of WarpingWarping occurs due to uneven temperature distribution and the resulting tension in the substrate. Since ABS or HIPS filaments warp more at uneven temperatures than PLA, for example, and tend to shrink during cooling, the warp effect can be observed more frequently with these materials.
If an ABS print is cooled down at room temperature, it can shrink by almost 1.5%. The larger the print model, the more unevenly it cools, the layers shrink unevenly and parts of the print bulge.
So the reasons for warping mostly have to do with temperature:
- Unevenly heated print bed
- Too fast printing process
- Incorrect location of the 3D printer (for example at the window)
- Incorrect slicer settings
- Contaminated print bed
1. Use a heated bed
A heated print bed keeps the model evenly warm during the printing process by equalising the temperature in the print object. At the same time, it also ensures better bed adhesion. If possible, the bed temperature should be just below the filament softening point, because: The higher the temperature of the bed, the lower the temperature difference in the individual filament layers and the resulting warping. However, be careful not to set the heating bed temperature too high, otherwise you risk plastic deformation of the model and intensification of the warp effect.
In addition, always preheat your heating bed and do not print immediately without waiting for a suitable temperature so that the heat can stabilise to some extent. The print bed can even be insulated for optimal heat distribution; temperature-resistant insulation from the automotive sector is very suitable for this.
2. Print in an enclosed print chamber
A closed housing keeps the temperature inside the model constant during the entire printing process. When printing with a heated chamber, you should always make sure to keep the doors closed during the printing process so that the heat inside cannot escape. You can find a suitable 3D printer cover in our shop.
3. Choose the right location for your 3D printer
A 3D printer should ideally be set up in a place where there are no drafts. A window seat, in the hallway or next to a door is therefore less ideal, as drafts of air unintentionally cool the print. Basically, you should regulate the room temperature by keeping windows and doors closed as much as possible.
4. Turn off the material fan for the first few layers
To prevent the bottom layers from becoming detached from the build bed, you can turn off or slow down the fan while the first layers are printing. Keep in mind, however, that the melted filament still needs to solidify quickly enough to allow a precise build-up of the layers.
5. Improve bed adhesion with adhesives or a suitable bed surface
As already mentioned, the lack of adhesion of the print to the bed can also lead to warping. To avoid warping your prints, use a build plate with good adhesion or improve your adhesion with adhesives, glue, blue tape, or a print bed coating.
Since most FDM printers are equipped with a glass or aluminium surface and the surfaces are often too smooth for printing thermoplastics, it can be worthwhile to use a flexible plate as a print bed upgrade.
6. Adjust your slicer settings
Not only can the temperature and print bed adhesion affect the bulging of your 3D print, but the wrong slicer settings also have an impact on your print quality.
- Reduce your printing speed
Especially if you have frequent problems with warping, you should try to reduce your printing speed. At the same time, the nozzle temperature should also be reduced accordingly as the extra heat is not heated with this lower flow.
- Use rafts and brims
A raft can help with larger and a brim with smaller components to avoid warping by building up a base layer, the edges of your model are “held” and these warp less. The raft can easily be detached from the model after printing.
7. Thoroughly clean your print bed
If you often have problems with warping or your prints do not adhere to the bed, clean it thoroughly with the cleaning agents provided. Stubborn residues such as glue can be removed with chemical solvents.
If your build platform is uneven or damaged, you should definitely replace it.
8. Use good quality filament
Last but not least, it should be said that you should always use high-quality filaments for successful 3D printing - and always adhere to the material-dependent application instructions. Only a high-quality filament that has been used correctly can achieve a beautiful print result.
How to avoid deformation of models when 3D printing
There is nothing “better” than walking away from the printer for a couple of hours and taking a nap, and returning to find this:
Vermicelli. Plastic
Sound familiar? Yes, these are the same “angel hair”, “spaghetti” or “vermicelli” obtained by tearing the model off the desktop. The cause of such a disaster is often the deformation of the layers. Twisting the edges of the model up causes the extruder to catch on the model and simply break or tear it off the platform. Then begins the artistic filling of the environment with plastic thread in the artistic style of Jackson Pollock.
Left: No. 5, 1948. Author: Jackson Pollock. Fiberboard, oil. Price: $140 million
Right: Angel hair, 2013. Author: Ravix. Prusa Mendel printer, ABS plastic. Price: $0
But the charms of deformation don't stop there. What is the easiest way to quarrel two "makers"? Correct answer: ask them which is better - PLA (polylactide) or ABS (acrylonitrile butadiene styrene). ABS - a thing, of course, tempting. This plastic is strong, durable and inexpensive. Polylactide, in general, is also relatively inexpensive, but relatively soft and biodegradable - with all the ensuing consequences. So why are popular devices like the Makerbot Replicator built to print with only polylactide? The environmental friendliness of PLA is a secondary reason, rather a bonus. And the main reason is the low glass transition temperature and minimal shrinkage. It does not require heating to ultra-high temperatures for melting, and when cooled, although it shrinks, losing volume, but not much. In other words, printing with polylactide is easier. But ABS “shrinks” quite noticeably, losing up to 8% of its volume. If you do not control the temperature regime, then you can get curvature and even cracks.
In our article, we propose to consider methods for eliminating deformation.
- 1 Use heated platform
- 2 Choose the right adhesion
- 3 Cleanliness is key to good printing
- 4 Height calibration
- 5 You drive more quietly - you will continue
- 6 Don't catch cold on your model
- 7 Turn down the heat
- 8 Reduce the density of model
- 9 Print with liner
- 10 Lugs
- 11 Thresholds
- 12 Thermowalls
Use Heated Bed
Heated Build Bed
This option is offered with many modern 3D printers, and in the case of the RepRap, you can modify it yourself. Let the heating add to the cost of the printer, but it's worth it. Heating the model from below allows you to slow down and even out the cooling process. If small PLA models can be printed without heating, then when printing large objects, a heating element is no longer necessary, since even a slight shrinkage of PLA has a cumulative effect with increasing model dimensions. When printing with ABS plastic, heating is simply necessary, otherwise the rapid shrinkage of the lower layers will lead to deformation of the upper, still hot parts of the model. It is worth paying attention to the uniformity of the platform heating. If the heating is not uniform, then the very first layers, cooling unevenly, can “twist”. Often the glue or tape used to hold the model in place won't even help. The edges will rise, the extruder will hook on the applied layers, and then - "vermicelli".
Choose the Right Adhesion
Kapton is a Great Platform Coating
If the plastic won't adhere to the platform, you're in trouble. Which one is the best - there is no consensus. There are tables made of aluminum, glass (even basalt), steel, titanium. Seasoned RepRapers pray for Kapton, a polyimide film applied to the surface of the platform. By the way, the film can be processed with a fine-grained emery cloth - a rough surface will contribute to the "seizure" with the plastic. Some users spray the surface of the platform with a spray adhesive containing acetone (to set the ABS), or even hairspray!
Cleanliness is the key to good printing
If the build platform is covered in dust, plastic will stick to the dust. How this will affect the adhesion of the model to the platform itself hardly needs to be explained. If you are printing with ABS, you can wipe the platform with acetone to dissolve the small pieces left from previous models. Acetone has no effect on polylactide, but you can try Limonene. By the way, the thread should also be kept clean, because the accumulation of dust in the extruder is fraught with all sorts of interesting, but unpleasant consequences.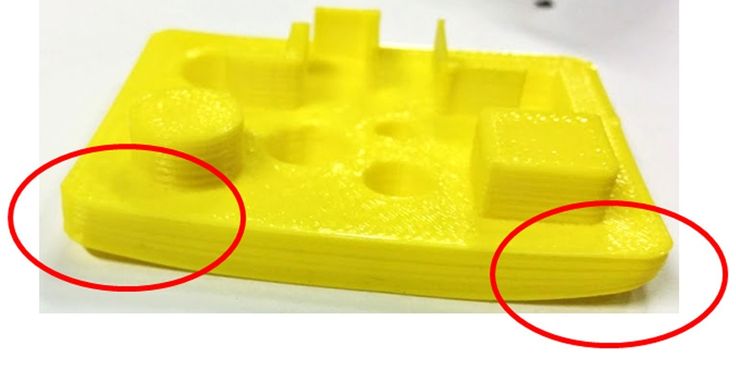 One simple method to clean the filament (if it's already dusty) is to use a foam filter before feeding it into the extruder.
Height calibration
Trying to print a cube with too much initial distance between nozzle and bed
A correctly applied first layer is the cornerstone of successful printing. If the head sits too high above the platform when applying the first coat, the adhesion may be too weak. This problem is solved experimentally: if your model breaks off the platform, try lowering the initial head height in small steps. If the platform is heated, then it makes sense to carry out the calibration in a heated state, because the deformation of the platform during heating can make the “cold” calibration inaccurate.
Slower ride - farther you will be
Reducing print speed can reduce model deformation
Yes, unfortunately, 3D printing even small objects takes a lot of time. But in order to increase adhesion to the platform and give the layers extra time to cool evenly, it may be necessary to slow down the printing process. This is especially important when working with PLA, because the polylactide takes a long time to cool down, and the lower layers can undergo deformation under the pressure of the upper layers if they do not have time to pass the glass transition point.
Don't catch cold on your model
Maker Case - a cabinet for 3D printers that prevents drafts
Drafts can have negative consequences not only for real people, but also for plastic ones. A banal draft can lead to uneven cooling of the model - hypothermia on one side, followed by one-sided shrinkage and lopsidedness. No wonder many manufacturers prefer to make closed cases for their printers. In addition, the tightly closed housing helps maintain a high background temperature in the working chamber, which is good when working with ABS plastic. But when printing PLA, you may have to remove one of the panels or open the door (depending on how the case is arranged) to help cool the model faster. Many manufacturers install additional fans on their extruders to blow off the fresh layers of polylactide (we counted three on the PrintBox3D One!). Although, in general, this is a sound idea, it often has the opposite effect, since only one side of the model is blown. In the case of PrintBox3D One, the calculation was made to quickly cool fresh layers - before subsequent layers become a barrier to airflow. And Picaso Builder uses a tricky system of channels built into the extruder to evenly blow the model from above.
Turn down the heat
Not yours. This refers to the temperature of the extruder. The ideal option is to heat the extruder to a temperature slightly above the glass transition temperature of the plastic, so long as the extrusion proceeds normally and the layers “seize” among themselves. After all, the stronger the plastic is heated, the longer it will cool down, and the more noticeable the shrinkage will be. But keep in mind that such experiments can bring additional stress on the extruder mechanism, up to and including damage to it. Yes, the nozzle can get clogged. Be careful.
Decrease the density of the model
Various degrees of filling
The model can be homogeneous (solid piece of plastic), hollow (walls on the outside, absolutely nothing inside), or lightweight (seemingly solid, but inside filled with plastic mesh or honeycombs) . The last option has a lot of advantages. This includes savings in materials compared to solid models, good strength compared to brittle hollow models, and, finally, a reduced likelihood of deformation. The logic is quite simple: the larger the surface of the layer in contact (i.e., sticking together) with the platform, and the smaller the volume of plastic in the following layers, the less likely the lower layer is to twist when the upper layers shrink. Add the already described substrates here, and the chances of successful printing increase many times over.
Print with a backing
Printing a wheel on a backing
A backing or "raft" is the base of the model, made in the form of a grid. Due to the high porosity, such structures cool quickly and evenly, and then serve as a reliable basis for the present model. The larger and thicker the substrate, the stronger and more reliable it is. Here you already have to find the perfect balance between functionality and material consumption. Many digital modeling programs (such as Skeinforge or ReplicatorG) have built-in underlays.
Lugs
Model with lugs
The problem with underlays is that they can seriously degrade the quality of the bottom layer of the model. After all, all this extra plastic will have to be removed, right? Alternatively, you can print the extensions of the bottom layer (the so-called "lugs") in the most vulnerable places for twisting - for example, in the corners. The lugs will help hold the edges in place until the bottom of the model hardens. After printing, they will be much easier to remove than the backing. The disadvantage of this technique is the need for an additional work surface.
Thresholds
Threshold Model
Essentially it is a combination of lining and lugs. The oversized lining is built on with additional objects (“thresholds” or “visors”) whose sole purpose is to hold the lining in place. The most effective method of preventing deformation of the lower layers, but also the most costly in terms of materials. The advantage is the fact that the “thresholds” themselves do not touch the model, and therefore, at the end of printing, only the substrate itself will have to be cleaned from the model.
Thermal walls
A kind of draft control. The idea is based on the construction of thin walls around the model, which keep warm air inside and contribute to a more uniform cooling of the model.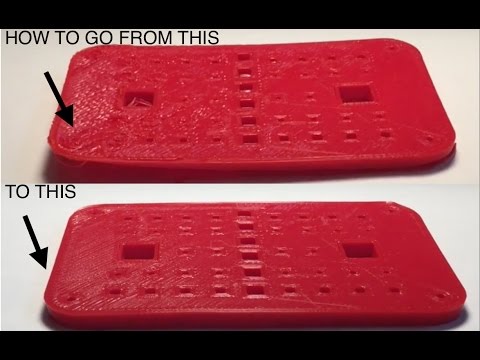 In fact, this is an alternative to the closed printer case. The walls themselves can be deformed, but since they are not part of the model, this is not a problem. The downside is the additional consumption of materials.
If you have your own tricks, write to us at [email protected]
Go to the main page of the Encyclopedia of 3D Printing
5 reasons why ABS should not be used for 3D printing
3DPrintStory News 5 reasons why ABS should not be used for 3D printing
"ABS has been great stuff while it lasted, but we really need to move on," says Miles Scott. And he's right. There are other materials that are less toxic, easier to 3D print, and more environmentally friendly.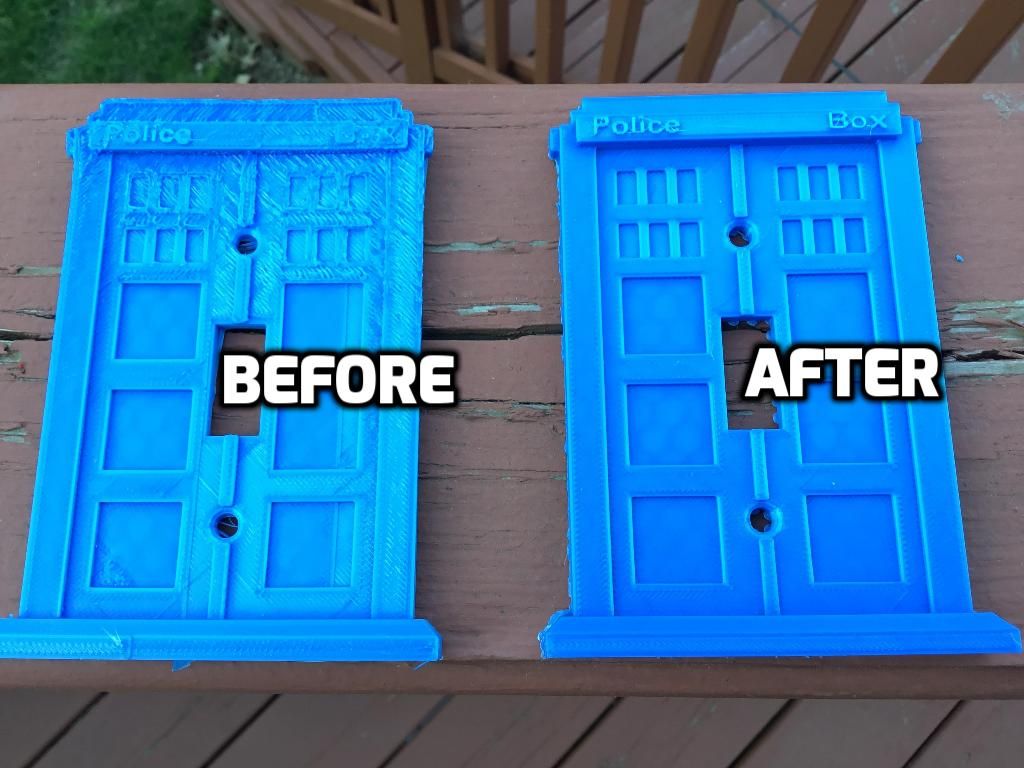
Before you pick up ABS forks and start yelling and threatening, let me start by saying that I don't consider ABS a bad material per se. But as the 3D printing market has developed, many companies have invested heavily in research and development. So at the moment there are many more options and alternatives in the choice of materials, which were definitely not there in the early days of the RepRap project. And now on the 3D printing market there are more durable and versatile fibers that are much easier to print.
So where is ABS in the context of 3D printing material right now?
Cause 1. ABS plastic definitely poisons you
ABS (acrylonitrile butadiene styrene) is a non-biodegradable petroleum-based plastic. And it is inherently more toxic plastic than PLA. The smell of ABS hits you and instantly sets off an internal alarm: this doesn't suit me. When using ABS plastics for 3D printing, it is simply necessary to shield the case using some kind of ventilation pipe to remove toxic fumes from the room.
Long-term exposure to ABS fumes is not fully understood. However, a study from 2015 shows that “both gaseous molecules and nanoparticles are inhaled by humans through the olfactory system. Ultrafine particles are deposited mainly in the cells of the respiratory system and reach the brain through the olfactory nerves of the nasal mucosa. absorption".
An article titled "ABS Safety" has been written on the Solidoodle Wiki. It states that "none of the components present in this material is listed as a carcinogen. Under normal processing conditions, this product does not contain toxic chemicals." However, you can also read in this article that "the fumes generated during the melting process may cause irritation to the eyes, skin, and respiratory tract, and if overexposed, may cause nausea and headache."
Will he kill you in an instant? Probably no. Is it good for you? Absolutely not. But did you really need research to make that claim? I believe evolutionary instinct will blow your nose at this thing.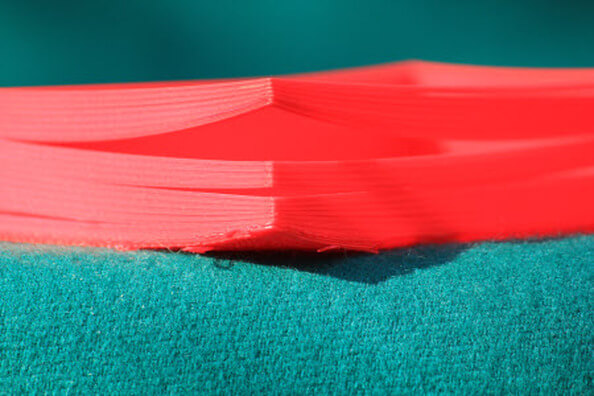 Unless you want to be the subject of a lengthy clinical study with the catchy title "Is it bad for me to breathe in melted plastic?".
I was talking to a friend of mine who is now in medical school when I wrote this article. I immediately ran into a 15 minute lecture on why this is terrible for my health and why I definitely shouldn't do it.
Reason 2: Stronger, more 3D-printable materials exist
When the early days of home 3D printing were in full swing, there was no multi-million dollar global market for filaments. So the community had to tap into the markets that were available at the time. As for thermoplastics, that meant ABS.
In the manufacturing world, ABS is used in huge quantities. So there were stable supplies of material and affordable prices. We now have real research and development on 3D printer materials and specialty resins developed for 3D printing. For example, PET and PETG plastics are much easier to print, and their properties are similar to those of ABS. Just next time it's these materials when you're going to buy some ABS. Believe me, you will be satisfied with the result of 3D printing.
Cause 3. Deformation, deformation, deformation!
If you want more proof that ABS was never intentionally designed for 3D printing, take a look at how sensitive it is to temperature.
ABS is used primarily for injection molding applications where heat has nowhere to go. When it comes to 3D printing, it's the exact opposite. Small temperature changes will cause the ABS plastic parts to rise right off the 3D printer table and ruin your 3D models. This is why those who use ABS make extensive use of enclosures that allow temperature differences to be stabilized.
If you don't want your 3D models to warp, you need a case. I have seen people use everything from laundry baskets to simply throwing a blanket over a 3D printer (by the way, this option, like many others, is very dangerous to say the least, don't do it).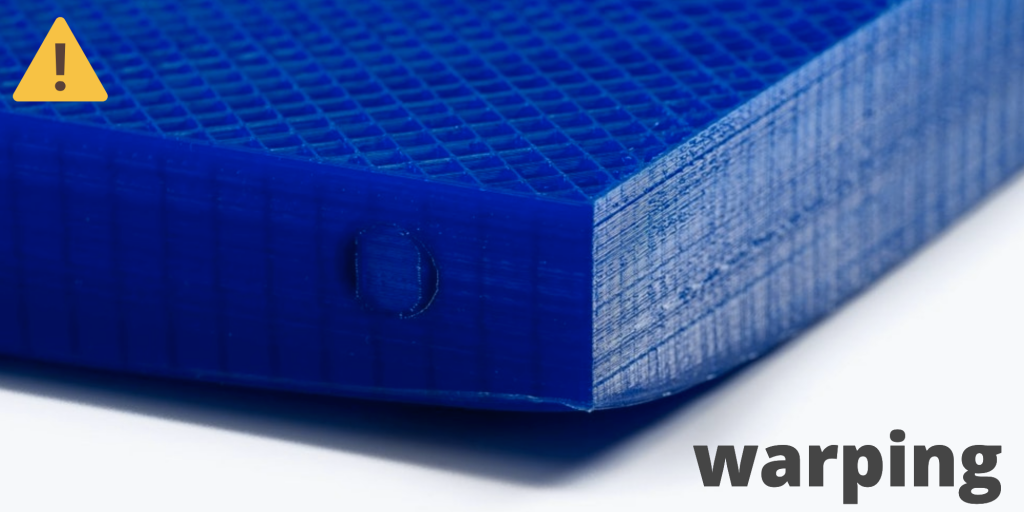 If you don't have a heated table, don't even try ABS printing. It will definitely not grab the 3D printer table.
Cause 4 Environmental Issues
ABS is not biodegradable. Your 3DBenchy will still be around 1000 years from now, long after we're all gone. Just imagine how many support materials for edge rafts and failed 3D models appear over time. How will it end? As a species, we face huge environmental challenges for the foreseeable future. Even if you think climate change is a Chinese conspiracy, the price of fossil fuels will directly affect ABS pricing, so you might see price changes for this filament if oil prices rise.
Cause 5: Hazardous chemicals used in post-processing
Acetone is used to smooth 3D ABS models. And yes, the effect is very good.
But! First, prolonged exposure to acetone vapor can seriously damage your respiratory system, not to mention that it is extremely flammable and can be hazardous to store.
I: The main advantage of ABS is its strength and heat resistance.