3D printer step calculator
3D Printer Calibration - LayerFused
Calibration Overview
3D Printer calibration is critical to 3D printing accuracy. These calculators and resources will allow you to calibrate your printer for optimal results.
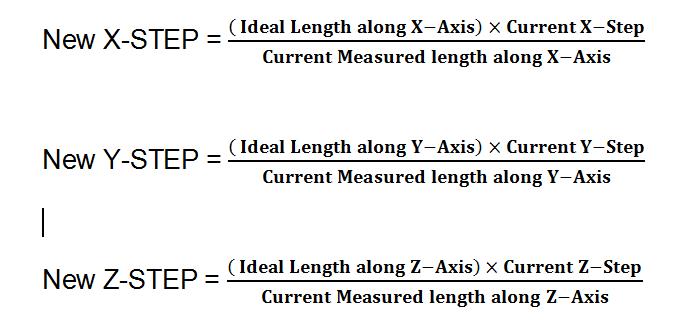
Steps per milimeterThe steps per millimeter (steps/mm) calculation is used to calibrate the X, Y, Z and E axis of your 3D printer. This same calculation is used regardless of the axis. The process is to have a known target you are trying to reach and then measure the actual value. The calculator will then adjust your steps/mm based on the measured value to provide a new value which will match the target value.
Current Steps/mm
M503 G-Code will reveal the M92 values. Use your existing X/Y/Z/E value for this field.
Target Value
The expected amount of axis movement. For example, enter 100 if you move the axis 100mm.
Measured Value
The actual amount of axis movement. Use of calipers is recommended, but a metric ruler can be used.
Flow Compensation Flow compensation is used to compensate for the expansion of the filament being pressed against the layer underneath. Use this calculator correct for the expansion of the filament by adjusting the flow rate. To use this calculator print a 20mm x 20mm x 20mm cube in vase mode and then measure the top 5 layers with your caliper. Measure near the center of the cube not near the edges. Enter the values below to see how you can adjust your flow compensation to produce the properly sized line width of extruded material.
Note that flow compensation can differ based on material.
Current Flow %
Most slicers have flow compensation set to 100% by default.
Nozzle Width
Enter the diameter of your nozzle.
Measured Values
Wall 1
Wall 2
Wall 3
Wall 4
Measure the thickness of each side of the cube wall using the top 5 layers near the center of the wall.
The startup code generator creates startup GCode for your 3D Printer. Simply copy and paste the output into your slicers startup gcode settings and you're done.
You can enable a number of features including Bed Leveling, Nozzle Purge and Wipe, Sound Alerts and more.
Printer
Bed Size X
The X size of your 3D Printer Bed in mm
Bed Size Y
The Y size of your 3D Printer Bed in mm
Options
Add Z Auto-Align
Execute a G34 and align the Z axis before homing the printer.
Home Before Printing
Execute a G28 and home the printer before printing. (required for most printers)
Enable Bed Levling
G29 - Adds bed levling, Loads from Mesh 0, Performs mesh tilt before printing to level plane.
Enable KISS Purge
Uses landing strip on your print bed to purge and prime nozzle, wipe tip right before printing. This feature requires a small space on your print bed to have a piece of painters tape on the front of your bed, called a landing strip, for the purge and wipe.
This feature allows you to turn off things like a "Skirt" or purge line that takes up more space on your bed.
Landing Strip Size 15mm X 40mm.
This feature only works on a rectangular print bed.
[See this in action]
Enable Audio Feedback
Adds M300 Audio feedback and a CHARGE! Fanfare when printing begins.
Output
Startup Code
RepRap Calculator - Original Prusa 3D Printers
Hi, I am a calculator. I will help you to calculate the real price of the filament converted to printing volume (in cubic centimetres), the number of steps per millimetre and the acceleration needed to reach a certain printer speed.
Real filament price
WORK IN PROGRESS! Great tool to compare real price of filament. Only measurement, which accurately tells you how much you can print with your purchased filament, is volume in cm3. Filament vendors should provide price per cm3 which doesn't happen now. So I made this simple tool for you to calculate it.
Example: You are offered 100m of PLA both in 3mm and 1.75mm for $25. With 3mm you will buy 2827cm3 but with 1.75mm just 962cm3 of plastic. That renders 1.75mm deal pretty awful as you will get just one third for the same price.
Filament name
Weight
Length
Diameter
Diameter presets 2.95 mm1.75 mm
Material - presets the density for calculations ABS - 1.08 g/cm3PLA - 1.3 g/cm3
Density
Package price
| Filament name | Price per cm3 | Total volume cm3 | Total wieght kg | Test whistles printed (2. 6cm3) 6cm3) |
|---|---|---|---|---|
| Prusa filament | 0.001 $ | 1000 cm3 | 1 kg | ??? |
Stepper Motors
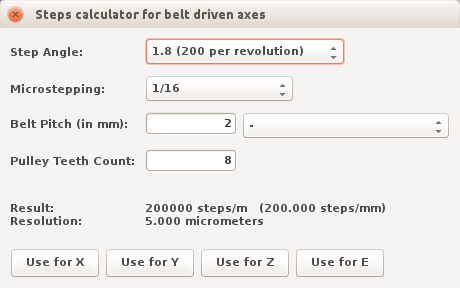
Steps per millimeter - belt driven systems
The result is theoreticaly right, but you might still need to calibrate your machine to get finest detail. This is good start tho.
If you struggle how to use this calculator, try aksing in ℹ steps per mm forum.
Motor step angle 1.8° (200 per revolution)0.9° (400 per revolution)7.5° (48 per revolution)
Driver microstepping 1 - full step1/2 - half step1/4 - quater step1/8 - uStep (mostly Gen6)1/16 - uStep (mostly Pololu)1/16- uStep (Smoothieboard)1/32- uStep (Crazy Smoothieboard)
Belt pitch (in mm)
Belt presets 2mm Pitch (GT2 mainly)MXL belt (2. 03mm)T2.5 (2.5mm)3mm Pitch (GT2, HTD)5mm Pitch (T5, GT2, HTD)0.2" XL belt (5.08mm)
Pulley tooth count
| Result | Resolution | Teeth | Step angle | Stepping | Belt |
|---|---|---|---|---|---|
| 0 Click to Share! | micron | 0 | 0° | 1/0th | 0mm |
Example:
M92 g-code can set the steps per mm in real time. Here is an example with your result for X axis.
M92 X0
Steps per millimeter - leadscrew driven systems
Gives you number of steps electronics need to generate to move the axis by 1mm.
If you struggle how to use this calculator, try aksing in ℹ steps per mm forum.
Motor step angle 1.8° (200 per revolution)0.9° (400 per revolution)7.5° (48 per revolution)
Driver microstepping 1 - full step1/2 - half step1/4 - quater step1/8 - uStep (mostly Gen6)1/16 - uStep (mostly Pololu)1/16- uStep (Smoothieboard)1/32- uStep (Crazy Smoothieboard)
Leadscrew pitch
mm/revolution
Pitch presets M8 - metric (1.25mm per rotation)M6 - metric (1mm per rotation)M5 - metric (0.8mm per rotation)12 (12mm per rotation)16 (16mm per rotation)25 (25mm per rotation)5/16"-18 imperial coarse (1.41111mm per rotation)3/16"-20 imperial (1.270mm per rotation)1/4"-16 Acme (1.5875mm per rotation)
Gear ratio
| Result | Leadscrew pitch | Step angle | Stepping | Gear ratio |
|---|---|---|---|---|
| 0 Click to Share! | 8 | 1. 8° 8° | 1/16th | 2 : 2 |
Example:
M92 g-code can set the steps per mm in real time. Here is an example with your result for X axis.
M92 Z0
Optimal layer height for your Z axis
Helps you to select layer height in a way, that Z axis moves only by full step increments. Z axis isn't usually enabled during inactivity. If the axis is disabled during micro-step, axis jumps to the closest full step and intorduce error. This effect is occuring to some extent even while leaving the Z axis motors enabled. This is most usefull to machines with imperial leadscrews but also for unusual layer heights with metric leadscrews.
Motor step angle 1.8° (200 per revolution)0.9° (400 per revolution)7.5° (48 per revolution)
Desired layer height
Leadscrew pitch
mm/revolution
Pitch presets M8 - metric (1. 25mm per rotation)M6 - metric (1mm per rotation)M5 - metric (0.8mm per rotation)12 (12mm per rotation)16 (16mm per rotation)25 (25mm per rotation)5/16"-18 imperial coarse (1.41111mm per rotation)3/16"-20 imperial (1.270mm per rotation)1/4"-16 Acme (1.5875mm per rotation)
Gear ratio
| Layer height | Error over 10cm | Number of steps | Step length |
|---|---|---|---|
| 0 | 8mm | 8 | 1.8mm |
| 0 | 8mm | 8 | 1.8mm |
| 0 | 8mm | 8 | 1.8mm |
Acceleration
Max Speed
Input your acceleration settings, distance/length of axis and you can see you your printer will hit your desired speed and for how long.
Acceleration
Distance or axis length
Desired speed
Online calculator for calculating the cost of 3D (3D) printing
You are here
Home » Our services
How to calculate the cost of 3D printing
- load the model in STL format into the calculator;
- get a cost estimate and recommendations;
- change the print settings or leave the default;
- if you are ready to order 3D printing on a 3d printer, click the "Order printing" button, fill in the contact details and send an application.
test model used for illustration purposes. To calculate your model, download it. The calculation takes place automatically.
Load STL file?Click the "Load" button and select the 3d model file. This is an STL file, such as 3dmodel.stl. The calculator will automatically calculate the cost immediately. You can go directly to the calculation below or change the 3D printing settings
Characteristics of the model, recommendations and cost of 3D printing
Volume, cm 3 : - Area cm 2 : - Dimensions, mm: - Plastic consumption, cm3: - Plastic consumption, gr: -
Recommendations: -
Preliminary cost of printing: -
Set your own 3D printing settings? Press if no special print settings are required, rather than the default settings*optimum settings for price/performance ratio). The default settings are marked with *.
Select material:? This is the material that will be used for 3D printing. Simply put, ABS is suitable for gears, housings and similar technical details, PLA is suitable for figurines and souvenirs, for the rest, see the material comparison table in the FAQ section.
ABS*ABS is strong and durable, suitable for printing housings, gears and stressed parts. We print by default.
PLAPLA has low print shrinkage, prints small fragments well, can print overhanging elements. Also, since PLA is made from corn, it can be used in food production
PET-GPET-G is stronger than ABS, less shrinkage, chemically resistant. This plastic has excellent interlaminar adhesion. Food grade plastic
CarbonCarbon is a nylon with carbon added. Very durable and wear-resistant, has low shrinkage and deformation during printing. In addition, after printing, the parts have a rough surface, on which the layering is not visible.
FlexFlex is an excellent rubber-like material. Unlike its TPU (polyurethane) counterpart, it is chemically resistant to engine oil and gasoline, and can be used as gaskets and flexible hoses in the automotive industry
PhotopolymerPhotopolymer resin is indispensable for printing small and precise details. Advantages: layer thickness up to 1 micron, no layers visible, possibility of printing transparent models, coloring before printing with coloring pigments
ABS-Like loaded and durable parts. Together with ultra-high precision printing, it is indispensable for printing small gears and machine parts
Select filling density:? This parameter characterizes how much the part will be filled with plastic. Often it is not necessary to completely fill the part, partial filling can be used to save plastic
10%
20%*
33%
50%
100%
Select layer thickness (height):? This parameter characterizes the quality. The thinner the layer thickness, the better the printing will be, but the longer the printing time and its cost
0.05mm
0.1mm
0.15mm
0.2mm
0.25mm*
Print order
test model
Hold the left mouse button to rotate the model
Use the middle mouse button or Shift and the left mouse button to zoom
Use Alt and left mouse button to move the model
Order printing
The print operator will receive a request with a 3D model and selected print characteristics and will contact you.
Download model STL
Read more
- Maximum file size: 120 MB .
- Allowed file types: stl .
Telephone
Order comment
Data
Add filesAdd new file
More details
- Maximum file size: 100 MB .
- Allowed file types: stl obj .
FDM thermoplastic 3D printing:
-
Eco-friendly PLA strength detail smoothness flexibility environmental
2923 rub/cm 3 bottles and children's toys.
 Due to the peculiarities of the material (detailing, printing "on weight") figurines, souvenirs and various decorative elements are well obtained from it. Well processed and smoothed. Order printing
 -
Popular ABS strength detail smoothness flexibility environmental
2919 rub/cm 3 Print order
Excellent price-quality ratio, made from oil.
 Well suited for printing cases, instruments, automotive components, gears and mechanisms, elastic and strong. Excellent mechanical and chemical processing. Order print
 -
Durable PET-G strength detail Smoothness Environmental friendliness
3923 rub/cm 3 Order PECH
In PET-G.
 Excellent interlayer adhesion, due to which parts from this plastic will be stronger than ABS. In addition, PET-G is chemical resistant and can be used in food production (common plastic bottles are made from PET). Order printing
 69 RUR/cm 3 Print order
Carbon is a nylon with added carbon. Thanks to this combination, carbon has the super strength of nylon, but is spared its disadvantage - strong shrinkage. Carbon also has an amazing property: the surface of the part after printing is rough without visible layering, like other plastics. Therefore, it can be used not only for printing heavy-duty and loaded products, but also for decorative elements. Order print
You must have JavaScript enabled to use this form.
Order
Phone
Service type - Not specified -3D printing3D scanning3D modelingother
Choice of plastic - Not Specified -ABS/PLAPET-GCarbonFlexFotopolimerABS-Like
Upload drawing or 3d model File formats: obj, stl, max, doc, pdf, jpg, png, step, 3ds, zip, rar. The maximum file size is 120 MB. In the description, describe the terms of reference and the details of the task.
Add new file
Read more
- Maximum file size: 120 MB .
- Allowed file types: obj stl max doc pdf jpg png step 3ds zip rar .
Notes
Many potential customers of our company who are considering our professional services think that 3D printing cost of is very high today. They say that new expensive equipment, not the cheapest materials and unique technology, which is not available on every corner, lead to an automatic increase in the cost of the service provided, which has only recently begun to be popular in our country. But such reasoning goes against the fundamental concept and philosophy of our company. From the first day of opening, we set ourselves the goal of bringing 3D printing technologies to the masses, making them the maximum available for everyone. And, in our opinion, on this path we have managed to achieve great success. 3D printing cost calculator , posted on the official website of our company, will help you make sure of this.
The development of appropriate software has been one of the top priorities of our skilled programmers. We wanted to demonstrate to potential customers that 3D printing can be quite affordable in its final price. And the best way to do this is by providing the opportunity to conduct your own calculations according to individual parameters, available to each visitor to our site. To take advantage of 3D printing cost calculator , you do not have to contact our managers, go through the registration procedure on the site or send your contact information anywhere. Just go to the site, go to a special page and take step-by-step actions, the end result of which will be to get the result you need in the form of the price of the ordered service.
How exactly is the calculation of the cost of 3D printing in the calculator on our website? This procedure boils down to making three basic steps .
- Download model
You will need a file of a three-dimensional model of the object, which you want to print by ordering the appropriate service from our company. The file must be in STL format, which is optimal both for the printing procedure itself and for carrying out the necessary calculations.
- 3D printing settings
These are advanced steps for specifying individual print process parameters. In particular, here you can determine the material of the printed object, the filling density of the object and the thickness of the printed layer. Each of these parameters, set in the corresponding windows of the online 3D printing cost calculator, will largely determine the quality of the final result. This is especially important for the thickness (height) parameter of the walls of the printed part, which will be the better, the thicker and stronger its underlying layer will be.
Please note that the defined parameters are already set by default, and you will have to change them as you wish in manual mode. As for the settings shown, they are suitable for the vast majority of our customers and their orders. We are talking about the use of reliable ABS plastic, a 20% filling density of the printed object, as well as a layer thickness of 0.25 millimeters. If these parameters suit you, you can safely skip the second paragraph and proceed to the third step of using the 3D printing cost calculator.
- Get result
When you upload the correct 3D model file, our calculator will quickly make the necessary calculations and then display the price on your screen. At the same time, the main characteristics of the printed object will be calculated and visually indicated, and recommendations will be provided regarding the possible need to change the order parameters in order to achieve a better result. Online calculation of the cost of 3D printing in the calculator starts immediately after you upload a three-dimensional model. But when changing the parameters from the second step, the calculation is repeated, giving the corrected result.
Is the amount received through the steps described final and irrevocable? No. The print cost calculator is designed to indicate for you the approximate price of the ordered service, which can change in one direction or another when placing an order directly together with the manager of our company. But you will already know what cost to expect in order to get the result you need. We guarantee that the final price prescribed in the contract, if it differs from the one calculated in the calculator, then only by a minimum value.
The fourth step of is filling in the contact information in the appropriate fields on our website, as well as sending an application for your 3D model and individually defined characteristics of the printing process to our company's operators. Of course, you will proceed to this step only if the cost of 3D printing given by the online calculator suits you.
3D printer. How to calculate plastic consumption and printing time.
 The cost of 3D printing.
Probably one of the most frequently asked questions from customers who want to build a business in the field of 3D printing is “How to calculate the material (plastic) consumption and time to print an object.”
For many, this question arises long before the decision to buy a 3D printer is made. In fact, this question is really important, as it allows you to calculate in advance the economic benefits of manufacturing a particular product.
Now we will teach you how to do it using this case for Iphone 5 as an example:
You can download this model from the following link.
Testing is carried out on the following settings:
Print speed - 90 mm/s, Free travel speed - 120 mm/s, Infill - 20%, Layer - 0.2 mm, Support - disabled.
First, let's learn three simple rules:
1) The amount of plastic spent on a particular product does not depend on the printer you use;
2) The speed of production is inversely proportional to the quality of the product;
3) The amount of plastic used for a particular product is VERY dependent on the print settings, in particular on the degree of filling the product (Infill) and the use of support (Support).
You can use any free program to calculate the printing time and the amount of material spent, but we will show you how to do it based on the 3 most popular ones:
The first software is MakerWare. At the time of publication of this article, the most current version of the program: MakerWare 2.4.1* (this software is suitable for working with 3D printers of the Replicator series and most of its copies from China). You can download this program for free on the website of the manufacturer , and read the description and details of working with the program on our website in the article " Working with MakerWare ".
*The highlight of the new version is improved print support for the MakerBot Dissolvable Filament (using a special support plastic ( HIPS ) which dissolves in Limonene). Also, a new profile has appeared in MakerWare, which contains the layout of a special compacted support.The standard melting point for MakerBot Dissolvable Filament (HIPS) is 250°C-260°C, which allows the support plastic to adhere well to the print plastic (such as ABS plastic). When working with printing with two extruders, you just need to specify a different melting temperature for the support plastic and plastic (print plastic) in the settings, and, accordingly, which of the plastics in which extruder. Please note: on Mac OS X, before installing version 2.4.1 (this is the latest version today), you must first uninstall MakerWare 2.4.0, otherwise the program will not work correctly.
In order for MakerWare to display the information we are interested in during the file generation process, it is necessary to check the “Preview before printing“ checkbox. Then, if you press the “Export” button, the program will display a window in which a layer-by-layer visualization of the 3D printing process will be built. In the upper right corner of this window you will see the information you are interested in. To activate this function, your computer must be equipped with a modern video card, if you see an empty window, then you can safely go to the store for a new video adapter or the latest drivers.
The second software is Cura. This program is the most versatile and feature rich software for 3D printers. The program is developed for Ultimaker 3D printers, but at the same time it is compatible with a number of other developments, such as reprap, delta and even the original replicator.
You can download the latest version of Cura on the official website.
To calculate the material, you do not need to do any additional manipulations, just place the object on the platform and the program itself will calculate the information we are interested in in the background.
We remind you that the performance of your computer directly affects the time it takes for the program to generate the G-code.
The third software is Repetier-Host. Repetier certainly cannot boast of a modern interface, simplicity and convenience. But on the other hand, the software has full-fledged Russification, flexible settings, the ability to connect third-party slicers, as well as a whole array of useful professional settings. This is the only program that allows you to customize literally every step of the 3D printing process, has a full-fledged manual control mode for a 3D printer, as well as the ability to launch 3D printing directly from a flash card that is installed in the printer.
Based on this open source software, many manufacturers create their own proprietary 3D printing programs. One such clone is the Polygon software for Picaso 3D printers.
You can download Repetier-Host from the developer's site.
You can calculate the printing time and plastic used by clicking on the “Slicing” button on the “Slicer” tab. After that, you need to go to the “G-code editor” tab, where you will receive the necessary information:
0005
| Name | MakerWare | Cura | Repetier |
| Logo |
|
|
|
| Interface | excellent | good | poor |
| Comfort | high | medium | low |
| Slicing speed | medium | high | slow |
| Third party 3D printer support | poor | rich | rich |
| Easy to calculate time and material | very simple | just | medium |
| Plastic spent on printing one cover for Ip hone | 13 | 15 | 14 |
| Time taken to print one case for Iphone | 65 min. | 44 min. | 52 min. |
Please note that all three programs, despite different slicers, showed approximately the same results. All differences in printing speed can be explained by the error and features of the movement of the extruder at different stages of creating an object.
Our results allow us to answer another popular question: “What is the cost of manufacturing an object on a 3D printer?”.
Now this question is easy to answer. We proceed from the fact that at the time of this writing, an ABS plastic reel in our store costs UAH 359, and a PLA reel costs UAH 379.
In total, we can print approximately 70 cases for Iphone 5 from one kilogram reel.
If we neglect electricity, then the cost of one cover from:
- ABS plastic will be about - 5 UAH. 13 kop.
- PLA plastic will be about - 5 UAH.
Learn more


