3D printer software for ender 3
Ender-3 Software& Firmware Download - Creality 3D Printer
Ender-3
Get Updates
Enter your email for any updates here.
Thanks for subscribing
Download Product Manual
Ender-3 User Manual V1.1
DownloadRelease Notes
Follow this operation manual.
BL Touch Introduction
DownloadRelease Notes
Download Product Firmware
Ender-3 series replacement touch screen (except Ender-3Max) 07 Dec. 2022
DownloadRelease Notes
Ender-3-Marlin2.0.1-HW-V4.2.2-SW-V1.2.1-Filament 29 Nov. 2022
Release Notes
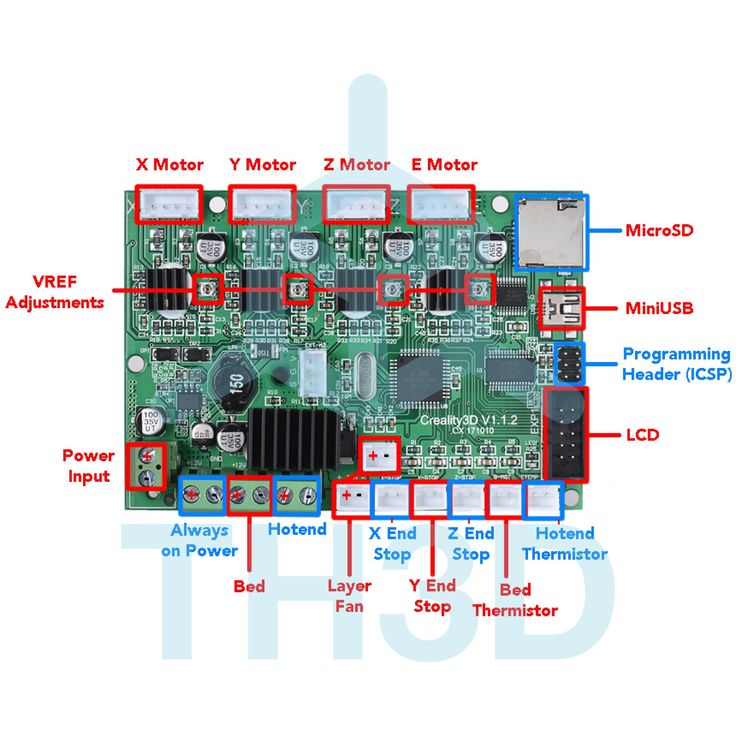
Firmware applicable model and mainboard version
Printer model: Ender-3
Printer mainboard version: V4.2.2
Notes: The firmware is Support filament detection function
Mainboard update:
1. Format the TF card on the computer side, and select 4096 for the allocation unit size.
2. Put the firmware file "Ender-3-Marlin2.0.1-HW-V4.2.2-SW-V1.2.1-Filament.bin" into the root directory of TF card.
3. Turn off the printer and insert the TF card into the card slot on the motherboard.
4. Reboot and wait for the update to finish.
5. After finishing the update, remove the TF card from the motherboard slot and delete the bin file inside.
Ender-3Marlin2.0.6HW4.2.2Z350 29 Nov. 2022
DownloadRelease Notes
Firmware applicable model and mainboard version
Printer model: Ender-3
Printer mainboard version: V4. 2.2
2.2
Notes: The firmware is Ender-3 Z-axis height increase 350MM.
Mainboard update:
1. Format the TF card on the computer side, and select 4096 for the allocation unit size.
2. Put the firmware file "Ender-3Marlin2.0.6HW4.2.2Z350.bin" into the root directory of TF card.
3. Turn off the printer and insert the TF card into the card slot on the motherboard.
4. Reboot and wait for the update to finish.
5. After finishing the update, remove the TF card from the motherboard slot and delete the bin file inside.
GD-Ender-3HW4.2.2SW2.0.8.2EuropeMulti 29 Nov. 2022
DownloadRelease Notes
Firmware applicable model and mainboard version
Printer model: Ender-3
Printer mainboard version: V4.22
Notes: Special firmware for Ender-3 with GD control chip,nine-language version
Mainboard update:
1. Format the TF card on the computer side, and select 4096 for the allocation unit size.
2. Put the firmware file "Ender-3Marlin2.0.6HW4.2.2.bin" into the root directory of TF card.
3. Turn off the printer and insert the TF card into the card slot on the motherboard.
4. Reboot and wait for the update to finish.
5. After finishing the update, remove the TF card from the motherboard slot and delete the bin file inside.
Ender-3Marlin2.0.6HW4.2.2 29 Nov. 2022
DownloadRelease Notes
Firmware applicable model and mainboard version
Printer model: Ender-3
Printer mainboard version: V4.2.2
Notes: The firmware is Factory standard.
Mainboard update:
1. Format the TF card on the computer side, and select 4096 for the allocation unit size.
2. Put the firmware file "Ender-3Marlin2.0.6HW4.2.2.bin" into the root directory of TF card.
3. Turn off the printer and insert the TF card into the card slot on the motherboard.
4. Reboot and wait for the update to finish.
5. After finishing the update, remove the TF card from the motherboard slot and delete the bin file inside.
GD-Ender-3HW4.2.2SW2.0.8.2CRTouchFilamentEuropeMulti 29 Nov. 2022
DownloadRelease Notes
Firmware applicable model and mainboard version
Printer model: Ender-3
Printer mainboard version: V4.2.2
Notes: The firmware is Ender-3 CR-touch/BL-touch version, compatible with support for filament detector.
Mainboard update:
1. Format the TF card on the computer side, and select 4096 for the allocation unit size.
2. Put the firmware file "GD-Ender-3HW4.2.2SW2.0.8.2CRTouchFilamentEuropeMulti.bin" into the root directory of TF card.
3. Turn off the printer and insert the TF card into the card slot on the motherboard.
4. Reboot and wait for the update to finish.
5. After finishing the update, remove the TF card from the motherboard slot and delete the bin file inside.
Ender-3Marlin2.0.6HW4.2.2BLTouchGD 16 Aug. 2022
DownloadRelease Notes
Ender-3Marlin2.0.6HW4.2.2GD 16 Aug. 2022
DownloadRelease Notes
Ender-3 Marlin2.0.6HW4.2.7 BLTouch Filament 02 Mar. 2022
2022
Release Notes
Ender-3 BL TOUCH (without adapter board) + Filament Detection 31 Mar. 2022
DownloadRelease Notes
Ender-3 BL TOUCH (without adapter board) + Filament Detection
Ender-3Marlin2.0.6HW4.2.7 24 Mar. 2022
DownloadRelease Notes
Firmware of 4.2.7 motherboard without accessories.
Ender-3 Marlin2.0.6 CR-touch or BLtouch firmware 05 Aug.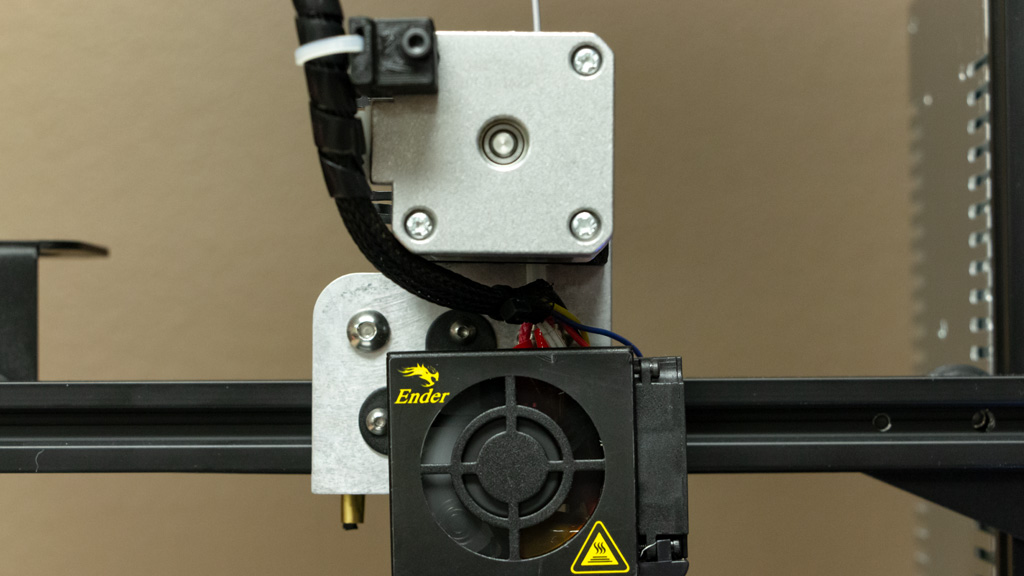 2021
2021
Release Notes
Ender-3 Marlin2.0.6 CR-touch or BLtouch firmware
Ender-3 4.2.7mainboard--High Temperature Full Hotend Kit firmware 15 Jun. 2021
DownloadRelease Notes
Ender-3 4.2.2mainboard--High Temperature Full Hotend Kit firmware 15 Jun. 2021
DownloadRelease Notes
Ender-3 Zaxis raised 350mm (8 bit) 03 Mar. 2021
DownloadRelease Notes
Ender-3 4. 2.7 mainboard (32bit) 28 Jan. 2021
Release Notes
Ender-3 4.2.2 mainboard (32bit) 28 Jan. 2021
DownloadRelease Notes
Ender-3 1.1.5 silent mainboard (8bit) 28 Jan. 2021
DownloadRelease Notes
Ender-3 1.1.4 mainboard (8bit) 28 Jan. 2021
DownloadRelease Notes
Ender-3_1. 1.6.2V_Source Code 22 Jul. 2020
Release Notes
Ender-3 SD Card File 22 Jul. 2020
DownloadRelease Notes
Download Slicing Software
Ender-3 Pro Software& Firmware Download
Ender-3 Pro
Get Updates
Enter your email for any updates here.
Thanks for subscribing
Download Product Manual
Ender-3 Pro User Manual V.2.2
DownloadRelease Notes
Follow this operation manual.
Download Product Firmware
GD-Ender-3 ProHW4. 2.2SW2.0.8.2CRTouchFilamentEuropeMulti 29 Nov. 2022
Release Notes
Firmware applicable model and mainboard version
Printer model: Ender-3Pro
Printer mainboard version: V4.22
Notes: The firmware is Ender-3Pro CR-touch/BL-touch version, compatible with support for filament detector.
Mainboard update:
1. Format the TF card on the computer side, and select 4096 for the allocation unit size.
2. Put the firmware file "GD-Ender-3 ProHW4.2.2SW2.0.8.2CRTouchFilamentEuropeMulti.bin" into the root directory of TF card.
3. Turn off the printer and insert the TF card into the card slot on the motherboard.
4. Reboot and wait for the update to finish.
5. After finishing the update, remove the TF card from the motherboard slot and delete the bin file inside.
Ender-3 ProMarlin2.0.6HW4.2.2EuropeMultiLanguage 29 Nov. 2022
DownloadRelease Notes
Firmware applicable model and mainboard version
Printer model: Ender-3Pro
Printer mainboard version: V4.2.2
Notes: The firmware is the nine-language version of Ender-3 Pro.
Mainboard update:
1. Format the TF card on the computer side, and select 4096 for the allocation unit size.
2. Put the firmware file "Ender-3 ProMarlin2.0.6HW4.2.2EuropeMultiLanguage.bin" into the root directory of TF card.
3. Turn off the printer and insert the TF card into the card slot on the motherboard.
4. Reboot and wait for the update to finish.
5. After finishing the update, remove the TF card from the motherboard slot and delete the bin file inside.
GD-Ender-3 Pro-HW-V4.2.2-SW-V2.0.8.23-CRTouch-FilamentEuropeMulti 09 Aug. 2022
DownloadRelease Notes
For the mainboard chip with GD word.
Ender-3Pro_HW4.2.2_SW2.0.9.03_SpritExt_h400 02 Aug. 2022
DownloadRelease Notes
Realize 300-degree high-temperature printing and support automatic leveling.
Ender-3Pro_HW4.2.7_SW2.0.9.03_SpritExt_h400 02 Aug. 2022
DownloadRelease Notes
Realize 300-degree high-temperature printing and support automatic leveling.
GD_Ender-3 Pro_HW_V4.2.2_SW_V2.0.8.2 09 Oct. 2021
DownloadRelease Notes
Ender-3 pro 4.2.7mainboard--High Temperature Full Hotend Kit firmware 15 Jun. 2021
DownloadRelease Notes
Ender-3 pro 4.2.2mainboard--High Temperature Full Hotend Kit firmware 15 Jun. 2021
DownloadRelease Notes
Ender-3 Series Touchscreen firmware (Excect Ender-3Max) 08 Mar. 2021
2021
Release Notes
Ender-3 pro 1.1.5 mainboard firmware (8bit) 20 Jan. 2021
DownloadRelease Notes
Ender-3 pro 1.1.4 mainboard firmware (8bit) 20 Jan. 2021
DownloadRelease Notes
Ender-3 pro 4.2.7 mainboard firmware (32 bit) 16 Jan. 2021
DownloadRelease Notes
Release Notes
Ender-3 pro 4. 2.2 mainboard firmware (32 bit) 16 Jan. 2021
Release Notes
Ender-3 Pro SD Card File 16 Jan. 2021
DownloadRelease Notes
Ender-3 Pro_1.1.6.2V_Source Code 16 Jan. 2021
DownloadRelease Notes
Download Slicing Software
Top best slicers for Ender 3 photopolymer 3D printer
Wondering what is the best slicer to use with your Ender 3 3D printer? The following describes how to increase the quality of 3D printing results on the Ender 3 using one of the top three slicers.
Layering
The Ender 3 3D printer is one of the most famous hobbyist 3D printers available on the market today. It is affordable, easy to set up, and delivers high quality 3D printing. But how does this printer (like any other 3D printer) convert a digital model of an object into a physical object? For this, a program called a slicer is used. nine0003
Do you want to know what is a slicer? When you're about to print a 3D object, your printer needs certain types of files containing commands and coordinates to create the desired object.
Slicers create such files by calculating trajectories and sets of commands to build a 3D object. The Ender 3 printer, like most 3D printers, uses a machine language called G-code, which presents the printer with a list of required commands for printing. nine0003
With the slicer, you can also change the printer settings by setting certain characteristics such as layer thickness, infill density and geometry. The Ender 3 is an open source printer, which means there is no perfect proprietary slicer for it. Each characteristic of any slicer has its strengths and weaknesses when that slicer is used with Ender 3. Let's see what to look for when choosing the best slicer. nine0003
What should I pay attention to?
When choosing a slicer, keep in mind that you will be using this program a lot, especially if your printer comes with default configurations and settings. When choosing a suitable slicer for yourself, you should consider the following points:
- Price: How much money will you need to invest in purchasing this program?
- Quality: Does it deliver the results you want? nine0023
- Advantages and disadvantages: What are the arguments for and against using this program?
- Ease of use: How easy is this slicer to use?
- Community: How many people can support you if you need help?
In this article, we'll take a look at three of the best, most popular slicers for the Ender 3 printer. We'll discuss all of the above characteristics of each slicer, as well as give a brief description of each of these programs. nine0003
Cura
Cura was developed by Ultimaker, a 3D printing company, and has good support from developers and the user community. Ultimaker has made the Cura slicer open source so you can find a free version for Windows, Mac and Linux operating systems. This program can use OBJ, 3MF and STL format files, which is very convenient for various types of projects. In addition, if necessary, it also fixes the files. nine0003
The Cura slicer is a good choice for users of various levels, and its customization options play an important role here. At first, you can configure the program to see only the printer settings you need, and as you gain experience, you can use more and more settings - up to all 200 available printer settings.
In addition, there are many add-ons for this program among the community and on the market that offer an even higher level of personalization of the program.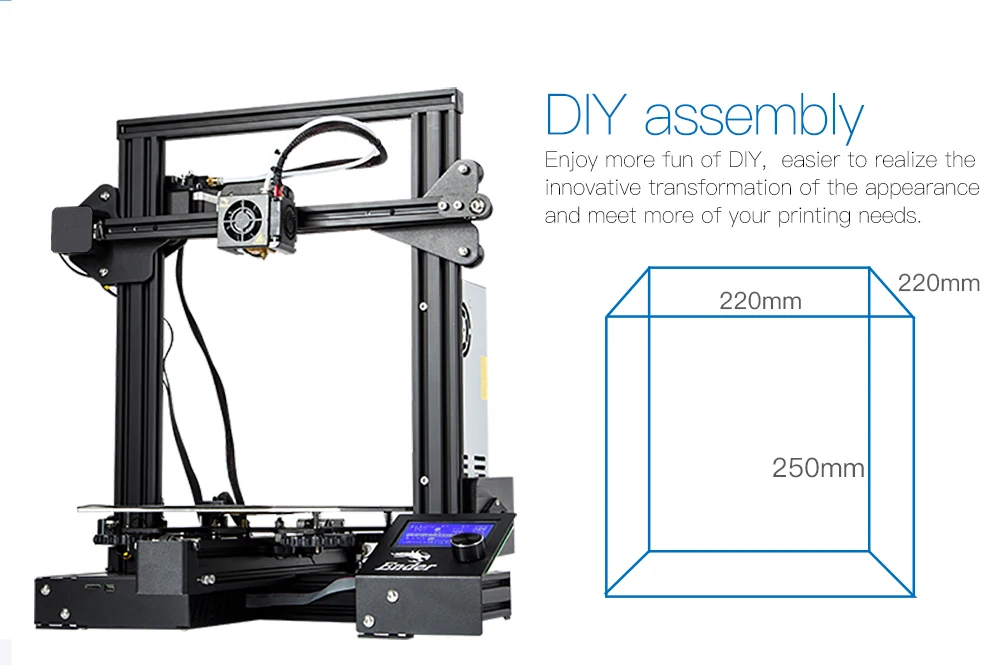 nine0003
The Cura slicer has a set of pre-set profiles for use with a variety of materials including PLA, ABS, PETG and TPU.
Cura is great for the Ender 3 3D printer because it offers a default template specifically tailored to work with that printer, making it easy for you to choose near-optimal settings. There are also many pre-configured slicer settings for various nozzle size, media and printer combinations, which is especially handy when you start upgrading your equipment. To fine-tune your printer, you can run a few test prints and set your printer up to suit your needs. nine0003
One downside of Cura's slicer is that it offers limited support for OctoPrint and other remote 3D printing software. Although the lack of full functionality in this area is inconvenient, but given all the other features of the slicer, it does not represent a decisive argument for abandoning this program.
The user community loves this program for its variety of settings and changes during printing, which give you the ability to fine-tune the print results to suit your needs.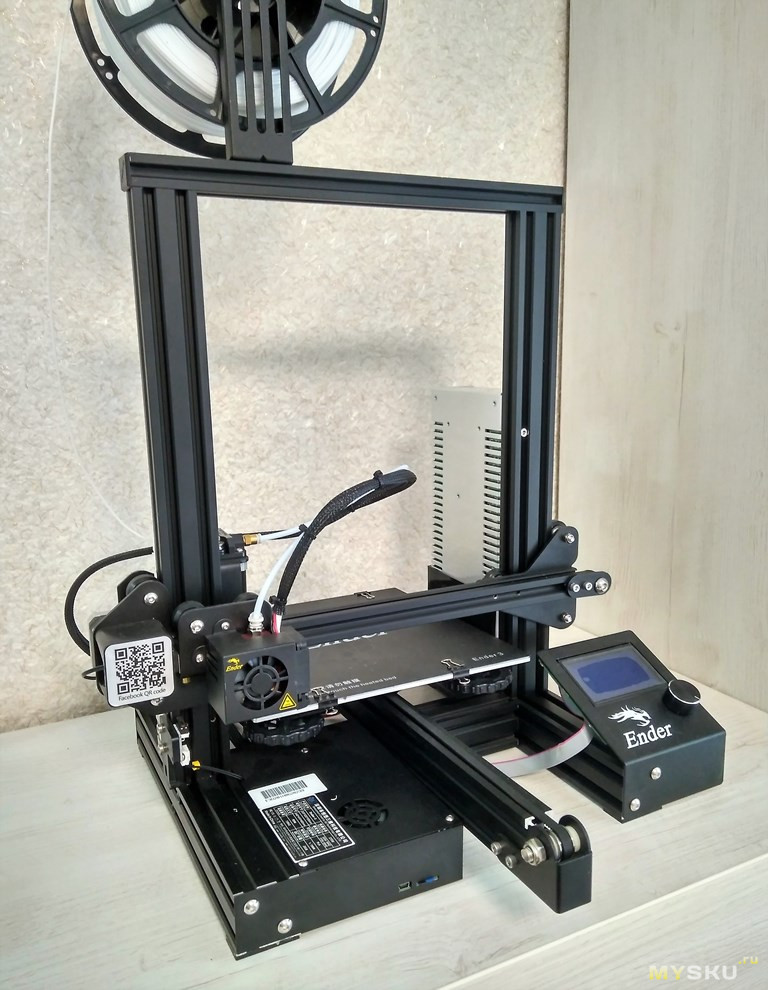 In addition, users like the ease with which this program can change the geometric shapes and infill densities. Also of great benefit are the continuous updates and bug fixes published by Ultimaker. nine0003
Simplify3D
Simplify3D is a great slicer for people with a lot of experience or for those who do 3D printing professionally. Like many other slicers, this program uses STL, OBJ, or 3MF format files and processes them very quickly.
This slicer provides the user with a lot of settings, including printer control, support for multiple extruders, and basically everything you would expect from a slicer. While so many possibilities might confuse you, the program's interface is not overwhelming and is easy to get used to once you understand some of the basics. nine0003
Due to the price of a license to use the program, it tends to be used at a more professional level, which is reflected in the software itself, which allows you to customize settings and workflow exactly according to your wishes.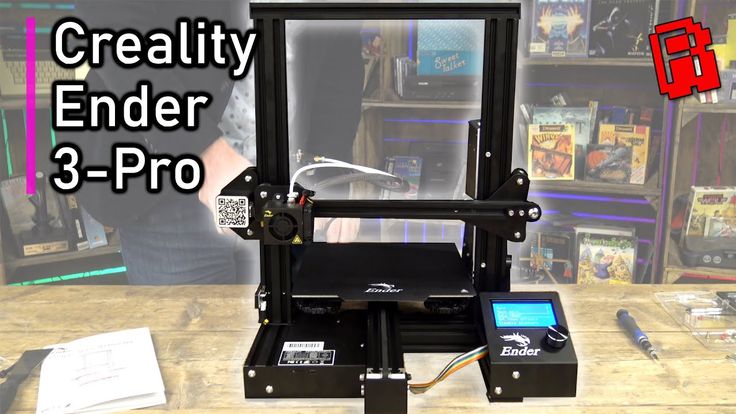 Because of this, Simplify3D produces fantastic quality results that will almost always satisfy you.
Unfortunately, Simplify3D does not support the Linux operating system and many users have been forced to switch to Windows in order to use this program. In addition, some users initially reported problems with plastic clipping. nine0003
In general, people seem to like Simplify3D, but it's important to note that when you start working with this program without experience with its interface, you may experience some difficulties.
Plastic for FDM printer
Out of stock
PLA plastic ECOFIL STRIMPLAST 1.75mm color Natural 0.75kg
Read more
Out of stock
PLA plastic ECOFIL STRIMPLAST 1.75mm color Red 0.75kg
Read more
Out of stock
RELAX plastic REC 1.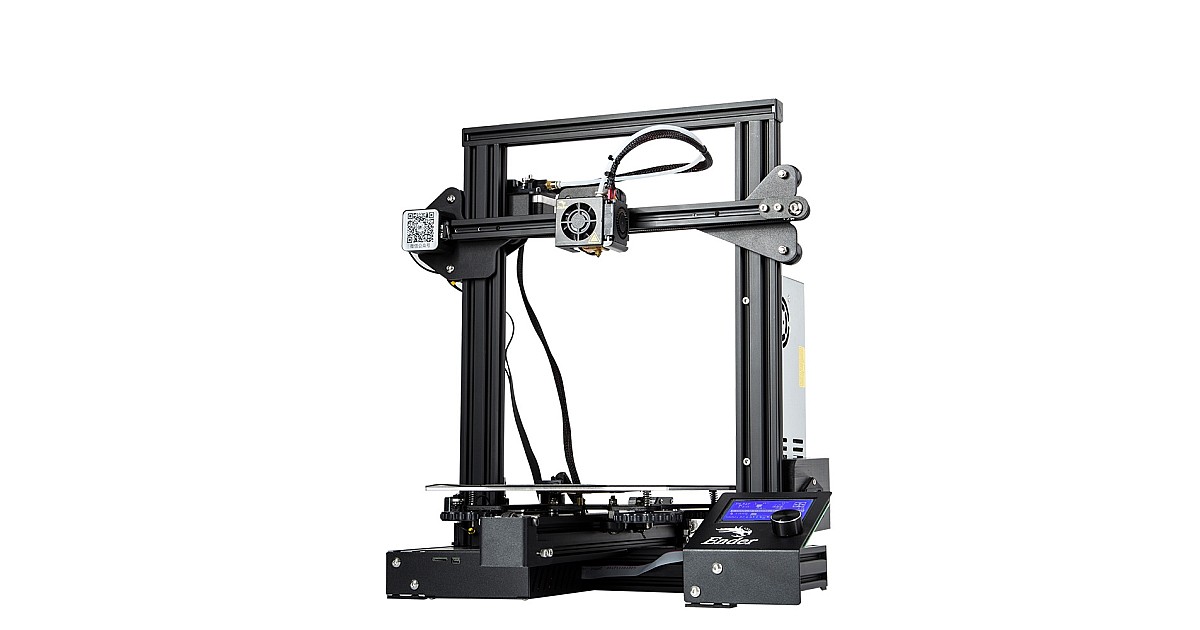 75mm black
More
Slic3r
The Slic3r slicer is an open source program with a number of experimental features that make it stand out from other offerings. It is generally considered to be the testbed that first introduced a large number of popular slicer settings and features. But we would recommend Slic3r for more advanced users as it always shows all the options. nine0003
Features worth mentioning include support for multiple extruders, sequential printing, and the use of modifiers or special G-code to change printer settings (to a greater extent than other programs allow). It supports new infill methods and pushes the limits of 3D printing to the max, bringing many of its previous users back to the platform. Slic3r uses STL, AMF and OBJ files and provides fast G-code generation. nine0003
Among the most attractive features of Slic3r are the absence of license fees and the very simple process of installing the program on the system. You can start working with it right away! It is also compatible with most 3D printers and works on all computer platforms. Due to its open source code, this program interacts seamlessly with OctoPrint and is still being developed with new features and improvements.
Slic3r has fewer users than Cura, which may cause you to run into trouble when trying to find solutions online. In addition, this program does not currently offer print time and material consumption estimates (but some improvements have been made in other programs derived from it, such as PrusaSlicer).
Although the Slic3r slicer does not have all the features, its unique characteristics make up for what this program lacks. After you get some experience with 3D printers, it's a good idea to give this slicer a try as well. nine0003
Final thoughts
Now you have some idea about the options for choosing the best slicer to use with your Ender 3 3D printer.
- If you are new to 3D printing and not going to do it professionally, then we recommend the Cura program.
 It has an excellent user interface and is easy to learn how to use.
 - If you want to try something new or don't want to rob the bank to find money to buy software, then try the Slic3r slicer. This option will open you a variety of possibilities and non-standard characteristics. nine0023
- If you're looking to get into 3D printing like a pro (and have some financial means to do so), get Simplify3D's complete pro package.
No matter which slicer you choose, it may seem less than ideal on the first try, but don't be discouraged. We highly recommend experimenting with test prints. While this process can be somewhat lengthy and tedious, it will improve the quality of your print over time. And if you're running into a problem, chances are you're not the first one to run into it, and a simple web search often yields useful results. nine0003
Your first 3D print with the Creality Ender-3 V2 / Amperka
Let's say you've already completed the printer assembly quest and you can't wait to print something. Here's how to get started printing with the Creality Ender-3 V2, and what settings to look out for in order to get the most out of your 3D printer.
Before printing on a 3D printer, the model must be prepared and divided into layers. Usually 3D models are distributed in STL format - this is a kind of JPEG in the world of modeling. A three-dimensional object in the STL format consists of a set of polygons - triangles, the coordinates of which are described in the file. nine0003
However, printers are unable to process STL files themselves. First, the selected model must be converted into a G-code - special commands for the printer that tell you where to move the head and at what speed to extrude plastic during the printing process. To convert an arbitrary 3D model into a G-code, there are special programs - slicers.
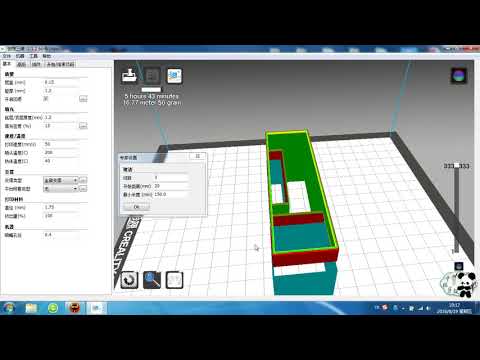
We will show how this operation looks like using the Creality Ender-3 V2 3D printer as an example. Let's process the popular 3DBenchy boat model in the Cura slicer. nine0003
This model is specially made to detect printing imperfections on 3D printers and calibrate settings. You can download any 3D model in STL format from specialized sites.
Slicer download
Any slicer program is suitable for converting models to G-code. In this example, we will use the Cura slicer - the most functional of the free programs. Download the slicer from the official site and run the installation.
Skip the welcome screens and accept the terms of use.
Setting up a printer in the slicer
Add a printer to the program using the "Add a non-networked printer" button.
Select "Creality Ender-3" from the list. This is the previous model, which has identical characteristics.
Any printer name can be entered in the Printer name field. It is needed to distinguish between several printers or several settings profiles of one printer. Name it "Creality Ender-3 V2". nine0003
All printer settings are the same as Ender-3, so nothing needs to be changed on this screen. Click the "Next" button.
Changing the program language
For convenience, let's immediately change the program language. Go to the settings using the “Preferences” → “Configure Cura…” button
Select Russian in the “Language” drop-down menu.
The interface language will change only after the program is restarted. Close Cura and reopen - you will be greeted by Russian-language menus. nine0003
Adding a model to the slicer
Click on the button with the folder icon and select the downloaded 3D model file.
Print settings
All program management is placed in the top panel with three buttons.
Printer selection
The name of your printer is displayed in the upper left corner. We only added one model, so this item should be Creality Ender-3 V2.
Plastic and nozzle selection on the printer
Your Creality Ender-3 V2 printer is capable of printing with a variety of plastics and nozzle sizes. Make sure that the standard 0.4 mm nozzle is selected in the program, which is installed in the printer from the factory.
Open the plastic and nozzle selection shutter. In the "Material" section, select your plastic. We print with PLA, so we chose "PLA" in the "Universal" section.
Selecting slicing settings
By clicking on the long button on the right, a list with basic slicing settings is opened. The developers of Cura tried to make the program more understandable, so they built hints into it. When you hover over an unknown parameter, a tooltip will appear that will help you understand what setting it is responsible for and what it affects. nine0003
Custom button opens detailed settings with many options. Leave all professional options at their defaults. We have enough basic settings.
The top slider "Profiles" is responsible for the height of one layer. The thicker each layer, the faster the model is printed. At the same time, by reducing the layer thickness, a more accurate print quality is achieved.
Set the layer height to 0.16 mm. This is the golden mean between speed and quality. nine0003
The second Infill slider controls the interior of the model. The printer can print only the walls of the model, and leave the internal volume empty. This will greatly reduce plastic consumption, but will negatively affect the strength of the model. So that the finished plastic part does not fall apart in the hands, its insides do not remain empty, but are filled with a mesh. The resulting edges increase the rigidity of the model.
To strike a balance between model strength and plastic consumption, set the infill to 20%. nine0003
Also in the slicing settings menu are two additional options: supports and sticking.
If the part has protruding parts that hang over the table, then the printer will not be able to print them - they will simply fall. To prevent this from happening, activate the "Supports" option with a checkmark. Under the overhanging parts, columns will be printed that will support the part.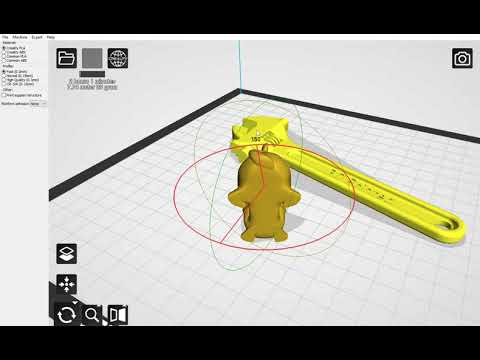
In our test model of the boat, there are no such parts, so the "Support" parameter does not need to be activated. But if you print your own model - do not forget about the supports. nine0003
Stick setting improves adhesion. This is the adhesive force between the workpiece and the table. If the adhesion is insufficient, the part may come off during the printing process. The printer will print a skirt around the model, which will increase the contact area with the table. After printing, it can be cut off, but it will not allow the model to come off the table in the middle of the process.
Activate this option, because the bottom of the boat is quite shallow, and an additional surface for stronger adhesion will be very useful. nine0003
Preview
Click the Slice into Layers button. After that, the slicer will calculate the trajectory of the head and generate a G-code.
Switch to the "Preview" tab, where you will see the built layers of the model.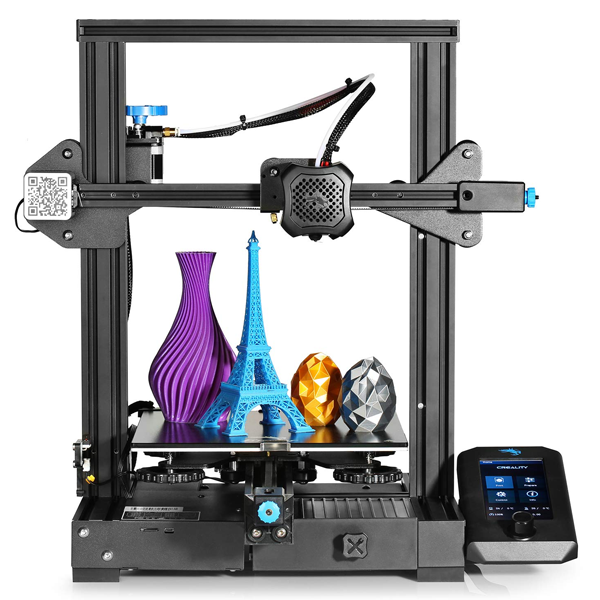 The preview helps you check your print settings and understand how your model will print.
G-code export
To write the finished file, it is easiest to connect a microSD memory card to the computer through the adapter supplied with the printer. The slicer will immediately detect the removable device and offer to save the file to it. Save the G-code to a memory card, or use the drop-down list to save to a file, and then manually copy to the card. nine0003
Table Calibration
The initial setup was already done when the printer was assembled, but over time the table may fail. If the model does not adhere well or, conversely, the first layer is too thin and the extruder starts to click, then the table must be recalibrated using the four corner screws.
Use the encoder on the screen to enter "Prepare".
Select "Auto home". The printer will set the nozzle to the zero position. nine0003
Then turn off the motors with the "Disable stepper" command.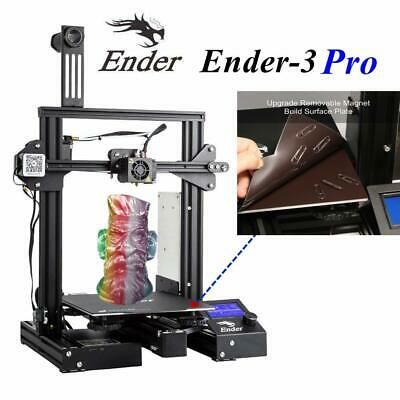
Place a sheet of paper between the nozzle and the table. Adjust the screw. The nozzle should scratch but not tear the sheet.
Move the print head and table by hand. Repeat this operation in each corner of the table to set the most even position in the horizontal plane.
Replacing the filament
Before the test print, we already loaded the filament spool, but sooner or later you will have to change it. For example, if you want to print in a different color or try a different type of plastic. To do this, you first need to remove the remnants of the old plastic. We will change the plastic to another one, or remove the remnants of the old one. nine0003
The filament melts in the nozzle during printing. If the nozzle is cold, then the plastic will fuse to the nozzle, and you won't be able to get it out. Heat the nozzle to the melting temperature of the plastic. To do this, go to the "Prepare" item.
Select "Preheat PLA". The nozzle will start to heat up.
Use the "Back" button to exit to the main menu.
Check that the nozzle has reached the correct temperature.
Use the indicator wheel to unscrew the plastic thread from the Teflon tube and extruder. nine0003
Cut off the end of the new plastic. In order for the plastic to get into the fitting and not get stuck in the extruder, it is more convenient to cut the end of the plastic at an angle. Printing will not start immediately. The printer first needs to heat the bed and nozzle to operating temperature.
Thread the end of the spool into the extruder and use the indicator wheel to push the plastic up to the nozzle.
Plastic should flow from the nozzle.
Printing from a memory card
Adhesion must be considered before printing. The glass has a special coating that improves the adhesion between the first layer of plastic and the table, but larger models may have curled edges.