3D printer height sensor
Auto Bed Leveling (ABL) Sensor Comparison – 3DMaker Engineering
One of the best upgrades you can add to a 3D printer to improve both performance and ease of use is an auto bed leveling sensor. Although they technically do not level the bed, they create a topological map of your bed and adjust the Z position of the nozzle to follow imperfections of your build surface for a more consistent first layer.
The first upgrade we do to all of our printers is solid mount the bed (remove the bed springs) and add an auto bed leveling sensor. This allows us to level the bed once and never have to worry about it again. When you have a print farm, the last thing you want to have to worry about is adjusting bed leveling knobs on a large number of printers.
Disclaimer: We currently sell a physical, hall effect type probe. We want to be upfront that we have not skewed our opinions based on this. The fact is, we tested each type of sensor extensively in our print farm and came to the conclusion that for our needs this was the most well-rounded option. Because of this, we decided to partner with a sensor manufacture to develop the 3DM Touch. We could have just as easily went with a capacitive or inductive style sensor which typically is much cheaper to manufacture.
If you Google “3D Printer Bed Leveling Sensors” you will find an endless number of manufacturers selling sensors of all shapes and sizes. To help simplify things we will break it down by sensor type instead of sensor brand. If you can understand the pros and cons of each of the technologies available it will help you determine the best one for your application.
Capacitive Sensor (ex. EZABL):
A non-contact sensor that can sense both metallic and non-metallic surfaces. This sensor works by monitoring the capacitance (how much energy the onboard capacitor can hold) which changes when an object is placed near its sensing face. It can detect any surface that has a die electric constant greater than air which should cover every build surface you will use (including glass). Another advantage of this sensor type is that it can probe extremely fast, saving you time during each print. Below is a basic diagram of how the sensor works.
One drawback is that while it can sense almost any surface, the distance at which it reads it will change depending on build surface type, temperature, and humidity. This is no problem if you only have one build surface and do not use an enclosure. If you plan to switch between different surfaces (ex. garolite, glass, PEI, polypropylene, etc.) like us, you will find yourself having to continually tweak your z-offset. Additionally, if you print in an enclosure where ambient temperatures vary, you will again need to adjust your z-offset.
Inductive Sensor (ex. P.I.N.D.A.):
This is another non-contact sensor, however, this type can only detect metallic surfaces. This means when the probe is analyzing a PEI spring sheet, it is actually mapping the spring steel and not the PEI surface you are printing on. This is usually not an issue, however, as the two surfaces should be relatively parallel with each other. If you are someone who likes to print on glass, garolite, or polypropylene—you may want to look for another option as these materials will not be detected. Although these sensors look very similar to a capacitive sensor, they work based on a completely different principle. They use the electrical principal called inductance. In a nutshell, an inductor coil in the sensor creates a magnetic field that changes when a metallic object is within its sensing distance. Non-metallic surfaces do not affect the magnetic field which is why the surface must be metallic.
Similar to the capacitive sensors, their readings are affected by temperature and humidity changes, so be prepared to make adjustments if you expect to see large temperature shifts. Some printer manufacturers, like Prusa, have done their best to use onboard sensors to automatically adjust for ambient temperature changes but in our experience it’s hit-and-miss. We have MK3S printers where we calibrated the z-offset at room temperature, put them in a heated enclosure, and found that the z-offset was then completely incorrect. If you are not printing in an enclosure, the temperature compensation seems to work fairly well for minor changes in room temperature, which is what we think it was really intended to do.
Physical-Hall Effect Sensor (ex. 3DM Touch+):
This is the only sensor on the list that actually makes contact with the bed as a means of detection. Because of this, it is unaffected by temperature and humidity changes like the other two contenders. It functions by using a plastic plunger (pin) and a hall effect sensor to detect your build plate. As soon as the plastic pin makes contact with the bed, it is retracted and registered by the hall effect sensor. Also, there is a built-in solenoid that allows you to extend and retract the probe via g-code which gives you plenty of clearance while printing. Below is a diagram of how a basic hall effect sensor works. Please note, the plastic plunger has a magnet embedded towards the top which is what the hall effect sensor is actually monitoring.
The main drawback of this sensor type is that it is slower compared to the other non-contact types. While there is only a few seconds difference per probe point, this can add up if you are doing a 7X7 (49 points) or greater grid pattern. The good news is that in Marlin 2.0 and newer, there is a feature called HSMode which allows you to probe nearly as fast as the others. The next issue is that it contains moving parts so, in theory, there is more that can break on the sensor. Luckily, the mechanism is extremely simple so there is almost no chance of it actually failing. The new plastic probe tips are also made to bend so if you accidentally crash it, you can simply bend the plunger back in place and get back to printing.
All testing was done with three brand new Prusa MK3S printers modified to accommodate the different sensor types.
Accuracy:
We wanted to test how well the three probes could continually reproduce a 0.24mm, single layer print without any other variables changing such as temperature or build surface types. We tested this by using micrometers to adjust the z-offsets until all three printers were printing a true 0.24mm thick first layer. Once dialed in, we printed the test print 5 more times and measured the thickness in several spots using the same micrometers. All of the probes were able to reproduce a 0.24mm thick first layer consistently without any deviation. If the inductive and capacitive probes are more accurate, they did not translate into any real-world results. Our conclusion: in a controlled environment all three options will provide accurate readings.
Winner: Tie (Inductive/Capacitive/Physical-Hall Effect)
Versatility:
Our expectations: set the z-offset once and continually get a perfect first layer, regardless of the build surface type or ambient temperature. When you have several printers, you don't want to have to think about tweaking z-offsets every time your printer setup changes. This saves both time and frustration which, in our opinion, is the most important function of a bed leveling probe.
On paper, the two non-contact sensors should be the most accurate. Their lack of moving parts and the sensing method give them a leg up (and was shown by Thomas Sanladerer on his YouTube comparison). However, when you throw in real-world variables such as different build surfaces and drastic temperature changes present in an enclosure, the Physical-Hall Effect type sensor comes out head and shoulders above the rest.
Similar to the previous accuracy test, we set our first layer height to 0.24mm and then printed an object that was only one layer thick. We then removed the print and measured it with micrometers and made adjustments until it was exactly 0.24mm. Once the z-offset was adjusted to produce a true 0.24mm first layer, we then heated the enclosure to 35°C and hit print without adjusting anything. The 3DM Touch was the only one that was able to reproduce the same 0.24mm first layer while the other two failed to have a successful first layer. We did this 4 more times and the results were the same each time. The non-contact sensors just weren’t able to give the same z-offset reading with the large change in temperature.
The next test was about switching between build surfaces. We did not test the inductive sensor as it can only sense metal and knew it wouldn’t be able to handle this task. For this test, we again adjusted the z-offsets on the two printers to produce a 0.24mm first layer using a spring steel build surface. After this, we then swapped out the spring steel build surface for a polypropylene plate. As expected, the 3DM Touch printed the same 0.24mm first layer while the capacitive (EZABL) sensor gave us a first layer height of 0.17mm which is an error of 30%. This is because even though the capacitive sensor can detect polypropylene, it detects it at a different distance than spring steel. If you plan on using different build surfaces, we recommend staying away from the inductive sensors as they will fail to detect everything except metal.
Winner: Physical-Hall Effect Sensor
Probing Speed:
Both non-contact sensors are considerably faster than the physical probe. They don’t have any moving parts so no time is required to cycle the probe up and down. As mentioned earlier, Marlin 2.0 has introduced HSMode for the 3DM Touch which has helped increase probing speed, however, even then it will still be ~10% slower to probe the same number of points. If probing speed is extremely critical in your application, an inductive or capacitive sensor might be the best choice for you.
Winner: Tie (Inductive/Capacitive)
Durability:
After testing each sensor type (multiple of each, over several months) none of them showed any signs of having issues with durability. Some argue that the 3DM Touch sensor has moving parts so it, in theory, could wear out. We are confident that your machine would need to be replaced long before the plunger mechanism wears out. The old BLTouch probes had metal tips that would get damaged if you crashed your machine but the newer ones all use “breakaway” plastic tips that deflect if crashed.
Winner: Tie (Inductive/Capacitive/Physical-Hall Effect)
Because the 3DM Touch is a lot more complex in its design, it tends to also be the most expensive. There are also very few manufacturers who produce them which is also a driving factor of cost. Quality capacitive and inductive sensors, on the other hand, can be found for less than $10. This is approximately a third of the cost of 3DM Touch-type probes. If you are on a tight budget and still want to add a bed leveling probe to your machine, both the capacitive and inductive sensors will be a great choice.
Winner: Tie (Inductive/Capacitive)
All three sensors seem to do a more than adequate job as long as you don’t plan on switching build surfaces or changing ambient temperatures drastically. Casual users who are on a tight budget will likely be extremely happy with either a conductive or inductive type sensor.
If you are a 3D printing “super-user” and have the extra budget, we would recommend the 3DM Touch as it requires the least amount of calibration in the long run. It handles everything from build surface changes to large temperature variation without ever needing to do any additional calibration.
Each user is going to have a different set of requirements for their printing needs. For us, the 3DM Touch made the most sense; for others, it may be a capacitive or inductive sensor. We hope that this article helps clear up any uncertainty about the various options available and will help you make an informed decision for your own needs. If you have any questions about areas we did not cover, please feel free to contact us and we will do our best to provide answers.
-3DMaker Engineering
Best Auto-Leveling Sensor for 3D Printing – Ender 3 & More – 3D Printerly
Getting the best auto-leveling sensor for your 3D printer is a valuable upgrade for better first layers, leading to more successful 3D prints. This article will go through some of the best auto-leveling sensors that you can get.
The best auto leveling sensor for 3D printing is between the BLTouch and the CR Touch. They can both be used on a variety of surfaces and have great accuracy for leveling. Some people have gotten better performance out of the BLTouch, while others think the CR Touch is superior due to its optical sensor.
You’ll want to know more about the best auto-leveling sensors, so keep reading on.
Best Bed Auto-Leveling Sensor for 3D Printers – Ender 3 & More
Antclabs BLTouch
The BLTouch (Amazon) is an automatic bed leveling sensor for 3D printers that help users achieve accurate 3D prints. It has become one of the most popular auto-leveling sensors for 3D printers and works excellently well with the Ender 3 and many similar 3D printers.
When attempting to produce a good print, a user encountered difficulties with his 3D printer. He expressed dissatisfaction with the manual leveling of the bed, which he claimed was time-consuming and inaccurate.
He chose the BLTouch sensor after a series of difficulties, and praised the product’s quality and recommended it as the first modification for anyone interested in 3D printing.
One user who has the Creality CR-10 said it was compatible and worked well to improve their printing quality and success rate of 3D prints. Putting together the auto-leveling sensor wasn’t too difficult for them, as long as you follow a good guide and have the right firmware compatibility.
It worked flawlessly after a simple installation and configuration.
Someone who used the BLTouch for the first time found that the BLTouch worked very well and was well worth the money to not need to constantly level the bed.
Many people experience issues with getting sensors to work such as a capacitive sensor. One user opted in to use the BLTouch sensor instead and said he got flawless first layers afterwards. Even when a bed is uneven or warped, it still works very well.
You want to avoid purchasing BLTouch clones because some users have noticed that they were incompatible with glass. They then went on to order the BLTouch and stated that nothing beats the real deal.
Some of the negative reviews of the BLTouch are from getting these untrustworthy cloned versions.
Pros of the BLTouch
- There is no need for an extension cable to connect the sensor to the main board.
- Installation is simple and it’s easy to use
- Light and relatively cheap
- BLTouch kit includes a mounting bracket and a 32-bit cable
- Works with a variety of materials
- Strong community support
Cons of the BLTouch
- Accuracy can be negatively affected if you have other devices that have an electromagnetic field
- Setup can be difficult if you don’t have the right firmware or a 32-bit board
- Has a plastic pin which can break if you have an issue
You can get yourself the Antclabs BLTouch from Amazon for a competitive price.
Creality CR Touch
The CR Touch, like the BLTouch, is a 3D printer automatic bed leveling sensor manufactured by one of the most well-known 3D printer manufacturers.
After having difficulty adjusting the first layer after a few prints, a user decided to purchase the CR Touch (Amazon) after reading positive reviews. He stated that the accuracy was excellent and that the update provided genuine satisfaction.
Most users find the instructions fairly simple to follow but it can get complex when it comes to changing firmware and things of that nature. As long as your 3D printer is compatible and has the capability to have an automatic leveling sensor, it shouldn’t be too difficult.
One user said he needed two attempts to install the correct firmware, but overall took them less than 30 minutes to complete on their Ender 5 Pro.
After reading positive reviews, a user decided to purchase a CR Touch. He had previously encountered a warped bed and tried flattening it with tissue paper and a magnet, which worked but required adjusting the first layer after a few prints.
The entire installation for the CR Touch took them about 45 minutes, including the firmware upgrade. The Sensor’s accuracy appears to be very high, and the results of multiple bed level tests were consistently positive.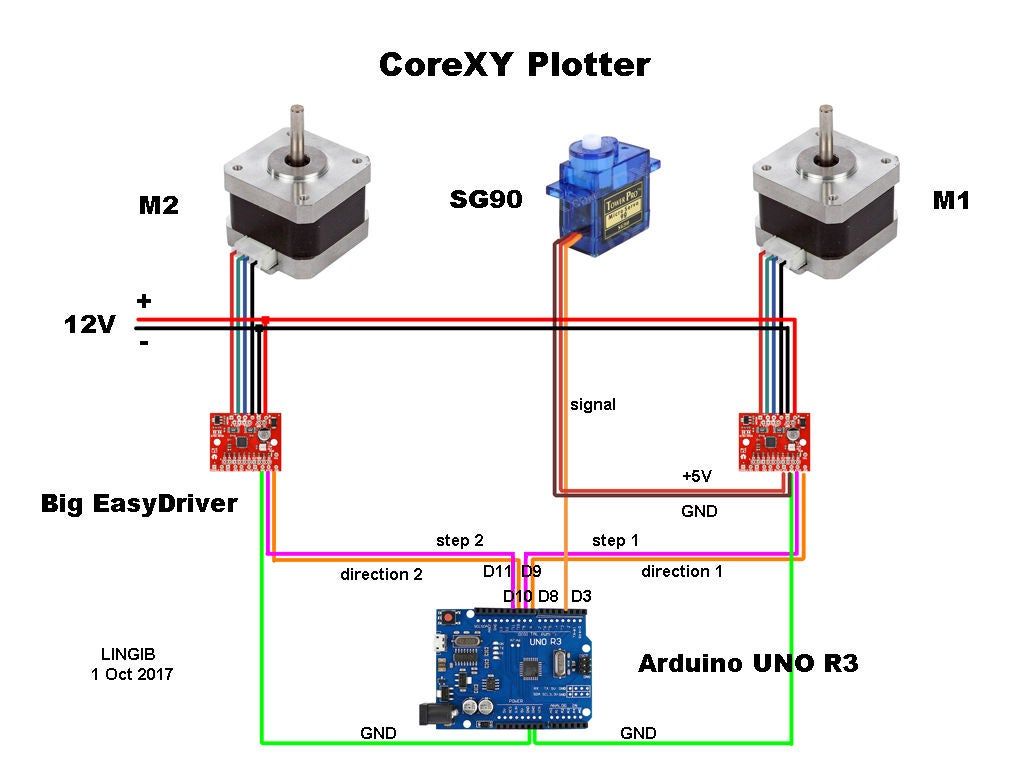
After revealing that the BLTouch is similar to the CR Touch, a user claimed that the CR Touch is super easy to install and has an easy firmware update via SD Card.
The difficult part for this user was opening the printer control box on the Ender Max, which was not designed to be easily accessible. Following a quick installation, the start G-Code should be updated to use the sensor.
Another user who is a beginner and 3D prints with an Ender 3 Pro said many good things about this sensor. They initially struggled at first with a few test prints, and stumbled across the automatic leveling sensors.
They chose the CR Touch over the BLTouch and found that it was very durable and has a fantastic metal probe feature. Installation and setup was simple.
The BLTouch has a plastic tip which can break off, so many people choose to go with the CR Touch instead.
Pros of the CR Touch
- Has a metal pin rather than a plastic pin, making it more durable
- Uses an optical sensor which has great accuracy
- When not in use, it retracts electromagnetically
Cons of the CR Touch
- Firmware is known to not be the best
- Heavier and larger than the BLTouch
- Can’t get a replacement probe, but the metal is harder to break
- Some users have complained about the sensor rattling
You can get yourself the CR Touch from Amazon for your auto-leveling needs.
How to Fix Ender 3 Auto Bed Leveling Not Working
When attempting to level your bed with the BLTouch Sensor or CR Touch sensor, you may encounter issues that result in a poor user experience. Understanding your printer, sensor, and other elements that contribute to practical usage is necessary.
The BLTouch and CR Touch auto-leveling sensors are excellent. However, users frequently encounter specific issues. This guide will provide some troubleshooting tips for the most common problems.
- Follow the instructions carefully
- Enable the appropriate firmware
- Avoid clones
- Observe your wiring system
- Test probe first
- Ensure compatibility with your 3D printer
Follow the Instructions Carefully
One of the biggest reasons why people have issues with automatic bed leveling on their Ender 3 or other 3D printer is because they didn’t follow the instructions carefully. Some users have mentioned that manufacturers don’t have the best instructions to follow.
I’d highly recommend finding a good YouTube video to follow because they are more thorough and simpler to follow along with. This video below by Teaching Tech on the BLTouch is a great one that many users have had success with.
Some 3D printers might not have the motherboard capable of using an auto leveling sensor such as an 8-bit board on an Ender 3 for example. You’ll need to upgrade your motherboard to a 32-bit one to be able to use the BLTouch or CR Touch.
Enable the Appropriate Firmware
You may have difficulty leveling your bed if the firmware is not updated. To avoid this problem, download the latest firmware and obtain relevant information to make the process less stressful. Additionally, firmware upgrades aid in getting the best performance from the probe.
Creality confirmed that if you do already have a BLTouch enabled firmware on a 32-bit board, that’s all you need to make the CR-Touch work, so you won’t need to do much on the firmware side of things.
Avoid Clones
Users typically have negative experiences with clones due to their inaccuracy. Purchasing the original sensor rather than the inferior quality is the best option to avoid spending more than required for repair and additional costs.
You can look on the side of the BLTouch for a code to verify if your sensor is a genuine one.
Some users have mentioned that a lot of these sensors are identical and just re-branded or licensed out by manufacturers. Cloned BLTouch’s aren’t going to have the same level of quality control that the genuine ones have though, so you do have an increased risk with the quality of it.
Websites like AliExpress sell clones which people have had much success with, so it’s really up to your personal preference and risk tolerance.
Observe Your Wiring System
One of the many issues that prevent auto bed leveling from working is a faulty wiring system. Examine your wiring system thoroughly to ensure that all cables are connected to the correct socket.
Test the Probe First
Before mounting the probe on the printer. Running a series of tests helps you confirm its performance rather than having a disappointing operation experience.
Check out this video comparing both the BLTouch and CR Touch sensors for accuracy using the M48 G-Code command.
BLTouch Vs CR Touch
Functionally speaking, the BLTouch CR Touch are identical but there are some differences in the design and durability. The CR Touch does have better durability because it has a metal pin instead of a plastic pin.
This can be a benefit and a negative because if you have an issue with the pin crashing into something, the steel pin could break something, while the plastic one would warp or break off.
They both operate using a different type of sensor, the CR Touch said to be more accurate, more durable, and less affected by heat and vibrations. They can both work on any 3D printer since the operation is similar to a BL Touch.
The issue with the CR Touch mainly seems to be with their firmware not being up to standard. Many people recommend to upgrade to the Jyers firmware because it has many improvements over other firmware, one of which is easier leveling.
Many people have done tests comparing the two but results do seem to be mixed.
This video below has the BLTouch performing better, but others have the CR Touch outperforming the BLTouch. It could be due to cloned or defective units.
SuperPinda Vs BLTouch
The SuperPinda is an auto-leveling sensor that makes 3D printing bed leveling simple and consistent. The SuperPinda has a high-quality sensor designed for Prusa 3D printers. It has a unique calibration area on the bed to help with leveling.
The BLTouch is a touch-based 3D printer bed leveling probe that enables automatic bed leveling regardless of your 3D printer’s print surface.
The BLTouch is a contact-activated automatic bed leveling sensor that uses a flexible probe to measure the gap between the build plate and the nozzle. The BLTouch sensor works with various surfaces, including glass and blue tape.
The SuperPinda is ideal for detecting changes in the magnetic characteristics of materials, whilst the BLTouch is suitable for many surfaces and operates effectively without recalibration. The SuperPinda responds to change based on the properties of the materials placed in front of it.
It’s hard to compare the SuperPinda with BLTouch. They are incredibly efficient in their operations and have received more good feedback. However, there are some little differences between the two sensors to consider.
- The BLTouch is powered by a physical (Hill Effect) technological system, whereas the inductive system power the SuperPinda.
- SuperPinda has excellent metal compatibility, whereas the BLTouch is compatible with all materials, including glass, metal, and plastic.
- SuperPinda is less expensive than the BLTouch
- SuperPinda is ideal for Prusa printers, while the BLTouch works efficiently for most other 3D printers
everything you need to know
3DPrintStory Reviews BLTouch sensor for 3D printer: everything you need to know
Automatic table calibration is a fairly common feature in desktop FDM 3D printers. However, most 3D printers with automatic table calibration use a non-contact inductive sensor, which is easy to install, operate and configure. These inductive sensors work well with metal 3D printer tables, but tables made from other common materials such as glass are virtually invisible to inductive sensors.
Perhaps it is because of this lack of inductive sensors that many people hear about BLTouch sensors: if you need to use a non-metallic 3D printer slot base but need automatic calibration, these sensors are a great option. Another plus of these sensors is its high accuracy. BLTouch raw readings have one of the lowest standard deviations of any sensor type for automating 3D printer bed calibration.
In this article we will look at the BLTouch sensor, its advantages and how to use it for a 3D printer (by the way, there are many clones of BLTouch sensors, but the original design belongs to Antclabs from South Korea).
What is a BLTouch sensor?
According to Antclabs, the original manufacturer of the sensor, "BLTouch is an automatic table calibration sensor for 3D printers that can accurately measure the angle of the table surface. " This sensor works on any type of surface, be it metal, glass, wood and others.
The 3D printer table tilt level sensor itself has a rather complex design. It consists of a microcontroller, a solenoid switch and a handpiece that is in direct contact with the table. The original BLTouch uses a Hall sensor for high accuracy, and this sensor, combined with the physical handpiece, allows it to be used with many types of tables.
In a sense, this sensor is equivalent to a microswitch mounted on a servo. When the tool head is lowered to "return" the nozzle in the Z-axis, the table pushes the tip slightly up, the Hall sensor is activated, and then the tool head rises.
TheBLTouch is one of the most accurate and reliable sensors available, so it's no wonder some manufacturers like MakerGear and CraftBot use this device on their high end 3D printers.
Now that we know exactly what we're dealing with, let's compare the BLTouch with the other two types of sensors.
Different types of sensors for automatic 3D printer table calibration
Inductive sensor
The key difference between inductive sensor and BLTouch is that the BLTouch sensor physically touches the table during the calibration process. The inductive sensor uses currents induced by magnetic fields to detect nearby metal objects, so there is no direct physical contact with the table.
But therein lies the problem: induction sensors only work with metal tables, as they only work when they come into contact with metal. So if you are using glass, then this type of sensor will not work for you.
Microswitch (mechanical limit switch)
Don't discount the old-fashioned physical microswitch either. Compared to the BLTouch, this sensor is less accurate and possibly less reliable in the long run because the measurement is dependent on physical parts that can wear out over time.
However, these mechanical switches outperform other options when it comes to cost and ease of setup. Since mechanical switches are very simple to implement, easy to set up and cheap, they have found quite a wide application.
Alternatives
Pinda Probe
Pina Probe is a sensor developed by Prusa Research which is an induction sensor with a thermistor to account for changes in bed temperature. The Pinda probe is specially designed for the Prusa line of 3D printers, which have special dot-mounted calibration markers on the table that help with alignment and skew correction.
This is said to be a very accurate sensor for 3D printers, and although there aren't many numbers on the internet, the reviews seem to be positive. So it is worth considering that this is a good option if your 3D printer has a metal table.
Ezabl Pro
Ezabl Pro is a capacitive sensor manufactured. It comes with a connection board that uses an optical isolator to prevent high voltage damage to the motherboard in case of connection errors.
In terms of accuracy, it can measure to one thousandth of a millimeter, which is what 3D printers need.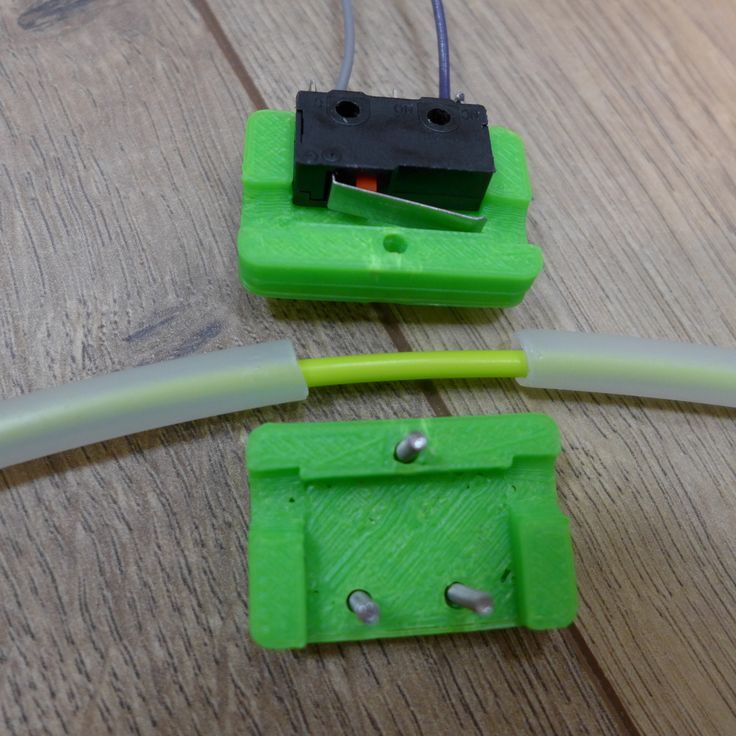 Ezabl Pro also has useful features such as double shielding that prevents any interference from other signals.
The main disadvantage of Ezabl Pro is the cost, which is about 65 dollars. But this sensor can work with glass tables.
Piezo Sensors
Piezo Sensor uses the piezoelectric effect to detect changes in force, pressure or strain and convert those changes into an electrical impulse. Precision Piezo is one of the few companies in the UK that makes piezo sensors for 3D printers. They have an accuracy close to 7 microns, which is pretty accurate for a 3D printer.
The advantage of the piezoelectric sensor is that a nozzle can be used as a sensing element without the need for additional components. In addition, a piezoelectric sensor can be placed on the print head or under the pressure platform. As for the price, it is in the same range as BLTouch.
BLTouch Sensor Setup Basics
Before you start modifying your 3D printer for BLTouch, you need to work through the following points.
Mounting the sensor
The BLTouch sensor must be installed as close to the printhead as possible. You can find many designs available for download on the internet. If you would like to design the mounting structure yourself, be sure to read the BLTouch documentation to take into account the overall dimensions of the sensor.
Some users have experienced a problem where the nozzle hits the table on one side and prints perfectly on the other. The reason for this is that the BLTouch is mounted at an angle to the nozzle. Therefore, when designing and installing equipment, make sure that the BLTouch is mounted perfectly at right angles and aligned with the nozzle.
After installing the sensor, be sure to record the distance between the BLTouch sensor and the nozzle center in both the X and Y directions.
3D Printer Firmware Configuration
To run BLTouch, you will need to change the 3D printer firmware in several places.
We used Marlin firmware version 1. 1.9 which was updated in March 2020. Enter the marlin.ino file and go to the configuration.h tab.
The first step is to activate the BLTouch sensor by declaring it. Remove the two slashes to uncomment the define statement:
#define BLTOUCH
The next step is to set the BLTouch offset using the X and Y distances you should have measured when you installed the sensor. Z-shifting may seem like a more complicated procedure, as the BLTouch probe protrudes below the nozzle for direct measurements. You will need to find the distance between the sensor and the end of the nozzle when the sensor is fully extended.
Also, since the probe goes below the nozzle, the offset must be negative. We recommend setting it to around -2.5 for safe first runs and then adjusting. You need to change the values of the following lines to match your numbers:
#define X_PROBE_OFFSET_FROM_EXTRUDER 30 // X offset: -left + right [nozzles] #define Y_PROBE_OFFSET_FROM_EXTRUDER 20 // Y offset: -front + back #define Z_PROBE_OFFSET_FROM_EXTRUDER -2.5 // Offset Z: -below + above
After you're done with the offset, you'll need to choose a table alignment type. You can choose from five different compensation methods, below we will give an example using the bilinear method as it is easy to get started with.
To select the appropriate option, uncomment it by removing the slash. Please note that only one option can be left without comment. Your code should look something like this:
//#define AUTO_BED_LEVELING_3POINT //#define AUTO_BED_LEVELING_LINEAR #define AUTO_BED_LEVELING_BILINEAR //#define AUTO_BED_LEVELING_UBL //#define MESH_BED_LEVELING
You can also set the number of mesh points that you will base your calibration on. Default is 9points that form a 3-by-3 grid along the x and y axes. The number of points can be increased for more accurate results, but keep in mind that the probing time will also increase proportionally.
#if ENABLED (AUTO_BED_LEVELING_LINEAR) || ENABLED (AUTO_BED_LEVELING_BILINEAR)
// Set the number of grid points per size.
#define GRID_MAX_POINTS_X 3 #define GRID_MAX_POINTS_Y GRID_MAX_POINTS_X
Testing
After setting up the firmware, you will need to check if the BLTouch is working properly by doing a basic test. Once it's complete, you can start adjusting the Z offset. There's a great video from 3DMakerNoob that walks you through the process step by step.
Slicer setup
Be sure to add the G29 command to your Gcode right after the G28 command.
Troubleshooting
Troubleshooting
The creators of the original BlTouch at Antclabs mentioned that the original sensors come with a QR code built into the circuit board on the back. Other Chinese manufacturers, called TL Touch and 3D Touch, are also known to produce lower quality products, resulting in poorer quality. When buying online, be sure to purchase from one of the authorized resellers that are listed on the Antclabs website.
Known Issues with BLTouch Sensor
The latest version of BLTouch V3 had issues with Creality printers where it did not work properly. The Marlin firmware developers worked closely with Antclabs and determined that certain changes needed to be made to the firmware.
An excellent tutorial video on how to fix this problem was made by Teaching Tech. After making changes, many users finally solved the problem.
Disadvantages of BLTouch
Although the BLTouch is an extremely accurate level sensor, it also has several disadvantages.
When using the BLTouch, it is important that there is no debris on the surface of the bed. A mechanical sensor detects the surface of the table and any damage or debris on the surface will result in inaccurate readings.
The BLTouch is also known to suffer from interference from currents in the hot end heater wires. This interference causes incorrect BLTouch readings. The Marlin firmware has a special line of code that will help you turn off the heaters while the sensor is triggered. To activate it, find and uncomment the following:
#define PROBING_HEATERS_OFF
Devices for auto-calibration of the 3d printer table
The print quality of 3D printers using FDM technology, the most common and affordable today, depends on many factors (printing material, heating table operating modes, extruder, temperature inside the printer, etc.
In addition to the above factors, printing is of great importance the first layer formed on the printing table.After all, both the adhesion of the plastic to the printed one and the quality of the final model as a whole depend on how well it is printed.In this regard, auto-calibration of the printing table is of great importance.0005
In essence, its essence lies in the fact that the 3D printer, using a special device (probe, probe, or other device), checks the flatness of the printing table when touched at several points (set programmatically in the firmware) and then builds “its own horizontal” plane. It is clear that this plane may not coincide with the real horizontal plane at all. It's just that a 3d printer builds its own new system of Cartesian coordinates, introducing the necessary “delta” into the movement algorithm
The following video most clearly shows how this happens, the video in English is visually clear.
There are several basic mechanisms for determining the "horizontality" of the 3D printer's printed plane:
There are circuits using conventional contact sensors (as in the video above), there are circuits in which users themselves make a system with a contact probe (probe). The principle is based on the closure of the electrical contact in the probe when the extruder nozzle approaches the surface of the printing table.
This type of structure has a disadvantage. Firstly, it is necessary to somehow organize the rise of the probe after calibration, and secondly, contact-type sensors tend to “loose” somewhat after a certain number of operation cycles. Well, it is necessary to calibrate the level of operation of the sensor and the level of the nozzle.
For a home 3D printer, it's quite a tolerable option. On many sites you can download ready-made versions of models in the .stl format of these very probes, for example, here: http://www.thingiverse.com/thing:1113971. 2. Pressure sensors
The principle of operation of this option is as follows: several pressure sensors (thin film FSR sensors) are placed under the surface of the 3D printer printing table, such as these:
As soon as the extruder nozzle nose touches the surface of the 3D printer printing table, it produces pressure, which detects the pressure sensor and generates a signal.
Thus, the extruder nozzle is the probe itself in the extruder nose - pressure sensor system. The following video shows the process in detail:
3. Piezo transmitter.
In this version of the auto-calibration of the 3D printer table, the piezoelectric effect is used - the effect of the appearance of a potential difference on the surface of dielectrics during mechanical action on them.
This effect can be both direct and reverse. The essence of the method used here is as follows: when the extruder nozzle touches the surface of the table, sound is generated (impact), then acoustic vibrations form mechanical vibrations, thereby forming a signal in the piezoceramic emitter, which is ultimately converted into the result of a collision between the table and the extruder. And then, according to the general scheme, a set of points is formed, according to which the “horizon” of the print plane is built.
This type of auto-calibration was implemented as shown in the video below:
4. Using the proximity sensor
Honestly, the idea has not been tested, the idea is not mine, but a friend's, but there are some prerequisites for its implementation.
So let's start with theory. The proximity sensor is used in many devices, including mobile devices, tablets, smartphones, etc. Its main task is to reduce the power consumption of a mobile device and increase the life of a single charge.
These devices most often use capacitive proximity sensors.
Most commonly used capacitive proximity sensors. The principle of operation of such sensors is as follows.
Sensor with switching system located under a special protective layer. Two conductive elements that are in close proximity to each other have some capacitance. This capacitance (in pF) occurs between the conductive ground layer and the pad of the sensor itself.
When an object begins to approach the sensor, the total capacitance of the system changes.