3D printer filament joiner
How to Join or Fuse Filament Together
In this article we’ll cover why you may want to fuse filaments together, why you perhaps shouldn’t do it – and we’ll cover our top 3 methods if you really still want to do it anyway.
How many times have you finished a 3D print, and the leftover filament on the spool isn’t quite enough to complete your next print. Or worse, have you ever finished a roll mid-print (the print then stops) and you’ve wasted all that filament and have to start again.
It’s possible to join PLA filament, or join ABS filament together. You can actually use the following methods to splice nearly any 3D printer filament together.
We’re going to cover how to build your own rudimentary 3D printer filament joiner. It’s much easier than you might think.
Why You Would Want To Fuse Filament Together
While we don’t fully recommend fusing 3D printer filament together (if done poorly it can easily cause jams and inconsistencies in your prints), sometimes it is necessary for one of the two reasons:
1. You’re printing something big, that’s larger than the commonly available 1kg spools, and thus you may need to join the ends of two or more spools together to make a seamless transition for a really big print.
Although we might suggest printing in smaller sections and gluing together once finished – as fusing could cause a jam, and who wants to risk that on a large print? You can also buy larger 3kg spools.
2. Or you may just have quite a few samples of various colors and want to create a rainbow effect on your prints – which is a far more fun reason. At least you can experiment this way, to get a feel for how your extruder responds to fusing before risking a larger print.The (unfortunately now unavailable) Artisea 3D Filament Splicer shows some great ideas.
Despite the risks involved, there are some techniques you can use to get an acceptably accurate join, that’s less likely to ruin your print. Here we’ll cover our 3 favorite methods, and afterward, let’s see if you can create something fun (or useful) from your leftover filaments!
Following this guide by no means guarantees you can print flawlessly with joined filament, but will significantly increase your chances of having a trouble-free print.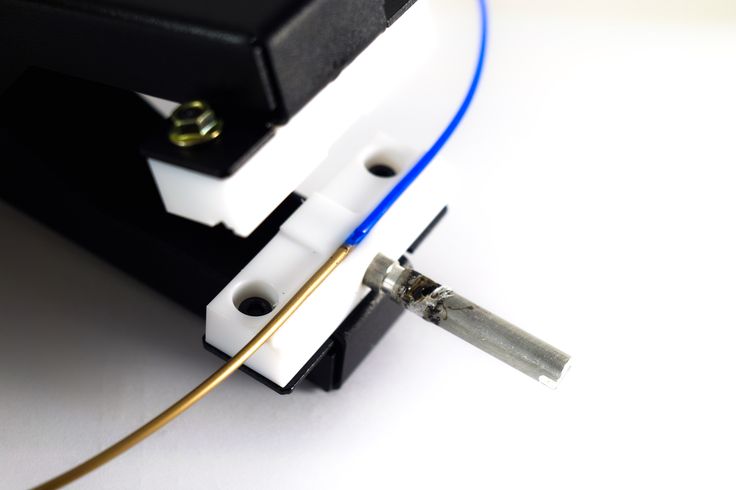
As each of these methods are ‘hacks’ – it’s likely you’ll get increasingly nicer results with practice!
Things to remember before trying to fuse filament
Regardless of your reasons for learning how to fuse pieces of filament together, there are the things you need to note beforehand:
- Never attempt to fuse different materials together, even if they have similar melting points. This could end in disaster for many reasons.
- Never attempt to fuse different brands of filament together. Two different brands of PLA may look like it’s doable, but as above – the melting points and makeup of the two brands can differ. Again this could cause jams in your extruder, or the join lengths of filament breaking apart and clogging your extruding motor.
- Regardless of what anyone says – don’t heat your filament for fusing with an open flame. You won’t know what temperature you’re using, and you could either not get a good enough bond, or you could even burn or boil the filament.
 For best results, you’re going to want to use an adjustable temperature soldering iron or another accurate heat source.
 - Make sure you cut each end of the filament cleanly before joining. This isn’t completely necessary, but it will make the join easier and stronger.
The ultra-simple 3D printer filament Splicer
Here’s the simplest method by Xabbax on the Reprap forums. If you’re looking for a quick answer to how to fuse PLA filament, this could be it. It’s probably the simplest 3D printer filament joiner.
- Roll tin foil closely around the filament to form a tight-fitting metal tube. Here a triangle piece is used so that it can better stand the heat in the middle.
- Push each end into the foil tube, and heat with a temperature-controlled heating element or adjustable soldering iron to around 180°C for PLA or 250°C for ABS. These are guide temperatures only, the filament you have could differ greatly.
- Once hot enough, while still gently pushing together you should feel the filament melt and fuse together.
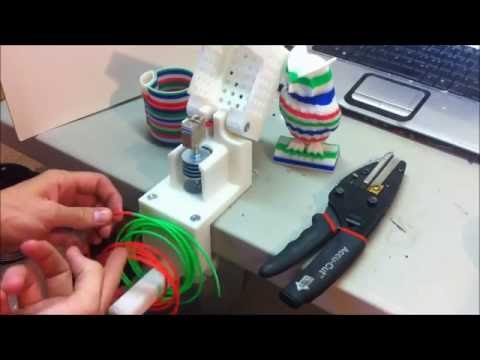 Once done, leave to cool for a few minutes and remove from the foil tube. There you have it – a simple filament fuser!
Something a little more reliable:
If you’re finding that a bit fiddly, this method might be a bit easier to manage.
You’ll have to print the splicer tool itself, but it will give you better guidance if you’re not able to wrap foil around the filament (if the filament has a tight coil for example).
Note: With this example it’s likely you’ll need to shave off the bulge created from the join afterwards.
You can check out this handy, very quick-to-make tool here on Thingiverse.
And for best results filament fusing results:
The last tool to splice your filaments together takes a little more preparation, but should yield the most reliable results. It’s produced by RichRap – you can see the details for his tool here.
It uses an aluminum block that’s drilled out to form a clamp to seal around the ends of the filament. The block is then heated up as above, with a temperature-controlled heat source.
Richard seems to have gotten the best results from this. It’s well worth a read.
Regardless of what you plan on making, I hope this article lets you create what you want to.
Whether you’re working on a large print, you want to make a specially colored print, or maybe you just want to join a load of filament samples together to create something unusual – please comment below with your thoughts and hopefully some pictures of what you create!
Related articles:
- How to use cleaning filament
- What you can use empty filament spools for
- Filament calculator: how many meters of filament on a spool
- How to untangle filament
3D Filament Splicer | Artesea GmbH
Home » Fruits of labor » Technology
Project cancelled, click here to read why
3D Printing is in some ways similar to personal computers of early 80es: It is revolutionary, exciting, fun and monochrome.
Our mission is to bring colors to open source 3D printing scene. Our first product on this journey is 3D Filament Splicer.
Printing in multiple colors
If you own filament based 3D Printer you can print in multiple colors, all what you need to do is join differently colored filament pieces in one string. The process is not exactly rocket science:
- Cut pieces of differently colored filament
- Heat up the ends of filament pieces
- Join them together
- Feed multi-colored filament into your printer
This can be done by hand with help of heat source such as print head of your 3D Printer or soldering iron.
Why Filament Splicer
Joining filament by hand without assistance of specialized tool is quite cumbersome process, it often produces deformed and fragile joins which can get stuck in extruder / bowden tube or snap during high stress situations such as retraction or passage through extruder drive mechanism.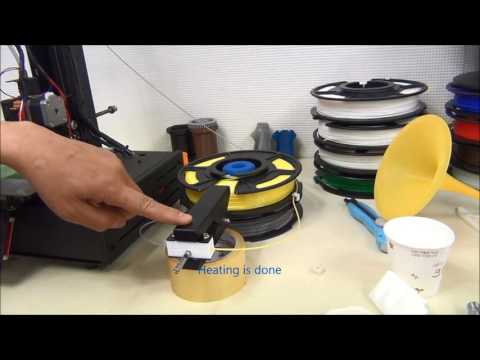 The later is especially true with high quality, tightly coiled filaments such as low opacity PLA from Ultimaker.
Filament Splicer considerably speeds up and eases the process of joining filament.
1. Filament joined by hand, join requires post processing and is likely to be fragile.
2. Filament joined by Filament Splicer, no post processing required, solid join.
Features
- Small and ergonomic footprint
- Quickly setup and pleasure to use
- Suitable for 1.75mm and 3mm filaments
- High temperature range up to 235c, suitable for PLA and ABS Filament
- Heater block made of pure copper with brass knife for cutting off excess filament
- Cooling block made of pure copper to quickly cool down and form joined filament
- Heat insulation PFTE parts are made of European PFTE with all appropriate certifications
- Copper parts are precisely CNC milled by our local partner company in Switzerland
- Works with 110v and 220v voltage
Splicer
Heater and Cooler
Usage
For small pieces of filament which can be rotated in fingers
- Hold filament pieces in both hands
- Touch heating block with filament ends for 1 second
- Join pieces in the appropriate groove on heater block
- Rotate filament ~360 degrees to remove excess plastic
- Move pieces into groove on cooling block
- Keep rotating in cooling block to ensure proper diameter
- One join takes less then 20 seconds to complete
For long pieces of filament which can not be rotated
- Hold filament pieces in both hands
- Touch heating block with filament ends for 1 second
- Join pieces in the groove on heater block
- Move pieces into groove on cooling block
- Push filament into cooling groove, so that excess plastic forms a bulge above the joint, wait for 3-5 seconds
- Remove cooled filament and use hot knife on heater block to quickly cut off excess plastic
- One join takes about 15 seconds to complete
Availability
Filament splicer can be pre-ordered from us, it is available as a DIY kit or fully assembled unit.
Pre-order Filament Splicer
Assembled
Kit
Tags:
products
technology
3d
filament
3D printer prints multi-colored filament from different materials
Engineers have introduced a new technique for printing colored plastic objects on a simple 3D printer with a single nozzle without the use of additional tools. To do this, it is necessary to print a thread consisting of colored segments in the right places in several steps, and then you can use this filament for conventional printing by layer-by-layer deposition. In addition to color, the method also allows you to create a thread from different materials. Article published at ACM Digital Library .
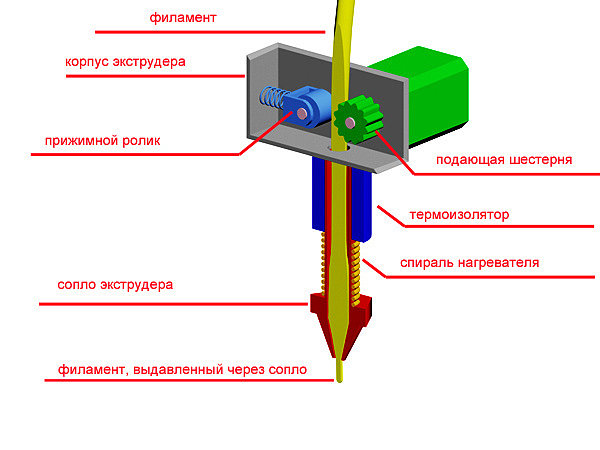
The most common and affordable 3D printing method is Fused Deposition Modeling (FDM). FDM printers have one (sometimes more) extruder that supplies filament to the substrate, and to print multi-colored objects, you either need to change the filament spool manually, stopping the printing process, or print on a printer with several extruders, or use additional devices to thread several threads at once.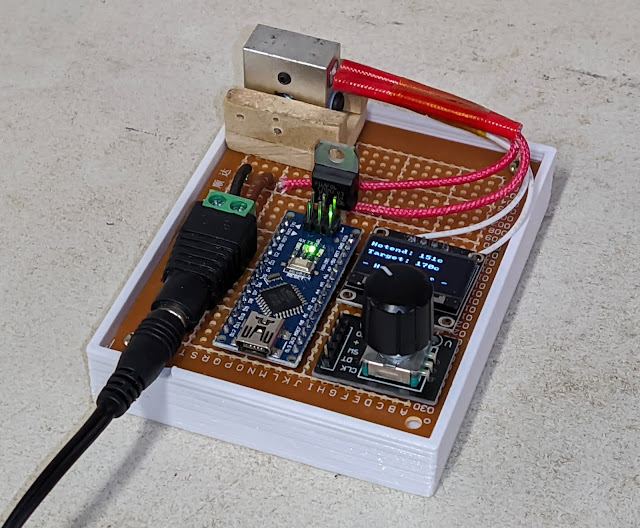 Printing with two extruders increases the chance of shearing, welding and other defects, and these defects are also difficult to avoid when manually changing the filament. In addition, manual replacement may be required several times during the printing process, which can greatly increase the time spent and increase the likelihood of printing defects. Accessories, on the other hand, need to be bought separately, and they often require certain skills and training, complicate and increase the cost of printing. There are also multi-color threads and materials that can change their color and properties, but these are not universal solutions that are usually not available to the average user. nine0007 Haruki Takahashi of Meiji University and colleagues have come up with a low-cost method for printing filaments of different colors and even materials on a printer with only one extruder. The method involves the creation of a programmable thread for each individual project using a 3D printer, which is then fed into the 3D printer as a regular filament.
 The length and number of required segments is generated in G-code format from a 3D model or 2D image using printer software. nine0005
A program developed by scientists uses this G-code to design a future filament and offers optimal printing options. The printer sequentially prints the filament in the form of a spiral, starting from the edge towards the center. First, all segments of one color are printed, and only then another, which significantly reduces the number of manual filament changes. The ends of the segments are cut diagonally during the printing process to increase the contact area between the segments, and are additionally fused with stitches - additional layers of filament. Fusing the stitch and simultaneously passing a hot nozzle at the point of contact increases the strength of the connection. nine0005
The scientists tested their technique on four different printers using filaments of different colors and different materials: polylactide, thermoplastic polyurethane, acrylonitrile butadiene styrene, polyvinyl acetate, nylon.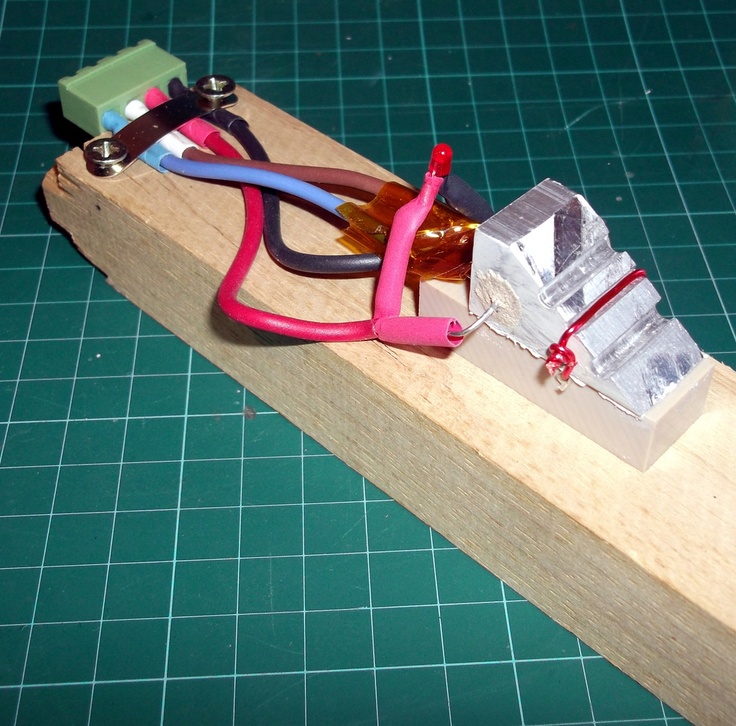 One of the samples printed with the programmable filament consisted of five colors, which is difficult to achieve using even multi-extrusion machines. In addition, the engineers printed a mock-up of a watch that combines a solid base and a flexible strap, proving the possibility of using dissimilar materials in their technique. nine0005
The researchers plan to refine their method in further studies and study the mechanical behavior of composite structures in more detail, as well as increase the strength of connections between heterogeneous materials. Already at this stage, the filament stitching technique provides good joint strength, reduces the cost and simplifies the printing process.
Recently, we wrote about another way to simplify the post-processing of 3D printed materials - this is the addition of a catalyst to the plastic to facilitate subsequent metallization. nine0005
Roman Kolesov
Found a typo? Select the fragment and press Ctrl+Enter.
How to connect a filament thread end to end?
extruder filament extrusion
Can two pieces of 1. 75 mm filament be joined end to end without changing the width? I'm asking this question because I'm interested in creating a multi-filament feeder for a single extruder, and I'm curious about how the filament changes while the 3D printer's extruder is running continuously. My current best guess for the optimal solution is for someone to "cut off" one end of the thread and "melt" it to the end of the other thread. nine0005
@J. Roibal - BlockchainEng, 👍8
5 answers
▲ 5
You would have to make sure that the connecting part of the two strands does not "bloom" and increase in diameter, which would happen if they were not limited during melting and joining time. Alignment is also critical, otherwise you will have a different diameter from one color to another at the connection point.
There is an item on Ebay that is precision drilled and has precision machined mating surfaces to ensure thread alignment.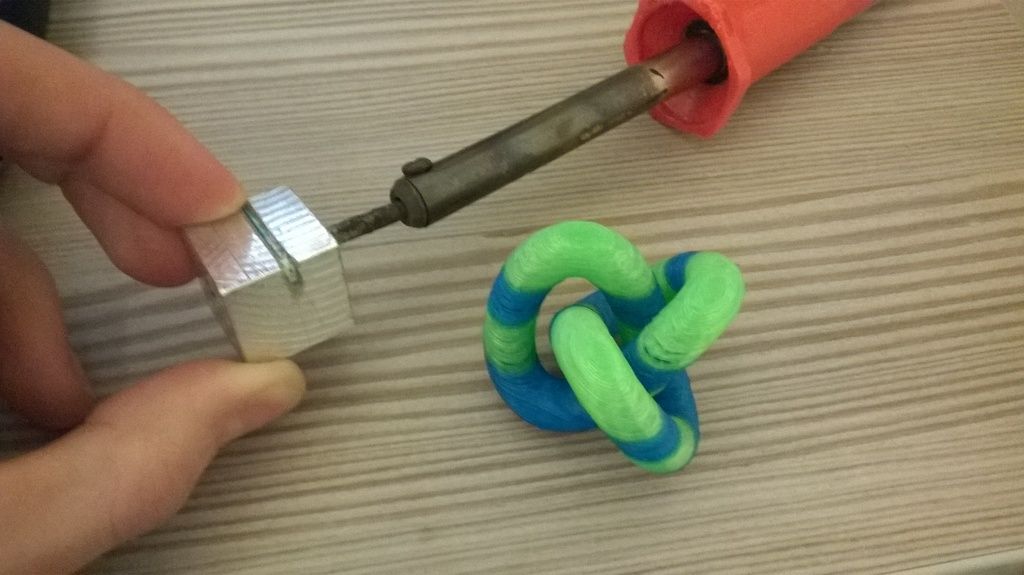 The filament is pulled through the two components, heated (in the case of the video by a match) and the two metal pieces are slammed together. Connecting the metal pieces also cuts off the excess bulge of the melted filament, providing the correct diameter. nine0005
In the case of the above product, the connectors must be threaded before the joining process, and then must be threaded, pushing them along the entire length of the thread.
It would be fine if someone joins only short lengths. Think how fun it is not to slide those two pieces over a whole spool of filament.
A detachable device that would allow the latch to be removed or otherwise opened to release the filament would require much more sophisticated machining to achieve the required accuracy, which is probably why we don't see such a product. nine0005
, @ fred_dot_u
▲ 3
There is a device that can do what fred_dot_u describes in his explanatory good answer: easywelder made by I3D Inno.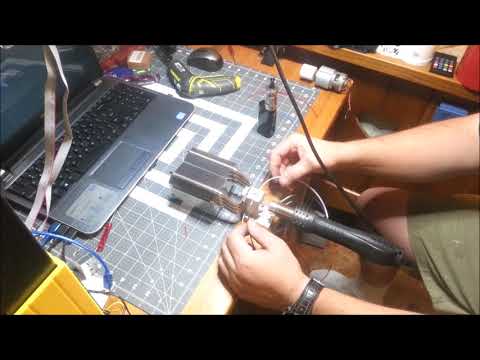
He fixes the filament in a separate part so that the edges meet perpendicularly, and then electrically heats the connection with a device that at first glance reminds me of a hair straightener.
I'm not sure about the quality of the joint this machine produces, but I'm skeptical if it's good enough for high precision 3D printing. Especially if you take into account the history of the device (he wanted to create his own O-ring from Ninjaflex), which the inventor briefly describes in this briefing: http://www.instructables.com/id/Welding-tool-for-plastic-filaments
, @ kamuro
▲ 0
I haven't tried this, but this is what I was thinking. The easiest way to try this that I could think of was to try and cut the ends evenly and then with a soldering iron or just a printer's nib to melt the ends and then quickly press them together and then sand the filament to try clear the connection.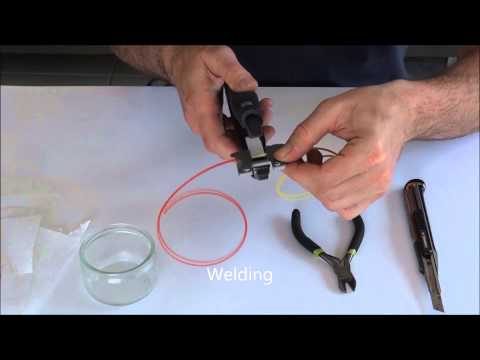
I think it would be better than trying to get the perfect width if your printer did infill when it hits the joint so over or under extrusion wouldn't make that much of a difference, or if the printer moved to the print side and is squeezed out in rarefied air, passing by the connection. I did this when changing filaments during printing by stopping the printer and changing the filament. nine0005
, @ user802599
▲ 1
Here's a neat method I came up with: - cut both ends diagonally - insert them into a piece of heat shrink tubing, making sure the diagonal cuts overlap - protect everything except the overlap with kapton tape - heat the ceiling with a heat gun. - you will need to monitor and experiment with the temperature. too much heat will warp and bubble the filament, too little heat will result in a bad connection - use a multimeter with a temperature probe.