3D printer for beginners reddit
gettingstarted - 3dprinting
- Getting Started
- Why 3D Printing?
- Getting started with 3D Printing
- Where to get a model printed
- What printer to get
- Where to find models
- Material Choices
- Slicers
- Printing and Troubleshooting
- Post Processing
- How to make models
- Further Info
| If you're new around here, welcome! We thought we'd put a few links together to springboard your foray into the fabulous (and sometimes frustrating!) world of 3D printing. :) |
|---|
| If you are contributing to this wiki please keep this page incredibly concise and extremely high level, keep further detail for the Detailed Info pages. |
Why 3D Printing?
3D printing (a.k.a Additive Manufacturing) is now pretty well established in industry as a prototyping tool, and is becoming more common as a process for creating finished custom or low-run parts.
In the home, printers can be a marvelous tool for solving practical household problems for example by repairing items, or creating new items that are fully customised for their position or use case. They also can be used for fun, and are popular for making tabletop gaming minis, and toys.
For inspiration browse the top posts of this subreddit.
Getting started with 3D Printing
The various types of 3D printing technologies all create real-world three-dimensional objects from digital models via the addition of material. These processes are able to produce novel structures that other manufacturing techniques cannot. Usually the 3D printing process looks like this:
Get a digital 3D model (by downloading or making one)
Slice it (use a program to generate instructions for the printer)
Print it (and troubleshoot it)
Post-process it (remove support material, clean up areas, paint etc)
Where to get a model printed
If you don't want to buy a printer (and you just want to have something printed), you can engage the help of a 3D printing service. Some popular choices include:
For a full list of service-providers (including design and model hosting services), please see the Services page.
What printer to get
If you're totally new to printing, the best place to ask for help when deciding what printer is right for you is our stickied monthly Purchase Advice Megathread.
Generally personal printers come in two main categories;
FDM (FFM) printers are best suited to larger objects and functional parts and work a bit like a like a hot glue gun that moves around, extruding plastic filament and building up an object layer by layer.
DLP (Layer Masking) printers are best suited to extremely detailed prints, and use light to cure resin in layers, masking it with an LCD screen.
There are, however, many other types of 3D printing technologies, which are explained here.
Where to find models
If you don't want to make your own models to print, there are many sites that host models for download. The more popular ones are:
Printables: upcoming and community-focused, feature-rich
Thingiverse: biggest model host, often buggy
Thangs: free models, which can be searched by geometry
My Mini Factory: free and paid models, guaranteed to print
GrabCad: functional/ technical models
YouMagine: Open source models
pinshape: free and paid models
yeggi: 3D model aggregator/search
CGTrader: free and paid models, not all of them made to be printed
A community-curated list of model host services can also be found on the services page.
The RepRap foundation also keeps a list of printable model-host services here.
When selecting a model you need to ensure they are manifold, here's an explanation of what that means and guide on fixing them. You can also try these free, automated services; Netfab, and Microsoft's tool
Material Choices
When you are just starting out with FDM 3D printing PLA is the recommended choice. It's very easy to work, relatively strong, with and comes without many of the safety concerns of other materials. A deeper discussion of materials can be found here.
If you are starting on a resin printer, check out our Resin Info page.
Slicers
Slicing software takes a 3d model and turns it into instructions for the 3D printer. The instructions are generally exported in GCode which essentially is a list of locations to move to, amount of filament to extrude, etc.
The popular choices for slicing software are:
Ultimaker Cura: free, open source, highly customisable. Getting Started, Full Manual
Prusa Slicer (Based on Slic3r), Beginning with Prusa Edition (old version)
There are, however, many other options, most of which are discussed here
Be sure to check the layer preview to see if it makes sense in your slicer before printing (no unsupported overhangs, no parts missing, etc). More info on the Slicers Page
Printing and Troubleshooting
Follow your manufacturer's instructions in setting up your printer and starting your first print. It's a good idea to print a test print first (usually printers come with one).
If it succeeds congrats on your first print! You can now start slicing and printing your own models or some calibration prints
If your print fails you can begin troubleshooting.
This video helps you get to know the parts of your machine, so you know what we're talking about! :)
By far the most common reason for prints failing is an issue with levelling/tramming:
Full-resolution printable copy can be found here.
This visual reference, and this video may also help.
Once you have your prints sticking and printing, these guides can help you identify and solve any other issues you're experiencing:
Our Troubleshooting and Calibration wiki page
A Printa Pro PrintaGuide
rigid.ink poster and visual guide
Matterhackers Troubleshooting Guide
Simplify 3D Visual Troubleshooting Guide
Ultimaker Visual Troubleshooting Guide
RepRap Wiki Pictorial Troubleshooting Guide and Descriptive Troubleshooting Guide, these are a bit more technical/ advanced
It's also worthwhile seeking information from the manufacturer of your machine.
You can try searching for similar issues that other folk have experienced in the following communities: /r/3Dprinting, /r/FixMyPrint, the 3D Printers Discord
If the above suggestions don't solve your issue then it's time to seek help from the community:
This video is a great overview on how to seek help with prints.
The best places to ask for help are here on /r/3Dprinting, /r/FixMyPrint, the 3D Printers Discord. When asking for help be sure to provide the following:
- A highly descriptive title (even if you don't know exactly what everything is officially called, please do your best to describe the issue in plain English. This not only helps you get the help you want, but also helps the rest of the community by keeping the sub searchable, so others can benefit from the help you receive.)
- Photos of the issue, screengrabs of the layer view in your slicer, screengrabs of the model itself.
- A description of what the machine was doing as it produced this issue.
- Your basic settings such as: nozzle and bed temperature, speed, nozzle/line width and later height, the printer you're using and the material you're printing in. Or better yet, a screengrab or an export of your settings (you can upload files free without an account here)
- Any other information you think could be relevant such as modifications or hypotheses.
Post Processing
Most prints need some work after they come off the printer to turn them into a finished part. Supports need to be removed, and surfaced may need to be smoothed. Here are some tutorials:
- How to finish 3D Prints guide
More info on the Post Processing page
How to make models
Can't find what you want online? Why not design and make it? Model-making software is split into 4 main categories, depending on your goal:
Full-resolution, printable copy here
These are just the top picks, model making is discussed in more depth on the Making Models page
More communities:
/u/Devtholt keeps a Multireddit of all 3d printing subreddits including some specifically for help, or tailored to certain printers or printer manufacturers.
 Also has some subs that are related to 3D printing peripherally, such as /r/lasercutting and /r/CNC
3D Printers Discord great platform for troubleshooting and socialising.
RepRap Forums
Purchase Advice Megathread - October 2022 : 3Dprinting
Welcome back to another purchase megathread!
This thread is meant to conglomerate purchase advice for both newcomers and people looking for additional machines. Keeping this discussion to one thread means less searching should anyone have questions that may already have been answered here, as well as more visibility to inquiries in general, as comments made here will be visible for the entire month stuck to the top of the sub, and then added to the Purchase Advice Collection (Reddit Collections are still broken on mobile view, enable "view in desktop mode").
If you are new to 3D printing, and are unsure of what to ask, try to include the following in your posts as a minimum:
Your budget, set at a numeric amount.
 Saying "cheap," or "money is not a problem" is not an answer people can do much with. 3D printers can cost $100, they can cost $10,000,000, and anywhere in between. A rough idea of what you're looking for is essential to figuring out anything else.
Your country of residence.
If you are willing to build the printer from a kit, and what your level of experience is with electronic maintenance and construction if so.
What you wish to do with the printer.
Any extenuating circumstances that would restrict you from using machines that would otherwise fit your needs (limited space for the printer, enclosure requirement, must be purchased through educational intermediary, etc).
While this is by no means an exhaustive list of what can be included in your posts, these questions should help paint enough of a picture to get started. Don't be afraid to ask more questions, and never worry about asking too many. The people posting in this thread are here because they want to give advice, and any questions you have answered may be useful to others later on, when they read through this thread looking for answers of their own.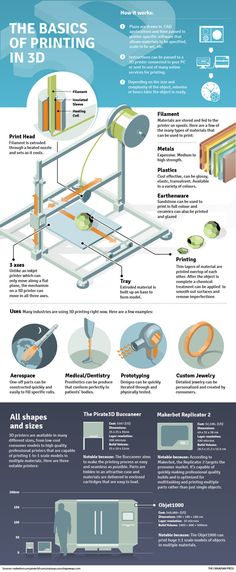 Everyone here was new once, so chances are whoever is replying to you has a good idea of how you feel currently.
Reddit User and Regular u/richie225 is also constantly maintaining his extensive personal recommendations list which is worth a read: Generic FDM Printer recommendations.
Additionally, a quick word on print quality: Most FDM/FFF (that is, filament based) printers are capable of approximately the same tolerances and print appearance, as the biggest limiting factor is in the nature of extruded plastic. Asking if a machine has "good prints," or saying "I don't expect the best quality for $xxx" isn't actually relevant for the most part with regards to these machines. Should you need additional detail and higher tolerances, you may want to explore SLA, DLP, and other photoresin options, as those do offer an increase in overall quality. If you are interested in resin machines, make sure you are aware of how to use them safely. For these safety reasons we don't usually recommend a resin printer as someone's first printer.
As always, if you're a newcomer to this community, welcome. If you're a regular, welcome back.
Pro 3D printer. : Pikabu
(warning: the beginning was written in 2018, I don’t know what popular models are now)
Obviously, the choice of a 3D printer must be approached thoughtfully. Therefore, it is not clear how you can not buy a printer with the name "Flying Bear 905" (dual nozzle version), which I ended up buying. I'll digress. Recently I heard that the names for a combat laser complex, a cruise missile and an unmanned underwater vehicle were chosen by voting. Although any educated person understands that the cruise missile should be called "Preved", the underwater vehicle - "Krevedko", and the laser complex - "Disco of the nineties", but some banality won. And then "Flying Bear 905", FlyingBear p905, that's respect! The distraction is over.
Why might a 3D printer be useful in life? 1 cm Thirdly, the interior acquires the distinct features of the villain Ivan Vanko's lair. These reasons are enough to understand that a 3D printer is needed! . nine0003
- Two nozzles. This is not even for printing with two plastics, but if one is clogged, then it’s not a problem, you can temporarily use the second one.
- Heated platform. Some plastics decrease in size after cooling (thermal shrinkage), so that they do not decrease ahead of time, the platform on which the model stands is heated.
- Autolevel. Some say it is necessary, some say no. This is a sensor that checks the distance to the table before printing.
First of all, of course, I tried to print a pistol from the first Bladerunner. The model, of course, found more complicated with a bunch of details.
The seams of the glued parts were coated with a primer from a car shop.
Then sanded and painted over with an airbrush. For the sake of experiment, I printed the handle with plastic with the addition of wood, but in fact the difference is not noticeable.
Then different samples, for example, 3D scan from photographs and subsequent printing.
Or you can use printed models for electroforming. This is copper plated. nine0003
I decided to repeat 3D printing of a large model, but at an improved level. Since cyberpunk is expected to be in the trend soon, I downloaded a 3D model of a pistol from the Cyberpunk 2077 game (of course, it’s strange that the game clearly has a two-row magazine, but here it’s thin, but they don’t look at free models in geometry). True, the model there came from two halves, each is printed for 9 hours. There is a nuance here. If there is a slight skew on the home printer, then the two large halves may not converge. Or print in two very large pieces, but if something glitches in the middle, you have to start over. And painting individual parts is inconvenient. Therefore, I loaded it into 3DSMax and divided it into parts. nine0003
While printing, I went to a car shop and bought a set for "not beaten, not painted, grandfather went to the bakery": transparent primer for plastic-adhesion activator (Kudo KU-6000) and primer-filler (Kudo KU-2201). Primer filler, unlike just soil, fills small pores, making the surface smoother. From past experiments, there was a putty for sealing large gaps in plastic (Chameleon 507), but it is two-component, it is more difficult to mix in proportions than just blow it out from a balloon. And a wide gap between the halves can, for example, be covered with plastic from a thermal gun. Plus sandpaper with numbers from 240 to 600. Plus cyanoacrylate glue. Instead of a tube of 3 grams of "moment" I took 20 grams of "Cosmofen CA-500.200", in terms of grams, the difference is significant, and so cyanoacrylates are all similar, only here the lid is more convenient, opens and closes by turning. nine0003
Everything is boring after that. Printing, initial smoothing of large "steps" with sandpaper at 240, gluing the halves (predictably, they did not converge a little), sealing the gap on the seam, primer for adhesion, primer-filler, then skins, increasing the number to 600.
Now we need a spray booth to fine paint did not scatter much around, even on the balcony. I drove to Leroy, bought the cheapest exhaust fan at 180 cubic meters per hour, attached a thin film folded several times behind to cover greenhouses (a universal thing, photographed against the background of a thick one, and a thin one came in handy as a filter). I fixed the film rolled up with a tube with staples and taped it to the fan with adhesive tape, we got a "filter bag", like a vacuum cleaner. And a trash bag on top of this flower arrangement. In fact, complete filtration did not work out, for complete filtration you need a large box and an extractor hood to display out the window, but it is still much better than without a fan. nine0003
Here I must say that I share the opportunity to collective farm and collective farm at any cost. Dilute cheap acrylic paint, then filter, then clean the clogged airbrush too lazy. So I bought a couple of little Tamiya pompous bottles. As it turned out, in my village of Odintsovo, near Moscow, there is a pick-up point for an online store of modellers (it should be noted the professionalism of the worker, who drew my attention to the fact that I ordered paint for brushes, not for an airbrush, and helped to correct the order). nine0003
Then I couldn't find where I used isopropyl alcohol to thin the paint, so I had to use ethyl alcohol. On the other hand, it's even better, because breathing vapors of isopropyl alcohol is harmful, but with ethyl alcohol you can save on alcohol, breathe alcohol mist - and already drunk.
I glued it, screwed another self-tapping screw into the trigger, otherwise people have a reflex to press, the glue may not withstand it. Well, in the end, of course, I see that the surface had to be refined to a more even one. On the other hand, this is the only way to learn. nine0003
Then it turned out that for accurate modeling 3DSMax is not the best choice at all. There are SolidWorks, Inventor, Fusion 360. I dug a little into Autodesk Inventor. If you need to make a simple detail in size, modeling such details in 3DS Max is like hammering nails in a TV. There is a lot of effort and pathos, but the efficiency is so-so. And here, when I understood the logic of work, it turned out that such details are made easily and quickly. Plus parameterization: you can bind dimensions in such a way that when you change the model will be rebuilt automatically. Here are the details made in 10: 9 minutes0003
"We can finally do something useful," I suddenly thought. And I decided to print an adapter from a 43mm drill stand to a 20mm drill.
It's often tempting to post in the style of an epic press release, but it's boring and lacks reader empathy. But errors in calculations, distortions of load-bearing structures, soil failures of seven meters - this is met with understanding. Moreover, perhaps next time the reader himself will not be afraid of experiments and will then give interviews on smoking ruins. nine0003
I have a drill stand. No need to ask why I bought it, I don’t know myself, I bought it in a cloud of consciousness (in my opinion, after I drilled a coin, I realized the usefulness of such things). And there is a drill from Proxxon (see "Bought in a cloud of consciousness"). Although, a drill is a useful thing if you need to saw off something small or polish it. And then I decided to put the drill in the rack, so that accuracy. But at the stand, the clamp is 43mm (for a drill), and at the drill, it is 20mm. It is clear that, ideally, a metal adapter is needed, but I don’t have a lathe, so we will collectively farm on a 3D printer. I put the model in Inventor with the expectation to fill the empty parts with something later (the toad strangled the printer resource to fill it), printed it. nine0003
How to fill voids? I once tried to fill a thin-walled 3D model with plastic from a thermal gun, it warped from heating. Theoretically, it would be possible to first put the model in the freezer, then pour it in parts, but I decided to try something new. I had PVA glue on hand, poured it in. After a couple of days I looked - the glue dried up and decreased in size several times. That is, there is a layer on the walls, a hole in the middle. Added glue, waited. Again a hole. In general, when, after the fourth flood, after drying, there were again holes, I went berserk a little and decided that the thermal gun was not such a bad thing and filled the remaining void with plastic. If the plastic does not stick to the PVA layer, these are its problems. nine0003
Seems to be holding up.
But, as usual, I recommend asking yourself before such purchases - do I really need it?
3D printing for "dummies" from the "teapot" - Personal experience on vc.ru
1029 views
I recently became the owner of a 3D printer, before that I knew practically nothing about 3D printing, so I decided to share my experience with the same "dummies", people who are far from this technology. My article is intended precisely and only for such people. The advice of “3D printers” with experience for beginners may turn out to be useless, due to their complexity or certain specifics. I think that my post, based on personal experience (and personal mistakes), not overloaded with technical details, will be very useful to a wide audience. Also, my description is based on personal experience with the Creality Ender 3 Pro 3D printer. The information below may not be useful for models from other companies. Unfortunately, I am not aware of the current Russian realities, and therefore everything described below applies to 3D printer models that are popular in the United States. I also apologize in advance for some words and terms in English (I honestly tried, but could not always find an adequate term in Russian). nine0003
First, I will give a few “maxims” and refuted stereotypes, perhaps, however, only mine:
- “3D printing is complex, expensive, and requires special knowledge” - this is absolutely not true! Perhaps this was once the case, but at the moment a 3D printer is a consumer device that is no more complicated (but rather, even much simpler!) TV, smartphone, computer. In addition, it is quite cheap, by modern standards, a hobby - one of the cheapest, probably. Special knowledge for 3D printing at home is not required, or rather, no more, which can be gleaned in a short time from the FAQ on the official website, as well as in user forms. nine0070
- “The 3D printer needs a special room because it stinks and makes a lot of noise” - this is also not true (or, more precisely, not quite true).
 There are plastics such as PLA and PETG that emit virtually no odor when printed, as well as printer models equipped with near-silent fans. However, the noise from the entry level models is not “fatal”, but, say, like from a gaming desktop / laptop in a “fancy” 3D game.
 - “You can make good money in 3D printing by printing at home and selling fun crafts on eBay, well, or save a lot of money by printing things you need for the home, like auto parts, etc.” – unfortunately, this is also not true. Yes, there are a lot of 3D prints for sale on eBay, but as you can imagine, the competition is up to par. The simplicity and affordability of this technology has now brought 3D printers to millions of homes; it is clear that a lot of people have made a "brilliant discovery" about the possibility of earning money by selling what they print. Consider 3D printing only as an interesting and low-cost hobby (set yourself an initial budget, for example, no higher than $200-250) that can please you, your family, as well as friends and acquaintances with original crafts and gifts.
 nine0070
 - “For 3D printing, you need to know a 3D modeling program or a CAD system - not at all necessary! There are a huge number of sites offering all kinds of 3D models for printing: scans of famous and not so famous sculptures, and busts of historical figures, and all kinds of figures of cartoon characters, films and computer games, and original witty crafts, like a sundial that shows time in digital form, and most of the models can be downloaded for free - at most, you will be asked to register for downloading! However, owning a CAD program is a very good skill (and, especially, for a DIYer - it was one of the “points” for buying a printer for me), but I haven’t gotten to that yet - but once I master it, I’ll definitely I will describe my experience0070
So, as I wrote above, I got an Ender 3 Pro printer from Creality. Entry level printers from this company are among the most popular in the United States, due to good quality, both manufacturing and printing, low prices, and wide community support. Well, and I will not hide it, a great "deal" in our local Microcenter-e (this is a computer store located in Cambridge, MA) played a significant role: they were sold for $99 at a promotion, plus a $10 off coupon for filament (a plastic thread for print), which I managed to use as many as three times 😊. For the printer itself, I also had to ride a couple of times to the store: they diverged, in the words of the classic, “like meat pies at a vegetarian lunch”! nine0003
The printer comes neatly packaged as a DIY kit.
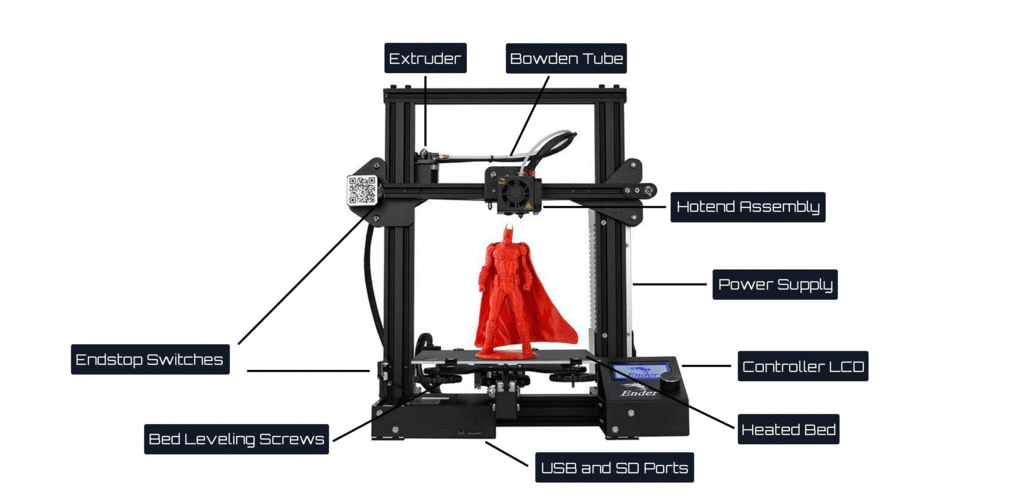
However, assembly, greatly facilitated by the video (paper instructions are also useful, but the video is much more visual), attached to the micro SD-card that comes with the printer, will take you no more than an hour or two maximum, after which the printer is literally ready to work ! What you should pay attention to when assembling: this is the location of the "limit switch" of the vertical axis (Z) - he strives to stand in, as it were, the place allotted for him, but everything is not so simple. This sensor is very important (however, they are all important, so it is important to follow the assembly instructions punctually, and understanding what exactly you are doing), because it determines the distance of the print head nozzle (hot end) from the print bed (heated / print bed). nine0003
The main elements of the 3D printer
And this distance is very important: if it is large, you will not be able to correctly calibrate the position of the print head, and if it is too small, then the print head may damage the surface of the printing plate. As I did (however, this can be found in a bunch of online manuals, and, probably, on the official website in the FAQ - but I did not look): after assembling the printer, I set all four calibration "lambs" under the printing table to a "relaxed" state , and the “endstop switch” of the Z axis was fixed at a deliberately greater distance so that the print head (hot end) was guaranteed to be at a distance from the printing table. Then I turned on the printer, and chose the command from the “Auto Home” menu. After the printer set the head to the “home” position, I turned it off, and rotating the motor (stepper motor) of the Z axis by hand, as well as carefully moving the “limit switch”, I ensured that the “click” of the “limit switch” (and this means the sensor is triggered) was heard by touching the head of the table surface, after which he fixed the “limit switch” tightly with a key. Then, taking a sheet of ordinary paper, and rotating the “lambs” of the calibration screws, as well as moving the print head across the entire surface of the desktop, he ensured that it moved, slightly “scratching” the sheet. But, unfortunately, such a “cold” calibration will not be enough for a successful print, so I will recommend the “hot calibration” or “battle check” method. Here in this video you can see how the calibration process takes place, as well as download the necessary files (the link is in the video description). There is also a link to print profiles for Ender 3 Pro - I also recommend downloading them (and what they are for, I'll tell you later).
 nine0003
After assembly and calibration is complete, your 3D printer is ready to go! If you stocked up with a kilogram coil with PLA plastic in advance (PLA filament, more about the plastics used for printing will be in the next part), then you can safely install it, and if not, then a small skein of plastic filament comes with the printer (but it’s better to buy a coil right away, because filament is also required for calibration!). On the micro SD card that came with the printer, there are several models ready for printing - these are files with the extension .gcode (G-code is a programming language for CNC devices, understood by most 3D printers. Don't worry, you won't need to learn features of this language - special programs called "slicers" (slicer) will take care of this for you, so that you load the filament (plastic thread from the spool) through the extruder (extruder, filament feeder into the print head) through a small hole in the extruder ( pressing the clamp with your hand and directing the thread through the feed tube, move the thread all the way into the print head), insert the micro SD card into the printer, and select the model in the form of a .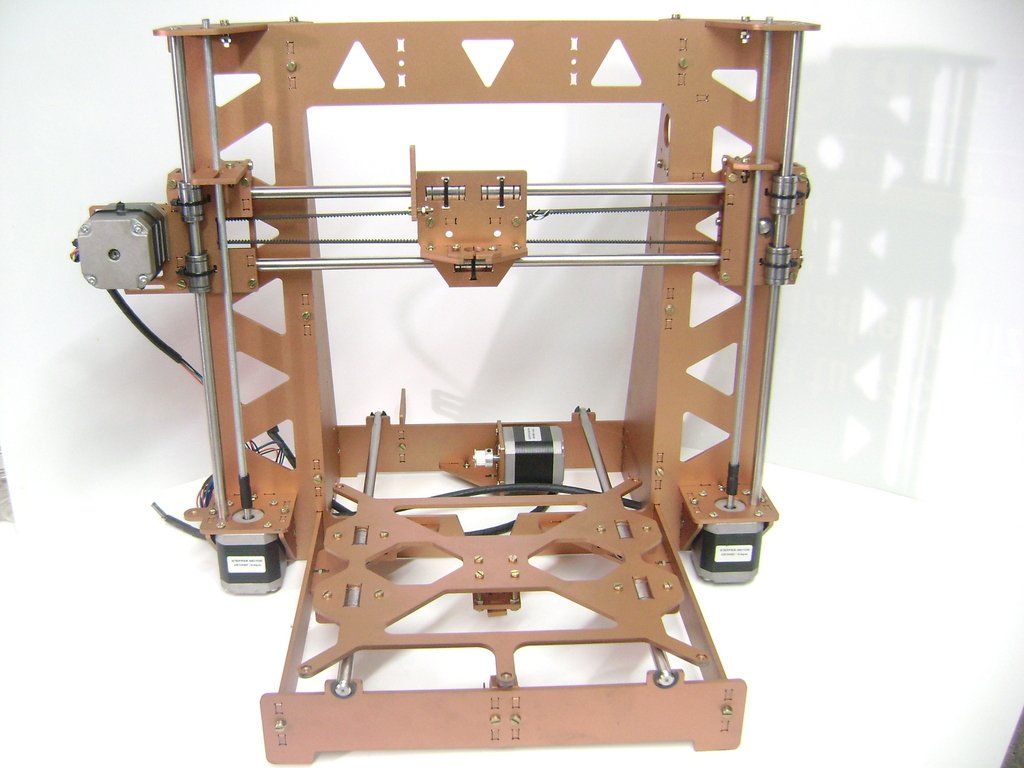 gcode file, you can safely start printing! nine0003
Models in gcode bundled with Ender 3D Pro
You can print anywhere - in the office, in the dining room, in the living room, in general, where you assembled the device. Later I will tell you where it is better to place the printer on a permanent basis, but any place is suitable for test printing - there will be no unpleasant smell or much noise.
But here's one thing you need to consider beforehand: 3D printing takes a hell of a lot of time! Even a small model can be printed for several hours (and a large one for several days!), Depending on the selected slicer settings, speed and printer settings. So, when starting to print, take this into account - the printing process, of course, can be paused (and then resumed), but for a start, I would recommend bringing the process without interruptions - well, to see a real good result, and feel confident in on their own, as well as the capabilities of the printer. nine0003
It should be noted that Creality uses the open source Marlin software as the firmware for its entry level 3D printers, but unfortunately pre-installs a very outdated version. If you are a programmer, or just “on you” with a computer for a long time, then it will not be difficult for you to assemble the latest version of Marlin yourself, for example, through VSCode, and then “flash” it via an SD-card (you just need to clear the card, and copy the release file with the .bin extension there). Otherwise, you can use my build - download, unzip, copy to a blank SD-card, turn off the printer, insert the card, turn on the printer. After a short time, the new firmware will be installed on your Ender 3 Pro (other printer models may require different builds). However, you can postpone this option for later - the printer is ready to work right out of the box. nine0003
Here I want to mention a few more useful printer improvements that will be useful for a beginner (however, these improvements are optional).
First, I recommend that you install and connect the open source OctoPrint software to your printer - you will need a Raspberry Pi with a camera for this. I used a cheap Raspberry Pi Zero W (with built-in WiFi) which, while not officially supported, works great. OctoPrint will add to your entry level printer far from entry level "features" - the ability to remotely control and manage the printer via a web interface, as well as from a great smartphone application. nine0003
This application is actively developed and well supported, has a very large and friendly community; many useful features are implemented either directly out of the box or using plugins; the documentation is also extensive and comprehensive. Installation, as well as connection to the printer, are extremely simple: download the sd-card image, edit the configuration file (specify the credentials of your WiFi access point), copy it to the card, connect it using a micro USB ↔ micro USB OTG cable to the printer - and profit! nine0003
My RPi Zero W with camera and temperature sensor connected to Ender 3D Pro
Secondly, I recommend that you immediately get spare surfaces for printing (build surface plate, this is a removable surface that is installed on a heated bed (heated bed), and on which, in fact, printing takes place). The printer comes with a "standard" flexible magnetic surface, and I assure you: you'll have to get a new one soon enough! So, it's better to take care in advance, because their cost is low, on Amazon they ask for $9.99 for a pack of two. You can also “upgrade” to a glass plate (it costs a little more), it has both its advantages and certain disadvantages, I will list them briefly. Advantages of the stock flexible magnetic plate: thanks to the magnet, it is easy to attach and remove from the heating bed for cleaning, thanks to the flexibility, it is very easy to remove finished models. Disadvantages: the plastic coating, on which, in fact, the printing takes place, is quite easily damaged and deformed both by the “regular” printing process itself and by the print head, in case of incorrect calibration, as well as by excessive heating of the heated plate - in general, a short-lived part. But, due to its low cost, it may well (and should!) be considered as a “consumable”. The advantages of glass plate include greater durability, cleanliness and "adhesive" properties of this surface.
 Disadvantages: slightly more difficult to attach to a heated bed (usually it is recommended to use ordinary office clamps for this, but personally I don’t recommend it because of their size; it’s much easier to buy special small clamps, they cost a penny on Amazon), and the difficulty of detaching printed models - you can't bend a glass plate. By the way, glass plates are also very inexpensive; nine0003
Thirdly (albeit looking ahead a bit), I would like to recommend this small "update", namely, glue for "sticking" models. Such glue is cheap (for 6 "sticks" they ask for $ 13), it is completely environmentally friendly, unlike popular home-grown products (there will be a story about them later), it is washed off with ordinary water, it does not smell. When using it, there are also a couple of “nuances”: you should not apply it to a cold surface, and you should not apply too little, because it will lose its adhesive properties when heated, and requires some practice in determining the optimal amount, but the ease of use of glue more than covers everything it.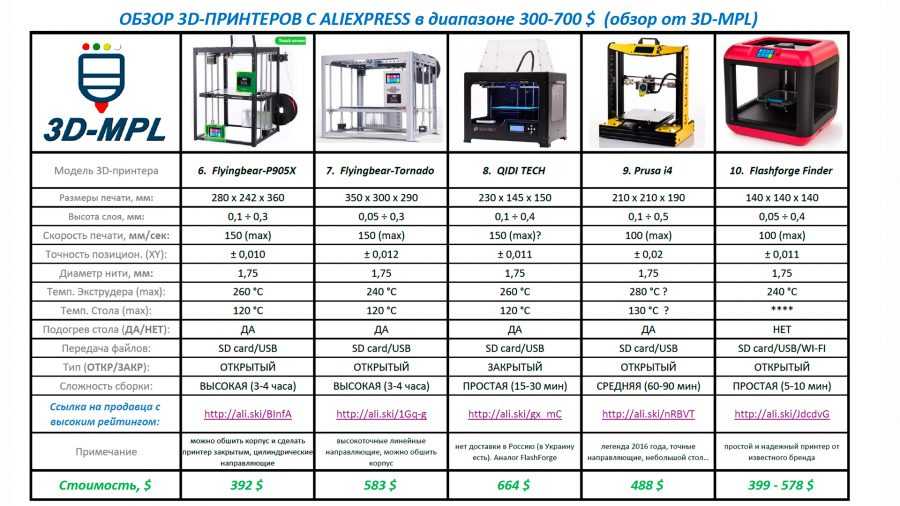 nine0003
Now I want to share my thoughts on where is the best place to place your new 3D printer you just bought. 3D printing is actually a “heat-loving” process, so it is highly desirable to place the printer in a heated room with room temperature (at least 20 ° C - 3D printing traditionally uses temperatures in degrees Celsius - well, or 70 Fahrenheit). As I already wrote, at the very beginning, when printing with some types of filament, for example, PLA, there are no unpleasant odors, and the noise from the fans is comparable to the noise of the fans of a gaming desktop or laptop during a fancy 3D game. Those. in the absence of a special room (workshop in the basement or garage), it is quite possible to install a printer in the office, or even a children's playroom, or family room. What's more, there is a way, by purchasing a printer enclosure, to reduce or even eliminate both possible odors and likely noise. I will talk about this in more detail later. nine0003
I personally installed the printer in my "workshop" in the basement.