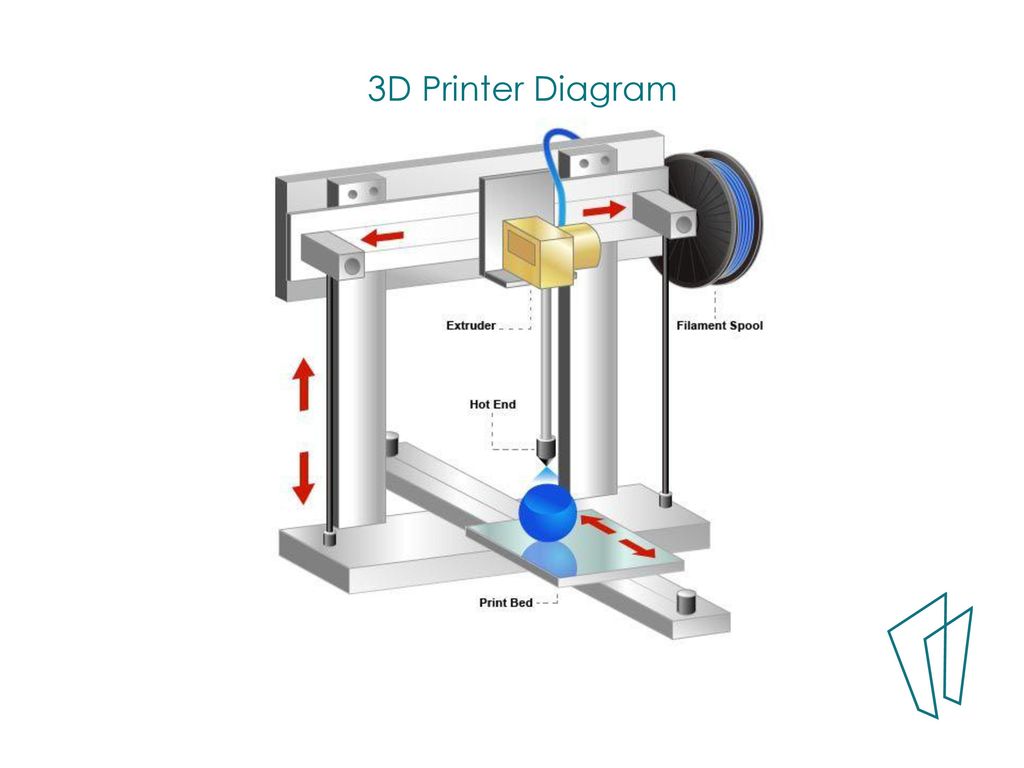
3D printer diagrams
3D Printing, Tactiles and Haptics
New technologies for creating tactiles and tactile experiences offer revolutionary ways of conveying spatial information. The work described below represents the DIAGRAM Center’s ongoing exploration of these technologies, including 3D printing and haptics.
3D Printing in Schools | Printing of Braille with 3D printers | SVG and 3D Printing | 3D Printed Teaching Aids
3D Printing National Forum | General Info on 3D Printing | Decision Tree
Tactile Graphics Project | Tactile Graphics Webinar | Imageshare | Haptics
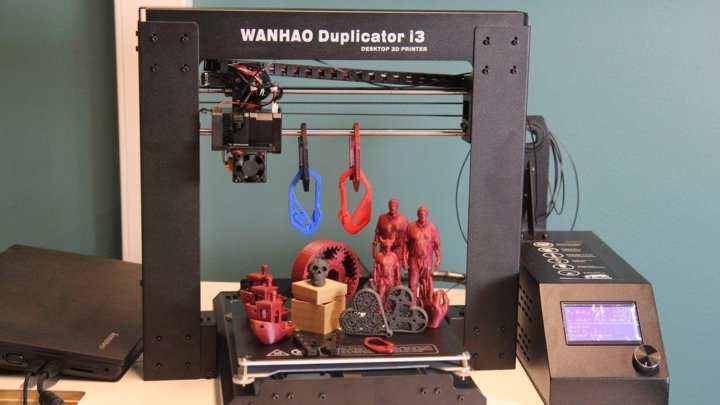
3D models add another dimension of depth to traditional images and open doors for multimodal learning. With revolutionary implications for education, medicine, and more, 3D printing offers a low-cost alternative to creating 3D models that increases opportunities for customization and experimentation. The DIAGRAM Center is exploring 3D printing technology as a way to increase access to curriculum and learning. For students, 3D-printed models can offer better ways of understanding spatial concepts for things that would otherwise be too large, too small, too valuable/rare, or too dangerous to hand to a student. They can be customized, created by non-specialists in accessibility, and shared with all students in a classroom.
Printing of Braille with 3D printers
The introduction of 3D printers in education has created a new opportunity for people to create tactile materials for students who are blind. This document seeks to inform object creators about the best way to add braille to 3D objects.
Based on testing with braille reading users and many different types of printers (Makerbot, MakerGear, TypeA, Ultimaker, and more) we found that ‘vertical braille’ is the best method of printing braille with a 3D printer (see below). Testing was conducted by the Lighthouse for the Blind and Visually Impaired in San Francisco, Texas School for the Blind and Visually Impaired, DIAGRAM Symposium on 3D Printing.
Download Word Version of Document
3D Printing for Accessible Materials in Schools
In 2013, researcher and TVI (Teacher of the Visually Impaired), Yue-Ting Siu (UC Berkeley & San Francisco State University) conducted a one-year research project about 3D printing in education.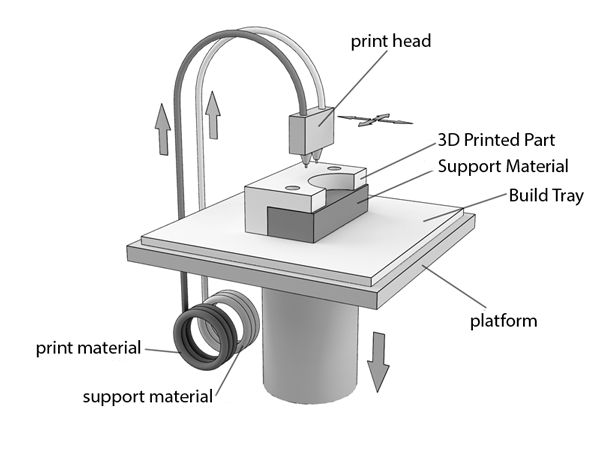 The main advantages of using 3D printing are: bringing imagined creations to life, ability to customize devices, enhancing the learning of all students in a classroom, and use of the technology by anyone to create an accessible environment. While there are still some challenges, Ting provided some recommendations that include:
- Collaboration between technology, computer programming, general education teachers, and community supports
- Simplify implementation of 3D printing to the acquisition and maintenance of a 3D printer as the technology gets more affordable and usable
- Cultivate open access repositories that offer curated selections of files for easy download and printing as aligned with academic curricula
- Provide training to promote understanding of 3D printing’s capabilities and how it fits into the larger set of tools for providing accessible materials for students with visual impairments.
Read the full report here (Word document): 3D Printing for Accessible Materials in Schools (final version). See also a closed-caption recording of Ting’s DIAGRAM webinar on this topic, along with handouts and a written summary of the Q & A for the webinar: 3D Printing for Accessible Educational Materials.
SVG and 3D Printing Report
In the DIAGRAM-sponsored report “Assessments of Raster-to-Vector (SVG) Conversion software and 3D Printers for Tactile Graphics” National Braille Press assesses SVG software to find a version that is affordable, and easy to use for publishers and individual content providers. Beyond the DIAGRAM Center’s interest in SVGs for publishers, SVGs also provide a number of digital conversion options for tactile graphics like 3D printed objects, when description alone is inadequate. 3D printers may provide one method for these solutions that can provide perfect proportioning, detailed resolution, and reduce the labor time required compared to the collage methods of creating tactile graphics, especially with complex images.
Download PDF Version of Report
Download Word Version of Report
Stanford Student Research Paper: “3D-Printed Teaching Aids for Students with Visual Impairments”
In the spring of 2014, three Stanford University undergraduates became interested in the work Benetech and DIAGRAM were doing to support accessibility in STEM for students with visual impairments.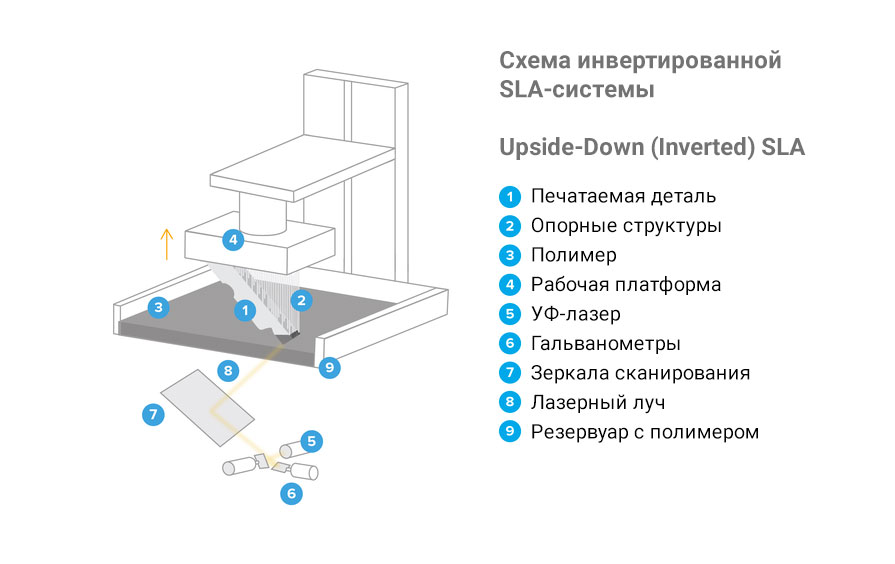 They set out to first determine what instruments already existed for these students and evaluate the need for 3D printed education tools. They then worked to address the lack of learning aids by designing and printing a variety of objects to be used in STEM classrooms. The results of their work indicated that 3D printed models fill a hole in available learning aids for visually impaired students, but determined it wasn’t feasible for them to design and print individual objects. They hope to work with Benetech and other members of the assistive technology community to build a repository of 3D designs that can be standardized for large scale general use in classrooms.
Download Word Doc
3D Printing National Forum
In October 2014, with numerous DIAGRAM community members joining, Benetech kicked off a 3D Printing for Accessible Education grant from the Institute of Museum and Library Sciences. Our deliverables include a National Forum to discuss topics and issues around 3D printing in education, a quick-start guide for 3D printing and a collection of STEM objects available for educators. We hope that our work will contribute to the field of accessible tactile objects for education. On June 17-19, 2015, we conducted a forum that brought together museums, libraries, educators, end users, technologists, and publishers to discuss the implications of 3D printing technology for education. Hear the presentation from the post-forum recap webinar (or download the slides from the recap webinar here: 3D Forum Recap Webinar 8415 (NN)) to learn more about the outcomes of the forum.
3D printed objects
quick-start guide for accessible printing (online PDF)
quick-start guide for accessible printing (word document)
For more general information about 3D printing and education see:
- Exciting Developments in Uses of 3D Printing in Education
- 3D Printing Industry (Education)
- 3D Printers in the Classroom
- 3D printers in schools: uses in the curriculum
- 3D printing in schools: The next industrial revolution?
- Horizon Report
For more information about any of the DIAGRAM 3D printing projects or to contribute to our growing collection of research on 3D printing for education, please email 3D(at)benetech(dot)org.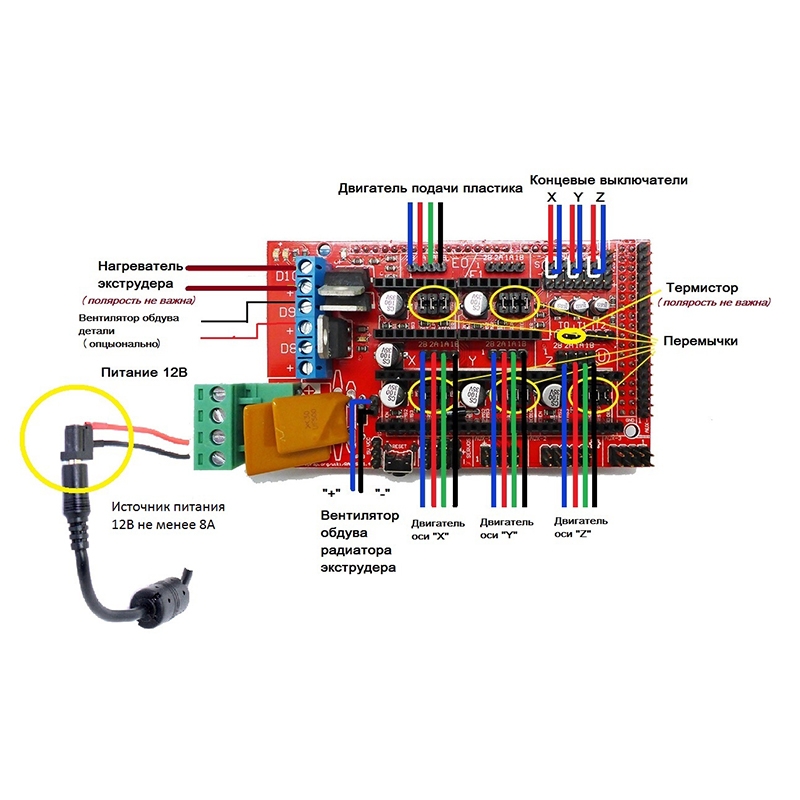
Decision Tree
Developed by Touch Graphics, Inc., the Decision Tree (report in Word) is a tool for choosing which print images need tactiles and which need descriptions. A digital decision tree allows the creation of tools that will expedite the work of making textbooks accessible by allowing non-specialists to make good decisions about which images need what kind of treatment to make them accessible. The tool was found to be a successful method for novices to categorize images (mean 66% correct). Future improvements to the tool’s success will come with better understanding and agreement among experts as to whether certain images need verbal or tactile treatment. The open-source image sorting tool was built using Lime Survey. The related survey questions and the xml are freely available. A flow chart is also available (Word version here) that shows how the decision process was captured in the sorting rubric.
Tactile Graphics with a Voice
The Tactile Graphics Project at the University of Washington has created the TGV (Tactile Graphics with a Voice), a QR-code reading app that allows text within images to be read and voiced by a mobile device such as an iPhone or Android phone.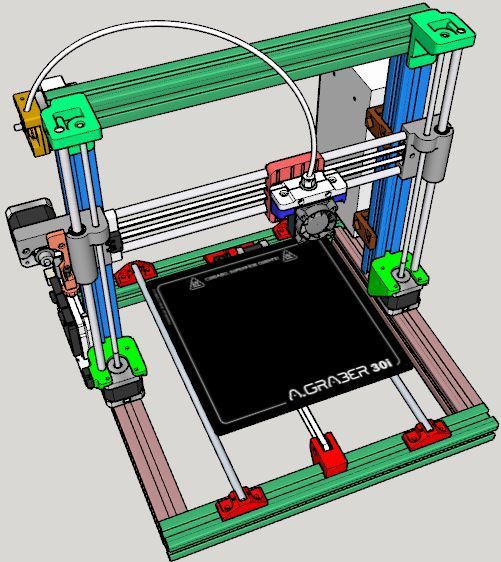 For those who are interested in creating tactile graphics that include QR-codes for embedded text in images, there is a revised Tactile Graphics Assistant Manual (PDF version here) that includes information about how to include QR-codes. The TGV Design Document is available for boththe iOS (PDF version) and for the Android (PDF version). The open source code is available for both the iOS version and the Android version of TGV as well. See the published paper about this work, which won Best Student Paper at the October 2014 ACM SIGACCESS conference on computers and accessibility.
Webinar: Tactile Graphics with a Voice
Imageshare
Developed by the DIAGRAM Center, Imageshare is a shared, open source platform for educators and consumers to explore and find alternative resources (modalities) related to key STEM concepts. As more accessible alternatives for images, such as tactile graphics and 3D object are produced, the benefit of having a centralized location where contributors and consumers can reference and discover accessible content also increases. Imageshare is that centralized collection that’s curated for accessibility. It not only eliminates redundancies within and across organizations, but also allows sharing of costly, time-intensive, and limited resources involved in the production of alternative content.
Prior to the adoption of the current name, “Imageshare,” this platform was also referred to as the Registry-Repository of Accessible Images (RRAI) and the Accessible Image Repository-Registry (AIRR).
Try Imageshare (alpha)!
Integrating Haptic Feedback for Image-based STEM Content within HTML and eTextBooks
-Mark Hakkinen, ETS
Summary:
Haptic technology, already present on some tablets and smart phones, is emerging as an innovative way to augment visual information with effects such as vibration or “feelable” textures. The implications for accessibility are exciting and this project explored using vibrotactile feedback to augment visual information in EPUB and HTML content. A sample EPUB with haptic enabled SVG shapes was developed and is available for download. Additionally, instructions and source code for adding haptic effects to EPUB and HTML content is provided. Finally usability issues with haptic interfaces are discussed along with the results from a usability study with students with visual impairments.
Introduction:
Consumer tablet devices, such as the Apple iPad and Google Android products, are making significant inroads in education as a platform for delivering eBooks, instructional material, and assessments. Accessibility of the devices, and the content presented using them is an important consideration, especially for students with visual impairments, where access to graphical and spatially presented information essential to the study of science, technology, engineering, and mathematics (STEM) can pose significant challenges.
A new class of technology – tablet-based haptics – may enable an effective mechanism for presenting graphical information to students with visual impairments. As tablets with haptic capability increase their foothold in the classroom, and in the hands of students at school (and home), there is the potential for significant advances in how students with visual impairments are enabled to independently interact with STEM content. This DIAGRAM Center funded research project examines the use of haptic feedback as a means to provide access to graphical information in HTML and EPUB, using widely available vibrotactile feedback. Sample content, source code, and a discussion of usability issues is included.
Learn More About Haptics
3D Printing: What It Is, How It Works and Examples
3D printers might seem like they're right out of a science fiction movie, but they're proving to be useful in a variety of industries. | Image: ShutterstockHow Do 3D Printers Work?
3D printing is part of the additive manufacturing family and uses similar methods to a traditional inkjet printer — albeit in 3D. Additive manufacturing describes the process of creating something in layers, adding material continuously until the final design is complete. This term most often refers to molding and 3D printing.
It takes a combination of top-of-the-line software, powder-like materials and precision tools to create a three-dimensional object from scratch. Below are a few of the main steps 3D printers take to bring ideas to life.
How Does a 3D Printer Work?
3D printers are related to additive manufacturing. 3D printers use computer-aided design to understand a design. When a design is ready, a material that can be dispensed through a hot nozzle or precision tool is printed layer by layer to create a three-dimensional object from scratch.
3D Modeling Software
The first step of any 3D printing process is 3D modeling. To maximize precision — and because 3D printers can’t magically guess what you want to print — all objects have to be designed in a 3D modeling software. Some designs are too intricate and detailed for traditional manufacturing methods. That’s where CAD software comes in.
Modeling allows printers to customize their product down to the tiniest detail. The 3D modeling software’s ability to allow for precision designs is why 3D printing is being hailed as a true game changer in many industries. This modeling software is especially important to an industry, like dentistry, where labs are using 3D software to design teeth aligners that precisely fit to the individual. It’s also vital to the space industry, where they use the software to design some of the most intricate parts of a rocketship.
3D PRINTERS USE MODELING AND SLICING SOFTWARE TO GUIDE THE PRINTER IN CREATING EACH OBJECT. Video: Digital Trends
Slicing the Model
Once a model is created, it’s time to “slice” it. Since 3D printers cannot conceptualize the concept of three dimensions, like humans, engineers need to slice the model into layers in order for the printer to create the final product.
Slicing software takes scans of each layer of a model and will tell the printer how to move in order to recreate that layer. Slicers also tell 3D printers where to “fill” a model. This fill gives a 3D printed object internal lattices and columns that help shape and strengthen the object. Once the model is sliced, it’s sent off to the 3D printer for the actual printing process.
The 3D Printing Process
When the modeling and slicing of a 3D object is completed, it’s time for the 3D printer to finally take over. The printer acts generally the same as a traditional inkjet printer in the direct 3D printing process, where a nozzle moves back and forth while dispensing a wax or plastic-like polymer layer-by-layer, waiting for that layer to dry, then adding the next level. It essentially adds hundreds or thousands of 2D prints on top of one another to make a three-dimensional object.
3D Printing Materials
There are a variety of different materials that a printer uses in order to recreate an object to the best of its abilities. Here are some examples:
Acrylonitrile Butadiene Styrene (ABS)
Plastic material that is easy to shape and tough to break. The same material that LEGOs are made out of.
Carbon Fiber Filaments
Carbon fiber is used to create objects that need to be strong, but also extremely lightweight.
Conductive Filaments
These printable materials are still in the experimental stage and can be used for printing electric circuits without the need for wires. This is a useful material for wearable technology.
Flexible Filaments
Flexible filaments produce prints that are bendable, yet tough. These materials can be used to print anything from wristwatches to phone covers.
Metal Filament
Metal filaments are made of finely ground metals and polymer glue. They can come in steel, brass, bronze and copper in order to get the true look and feel of a metal object.
Wood Filament
These filaments contain finely ground wood powder mixed with polymer glue.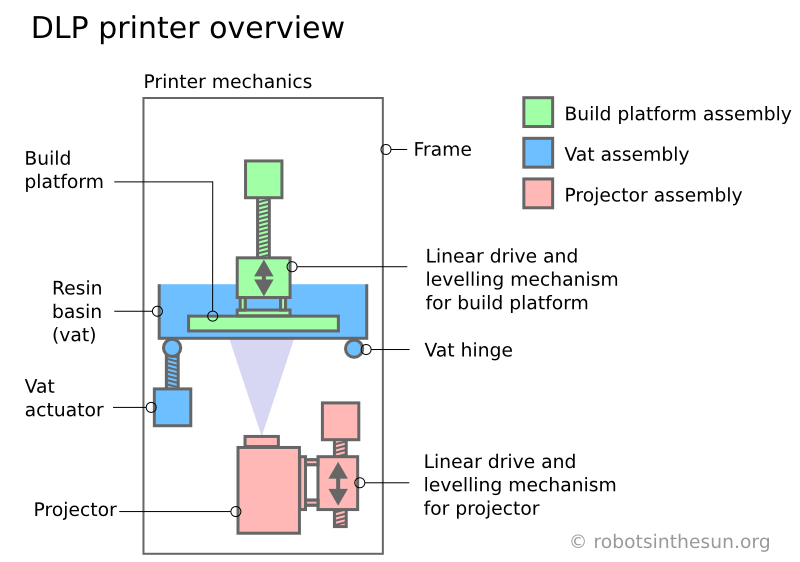 These are obviously used to print wooden-looking objects and can look like a lighter or darker wood depending on the temperature of the printer.
The 3D printing process takes anywhere from a few hours for really simple prints, like a box or a ball, to days or weeks for much larger detailed projects, like a full-sized home.
How Much Do 3D Printers Cost?
The cost of 3D printers vary based on the size, specialty and use. The cheapest 3D printers, for entry level hobbyists, typically range from $100 to $500. More advanced models can range between $300 and $5,000. Industrial 3D printers can cost up to $100,000.
3D Printing Processes and Techniques
here are also different types of 3D printers depending on the size, detail and scope of a project. Each different type of printer will vary slightly on how an object gets printed.
Fused Deposition Modeling (FDM)
FDM is probably the most widely used form of 3D printing. It’s incredibly useful for manufacturing prototypes and models with plastic.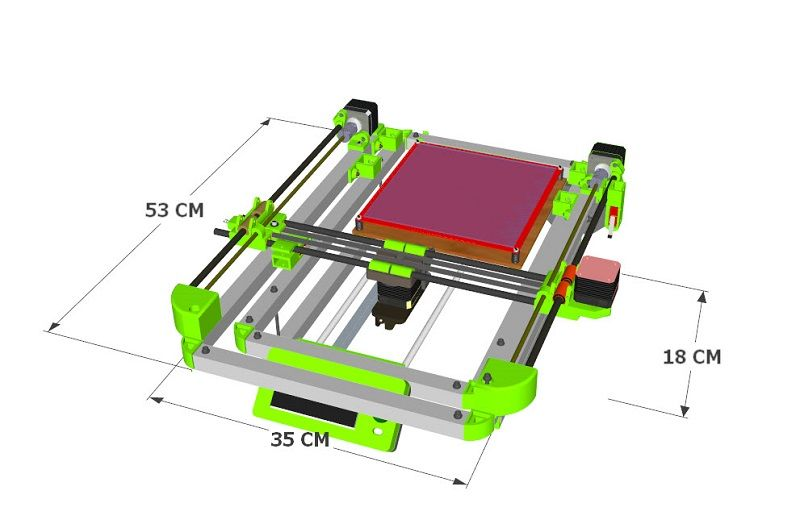
Stereolithography (SLA) Technology
SLA is a fast prototyping printing type that is best suited for printing in intricate detail. The printer uses an ultraviolet laser to craft the objects within hours.
Digital Light Processing (DLP)
DLP is one of the oldest forms of 3D printing. DLP uses lamps to produce prints at higher speeds than SLA printing because the layers dry in seconds.
Continuous Liquid Interface Production (CLIP)
CLIP is amongst the faster processes that use Vat Photopolymerisation. The CLIP process utilizes Digital Light Synthesis technology to project a sequence of UV images across a cross-section of a 3D printed part, resulting in a precisely controlled curing process. The part is then baked in a thermal bath or oven, causing several chemical reactions that allow the part to harden.
Material Jetting
Material Jetting applies droplets of material through a small diameter nozzle layer-by-layer to build a platform, which becomes hardened by UV light.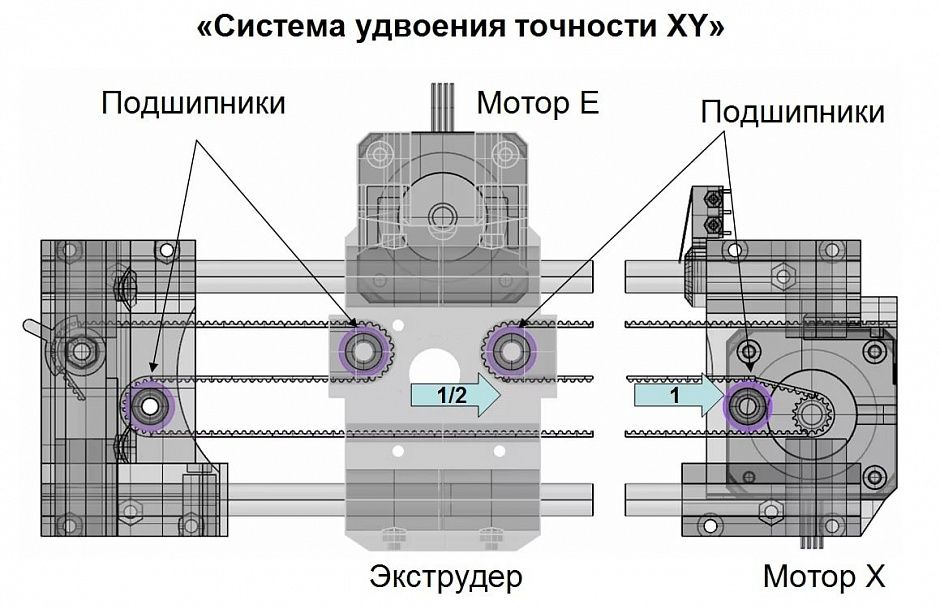
Binder Jetting
Binder Jetting utilizes a powder base material layered evenly along with a liquid binder, which is applied through jet nozzles to act as an adhesive for the powder particles.
Fused Deposition Modeling (FDM)
FDM, also known as Fused Filament Fabrication (FFF), works by unwinding a plastic filament from a spool and flowing through a heated nozzle in horizontal and vertical directions, forming the object immediately as the melted material hardens.
Selective Laser Sintering (SLS)
A form of Powder Bed Fusion, SLS fuses small particles of powder together by use of a high-power laser to create a three-dimensional shape. The laser scans each layer on a powder bed and selectively fuses them, then lowering the powder bed by one thickness and repeating the process through completion.
Multi-Jet Fusion (MJF)
Another form of Powder Bed Fusion, MJF uses a sweeping arm to deposit powder and an inkjet-equipped arm to apply binder selectively on top. Next, a detailing agent is applied around the detailing agent for precision. Finally, thermal energy is applied to cause a chemical reaction. Direct Metal Laser Sintering (DMLS) also utilizes this same process but with metal powder specifically.
Sheet Lamination
Sheet Lamination binds material in sheets through external force and welds them together through layered ultrasonic welding. The sheets are then milled in a CNC machine to form the object’s shape.
Directed Energy Deposition
Directed Energy Deposition is common in the metal industry and operates by a 3D printing apparatus attached to a multi-axis robotic arm with a nozzle for applying metal powder. The powder is applied to a surface and energy source, which then melts the material to form a solid object.
3D printing for the newest ones. From A to Z. Kinematics.
In this article, we will understand what 3D printing is and what the kinematics of 3D printers are.
1. 3D printing. What does she taste like?
There are a lot of printing technologies, from FDM (FFF), which is used by more than 90% of printers on this portal, to SLA / DLP / LCD (with photopolymers) and SLS / SLM (powder sintering using powerful lasers)
At the initial stage, we are interested in FDM - layer-by-layer deposition of a molten rod. The picture below shows the hot end (Hot end) - that part of the 3D printer extruder where the rod is melted. nine0003
The plastic rod is fed through the Teflon tube and radiator into the thermal barrier, and through it into the heating block. It melts there and exits through the nozzle. The nozzle has a certain diameter, which is marked on it.
It is often made of brass, as the material is inexpensive and easy to process. The accuracy of printing depends on the nozzle. The smaller the nozzle, the more threads fit into one mm.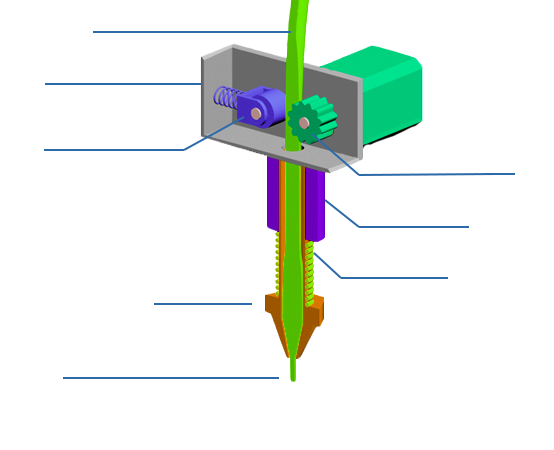
Heater and thermistor provide feedback for temperature control and regulation. That is, the voltage supply to the heater depends on what temperature the thermistor shows, and the processor compares it with the set one. nine0003
Next we see the heating block. A nozzle is screwed into it on one side, and a thermal barrier on the other.
The thermal barrier is used to minimize the heating of the plastic above the thermoblock.
[IMG]http://3d-makers.nethouse.ru/static/img/0000/0002/6151/26151635.2ofdbr37y8.W665.jpg[/IMG]
Most often made of stainless steel. It has a lower thermal conductivity than conventional, unalloyed steel. To prevent the rod from melting above the thermal block, a radiator is screwed on top of the thermal barrier and blown by a cooler. Everything is quite simple. nine0003
It is very common for melted plastic to leak through threads.
This means that the nozzle has not pressed the thermal barrier in the heater block.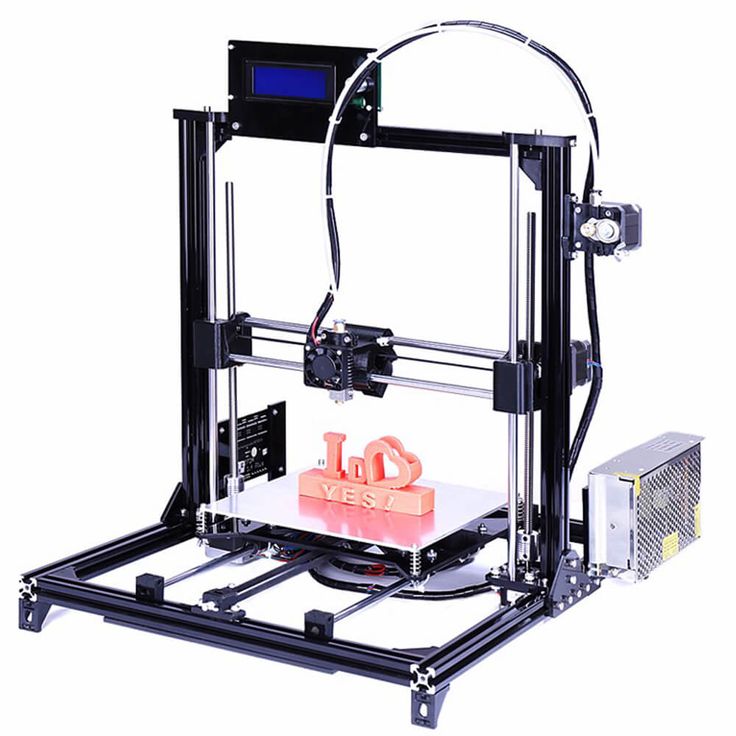 Therefore, when disassembling and assembling the hot end, we first screw the thermal barrier into the heating block, and then press it with a nozzle. If, when you twist the nozzle, there is a gap between the end of the nozzle and the heating block, then this is normal, the gap in order to press the thermal barrier with the nozzle.
In order to feed the bar at the right time and in the right place, a feeder is needed, that is, a bar feeder. nine0003
Sometimes it is performed combined with a hot end, and then this type of extruder (this is all together a hot end + feeder) is called a direct (direct), that is, a direct feed, without tubes.
The same feeder is made separately, and the bar is fed through a fluoroplastic tube. Such a system is called bowden.
This is to lighten the moving part. As for the positive aspects and disadvantages - each design undoubtedly has them.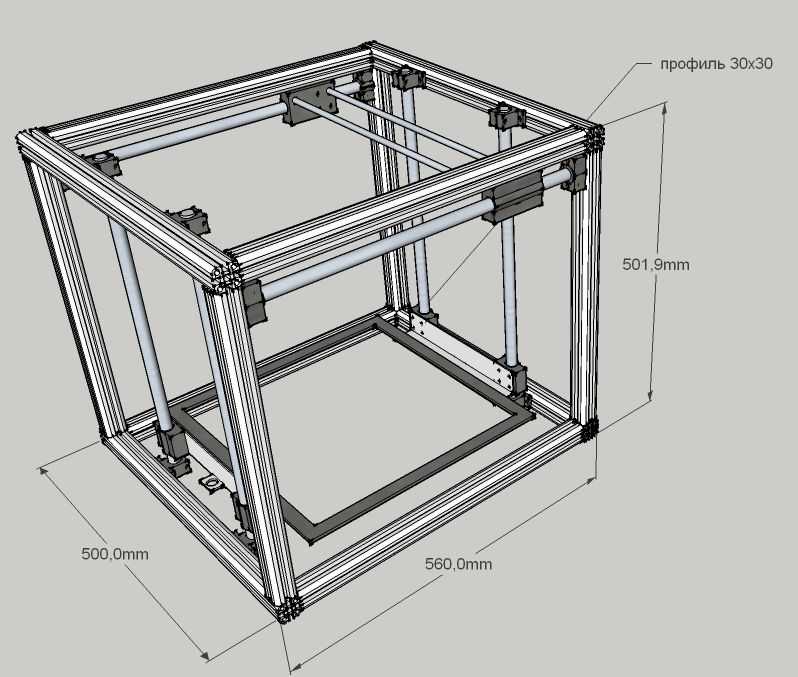
Direct extruder:
1. Advantages:
a) More reliable due to fewer plastic feed connections;
b) Less picky about the materials it prints on, in particular rubber-based rubber is problematic to print on bowden extruders;
2. Disadvantages:
a) Large weight, due to this, during acceleration / deceleration, small ripples can be observed on the surface of the part;
b) Dimensions. They greatly affect the plot area. Let's say, like in the picture above, a direct with 4 colors would be very huge. And for Bowden, this is just right. nine0003
Bowden extruder:
1. Advantages:
b) The coil does not twitch after the model, otherwise, when the coil turns with the direct are entangled, we will get a skip of steps, since the carriage will pull the coil along with it.
2. Disadvantages:
a) Retract settings (pulling the rod back during idle movements so that the molten plastic does not ooze out of the nozzle while expanding) is more difficult, since the rod is smaller than the inner diameter of the tube, it tends to stretch; nine0003
b) It is more difficult than on direct to select all gaps in order to print with various flexible plastics.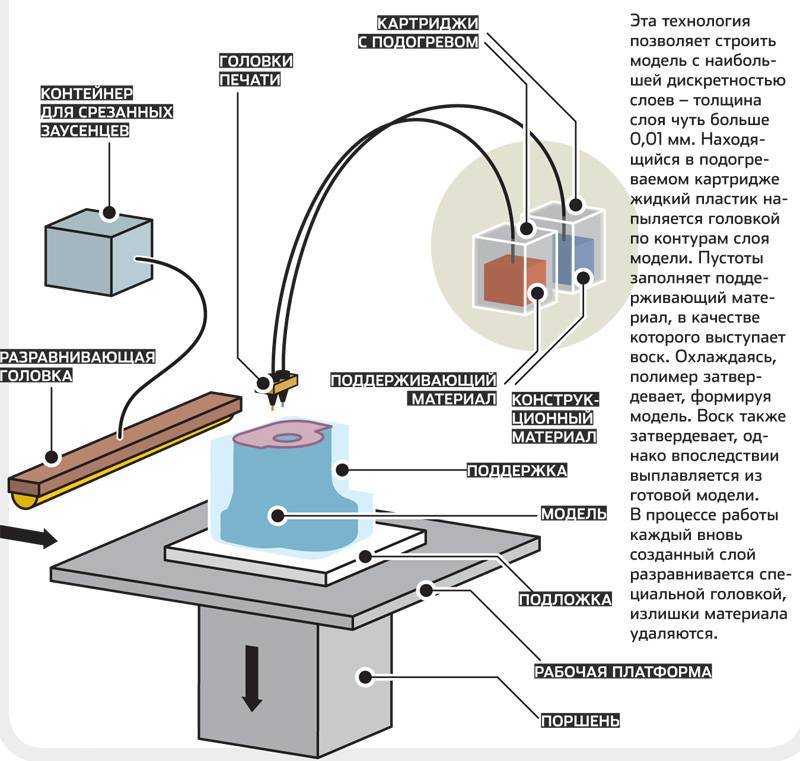 Everyone who says that printing on Bowden is impossible with flexible plastics is blatantly lying. I am typing. And quite successfully.
Now we go directly to the mechanics and its calibration.
Part 2. Mechanics. What, how and what pulls?
There is a very limited number of kinematic schemes for which the firmware is written, and which work out movements quite tolerably. nine0003
Consider everything, from the most common:
1. Design and kinematics from Joseph Pryusha (no need to read Prus, Prasha and so on, this is the name of a person, after all).
Movement along each of the axes is provided by its own independent motor. Movement along the Z axis (up and down) is provided with the help of 2 motors and with the help of a kinematic screw-nut pair. M5 studs are often used; recently, screws with trapezoidal threads have been increasingly installed. nine0003
Here is a trapezoidal screw.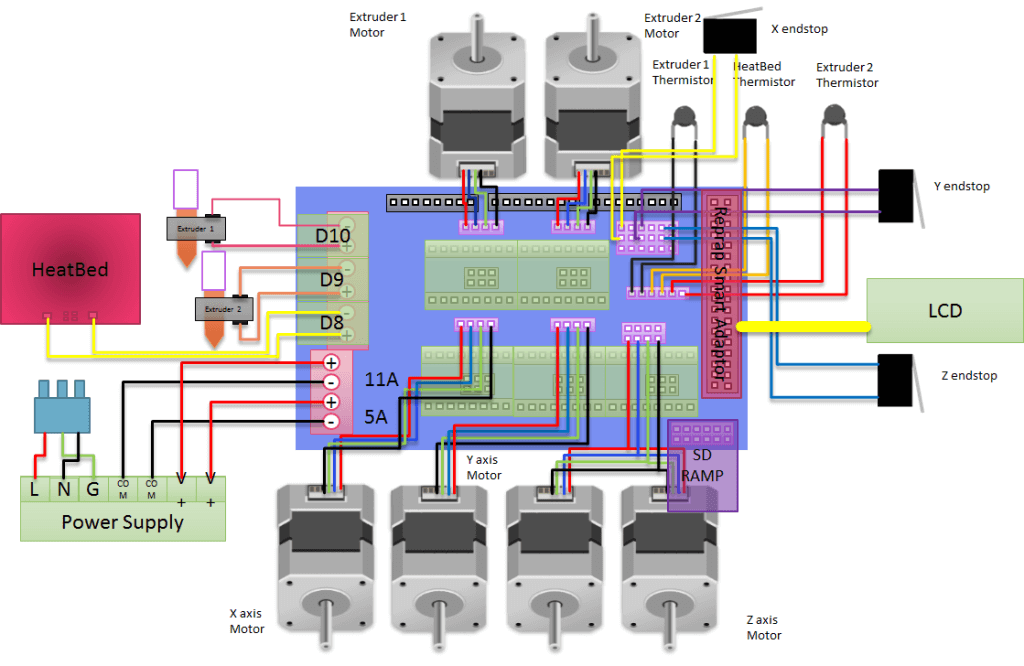 How studs with metric threads look I will not apply.
The only thing I will explain about moving along the studs and trapeziums is that for the production of trapeziums they take a calibrated rod and roll it between rollers at an angle. Get helical grooves. This method, a priori, gives better quality and step accuracy than building studs of far from the highest quality.
To connect 2 motors to one axle (and 1 connector) at the same time, the following scheme is used. nine0003
Connection in series, 2 wires soldered and the rest crimped. You can ignore the colors, the main thing is that the windings ring. A and B are windings, and 1 and 2 are terminals.
Advantages of this kinematics:
1) Independent movement of each axis. It is easy to catch to understand which axis skips steps. Kinematics migrated to printers from CNC milling, so many manufacturers make desktop milling machines on it, instead of an extruder they offer to install a laser for engraving or cutting, a spindle for milling boards, an extruder for chocolate or even dough to bake pancakes. nine0003
Pictured above is a ZMorph printer. It can be used as a printer (with one or two extruders), as an engraver (Dremel machine), as an engraving laser, and so on. A small presentation video.
Milling machine with this kinematics. I note that for milling it is necessary to use a screw-nut pair to move, and not belts, they are not designed for such loads.
Chocolate and pancake printers according to your design. It is worth noting that it is not recommended to use chocolates like Alenka or Babaevsky, since they already contain cocoa butter and during processing (melting and hardening) the result is unpredictable. It is necessary to use chocolate in galettes, such as the Belgian Callebaut, as it does not contain cocoa butter, and must be added for the final filling. For this type of chocolate, each pack has a graph of its crystallization. It is desirable to take the oil in powder form. For more information, I recommend Google about tempering chocolate. nine0003
2) The kinematics are as easy as two fingers. Its very easy to assemble. Many even collect on old DVD drives.
3) Easily changed to suit your needs, the size of the extruder is also of little importance, as it protrudes forward and does not interfere with the movement of other parts. Many people put a second extruder, or make the nozzles swing so that the nozzles of one extruder do not remain on the part when printing with the second nozzle.
Therefore, for this kinematics, there are a huge number of extruder variations, for every taste, on a very famous site. nine0003
Disadvantages of this kinematics:
1) Complicated calibration. Yes, since the table 'jumps', it is difficult to print with high quality, because the part + table, with a sharp change in the direction of movement by inertia, tend to go further. Ugly print artifacts are obtained. And for high-quality printing, you need a small speed. In general, it all depends on the frame. My first printer was a Chinese pryusha. With acrylic frame.
Acrylic is not very hard. And as you know, the rigidity of the printer, like the CNC, is the most important thing. And it was possible to print more or less qualitatively at speeds of 40-50 mm / s. Then I transplanted it to a steel frame from MZTO. nine0003
And after that, without loss of print quality, I was able to print at speeds up to 100 mm / s.
2) Delamination. Due to the open case and the constantly moving platform, hot air, one might say, is constantly blown away, and by cooling the part excessively with drafts, we increase the already large shrinkage of nylons, abs and other capricious plastics. Someone sews a fur coat for a fabric printer, and someone is content with boxes.
But the goal, as always, is the same - to reduce the effect of drafts on the shrinkage of the part. nine0003
Key points for correct calibration of printers with this kinematics:
1) Place the printer on a level surface. Preferably horizontal. This requires a bubble level. Next, set the level of the position of the X axis.
2) Transfer to the home position. It is done either in the printer menu with the Home / Home command, if you are printing from a computer, then either with the G28 command in the command line, or with special buttons with the house icon.
Next, tighten the table screw so that the nozzle touches the glass. It did not press on the glass, but touched. We look at the light and twist. After that, move the extruder to another corner with the arrows in + X, + Y from the PC, or through menu
Turn the screw in the same way until it touches the nozzle. And repeat the operation for the remaining points.
I will try to save you from mistakes. In the photo of the printer above, the glass on the table is fastened with as many as 8 clamps. And it is quite possible that there will be a hump in the center. To avoid such problems, the glass should be fixed with 3 clamps. The plane is built, as is known from descriptive geometry, by 3 points. And calibration will be easier in this case. Just tighten the screw over the limit switch in Z.
For the nozzle to touch the glass in the middle of the side with 1 clamp. Then we distill the hot end into the corner where there is another clamp, tighten the table screw, and repeat the operation with another angle.
Regarding wobble.
All sorts of anti-wobble systems such as installing a bearing in the upper support do not work.
Just because putting 4 far from perfectly even cylinders in perfect parallel and in the same plane is an unrealistic task. Especially on a flimsy acrylic frame with printed details. Therefore, if we take the straightness of the shafts as a constant, and set them parallel on the frame (purely hypothetically), and release the screws (from below the coupling for attaching to the motor) and nuts for attaching the X axis. Due to their curvature, the screws will spin like a mixer, but on printing will not be affected. nine0003
Otherwise, the design will work on who will be stronger in terms of bending resistance. And it will turn out far from a flat wall. Do you need it?
2. Kinematic design of Felix printers.
There are many such printers, such ones are made by MZTO (mz3d.ru), already mentioned by Felix. In fact, the kinematics are the same as those of the Prusa. axes independent of each other. Only now the table does not travel along one axis, but along two at once. Along the Z axis, and along the Y axis.
The design of the table is something like this.
A platform rides on the Z shafts. The engine hangs at the back. The table moves along the rails with the help of a belt. The hotend moves only along one axis. The design is very funny, since the table weighs much more than the hotend, and they try to move it along 2 axes at once.
Advantages of this kinematics:
1) There is no second motor along the Z axis. There is no notorious wobble simply because there are 2 shafts and 1 propeller. The screw should also not be fixed from above. If it's not a ball screw. nine0003
Ball screw is a separate issue. If we take a high-quality ball screw, say, from the same Hiwin, then it is manufactured according to at least the 7th accuracy class (if rolled, and if polished, then the class is even higher) and must be installed in bearing supports. On the drive side there are 2 back-to-back angular contact bearings, and on the other end a radial bearing with a loose fit to compensate for thermal expansion.
The purpose of mounting a ball screw is to ensure movement accuracy. If it is installed incorrectly, money is wasted, and the accuracy will not be higher than a screw-nut pair with a trapezoidal thread. For FDM, trapezoidal accuracy is more than enough. nine0003
2) Plenty of space for a direct extruder. As in the previous kinematics, there is room for creativity, to select the one and only extruder that you like.
3) Rigid frame. It is possible to make a normal frame. Rigid, durable. Yes, even cast iron. The guys from Felix decided not to bother their heads and sculpt from an aluminum profile. MZTO went further, bent the steel sheet. And the shelf for the installation of the table was milled from a sheet of aluminum.
4) If we take the design of Felix on the profile, then by replacing a pair of pieces of the profile and the Z screw, you can increase the print area. nine0003
Just be sure to add stiffness. And it will turn out like a miracle of design thought. Big, meaningless and merciless.
Kinematic disadvantages:
1) Undoubtedly large twitching masses. The table back and forth, and if you turn on the movement along Z during idle movements (Z-hope), then there will be a disco.
2) There is no way to make him a normal heat chamber. The table moves back and forth and the temperature gradient simply blows away. Hence the problems when printing with nylons or ABS. Small drafts in the room will easily show you where the crayfish hibernate, how the material shrinks. nine0003
The calibration of the table of this printer is similar to the calibration of the Prusa table, only slightly simpler. It is easier due to the fact that you do not need to level the X-axis, it is automatically set when assembling the frame. We bring the nozzle to the table and twist the lambs.
3. Ultimaker kinematics.
One of the most common variations of Cartesian kinematics.
There are not very many such printers, but they do exist. Variation from Zortrax deserves attention. A variant of the same Raise is closer to the classics. nine0003
Zortrax has twin shafts, the reason is simple - they have a direct extruder with a full size Nema 17 motor. Raise Dual has a double direct extruder, so the classic 6 mm shafts are replaced by 8 mm. And the total weight of the 'head' is almost 900 grams.
Kinematics built entirely on shafts. They act both as guides and as pulleys. Kinematics also refers to Cartesian kinematics with independent movement along each axis by its own motor. Very picky about the straightness of the shafts. If you use curved shafts, you can get very funny artifacts on the walls of models. And they will be on all 3 coordinates. Most often it looks like a different thickness of the first layer and small waves along the walls. Therefore, all the salt and the high price of the original Ultimaker is only in high-quality components.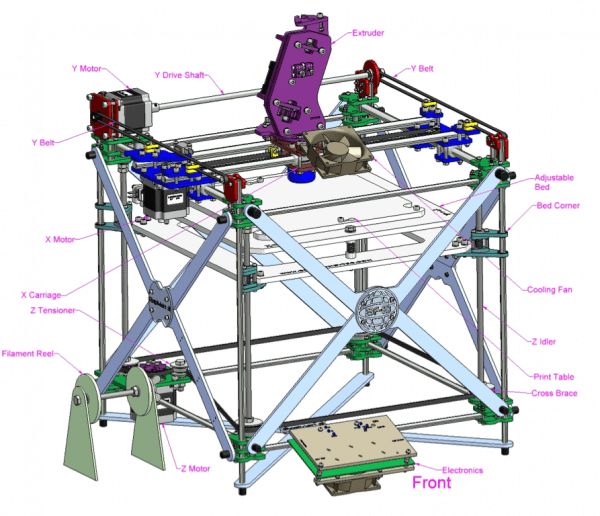 Namely, in straight shafts. The belts are often used as ring belts, which simplifies their tensioning system, since it is important that all 4 belts are equally tensioned. nine0003
Advantages of this kinematics:
1) The table only moves along one axis. vertical. And the temperature gradient in no way suffers from this. The table is cantilever, so it is desirable to provide stiffeners or take this into account with the thickness of the table.
The metal fold on the table acts as a stiffener.
Many Chinese clones are equipped with such stiffening ribs for the table.
2) Despite the seeming complexity of the kinematic scheme, it is simple and each axis moves with its own motor. nine0003
3) The body is closed, which protects against drafts, and therefore delamination. Some put an acrylic door to heighten the effect.
Disadvantages of kinematics:
1) For good printing, it is not enough to buy a pack of even rollers.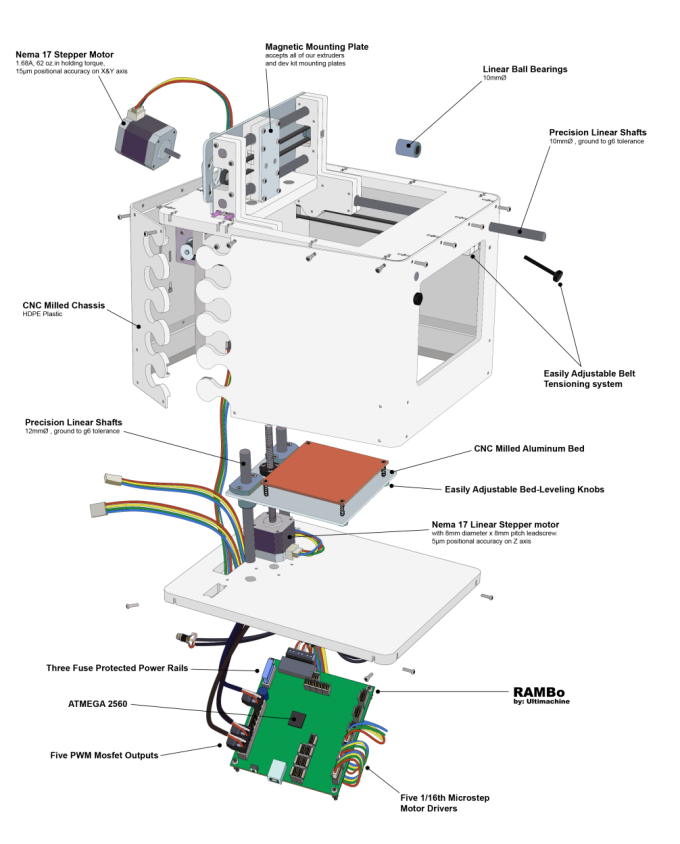 Collecting all these shafts correctly together is another task. At the same time and buy good bearings. Not that, Chinese junk, which is often sold on Ali, but normal bearings. If the bearings that are placed in the housing rotate poorly, the print will be jerky and with a shift in the layers. The consequences can be asked from Vanya (Plastmaska). Also, when buying leopard bushings, brass bearings with graphite inserts, be prepared for the fact that they will play. And if there is a backlash, the whole structure will knock. nine0003
And also, the Chinese like to push brass instead of bronze. And with even wear of brass and graphite, there will be an oily sticky black film on the shafts, which will make the movements harder. Ilya (tiger) offers good bushings. He also wrote about these difficulties.
2) All shaft parallels must be set correctly. I suggest using this device.
4 shafts that go along the walls of the body automatically stand up correctly, but it is important to set the crosspiece correctly in order to get angles 90 degrees in the XY plane.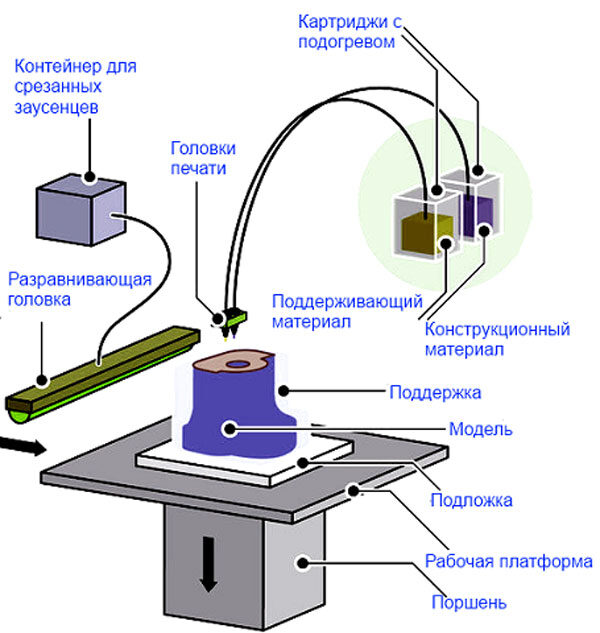
3) The design does not provide for an increase in the printable area with a couple of profile pieces, so the size of the hotend matters. Direct is difficult to put, but you can if you want.
Calibrating the table couldn't be easier. The table is often on 3 attachment points. Move the hot end by 3 points and turn the thumbs.
4. Kinematics used by Makerbot.
Also very widespread. In particular, printers from Makerbot, BQ, BCN3D, Magnum, magnum clone Zenit and quite tolerable makerbot replicas Flashforge and Hori work on this kinematic scheme. nine0003
In this case we have independent movement of each of the axes, with a Z table and all the resulting sides.
The main drawback is that the engine hangs on one side of the rolling beam, creating a kind of imbalance. This shortcoming was compensated in a two-extruder version - BCN3D Sigma. There, each bowden head has its own engine to move along the beam. And they are installed at the edges of the beam and balance each other. For uniform movement of each of the edges of the beam, 2 shafts, pulleys and belts are used. Belts must be tensioned equally. nine0003
Advantages of kinematics:
1) Independent movement of each axis.
2) Z-moving table. The temperature gradient does not suffer from 'blowing'.
3) Enclosed housing. If not closed, then there is a quite normal chance from the point of view of aesthetics to close it.
4) Scalable kinematics possible. Various BigREPs and others with 1m print areas use exactly this kinematics, as various H-bot/CoreXYs will ring like hell due to the presence of 4-5m belts and their stretching during accelerations. nine0003
Disadvantages of kinematics:
1) Unbalanced masses on the moving beam, hence the maximum print speed, with acceptable quality no more than 60-80 mm/s. Some manage to balance them and it is not so noticeable.
2) Bulky structures on the shafts to avoid unbalance during movements.
3) Make sure that the belt tensions on the right and left are the same.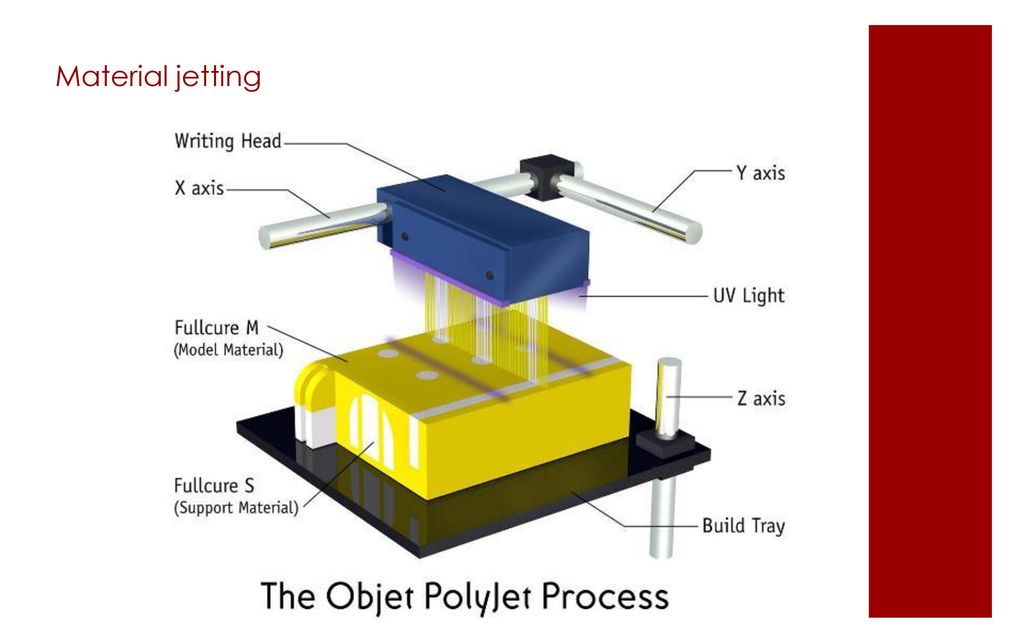
4. H-bot/CoreXY kinematics.
Next in distribution. Also Cartesian. Two motors are stationary, but move the carriage along the rails with one long piece of belt, or with two, but shorter. The math is more complicated than the previous ones, as it is necessary to synchronize the rotation of both motor rotors. That is, to move along each axis, you need to rotate both motors, and to move diagonally, only 1.
[IMG]http://www.doublejumpelectric.com/projects/core_xy/pics/hbot.svg[/IMG]
In fact, the mathematics for rotating motors is the same, but the implementation in mechanics is different. One of the biggest disadvantages of the H-bot over the CoreXY is that the belt tends to rotate the beam as it moves.
In the picture on the left, this is noticeable, the forces on the right and the forces on the left create a torque. Therefore, to implement this kinematics, the rigidity of the kinematic scheme is necessary. Most often it is implemented in rails. nine0003
With rigid beam. Some do, of course, on the shafts, but in the end - this is not a fountain.
And then they realize this and move to the rails.
For they are both easier to assemble and set up, and it is not necessary to invent carriages so that the shafts do not need to be fixed well.
CoreXY, unlike the H-bot, is driven by two belts.
And so, for ease of understanding, I will describe the positive and negative aspects of each variation of this kinematics. nine0003
H-bot.
Advantages:
1) Only one belt is needed, and the scheme provides for its operation without twisting.
2) It is more convenient to tension one belt than 2, so only one normal tensioner is needed in this scheme.
Even so.
Disadvantages:
1) The belt tends to stretch over time, and since the amount of stretching directly depends on the length, it is necessary to monitor its tension. Otherwise, you will get ugly waves on the surface before the stops. nine0003
With a loose belt tension, the carriage will have this play.
2) It is necessary to set the rollers strictly perpendicular to the XY plane, since if the roller is slightly skewed, the belt will be eaten against the roller shoulders. And we will get such a bullshit.
Tested in the skin and ZAV printer. Therefore, I always recommend that the rollers be fixed normally, and not cantilevered, in order to avoid bending the roller axis from belt tension.
3) Complicated mathematics, due to which at speeds above 100 mm/s there may be problems with the lack of resources of 8 bit boards. nine0003
CoreXY.
Advantages:
1) Two short pieces of belt. They are easier to find than one long one.
2) The forces balance the beam, but do not tend to turn it, so these kinematics can also be assembled on shafts.
Disadvantages:
1) There are schemes with belt twisting and belt transition from one level to another - this is not very pleasant for a belt. Especially when one belt rubs against another. This moment is on video. nine0003
:{}
2) The difficulty of tightening the belts. They must be tensioned equally, otherwise the tension forces will tend to turn the carriage.
3) Complexity of assembly and development. It is necessary to maintain the verticality of the rollers, relative to the horizontality of the platform for installing motors and rails. A slight misalignment of the rollers will cause the belt to tend to slide down the roller, and if it rests against the shoulder of the roller, it will creak, if the shoulder is large, and if it is small, it will try to drive into it, as in the photo from the h-bot description .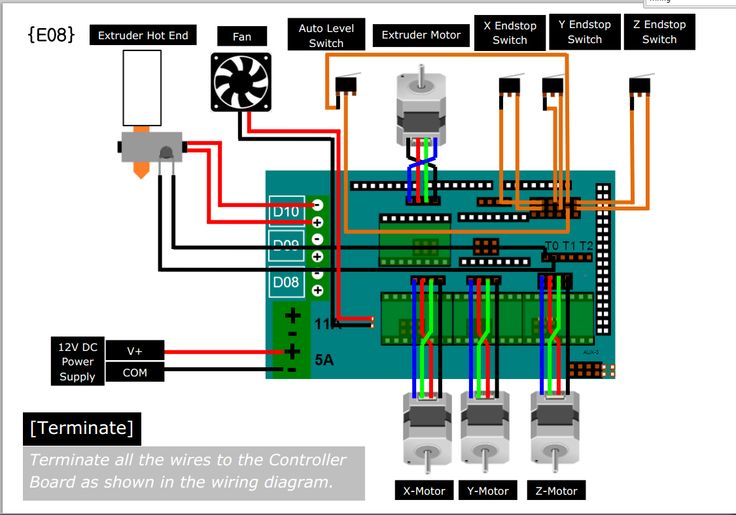 nine0003
The general disadvantage of kinematics is poor scalability. That is, it is very problematic to set such a kinematics for a print area larger than 300 * 300 simply because of the elongation of the belt during printing. For small printers with high print speeds - one of the best kinematics.
5. Delta kinematics.
The kinematics are based on the movements of the delta robot.
Only the hot end is installed instead of grips. It has its own set-up problems, but it can take a very long time to print. It is rare when direct extruders are installed, since the effector (a platform for installing a hot end) is often mounted on magnets and it is necessary to unload it as much as possible. But in order to reduce the length of the tube (more specifically, the effect of the length of the tube on the print quality due to the correct adjustment of the retracts (pulling the plastic rod back to reduce its leakage from the expansion)) on the print quality, the extruder is hung on the same carriages, but on separate hangers. This reduces the length of the bowden tube and increases print quality. nine0003
Advantages:
1) Easy to customize. To increase the height, it is enough to buy 3 pieces of a longer profile, and increase the maximum height in the settings.
2) Takes up little space. It is more often high than bulky in length and width, due to this compactness.
3) If you make a light effector (carriage on which the hot end is installed), then you can achieve high speeds without losing print quality.
4) Vertical movement is the same as XY movement. Thus, there is no sticking of linear bearings on the table crossings, as in Cartesian printers, no extra motors rolling on the beam...
5) The absence of protrusions makes it possible to close the housing and stiffen the frame.
6) The aesthetic part - it's more interesting to stick to the work of the delta.
Disadvantages:
1) Difficult mathematics of movements, it is recommended to install 32-bit boards at once.
2) Complicated setting. A common problem in tuning is to remove the so-called 'lens', because each rod rotates with a radius, and if the tuning is incorrect, your printed plane will be either a convex or concave lens. nine0003
3) It is difficult and expensive to make a rigid frame, so that it would not dangle from the constant jerking of the carriages.
4) Difficulty installing a direct extruder. It turns out to be heavy, and since many deltas are made on magnets, it will not be possible to accelerate. Although, there is one neat and easy solution - installing a ready-made direct extruder with a gearbox. Like E3D Titan Aero or Bondtech BMG.
5) Parts precision problems - any unevenness and misalignment will be visible even if they are on the same axis. And they add up along the axes. nine0003
To sum up , do you want a small printer (not larger than 300*300 mm) with nimble kinematics? Then you should go to Ultimaker or H-bot/CoreXY. Need a printer with a large printable area or 2 independent extruders? Then to Makerbot. If you print vases, hookahs and sufficiently high details - delta. For everything else there is a classic - Prusa. Experiments with double carriages, chocolate, engravings? Yes, anything. And most importantly - cheap.
You can even screw on 4 colors. nine0003
3D printer models
Looking for 3D printer models? The Internet is filled with sites that offer them for free. We have collected the TOP 10 catalogs that you can use to search and download free models in STL format. We hope you can find what you are looking for.
- Yeggi
- Yobi 3D
- STLfinder
→ myminifactory.com
My Mini Factory is a 3D model depository operated by iMakr, an online store that sells 3D printers and accessories. It also has one of the biggest 3D printer shops in Central London. The site contains 3D models designed by professionals, and all models stored on it are checked for quality. You can also make a request for the desired model, which their designers will create and put in the public domain. Billing itself as a 3D printing social network, MyMiniFactory is a thriving community of makers who love to showcase their creations. Users vote for the best models, which allows popular creations to rise to the top of the list and gain popularity. The site presents models that are stored on its social network, as well as outside it, for example, on the Thingiverse and YouMagine sites. nine0003
→ thingiverse.com
The most popular and famous site among 3D printer users, Thingiverse is owned by MakerBot Industries, the creator of the popular Replicator 3D printer series. The site allows users to store and share 3D model files that are used with 3D printers. It's a very popular site and has a large community of people hosting various categories of files on it. So if you're looking for "cool" printable stuff, Thingiverse is worth a visit. It is a portal designed to provide its users with ways to share their designs and to help print 3D creations. The site has a system that tries to find out what you like. The more you interact with the site, downloading and evaluating various developments, the better its recommendations will be. nine0003
→ 3dshook.com
Another online community of 3D print enthusiasts showcasing interesting 3D printer accessories, electronics, and most importantly, 3D models. The site contains many very interesting models of cars and buildings, as well as various add-ons and spare parts for your 3D printer. A huge catalog of paid and free models for a 3D printer. There are original unique products. Convenient search, navigation, rubricator. 3DShook has over 40 categories and adds over 100 new models to its collection every month. On 3DShook you can always find something for your home, animals, kids or something special for yourself. nine0003
→ youmagine.com
YouMagine catalog for Cube series consumer 3D printers manufactured by 3D Systems. The site mainly offers various ways to buy 3D printer supplies and files, but it also has a number of cool free items available, mostly in the Kids section. Some of these elements can be customized by children using an online application. The company offers 3D modeling and publishing tools on its website for both hobbyists and professionals. The site offers a content warehouse where the community hosts and shares models. Registration is required to download files. nine0003
→ 123dapp.com
Autodesk 123D is a suite of computer-aided design (CAD) and 3D modeling tools aimed specifically at hobbyists. Along with the toolkit, Autodesk also has a website where users can record their designs and share them with other users. Many of these models can be downloaded and printed using Autodesk as a utility to interface with the MakerBot 3D printer. The goal of the Autodesk website is to "help engineers build products faster." The site offers tools to help them collaborate on their files. For the casual 3D printing enthusiast, the best part of the site is the large library of free files created by a community of over a million engineers. Registration on the site is required, but the number of files that are then available is worth it. nine0003
→ cgtrader.com
Being primarily a place to buy and sell a variety of 3D models (not necessarily just those designed for 3D printers), CGTrader does offer a selection of free models that can be used on 3D printers. The site has a system that tries to find out what you like. The more you interact with the site, downloading and evaluating various developments, the body will have better recommendations. nine0003
→ cults3d.com
A French community and marketplace where developers can share or sell their creations. The site has a collection of high quality models that you can download. Users can follow the work of the designers they like and get instant updates when a new creation is posted on the site. The site's name, Cults, is a backwards spelling of St. Luc, the patron saint of artists. The site also supports English. This is a relatively new community, so the number of its users is not very large yet. nine0003
→ instructables.com
The Instructables website is a community where users can share their DIY projects. This also includes products obtained using 3D printers. The site also provides explanations and instructions describing how to build 3D elements, and some designers take the time to answer questions from site members. Instructables allows users to store and organize their 3D printing projects. This is done to help them work together in the future. You can think of this site as a GitHub 3D printing site where users can share their files, discuss projects, and participate in them. The site also offers the ability to make a request, so if you can't find what you're looking for, you can ask the site's community about it. nine0003
→ pinshape.com
Pinshape, a marketplace for 3D models, is similar in style (layout, appearance, and ability to capture likes) to the well-known site Pinterest. You can buy models from designers, or download them for printing yourself if they are offered for free. Pinshape allows users to host and share 3D model files on it. Basically, this site acts as an online store where you can buy 3D printed parts, or order your own 3D model to be printed. But if you look closely enough, you can find people who sell their products and also offer the files you need so you can print them yourself. nine0003
→ 3dfilemarket.com
A new and growing repository of 3D File Market models. All models are tested for suitability for 3D printing. You can download as many models as you like without registration, although you must provide your email address to access the 3D model files. This is a very simple site aimed at being a repository of model files for 3D printers, and nothing more. The basic design of the site allows users to put files on it for public access, and download files that they would like to use. The site contains many small, simple 3D models ready to be printed, as well as a good selection of everyday items and even spare parts for 3D printers. nine0003
Search engines for 3D models in various formats, including STL for a 3D printer. Use queries in English, these search services collect information about models from all over the Internet.
→ yeggi.com
Yeggi is a search engine that will browse major 3D printing websites to find files compatible with 3D printers. You can also browse some popular searches to get an idea of what the community is currently interested in. nine0003
→ yobi3d.com
When in doubt, use yobi3D to search for files that match the desired 3D printer. This tool is useful if you want to search for one thing across all sites at once. A very convenient format filter, fast search, high-quality previews and stl models prepared for 3D printing for printing.