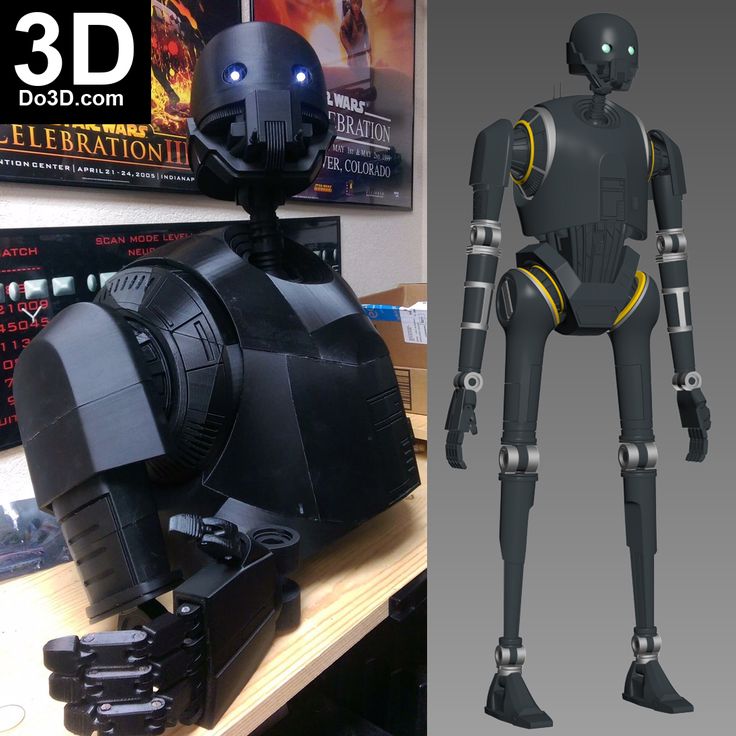
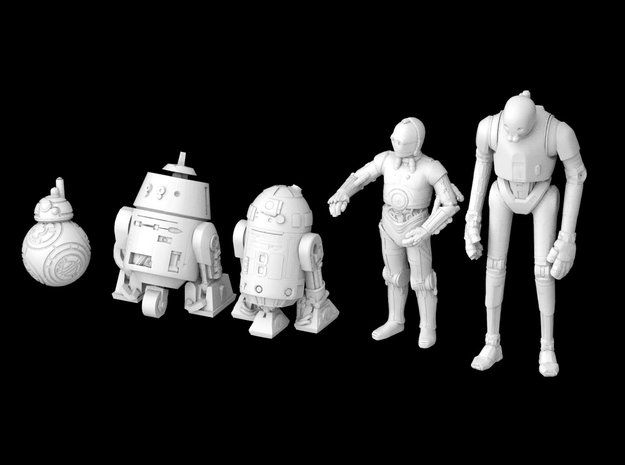
3D printed droid
Droid best STL files for 3D printer・Cults
Model R2D2 of 38cm
Free
R2D2 Head
€0.94
Droid 2.0 - Echo Dot (4th & 5th Gen) Holder
€4.71
XBOX Series X Gonk Droid Stand
€4.71
Jawa Droid repairs 2D wall hanging
€2.35
Sonn-Blas SE-44 C Blaster
€12.49
Candle Droid - articulated and print in place
€2.35
K-2S0 star wars
€2.50
C3P-Octopus
€2.29
R2D2 Chibi Flying Mode Star Wars Fan Art
€15
STAR WARS LEGION Commando Droid SET
€8. -21% €6.79 60
STAR WARS LEGION Commando Droid
€1.43
STAR WARS LEGION Commando Droid
€1.43
STAR WARS LEGION Commando Droid
€1.43
STAR WARS LEGION Commando Droid
€1.43
STAR WARS LEGION Commando Droid
€1.43
STAR WARS LEGION Commando Droid
€1.43
Surveillance droid
€3.75
The Hive Black Friday Droid Bundle
Free
Lola Droid from Obiwan Kenobi Christmas Ornament 3D Model for 3D Printing
€1.38
Star Wars Control Panel 1
€1. 15
15
STAR WARS LEGION Commando Droid set
€4.30 -10% €3.86
STAR WARS LEGION Commando Droid set
€4.30 -10% €3.86
K-2SO
€2
STAR WARS VINTAGE R2-R2 , CUSTOM UNPRODUCED KENNER R2-D2, HASBRO ACTION FIGURE, 3.75", 1/18, 5POA
€4.70
R2D2
€1.20
R2D2
€1.20
Star wars General Kalani High poly model
Free
Gonk Droid - 3D Print .STL File
€4. 15
15
Scavenger The Librarian
€5.65
STAR WARS REBELS CHOPPER ACTION FIGURE, C1-10P ASTROMECH DROID CUSTOM UNPRODUCED KENNER, HASBRO, 3.75", 1/18, 5POA
€5.64
Vintage Mech Droid - 28mm Miniature Robot
Free
STAR WARS BD-1 DROID ARTICULATED, HIGHLY DETAILED & PRINTABLESTAR WARS BD-1 DROID ARTICULATED, HIGHLY DETAILED & PRINTABLE
€9.40
MSE Benchy / Mouse Droid Benchy
Free
BB-9 STAR WARS
€5.18
R2D2 Chibi Super Deform Container Star Wars
€10
SD HEISEI GIGAN 1992 PVC VINTAGE FIGURE 1.5 INCH CHIBI GASHAPON
€2.82
SD MECHAGODZILLA 74 PVC 1992 VINTAGE FIGURE 1.
 5 INCH CHIBI SUPER DEFORMED
€2.82
SD MECHA KING GHIDORAH 1992 PVC VINTAGE FIGURE 1.5 INCH CHIBI SUPER DEFORMED
€2.82
BB-8 Christmas toy / ornament
Free
Mouse Bot USB Holder [SD, USB, Micro USB Combo]
Free
B1 Battle Droid V5 (Lego Compatible) (Includes parts for BX Commando)
Free
STAR WARS LEGION DUM PIT DROID
€1.15 -10% €1.03
STAR WARS LEGION gonk droid
Free
the Iron Giant. Giant 70 centimeters high 18 pieces
€1.50
TIE/mg Mining Guild starfighter 3.
 75" figure toy ship 3d print files
€18.82
Tye-WING ugly 3.75" figure toy ship 3d print files
€18.82
Star Wars Jabba Jabba Palace Torture Room Playset
€4
3D Printed Mouse Droid Parts
In the Mouse Droid Builders Facebook Group there was a post from member Azman Sugi who posted pictures of his Mouse Droids Train (the way we have seen them in some books and on Wookiepedia). Seeing this gave me the idea that it was time to revive my 3D Printed Mouse Droid Parts project. First step was to get a hold of a lower shell to do all of the work on. The lower shell below is cut out from foam-board using the plans that were shared by Ziz. The foam-board was acquired from one of those Dollar Stores. Michael Erwin created a 3D printable set of wheel rims for a full scale Mouse Droid with a three hole bolt pattern to match the hardware included with the Resurrection chassis. Paul Murphy took Michael's rear tire design and changed it up so that it would use the standard parts sold by RJ Speed for their "Legends" ladder frame chassis which used a four hole bolt pattern. In wanting to try to make as many of the parts myself I created a new hub to work with Paul's wheels which would adapt it to a 1/4 inch steel shaft.
[Note: To find Paul's Mouse Droid Designs go to: Onshape and search for "MSE-6 greeblies"] These hubs and rims were coupled with a axle design that I created based on my design from my A&A Mouse Droid. I will be sharing my axle parts shortly online. Feel free to message me if you need them.
With the way that these wheels & hubs are displayed here in the pictures they are on the shaft with a friction fit. They would work fine as is if you were making these parts for slaves in part of a Mouse Droid Chain such as Azman's. Maybe you might add a little glue or something to the shaft to keep the hubs from popping off the ends if you drilled out the hole too large. Here is a list of parts used for the rear axle build.
Next on the list of stuff is to create a way to transfer power to those rear wheels so that this design can be used universally. So I'll be using two 16 tooth sprokets, a length of 0.250 chain, a 80 tooth 32 pitch gear, and a 20 tooth gear to transfer power from a motor and to the rear axle. Foam Tires: When ordering foam tires for your 3D Printed rims you must understand that every machine & material is different. So you must measure the rims and send the information in for the proper size to be delivered to you. When ordering state in the comments: "NEEDS to be XXmm OD. No truing or cleanup just a raw edge. " XX = the OD you specify. You can order your foam tires from this website: http://tmrcracing.com/Donuts-Donuts. When ordering tires from this place follow this information to place the order correctly (OD stands for outer diameter, and ID stands for Inner Diameter): The tire compound is "Black" and request No truing or cleanup, you want just a raw edge. Front tire (donut): 75mm OD X The width of your wheel rim X The OD of your front wheel rim minus 2mm will equal the ID of the front donut.
Gear tower transmission: I took my basic design from my A&A Mouse Droid and tried to improve on it in a new way since I am now able to 3D print. I am including the different views & phases that the design has gone through.
So my son asked that I continue to prototype this build on out 3D printer as opposed to getting the bottom tray laser cut or done on a CNC router table.
|
 A simple box cutter (the type that you can break off tips) was used to cut out the parts. As for assembly I use a hot glue gun and clear tape. At this time I am still modifying bottom of the shell to better suit the tires once things are all mounted in place. The front wheels area will need to accommodate the tires turning left and right for steering. Once the modifications are complete I will draw things out on a CAD program for the bottom of the shell to match up with Ziz's plans.
 Keeping the spirit of designing the parts and using my 3D Printer to make as much as I can here are my thoughts. Since I have those long 3mm screws coming out of the back of the wheels I might use them along with another shaft collar with a long set screw. The long set screw will be pinned down in place with a small piece of sheet metal being held in place by those 3mm screws.
  htm
htm Here is what my design is looking like. I was able to find files for the gears and hubs so I added them into pictures to help you understand.
Best STL Files for Droid・Cults
3D Printer38cm R2D2
Free
Head R2D2
0.94 €
Droid 2.0 - Echo Dot Holder (4th and 5th generation)
4.71 €
Stand for XBOX Series X Gonk droid
4.71 €
nine0002 Java droid repairs 2D wall hanger2.35 €
Blaster Sonn-Blas SE-44 C
12.49 €
Candle droid - with hinge and seal in place
2.35 €
K-2S0 Star Wars
2.50 €
C3P-Octopus
2. 29 €
29 €
15 €
STAR WARS LEGION Commando Droid SET
€8.60 -21% 6.79 €
Commando droid STAR WARS LEGION
1.43 €
STAR WARS LEGION 9 Commando Droid0003
1.43 €
Commando droid STAR WARS LEGION
1.43 €
Commando droid STAR WARS LEGION
1.43 €
Commando droid STAR WARS LEGION
1.43 €
Commando droid STAR WARS LEGION
1.43 €
nine0002 Surveillance droid 3. 75 €
75 €
The Hive Black Friday Droid Bundle
Free
Lola Droid from Obiwan Kenobi Christmas Ornament 3D Printable Model
1.38 €
Star Wars control panel 1
1.15 €
STAR WARS LEGION 9 Commando Droid Pack0003
€4.30 -10% 3.86 €
STAR WARS LEGION Commando Droid Pack
€4.30 -10% 3.86 €
K-2SO
2 €
nine0002 STAR WARS VINTAGE R2-R2, CUSTOM UNPRODUCED KENNER R2-D2, HASBRO ACTION FIGURE, 3. 75", 1/18, 5POA
 4,70 €
R2D2
1.20 €
R2D2
1.20 €
Star Wars General Kalani High Poly Model
Free
Droid Gonk - 3D printable .STL file
4.15 €
Scavenger Librarian
5.65 €
STAR WARS REBELS CHOPPER ACTION FIGURE, C1-10P ASTROMECH DROID CUSTOM UNPRODUCED KENNER, HASBRO, 3.75", 1/18, 5POA
5,64 €
Vintage Mech Droid - 28mm Miniature Robot
Free
STAR WARS BD-1 DROID - FULLY ARTICULATED, ULTRA DETAILED AND PRINTABLE
9.40 €
MSE Benchy / Mouse Droid Benchy
Free
BB-9 STAR WARS
5. 18 €
18 €
R2D2 Chibi Super Deformable Container Star Wars
10 €
SD HEISEI GIGAN 1992 PVC VINTAGE FIGURE 1.5 INCH CHIBI GASHAPON
2,82 €
nine0002 SD MECHAGODZILLA 74 PVC 1992 VINTAGE FIGURINE 1.5" CHIBI SUPER DEFORMED2.82 €
SD MECHA KING GHIDORAH 1992 PVC VINTAGE FIGURE 1.5 INCH CHIBI SUPER DEFORMED
2,82 €
Christmas toy / decoration BB-8
Free
USB Mousebot Holder [SD, USB, Micro USB Combo]
Free
B1 V5 Battle Droid (Lego compatible) (Includes parts for BX Commando)
Free
STAR WARS LEGION DOOM PIT DROID
€1. -10% 1.03 €  15
15
Race droid from STAR WARS LEGION
Free
le Géant de Fer/ Iron. Giant 70 centimeters high 18 pieces
1.50 €
TIE/mg Mining Guild starfighter 3.75" figurine toy ship 3d print files
18.82 €
Tye-WING ugly 3.75" figurine toy ship 3d printing files
18.82 €
nine0002 Star Wars Jabba Jabba Palace Torture Room Playset4 €
3D Printed Star Wars RC Robot
I was very impressed with the BB8 Star Wars robot and how it moves. After I found out that several different working RC models of the BB8 had been created for the movie, I decided to figure out how I could build my own RC model. After many trials and errors, typos and curse words, I settled on this design. nine0205
This is an easy-to-build robot inspired by Disney's BB8 from Star Wars. It is controlled by Arduino Uno via Bluetooth from a smartphone.
The design is very simple, so I hope you can put it together and add your own improvements.
Step 1: List of materials
List of items used on the project and where I found them:
- Styrofoam ball: link
- Arduino Uno: link
- Motor Shield Link
- Bluetooth models HM10: link
- Motor and wheel: link
- Magnets: link
- Battery: link
- Battery slot: Ref.
- White primer: Ref.
- Metallic Markers: Ref.
- Set of other markers: Ref.
Step 2: Create a spherical body for BB8
First we need to print the two hemispheres that together make up the body of BB8. The files for them and other instructions planned for later are available on Thingiverse: link. I have also added them to each step for convenience. nine0005
You need to print them with a detailed overlay. This will take some time, but the thinner the layers, the smoother the surface of the ball will be inside and out as the printer approaches the top layer.
When printing is complete, remove the internal supports and use sandpaper to smooth out any rough surfaces where the parts came into contact with the support materials.
Files
- Grooved_Half_V2.STL
- Tounged_Half_V2.STL
Step 3: Start Assembly
Print the main chassis file. Unlike the spherical halves, this part does not need props. We will then need two small screws to secure the Arduino Uno as shown in the picture. You don't need to tighten the screws, just tighten them to keep the module in place. You can also use hot glue to secure.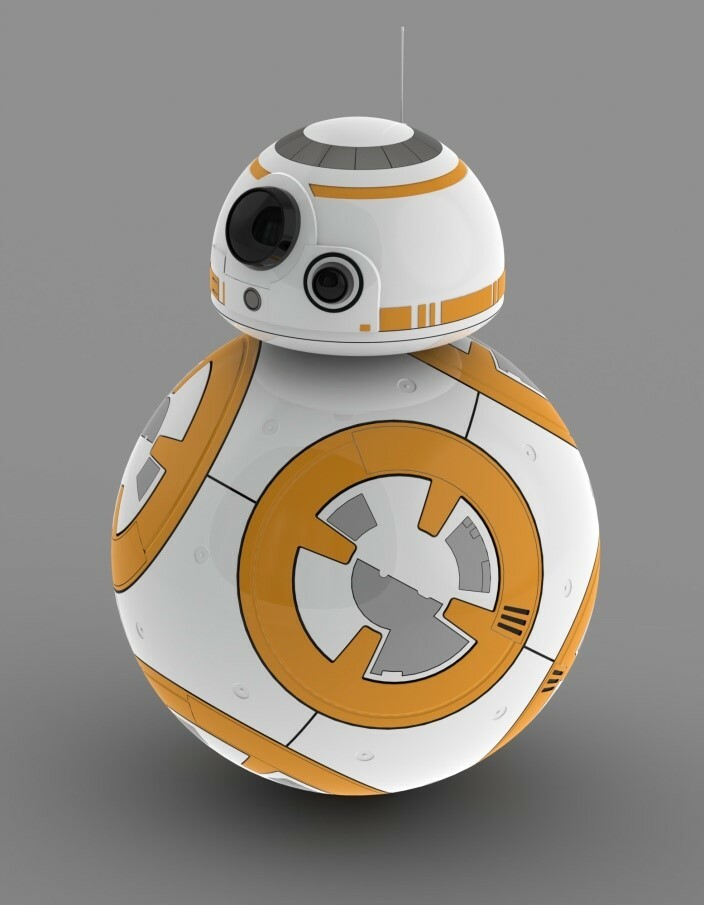
Files
- Chassis_V9.STL
Step 4: Let's solder (it's easy!)
Solder a 16 cm wire to each terminal of both DC motors.
The motors (in their cases) can then be attached to the inner chassis we worked on in the previous step. Insert the motor into place as shown in the pictures and gently insert the tie rod into the bottom hole of the motor housing. Once you push it through, it will appear on the other side. Then keep pulling it through the top hole and tighten the tie.
Cut off the excess, but don't throw it away. Take the piece we just cut off and insert it into the hole at the far end of the motor that is nestled in the chassis. Insert it until it stops and then cut it off. nine0005
Repeat the step on the opposite side of the chassis for the other engine.
Step 5: Solder (Easy Again) Wires for the Motor Shield
Show 3 More Images on the breadboard). These will be soldered to the correct pins on the breadboard and will allow you to later connect the Bluetooth module.
(If you have 4 wires of different colors, I would use them and note which wire is soldered to which pin. This will make assembly a little easier in the future). nine0005
- The first wire must be soldered to pin ‘1’ on the Motor Shield board.
- The second wire must be soldered to pin '0'.
- The third is soldered to the 3.3V pin.
- The fourth and last is soldered to ground. It can be passed through a hole adjacent to the ground pin on the motor case and soldered to the underside of the board.
While we're waiting for the soldering to cool down a bit, we can add two extra zip ties around the back of the motors to wrap around the wires we've soldered. This will help prevent tension or movement in the wires and prevent damage to the solder. nine0005
We can now place the Motor Shield on the Arduino uno. This is done by plugging the pins from the bottom of the Motor Shield into the corresponding female receivers on the top of the Arduino board. Be careful to make sure the pins are aligned and none are bent or damaged.
Step 6: Connect the Motor Shield and Motors
Now we can connect the motors to the Motor Shield board. The polarity is not important at the moment, as we can correct it further in the Arduino code. nine0005
Take both wires from one of the motors and attach them to the two nearest terminals where 'M2' is written on the board. The two wires from the other motor are also attached to the terminal closest to 'M1' on the Motor Shield board.
Step 7: Attach Power Supply
At this point you will need hot glue or something similar to apply to the back of the battery pack and attach it to the chassis as shown in the pictures. It is important that the part where the wires come out of the battery pack faces the same direction as the Arduino, as we will be connecting them together. nine0005
Take the wires from the battery pack and screw them to the power terminals on the Motor Shield. The positive (red) should be connected to the top terminal, the negative should be connected to the terminal below.
Step 8: Mount the Wheels
This is a very short step and you may have already done it.
Attach wheels 🙂
Step 9: Power Up and Load Code
Before inserting the batteries into the battery pack, we need to remove the jumper that supplies current to the Motor Shield terminals (in this case, our pack of batteries) to the Arduino. Don't lose this little jumper as we'll need to put it back in when we're done programming. nine0005
Once you have done this, insert 4 AA batteries into the battery pack and connect the Arduino to your computer using the USB cable.
Once connected, you can upload the code to the Arduino. You can find the code here: link
I won't explain how to upload the code. There is a lot of material on the web showing how this is done.
When the code is loaded, open a console window in the Arduino environment and send serial commands.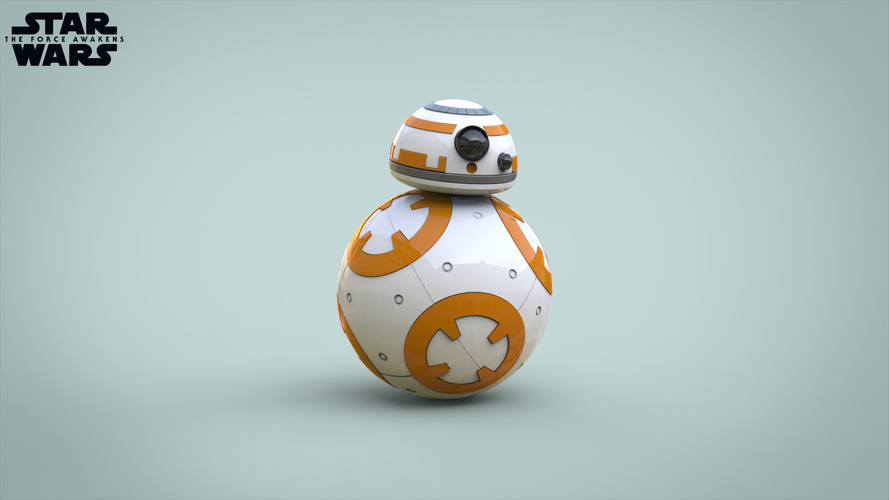
- Send 'F' to move forward
- Send 'B' - to move backwards
- 'L' - turn left
- 'R' - turn right
- ‘S’ or any other letter - stop.
If you ask the robot to move forward and the motors move in opposite directions, then you need to change the code and fix it. Find line 45 and change the word 'BACKWARD' to 'FORWARD' (necessarily in capital letters - the code is case sensitive). Then on line 53 change 'FORWARD' to 'BACKWARD'. After you've made changes, don't forget to re-upload the code. nine0005
After everything works as it should, you can disconnect the USB from the Arduino and put back the jumper we removed earlier. Now you will find that the battery pack powers both the Motor Shield and the Arduino 🙂
Step 10: Bluetooth
How to Connect the HM10 Bluetooth Module
Look at the attached pictures. If you remember what color wire you connected to which pin, then everything should go like this:
- The wire connected to 3.
 3V should be connected to ‘VCC’
 - Wire connected to Ground goes to ‘GND’
- The wire connected to '0' / Tx on the Motor Shield must be connected to 'RXD' on the HM10 board
- Wire connected to 1/ Rx on Motor Shield must be connected to 'TX' on module
It is very important to pay attention to the fact that the so-called talking pin 'TX' (T - transmitting) for data transmission, connects to the listening 'RX' (R - receiving) on the HM10, and vice versa.
If everything goes according to plan, the Bluetooth LED should light up. Now it can be bent to the place of its further stay behind the Arduino, but in front of the column. nine0005
Step 11: Connect Phone
For iPhones and iPads, there is a free app in the App Store called ‘HM10 Bluetooth Serial Lite’. I use it to connect the Bluetooth module and then send the same serial commands that we used earlier on the computer: 'F', 'B', 'L', 'R' and 'S'.
If you want to create control buttons on your phone, you can find the program ‘HM10 Bluetooth Serial Pro’ which worked great on my phone. nine0005
I'm sure there are many other applications that will allow you to send serial commands over a Bluetooth connection. I don't have an android device, so if anyone can recommend an android app if they find one that works well, i'd be very grateful :)
Step 12: Test Drive
into the body half of BB8, put the other half on top and temporarily secure them with tape (if the tongue and grooves are not enough for them to stick together). nine0005
Take the ball for a test drive and admire the work done.
(Without the head attached, it's hard to know which direction "forward" would be, but it will become much clearer soon)
Step 13: Print the base of the head
Print the base file for the head. Although I didn't really bother about what color the printed main body would be, I recommend printing this part in white.
Files
- Head_V6.STL
Step 14: Attaching the Magnets to the Chassis
Using hot glue, attach the 6x3mm neodymium magnets to the appropriate locations on the top of the chassis.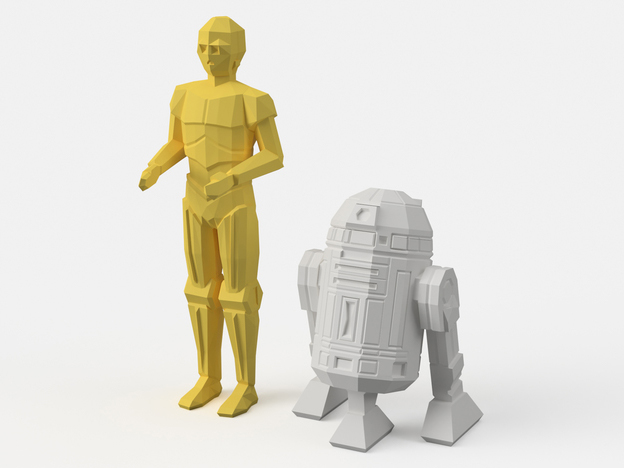 You need to be sure that their north poles are the same. That's right, it is necessary that the poles of all magnets are located in the same direction.
Step 15: Attaching the Magnets to the Head
We are using the magnets we attached to the chassis in the previous step to properly position the magnets in the head. nine0005
First, lay down the chassis and place the BB8 body half on top. Put a couple of layers of napkins or paper on top. We can then take three additional neodymium magnets and let them determine their position and orientation (their north and south poles) by themselves with the three bottom magnets mounted on top of the chassis.
When they are aligned, apply a little hot glue to their surface and orient the printed BB8 head base directly on them, making sure that each magnet is fixed somewhere around the inner ring as shown in the pictures. nine0005
Allow the adhesive to cool, then remove the structure and carefully remove the paper from the magnets.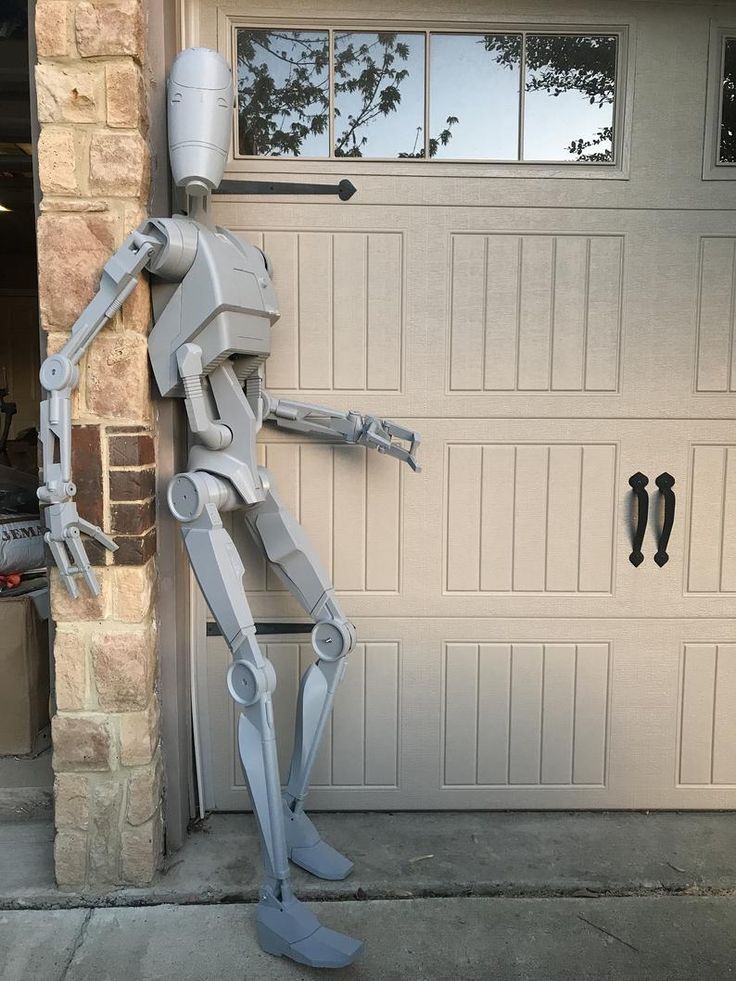 The paper can be recycled, as we will no longer need it.
Step 16: Styrofoam Head
It is very important to keep the weight of the BB8 droid head as light as possible. I tried many different ways to print the head, but nothing beats the lightness and comfort of foam.
So we cut a 120mm foam sphere in half and then glue it to the base of the head. nine0005
The first time I used a kitchen knife to cut. For most purposes this will work, but it will make a lot of dirt and leave a lot of nicks around the edges. To solve this problem, I designed a battery operated wire cutter. If you don't have one yet, you can see how it's made here:
Anyway, the choice is yours, we just need to cut the ball in half as neatly as possible.
Step 17: Insert LED 9 into the head0212
Start by soldering an LED (I chose red) to the C2032 battery holder (coin sized lithium battery).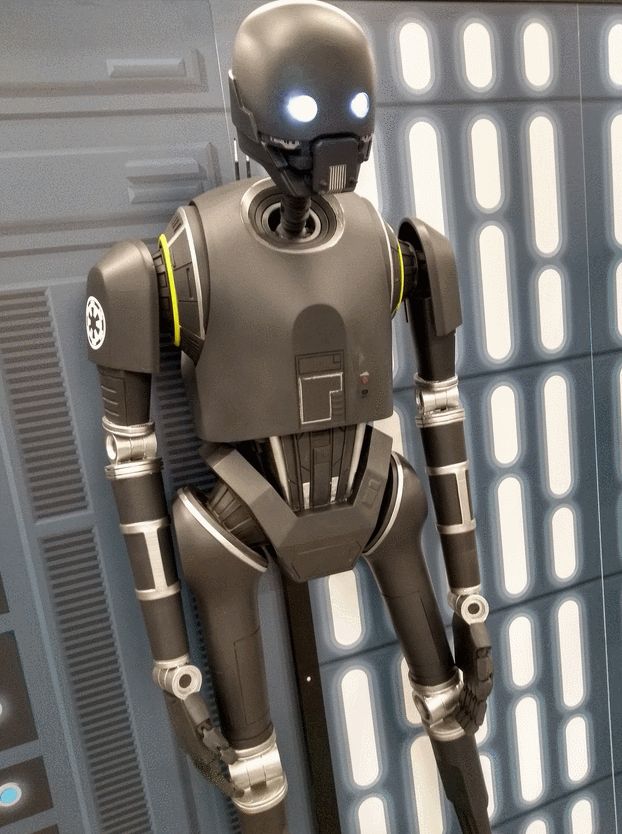 Then pass the LED through the hole in the base and glue the battery holder to the underside of the head (where the magnets are).
On the other hand, carefully bend the wires so that the front of the LED rests on the edge of the printed part, and then add hot glue to secure everything.
Step 18: Attaching the Head to the Styrofoam
If necessary, use a knife or similar to cut a hole in the foam ball to place the LED.
Apply some hot glue around the perimeter of the printed part and secure the foam to it. When the glue has cooled, we can fill in all the gaps with putty or something similar. When everything is dry, use sandpaper to remove the bumps.
Step 19: Decorate the Head - Add Colors
Start by painting the head with a few coats of acrylic paint. This will help even out all the shades of white and seal the foam. If the foam beads are not compacted, they are prone to absorb other materials, swell and eventually collapse. nine0005
Using a pencil, you can start sketching patterns. Draw lightly, as you may make a mistake.
I then used different metallic and regular markers to paint the details. To make everything look more defined, I went outside the areas marked with a pencil, and made more confident strokes this time.
Step 20: Decorate the Head - Add Volume
For the robot's antenna, I cut off the tip of a cheap brush and then painted it black. nine0005
Then I made a hole in the head with a drill. I added some glue to the tip of the antenna and placed it in the newly drilled hole.
I then printed the "eye" and "sensor" in black and attached them to the head with hot glue.
Files
- Eye.STL
- Sensor.STL
Step 21: Decorate the body
Before painting the two parts of the robot's body, it's a good idea to wipe the surface with a damp cloth to remove any plastic dust that may have remained from the sanding done. Once you've done that and the pieces are dry, spray paint them with white plastic primer. After you apply a few layers and everything dries, you can move on. nine0005
Use duct tape to connect the two halves of the body together while we decorate it. If you're using four shapes and want to spread them evenly around the equator of the body, then you can use duct tape to separate spaces for the elements we'll be drawing shortly.
BB8 has six large elements spaced equally across the body: one on the top, one on the bottom and four along the waist.
As with the head, you can use a template to outline all the elements exactly on the body. After drawing, you can safely use felt-tip pens to add colors. Repeat the process all over the body, including and excluding different parts of the template, to create unique shapes. nine0005
If you find yourself smearing your pencil outlines, don't worry. In my opinion, this helps to give the robot a shabby look.
As with the head, when I finished with the coloring, I went over the lines more precisely with a pencil so that the drawing was better demarcated from the white area.