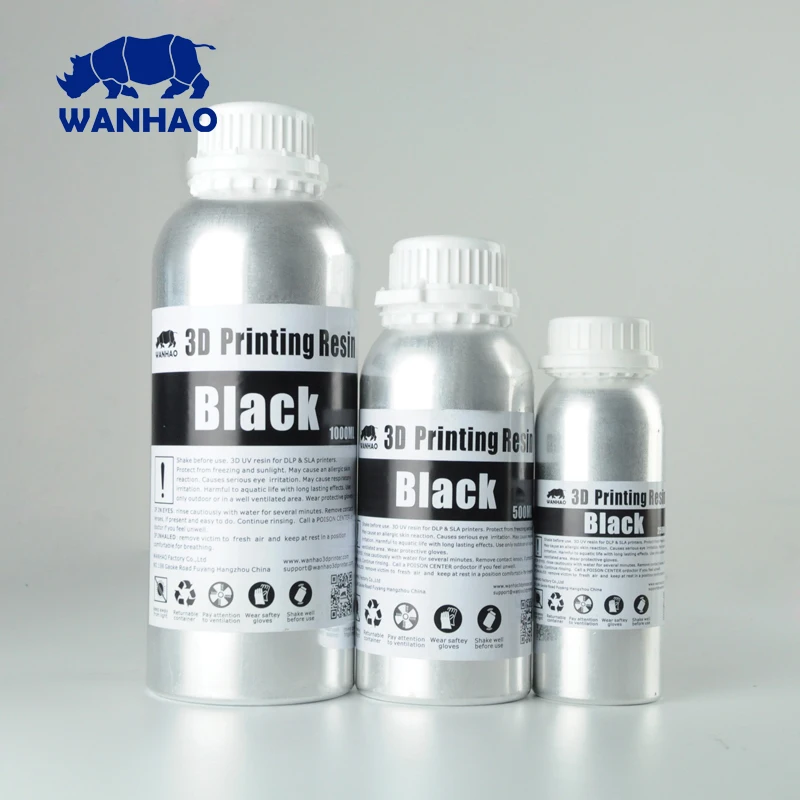
3D print resin coating
Guide to Post-Processing and Finishing SLA Resin 3D Prints
Stereolithography (SLA) 3D printing has become vastly popular for its ability to produce high-accuracy, isotropic, and watertight prototypes and parts in a range of advanced materials with fine features and smooth surface finish.
However, parts do not come out of the printer 100% finished: they often require post-processing. While parts directly off the build platform are ready to use and smooth, a few extra finishing touches will make parts suitable for a wide range of applications.
In this guide, we cover everything you need to know about post-processing SLA parts, from washing parts in IPA, post-curing them with light and heat, painting, sanding, and more.
White Paper
Looking for a 3D printer to realize your 3D models in high resolution? Download our white paper to learn how SLA printing works and why it's the most popular 3D printing process for creating models with incredible details.
Download the White Paper
Many users want to know how to paint SLA 3D printed parts, or how to smooth and polish them to create beautiful, customer ready models. In order to do this, parts must be washed to remove sticky, excess resin from the surface. Failing to properly wash parts will leave the parts sticky and unseemly, so post-processing is vital to successful 3D printing.
Washing SLA Parts Tips:
- Formlabs recommends washing SLA parts with isopropyl alcohol (IPA) or tripropylene glycol monomethyl ether (TPM). Most users find IPA is more effective for washing parts. Note that IPA solutions can often only be bought in large quantities, so you should be prepared to store excess IPA for future use. Check for local availability before deciding the best course of action.
- Parts should be moved around in the solvent as well as soaked for optimal cleaning.
- Parts should be washed before removing supports.
- When creating designs with narrow channels, such as microfluidics, a syringe may be necessary to clean our internal resin and stop resin from curing and blocking channels.
- Some parts may require two washes in IPA or TPM to be fully clean. Before finishing, we recommend washing in water. For each part, you should use your own judgement whether the part is fully cleaned.
Formlabs recommend Form Wash alongside Formlabs desktop printers, and Form Wash L for large-format SLA printers to automate washing and rinsing your printed parts.
See the Form WashSee the Form Wash L
When an SLA part finishes printing, the polymerization reaction may not yet be completed. This means parts have not achieved their final material properties and may not perform as expected, especially tough parts under stress. Exposing the print to light and heat, called post-curing, will help solidify its materials properties.
Curing SLA Parts Tips:
- Post-curing is optional for standard resins.
 Other resin types require post-curing to achieve their optical mechanical properties.
 - For biocompatible materials, post-curing is necessary to achieve the safety standards determined by regulatory agencies.
- Each material should be exposed to the curing process for a specific amount of time. View curing times for each resin here.
Form Cure and Form Cure L, the two post-curing solutions from Formlabs for desktop and large-format SLA 3D printers, are designed to post-cure parts printed in Formlabs Resins with speed and consistency. With Form Cure and Form Cure L, SLA 3D printed parts can be post-cured at precisely the correct wavelength, at different temperatures, and for varying lengths of time.
See the Form CureSee the Form Cure L
White Paper
In this white paper, learn the basics of post-curing and how to adjust your process to save time and achieve the best performance.
Download the White Paper
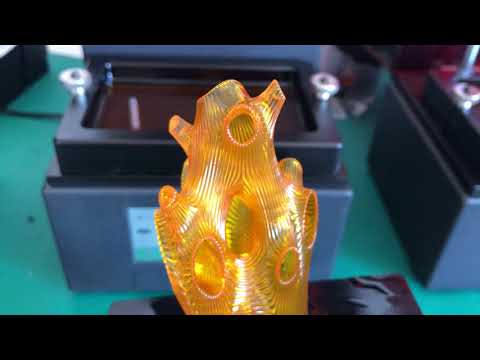
Sanding SLA 3D printed parts is often the best method or smoothing edges, removing blemishes, and getting rid of any left over support marks. Hand sanding is most effective on simple shapes, but it can be hard or impossible to sand complex objects with deep crevices and internal supports.
The best way to sand SLA parts is to start with a low grit sandpaper, and slowly move to finer grit levels over time. For example, SLA 3D printed parts can be sanded to be smooth and glossy with 3,000 grit sandpaper. Slowly increase the grit, polishing and smoothing the part until it reaches its desired texture. At around 12,000 grit, the parts should become reflective. If you’re having trouble, sanding your part under running water or on a wet piece of sandpaper can sometimes help create a smooth surface on tough parts.
SLA parts come off the build platform with notably less layer lines than parts printed with other 3D printing processes, like FDM. Oftentimes, the layer lines on SLA printers are not noticeable. This means FDM prints often require significantly more sanding to smooth parts. That said, if you need a glass-smooth finish, SLA does require sanding to fully remove any trace of layers, especially on spherical parts.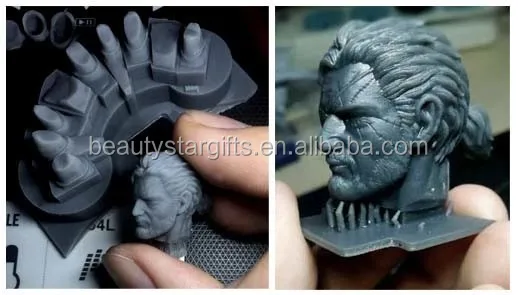 Slowly increasing sandpaper grit will allow you to eliminate or reduce layer lines to a miniscule level on any SLA part.
The most common reason for sanding 3D printing parts is to remove support markings. As you become more comfortable with 3D printing, it may be worth spending additional time during the print preparation process to angle 3D prints in ways that remove or reduce supports from important parts of a print. For example, if you are printing a bust or model, it is often possible to angle the part so that the model face does not require supports. This will make the sanding process much easier.
Once you are happy with the sanding process, a basic microfiber cloth can be used to remove any minor imperfections and sandpaper powder left on the surface of the print.
If you are performing a significant amount of sanding on a single part, we have found that rubbing the part in mineral oil after a wash can create a super smooth surface finish. Like most techniques, mineral oil may or may not produce significant benefits for your print based on part geometry; you may have to try sanding multiple parts before finding the perfect finishing technique.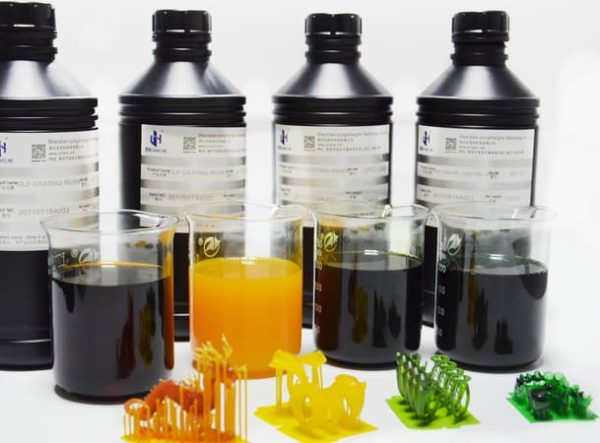
For anyone focused on high-quality, precise SLA parts, Formlabs Finishing Tools is a set of curated products designed to streamline the SLA post-processing workflow and help users achieve superior surface finish, perfectly smooth planes and edges, and an elevated appearance, all while driving down your labor time and cost per part.
See Finishing Tools
An example of a SLA 3D printed part painted with acrylic.
Printing With Dyed Resin: This process requires taking 1L of Clear Resin and dyeing it, normally with Alcohol Ink, to create a custom color. The modified Clear Resin can then be put into a Formlabs 3D printer for use, and the part will print in the new customer color that you have created. Alcohol inks completely dissolve into Clear Resin, making it the ideal coloring agent to give you consistent colors throughout your print. If you are going to be coloring 3D printed parts with dyed resin, note that you will want to use a separate wash solution for these parts, as the colored resin will dissolve in the wash. Label your wash solution based to keep track of which types of dyes have been used to make sure you don’t accidentally wash a White Resin part in water containing a dark dye.
Clear resin mixed with alcohol ink.
Tip: Formlabs Color Kit is a standard integrated color mixing package offered by Formlabs. Color Kit enables 3D printing in a range of colors without the manual work of finishing and painting. To see how the coloring kit works, view the video below.
To see Color Kit in action, check out how birdkids developed a new product using 3D printing with a wide range of materials, including Color Kit, to prototype the color palette for the new product.
Learn More About Color Kit
Dyeing SLA Parts After Printing: If you don’t want to mix an entire batch of dyed material, but still want to dye your parts, you can apply the dye after printing. You can easily dip regions of interest into different dye solutions to obtain multi-colored parts.
Certain resin are going to be easier to dye than others, such as Clear Resin and Elastic Resin. Once again, we recommended creating an alcohol ink solution and soaking your 3D printed parts, with the supports, in the solution.
One benefit of coloring 3D printed parts with dyed resin is that you do not need to change the color of an entire liter of resin. Instead, you can print multiple parts in Clear Resin and dye them in different colors. Dyed 3D printed parts are also much easier to clean with IPA, as they do not require a dedicated IPA wash.
Painting With Acrylic: For complex models with intricate details, it might only be possible to add some color with the use of paint. Although this process can be time-consuming and the result is determined by your painting abilities, it offers more artistic license to the user. As painting is done after the part is already washed and cured, this workflow also does not require a dedicated IPA wash.
A skilled painter using acrylic can bring parts to life.
Spray Painting: Spray paint creates smooth surfaces and deep color gradients, and is especially efficient for large or flat prints. In the hands of a skilled user, SLA 3D printed parts can quickly be spray painted. The best technique for spray painting is to use multiple, thin coats, ideally done in a single session. A spray-on primer is the best way to paint your printed parts because it quickly covers a surface with an even coating. We recommend you read the Formlabs “How to Prime and Paint 3D Printed Parts” guide for a step-by-step tutorial on best practices on spray painting SLA 3D printed parts.
For an installation in Times Square, Window to the Heart, the Formlabs and Aranda/Lasch teams worked with an auto body shop to spray coat each tile in Lesonal Universal Clear.
For parts that are created to truly impress, there is one alternative step users can take in the polishing process. To fully polish SLA 3D printed parts, you may want to coat them instead of using one of the painting methods mentioned above. Generally a clear spray coating is best to bring parts to a glistening finish. Spray coatings should be applied only after the part has been meticulously sanded.
When coating 3D printing parts, it is recommended to skip the curing process for Clear Resin, as it can sometimes cause yellowing in parts. If the part you are coating is going to be used for pure aesthetics, then curing to bring out its mechanical properties may not be necessary. Instead of curing, a part should be left to air dry after an IPA and water wash. Once it’s completely dry, apply two to three spray coats in a dust-free environment.
Coating can also open up new avenues for using 3D printed parts. One of those is to electroplate the parts in order to change and enhance their useability. Electroplating is an electro-chemical process in which metal ions are deposited in a thin layer on the surface of a part. Electroplating surfaces significantly strengthen their underlying parts and improve material resistance to wear, UV exposure, and corrosion.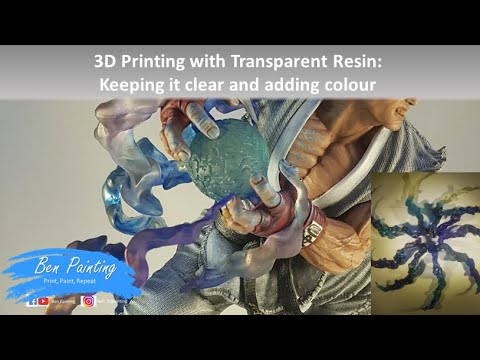 This is excellent for end-use parts, and is a cheaper alternative to metal 3D printing.
Want to see electroplating in action? Volkswagen printed hubcaps on a Formlabs desktop SLA 3D printer using Clear Resin, then electroplated them with a 0.004-inch-thick layer of nickel. The resulting parts look and feel like metal, but they could be produced quickly as designs evolved, with minimal geometric constraints.
Post-processing SLA parts is not a daunting task. After a few prints, most users are washing, post-curing, painting, sanding, and more with ease. Bringing your creation to life has never been easier with affordable, desktop 3D printing and the knowledge of how to post-process your parts.
Download our white paper to learn more about SLA 3D printing. Want to hold a high-quality SLA part in your hands? Order a free sample part below.
Download the White PaperRequest a Free Sample Part
Guide to Transparent 3D Printing
Clear materials, such as glass or acrylic, have a wide variety of applications in consumer products, industrial uses, healthcare, and more. However, prototyping or producing low volumes of clear parts can be expensive and inefficient with traditional methods, which raises the question: can you 3D print transparent parts? The answer is yes, with the right technology and materials.
Stereolithography (SLA) 3D printing can create transparent objects that, with some post-processing, can be made optically clear. Formlabs' latest SLA 3D printers, the compact Form 3+ and the large format Form 3L, take clarity one step further by using a flexible resin tank that reduces peel forces, resulting in clearer parts with smooth surface finish.
There are multiple materials for producing translucent and transparent 3D printed parts:
- Clear Resin is a rigid material that polishes to near optical transparency, making it ideal for fluidics, moldmaking, optics, lighting, showcasing internal features, and any parts requiring translucency.
- BioMed Clear Resin is a rigid, transparent material for biocompatible applications requiring long-term skin or mucosal membrane contact.
- Elastic 50A Resin is a soft and stretchy material that is semi-translucent. It is ideal for prototyping parts normally produced with silicone.
- Flexible 80A Resin is a more stiff soft-touch material that is also semi-translucent. It is ideal for simulating the flexibility of rubber or TPU.
In this guide, we walk you through various finishing methods to create transparent 3D printed parts for a variety of applications, from optics to light pipes to fluidics. Methods range from quick solutions for adequate transparency, to niche techniques for creating optically clear parts.
Clear and transparent 3D prints are ideal for creating clear prototype parts, showing internal cavities and details, housing LEDs, creating windows, or printing see though anatomical models and medical devices. Formlabs and our customers have used Clear Resin to create a completely optically clear lens for a fully 3D printed camera, tiles for a Fresnel lens installation in Times Square, light pipes, prisms, millifluidic devices, and more.
Formlabs applications engineer Amos Dudley designed and 3D printed a lens for a fully 3D printed camera.
Sample part
Curious to see how transparent 3D prints SLA 3D printing is capable of? We’ll ship a free clear 3D printed part to your office.
Request a Free Sample Part
Yes, but with caveats. Polymethylmethacrylate (PMMA), commonly known as acrylic, is a transparent thermoplastic that is commonly used as a more durable alternative to glass. While 3D printing acrylic is possible with fused deposition modeling (FDM) 3D printers, it's not really user-friendly as the material itself is toxic and prone to warping, while the 3D printed parts are only semi-translucent due to the lower resolution of FDM printers.
For a 3D printing acrylic-like fully transparent parts, we recommend printing on an SLA 3D printer with Clear Resin and then post-processing the 3D printed parts for full transparency using one of the methods mentioned in this article. Using an acrylic spray is one of the methods to ensure clarity.
We’ve tested several techniques for post-processing parts 3D printed in Clear Resin. In this post, we’ll cover manual sanding, clear coating, and resin dipping. Each finishing option requires varying levels of effort, depending on the degree of transparency and surface finish your part requires.
Applications: Manual sanding and polishing can be effective for simple shapes with few details, but are less suited to finishing complex models. It is very difficult to reach total optical transparency with this method.
You’ll have to sand to extremely fine grits to manually finish a transparent part, but with some effort, you can sand and polish parts to be as clear as a magnifying glass. It is, however, very challenging to completely eliminate all layer lines via manual finishing—you may notice micro-scratches when holding the part at a shallow angle to the light.
Instructions: Use a range of incremental sandpaper grits to smooth your surface, then polish the part with acrylic cleaner and a microfiber cloth.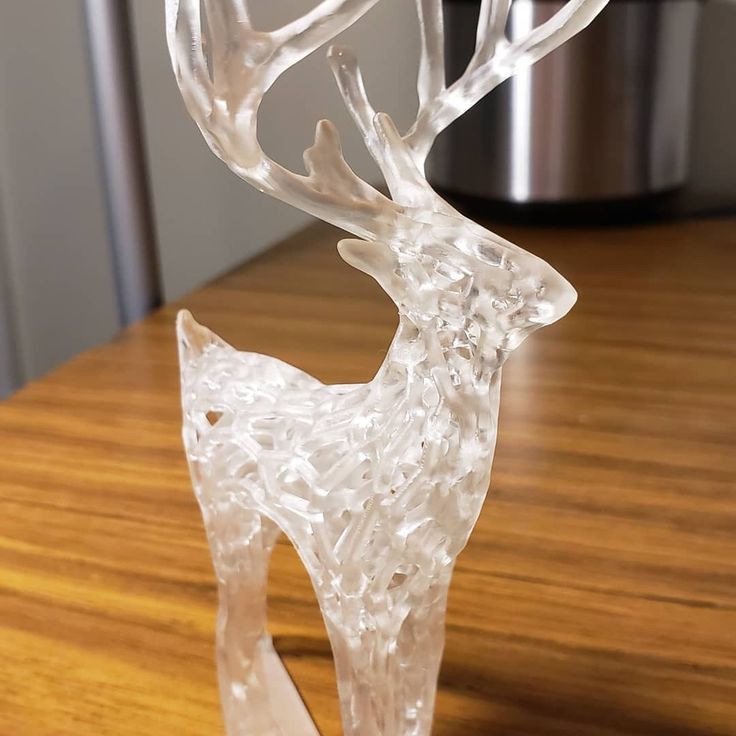
At around 3000 grit, transparent 3D printed parts become glossy and very smooth to the touch. By 12000 grit, they are reflective. Try using a range of sandpaper and micromesh pads with grits from 400 to 12000, in increments of 200, slowly and carefully to clean the parts between grit levels and to eliminate scratches from the previous level before moving on to the next.
Our support site offers a simple visual step-by-step guide for manual sanding, including an optional finish with acrylic spray.
Tip: If you only need semi-transparency, simply use mineral oil to create an even finish and hide any light spots on your part.
We’ve tested a variety of methods of polishing clear 3D prints, from hand sanding and spray coating to resin dipping.
Applications: Spray coating is an easy, fast way to improve the clarity of parts without much reduction in detail. This method is effective for all kinds of models, as it's able to coat complex details that may be hard to reach with regular sanding and polishing.
Clear coating alone helps to conceal layer lines and protect parts from UV exposure, which can cause yellowing and unintended post-curing. If you’re looking for a smooth, glass-like surface finish, perform the manual sanding and polishing technique prior to coating; the more sanding that comes before clear coating, the better the clarity. This additional step is great for post-processing prototypes that look like fully transparent plastic, e.g., packaging, bottles, and microfluidics.
Instructions: There are several options for clear coating 3D prints, from inexpensive sprays to products that require a dedicated room and tools.
- General purpose clear coat spray paints: There is a wide variety of high quality and affordable sprays. We recommend using a 2K clear coat.
- Automotive sprays: High-solids acrylic urethane clearcoats offer very high gloss and are designed for air-dry and baking conditions, but require a spray gun and dedicated space for spraying, as well as a base coat.
For spray coating, start with a clean, dry part already washed in isopropyl alcohol (IPA). Do not post-cure the part ahead of spraying, as this can cause yellowing. Let the part air dry. Once it’s completely dry, apply two to three spray coats in a dust-free environment.
Tip: For a fee, auto body shops may do the coating for you with a spray like Lesonal Universal Clear. In most cases, these shops will use a light solvent, like naptha to clean and prepare the part’s surface prior to painting.
For an installation in Times Square, Window to the Heart, the Formlabs and Aranda/Lasch teams worked with an auto body shop to spray coat each tile in Lesonal Universal Clear.
Applications: This method is best for when you need very transparent parts, and only works on flat or near-flat surfaces, such as a lens or a window into the interior of a part.
Resin dipping results in parts that are extremely smooth, with clear and sharp surface reflections.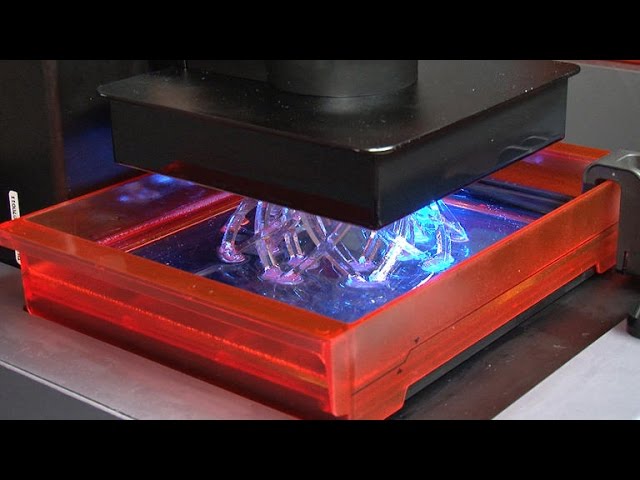
This technique can be used to create an even smoother finish for parts printed in other SLA materials, although it can reduce detail.
Instructions: Apply Clear Resin to the part with drops from a syringe, or by dipping the part as as desired. The viscous resin will fill layers and scratches on the part, forming a completely smooth surface.
The layer of resin should be as thin as possible, while still eliminating layer lines. Pull off any bubbles with a syringe. Completely post-cure the part using the appropriate settings, then repeat the process for the other side, both dipping and post-curing.
Three stages of resin-dipped lenses, with the final lens on the left.
Note: The dipping process alters focal length slightly for lenses. For our 3D printed camera lens, Formlabs applications engineer Amos Dudley designed and printed a lens testing device.
With the Form 3+ SLA 3D printer, you can create clear and fully transparent 3D prints affordably and with minimal post-processing.
Download our white paper for a detailed overview of SLA ecosystems and the step-by-step 3D printing workflow.
Curious to see the quality and clarity firsthand? Request a free transparent 3D printed sample part.
Request a Sample Printed in Clear Resin
Industrial 3D printers for printing resin-coated sand for injection molds and polystyrene
SLS technology (Selective Laser Sintering - Selective Laser Sintering)
SLS 3D Printer Scheme for Polymer Coated Sand and Polystyrene
Technical parameters of industrial 3D printers SLS-PS
| Model nine0019 | SLS-500PS | SLS-1000PS | SLS-1200PS | SLS-1400PS |
| CO2 laser, Power W | 55 | 100 | 100 | 100*2 100*4 |
| Scanning system Dynamic focus nine0019 | 8 m/s | 8 m/s | 8 m/s | 8 m/s*2 8 m/s*4 |
| Print Layer Thickness | 0. 08-0.3mm 08-0.3mm | |||
| Print Accuracy | ±0.2mm (L≤200mm), ±0.1% (L>200mm) | |||
| Print chamber size mm nine0019 | X500 Y500 Z400 | X1000 Y1000 X600 | X1200 Y1200 Z600 | X1400 Y1400 Z500 |
| Powder supply | Two pistons on both sides | |||
| Print material | Color coated sand, polystyrene | |||
| Operating system | Windows XP | |||
| Software | HUST 3DP (independent research and development) | |||
| File Format | stl, online cuts in the process of formation, changing the layer thickness, scanning. 3D visualization | |||
| 3D printer dimensions mm nine0019 | X2070 Y1280 Z2080 | X2150 Y2170 Z3100 | X2350 Y2390 Z3400 | X2520 Y1790 Z2780 |
| Power supply | 3 phases, 4 lines with earth, 380V±10%, 50Hz | |||
| Working temperature | 18-25°C | |||
| Operating Humidity | Not more than 60% | |||
| Power consumption kW | 3 | 4 | five | 9/16 |
Catalog
Download >>> View >>>
Video
Related products
3D printer SLA-600
Industrial stereolithographic 3D printer SLA on photopolymer resin
Industrial 3D printers for metal printing using EBM technology
Equipment for the production of metal powders for 3D printers using induction vacuum melting and gas atomization
Industrial 3D printers for metal printing SLM nine0003
Industrial 3D Metal Printers LMD
Industrial 3D printers for printing with nylon (polyamide) and polypropylene powder
Industrial 3D printers for printing ceramics
Auxiliary equipment for additive 3D manufacturing and prototyping
Electroplating of 3D printed models / Habr
Picture youtube channel Jason Welsh
With the spread of 3D printing, many hobbyists have received unique opportunities, which, however, are limited by the properties of the material itself - the plastic base.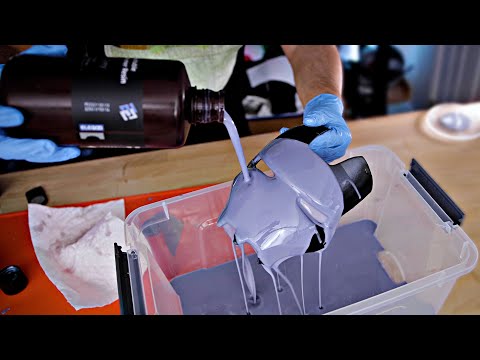 In one of the previous articles, we talked about an interesting way to make metal castings from 3D printed models using metal melting in a conventional home microwave.
However, it is not always necessary to manufacture ultra-monolithic metal parts in complex ways, as there is a much simpler option ...
And this widely known method is electroplating! That is, a coating with metals dissolved in the form of salts in an electrolyte, when an electric current is passed through it.
The method is quite interesting, because with proper organization it allows you to deposit metals even on hard-to-reach parts of surfaces, and the do-it-yourselfer has at his disposal a relatively easy way to create any objects that look like metal.
This is especially true with the advent and wide distribution of inexpensive photopolymer 3D printers, the print resolution of which makes it possible to create quite interesting “metal” figurines that an ignorant person can hardly distinguish.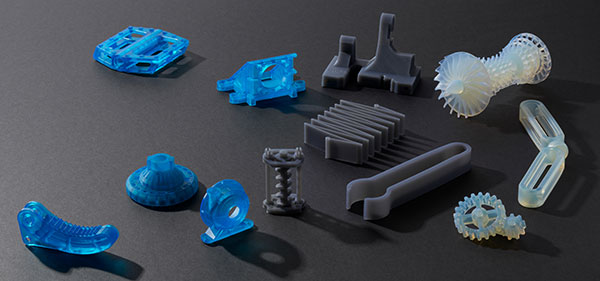 Especially if the figurines have voids to fill them with some kind of weighting agent, for example, hunting lead shot mixed with epoxy or other binder. nine0003
Caution: electroforming involves working with electricity and chemicals, which can be quite dangerous. All subsequent information is given for general development. The author does not call for anything and is not responsible for the result of any experiments, if you want to conduct them.
▍ General description
The process of electroforming is the movement of metal salt ions, since when they are dissolved in an electrolyte, they undergo electrolytic dissociation, that is, they turn into a set of ions with positive and negative charges. nine0003
For this process, it is necessary to lower two contacts (negative and positive) into the bath with salts dissolved in the electrolyte and connect them to the corresponding terminals of the power source:
Odnoralov
When an electric current appears on the contacts, the ions in the electrolyte begin to move: with a positive charge they move to the negative contact, with a negative charge - to the positive one.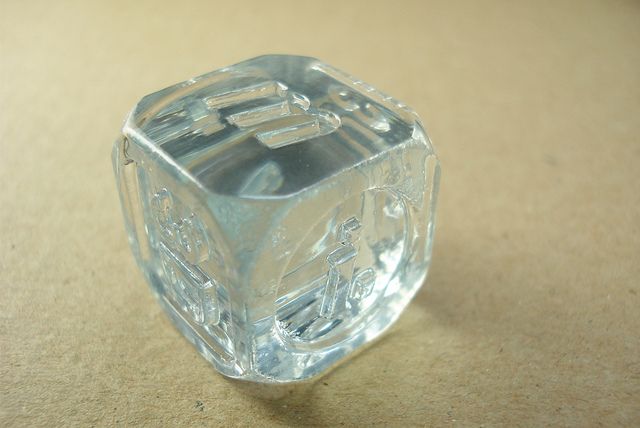 Coating occurs when applying voltages in the range from 1 to 5-6 volts. nine0003
In this case, pure metal is deposited on the negative contact, and an acid residue is released on the positive contact. The amount of metal deposited on the negative electrode is directly proportional to the amount of current that was used to deposit it. That is, to put it simply, many amperes deposit more metal in less time, and fewer amperes deposit less metal in more time.
But this is to say in very general terms, since you also need to take into account the surface area of \u200b\u200bthe part on which you want to deposit metal, since a large current for a small surface will damage the coating. There is a good table for this, which allows you to calculate the amount of deposited metal:
Picture from the book "Entertaining electroplating", N.V. Odnoralov
To calculate the amount of metal that will precipitate in a certain time, you need to take the value from the last column of the table and multiply by the current strength and the time of electrolysis.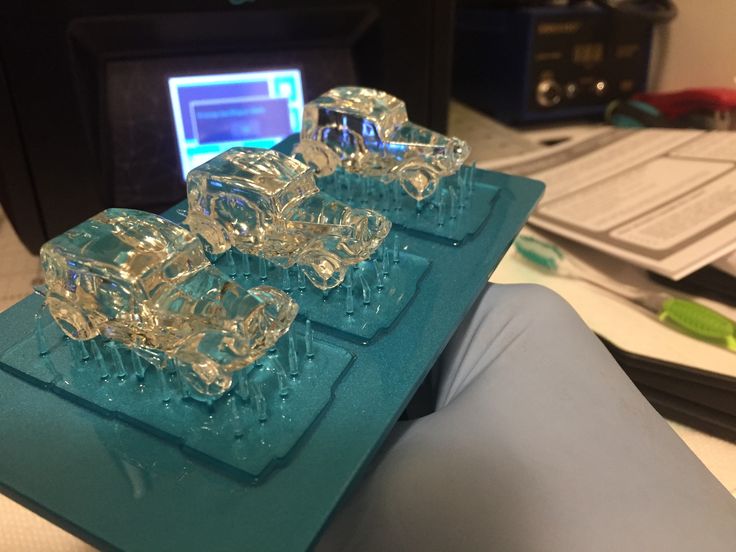
For example, in the literature cited at the end of the article there is the following calculation:
1.186 x 8 x 3 = 28.464 g.
the following calculation is required: the amount obtained is divided by the density of the metal ( 8.9g/cu. see for copper) electrolytically deposited, as well as on the surface area. For example, if the surface area is 100 sq. cm (1 sq. dm), the resulting thickness of the metal film will be 0.31 mm. This is information from the literature and this approach can even be improved nowadays if your slicer, CAD or other 3D editor can calculate the surface area of a 3D model.
▍ Electrolyte and bath
As an electrolytic bath, it is best to use plastic, glass or ceramic containers. nine0003
The model for coating (cathode) and the second electrode (anode) are suspended in baths on hooks made of conductive wire in such a way that this suspension does not get into the electrolyte and does not corrode it.
Use a plate of the same metal as the second electrode to cover the 3D model.
In the process of galvanization, it is necessary that the parts to be coated with metal be turned to the metal plate (anode) with the largest side. However, this is not always possible, therefore, various tricks are used: more than one plate is used, hanging them from both sides of the part (a - surrounding plates, b - coated part):
Picture from the book "300 Practical Tips", V. G. Bastanov
Or, in general, they use a round container with curved plates (with - bent anode plates):
Picture from the book "300 Practical Tips", V G. Bastanov
In order for all elements of the covered product to be properly connected to the electric current, additional electrodes are brought into recesses and other deep places.
One of the simplest and most affordable metals to create coatings is copper. Therefore, it is necessary to purchase copper sulphate (looks like plastic bags with bright blue crystals), which can be bought in almost any department of stores working in the "Garden and vegetable garden" theme:
Picture markik.ru
Electrolyte is produced by dissolving copper sulphate in water, and for this it is desirable to use hot or warm water.
Then the resulting solution must be cooled, after which sulfuric acid is slowly poured into it in a thin stream to increase the electrical conductivity. In this case, the solution will be very hot, so you need to do it very slowly so that splashing does not occur, which can cause severe burns. As sulfuric acid, it is quite possible to use a regular battery electrolyte from an auto shop. In the process of mixing water and sulfuric acid, personal protective equipment must be used. nine0003
The required amount of copper sulphate is calculated from the ratio of 200-250 g of copper sulphate per liter of water. As water, it is desirable to use distilled water for automotive electrolytes (also sold in bottles in car dealerships). When selecting the amount of sulfuric acid in the electrolyte, one should be guided by an approximate ratio of 30-35 g of acid per liter of water.
To improve the quality of the resulting copper film, you can add alcohol at the rate of 8-10 g per liter, which will lead to precipitation of copper in a finer crystalline form, as well as an increase in its hardness and elasticity. nine0003
In general, exceeding the indicated values both in terms of acid content and alcohol content will lead to a deterioration in the quality of copper and an increase in its friability.
Electrolysis is usually carried out at a temperature of about 18-20 degrees, which, however, may increase when heated during the passage of current.
Over time, sludge will form at the bottom of the electrolytic bath, which must be filtered periodically, otherwise it will float in the electrolyte and be included in the metal structure, degrading its quality.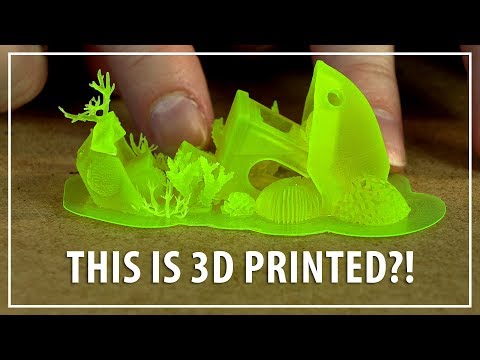 nine0003
In the process of electrolysis, it is necessary to control the ongoing process, for which you can focus on the classic table of indicators: Odnoralov
And there is an interesting point here, which is that the result will be a copper matte finish.
Despite the above restrictions on the content of components, there is an interesting recipe on the net, practically tested by its author, where the content of components, in particular, sulfuric acid, is much higher than usual. However, the method allows obtaining copper glossy coatings. To do this, for each liter of water you should take: 200 g of copper sulfate, 180 g of sulfuric acid, 0.07 g of thiourea, 0.07 g of edible salt. nine0003
The process takes place at a current of 10-20 mA per sq. see
When studying the experiments of interested people, the author of the article paid special attention to the fact that do-it-yourselfers, as a rule, miss the use of chemical methods for creating gloss. Instead, at the final stage, they suffer, rubbing the resulting model with a velvet cloth with polishing paste (which, in principle, does not deny a similar approach here).
Often copper is used in electrolysis as a substrate for subsequent, "more noble" metal coatings. This is necessary both for preliminary leveling of the surface so that the final coating looks more presentable, and because it is impossible to directly apply the final coating to the original surface due to the impossibility of strong adhesion to it. nine0003
There are many different recipes for creating metal coatings on the net, but half the success in this business is understanding the sequence of processes, as well as understanding the possibility and impossibility of applying certain metals to target surfaces. Therefore, the following formulations can be studied for yourself simply for informational purposes to understand which components are required to apply a particular coating and which you have the opportunity to get.
However, if you are interested in the appropriate coating, you need to study the accompanying technological process in more detail, since this is half the battle.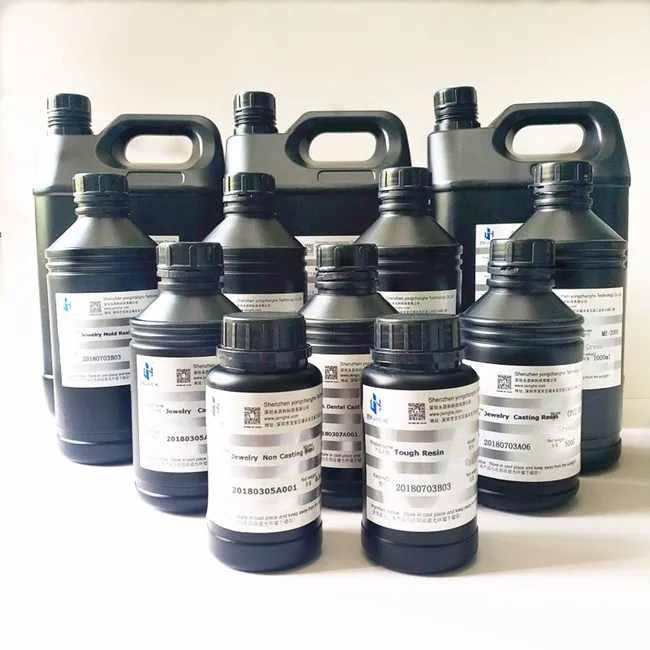 In particular, as far as the author of this article is aware, chromic anhydride (used in chromium plating) is a strong carcinogen, so you should study the coating of interest to you very closely from different angles (in terms of technology) before taking it:
The numbers in the recipes shown above indicate the sequence of preparing the mixture, while mixing each component with 200-300 ml of water, after which the same amount of water and the next component in the list are added, etc., until the total amount of electrolyte reaches 1 l. nine0003
A detailed description of some of the plating technologies is given in the literature available at the end of the article.
▍ Surface degreasing
The classical technology of galvanic coating involves preliminary high-quality surface preparation, which consists in cleaning it from pollutants and degreasing. Usually the surface is cleaned of coarse contaminants using solvents and alcohols. Subsequently, the part is dipped in a hot solution of caustic soda dissolved in water (80-90 degrees), at the rate of 10-15 g per liter, after which the removed part is washed with running water. Such degreasing gives a good subsequent wetting of the parts with water, which is a marker of the absence of grease contamination.
By the way, as far as the author knows (at this point a chemist's comment is required, not completely sure), ordinary household bathroom products, especially for cleaning heavy blockages, sold in black plastic bottles in the form of loose formulations, are predominantly caustic alkali (sodium or potassium). The chemical purity certainly leaves much to be desired, but at least they are quite affordable and are available in almost any store. nine0003
However, due to the low heat resistance of the photopolymer resin (of course, if you do not use a special, heat-resistant version of it that can withstand temperatures above 200 ⁰С), this method seems difficult to implement. Therefore, the following is most applicable: all operations with the finished printed part are carried out with gloves (removal of supports), after which the part is thoroughly washed in isopropyl alcohol.
Since the part is freshly printed, it must not contain any particular contaminants that may cause subsequent problems. nine0003
▍ Conductive coating
Since we are dealing with a 3D printed plastic part, it is natural that it does not conduct electricity. To give the surface of the part the properties of electrical conductivity, according to classical technology, it is rubbed using soft artistic brushes with finely ground lamellar graphite, which can even be used as a pencil lead.
But this is a classic method, and now there are simpler methods, one of which is the application of an aerosol coating using an airbrush (metal mixtures, in particular copper):
Or from a can using Graphite 33:
It is also possible to use pure graphite powder mixed with some binder, eg paint.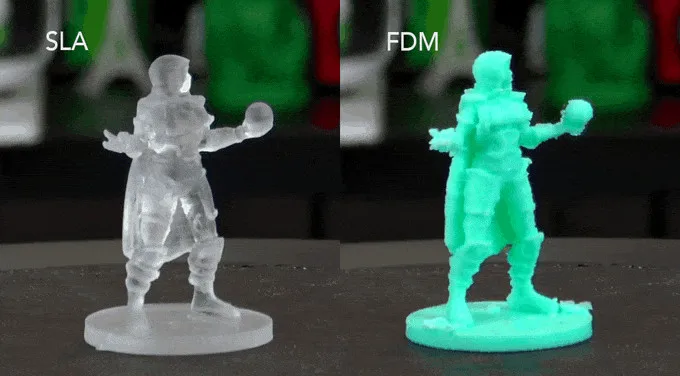 The example below illustrates this well and also shows how presentable a simple copper plating can be:
some interesting thoughts about creating conductive surfaces. nine0003
Why did this idea come to mind: I remembered my childhood and the experience of smoking various surfaces with a candle or matches (not always socially approved :-)).
The author began to study this topic for realism in the field of "smoking 3D models", since, in theory, soot, which is carbon, should conduct electricity well!
As it turned out in the process of diving into the topic, alternative ways to create conductive surfaces are a kind of "Holy Grail" in the field of chemistry and there are quite active discussions on this issue in the relevant chemical forums. nine0003
If we try to summarize the results of these discussions, the most promising options, from the point of view of chemists, are the following options:
 The result of this method gives almost graphite soot. Here it should be noted that the pyrolysis of acetone occurred during the tests of chemists without air access. No one has done smoking with acetone in the presence of air, so this method still requires its own experiment; nine0324
  nine0324
 Summarizing all the smoking methods, it should be said that according to the results of a number of tests, everyone noted the highest degree of soot adhesion to the surface, which is explained by high-temperature fusion. All these methods are quite curious and deserve their attention, as they lead, if successful, to obtaining a cheap, fast and high-quality conductive coating.
The high temperature that occurs during the smoking process is not an insurmountable barrier, since it can act for a very short time if the flame is pressed almost close to the model, which will cause the predominantly low-temperature zone of the flame to interact with the model (usually has a blue color and is located in the center of the tongue flame, at its base). A side benefit of this treatment will be some melting of the surface roughness and their smoothing, which will eliminate the need for manual action (for example, using iron wool). nine0003
▍ Prospects?
Oddly enough, there are very few homemade products of this kind in RuNet, since 3D printing enthusiasts usually limit themselves to just coloring a printed 3D model, losing sight of the interesting possibilities that electroplating provides.
The use of electroforming also draws prospects that have never been seen before: literally in May of this year, there was news that the developers from the Moscow Institute of Physics and Technology created an antenna for 5G and 6G using a new technology: the antenna was printed on a 3D printer, after which it was covered with metal using galvanization. This way of producing complex technical things seems quite interesting and allows any do-it-yourselfer to create quickly and easily even very complex designs, which, moreover, will be significantly cheaper than fully printed using 3D metal printers. nine0003
The topic of electroplating is quite large, and it is difficult to state all the subtleties within the framework of one article, so I recommend those who are interested to read the relevant chapters of the books below. They cover many issues in great detail, the approach to which has not lost its relevance, despite the years of publications.
Materials of books were used for writing the article:
1.