3D geometric shapes to print cut and fold
Foldable 3D Shapes (FREE Printable Nets!)
Exploring the properties of three dimensional shapes is fun for all ages! Because kids are introduced to 3D shapes early on, you could make these together with young kids, or you could use them with high schoolers to explore more complex math. No matter how you use them, this set of foldable 3D shapes is bound to be a hit!
*Please Note: This post contains affiliate links which help support the work of this site. Read our full disclosure policy here.*
I highly recommend printing the nets on stock paper rather than regular paper. I have tried it both ways, and regular paper is just too flimsy.
After printing, simply cut out the 3d shape nets on the solid lines.
If you’ve printed on white card stock as I have, take some time to get creative and color or decorate the shapes before assembling them! This could make a great math art project!
If your students are older, have them label the different parts of the shape (face, edge, base) before assembling to use as a reference throughout their study of shapes! 🙂
This will help them see and learn math vocabulary.
Then, carefully fold each tab so that it can be used to glue the shape together, and fold each side of the shape.
Finally, glue each side together. I suggest adding a few dabs of glue to each tab and then hold it in place for a few seconds before gluing the next tab. This will help make sure it stays together.
You can also use tape if that’s easier for you (or you don’t have glue).
Once all the shapes are assembled, you can use them however you like, depending on the age of your kids!
Learning ideas for foldable 3D shapes:- Discuss math vocabulary such as polyhedron, face, edge, prism, etc.
- Compare the shapes by counting number of faces and edges or other characteristics
- Use them to go on a 3D shape hunt: find the shapes in real life
- Compare the different pyramids and then compare them to the great pyramids of Egypt (combining math and history!)
- Use the nets to learn about surface area and volume
- Use them along with the book, Sir Cumference and the Sword in the Cone to learn about Euler’s formula (see more free resources to use with the book here!)
- Or simply as a fun math art project!
This set of geometric nets is FREE to download and contains the following three dimensional shapes:
- Cube
- Rectangular Prism
- Triangular Prism
- Cylinder
- Triangle Based Pyramid
- Square Based Pyramid
- Pentagon Based Pyramid
- Cone
In addition, this set includes a foldable copy (with tabs) to allow students as young as preschool build their own models, as well as geometric nets without tabs to be used for any other purpose in the geometry classroom!
For instance, let students measure the nets to explore surface area with these FREE surface area lessons (surface area of prisms and cylinders and surface area of pyramids and cones)!
{Click HERE to go to my shop to get the foldable 3D shapes Printable Pack!}Hope you find these helpful and FUN as you explore three dimensional shapes!
Looking for more 3D shapes fun? Try one of these resources:
- 3D shapes games printable pack
- Exploring 3D shapes with a 3D drawing pen
- 3D shapes and their nets worksheets
Never Run Out of Fun Math Ideas
If you enjoyed this post, you will love being a part of the Math Geek Mama community! Each week I send an email with fun and engaging math ideas, free resources and special offers.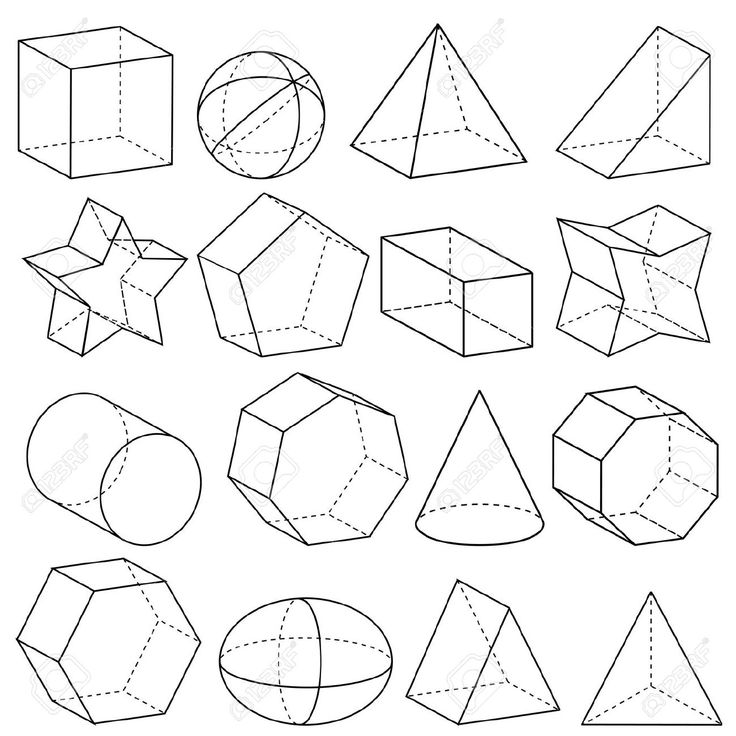 Join 163,000+ readers as we help every child succeed and thrive in math! PLUS, receive my FREE ebook, 5 Math Games You Can Play TODAY, as my gift to you!
How to Make Paper 3d Shapes
craft Hands-On Learning Math
- Share
- Tweet
This post may contain affiliate links.
Let’s make 3d Shapes with paper! It’s easier than you may think.
I have always been fascinated with origami and other paper folding crafts. I think it is so neat that from just a piece of paper you can make so many different things. Today I want to share with you how we made 6 different 3D shapes out of paper. Plus I also have printable templates available for you.
Learning to makes these shapes would be great for geometry or just to practice the 3d shapes names.
My kids thought these were really cool. They played around with them for a while. Then they tried making lots of other kinds of shapes out of paper. They were pretty fascinated by it all.
All you need to make these paper 3d shapes is paper, scissors, a pencil, a ruler and tape.
I also have printable templates with a few more 3D geometric shapes, if you want a simpler way to make them! They are available in my shop.
There are 6 common 3d shapes that I am going to teach you about today.
- Cube
- Cuboid (rectangular)
- Cone
- Square-Based Pyramid
- Triangular Prism (tent shaped)
- Octahedron (diamond0like shape)
To make each of these 3d shapes I used an 8 1/2 x 11 sheet of paper to make them.
How to Make a 3d Cone: For the cone, I traced a large circle, then cut a wedge out of the circle. Wrap it up and add a piece of tape to secure it.
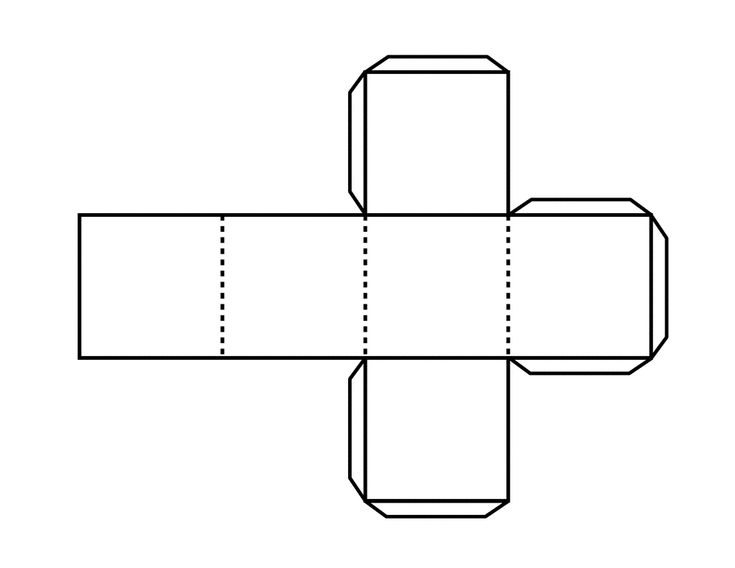
How to Make a 3d Cube: For the 3d cube, you need a cross-like shape with even squares. Mine were 2 1/2 inches per side. You need four squares going down and three going across.
How to Make a 3d Triangular Prism: The Triangular Prism is made by dividing the paper into thirds. Then in the center section you will make your triangular cut-outs. I measured the sides of my paper sections to make the triangle side the same length. It ended up being 2 3/4 of an inch per side.
How to Make a 3d Square Based Pyramid: A Square-based Pyramid is started with a square and then triangles coming out from each side. Mine is about 3 inches per side. You have to make sure each side of the triangle is equal to the sides of the square.
How to Make a 3d Cuboid: For the cuboid, I divided the paper into fourths. Then one of the sections needs a square cut-out. I made this by cutting into the other parts and removing the sections.
How to Make a 3d Octahedron: The octahedron was the trickiest.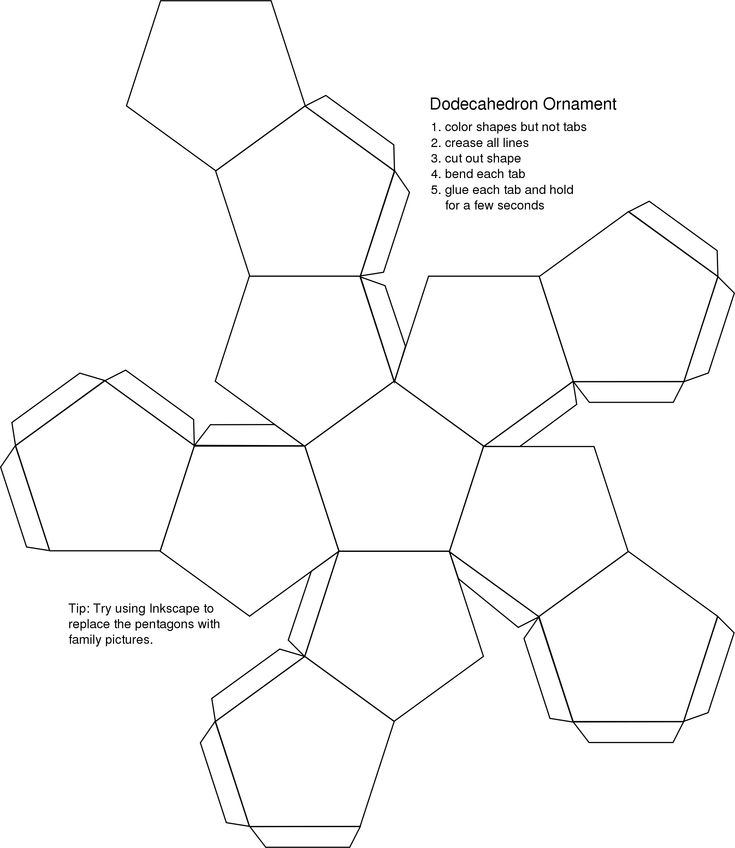 It is a series of 8 equilateral triangles. Six of them are in a row facing opposite directions The other two are hanging off the ends.
The 3d octahedron I made 2 inches per side, but it ended up very small. You could probably fit a 2.5 inch one on a paper. To fold this up, you just start folding the triangles and it sort of just bends into the shape. Add tape to keep it all together.
These 3-d geometric shapes would be fun hanging up by a string as a decoration, too!
The 3d shapes set pictured below is available in my shop.
$2.00Add to cart
3-D Alphabet Letters
Engineering: Make Paper Hold Up Books
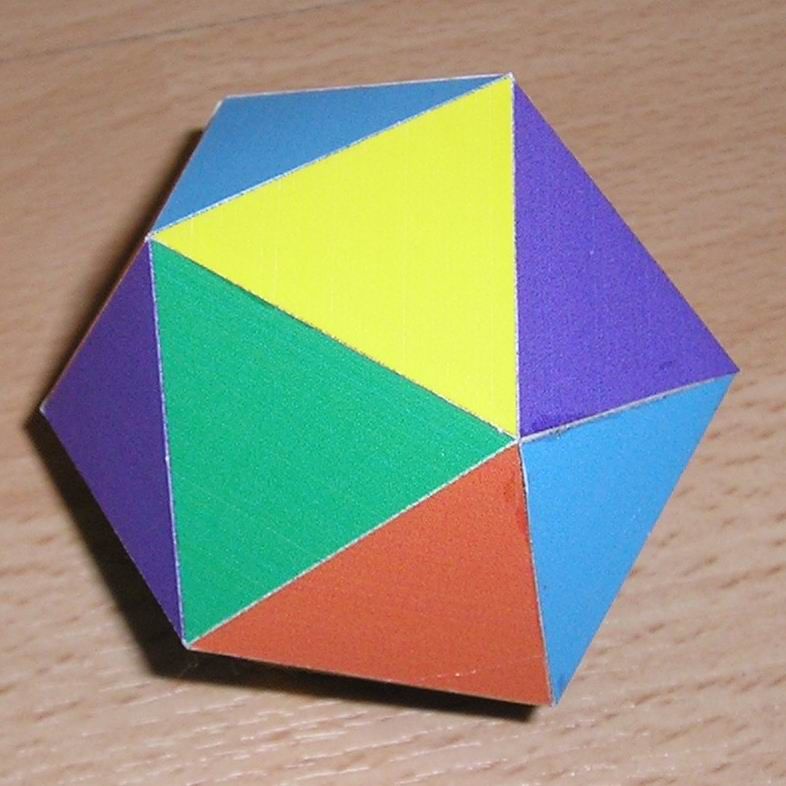
Rainbow Paper Icosahedron
Stellated Dodecahedron
SaveSave
SaveSave
Hershey Fractions Printable Math Cards
Jumbo Geometric String Painting With Kids
8 Comments
Patterns of geometric shapes.
 Topic: Volumetric geometric shapes
 Groats through a sieve - each child should have his own sieve. Transfusions and water games Development motor skills, preparation of the hand for writing. Development motor skills are very important for children... ... following a harmonious sequence. Simple Math: A Box Called Ten Creativity . Joint activities creativity for children of different ages to organize not ... ... cotton wool - such an activity will entertain him for a long time. The older child can do 9 at this time0003 application : glue pieces of colored paper onto the blank drawing. – Sculpt from plasticine...
Date of update: 07/01/2017
I would go to the artists... Why do children need to draw
To be painted later, colored sand for pictures. In recent years, such types of creativity have been gaining popularity in Russia. like quilling (3D appliqués from folded narrow strips of multi-colored paper), origami (Japanese national creativity nine0004 , folding paper toys), scrapbooking (designing photo albums, notebooks and postcards of various kinds with applications ).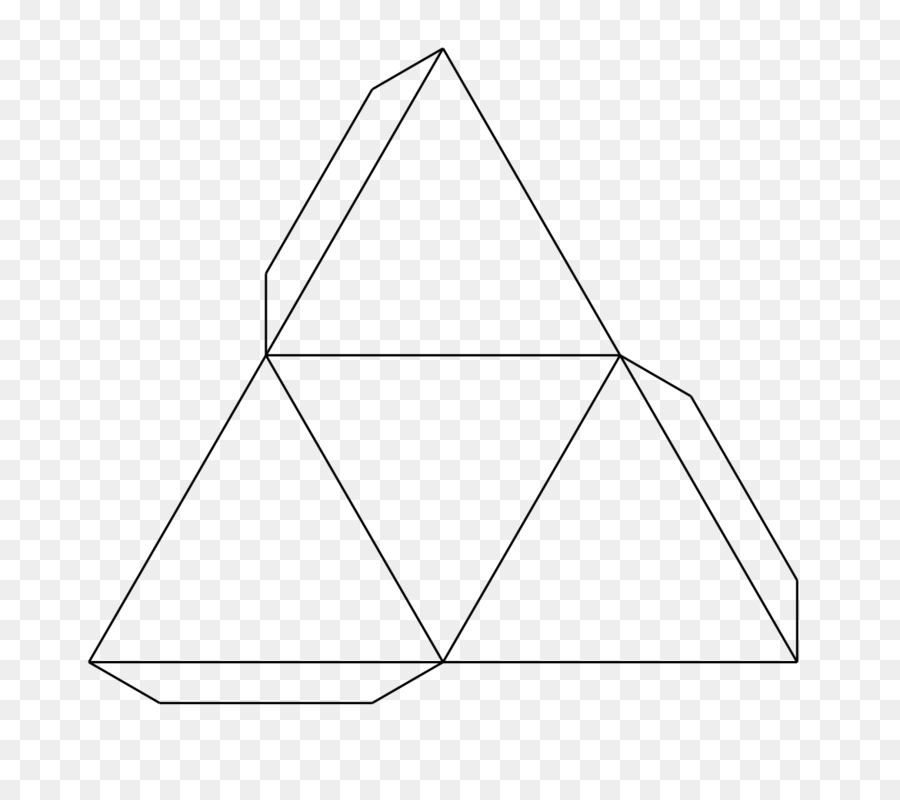 Of course, it is not easy for children to do some of them. For example, excellent is very important for quilling. fine motor skills, and it can be difficult for a baby to hold and properly glue these narrow paper strips rolled up like a snail, which strive to unfold at the most inopportune moment ... But do not be in a hurry to lose heart: in some species creativity ...
Date of update: 10/20/2016
The largest list of games for activities with the baby
Depict other animals (walk like a bear, jump and croak like a frog, etc.). DEVELOPMENT logic 1. “Collect only” (learn to select only from scattered objects ... ... (ant bee, etc.). 20. Sun, clouds, month, moon, stars, rain, snow, puddles. Creativity 1. Drawing: with wax crayons, paints, felt-tip pens (it is better to take on water ... ... a child will easily learn at 1.5 years old, something will “come” after two - everyone is different. nine. Application paper (various textures), appliqué torn paper, appliqué from.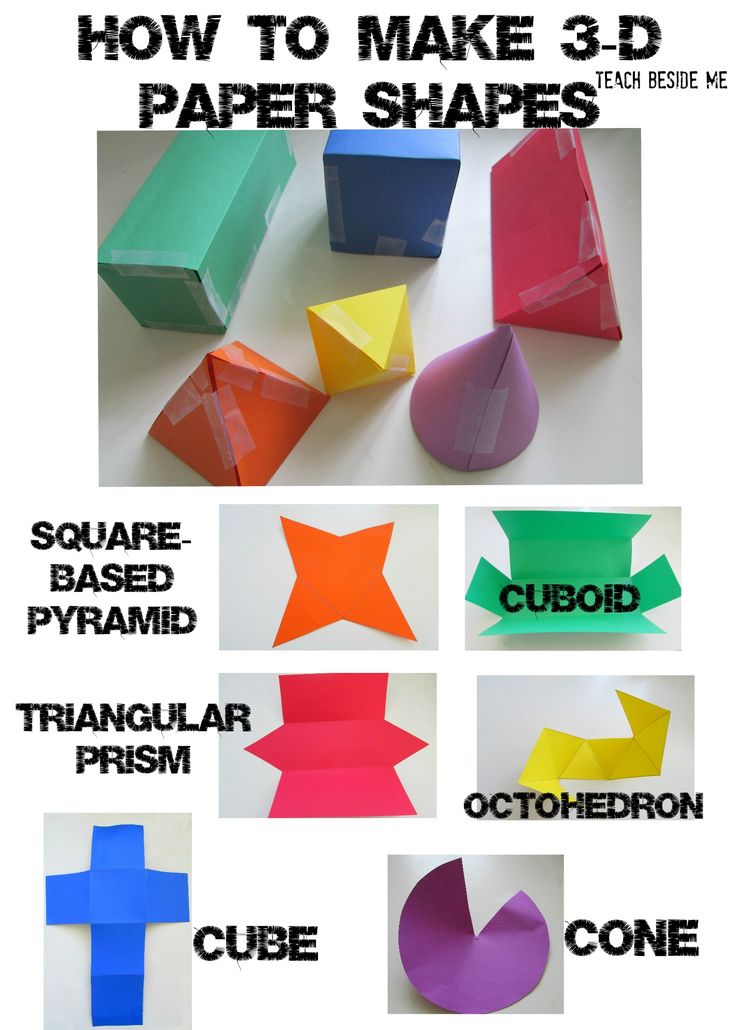 ..
..
Date of update: 06/20/2016
Creativity with two children: together - more fun!
The opportunity to develop both children at once. During this lesson, you can maximize the development of fine motor skills, a sense of color, development fantasy and many other aspects of parenting. Also, this activity tends to delight absolutely everyone ... ... potato stamps. Awaken the imagination of children, infect them with a new idea - and enjoy the peace and happiness that creativity with children! Volumetric applications with a non-standard approach Not a single child will refuse to make application in the company of his brother or sister. You can...
Update date: 06/11/2016
If you are tired of just drawing...
The process is a lot of fun. And you need to create all the conditions for them. Along with planar application teach them how to make three-dimensional: three-dimensional is better perceived by a preschooler and .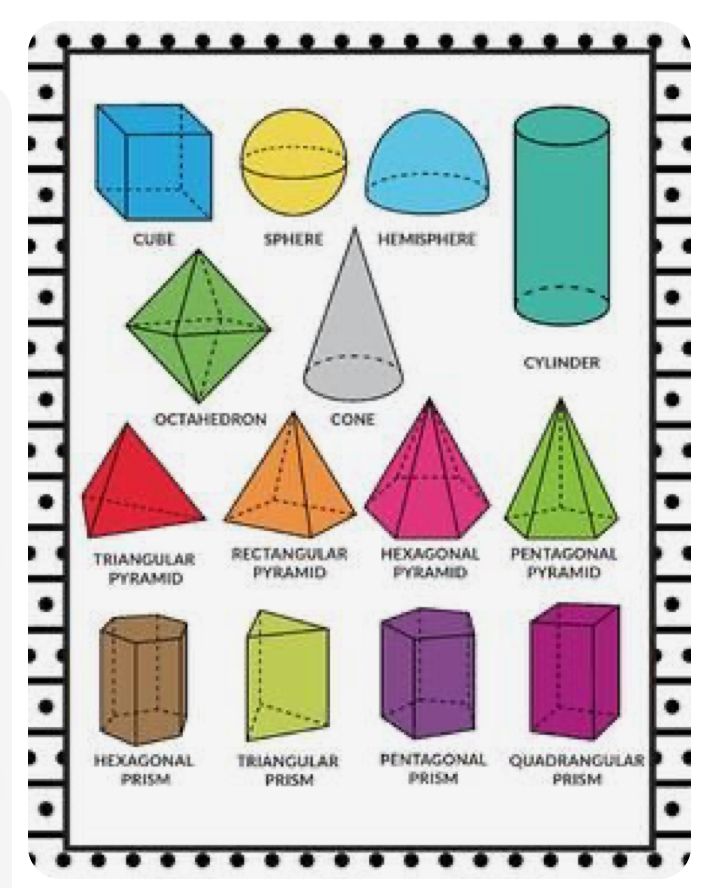 .. ... cut out from postcards, depict sky and clouds with fabrics, etc. The limit of perfection and creativity is not in visual activity. Drawing on stones The very shape of the pebble ... ... them. Drawing brings only benefits to your baby. Drawing has a fruitful effect on development memory and attention, development fine motor skills and imagination. Imagination and fantasy...
Large selection of developments of simple geometric shapes.
Children's first introduction to paper modeling always starts with simple geometric shapes such as the cube and the pyramid. Not many succeed in gluing a cube the first time, sometimes it takes several days to make a truly even and flawless cube. More complex cylinder and cone shapes require several times more effort than a simple cube. If you don’t know how to carefully glue geometric shapes, then it’s too early for you to take on complex models. Take care of yourself and teach your children to crate these “elements” of modeling from ready-made scans. nine0013
To begin with, of course, I suggest learning how to glue an ordinary cube. Reamers are made for two cubes, large and small. A more complex figure is a small cube because it is more difficult to glue it than a large one.
So let's get started! Download the development of all the figures on five sheets and print on thick paper. Before you print and glue geometric shapes, be sure to read the article on how to choose paper and how to cut, bend and glue paper in general. nine0013
For better printing, I advise you to use the AutoCAD program, and I give you a development for this program, and also read how to print from AutoCAD. Cut out the development of the cubes from the first sheet, along the fold lines, be sure to draw a compass needle under the iron ruler so that the paper folds well. Now you can start gluing the cubes.
To save paper and just to be on the safe side, I made several unfoldings of a small cube, you never know if you want to glue more than one cube or something won't work the first time. Another simple figure is a pyramid, you will find its sweeps on the second sheet. Similar pyramids cost the ancient Egyptians, though not made of paper and not so small :)0013
And this is also a pyramid, but unlike the previous one, it has not four, but three sides.
Development of trihedral pyramid on the first sheet for printing.
And another funny pyramid of five faces, its development on the 4th sheet in the form of an asterisk in two copies.
A more complex figure is the pentahedron, although the pentahedron is more difficult to draw than to glue.
Reaming of the pentahedron on the second sheet.
So we got to the complex figures. Now you have to tighten up, gluing such figures is not easy! To begin with, a regular cylinder, its development on the second sheet. nine0013
And this is a more complex figure than a cylinder, because at its base is not a circle, but an oval.
Development of this figure on the second sheet, two spare parts made for the oval base.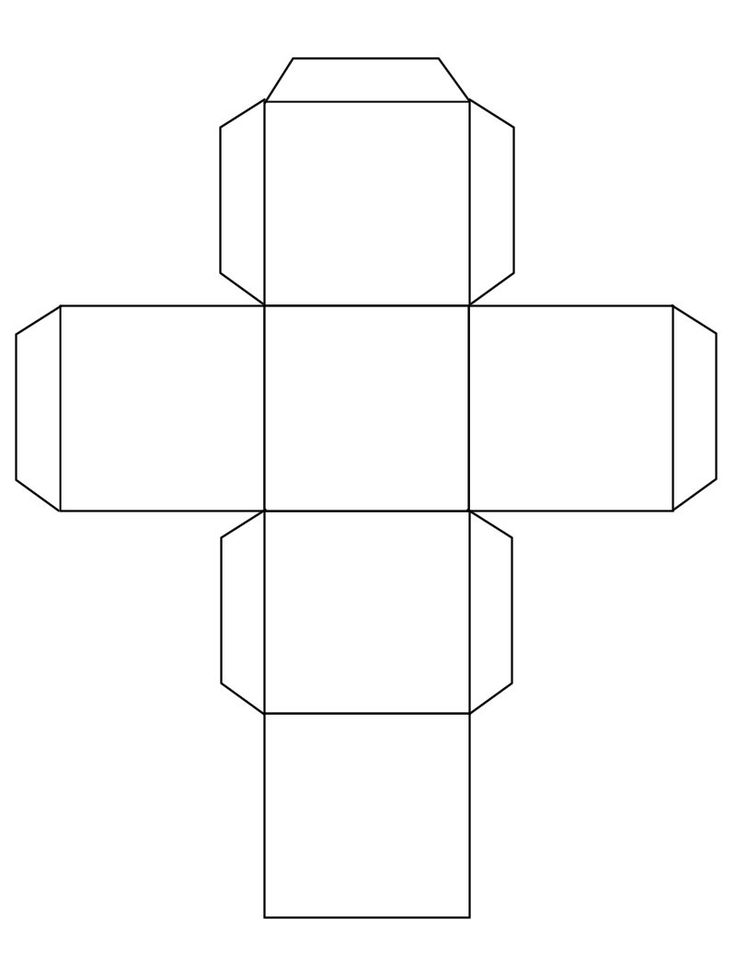
To accurately assemble the cylinder, its parts must be glued end-to-end. On the one hand, the bottom can be glued without problems, just put a pre-glued tube on the table, put a circle on the bottom and fill it with glue from the inside. Make sure that the diameter of the pipe and the round bottom fit snugly together, without gaps, otherwise the glue will leak and everything will stick to the table. The second circle will be more difficult to glue, so glue auxiliary rectangles inside at a paper thickness distance from the edge of the pipe. These rectangles will not let the base fall inward, now you can glue the circle on top without any problems. nine0013
A cylinder with an oval base can be glued in the same way as a regular cylinder, but it has a lower height, so it is easier to insert a paper accordion inside, and put the second base on top and glue it along the edge.
Now a very complex figure - a cone. Its details are on the third sheet, a spare circle for the bottom on the 4th sheet.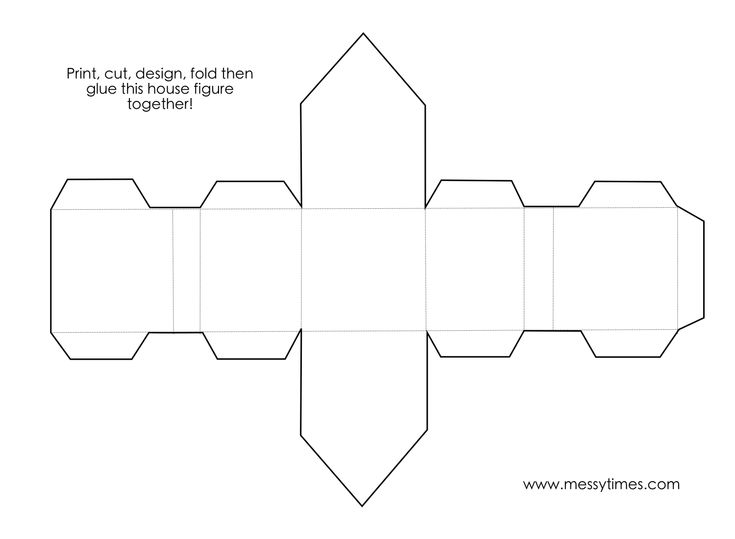 The whole difficulty of gluing the cone is in its sharp top, and then it will be very difficult to glue the bottom.
A complex and at the same time simple figure is a ball. The ball consists of 12 pentahedrons, the development of the ball is on the 4th sheet. First, the two halves of the ball are glued, and then both are glued together. nine0013
Quite an interesting figure - a rhombus, its details are on the third sheet.
And now two very similar, but completely different figures, their difference is only in the base.
When you glue these two figures together, you will not immediately understand what they are, they turned out to be completely unreceptive.
Another interesting figurine is a torus, only it is very simplified here, its details are on the 5th sheet.
And finally, the last figure from equilateral triangles, I don't even know what to call it, but the figure looks like a star. Development of this figure on the fifth sheet. nine0013
That's all for today! I wish you success in this difficult work!
SUMMARY AND METHODOLOGICAL SUPPORT OF THE LESSON (LESSON) IN PAPERPLASTICS.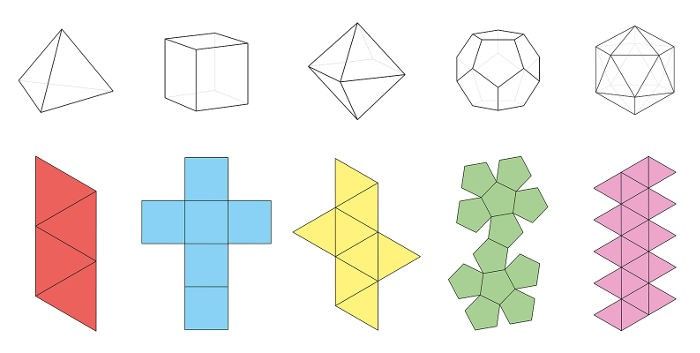
Subject: Volumetric geometric shapes.
Goals and objectives of the lesson: To develop the student's figurative volume-spatial thinking and imagination. Completing the task involves familiarization with the material, acquiring the ability to perform an accurate drawing, cut out various shapes, the ability to use sharp cutting objects (cutter, scissors), glue parts together and assemble a three-dimensional geometric figure. nine0013
Equipment: At the teacher : computer and projector, product samples, tools (scissors, cutter, paper, ruler, pencil, eraser, glue), templates, safety instructions for working with cutting tools, presentation. Students : lining wooden board (30 * 20 cm), scissors, cutter, paper (whatman) A3 format - 2 sheets, ruler, pencil (hard), eraser, glue (moment "crystal").
Lesson type: nine0004 mixed
Lesson progress:
1. Organizational moment -1 minute.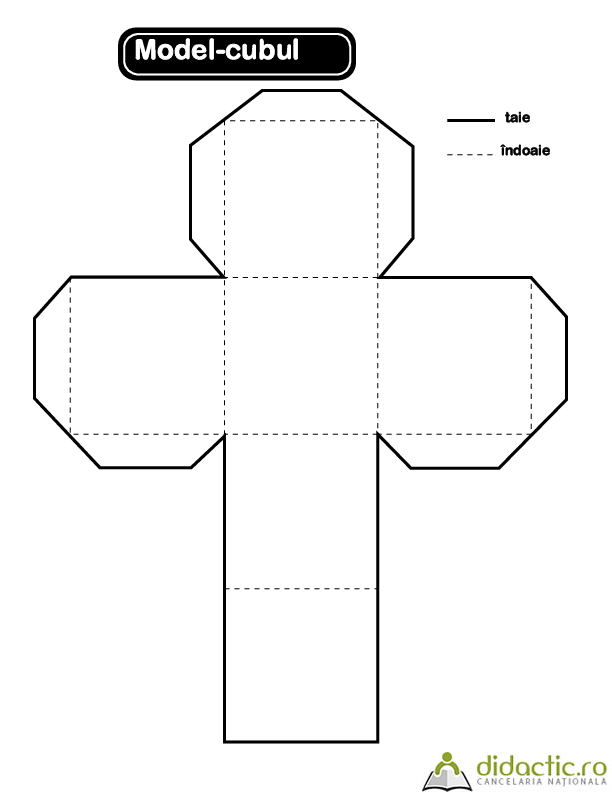
Checking readiness for the lesson.
2. Teacher's explanation - 9 minutes.
Reporting the topic of the lesson, goals and objectives.
Material explanation:
In the process of classes, the teacher consistently tells and clearly shows about the construction of drawings for three-dimensional geometric shapes and purposefully forms students' ability to work with their hands, teaches them to precise finger movements, improves fine motor skills of the hands, develops the eye. nine0013
- « Using a cutter, scissors and glue, you can quickly make a model of any product, a simple composition, a layout from a sheet of paper. Unlike clay sculpture, where the mass is collected by building up and refining forms, there is no frame in paper products. Almost all products are hollow and look like a shell. However, this is not an impression from the finished form, but a completely independent plastic shell created by folding paper along pre-applied lines - cuts. Notches are the structural basis of all products made from paper (they are called stiffeners). A sheet folded in half forms a rib. If the sheet is folded several times, then a different texture can be obtained from the number and nature of these rectilinear folds. nine0174".
The basic qualities of abilities formed by classes, on the one hand, relate mainly to the field of perception (development of the analytical-synthetic view of the object), on the other hand, to the field of motor skills (optional area of the hand). The main form of conducting classes is a mixed type lesson (a lecture is combined with practical work).
3. Practical work of students - 1 hour 20 minutes.
Models of geometric shapes of various sizes and shapes were selected for work. nine0013
Progress of work:
1. On a sheet of white paper (drawing paper), we outline the dimensions and contours for creating geometric shapes as indicated on the template.
2. Cut along the contour, make cuts on the inner edges of the figure from the front side. We remove the auxiliary lines with an eraser and bend.
3. Lubricate the areas marked “for glue” with glue (as indicated on the template) and proceed to construction.
By the same principle, the task is performed with the following geometric shapes. nine0013
5 minutes before the end of the lesson mini-view and discuss the work.
Visual material for the lesson.
Lesson Presentation : Paper plastic. Volumetric geometric shapes.
Geometric pyramid.
http://pandia.ru/text/80/128/images/image005_30.jpg">
Explanation for the slide: dotted line, remove auxiliary lines with an eraser
Octahedron.
DIV_ADBLOCK219">
.
3. Lubricate additional inserts on the figure indicated by hatching with glue and glue the figure with additional inserts inside.
dodecahedron.
along the line marked with a dotted line.0013
3. Lubricate additional inserts on the figure marked with hatching with glue and glue the figure with additional inserts inside.
ICOSAHEDRON.
Explanation for the slide: 1. The drawing of the icosahedron is transferred to the student's sheet with an accuracy of 1: 1, as indicated on the template. The construction begins with an isosceles triangle, one side of which is 4.5 cm and a height of 4 cm. Next, as indicated on the template, we transfer the drawing of all the remaining isosceles triangles. nine0013
Explanation for the slide: 2. After drawing the drawing, cut out along the contour (solid line) and make cuts with a cutter along the line indicated by the dotted line. Auxiliary lines are removed with an eraser.
3. Lubricate additional inserts on the figure indicated by hatching with glue and glue the figure with additional inserts inside.
teacher's pedagogical drawing.
examples of student work.
Three-dimensional geometric figures of the senior group 2/4 grade. nine0013
Teacher: .
Star exercise
| Lesson objectives | Methods and techniques | |
| · To give an idea of the history of paper plastics. Introduce the basic methods of working with paper in the paper-plastic technique Introduce the main stages of work, teach accuracy in the course of work · To develop the student's figurative volume-spatial thinking and imagination. nine0013 · To consolidate students' understanding of paper-plastic. | Use of visibility Self-execution Compare | |
| Equipment | Materials | |
| Multimedia Visual aid | Drawing paper, stationery cutter, scissors, ruler, compasses, pencil, eraser | Performing the “Star” exercise using the paper-plastic technique. |
| Lesson Plan | Sample work | |
| 1. Organization 3 min. 2. Introductory talk 10 min. 3. Independent work 30 min. 4. Conclusion 2 min. |
|
1. Organizational part.
Our task for today's lesson will be an exercise in the "star" paper-plastic technique. nine0013
2. Explanation of the material.
Paper plastic. What is it: paper sculpture, architecture or design? This type of artistic activity can equally be attributed to all these areas, since paper, as a design material, is widely used by artists, architects, and designers. From a sheet of paper with a cutter, scissors and glue, you can quickly make a model of any product, a simple composition, a layout. nine0013
Paper plastic is close to sculpture. In contrast to sculptures made of clay, where the mass is collected by building up and refining forms, there is no frame in paper products.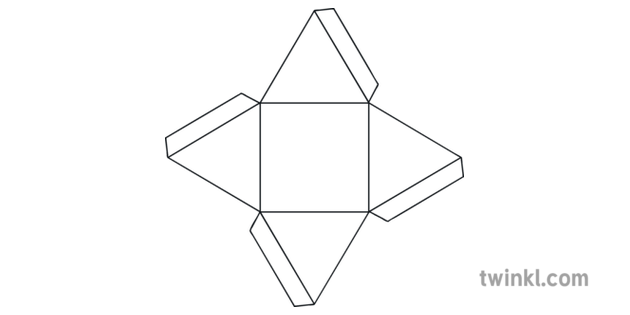 Almost all products are hollow and look like a shell. However, this is not an impression from the finished form, but a completely independent plastic shell created by folding paper along pre-applied lines - cuts.
Technology features. nine0174 Notches are the structural basis of all products made from paper (hereinafter they will be called stiffeners). A sheet folded in half forms a rib. If the sheet is folded several times, then a different texture can be obtained from the number and nature of these rectilinear folds. In Japan, this method of papermaking is called origami.
Materials and tools. The main tool in paper plastic is a cutter (clerical knife). Scissors are needed for cutting paper, making various patterns, cuts, notches, etc. A ruler, preferably a metal one 25-30 cm long, because plastic and wooden rulers are not accurate and quickly fail. Compasses, for constructing a circle and dividing it into six parts. nine0013
3. Doing work.
Today we got acquainted with the paper-plastic technique, watched a multimedia presentation in this area, and looked at and touched what this technique is on a visual aid. And now we will try to perform the exercise "star". To do this, your workplace should have tools such as: a ruler, a pencil, an eraser, a cutter, scissors. The exercise will be done on paper. Each of you also has a template on the tables for performing work with given dimensions. Please note: the yellow line is the construction, we cut it out along the brown line, we cut the straight green lines with a cutter and bend it away from ourselves, the green dotted lines are cut with a cutter and bend it towards ourselves. We begin the work with a drawn circle with a diameter of 20 cm. After that, we proceed to drawing auxiliary lines and proceed to design. nine0013
4. Consolidation of the material covered.
So our creative lesson has come to an end. We got acquainted with a new direction in art - paper-plastic technique.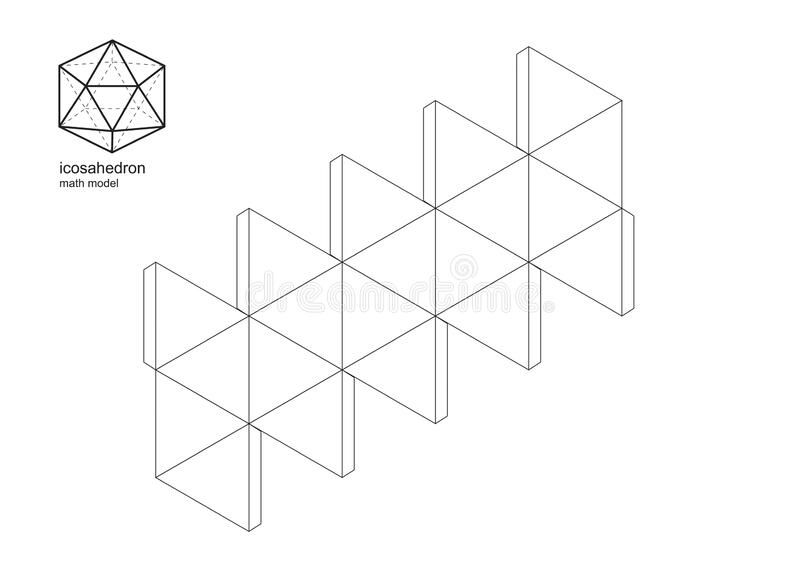 So tell me please, what is the difference between paper sculpture and clay sculpture? In which country abroad is this technique used, and what is its name there? What materials may we need to create a paper composition?
Do-it-yourself unusual paper figures schemes. Geometric shapes made of paper. Gluing templates
Nowadays, probably, everything is made of paper. The huge demand for this product is due to its wide popularity and extensive scope. Today we will talk about do-it-yourself volumetric paper figures. For some people, this hobby develops into a profitable business. profession, because one can only say about their exhibits that this is a real work of art.
In the modular origami technique, three-dimensional paper figures are assembled from a large number of identical parts (modules). Each module is folded according to the rules of classic origami from one sheet of paper, and then the modules are connected by nesting them into each other.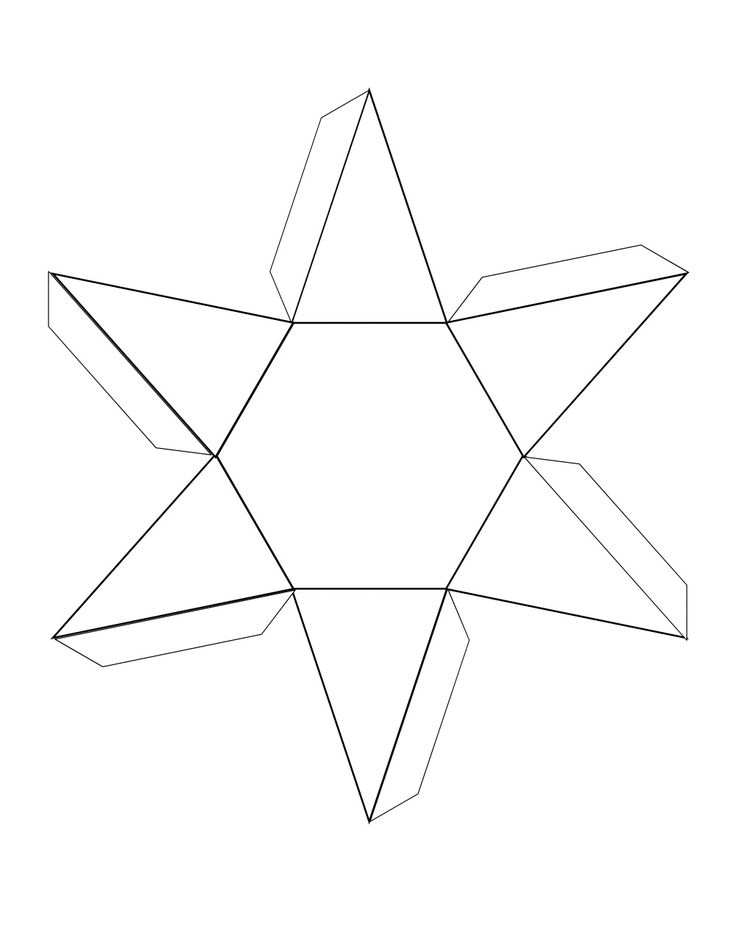 At the same time, the friction force does not allow the structure to disintegrate. In the modular origami technique, boxes, flat and voluminous stars, spherical objects are often made, which in Russia received the inaccurate name kusudama, since initially kusudama involved stitching modules into a ball. nine0013
Wet origami - closer to reality
There is another type of popular origami - wet folding. To give smooth lines, the paper is slightly moistened with a sponge or spray gun. Most often used to create animal figurines. Wet paper is more pliable and holds its shape better after drying. The peculiarity is that by wetting the structure again, you can give it a different shape without tearing the paper.
Kirigami - volumes from the plane
Scissors and glue can be used for the kirigami technique. Crafts using the kirigami technique are somewhat reminiscent of children's panorama books. Also, this technique is often compared to ‘pop-up’ postcards. Unlike traditional pop-up cards, these paper models are usually cut and folded from a single sheet of paper. Most often, they develop three-dimensional reproductions of architecture, geometric patterns and various everyday objects, etc.
Kusudama - rounded shapes
Kusudama technique has the same principle as modular origami. The main difference is that the figures have a spherical shape, and the parts for connection can not only be nested one into the other, but also glued or sewn.
Cubecraft - square bun with many faces
This is a modern paper craft technique. In this technique, all the figures are folded according to the same pattern. The point is that you can make figurines of various famous characters from movies, comics, cartoons, as well as real personalities: politicians, musicians, actors, etc. Such figurines are put on the table as a reminder or just to please the eye. nine0013
Papier-mache - remembering childhood
The name of papier-mâché technique is translated from French as “chewed paper”. But you will be surprised when you learn that China is the birthplace of this technique.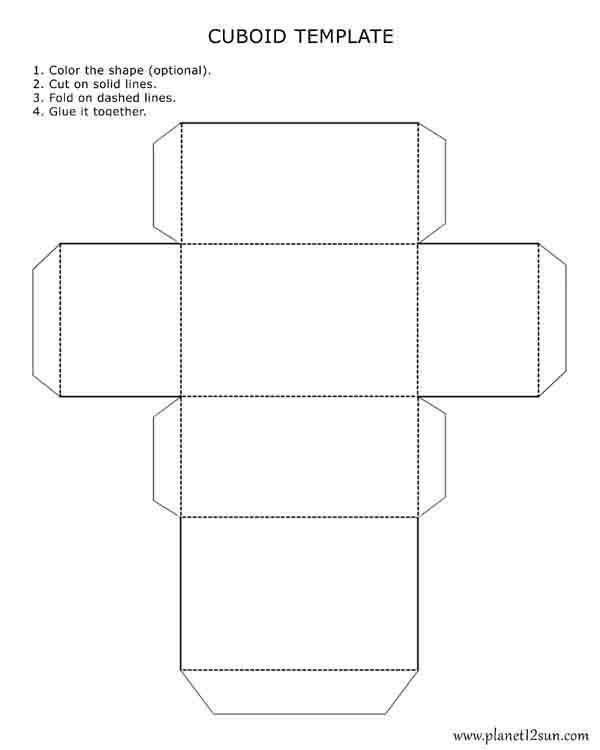 The technique consists in multi-layer gluing pieces of paper soaked in a paste. Then the paper figures are primed and painted. You can make anything from papier-mâché (vases, toys, mugs), but most often they make masks.
Decoupage - decorate old things
Decoupage in translation means "cutting". Most often, the decoupage technique is used for old furniture - some dragons or birds, plants or animals are cut out. It gives a new shine to old things. It is also used in the creation of exclusive interior items, in the design of clothes and the manufacture of fashion accessories.
Facing - quilling in a new way
Using the trimming technique, you can make beautiful postcards or even pictures. Quilling uses long strips that are wound around a thin stick. Small squares are also cut here. Then, a stick is applied to the center of the square, and this square is wound on it. The resulting part is glued to the base. It turns out sometimes unusual and very voluminous.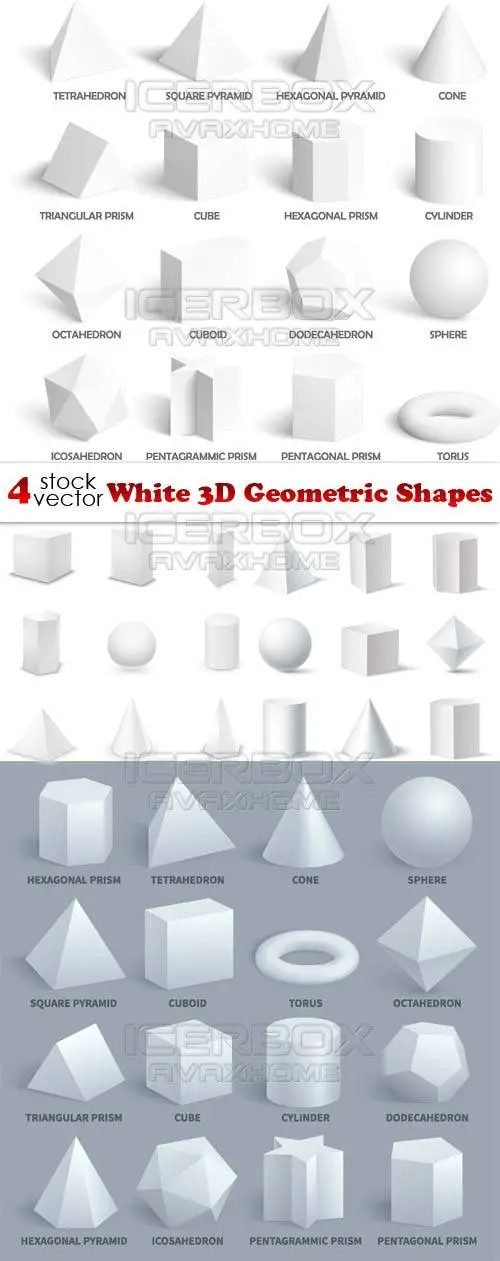 nine0013
Paper art - metal imitation
This technique was invented in 2006 and basically contains imitation of metal and wood from paper napkins. The technique imitates wood carving or metal chasing. Coloring and patination gives natural textures. Strips of napkins soaked in water are twisted into threads, then a pattern is laid out of them and fixed with glue. After drying, it remains only to paint and give naturalness.
Iris Fold - Rainbow Fold nine0424
To make a craft using this technique, you need to cut several strips of paper of different colors and lay them in a spiral or in another fancy way. It all looks like a multifaceted figure. The imposition of translucent papers on top of each other gives interesting effects when decorating.
Pergamano - painstaking work
Patterns and decorations in this technique are made on parchment paper using perforation and embossing. Most often, the parchment technique is used in the manufacture of postcards and invitations.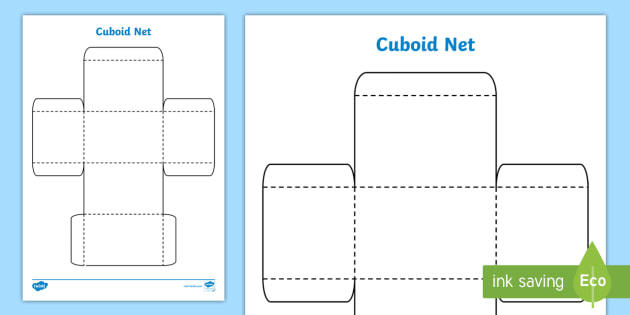 nine0013
Katagami - need a sharp knife
Some more Japanese paper art. Katagami is the art of cutting whole pictures out of rice paper using a special sharp knife and stencil or along a drawn line. Most often used for paintings.
A collage is an image composed of various pieces of paper (wallpaper, newspapers, magazines, photographs, etc.) that differ in color and texture. Previously, they cut out pictures from magazines, newspapers, books and decorated things with them (remember your grandmother's suitcase or dressing table). Now this old technique has again become fashionable and is widely used in various countries when decorating handbags, hats, trays, Christmas tree decorations, sundials, caskets, dishes, packages, etc.
Paper modeling - paper becomes…
Special interest, paper simulation . You can create almost any volumetric paper shape with your own hands. Starting from military equipment, architectural monuments and ending with various types of animals, both known to everyone and fictional. Of course, ideally, you need to be able to do everything (drawings, details, etc.) with your own hands, but for starters, you can use the Internet. Through the search, you can find a lot of drawings and layouts that can be printed on a printer, cut and glued. There are even special sites that store paper models: airplanes, cars, movie and cartoon characters. nine0013
All of the listed paper craft techniques have their own nuances, advantages and disadvantages. But most importantly, when choosing what kind of paper art to do, I advise you to be guided solely by your own heart. In order to make a bewitching figurine, you must truly love this business.
This is painstaking work that requires care and patience, and only with a strong desire can everything be done as it should be. The admiring glances of friends and praise addressed to you can become a reward for you. nine0013
Paper products look very nice if everything is cut and assembled evenly. The main thing is that no special skills are required to create such figures.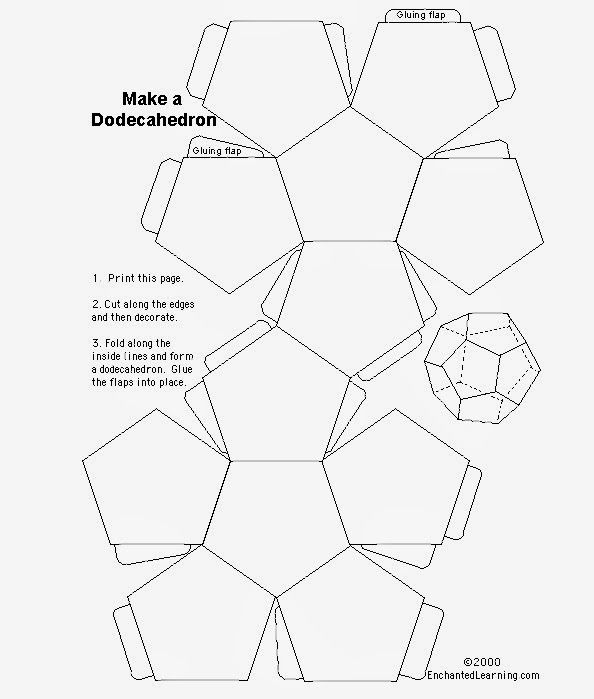 Enough carefully connect everything. With a little practice, you will get everything much faster and smoother.
An example of how unusual paper shapes can be can be seen in the video below. I advise everyone to see it, because it is really unusual and a masterpiece. nine0013
Rectangle, square, triangle, trapezium and others - geometric figures from the exact science section. The pyramid is a polyhedron. The base of this figure is a polygon, and the side faces are triangles with a common vertex, or trapezoid. For a complete presentation and study of any geometric object, mock-ups are made. Use the most diverse material from which the pyramid is made. The surface of a polyhedral figure, developed on a plane, is called its development. The method of converting flat objects into volumetric polyhedra and certain knowledge from geometry will help to create a layout. It is not easy to make reamers from paper or cardboard. You will need the ability to perform drawings according to given dimensions.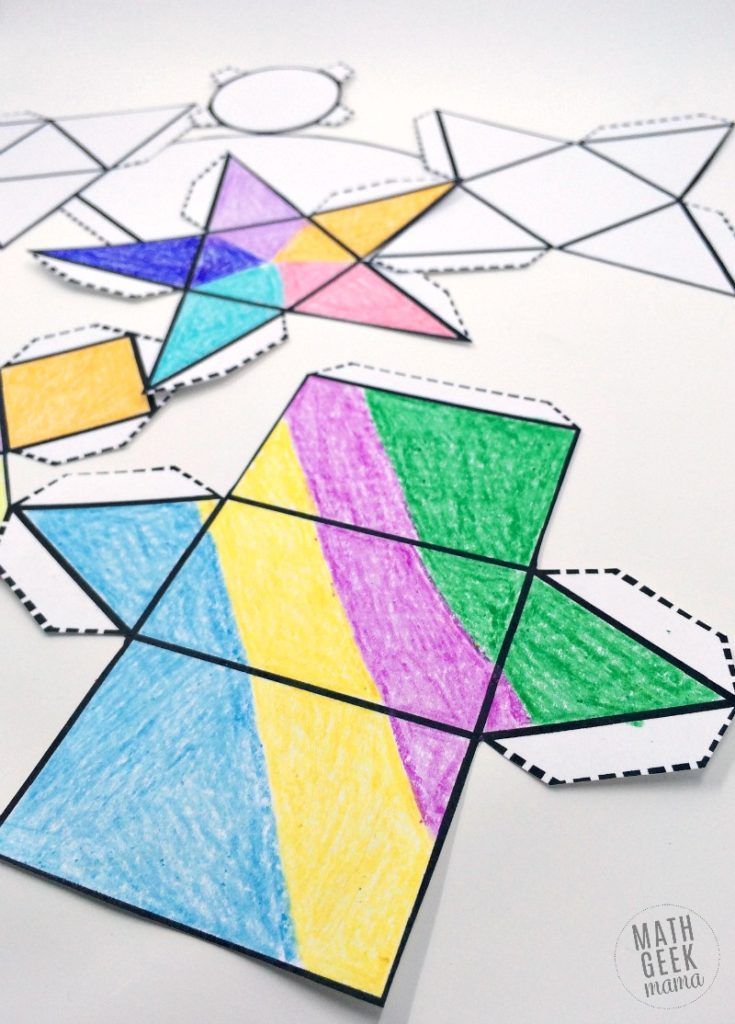 nine0013
Materials and fixtures
Modeling and execution of multifaceted three-dimensional geometric shapes is an interesting and exciting process. From paper, you can make a large number of various layouts. For work you will need:
- paper or cardboard;
- scissors;
- pencil;
- ruler;
- compass;
- eraser;
- glue.
Determining the parameters
First of all, let's define what the pyramid will be. The development of this figure is the basis for the manufacture of a three-dimensional figure. Doing the job will require extreme precision. If the drawing is incorrect, it will be impossible to assemble a geometric figure. Suppose you need to make a layout of the correct
Any geometric body has certain properties. This figure has a base and its top is projected into its center. Selected as the basis This condition determines the name. The side edges of the pyramid are triangles, the number of which depends on the polyhedron chosen for the base.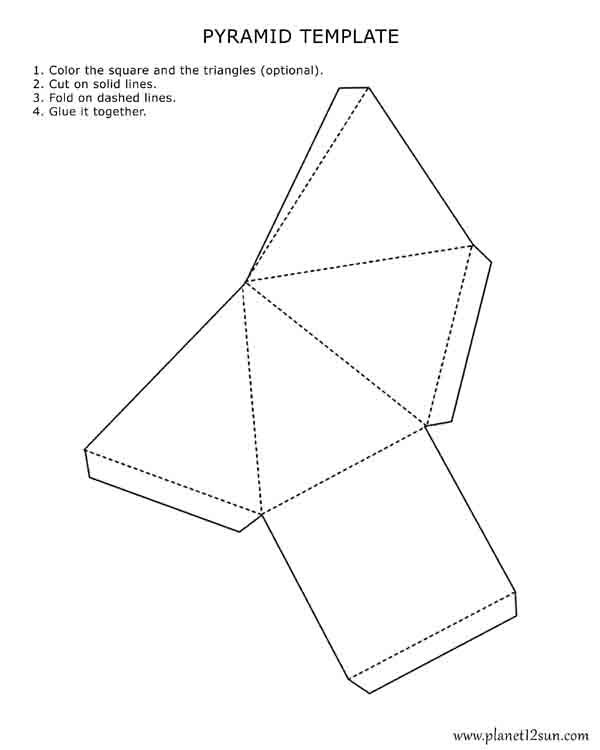 In this case, there will be three. It is also important to know the dimensions of all the constituent parts of which the pyramid will be composed. Paper sweeps are performed in accordance with all data of a geometric figure. The parameters of the future model are negotiated in advance. The choice of material used depends on these data. nine0013
How is a regular pyramid unfolded?
The basis of the model is a sheet of paper or cardboard. Work begins with a pyramid drawing. The figure is shown expanded. A flat image on paper corresponds to pre-selected dimensions and parameters. has a regular polygon as its base, and its altitude passes through its center. Let's start with a simple model. In this case, it is a triangular pyramid. Determine the dimensions of the selected shape.
To build a net of a pyramid, the base of which is a regular triangle, in the center of the sheet, using a ruler and a pencil, draw the base of the given dimensions. Next, to each of its sides, we draw the side faces of the pyramid - triangles.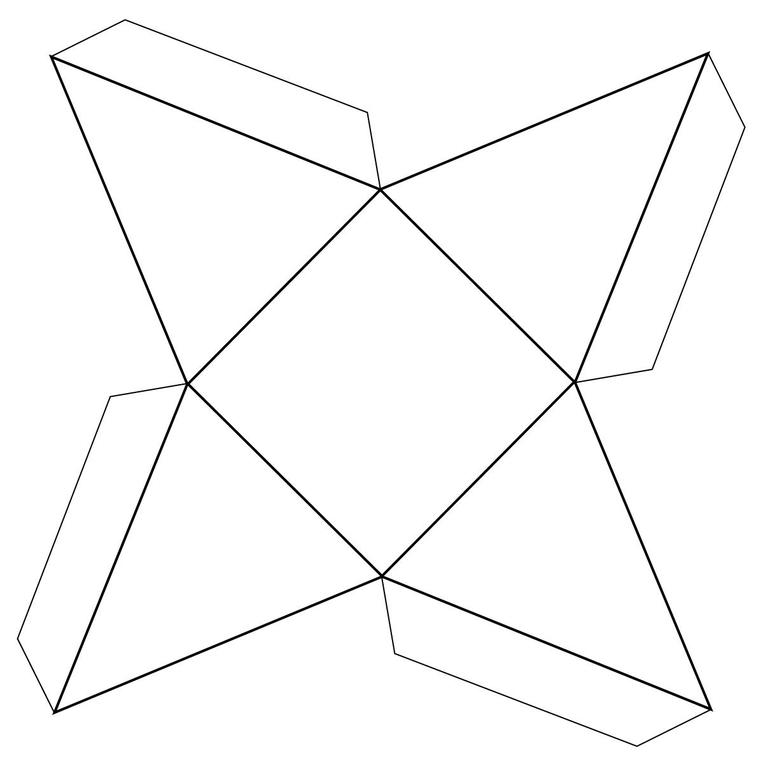 Now let's move on to building them. The dimensions of the sides of the triangles of the lateral surface are measured with a compass. We put the leg of the compass at the top of the drawn base and make a notch. We repeat the action, moving to the next point of the triangle. The intersection obtained as a result of such actions will determine the vertices of the side faces of the pyramid. We connect them to the base. We get a drawing of a pyramid. For gluing a three-dimensional figure, valves are provided on the sides of the side faces. We finish drawing small trapeziums. nine0013
Assembling the layout
Cut out the completed pattern along the contour with scissors. Gently bend the scan along all lines. We fill the trapezoid valves inside the figure so that its faces close. Lubricate them with glue. After thirty minutes, the glue will dry. Volumetric figure is ready.
First, let's imagine what a geometric figure looks like, the layout of which we will make. The base of the chosen pyramid is a quadrilateral.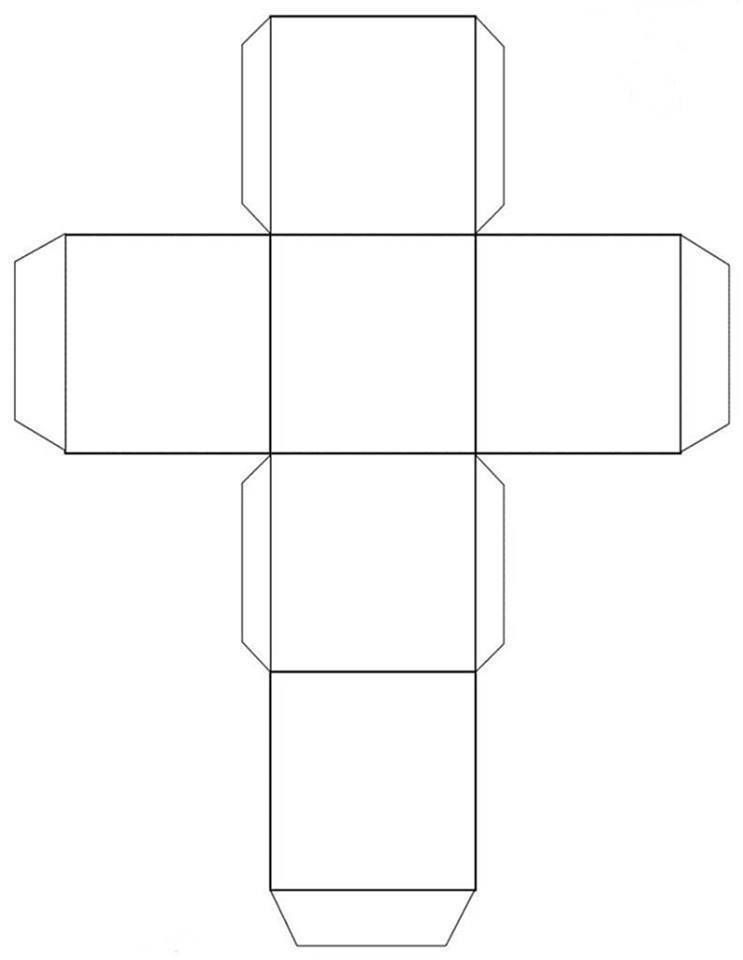 Lateral ribs - triangles. For work, we use the same materials and fixtures as in the previous version. The drawing is done on paper with a pencil. In the center of the sheet, draw a quadrilateral with the selected parameters. nine0013
Divide each side of the base in half. We draw a perpendicular, which will be the height of the triangular face. With a compass solution equal to the length of the side face of the pyramid, we make notches on the perpendiculars, setting its leg to the top of the base. We connect both corners of one side of the base with the obtained point on the perpendicular. As a result, we get a square in the center of the drawing, on the faces of which triangles are drawn. To fix the model on the side faces, draw auxiliary valves. For reliable fastening, a centimeter-wide strip is enough. The pyramid is ready for assembly. nine0013
The final stage of the layout
Cut out the resulting pattern of the figure along the contour. Bend the paper along the drawn lines.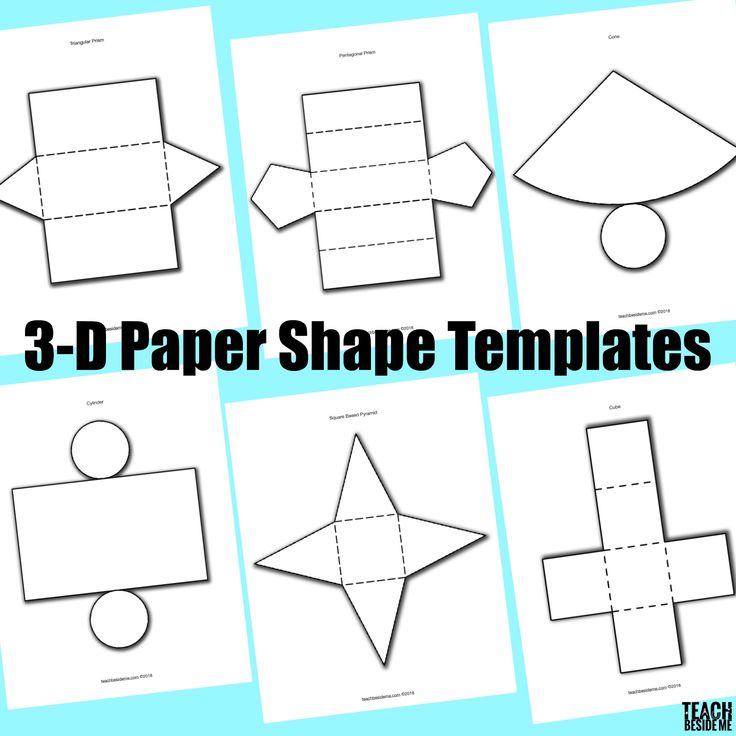 The volumetric figure is collected by gluing. Lubricate the provided valves with glue and fix the resulting model.
3D models of complex shapes
After completing a simple polyhedron model, you can move on to more complex geometric shapes. The development of a truncated pyramid is much more difficult to perform. Its bases are similar polyhedra. The side faces are trapezoids. The sequence of work will be the same as that in which a simple pyramid was made. The sweep will be more cumbersome. To complete the drawing, use a pencil, a compass and a ruler. nine0013
Building a drawing
The development of a truncated pyramid is performed in several stages. The side face of the truncated pyramid is a trapezoid, and the bases are similar polyhedra. Let's say they are squares. On a sheet of paper, we draw a trapezoid with the given dimensions. We extend the sides of the resulting figure to the intersection. The result is an isosceles triangle. We measure its side with a compass.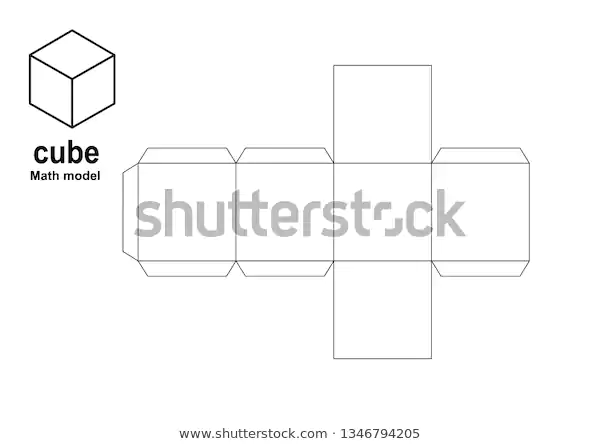 On a separate sheet of paper we build which will be the measured distance. nine0013
The next step is to build the side edges that the truncated pyramid has. The sweep is performed inside the drawn circle. The lower base of the trapezoid is measured with a compass. On the circle we mark five points that connect the lines with its center. We get four isosceles triangles. With a compass we measure the side of the trapezoid drawn on a separate sheet. This distance is set aside on each side of the drawn triangles. We connect the obtained points. The side faces of the trapezoid are ready. It remains only to draw the upper and lower bases of the pyramid. In this case, these are similar polyhedra - squares. Draw squares to the upper and lower bases of the first trapezoid. The drawing shows all the parts that the pyramid has. The sweep is almost ready. It remains only to finish the connecting valves on the sides of the smaller square and one of the faces of the trapezoid. nine0013
Completion of modeling
Before gluing the three-dimensional figure, the drawing is cut out along the contour with scissors.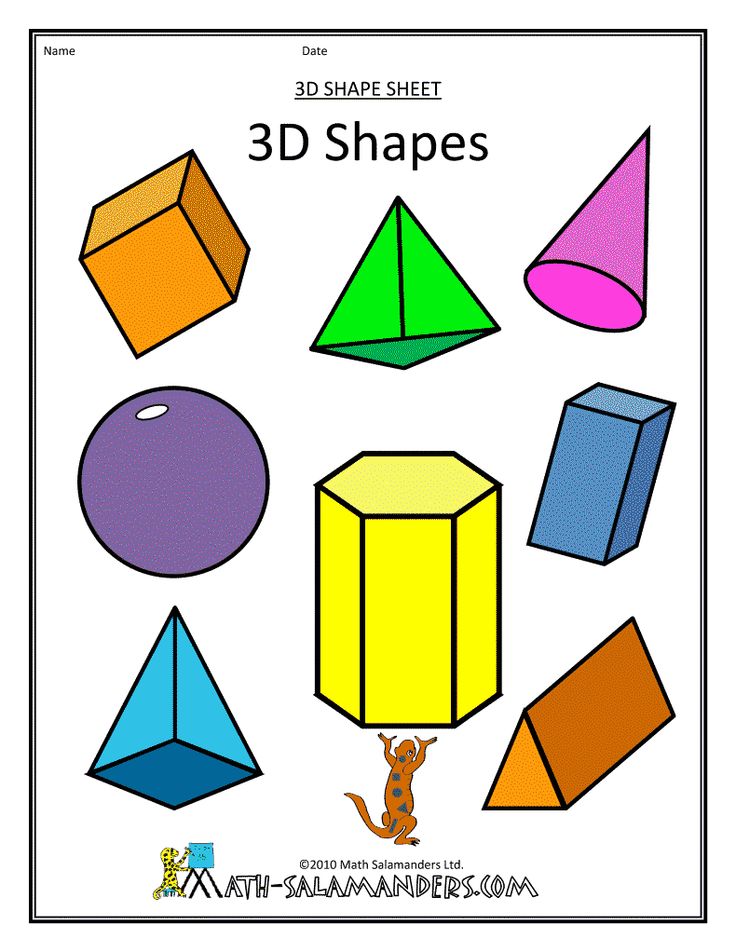 Next, the scan is carefully bent along the drawn lines. Mounting valves are filled inside the model. Lubricate them with glue and press them to the edges of the pyramid. Let the models dry.
Making different models of polyhedrons
Making three-dimensional models of geometric shapes is an exciting experience. To master it thoroughly, you should start by performing the simplest scans. Gradually moving from simple crafts to more complex models, you can begin to create the most intricate designs. nine0013
Large selection of developments of simple geometric shapes.
Children's first introduction to paper modeling always starts with simple geometric shapes such as the cube and the pyramid. Not many succeed in gluing a cube the first time, sometimes it takes several days to make a truly even and flawless cube. More complex cylinder and cone shapes require several times more effort than a simple cube. If you don’t know how to carefully glue geometric shapes, then it’s too early for you to take on complex models.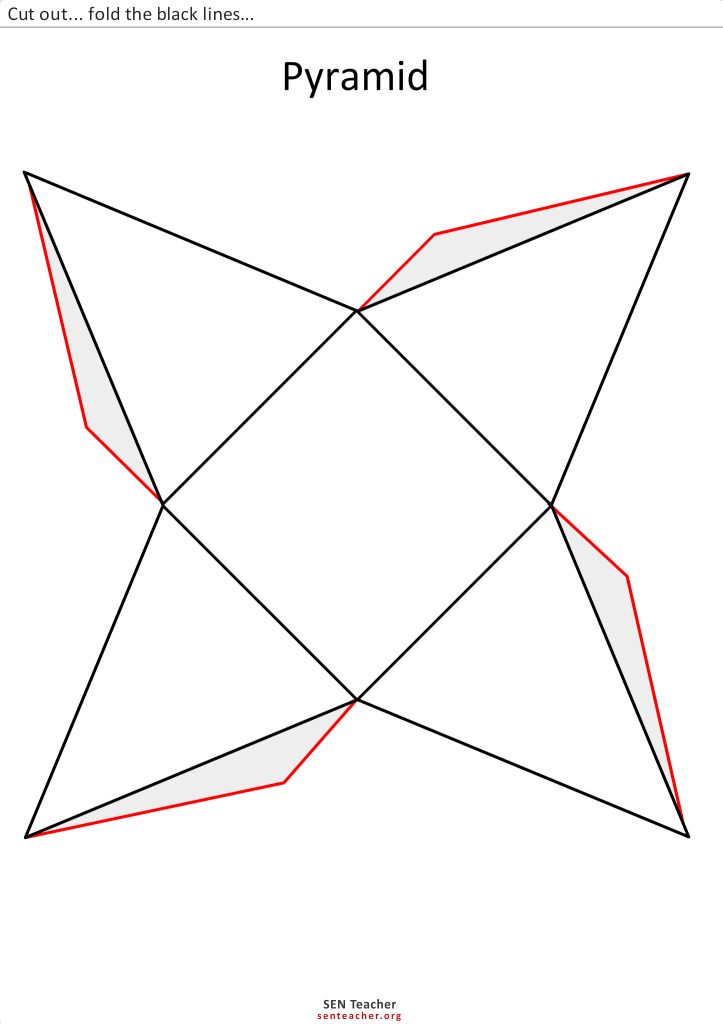 Take care of yourself and teach your children to crate these “elements” of modeling from ready-made scans. nine0013
To begin with, of course, I suggest learning how to glue an ordinary cube. Reamers are made for two cubes, large and small. A more complex figure is a small cube because it is more difficult to glue it than a large one.
So let's get started! Download the development of all the figures on five sheets and print on thick paper. Before you print and glue geometric shapes, be sure to read the article on how to choose paper and how to cut, bend and glue paper in general. nine0013
For better printing, I advise you to use the AutoCAD program, and I give you a scan for this program, and also read how to print from AutoCAD. Cut out the development of the cubes from the first sheet, along the fold lines, be sure to draw a compass needle under the iron ruler so that the paper folds well. Now you can start gluing the cubes.
To save paper and for every fireman, I made several unfoldings of a small cube, you never know if you want to glue more than one cube or something will not work the first time.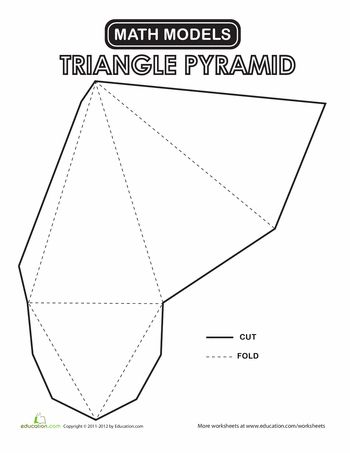 Another simple figure is a pyramid, you will find its sweeps on the second sheet. Similar pyramids cost the ancient Egyptians, though not made of paper and not so small :)0013
And this is also a pyramid, but unlike the previous one, it has not four, but three sides.
Development of triangular pyramid on the first sheet for printing.
And another funny pyramid of five faces, its development on the 4th sheet in the form of an asterisk in two copies.
A more complex figure is the pentahedron, although the pentahedron is more difficult to draw than to glue.
Reaming of the pentahedron on the second sheet. nine0013
So we got to the complex figures. Now you have to tighten up, gluing such figures is not easy! To begin with, a regular cylinder, its development on the second sheet.
And this is a more complex figure compared to the cylinder, because at its base is not a circle, but an oval.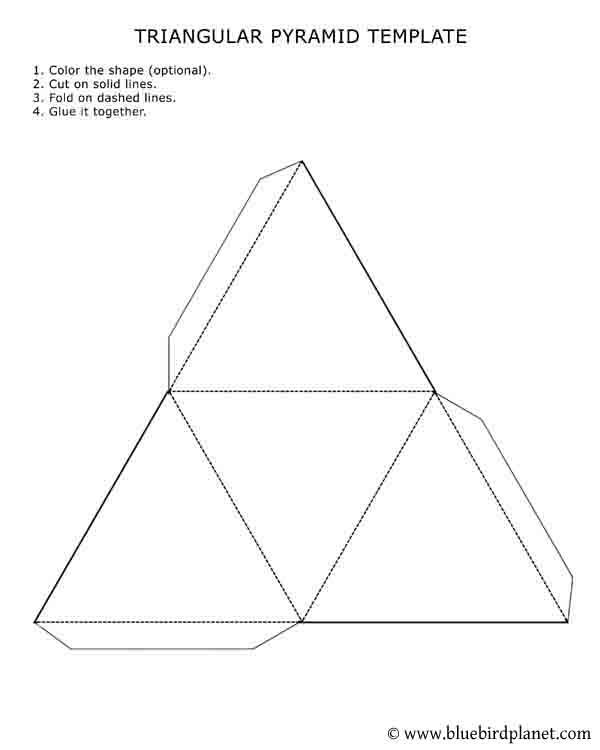
Development of this figure on the second sheet, two spare parts made for the oval base.
To accurately assemble the cylinder, its parts must be glued end-to-end. On the one hand, the bottom can be glued without problems, just put a pre-glued tube on the table, put a circle on the bottom and fill it with glue from the inside. Make sure that the diameter of the pipe and the round bottom fit snugly together, without gaps, otherwise the glue will leak and everything will stick to the table. The second circle will be more difficult to glue, so glue auxiliary rectangles inside at a paper thickness distance from the edge of the pipe. These rectangles will not let the base fall inward, now you can glue the circle on top without any problems. nine0013
A cylinder with an oval base can be glued in the same way as a regular cylinder, but it has a lower height, so it is easier to insert a paper accordion inside, and put the second base on top and glue it along the edge.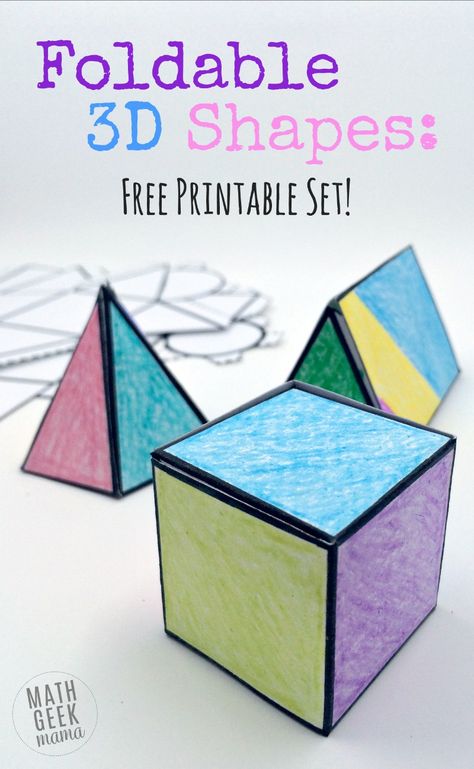
Now a very complex figure - a cone. Its details are on the third sheet, a spare circle for the bottom on the 4th sheet. The whole difficulty of gluing the cone is in its sharp top, and then it will be very difficult to glue the bottom.
A complex and at the same time simple figure is a ball. The ball consists of 12 pentahedrons, the development of the ball is on the 4th sheet. First, the two halves of the ball are glued, and then both are glued together. nine0013
Quite an interesting figure - a rhombus, its details are on the third sheet.
And now two very similar, but completely different figures, their difference is only in the base.
When you glue these two figures, you will not immediately understand what they are, they turned out to be completely unreceptive.
Another interesting figurine is a torus, only it is very simplified here, its details are on the 5th sheet.
And finally, the last figure from equilateral triangles, I don't even know what to call it, but the figure looks like a star.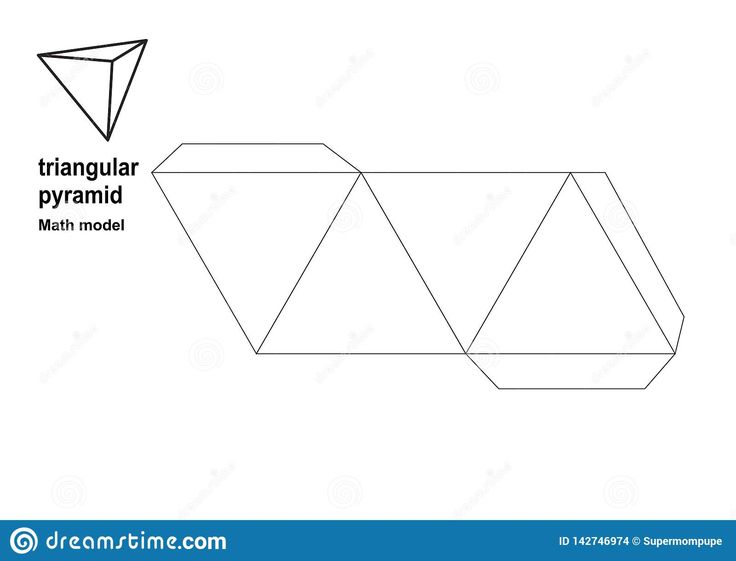 Development of this figure on the fifth sheet. nine0013
That's all for today! I wish you success in this difficult work!
The most complex and unusual forms of structures, devices, mechanisms are based on elementary geometric figures: a cube, a prism, a pyramid, a ball, and others. First, learn how to create the simplest shapes, and then you can easily master more complex shapes.
Many modellers start out with paper models. This is due to the availability of the material (finding paper and cardboard is not difficult) and ease of processing (no special tools are required). nine0013
However, paper also has a number of characteristic features:
- capricious, fragile material
- requires high accuracy, attentiveness, perseverance when working
For these reasons, paper is a material for both beginners and real masters, and models of the most varied complexity are created from it.
In this article we will study the simplest geometric shapes that can be made from paper.
You will need the following materials:
- paper sheet
- pencil
- ruler
- eraser
- scissors
- PVA glue or glue stick
- glue brush, preferably with stiff bristles
- compass (for some figures)
How to make a paper cube?
A cube is a regular polyhedron, each face of which is a square.
Creating a cube consists of two stages: creating a development and gluing. figures. To create a diagram, you can use the printer by simply printing the finished diagram. Or you can draw a sweep yourself using drawing tools. nine0013
Drawing a net:
- Select the size of the square - one side of our cube. The piece of paper should be at least 3 sides wide of this square and a little over 4 sides long.
- We draw four squares in the length of our sheet, which will become the sides of the cube. We draw them strictly on the same line, close to each other.
- Above and below any of the squares, draw one of the same square.

- We finish drawing strips for gluing, with the help of which the faces will be connected to each other. Each two faces should be connected by one strip. nine0497
- The cube is ready!
After drawing, cut the reamer with scissors and glue the PVA. Spread the glue with a very thin layer evenly with a brush over the gluing surface. We connect the surfaces and fix in the desired position for a while, using a paper clip or a small load. The glue setting time is about 30-40 minutes. Drying can be accelerated by heating, for example, on a battery. After we glue the following faces, fix in the desired position. Etc. So gradually you will glue all the faces of the cube. Use small amounts of glue! nine0013
How to make a paper cone?
A cone is a body obtained by combining all the rays emanating from one point (the top of the cone) and passing through a flat surface.
Draw a net:
- Draw a circle with a compass
- Cut out a sector (a part of a circle bounded by an arc of a circle and two radii drawn to the ends of this arc) from this circle.
 The larger the sector you cut out, the sharper the end of the cone will be.
 - We glue the side surface of the cone. nine0497
- We measure the diameter of the base of the cone. Using a compass, draw a circle on a sheet of paper of the required diameter. We finish drawing triangles for gluing the base with the side surface. Cut out.
- Glue the base to the side surface.
- The cone is ready!
How to make a paper cylinder?
A cylinder is a geometric body bounded by a cylindrical surface and two parallel planes crossing it.
Drawing a net:
- We draw a rectangle on paper, in which the width is the height of the cylinder, and the length will determine the diameter of the future figure. The ratio of the length of the rectangle to the diameter is determined by the expression: L=πD, where L is the length of the rectangle, and D is the diameter of the future cylinder. Substituting the required diameter into the formula, we find the length of the rectangle that we will draw on paper.
 We finish drawing small additional triangles that are necessary for gluing parts. nine0496 Draw two circles on paper, the diameter of the cylinder. This will be the top and bottom base of the cylinder.
 - Cut out all the details of the future paper cylinder.
- We glue the side surface of the cylinder from a rectangle. Let the parts dry. Glue the bottom base. We are waiting for drying. Glue the top base.
- Cylinder ready!
How to make a box out of paper?
A parallelepiped is a polyhedron with six faces and each of them is a parallelogram. nine0013
Drawing a flat pattern:
- Select the dimensions of the box and the angles.
- We draw a parallelogram - the base. On each side, draw the sides - parallelograms. From any of the side, draw the second base. Add strips for gluing. A cuboid can be rectangular if the sides are rectangles. If the box is not rectangular, then creating a net is a little more difficult.
 For each parallelogram, the required angles must be maintained. nine0497
 - Cut out the scan and glue.
- The box is ready!
How to make a paper pyramid?
A pyramid is a polyhedron, the base of which is a polygon, and the remaining faces are triangles with a common vertex.
Drawing a net:
- Select the size of the pyramid and the number of its faces.
- Drawing a base - a polyhedron. Depending on the number of faces, it can be a triangle, square, pentagon or other polyhedron. nine0497
- Draw a triangle from one of the sides of the base, which will be the side. We draw the next triangle so that one side of it is in common with the previous one, and so on. So we draw as many triangles as there are sides in the pyramid. We finish the strips for gluing in the right places.
- Cut out and glue the shape.
- The pyramid is ready!
is fun and easy to do, the main thing is to choose a theme that will be interesting for children.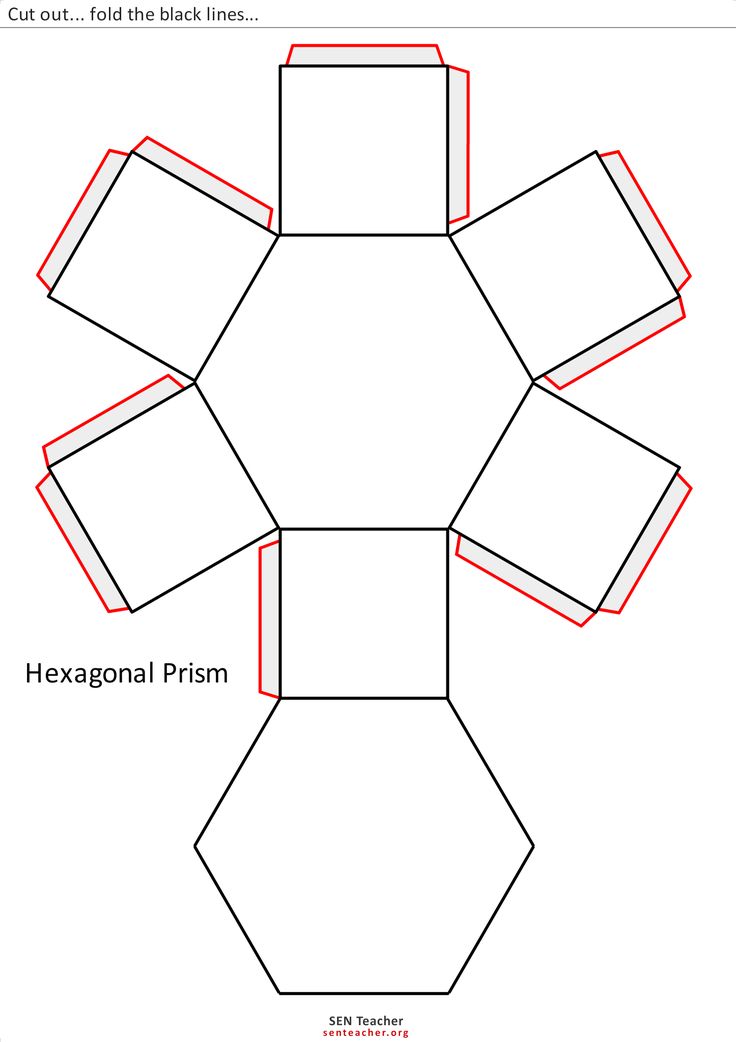 Despite the fact that today you can use any materials for children's art, paper is still a favorite. It is interesting and easy to work with her at any age: for the smallest pupils of the kindergarten, and for younger schoolchildren. nine0013
If we consider, then the most common themes for creativity are various animals and insects, and if we create three-dimensional figures, then we suggest you make colorful caterpillars. Although it seems that this is an elementary craft, we will present you the most interesting master classes that will be interesting to repeat with your own hands.
Sometimes to create 3D DIY paper crafts , you need to buy some special paper, thick enough, embossed or with an unusual pattern. But for our master classes, you do not have to run around the shops in search of unusual materials, we need to buy the most common set of colored sheets. For a multi-colored caterpillar, we need the whole palette of colors. nine0013
Sometimes just cutting out is enough paper craft templates, 3D Then glue the figures, but for this work you will not even need printed templates. The main part of our creative task will be an oval, and since we will have to cut out several identical ovals, it would be more correct to prepare one cardboard stencil and then transfer it to colored sheets.
This is the whole set of necessary materials, but be sure that 3D paper and cardboard crafts nine0004 will turn out beautiful and unique. So, we have a suitable stencil "Oval" and we need to circle it on colored sheets, and the more colors there are, the more elegant and colorful the caterpillar will turn out. From one color, you can cut 2-3 ovals, and then glue them, alternating with each other.
In total, you need to cut at least 10 oval blanks, but more is possible, for example, the caterpillar presented in the master class consists of 14 oval parts. Each oval must be bent in half, and it is better to bend all the blanks so that one half is literally a couple of centimeters larger than the other. Most of it will subsequently become the top, and with the help of the bottom we will connect the workpieces to each other.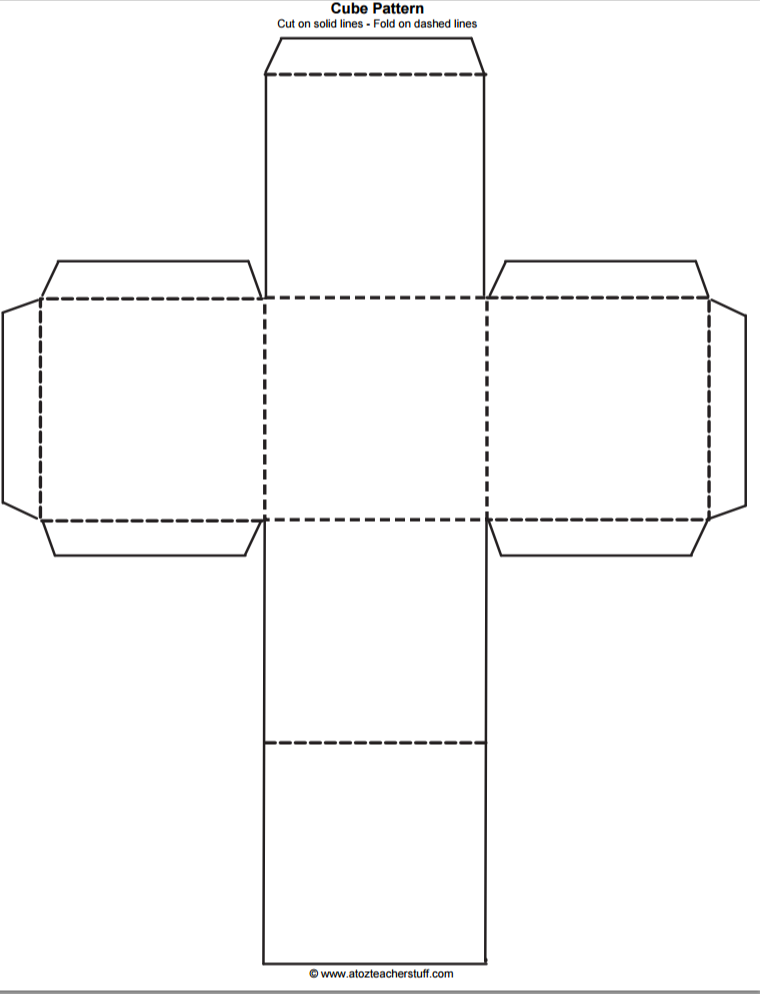 nine0013
When you glue the blanks together, leave a space of about 1 cm between adjacent ones. -2 cm more. To decorate the head of the caterpillar, you should also cut out two “horns” blanks, one “mouth” and glue puppet eyes to the extreme part. In the end, you just need to straighten all the paper parts to get a neat caterpillar. And such voluminous colored paper crafts is interesting to make at any age, or you can make the caterpillar part of the autumn composition.
3D paper crafts for kids
There are special techniques for making 3D paper crafts are first printed, then the template is cut out along the contour and folds are made along the dotted lines. After that, the blank is folded and a three-dimensional figure is obtained. But this one definitely won’t fit, so we present you the simplest and most affordable ideas. For such work, you don’t even need a printer, and even more so you don’t have to look for special schemes, you just need to arm yourself with scissors and buy a set of colored sheets.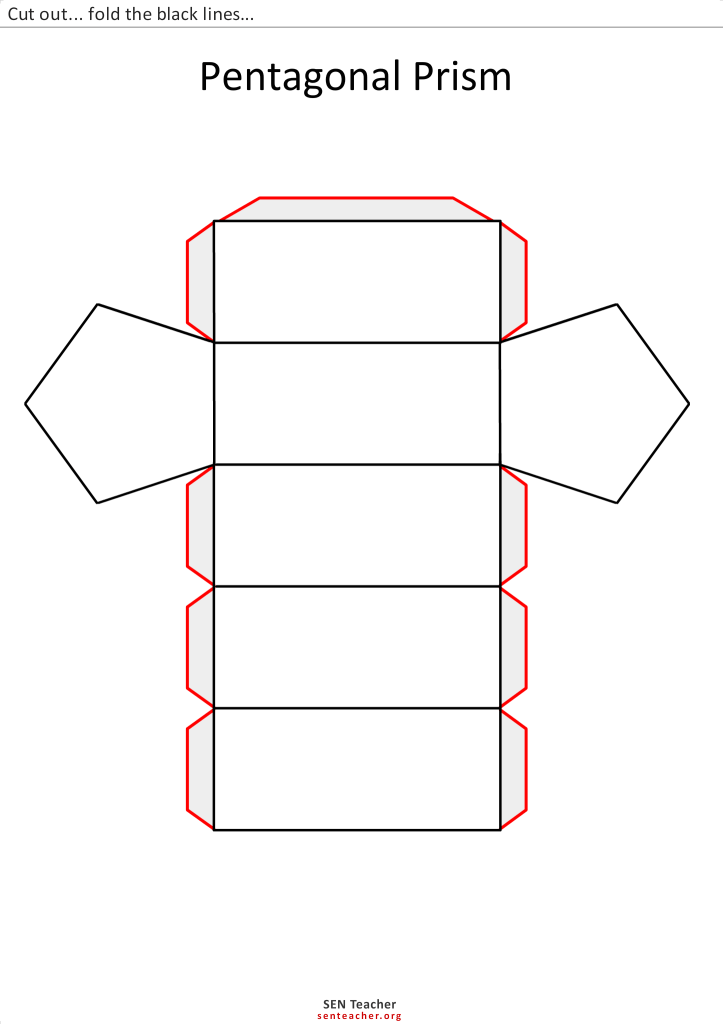 nine0013
Caterpillars are the most interesting 3D paper crafts for kids preschool age, and you can arrange a whole competition where the kids will present their fantastic caterpillars. Such work has one more advantage - the children will be able to do such a craft on their own, without the help of their parents.
The first step is to cut about 10 strips of the same size - 10x2 cm, using different colored sheets. In addition, we will need one more paper blank - a large sheet on which we will form a multi-colored caterpillar from the rings. nine0013
Roll each paper strip into a ring and glue the ends together. It is from such rings that we will fold our caterpillar. When all 10 rings are ready, you can take a green leaf base and form a craft on it. The first 2-3 rings must be glued to the base leaf, and glued together. The next 3-4 rings will come off the ground, as the body of a caterpillar does when it crawls along the surface. And the last 2-3 also need to be glued to the base.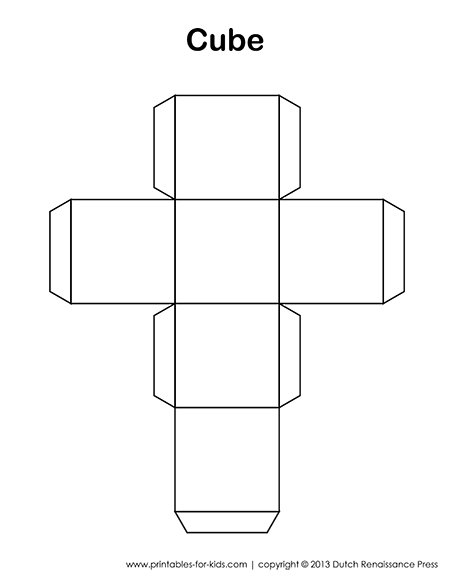
To complete the caterpillar, all we need is a felt-tip pen, with which we can draw eyes and a mouth. nine0013
It's real fun for a child to create three-dimensional paper crafts, diagrams, templates should be chosen, focusing only on the hobbies of a preschooler. And if you know that it will be interesting for a child to make a favorite cartoon character. You can also choose thematic works for the holidays to congratulate loved ones and loved ones.
Through creativity, a child is taught not only to take care of the environment, but also to love and know their history. In recent years, exactly craft, voluminous dove made of paper can be done by May 9, at the same time telling the preschooler about the heroism of our compatriots and the tragic pages in the history of our state.
You don't need to buy a whole set of colors for a pigeon, any white sheet will do, on which you want to print a template. This template consists of two parts: one part is a body and a voluminous tail, and the second is wings.