Why is my 3d printer not printing
Not Extruding at Start of Print
Not Extruding at Start of Print
This issue is a very common one for new 3D printer owners, but thankfully, it is also very easy to resolve! If your extruder is not extruding plastic at the beginning of your print, there are four possible causes. We will walk through each one below and explain what settings can be used to solve the problem.
Common Solutions
Extruder was not primed before beginning the print
Most extruders have a bad habit of leaking plastic when they are sitting idle at a high temperature. The hot plastic inside the nozzle tends to ooze out of the tip, which creates a void inside the nozzle where the plastic has drained out. This idle oozing can occur at the beginning of a print when you are first preheating your extruder, and also at the end of the print while the extruder is slowly cooling. If your extruder has lost some plastic due to oozing, the next time you try to extrude, it is likely that it will take a few seconds before plastic starts to come out of the nozzle again. If you are trying to start a print after you nozzle has been oozing, you may notice the same delayed extrusion. To solve this issue, make sure that you prime your extruder right before beginning a print so that the nozzle is full of plastic and ready to extrude. A common way to do this in Simplify3D is by including something called a skirt. The skirt will draw a circle around your part, and in the process, it will prime the extruder with plastic. If you need extra priming, you can increase the number of skirt outlines on the Additions tab in Simplify3D. Some users may also prefer to manually extrude filament from their printer using the Jog Controls in Simplify3D’s Machine Control Panel prior to beginning the print.
Nozzle starts too close to the bed
If the nozzle is too close to the build table surface, there will not be enough room for plastic to come out of the extruder. The hole in the top of the nozzle is essentially blocked so that no plastic can escape. An easy way to recognize this issue is if the print does not extrude plastic for the first layer or two, but begins to extrude normally around the 3rd or 4th layers as the bed continues to lower along the Z-axis. To solve this problem, you can use the very handy G-Code offsets which can be found on the G-Code tab of Simplify3D’s process settings. This allows you to make very fine adjustments to the Z-axis position without needing to change the hardware. For example, if you enter a value of 0.05mm for the Z-axis G-Code offset, this will move the nozzle 0.05mm further away from the print bed. Keep increasing this value by small increments until there is enough room between the nozzle and the build platform for the plastic to escape.
The filament has stripped against the drive gear
Most 3D printers use a small gear to push the filament back and forth. The teeth on this gear bite into the filament and allow it to accurately control the position of the filament. However, if you notice lots of plastic shavings or it looks like there is a section missing from your filament, then it’s possible that the drive gear has removed too much plastic. Once this happens, the drive gear won’t have anything left to grab onto when it tries to move the filament back and forth. Please see the Grinding Filament section for instructions on how to fix this issue.
The extruder is clogged
If none of the above suggestions are able to resolve the issue, then it is likely that your extruder is clogged. This can happen if foreign debris is trapped inside the nozzle, when hot plastic sits inside the extruder too long, or if the thermal cooling for the extruder is not sufficient and the filament begins to soften outside of the desired melt zone. Fixing a clogged extruder may require disassembling the extruder, so please contact your printer manufacturer before you proceed. We have had great success using the “E” string on a guitar to unclog extruders by feeding it into the nozzle tip, however, your manufacturer should also be able to provide recommendations.
Related Topics
10 Causes And Fixes Of 3D Printer Not Printing
3D printers can be complex devices, which means that there are many things that can go wrong when printing. Whether your problem is that your printer isn’t printing at all or you are struggling with some of the common printing issues, knowing how to fix these issues can improve your experience with your 3D printer. This will address 10 of the most common issues with a 3D printer not printing or printing improperly to help you better understand these issues and fix them.
So what are 10 causes and fixes of 3D printer not printing?
Why is the 3Dprinter not printing?
When it comes to the 3D printer, there are a lot of reasons why your printer won’t print or has trouble printing out your project as you intended. These 10 major issues include:
- Clogged Nozzle/Extruder
- Filament Doesn’t Stick
- Other Filament Issues
- Nozzle Too Close
- Plastic is Overheating
- Over-extrusion
- Warping
- Elephant’s foot
- Snapped Filament
- Printer Stops Extruding while printing
There are plenty of other reasons why your 3D printer is having a problem, but these are some of the most common causes that you will likely encounter.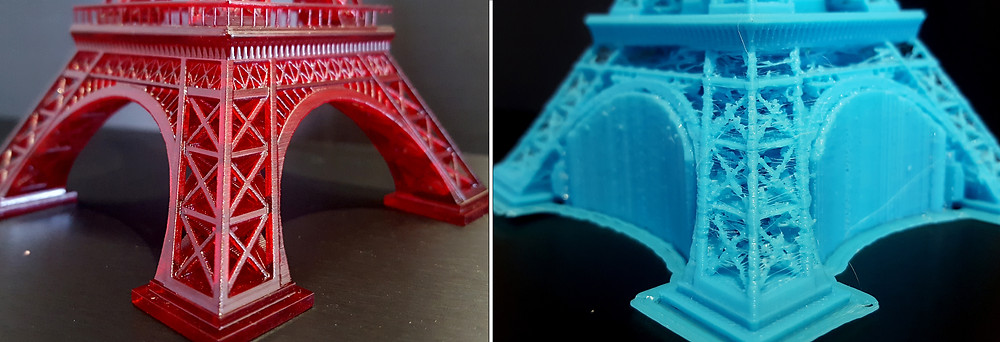 By reading on, you can learn all about the different problems as well as the ways that you can fix these problems.
Clogged Nozzle/Extruder: What is this problem?
You will inevitably have to deal with a clogged extruder at some point during your time with a 3D printer. The first sign that this is a potential problem for you is that you will hear a loud, grinding noise that is disturbing to the ears. After hearing the noise, you may look and notice that there is no filament coming out of the extruder. If the nozzle is only partially clogged, the filament will still come out but you will notice signs of under-extrusion such as cracks, thin layers, and holes in the finished project.
How does the extruder get clogged? There are a few different causes for this problem. Typically, this is as a result of leftover filament clogging up the nozzle. This may also be because there was some other obstruction that got into the extruder, such as dust. You can prevent this problem by using high-quality filament and printing at the proper temperature. Regular maintenance, including cleaning and lubricating the extruder.
How do you fix a clogged nozzle/extruder?
There are 2 different ways that you can fix this problem. The first approach is to remove your filament from the printer. Then, you will need to heat up the extruder to the last temperature that you used or the temperature that you use most often. After heating up the extruder, take a needle or something else that is small enough to fit inside of the extruder’s hole. It could take several attempts to clear out the blockage and this approach works best for PLA or if the problem is the result of dust.
The second option is to do a cold pull, which is the best approach if you are working with filaments that are flexible, like nylon. This process starts by heating up the temperature of the nozzle to the same temperature as the filament. You will then push out as much filament as you can manually, without putting too much pressure on it. Once you have done this, you will need to let the nozzle cool down to about 100 degrees Celsius. Then, you can pull your filament up and out of the nozzle. This approach can remove the obstruction out and the filament so that you can load another spool (or reload that spool) and start your project again.
If neither of these approaches work, you will probably have to take apart the extruder to remove the obstruction or soak it in some liquid to dissolve the obstruction.
Filament Doesn’t Stick: What is this problem?
When printing out your project, the project will depend on whether or not that first layer sticks properly to the surface you are printing it on. You may notice that everything looks like a crazy string everywhere if this is a problem. This is easily one of the most common problem that people encounter when they use a 3D printer. The first layer is the foundation of the project, so if this doesn’t print out well then the rest of the project will suffer. If you notice this is an issue, you need to do what you can to fix it right away.
There are a couple of reasons why this is happening, though the most common issue is that the printer bed is not properly leveled.
How do you fix the filament not sticking?
The first thing that you should check is to make sure that the bed temperature is high enough so that it prevents the project from cooling down. When it cools down, it will begin to curl up as it contracts. You may need to try a few different temperatures until you achieve the look that you want for your project.
The next thing that you should check is the vertical Z-axis. This needs to be at the correct height to get the perfect amount of pressure between the extruder and the print bed. Make sure that this is not only at the right height, but it’s also leveled to ensure that evenness that is so important to a solid foundation.
If nothing else works, you may want to make sure that the print bed is clean of grease and debris, which could prevent the filament from sticking. You will need to be careful about how you clean it as you don’t want to scratch the surface or cause some other type of damage that can negatively impact future projects.
Knotted Filament: What is this problem?
Did you start a print project, only when you checked on your print you notice that it stopped at some point during the process? If your printer just suddenly stops printing in the middle of a project, the reason is usually as a result of a knotted filament. This isn’t a manufacturer defect that you can blame on anyone but user error.
When you look at a new spool, you will notice that the filament is either taped down to its spool or it gets weaved through any of the holes on the edge of the spool. If you cut the filament loose, the tension will make it so that the filament will uncoil. The problem here is that the filament can slip under another coil, which causes it to tangle and become knotted. You may also have not taken the right amount of care when changing the filament, which caused it to knot up.
The good news is that in both of these cases, it can be a relatively simple process to tangle the knots.
How do you fix knotted filament?
Even for those more difficult looking knotted filaments, it is fixable. It’s also important to know that this is fixable without you having to uncoil the entire filament spool. One of the most important things to understand is that you can’t just uncoil the filament to find the knot. This will just lead you to making it much worse than it was before you tried to fix it.
The best approach is to give yourself enough slack so that you can create entire loops that go over the edge of the filament spool. As you first do this, you may notice that there are 3 “paths” of filament. This means that you still need to get the knot out. You should continue this process until you only notice 1 path. This will mean that you have gotten the tangle off of the spool. At this point, you can start to respool the filament, keeping tension on then end and getting out knots as needed through this process. Once the knot has been completely untangled, you need to be sure that you use tape or clip to pass the filament through a hole on the side of the spool.
A knotted filament is a problem that can be prevented. You should avoid getting to the end of the filament unless it’s still tight enough where it doesn’t unspool or not letting the filament go until the end unless it’s in the extruder. Maintaining the control end of the filament spool can also help you prevent this problem.
Nozzle too Close: What is this problem?
Have you loaded everything in right but nothing is printing out? Your issue could be that the nozzle is too close to the print bed. If you have properly loaded the filament into the printer and there’s nothing else that appears wrong with the printer but it’s still not printing, this is generally a sign that the print bed and nozzle are too close together.
This can be a significant problem. This could cause the filament to not stick properly or you lose out on layers of your project, or this could lead to a blockages as the filament gets backed up into the extruder. If this happens, you will end up with a bigger problem thanks to any blockages that this may cause.
There are a few reasons why this could have happened. Maybe you accidentally turned the print bed in a way that moved it too close to the nozzle. Maybe when you set up the printer, you set the print bed up too close to the nozzle. Whatever the case may be, this can usually be a pretty simple fix.
How do you fix the nozzle being too close to the print bed?
When it comes to fixing the issue of the nozzle being too close to your print bed, there are a couple of different approaches that you can take. The first approach is to do a z-axis offset. This approach requires you to move the nozzle so that it isn’t too close. For the most part, 3D printers have a setting within their system settings to do this for you. You are able to use the program to give the z-axis a positive value, which will raise the nozzle higher. However, you need to remember that a negative value can fix any sticking issues that you may be having. What this means for you is that you need to find the best balance between the printer not printing because the nozzle is too close or the filament not sticking because it’s too far away.
The other option you have is to just simply lower the print bed. The problem with this solution is that you may not always have the option of lowering the print bed, depending on the 3D printer that you have. If your 3D printer does have this capability, you can try this approach as well. You just have to remember that when you do this, you have to make other adjustments to your printer as well. This includes releveling and recalibrating the print bed.
Printer Overheating: What is this problem?
Overheating can be a major problem for a 3D printer, one that can cause serious issues. When overheating happens, simple things like misshaped or warped projects can occur. It can also lead to the printer inevitably shutting down and being unable to finish up the print. The printer can not only overheat, it can also cause the filament to overheat.
How do you fix the printer overheating problem?
One of the best approaches to fix this problem that you can take is to cool every layer.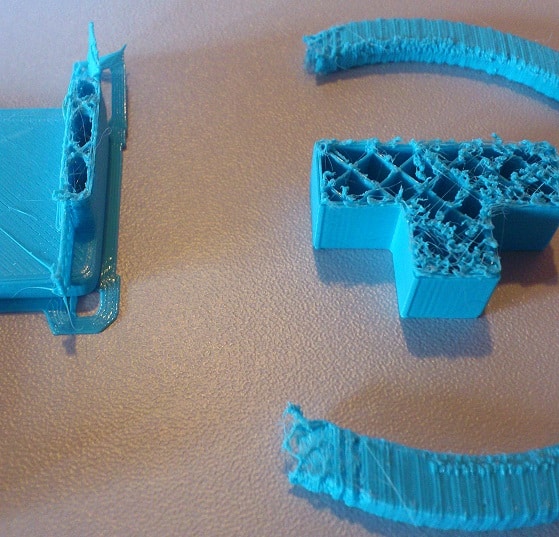 Typically, fans come with their own fans already but you may want to spend the money to get another fan. Adding another fan can make the cooling process faster and far more effective.
There are other ways that you can help this problem, such as lowering the temperature. However, this can cause a wide variety of different issues. It can be difficult to balance the quality of the finished project with the lower temperature, so this approach will require some patience. This is also why this approach is considered to be a last resort. Another alternative that you can consider is to reduce the speed of printing your project. By reducing the printing speed, you are giving the layers an adequate amount of time to cool off while you are printing, which can help to prevent these problems.
Over-Extrusion: What is this problem?
A common problem that 3D printer users of all experience levels face is over-extrusion. This problem occurs when your 3D printer is pushing out more plastic than it should be and can cause a blockage or jam at the end of the nozzle.![]() As this jams up, this can lead to a more serious blockage and can lead to your printer overheating.
As this jams up, this can lead to a more serious blockage and can lead to your printer overheating.
You can notice that this is an issue because you will see signs of the plastic stringing or oozing out. The minute you notice these signs, you should check to see if your printer has an over-extrusion problem.
How do you fix over-extrusion?
You have a few different approaches that you can take here. One of the first things that you should do is to decrease the extrusion multiplier. You can change the flow setting in the 3D printer software that you are using to print from, which slows the rate that the 3D printer extrudes plastic. You should decrease this rate by about 2.5% increments until you achieve the appropriate level of extrusion.
If doing this doesn’t work, then you need to take a different approach. The next approach that you should try out is to lower the print temperature. When you use a high temperature for your 3D printing, the filament ends up melting faster, causing too much filament to come out of the extruder. Slowly decrease the temperature until you get to the point where it’s melting as it’s intended to. You can lower the temperature in 10 degree increments until you achieve the perfect level.
Warping: What is this problem?
Warping is an incredibly common problem that people with 3D printers has is with warping. You will notice warping typically at the bottom of the project, where it will look curled up or just uneven. You may even notice that the project is completely lifted up off of the printing bed. The print becomes smaller as it cools off, but problems occur when it starts to warp too much that your print doesn’t look or function as you need it to.
How do you fix warping?
For the most part, warping is usually always caused by temperature control issues. This means that it’s easier to determine what the cause is, so that you have an easier time in fixing the problem. There are 2 primary fixes that you can use to remedy this issue.
The first option that you can use to fix the problem is to use a print bed that has been heated so that the filaments can have an easier time sticking to the print bed. Most high temperature filaments such as ABS can gain a lot of benefit from using a print bed that is heated to prevent warping, but PLA can as well. What’s great about heated print beds is that this can not only prevent the cooling and warping that can occur, but it can also help the print stick better to the board to get a better quality print.
Another approach that you can take is to take a look at the type of printer that you are using. When you use an open-frame or semi-enclosed printer, your print is going to be more susceptible to the environment. This means that if there’s so much as a draft of cool wind coming into the area, your print can be negatively impacted. If this is a problem for you, you may want to consider building or buying an enclosure that can keep your printing process more controlled. This will prevent the environment from impacting your print, improving the print quality.
Elephant’s Foot: What is this problem?
The elephant’s foot is the term that has been given to when the base has an outward bulge.![]() To put it more simply, this term refers to when the print curves or bows at the bottom of the base. While heated beds are generally a great tool to use to prevent a lot of common issues when printing on your 3D printer, it can also be the cause of some issues as well. Elephant’s foot is one of the issues that can be attributed to your heated print bed.
To put it more simply, this term refers to when the print curves or bows at the bottom of the base. While heated beds are generally a great tool to use to prevent a lot of common issues when printing on your 3D printer, it can also be the cause of some issues as well. Elephant’s foot is one of the issues that can be attributed to your heated print bed.
Taller prints are going to be more susceptible to this problem, since the weight of the print will push down on the print and create this effect on the base.
How do you fix Elephant’s Foot?
One of the first things that you should look at is if the print bed is even. This is especially true if you just noticed that this is a new problem. You should check the printer bed to see that it is level according to the specifications of your printer. You can also try to manually level your print bed, as this can be a more accurate way to level the print.
Is your print bed level and this is still an issue? You may need to adjust the settings on your printer. You should first try raising up the extruder just a little bit, which can stop the extruder from interfering with how well your first layers print out. You will then want to try lowering the temperature of your heated print bed, which will allow the first layers to dry a little quicker. Lastly, you can lower the speed of extrusion for the first layer as this can give the filament more time to become solid and stick to the print bed.
Snapped Filament: What is this problem?
Snapped filaments can occur for a few primary reasons. One reason is that the moisture causes the filament to get brittle and snap. This is why filament is typically stored in a plastic bag, as this can help keep the moisture out. These bags can be vacuum sealed or have silica beads. This is just one issue that can occur.
Another problem is that there is mechanical stress caused by being curled in a reel for a longer time. This can cause a lot of tension that causes the filament to be brittle and lack flexibility. Any sections of filament that are held straight will be more likely to break in this case.
Lastly, there is the problem of using lower quality filament for your project. You may notice that you have a problem with snapped filaments a lot when you buy a specific brand but not with others. You shouldn’t confuse high quality filament with the most expensive, as you can find some inexpensive but high quality filament.
How do you fix a snapped filament?
If you keep trying the same brand of filament and end up with the same issues, the first thing that you should try is switching to a higher quality brand. Be careful to check reviews before buying to ensure that you are investing in a high quality filament. If this doesn’t work, you will want to check to make sure that your temperature and flow rate are properly set.
You can also prevent this problem by:
- Properly storing the filament
- Drying out filament in case of moisture
- Reduce the amount of moisture in the air
Printer Stops Extruding While Printing: What is this problem?
It’s a common problem to have the printer stop extruding during the printing process. There are a few reasons why this happens, including:
- Printer is Out of Filament
If you are working on a project that takes a lot of filament, you should be sure that you have enough filament in the printer to work on the project. It’s always a good idea to check the spool before you start working on any project.
- Extruder Clogged While Printing
While the printer was printing, it is possible that the extruder became clogged. Look to see if you notice signs of the extruder being clogged. If not, check for any dust or debris in the spool that might have clogged the extruder.
- The Extruder Motor Has Overheated
As the printer prints, the mechanism in it is constantly in motion. This can cause the motor to overheat as it moves back and forth printing the project out.
How do you fix the printer stopping extrusion while printing?
The first thing that you should do is to check to see if you have the amount of filament that you need for the project. If this is the problem, you just need to put a new spool in. If this isn’t the issue, you should check to see if the extruder clogged while printing. Clean out the extruder and/or filament spool and you should be able to print uninterrupted again. If neither of these are the issue, you may need to just shut off your printer and let it cool down.
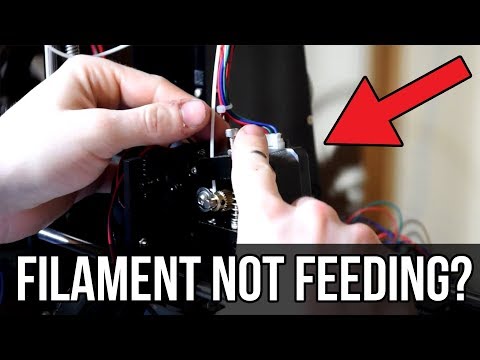
3D printer won't print - no extrusion when printing starts
This problem is quite common among users of new 3D printers, but luckily it's very easy to fix! If your extruder does not start extruding plastic when the job starts, there are 4 possible reasons for this. Below we will go through each of them and explain what settings can fix this problem.
Extruder was not primed (filled) prior to printing
Most extruders have a bad habit of leaking plastic when not in use but at high temperatures. The hot plastic inside the nozzle seeps through the hot end, causing voids inside the nozzle where the plastic flows out.
Leakage at rest can occur before printing, when the extruder is preheating, and also at the end of printing, when the extruder begins to cool down gradually. If some plastic has leaked out of the extruder, it will likely take a few seconds on the next extrusion before the plastic starts to exit the nozzle again. When you try to start printing after the plastic has flowed out of the extruder, you may notice some delay before the extrusion starts.
To solve this problem, just before you start, make sure you set up your extruder so that the nozzle is filled with plastic and ready to extrude. The standard technique is to print the so-called "skirt" (skirt). This “skirt” is a ring, a stroke, an outline around your future part, and while it is being printed, the extruder is being filled with plastic. If you feel that additional preparation is required, you can increase the number of skirts printed, the corresponding settings are available in a number of 3D printing programs.
Some users prefer to pre-extrude the filament "by hand". This process is often called Jog Control in the control panel.
Nozzle starts running too close to the bed
If the nozzle is too close to the print bed, there may not be enough space for the plastic to exit the extruder. The hole at the end of the nozzle is essentially blocked, so there is nowhere for the plastic to go. Obviously, this kind of problem is indicated by the situation when the plastic is not extruded on the first, or even on the second layer, but somewhere from the third or fourth, as the platform descends along the vertical axis, everything returns to normal. This problem is very simply solved by setting the G-Code, which is located under the tab of the same name in the 3D printing program. There you can very finely tune the position along the Z axis without having to change any settings directly in the hardware. For example, if you enter a value of 0.05 mm for the G-Code Z Offset, the nozzle will retract 0.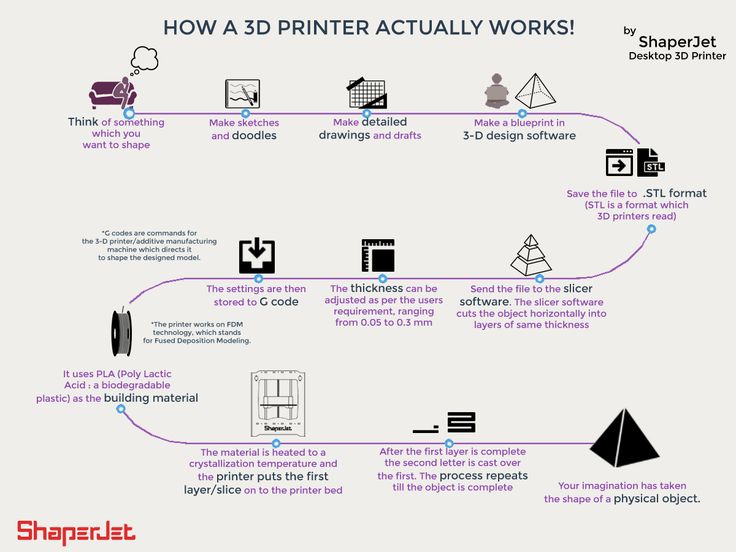 05 mm from the bed before printing. Continue to increase this value in small increments until there is enough space between the nozzle and the platform for the plastic to exit.
Filament ground off drive gear
Most 3D printers use a small feed gear to push the filament forward or backward. Its teeth cling to the filament, which allows you to precisely control the position of the thread. However, if you notice a large amount of plastic shavings near the printer, or there is a feeling that some section of the filament is “lost”, it is possible that the drive gear has “gnawed” too much plastic. If this happens, the gear, when it tries to push the filament forward or backward, has no choice but to continue to bite deeper and deeper. Please refer to the section Filament Turns Down for instructions on how to solve this problem.
Extruder clogged
If none of the above options work for you, then you most likely have a clogged extruder. This can happen when debris of any kind gets into the nozzle, when the hot plastic has been inside the extruder for too long, or when the extruder is not cooled enough and the filament starts to soften in the wrong place.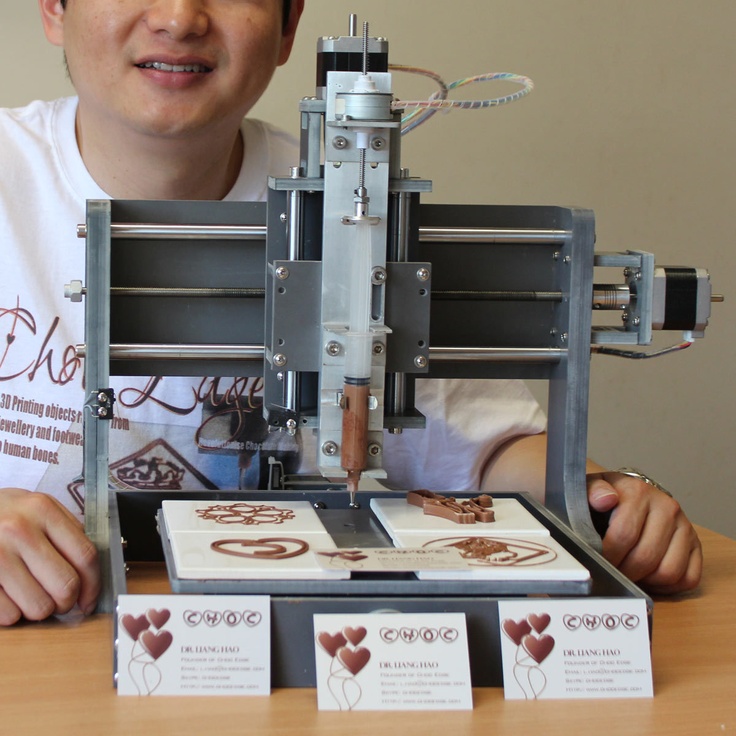 You can clean the nozzle mechanically, for this many stores offer special needles and drills for cleaning the extruder nozzle, we also recommend using the cold drawing method, search the Internet for how to do this: cleaning the extruder nozzle of a 3D printer. As a last resort, if all else fails, the problem with a clogged extruder is solved by disassembling it, and before taking on this matter, it is useful to contact the manufacturer or seller of your printer. The nozzle and thermal barrier can be immersed in a solvent, thereby chemically cleaning the adhering plastic, then mechanically subtracting all deposits from it.
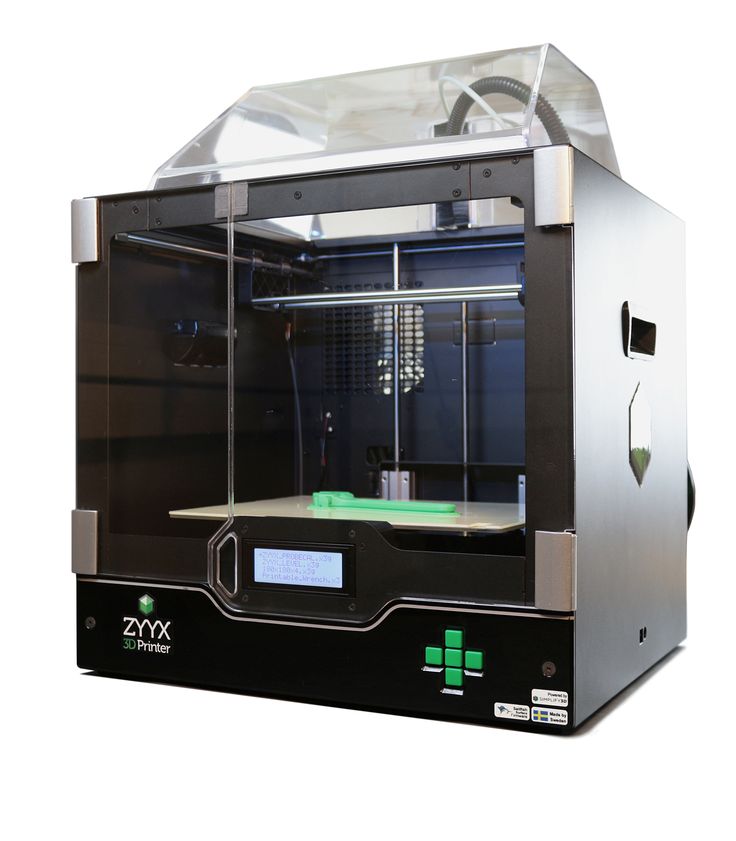
Simplify3D slicer menu is used as an example. Menu items, their name and location in your software may differ.
Why a 3D printer is not a printer / Sudo Null IT News There was no special reason to write a whole article about this, but having accumulated irritation from articles and comments where these machines are mentioned, I decided that the reason was not too necessary.

There are several reasons for my dislike. Some of the arguments may seem controversial, but in the complex, in my opinion, they are quite strong. From a practical point of view, the article is completely useless, but it seems to me that when discussing 3D printers, it is useful to know, understand and remember these arguments somewhere in the background.
Printer that does not print
To begin with, let's turn to those processes that are actually called printing. Interestingly, there are no disagreements between Russian and English: what to print that to print mean exactly the same actions.
Firstly, it is the process of applying an impression - sometimes flat, sometimes embossed - onto some more or less flat substrate. The basis, of course, is not all: such actions with metal are not printing, but embossing, and with leather - embossing. But in general, the definition is correct. Printed gingerbread, wax seal, that's all. Many books, and until recently all of them, have been printed in this way since ancient times. Here one could recall Gutenberg, but he did not invent the printing of books - only a set of individual letters and a typesetting box. Anyway, at least five hundred years word stamp meant nothing else.
By the way, this is not just about imprinting, but about imprinting at once, in one pass on the entire surface. Note that the typewriter is still a typewriter, not a typewriter. The second name is found, but much less often even now, and at the beginning of the twentieth century it was almost exclusively writing. The same in English: typewriter, not printer. Although, according to the mechanism of action, it is quite a printer: it makes an impression.
Over the course of several centuries, however, books, newspapers, and other printed materials have become so merged with the concept of printing that printing has become the name for any application of something to paper that is not done by hand. Photographs were first printed. Judging by google ngram, this did not happen immediately: they were manufactured for the first few decades. Then came office printers. At first, mechanically, they were the same typewriters, only automated, then there were matrix, inkjet, laser. None of them can tolerate the print of the entire page at once, and laser and inkjet do not deal with prints at all, nevertheless, they have firmly entered life and language.
3D printers, as you can easily see, have nothing to do with printing at all: they don’t make prints and they don’t make books. At least they have something in common - a nozzle - with inkjet printers, and even then, the similarity is very approximate. Although it is due to this similarity that they got their name. So we are dealing with a "linguistic derivative" of the second order. So what, you ask? Since the name of the printing process has spread to inkjet machines, what prevents it from spreading further, if the language needs it? In general, this is so.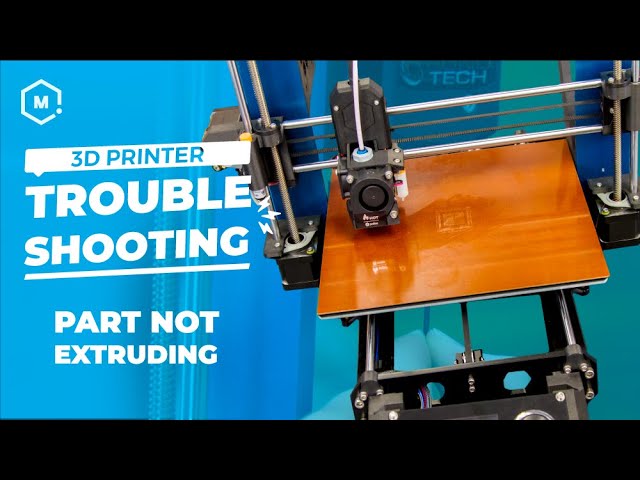 There are countless words that today have a completely different meaning than a hundred and even more than five hundred years ago. But there is a nuance.
Such different 3D printers
Now there is a tendency to combine all the lathe synthesis machines into one large group and oppose them together to traditional machines. At first glance, this is logical: after all, in the first approximation, we do not make a difference between a cutting tool or a machine for wood and metal, between different types of cutting. Although a saw cannot make a turned leg of a chair, and a lathe cannot cut a log into boards, anyway, both are machining. So, it would seem that synthesizing machines can be combined: what difference does it make how the next layer is applied, if it is applied?
But the differences within them are much stronger than they seem. Cutting, ultimately, comes down to one process of separating a piece of material from another piece of material with a cutting edge. The category of 3D printers also included extrusion machines that make plastic parts, from expensive and accurate jewelry for master models to cheap “household” ones; and laser sintering and fusion machines, which have much more in common with traditional powder metallurgy than with extrusion technologies; and even automatic pouring of thick concrete.
Laser machines are very expensive and complex, their raw materials are also much more expensive than plastics, and it is almost always easier to cut a part from a workpiece; their scope is extremely narrow. However, due to the common name, people often confuse "adult" machines with household ones and are sure that quite soon they will have this at home, and the transition of all factories to additive technologies is almost a done deal - it just takes time.
Apartment or workshop?
And in general, the very name “3D printer” provokes the idea that “well, this is the same printer as I have on my desk, only 3D. Yes, it’s expensive for now, and it doesn’t know everything, but it will soon get cheaper and learn.” It won't get cheaper and won't learn. And this is the main reason why I don't like this name. A 3D printer is not a printing console for a computer, it is a machine. Nothing better or worse than turning or milling.
How many of you have at home not only a milling machine, but at least a workbench and a vise? So: if you don’t have a workbench, then there won’t be a 3D printer either. This is a full-fledged, real machine , which is needed only in three places: in the home workshop, in the laboratory, in the individual production workshop.
If you have a hobby, you want to do something at home, please. Milling, turning, additive - each machine is good in its own way, and none can fully replace the other. Choose what is more necessary and more interesting for you personally. Just understand that in any case, you need either a separate room for a workshop, or a readiness for the living room to turn into a workshop.
If you need to prototype multiple products, great, an additive plastic machine will cost your lab a lot less than multiple plastic injection molds. As soon as you enter the series, casting will become cheaper.
If you need to make three very intricate shapes - a rocket engine with complex cooling channels or something like that - contact those who have a powder laser machine. If the product needs to be mass-produced, find a way to simplify it and adapt it at least to a CNC machining center. It will almost certainly come out faster, cheaper and stronger.
The layman does not need a 3D printer. How many do not need a photo printer: once it seemed that everyone would print photos at home, but it turned out that they stopped printing altogether, they look directly from the screen. If you still need to print, then going to a darkroom is often easier than buying a printer. If you have a broken plastic part, it will be cheaper to buy it, or order it from a workshop that already has a 3D printer and where ten parts a day are made on it, rather than three per year.