What should i know about 3d printing
14 Things To Know Before Getting Started With 3D Printing – 3D Printerly
For people wanting to get started with 3D printing, I’ve put together some awesome tips that will help you in your future journey. You don’t want to be going in blind before buying a 3D printer so read on and get some important information before you get to 3D printing.
3D printing is simple, yet complicated at the same time depending on if you know the foundation of what makes a 3D printer work. Once you get to that stage, things get easier and your horizons for what you can produce only expands.
It’s a really exciting time so without further delay let’s get into it!
1. Buying Expensive Doesn’t Always Mean BetterThe first thing you should do with 3D printing is to make sure you know what a good one looks like.
People usually think cheaper things don’t get the job done as good as expensive things. This is true in many cases, but with 3D printers, it’s quite different.
As time goes on 3D printer manufacturers have seen massive competition, and so there’s a race to make 3D printers not only cheaper, but better quality overall.
Similar to if you had 2 restaurants in your town compared to 10 restaurants, each one will have to lower their prices while improving on quality as good as they can.
Now there are different things that make a 3D printer more expensive, such as whether it’s an FDM or SLA printer, the brand, the functions of the 3D printer and so on.
When you’re a beginner, however, the cheaper 3D printers will give you the quality you desire, plus some.
Some expensive printers don’t always do much for quality, so it’s always important to check out a few reviews and find out whether it’s worth digging deeper into your pockets for a pricier 3D printer.
I’d recommend starting out with a cheaper printer like the Ender 3, then with more experience and research, you can look into the more premium printers.
If you do want better features and you have some extra money to spend, you can always go for the upgraded Creality Ender 3 V2, a well-respected and high quality filament 3D printer.
By far the most common 3D printing material is your good old PLA. It’s cheap, easy to handle and has great versatility as many printers will be PLA compatible. At this moment in time, PLA is the second highest consumed bio-plastic in the world.
The cool thing about PLA is it’s made out of a renewable resource that’s biodegradable and easily produced through fermentation of starch from crops, mostly corn, wheat or sugar cane.
PLA is one of the safest 3D printing materials out there, and does not emit nearly as many particles as other materials.
It can be designed to last for weeks or years by varying composition and quality in production.
It’s a non-toxic, odorless material which is already widely used in many manufactured products. You would have to live in an odd place to not have something around you that’s made of PLA.
It’s range of applications include computers and mobile phone casings, foil, tins, cups, bottles and even medical implants.
PLA melts at a relatively low temperature which makes it easier for printing, but less useful if you want to store hot items. As PLA manufacturing develops, I can only see it becoming cheaper and better quality in the future.
OVERTURE PLA Filament is one of the most popular 3D printing filaments on Amazon, a very reputable and high quality brand.
3. You’re Better Off Getting an Auto-Levelling 3D PrinterNow to get an accurate print, you need your print bed to be levelled.
You have the choice between getting a manual levelling printer or an auto-levelling printer, which one do you choose? If you really like the DIY aspect of things and learning the ins and outs, then manual levelling is a cool challenge to get things right.
If you’d rather focus on the main 3D printing process, then getting yourself an auto-levelling printer is the better choice.
An auto-levelling printer will generally have a switch or proximity sensor near the tip of the print head and will move around the print bed to measure distance away.
If you did decide to get a manual 3D printer because of certain functions or designs, you can still get an auto-levelling sensor attachment to give you the same results. These can be quite pricey so keep this in mind before getting a manual levelling printer.
Many problems with prints do come from print beds not being level resulting in clogging, scratch marks on prints and first layers being uneven leading to poor adhesion.
An example of a good auto-leveling 3D printer is the Anycubic Vyper from Amazon. It has a pretty good build plate size of 245 x 245 x 260mm, equipped with a 16-point intelligent leveling system, a silent motherboard, a PEI magnetic platform, and plenty more.
4. Don’t Cheap Out on Your Filament3D printer filament is a very important staple to the final product that you will create. Some filament comes better than others, and these can make a massive difference.
The great thing here is that filament is relatively cheap, especially PLA filament which is easily made in factories. 1KG of decent PLA filament will cost you around $20-$25.
Depending on how often you’re printing, the size of items you print and how successful your prints are, 1KG of PLA can last you over a month.
As you search far and wide for PLA filament, you’ll find some that have extra features. You have PLA filament out there that has a silky look to it, glow in the dark, extra strength, a very wide range of colors and so on.
These will have different price tags but, all in all, you probably won’t be spending more than $30on 1KG of it.
Cheaper filaments aren’t always bad quality, so I’d recommend having a good read of the reviews and try out what you can. Once you have the perfect filament for your printer, printing will become a lot less problem-solving and a lot more creativity.
Moving on to other printing materials such as ABS and resin, these have the same kind of idea with resin being one of the pricier materials.
This lovely ELEGOO LCD UV ABS-Like Resin will set you back around $40 so choose wisely on whether you want a PLA compatible 3D printer or an SLA, resin compatible one since filament is cheaper.
A good rule of thumb when it comes to 3D printing is knowing its basic structure and foundation. In the long run, with the replacements and possible future upgrades to your printer, this will make a world of a difference in how you progress.
There are many videos you can watch to inform you of the structure of your specific 3D printer, so I would recommend taking out a bit of time just to get familiar with it.
3D printers do require a basic level of maintenance and upkeep, such as keeping rods lubricated and replacing worn-out nozzles.
With heavy use, a nozzle can last you 3-6 months and with casual use up to 3 years so it’s not too often you’ll have to do this in most cases.
As time goes on, the better you maintain and update your printer, the longer it will operate in an efficient fashion.
Learning these things is great in an educational aspect. Being able to put a machine of this complexity together does take some smarts and practical knowledge of engineering.
This is one of the reasons why 3D printers have made their ways into classrooms and universities, with more and more being spent on them each year.
The understanding of your 3D printer can even lead you to new passions and hobbies not just within 3D printing.
The mechanical process of 3D printing does branch into many other fields such as automotive, aviation, healthcare, architecture and many more.
Here’s an assembly video of the Ender 3 by CHEP.
6. A Good Print Bed Makes the World Of DifferenceIn the 3D printing world, things aren’t always so straightforward and hobbyists often run into issues when printing. There are many issues that can produce these problems and your printing bed could be one of them.
Having a good print bed makes a difference by giving your first print layer a solid foundation to be able to build on throughout the process. If your print moves in the middle of the print, it will definitely affect the rest of the print.
Print beds can be made out of plastic, aluminum or glass.
A low-quality print bed can cause issues such as layer adhesion, not retaining temperature, prints sticking down too hard and uneven bed levelling.
Having a high quality print bed will alleviate many of these problems in one, so this is something I’d recommend you get right before you start printing.
Glass is a popular option among 3D printer hobbyists because it tends to be easier to remove your prints after you’re done and it leaves a smooth finish on the bottom of your print.
It only needs a modest amount of heat (60°C), but do keep in mind, prints with thinner sections could be pulled off easily due to the lower adhesion. A fix for this would be to use either masking tape, or glue to help prints stick down better.
You don’t want print bed materials that stick too well because some people have reported their print beds and prints being damaged as they remove the finished product, especially when printing in ABS as it requires higher temperatures.
I’d recommend the Comgrow PEI Flexible and Magnetic Printing Surface for your printing needs.
7. You’ll Need a Set of ToolsIf only you could just buy your 3D printer, materials and get to printing without anything else! Although ideal, this won’t be the case but you won’t need anything too fancy.
The general sort of accessories you will need is:
- A spatula/palette knife – to remove prints off the bed
- Filament storage containers
- Adhesive material – masking tape, glue etc.
- Tweezers – for cleaning out nozzles and prints
These are the basic sort of tools that will definitely come in handy, but there are more advanced tools you might want to grab as you get more familiar with 3D printing.
Many of the tools you’ll need come with your 3D printer in a set, but there are many other tools that you’ll want to get afterwards.
A great set of tools you can get from Amazon is the AMX3D Pro Grade 3D Printer Tool Kit, a set that gives you the ability to remove, clean, and finish your 3D prints like the professionals do.
8. Don’t Forget About Safety!I can’t stress this enough, as fun a 3D printer can be you always want to keep safety a top priority. I’ve written about 3D printer safety in this article, it’s my first article so it isn’t the greatest but definitely has useful information about safety.
It’s easy to focus on the great prints you’re going to make, and forget about safety tips when 3D printing. Luckily, there are some tips that will really improve your safety with ease.
- Get a 3D printer enclosure if you don’t already
- Make sure your printing room is ventilated/filtered
- Be aware of fire hazards around your printer
- Your printer can get very hot, so keep out of reach of animals and children!
As long as you have safety in mind, you should be okay. 3D printer manufacturers have realized that safety is a growing concern with consumers so they have developed very good systems over time.
3D printers are considered as safe as one of your household appliances.
Problems can arise when you play around with your settings, so use default settings unless you know what you are doing and be familiar with what each setting does.
The Creality Fireproof & Dustproof Enclosure from Amazon is a great purchase to improve your 3D printing safety.
9. Don’t Be Afraid to Ask The 3D Printing Community For HelpThe 3D printing community is one of the most helpful that I’ve seen. It’s just a great collective of people who have similar goals, and love it when people succeed in their goals.
There’s a massive number of 3D printing forums out there, from Reddit to brand-specific forums that you can get help from.
A common consensus I see is several people answering questions that someone asks whether simple or quite in-depth.
3D printing, being quite an engineer focused type of field, brings about very talented people who are ready to share their skills and knowledge in the craft.
Not only do you have forums but you have many YouTube videos with people answering common questions and solving problems.
It can be a bit of a learning curve to figure certain things out, but getting the information shouldn’t be difficult at all.
Websites like Thingiverse is a staple in the 3D printing community, and has endless open source designs for people to download and even recreate if they are up to it.
10. You Won’t Get It Perfect Straight AwaySome people get their 3D printer started and print out the most beautiful, flawless designs they could imagine. Others start up their printer and things don’t exactly go to plan. This can be worrying as a beginner, but it is more common than you think.
Just like many other activities out there, once you figure a few important things out you will be able to do operate without issues.
Once you identify the issues, the fixes are usually something quite simple, such as re-levelling your print bed, or using the right temperature settings for your material.
It can take a few mistakes and low quality prints before you start getting that picture perfect quality you are after. It’s always easier to use the designs that other people have made and tested so you know it works.
When you have a decent number of prints coming in nicely, you can start to create your own designs, but this can take some time to get right. Once you’ve got your digital designs down, it opens up a world of possibilities with 3D printing.
11. You Can Print a Lot But Not Everything3D printing really does have a huge range of applications in several fields, but it can’t do everything. On the other hand, it can do a lot of things that normal manufacturing methods cannot achieve.
Check out my article on its applications in the medical field.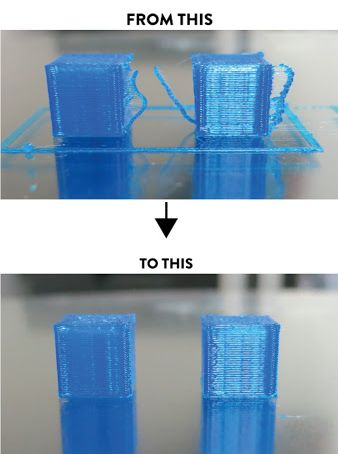
3D printers don’t print “things”, they simply print shapes but very detailed shapes that come together to form an object. They will take the material you’re printing with, then form it into a specific shape.
Another article I wrote which relates is about What Materials & Shapes Cannot Be 3D Printed?
The downside here being that you are limited to this single material. In more advanced cases of 3D printing, people can print with multiple materials within one printer.
3D printing has definitely seen advancements in what kind of material that can be printed, ranging from carbon fiber, to gemstones. American Pearl is a company that has 3D printing at its forefront.
They produce a 3D printed model of jewelry, in a personalized fashion then pour metal into this design.
After it hardens, gemstones can be added by an expert jeweler based on exact specifications and some of these personalized jewelry pieces can go for $250,000.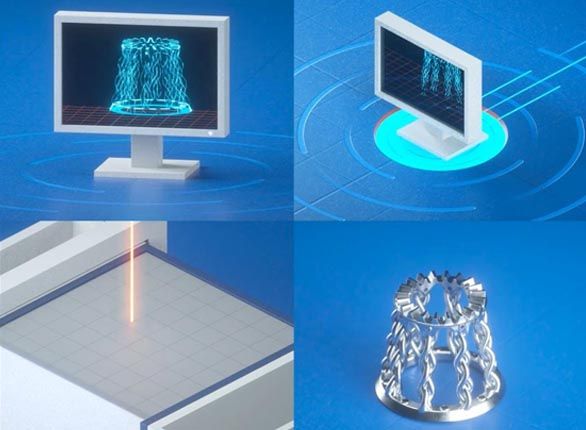
On top of this, American Pearl can deliver such a piece in only 3 days, and at a cheaper price than competitors.
The 3D printing gun is a big advancement in showing what 3D printing is capable of. The great thing is, it’s a very open-source type industry where people can work together and improve on things that have been developed by others.
This allows for a more, in-depth scope of development in the field.
The RepRap is a well-known printer which aims to be able to 3D print a 3D printer, but at this stage it can only print out the frame or body of the printer. Maybe, one day we will get to this stage but at this moment it isn’t on the table.
12. Stick With FDM Printers, For NowWhen doing your research on 3D printers, you may have come across the fact that there are “types” of printing. The main two are Fused Deposition Modelling (FDM) and Stereo-lithography (SLA) and they are quite different.
My recommendation for what printer to go with first is definitely FDM. There is a broader choice with FDM printers and the filament printing materials are usually cheaper.
Check out my article on the comparison between Resin vs Filament 3D Printers (SLA, FDM) – Which Should I Buy?
SLA uses a liquid resin material and is done layer by layer rather than a strand of material like with FDM. It uses a curable photopolymer which hardens when a strong light is focused on it from the screen within the printer.
These can be faster to print but they are quite pricey, and higher objects do take longer to print. SLA printers are definitely getting cheaper over time, so this could be a first option in the future for hobbyists, but for now, I would stick with FDM.
FDM printer have much more versatility when it comes to printing materials, as they can be compatible with PLA, ABS, PETG, TPU, PVA, nylon and more. The availability and range of FDM printers does outclass SLA printers.
SLA does have its advantages, quality-wise it does take the cake. The ability of SLA to produce high resolution, smooth quality finish prints really does outclass your usual FDM printers.
Another article I wrote is about a comparison between the printing materials themselves Resin Vs Filament – An In-Depth 3D Printing Material Comparison.
There are more costs included with SLA printing such as part replacements for the resin tank, build platform and just the high cost of resin can really set you back over time.
Unless you are really familiar with 3D printing and have a few bucks to spend, I would avoid SLA printing. If you are really interested in getting something printed in PLA, it could be worthwhile using a 3D printing service.
13. If You Want to Get Good, Learn How to Design and SliceThere are a few steps in the process of designing what you want to print, from design in a CAD (Computer Aided Design) software to “slicing” the design, which simply means to translate your drawing to something a 3D printing can understand and print.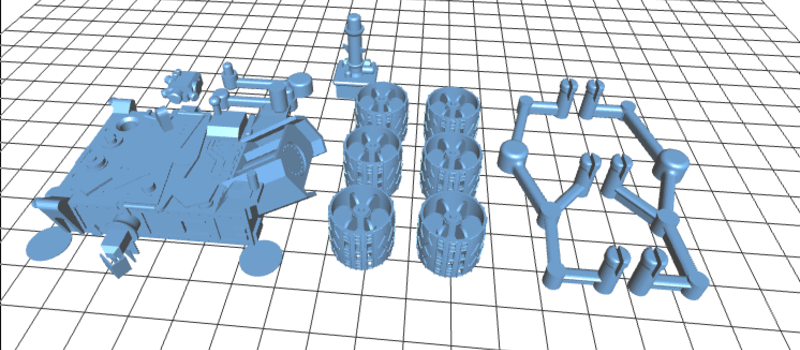
If you want to propel your 3D printing journey far, I’d start off using other people’s designs but learning how to design and slice at the same time.
This will be an invaluable skill in the future, and if you want to personalize 3D prints, it’s necessary to be able to do that.
You’ll need a dedicated slicing software to achieve this, as 3D printers cannot print without a G-code instruction, created by slicing. What slicing does is it creates routes for a 3D printer to act on while printing.
It tells the printer what speed, layer thickness to lay down at different points in each print.
Regardless of what you think about slicing, it really is necessary to get the job done.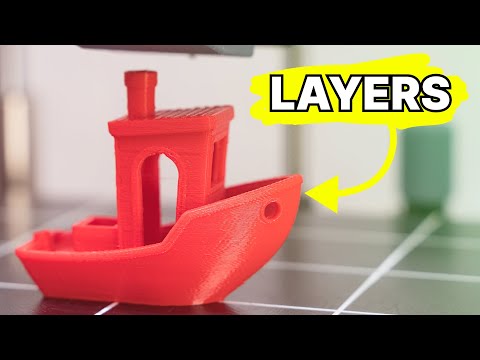 There are several hundred different slicing programs out there, some professional ones costing over $1,000 but at early stages, the free ones will do just fine.
Some 3D printers (Cura & Makerbot Desktop) actually have designated slicing software that comes with it, and unless stated by the company, you are free to choose another slicing software to your liking.
CAD and slicing software can get complicated, but developers have kept this in mind, and created beginner-friendly programs for people to get started on. Slic3r is a good beginner software to start with.
I’d advise to just start with basic shapes, putting these shapes together, then getting more detailed as you understand the process better. There are many YouTube guides that you can follow for getting started, the earlier, the better!
14. The Slower, the BetterThis ties in with the last point with the slicer because this is where you input the settings for your printer to process. I’ve written a more in-depth article about how long it takes to 3D print.
When it comes to your final prints, you will have to balance out how long you are willing to wait, with how high you want the quality to be.
The three main factors here are:
- Print speed – average is usually 50mm/s
- Layer height – basically the resolution of the print (from 0.06mm to 0.3mm)
- Infill density – measured in percentages, 100% means solid
Generally, the longer settings on a 3D printer will get you a more detailed finish on prints. This is done if you want a strong, functional and smooth print. Something that requires less detail or is just a prototype won’t need those features so it can be printed a lot faster.
Print speed needs to be balanced because having a speed to fast can cause print imperfections and weak layer adhesion.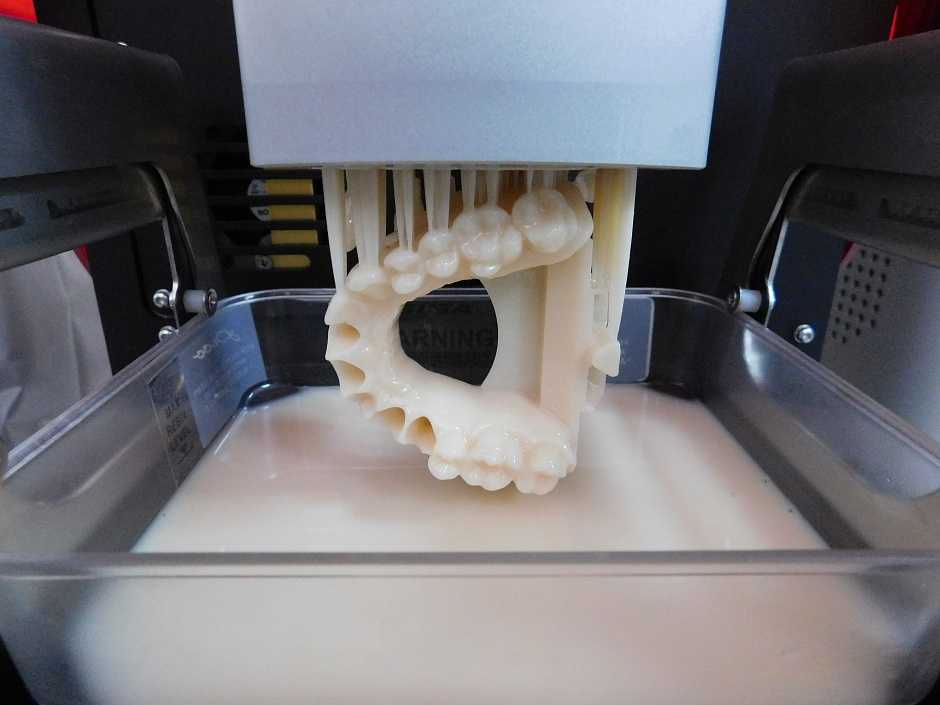 Too slow of a speed can cause the deformation of prints due to the nozzle sitting on the plastic for too long.
The size of your nozzle really does make a difference in how long your print will take. For example, a print job that takes 11 hours using a 0.4mm nozzle at 150mm/s will only take under 8 hours using a 0.8mm nozzle at 65mm/s.
It takes a print twice as long to finish if you change the layer height setting from 0.2mm to 0.1mm because the nozzle will move over the same areas twice over.
Conclusion3D printing is an awesome field to get into, as it has applications which can stretch far and wide into most other fields in some ways.
It’s much more reasonably priced than in the past to get involved, so I would recommend it to anyone who wants to produce rather than always consuming.
There is somewhat of a learning curve with 3D printing but nothing the average person can’t get the hand of. Even younger children in schools are making use of 3D printing.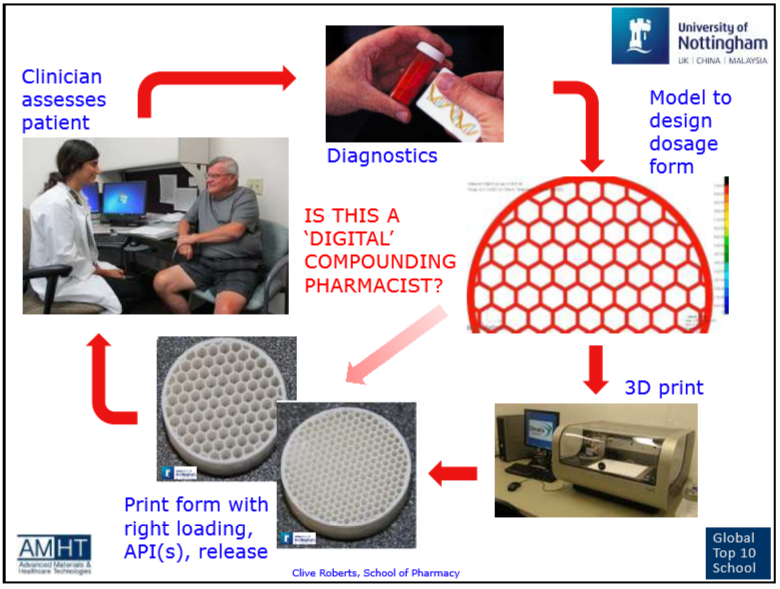
Once you get to a stage where you are confident with 3D printing, it will be a very fun activity for years to come.
10 Things You Should Know Before Buying 3D Printers
So you have decided to buy yourself a 3D printer after hearing about the amazing things it can build. You want to get started on printing models of your own a custom phone case, cosplay materials, figurines, musical instruments – the possibilities are endless.
Hold your horses, there are a few things you need to know before diving into the world of 3D printing.
There are a lot of 3D printers on the market today that have varying specifications, which in turn cater to different demands.
On top of that, there are technicalities about 3D printing that you really should look into. To help you decide on which printer to make your first, we have complied a list of 10 things you need to know before you buy a 3D printer.
10 Cheap and Affordable 3D Printers to Buy
10 Cheap and Affordable 3D Printers to Buy
There was a time when 3D printers were a novelty - but not anymore. You see hundreds of... Read more
1. Types of 3D printers
3D printing is a broad term that covers the technologies required for producing physical materials. The one you probably heard of in the media and the most popular among hobbyists is the one that uses Fused Deposition Modeling (FDM).
Fused Deposition Modeling (FDM)
FDM is an additive process, where a model is created by heating and extruding plastic, pieced together layer by layer.
Most of the 3D printers referred in this post works on FDM, as they are more widely available and easy to find.
There are 2 other types of 3D printing available: Stereolithography and Selective Laser Sintering (SLS). They are much more expensive compared to FDM.
Stereolithography
Stereolithography also uses the additive process but instead of extruding plastics, the process utilizes an ultraviolet light beam to harden a model from a pool of photosensitive liquid.
This allows for a higher quality printout.
Selective Laser Sintering (SLS)
SLS is similar to stereolithography, except that the process involves lasers and powders instead of UV light beams and liquid. A laser is used to melt the powder, creating a layer of the printed material.
This allows some models to print metal objects, which is not possible in the other two processes.
2. Build Your Own Or Buy One
The 3D printing community is one made of creators and makers, so it makes sense that many people would like to try their hand in building a 3D printer on their own.
There are building instructions and 3D printer kits available online if you decide to go with this route.
Building your own printer can be cheaper than buying one but if you don’t have the time, you could always buy a pre-assembled printer.
Your final decision will depend on whether you are interested in tinkering with the technology, or just want to start printing right away.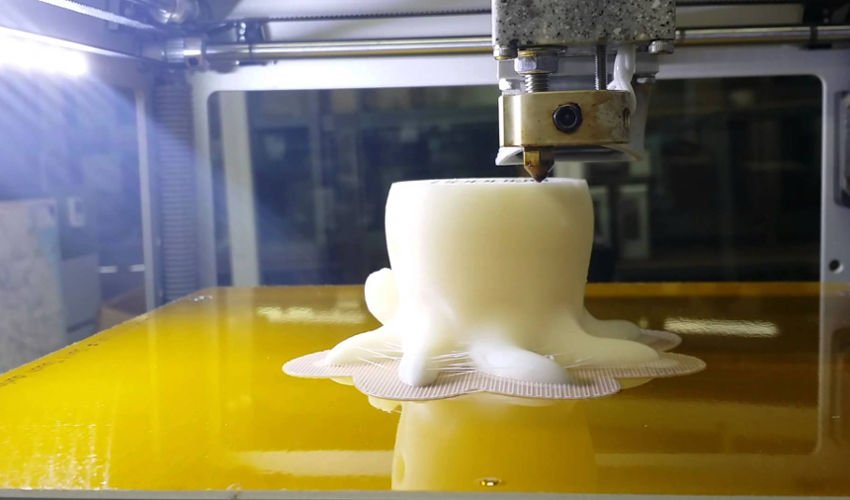
3. Price
One of the main factors that can help turn 3D printers mainstream is their market price. Prices depend mainly on the quality of the output.
In general, the higher-quality ones tend to go above $1000; professional printers can even go above $2000, e.g. the MakerBot series. But if you are just dipping your toes in 3D printing, you can start with simple models that go for as low as $100.
With rising popularity and heavy competition, the prices of printers will only go down while the quality improves. Note that these printers do not come with the materials you require to print your products.
You will need to separately acquire the materials as different products may require different materials.
4. Materials used to print
The two materials required for 3D printing are Poly Lactic Acid (PLA) and Acrylonitrile Butadiene Styrene (ABS). Both are thermoplastics that will become soft and malleable when heated, frozen when cooled.
They are sold as 1kg (2.2lbs) spools of filament, priced in the $30 range.
Let’s take a look at the good and bad of both materials.
Poly Lactic Acid (PLA)
PLA is a type of plastic that is derived from corn starch, excellent for beginners to start dabbling with. Also great for creating small, simple household items. Other characteristics include:
- Biodegradable and environmentally sound
- Cools quickly, which prevents problems with model warping
- Available in both solid and translucent colors, gives printed objects a glossy look
- Disadvantage: Its low melting point may cause models to deform under high heat
- Disadvantage: It is difficult to work with if you require joints and interlocking parts
Acrylonitrile Butadiene Styrene (ABS)
ABS is a petroleum-based plastic that is a popular choice because of its strength and flexibility – think Lego bricks (which can be made using 3D printers, if you didn’t know).
- Its flexibility makes creating interlocking pieces easier to create and work with.
- It also has a higher melting point, so your creations will be less likely to deform under high heat.
- Disadvantage: It takes longer to cool compared to PLA; models are susceptible to warping.
- Disadvantage: It emits fumes during printing (more on this below).
How to Choose
You need to know which material is suitable for your final product. From there you can choose which type of printer you should buy. It is important to know that not all printers can accept both materials – some will work with only either one type.
When it comes to filament size – 1.75mm or 3mm in diameter – it doesn’t factor much into the end quality. More popular printer brands go with 1.75mm so it is recommended that you start with that.
5. Safety
When it comes to 3D printing, there are a few safety issues to take note.
Playing With Heat
The most important thing to remember is that you are working with heated plastics. Extruders, plastics and in some printers, the print bed itself can get very hot and can cause bad burns if you are not careful.
Some printers have no enclosure around the print area; practice extra caution with these printers.
Beware of Fumes
It is important to keep your 3D printer in an well-ventilated room. During the printing process, expect fumes to be emitted, particularly when you use ABS plastics.
These fumes are reported to be rather overwhelming although there is little to no research that states the impact they have on general health.
Still, it is best to take the necessary precautions, particularly if you will be using 3D printers a lot.
Food-Grade Plastic
3D printers can be use to create many types of household items, including kitchenware. Both ABS and PLA are generally food safe but if there are additives added in, those additives may not be.
Another major concern is that products created with FDM-type 3D printers have porous surfaces on which bacteria can collect in.
You can coat the object to make it safer to use but it is best to limit the usage of 3D printed kitchenware.
6. Quality
To produce high quality 3D printed products, you need to take note of two things: print resolution and print speed.
Print resolution refers to the level of detail the printer can get, measured in microns – the smaller it is, the higher level of detail in the objects you can create.
Print speed measures how fast the printer can move its extruder – the higher the print speed, the faster it will print.
Note that other features may affect the print speed, such as the acceleration and deceleration of the printer, which helps prevent the printer from shaking.
In the end though, the best way to gauge the quality of a printer is to look at its output. You can look at photos, available online, of the final output of 3D printers before buying.
7. Obtaining A 3D Model
When it comes to getting a 3D model, there are two routes: you can create it yourself or download a pre-made model blueprint from the Internet.
If you intend to create your own model, there are a variety of software, both free and commercial, that will help you bring your creation into the real world. If you like, you can even learn 3D modeling.
Learning to model in a computer is a difficult task that will take time and effort to truly get used to. Fortunately, for those who are short on time, there are websites that provide 3D models of many different items, made by enthusiasts from all over.
A quick google search can probably yield you the item that you’re looking for.
8. STL Files
The STL file (STereoLithography) is the standard file format that you will use to print your 3D model into a physical object.
The file can be generated using most CAD programs so if you are building your own 3D models, chances are the software you are using can output one.
Basically inside an STL file is the information needed to produce a 3D model. The model itself is broken down to a series of triangles and a list of their XYZ coordinates is used by the printer to create the physical object, layer by layer.
9. Slicing Software
Once you have an STL file of the model you want to print, you will have to put them through a slicing software. What slicing does is that it “tells” your printer how to print your model.
It provides instructions on the number of layers needed, the starting position of the printer and the parts of the model that should be solid or hollow.
There are a number of software to help you with this although some software come with the printer. A good example would be MakerBot’s MakerWare.
10. Community
The great thing about a new tech trend is that there is almost always an online community devoted to it.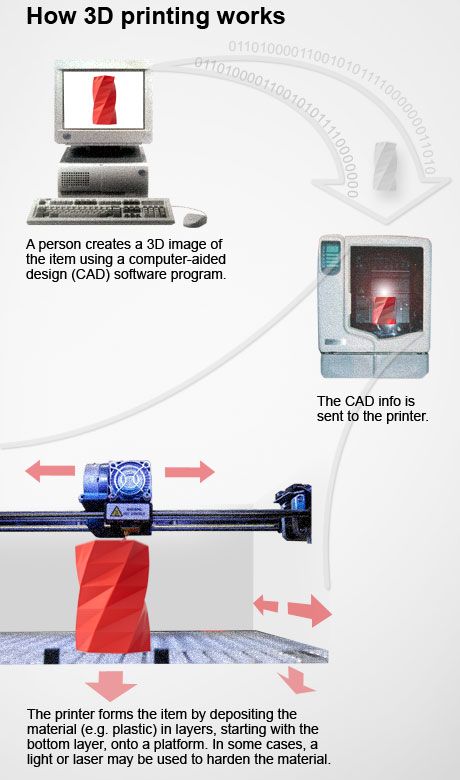 It is no different with 3D printers.
Check online for a community of people who own a particular brand, to get more insight and answers to questions you may have about the ins and outs of that printer.
If the community is small or worse, nonexistent, the lack of users should raise a red flag about that particular brand.
All you need to make a sound investment is to read up more about that brand and its competitors so you know what you are getting into.
One of the main factors that can help turn 3D printers mainstream is their market price. Prices depend mainly on the quality of the output.
In general, the higher-quality ones tend to go above $1000; professional printers can even go above $2000, e.g. the MakerBot series.
But if you are just dipping your toes in 3D printing, you can start with simple models that go for as low as $100.
With rising popularity and heavy competition, the prices of printers will only go down while the quality improves.
Note that these printers do not come with the materials you require to print your products. You will need to separately acquire the materials as different products may require different materials.
4. Materials used to print
The two materials required for 3D printing are Poly Lactic Acid (PLA) and Acrylonitrile Butadiene Styrene (ABS). Both are thermoplastics that will become soft and malleable when heated, frozen when cooled.
They are sold as 1kg (2.2lbs) spools of filament, priced in the $30 range.
Let’s take a look at the good and bad of both materials.
Poly Lactic Acid (PLA)
PLA is a type of plastic that is derived from corn starch, excellent for beginners to start dabbling with. Also great for creating small, simple household items. Other characteristics include:
- Biodegradable and environmentally sound
- Cools quickly, which prevents problems with model warping
- Available in both solid and translucent colors, gives printed objects a glossy look
- Disadvantage: Its low melting point may cause models to deform under high heat
- Disadvantage: It is difficult to work with if you require joints and interlocking parts
Acrylonitrile Butadiene Styrene (ABS)
ABS is a petroleum-based plastic that is a popular choice because of its strength and flexibility – think Lego bricks (which can be made using 3D printers, if you didn’t know).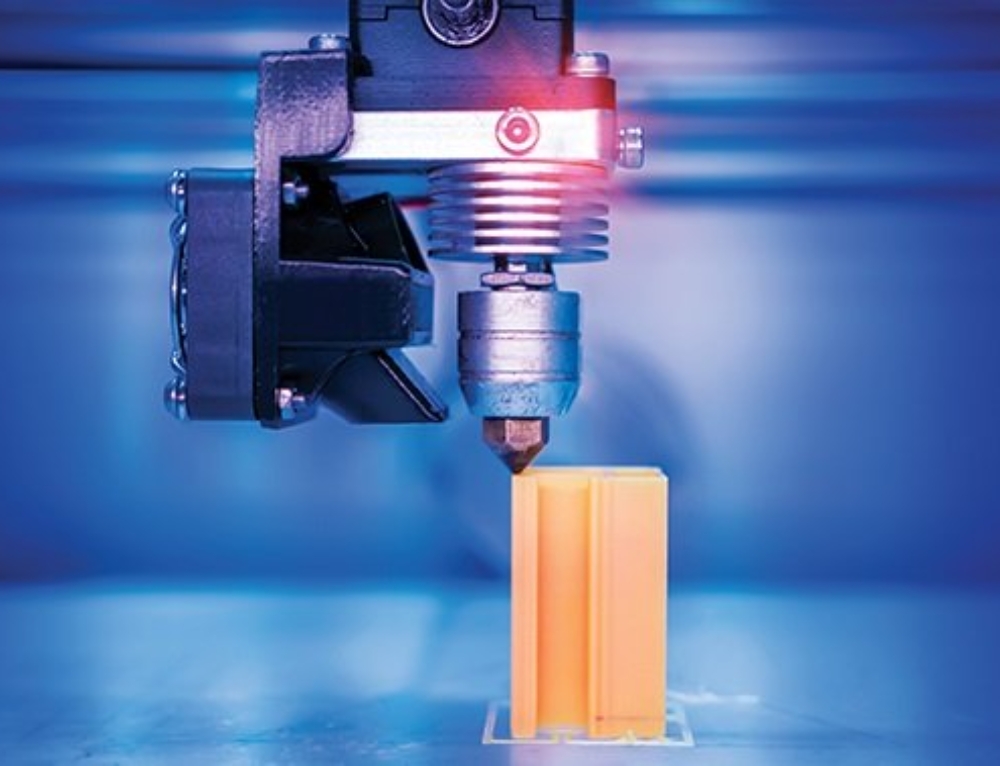
- Its flexibility makes creating interlocking pieces easier to create and work with.
- It also has a higher melting point, so your creations will be less likely to deform under high heat.
- Disadvantage: It takes longer to cool compared to PLA; models are susceptible to warping.
- Disadvantage: It emits fumes during printing (more on this below).
How to Choose
You need to know which material is suitable for your final product. From there you can choose which type of printer you should buy.
It is important to know that not all printers can accept both materials – some will work with only either one type.
When it comes to filament size – 1.75mm or 3mm in diameter – it doesn’t factor much into the end quality. More popular printer brands go with 1.75mm so it is recommended that you start with that.
5. Safety
When it comes to 3D printing, there are a few safety issues to take note.
Playing With Heat
The most important thing to remember is that you are working with heated plastics. Extruders, plastics and in some printers, the print bed itself can get very hot and can cause bad burns if you are not careful. Some printers have no enclosure around the print area; practice extra caution with these printers.
Beware Of Fumes
It is important to keep your 3D printer in an well-ventilated room. During the printing process, expect fumes to be emitted, particularly when you use ABS plastics. These fumes are reported to be rather overwhelming although there is little to no research that states the impact they have on general health. Still, it is best to take the necessary precautions, particularly if you will be using 3D printers a lot.
Food-Grade Plastic
3D printers can be use to create many types of household items, including kitchenware. Both ABS and PLA are generally food safe but if there are additives added in, those additives may not be. Another major concern is that products created with FDM-type 3D printers have porous surfaces on which bacteria can collect in. You can coat the object to make it safer to use but it is best to limit the usage of 3D printed kitchenware.
6. Quality
To produce high quality 3D printed products, you need to take note of two things: print resolution and print speed.
Print resolution refers to the level of detail the printer can get, measured in microns – the smaller it is, the higher level of detail in the objects you can create. Print speed measures how fast the printer can move its extruder – the higher the print speed, the faster it will print. Note that other features may affect the print speed, such as the acceleration and deceleration of the printer, which helps prevent the printer from shaking.
In the end though, the best way to gauge the quality of a printer is to look at its output. You can look at photos, available online, of the final output of 3D printers before buying.
7. Obtaining A 3D Model
When it comes to getting a 3D model, there are two routes: you can create it yourself or download a pre-made model blueprint from the Internet. If you intend to create your own model, there are a variety of software, both free and commercial, that will help you bring your creation into the real world. If you like, you can even learn 3D modeling.
Learning to model in a computer is a difficult task that will take time and effort to truly get used to. Fortunately, for those who are short on time, there are websites that provide 3D models of many different items, made by enthusiasts from all over. A quick google search can probably yield you the item that you’re looking for.
8. STL Files
The STL file (STereoLithography) is the standard file format that you will use to print your 3D model into a physical object. The file can be generated using most CAD programs so if you are building your own 3D models, chances are the software you are using can output one.
Basically inside an STL file is the information needed to produce a 3D model. The model itself is broken down to a series of triangles and a list of their XYZ coordinates is used by the printer to create the physical object, layer by layer.
9. Slicing Software
Once you have an STL file of the model you want to print, you will have to put them through a slicing software.
What slicing does is that it “tells” your printer how to print your model. It provides instructions on the number of layers needed, the starting position of the printer and the parts of the model that should be solid or hollow.
There are a number of software to help you with this although some software come with the printer. A good example would be MakerBot’s MakerWare.
10. Community
The great thing about a new tech trend is that there is almost always an online community devoted to it. It is no different with 3D printers. Check online for a community of people who own a particular brand, to get more insight and answers to questions you may have about the ins and outs of that printer.
If the community is small or worse, nonexistent, the lack of users should raise a red flag about that particular brand. All you need to make a sound investment is to read up more about that brand and its competitors so you know what you are getting into.
everything you need to know
Many 3D printer owners experience parts coming off the table during 3D printing. Let's take a look at the causes and solutions.
What is adhesion?
The very concept of "adhesion" means the adhesion of surfaces of dissimilar bodies. In 3D printing, platform adhesion is the ability of the plastic that a part is made of to adhere to the surface of the stage during printing.
If the adhesion is insufficient, then the manufactured parts may be deformed or even come off the table.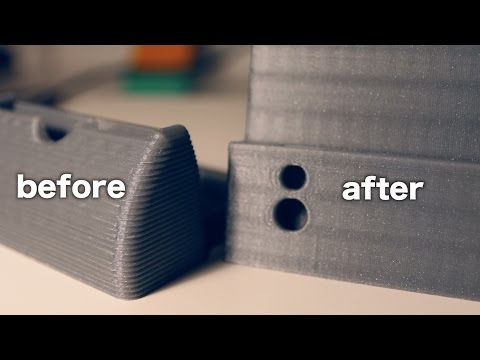 During 3D printing, the part must be firmly attached to the platform, and after completion, it should be easy to remove. Filament manufacturers typically recommend adhesives for their filaments, and 3D printer manufacturers offer worktables in aluminium, glass, stainless steel, or even with specialty coatings. All this helps the plastics stick better during printing, but there are no working surfaces that are equally well suited for all types of plastics. nine0003
Also, do not forget about thermal expansion, which causes a change in the dimensions of manufactured parts at different temperatures. The difference in temperature between the bottom and top of a part can cause the edges of the part to peel off during 3D printing. This mainly applies to materials such as ABS, which require a heated worktable to work with. When printing with these materials, the layers need to cool down a bit to be able to build a 3D object at all, but not so much as to cause peeling at the edges. nine0003
In this article we will look at what affects adhesion and how to solve many problems in terms of adhesion of products to work surfaces.
3D Printer Enclosed Chamber
For printing on materials with high heat shrinkage, the best option is to use 3D printers with an enclosed chamber that prevents drafts and retains heat. Many printers are equipped with an active chamber heater that maintains the desired temperature and does not allow the parts to cool. A uniform background temperature during 3D printing reduces warping and ensures better adhesion. nine0003
Owners of open printers are left to come up with various devices (for example, boxes) that cover the 3D printer to keep heat, or build heat-retaining walls around the printed model, which increases printing time and filament consumption.
First coat adhesion
The first thing you should pay attention to is the adhesion of the first layer. This is one of the most common problems faced by almost all printers. If the first layer is laid unevenly, then the percentage of rejects for the rest of the part increases very much, so it is very important to solve the issue of adhesion of the first layer before 3D printing. In most cases, the problem is solved by calibrating the work table and adjusting the distance between the nozzle and the work surface. nine0003
It is important to correctly set the distance between the nozzle and the stage surface
Brim and Raft methods
For better adhesion of the product to the working surface of the table, in the print settings it is often necessary to create additional elements - the substrate or the frame of the model, which help to keep the manufactured part on the table. Brim or Raft increase the contact surface of the plastic with the work surface around the lower layers and thereby increase traction. nine0003
Underlays or Rafts consist of several layers and are horizontal grids of filament located under the model. The raft is used as a base for the first layers of the product and is designed to increase the level of adhesion. In addition, the raft helps to level the surface of the table: if there are irregularities on the surface, they are leveled to a certain extent by the substrate, and the model is printed already on a flat base. Another advantage of rafting is that it reduces the chance of problems due to too much or too little gap between the nozzle and the table when laying the first layer. nine0003
Brim is used to stabilize small patterns or "islands" (separated areas of the printed product). Brims increase the contact area and help the model stay on the table if it comes into contact with the surface in small areas.
Worktable temperature and adhesion promoters
After calibrating the platform and adjusting the gap between the nozzle and the surface of the table, let's move on to the next question. The next reasons for poor adhesion may be the wrong stage temperature (if the 3D printer has a heating option) and the wrong selection of adhesion promoters for a particular filament. nine0003
Working stage temperature selection
One of the common causes of poor adhesion is the wrong stage temperature selection for a particular material. When the molten filament is applied to the table and then cools, deformation occurs. If the temperature of the stage is incorrectly selected, the outer edges of the printed product are compressed, and we get warpage: the edge of the product comes off, clings to the nozzle, and the product completely comes off the platform.
Usually, 3D printing filament manufacturers list the recommended heating temperature for the stage on their website or boxes. For the most common materials, you can use average values. nine0003
Examples of worktable temperatures for some materials:
- PLA: 60°C
- ABS: 100-110°C
- PETG: 85°C
- Nylon: 100°C (depending on material composition) )
- Polycarbonate: 110°C (the higher the temperature, the better)
Worktable temperatures for each manufacturer's plastic may vary. You can choose the optimal temperature only empirically.
Adhesion agents nine0007
To increase adhesive properties and reduce the risk of damage to the glass surface of the desktop, additional agents are often used, such as varnish or glue for 3D printing, PVA glue, stationery glue stick, dissolved ABS plastic (so-called "ABS juice" ), blue tape, etc. One tool for printing all types of plastics will not be enough. In our article, we will not consider such folk remedies as beer or sugar syrup, but will focus on more traditional methods. nine0003
Basic adhesives:
Varnish or adhesive for 3D printing
The days of hair sprays are long gone, and now almost no one uses them due to low efficiency. More effective adhesives for 3D printing have come to replace.
Typically, 3D printing lacquers and adhesives are formulated to take into account the properties of different filaments and allow the first layer of the printed model to be reliably adhered to the worktable. Simply put, these are universal tools suitable for working with multiple types of filaments. nine0003
There are already quite a few manufacturers of 3D printing varnishes and adhesives on the market in various volumes and for any budget. It's not worth saving - one bottle will be enough for several months of printing, and you will save your nerves and time spent on reprinting damaged parts.
Easy to use: spray varnish or glue on the platform and spread it evenly over the surface with a clean, soft cloth.
ABS juice nine0050
Composition for those who like to save money or who do not have glue or varnish on hand. It is made simply: finely chopped ABS rod or the remnants of a previous printing with ABS plastic are immersed in acetone and after a few hours a thick solution is obtained that can be applied with a brush even on a cold platform.
This method is very reliable as an additional adhesive, but acetone evaporates during 3D printing and creates an unpleasant odor. nine0003
PVA glue, stationery glue stick
PVA glue is applied to the work surface with a brush and rubbed until a uniform thin layer is obtained. As a rule, when hardening, the glue becomes transparent. After drying, you can start 3D printing. The method is not bad, but the reliability of such a method is doubtful due to the fact that not all PVAs work well.
Stationery glue stick is mainly used when there is nothing else at hand. The most popular option is Kalyaka-Malyaka glue. The glue is applied in one layer, after the platform cools down, the part is easily separated, and the glue itself is easily washed off the glass and from the printed part. nine0003
Kapton film, blue masking tape and Lomond film
Masking tape is more suitable for 3D printers without platform heating. The adhesive tape is carefully glued to the entire area of the table and allows you to print small details without heating the table. This option is especially suitable when working with PLA plastic, however, with an increase in the area of \u200b\u200bproducts, the edges of the parts can come off along with the adhesive tape, so the relevance of this method is limited. Kapton tape or Lomond film is more commonly used. nine0003
On Kapton tape, the lower surface (the sole of the product) is very smooth, the parts are well separated after cooling, but you can’t leave the product on the cooled table, as the plastic pulls the tape together, and air bubbles form under it. When 3D printing on Kapton tape, it is necessary to heat the platform and additionally smear the adhesive tape with glue. Suitable for 3D printing of medium-sized products.
Lomond film was popular until various adhesives appeared. After gluing, the top layer on the film itself must be washed off for better adhesion. Details after printing on such a film are quite difficult to tear off. Over time, bubbles also form under the film, so the film must be changed regularly. Suitable for 3D printing large items. nine0003
Additional Points to Remember
PLA is the least demanding polymer. For stable printing with polylactide, it is not necessary to treat the surface of the table with additional adhesives, a clean glass surface is sufficient. A prerequisite is that the platform is heated to 60°C. If the platform is not heated, then it is better to print using adhesive agents - varnish, 3D printing glue or blue tape for small parts. nine0003
PLA also loves airflow, so keep the fans on full.
ABS is highly shrinkable and needs help to better adhere to the surface. The main types of additional tools are varnish or glue for 3D printing, ABS glue, stationery glue stick, PVA glue.
When working with ABS, the platform must be heated to 100-110°C. It is advisable to use 3D printers with closed cameras that support high background temperatures. When 3D printing on open printers, it is necessary to use a heat-retaining cocoon around the model. Many slicers already offer this feature. Blowing of products made of ABS plastic is highly undesirable, as cracking of parts in layers and detachment from the working surface due to shrinkage can occur. nine0003
PETG is a very easy to work material that does not require high temperatures or fine print settings. Plastic has excellent adhesive properties and adheres very strongly to clean surfaces. On the other hand, high adhesion can lead to separation of pieces from glass tables when products are separated, so it is advisable to apply separating layers on the work surface - the same glue or varnish for 3D printing. This will help both separate products and prevent damage to the glass. nine0003
Flex has high adhesive properties, bonding well not only between coats, but also to work surfaces. Again, it is advisable to use 3D printing varnish or glue to avoid damaging the glass. Film coatings are not recommended.
In the case of composite materials , the choice of adhesive agents is mainly determined by the type of material serving as the basis. Usually recommendations for preparing for 3D printing with composites can be found on the manufacturer's website. If not, please contact technical support for advice. nine0003
For example, the FormaX composite from the X-line range is based on ABS plastic, but the properties of the composite material differ from pure ABS due to the presence of carbon fiber filler. Formax is not characterized by cracking in layers, but the composite requires the use of additional adhesive agents, so the manufacturer recommends using varnish or glue for 3D printing
Material storage and drying
The effect of moisture on filaments can be both cosmetic and functional. The most innocuous result of high humidity is a change in the textures of 3D printed products, although this is rarely limited to roughness alone (and haze when it comes to transparent plastics) and is usually accompanied by a decrease in interlayer adhesion and adhesion to the substrate. A more serious effect can be an uneven supply of plastic: water in a sufficiently wet filament boils when passing through the hot end, and the resulting steam leads to the appearance of bubbles in the material being laid and even to jerky extrusion with all the ensuing consequences in terms of quality and poor adhesion. Detailed instructions for storing plastics are available at this link, and for drying plastics - here. nine0003
That's all for now.
The Wiki on our site has separate, detailed articles about each of the filaments. How to print and with what parameters. Come read here.
If you have additions or comments - we are waiting for your answers.
Regards, REC3D team.
Photos from the blogs of Sergey and akdzg are published in the article.
3D Printing Basics / Sudo Null IT News
KolianM
3D work *Prototyping *DIY or DIY 3D printers
A 3D model that will be printed on a 3D printer is different from a 3D model designed for casting or milling. This is due to the technical features of the 3D printer, from which you need to either squeeze the maximum benefit, or adjust to the disadvantages of printing.
As a caveat, I note that these recommendations relate mainly to the FDM (FFF) 3D printing method, in which a plastic rod is heated by a moving extruder that forms the part layer by layer. nine0003
Development of a 3D model starts with a sketch. It can be a drawing on paper, a material prototype, a mental image, etc. What is important to pay attention to when creating such a sketch and the model itself, we will analyze in detail.
Part strength
Here and further down the text there are several sub-points that must be taken into account at the same time, kept in mind from the very beginning.
- Be aware of the layering or anisotropy of the material: it is much easier to break a part in layers than across. This must be taken into account in advance, given the location of the 3D model on the 3D printer table. nine0203
- Add fillets. The leg of the stool and the tabletop at the junction should have a rounded corner. At the same time, the larger the radius of curvature, the stronger the leg will be fixed on the tabletop. Similarly for various body parts. Modeling a box All right angles are rounded.
 It doesn't matter what plane they are in. Even where a right angle is needed, we make a radius of 0.5 mm. The printer will pass through such a section more easily than an unrounded one, there will be no impact from a sharp stop of the extruder, the part will not sway, and other pluses. nine0203
- Wall thickness and filling. The maximum strength at 100% infill is a fact, but if you need to lighten the part or save plastic, you can make a much larger wall thickness in the print settings, while setting the infill much lower. This works with parts that have holes for fasteners. When creating machine code for a printer, absolutely all the outer walls are thick, so the fastener will be surrounded by a reliable thick layer of plastic of your part.
- Support. This element affects the strength in that the layers supported by the support are not always ideal in structure. This can be solved by increasing the wall thickness, filling, but it is better not to do support at all.
 Support is added by the slicer depending on the angle between the part wall and the table plane. Often the default is 60 degrees, sometimes 45. This setting is selected experimentally for each 3D printer. You can check this with the help of special test parts. For example, https://www.thingiverse.com/thing:2806295 - do not forget to turn off support to check the real quality of 3D printing in its absence. For example, you need to print a T-piece for tubes. Cast products are made in a T-shape. 3D printing makes the product L or even Λ-shaped. In the second case, support can even be avoided, and the part will be stronger due to the layers located at an angle of 45 degrees to the tubes. We, in the workshop, set up slicers for each machine and ask the client about the strength requirements, and, depending on this, choose a 3D printer to print. nine0203
Geometric restrictions
- The wall thickness is limited from below by the size of the 3D printer nozzle.
 Its diameter is constant and in the vast majority of cases it is 0.4 mm. Smaller thickness - long 3D printing for most parts. The larger the nozzle, the bonds between the layers are less strong, the steps between the layers are more visible. And in general, the wall thickness should be a multiple of 0.4 mm, then the 3D printer will be able to accurately make the wall in two passes (0.8 mm), in 3 passes (1.2 mm), etc. Other thicknesses will cause the 3D printer to leave a gap or overflow, which negatively affects the strength and appearance of the printed part. nine0203
- 3D printing of thin cylinders and "needles". For 3D printing of such products, special 3D printer settings are needed: low 3D printing speed, allow time for cooling, otherwise such a structure will bend. Vertically standing thin elements are best avoided at all costs. Even if they are printed, they will be very fragile. It makes sense to leave them only for decorative purposes, but you must be prepared that their quality will be worse than the quality of other elements of the 3D part.

- 3D printed holes. I note that if the hole is straight and through, then it can be drilled, if it is curved and requires support, then it may turn out that it will be impossible to get support.
- When 3D modeling, it is important to consider the overall dimensions of the 3D printer. We use convenient 3D printers, table 250x250 mm, diagonal 353 mm. This is where you need to enter the dimensions, if possible. Otherwise, you need to order either an industrial 3D printer with a large print area, or use gluing, but assembly is better, so the assembly process will be controlled by the developer, and not by the 3D printing master. nine0203
- Large footprint may cause edges to peel off the table. We use special glue, but this does not always help. We are periodically approached with a complaint about colleagues in the shop that for them such “minor” defects as a folded edge are not a reason to restart 3D printing, take it as it is. But an engineer who 3D models a part can take this into account in his work and make either assemblies or thin-walled flat 3D parts that “do not have enough strength” to compress the outer contour and, as a result, raise the edge.
 nine0203
- Tall and thin "towers" may not work well due to vibrations that occur when the 3D printer is running closer to the top, and layer shifts are also possible.
Dimensional stability, accuracy
- Precise 3D printing is quite rare. I don’t want to speak in engineering terms here, but the likelihood that a complex composite structure will assemble the first time is very low. Here, rather, you need to take into account the fact that you can then mechanically refine the details. nine0203
- Holes for fasteners are best done with a margin of 0.5 mm in diameter. This will not reduce strength, the fasteners will also not dangle due to tightening forces, but if you do it without a margin, you will definitely have to drill it out. Reducing the size of a large shaft, >10mm sandpaper is much easier than making a hole, which requires a huge drill that cuts into the plastic walls and breaks the part, or gets stuck in it.
 It is also important to consider that when drilling, the plastic melts and the drill can melt into it so that it cannot be removed. There have been cases. nine0203
 - Heat shrinkage is not always compensated, more precisely, it is very difficult to catch it, it is not the same in different directions, so it is extremely difficult to take it into account. It's easier to print a test version, and then make adjustments.
When appearance matters
- Think about how the craftsman will orient the part on the 3D printer table. 3D printing proceeds in layers, which is clearly manifested when printing surfaces that are at a small angle from the horizontal of the table. Skinning will be long and painful, because you will have to cut this "ladder" to the deepest depressions of the "steps". It is better to place such surfaces either horizontally, for example, put on a table, or increase the angle. In some cases, even adding support that spoils the wrong side of the wrong side saves time and effort on post-processing.
 nine0203
- Support. First, the surface it supports has significantly more defects than without it. Secondly, thin and high support is weak, wobbly, which leads to the fact that the supporting part may have serious defects, or not work at all.
- First layer quality improvement. You need to add a bevel. Even where a sharp corner is not needed, I recommend adding a chamfer of 0.5 mm. It will not be clearly visible, but the edge will be neat. nine0203
What you need to know in order not to make a mistake when ordering 3D printing
When appearance is important
- Location of the part on the table. Remember about anisotropy.
- Wall thickness and filling. What you can run into here: the filling is 20% cells, which are either visible through a thin outer wall, or the filling slightly tightens the outer wall during shrinkage, but at the same time it is visually easy to determine that there is support inside.
 Here, first of all, an increase in the thickness of the outer wall, or an increase in the filling density, helps. Please take this into account when ordering. nine0203
Postprocessing
The elimination of stepping is achieved by mechanical and chemical methods. It is possible to use putty. Acrylic paint available. If the part has a complex color structure, then we use the ProJet 4500 printer, which works on a different technology. He glues the powder particles together with colored ink glue. It turns out well.
Morality
In conclusion, I would like to note that these recommendations and the accumulated experience will make it possible to produce parts by 3D printing, which in their properties will not be inferior to cast ones, which makes it possible to save significant funds in the presence of a customized printer and small production volumes. From my own experience, I note that fiddling with the printer, debugging it, knowing “all the cracks” is a separate topic, which I will talk about later.