What is raft and brim in 3d printing
Rafts, Skirts, and Brims Tutorial
Raft
Skirt
Brim
This tutorial will help you understand the differences between rafts, skirts and brims. All three techniques provide a starting point for your 3D printed models, but they have different uses and advantages.
Rafts
A Raft is a horizontal latticework of filament that is located underneath your part. Your 3D printed part will be printed on top of this raft, instead of directly on the build platform surface. Rafts are primarily used with ABS to help with warping and bed adhesion, but they can also be used to help stabilize models with small footprints, or to create a strong foundation on which to build the upper layers of your part. The raft included in Simplify3D has been optimized over years of testing on hundreds of different machines to ensure easy separation and a high-quality surface finish on the bottom of your part. Once the print is complete, the raft effortlessly peels away from the print and can be discarded.
For our example today, we are going to add a raft to the popular “Dodecahedron” model. First, download and import the STL file from here. Then click “Edit Process Settings” in Simplify3D and place a checkmark beside the “Include Raft” option. The software also includes many settings that allow you to customize the raft for faster print times or improved adhesion. To adjust these setting, click on the “Show Advanced” option in the bottom left of this window and then go to the Additions tab. This tab contains the settings for the raft, as well as the skirt and brim which we will discuss shortly. An explanation of the important settings are given below:
- Raft Top Layers – The number of interface layers that are printed at the top of the raft. Your model will be printed on top of these layers, so you usually want at least 2-3 layers to ensure a smooth surface.
- Raft Base Layers – The number of extra-thick layers at the very bottom of the raft.
 These layers are printed slow and thick to ensure a strong bond to the build platform.
 - Raft Offset from Part – How wide the raft will extend beyond the edges of your part
- Separation Distance – This is an important setting that defines the height of the air gap between the raft and your part. Typically, having a gap of at least 0.1mm will help keep the part connected to the raft,
while still allowing for easy separation once the print is complete. - Above Raft Speed – Use this setting to customize the speed of the first layer of your part that is printed on top of the raft surface. Using a slow speed for this layer will also help the part stay attached to the raft during the print.
Adjust any of these settings and then click OK to save your changes. Click “Prepare to Print” to use the realistic pre-print simulation in Simplify3D to view an animated preview of the exact settings that you changed and how they will affect the print. Once you are happy with the changes, you can try running a test print on your 3D printer.
When the print is completed, remove the entire raft and model from the build platform. You can then grab the raft and begin to peel it away from the part, leaving a high-quality surface finish on the bottom of your print. Usually, this can be done by hand, but for extra delicate parts, you may want to use a thin spatula or tweezers to help with the removal. If you find you are having a difficult time removing the raft from the part, you can try increasing the raft separation distance or altering the other settings explained above.
Skirts
A skirt is an outline that surrounds your part but does not touch the part. The skirt is extruded on the print bed before starting to print your model. Skirts serve a useful purpose because they help prime your extruder and establish a smooth flow of filament. Observing the skirt also allows you to detect and adjust any leveling or adhesion issues before the actual model begins printing.
You can customize your skirt by adjusting the settings on the Additions tab. This allows you to adjust the skirt position, the amount of plastic that is primed, and even the extruder that is used for the skirt.
- Skirt Extruder – Choose the extruder that will be used to print the skirt. This allows you to prime different extruders at the start of your print. If you want to prime all of your extruders, select the “All Extruders” option.
- Skirt Layers – How many layers you want to include a skirt. Typically, 1 layer is enough to prime the extruder, but adding a 2nd or 3rd layer may help create a more robust skirt that can be peeled away from the bed easier.
- Skirt Offset from Part – How far away the skirt should be from the edges of your part
- Skirt Outlines – How many loops you want to print around the outline of your model. Increase this value if you need to prime your extruder more by extruding extra filament.

Brims
A Brim is a special type of skirt that is actually attached to the edges of your model. Typically, the brim is printed with a increased number of outlines to create a large ring around your part, similar to the brim of a hat. Brims are often used to hold down the edges of your part, which can prevent warping and help with bed adhesion. The Brim may be a preferred option to the raft (which also helps with adhesion), as the brim can typically be printed much faster and uses far less filament. Once the print is complete, the thin brim can be separated from the solid model and discarded.
Because the Brim is a special type of skirt, it uses many of the same settings explained in the previous section. To setup a Brim in Simplify3D, set the skirt offset to 0mm so that the brim will be touching the edges of your model. Then increase the number of skirt outlines to 5 or more to create a wide ring around your part. You can raise the number of outlines even further if you need to increase the surface area of the brim for extra adhesion. Now when you start your print, the brim will serve as both priming and an adhesion assistant!
After the print is complete, the thin brim should easily peel away from the solid part. If you find that the brim is attached too firmly, you could increase the skirt offset slightly to 0.1 or 0.2mm to add a small gap between the brim and the part.
Now you know 3 new techniques to help improve the foundation of your 3D printed parts! Next time you are struggling with adhesion, priming, or small delicate parts, you will know the exact technique to use.
More Tips to Improve Your Prints
If you want even more tips on how to improve your 3D printed parts, be sure to check out our extensive Print Quality Guide. This guide covers dozens of common issues and provides tips and suggestions for each one, giving you the knowledge you need to succeed.
View the Complete Article Library
Skirt vs Brim vs Raft; When to use them! – 3D Solved
Printing can come with it’s fair share of difficulties, and poor bed adhesion and having a badly printed first layer are definitely part of those difficulties.
A Skirt, Brim and Raft can definitely help with providing a better first layer adhesion, prevent warping (not the skirt really, but I’ll get into that shortly), and more.
In this article, I will go over all the differences between rafts, brims and skirts, and tell you when each one should be used and why, their pros and cons, how to use select them in the slicer and adjust the settings, and much more!
So, what’s the difference between a Skirt, a Brim and a Raft? A Skirt is a number of printed lines surrounding the model that serves to prime the extruder, but it doesn’t touch the print. A Brim is identical to a skirt but wider and it also helps with bed adhesion because it connects to the print, and a raft is a printed platform where the model gets printed on that also helps with adhesion.
Table Of Contents
- What is a Skirt?
- What is a Brim?
- What is a Raft?
- Time and Material Consumption when printing with a Skirt, Brim and Raft
- Some Frequently Asked Questions
- Conclusion
- Check out our recommended products section
What is a Skirt?
A Skirt is an outline that’s extruded surrounding the model that’s about to be printed without coming into contact with the print itself. It’s designed to prime the extruder and to achieve a smooth flow of material before the print even starts, but it doesn’t support the print in any way.
In addition to this, a skirt will help you identify another problem before the print even begins, which is if the bed is badly leveled: If the lines of extruded plastic aren’t sticking too well at a certain part of the print or if they are getting squished too much, you probably need to re-level it or you can do this while the skirt is being printed if you’re fast enough.
When to use a Skirt?
Using a Skirt is advisable for any print because priming the extruder helps you achieve a much better first layer, and having a first layer that adheres well to the build plate ensures that the rest of the print succeeds without detaching from it.
It also helps you find out if there are any issues such as having a poorly leveled bed, if there’s some under-extrusion going on, etc. before the print even starts, which saves time and filament.
However, you may consider using a Brim or a Raft (more on these two in a second) if the base of the object you’re printing is too small and is detaching from the build plate, since even if you use a Skirt and the extruder is properly primed, the contact surface area may be too small to adhere properly to the bed.
I generally use a skirt, especially when printing objects that have a fairly large base, such as a benchy, for example. But if you start a print and it doesn’t stick too well, consider trying it with a Brim.
Pros
- Primes the nozzle.
- Insures proper material flow.
- Allows you to detect if the bed needs to be leveled (can be adjusted while the skirt is being printed).
- Low material usage.
Cons
- Doesn’t increase the contact surface area of the print, providing no support and not improving bed adhesion.
Skirt Slicer Settings (Cura)
Most Slicers, such as Cura, tend to have the Skirt automatically enabled for all prints, but if it’s not enabled then follow these steps:
- Go to “Print Settings” and then “Build Plate Adhesion” and select the Skirt.
- Adjust the Skirt Line Count (How many lines it will print before starting with the actual print).
- Set the Skirt Distance (Default is fine).
Note: If you don’t see most of these settings, click on the Hamburger Icon next to the search bar and enable “Expert Mode”.
What is a Brim?
A brim is a layer of filament that gets printed around the 3D object and that makes contact with the edges of the model in order to help with bed adhesion and to prevent warping. A Brim doesn’t reach below the print like a raft does, but rather only makes contact with the outer walls of the print.
Essentially, you could think of a brim as being the exact same thing as a skirt that makes contact with the print itself and increases the contact surface area to improve bed adhesion.
Difference between a Skirt and a Brim
Left: Skirt.Right: Brim.
A Skirt and a brim are practically identical since they are simply a series of extrusions made around the 3D model, with the only difference being that the brim comes into contact with the 3D model to help it adhere better to the build surface while the skirt doesn’t.
Both consist of just one layer of plastic printed around the model, with the skirt generally having a total of 3 Lines (lines = how many lines of plastic are printed one next to the other, not on top of the other) while the brim usually has a much higher line count, generally around 20.
When to use a Brim?
A Brim should be used whenever a better bed adhesion is required since it can help with warping and with keeping prints from detaching from the bed because it increases the contact surface area of the print.
If your print requires just a few supports for a small part at the top of the print, use a brim to help those small supports stay firm and well adhered to the bed.
Another huge reason to use brims is when printing objects that have a small base since these generally have a much harder time adhering to the bed.
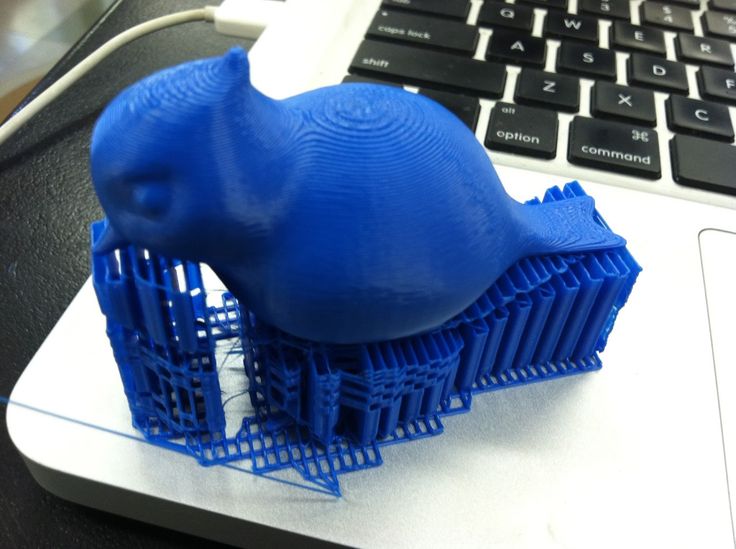
For example; I generally use it when printing objects that have small parts that are first printed separate from the rest of the print since they tend to not stick well to the bed, such as the feet of this spaceship.
This print is very hard to get right without a brim, but a cakewalk with one.
When to use a Brim:
- Prevent Warping.
- Improve Bed Adhesion.
- Strengthen the supports.
- Prints with a small base.
Pros
- Improves bed adhesion of the print.
- Prevents Warping.
- Let’s you diagnose problems with adhesion and if the bed is poorly leveled, same as with the skirt, and you can adjust this while the brim is being printed.
- Easy to remove and doesn’t leave as big of a mark as a Raft.
- Uses less material than a Raft.
Cons
- Uses more material than a Skirt.
- May leave a small mark that needs to be sanded to get a smooth finish (generally not too noticeable).
I would highly recommend a brim over a raft whenever you can since it only attaches to the edges of the print and not the bottom as well, which is easier to remove and leaves almost no marks, however, it doesn’t provide as great of a bed adhesion as the raft.
Brim Slicer Settings (Cura)
To access the Brim settings, click on “Print Settings” and then on “Build Plate Adhesion”.
- Under “Build Plate Adhesion Type” select the Brim.
- Adjust the Brim Line count (Generally 20) and the Brim width (Generally 8mm).
- Choose if you only want the Brim to be on the Outside (Recommended), but having it on the inside is also possible for even more adhesion.
Note: If you don’t see most of these settings, click on the Hamburger Icon next to the search bar and enable “Expert Mode”.
What is a Raft?
A Raft is a grid-type surface that’s printed directly onto the bed of the 3D printer and that’s used as a base to print the 3D model on, and it allows you to get the first layer of the print right and also to keep it from detaching from the build surface.
Essentially, a raft works as a platform that you use to print the model on, and since getting the first layer exactly right can be quite difficult, especially with printers that have manual bed leveling, printing with a raft can get rid of some common issues, such as the print detaching from the build plate, warping, strong first layer, etc.
Difference between a Raft and a Brim?
Left: Raft.Right: Brim.
A Raft is a printed platform that is used to print the 3D model on while a brim is just a series of extruded lines surrounding the model that help it stick better to the bed, but a brim doesn’t make its way underneath the print while the raft does.
When to use a Raft?
The reasons for using a raft are similar to the ones I mentioned about the brim, but a raft would be used in more extreme cases, like for example if you’re printing with a material such as ABS that tends to warp a lot, since it will further help avoid this issue.
Remember the image of the spaceship I linked earlier? Well, if for some reason those tiny legs don’t adhere to the bed even when using a brim, a raft will make certain that they do! Essentially, if the part has a small base/bases, then a raft will almost completely remove the risk or the print detaching from the build plate.
Essentially, a raft should be used whenever a better bed adhesion is required and a brim isn’t enough.
However, keep in mind that a raft will adhere very strongly to the print and removing it will leave loads of marks, and you even run the risk of actually breaking the model while trying to remove it.
When to use a Raft:
- Prevent Warping.
- Improve Bed Adhesion.
- Prints with a small base.
Pros
- Very strong bed adhesion.
- Helps with warping (the raft might warp, but not the print).
Cons
- Difficult to remove.
- Possibility of damaging the print while removing it.
- Uses a lot more material than a Skirt or a Brim.
- Leaves a lot of marks once removed (not ideal for prints that need to be aesthetically pleasing).
Raft Slicer Settings (Cura)
To access the Raft settings, click on “Print Settings” and then on “Build Plate Adhesion”
- Under “Build Plate Adhesion Type” select the Raft.
- Adjust the Raft Air Gap (how much the first layer will be raised or lowered to determine how strongly it will adhere to the raft).

- Use at least 2 or 3 Top Layers for the raft for a better and smoother finish.
Note: If you don’t see most of these settings, click on the Hamburger Icon next to the search bar and enable “Expert Mode”.
There are many other settings but these are the ones that I feel are the most important and the only ones you should worry about.
Time and Material Consumption when printing with a Skirt, Brim and Raft
I was curious about this myself since I had never really compared the time it takes to print with a Raft, Brim and a Skirt, as well as the difference in material consumption, so I went into Cura and sliced a couple different models to see for myself.
I decided to slice our trusted old benchy a couple times, and here are my findings;
Skirt
The time it takes to finish the print is 3 hours and 5 minutes, and the material that’s going to be used are just 10g of filament (3.37 meters).
Brim
Printing the same Benchy but with a Brim would take 3 hours and 7 minutes, so not much of a difference timewise, and also 10g of filament (3. 44 meters).
As you can see, using a brim or a skirt doesn’t really affect print time nor material usage.
Raft
The results here were as I expected since printing with a raft does require the use of more material, I just didn’t imagine that it would be this much.
It would take 3 hours and 39 minutes to finish the print, so about a 10% longer than printing with a skirt or brim, and 13g of filament (4.22 meters) which is close to 30% more.
Note: Using a raft won’t increase the material usage by that same percentage for all prints since this highly depends on the print itself; A narrower but taller print will require substantially less material for the raft than a print that has a much larger base.
Some Frequently Asked Questions
Which one is better for adhesion? A raft serves as a platform on which to print the 3D model, providing a strong adhesion to the bed as well as serving as a good foundation for the print itself. It provides a much better bed adhesion than a Brim and also prevents warping much more.
What’s better, printing with a Raft or a Brim? The only reason to use a raft over a brim is if the print isn’t sticking to the bed or if it’s warping too much, since removing a raft can cause damage to the model and leave marks.
How many layers should a raft be? The top layers of a raft are the ones that serve as the building platform for the print and there should be at least 2 or 3 top layers for optimal results since 1 layer doesn’t result in such a smooth finish of the print.
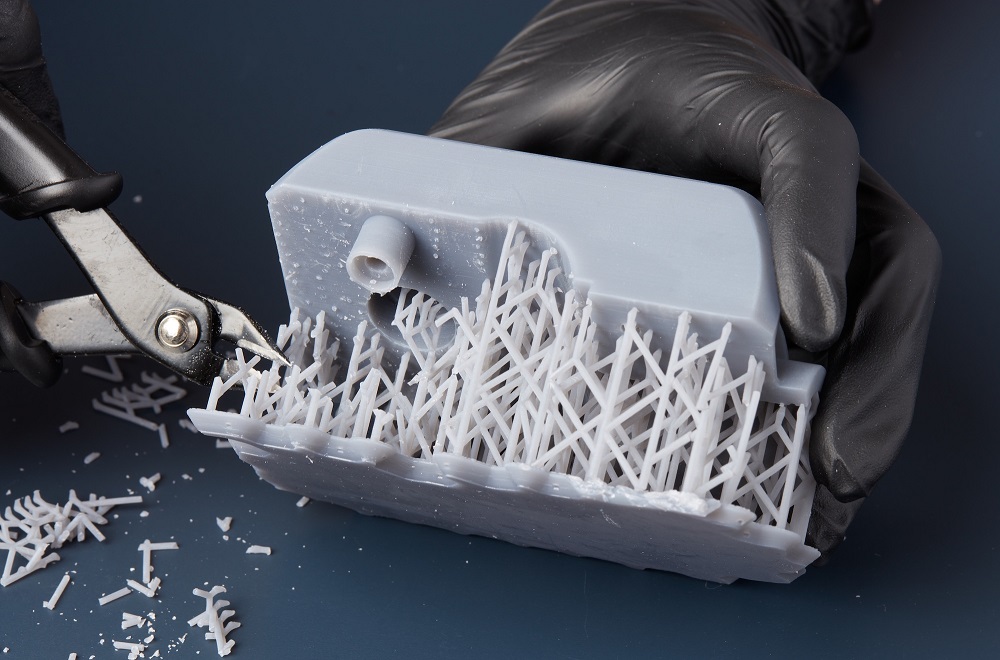
Do Resin prints need rafts? With resin printers, a support structure similar to a raft (called PAD) is used to avoid the part from detaching from the build plate, especially when the print is in its advanced stages since that extra weight may cause it to detach.
Conclusion
For most prints, I’d recommend going with a skirt. If you properly leveled the bed then you shouldn’t have too much of an adhesion problem.
However, using a brim is a great way of increasing adhesion and dealing with warping (not as much as using a raft though) especially considering that it’s easy to remove, won’t risk breaking the model and doesn’t leave too much of a mark.
If using a skirt or a brim don’t manage to keep your print from detaching from the build plate or from warping, then try using a raft. Just remember that rafts have a lot more cons than the other two because removing them isn’t simple at all and doing so may cause damage to the print.
I hope this information was useful!
Have a great day!
We created a recommended products section that will allow you to remove the guesswork and reduce the time spent researching what printer, filament, or upgrades to get, since we know that this can be a very daunting task and which generally leads to a lot of confusion.
We have selected just a handful of 3D printers that we consider to be good for beginners as well as intermediates, and even experts, making the decision easier, and the filaments, as well as the upgrades listed, were all tested by us and carefully selected, so you know that whichever one you choose will work as intended.
Raft "Rafts", Brim "brims" and Skirt "skirts" - why they are needed and how to use them in 3D printing
Our first layer is the most important
It is widely believed in the 3D printing community that how smoothly and correctly the printing of the first layer went, determines the success or failure of the object as a whole. In most cases, achieving proper adhesion of the first layer to the work surface is 90% winning the battle.
We all know this feeling when you carefully follow how the first layer is laid out, look at how it looks, whether it adheres well, whether the filament flows smoothly ... And now it's time to invite such tricks to the stage as “ rafts", "fields" and in some way "skirts".
Of course, you know that a filament that does not adhere well to the work surface can cause a lot of problems, and an ambush can happen, if not at the very beginning, then at the very end, when you remove from the work surface, it would seem , a beautifully printed object, but only to see that it is somehow skewed, that its corners are somehow strangely twisted.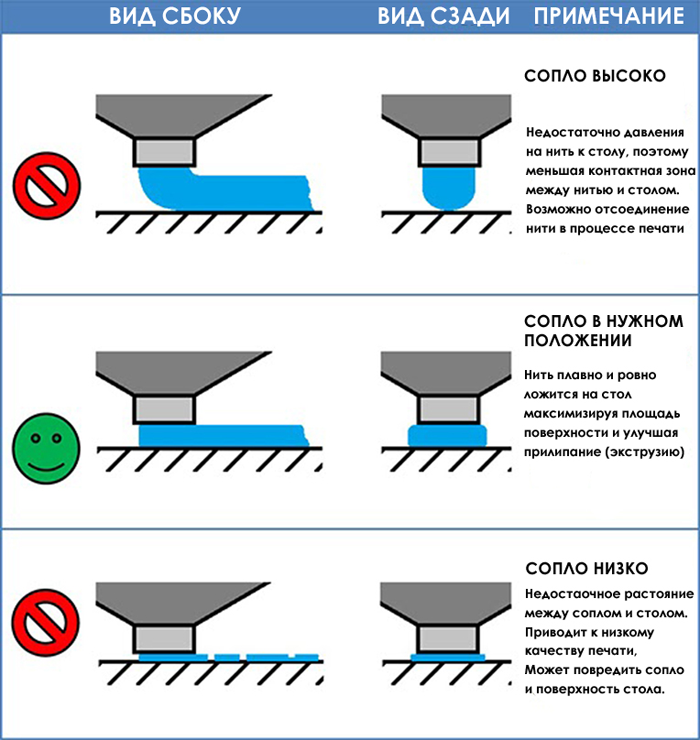
It's a waste of filament, a waste of money and finally a waste of your time.
And here you may ask: "So how can "rafts" or "fields" radically improve the quality of the first layer in this way?". In this article, we will look at "rafts", "fields" and their sister, "skirt", what they are and how they are best used.
We'll also talk about lesser-known ways to help you deal with other printing problems, such as over or under extrusion and even internal cracking.
From left to right: "raft", "fields" and "skirt" (Simplify3D screenshot)
What is a "raft" in 3D printing?
Raft A "raft" is essentially a temporary horizontal surface that sits underneath your object.
It consists of a set number of layers with a specific infill percentage and covers an area slightly larger than the base of the printed object.
The main task of the "raft" is to increase the grip on the work table. Some materials such as ABS benefit greatly from the use of a "raft".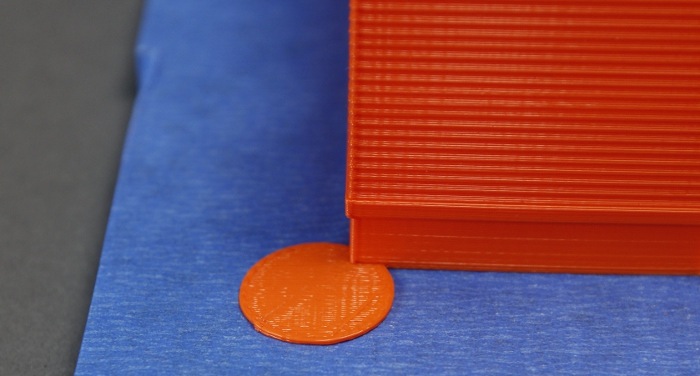 Then, first, a “raft” consisting of a certain number of layers is laid out on the desktop, and a printed object is already being built on it.
You don't have to worry about how to separate this plot from the printout: there is a small gap between the plot and the object, so if you set the plot parameters correctly (we'll explain how later), with its separation after cooling there will be no problems.
Since the printed area of the raft is larger than the base of the object, the cohesive forces generated are also greater. This also reduces the risk of the object being skewed, because the edges of the raft are more likely to be bent, but the bottom of the printout itself will remain flat.
Raft can also be used to provide more stability for objects with a small footprint. In this case, the "raft" acts as a "normal" foundation. This technique is also useful when printing large objects or objects that can end up quite heavy.
The "raft" can also compensate for small inaccuracies in the calibration of the desktop and even bumps, scratches and dents in the coating.
Here are a few slicer parameters you can play with to get a quality raft without using too much material to create it.
- Separation Distance. This is perhaps the most important parameter. It defines the width of the gap between the surface of the "raft" and the base of your printout. It is necessary to achieve a balance between ensuring that the printed object is held securely enough on the “raft”, and making it easy to separate it later. Usually 0.1 mm is sufficient, but for more ductile materials this distance can be increased.
- Above Raft Speed. We are talking about the speed with which the first layer will be laid out on the surface of the "raft". The speed must be low to ensure good grip.
- Raft Top Layers. This is the number of layers on the surface of the raft. The base of your object will be in contact with this surface, so you need 2-3 coats to get the surface smooth enough.
 You can increase the number of layers if you get blistering on the bottom of the printout.
 - Raft Base Layer. This is the very first layer of the "raft", it prints slowly. It is important that it sticks well to the desktop, otherwise everything will be pointless.
It should be noted that for some FDM printers the use of "rafts" is always mandatory, and for some it is not required at all. For example, Zortrax printers use a heated perforated work surface. Due to the presence of perforation, the "raft" should be used when printing any objects.
On the other hand, solid surface printers very often do not require a "raft" because the temperature of the desktop is already so high, which contributes to a significantly better adhesion and, accordingly, a reduction in spatial distortion of the printout.
Certain drawbacks of the "rafts" are that with some slicer settings these "rafts" can be difficult to separate, especially from objects made of more plastic materials, and also that the bottom of the object is not as glassy smooth as in the case of a solid working surface.
And, of course, the fact that you have to print some kind of “raft”, which is then immediately thrown away, can be annoying – and the filament was of high quality! But it must be borne in mind that in some cases, without the presence of a "raft", the path to the wastebasket is prepared for the entire printout in general.
It is best to separate the "raft" from the finished object with the same tool as the one with which you separate the printout from the work surface. Slide a thin plate or wide knife between the base of your object and the "raft" and gently lift from one side. Once one end of the "raft" has come off, the rest will come off more easily.
If the separation process was not without difficulty, you may need fine sandpaper, about 400 grit, to sand the base of the printout.
In some cases, it turns out that the only way to make the printed object stick to the desktop is with the help of a “raft”, nothing happens when printing directly onto the surface.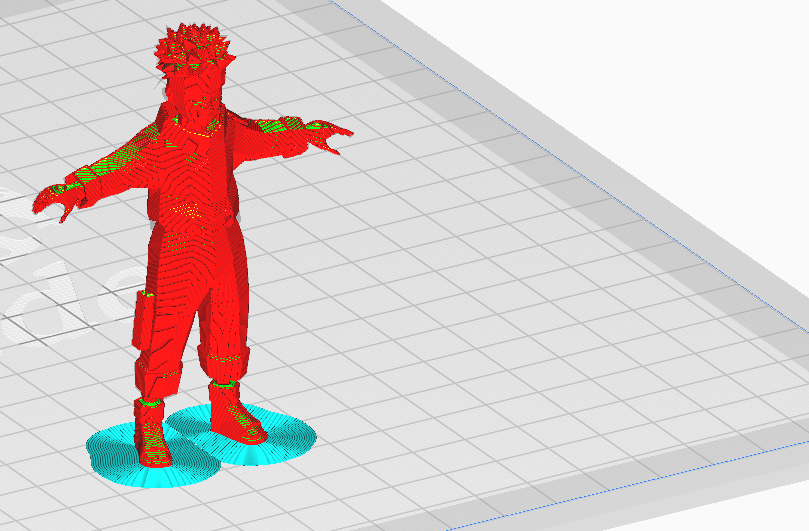 This can happen because, at default settings, the raft prints more slowly, has a thicker first layer, and the fans are turned off.
In this situation, you can try to print without a "raft", simulating its settings when printing the first layer, which should increase adhesion.
What is a "margin" or "side track" in 3D printing?
Brim "Fields" can be considered close relatives of "rafts".
As mentioned earlier, a "raft" is a stabilizing base on which the printed object is placed completely in order to improve adhesion.
"Fields" take place only along the perimeter of the object, not in contact with its base. It turns out that "Fields" is like a hat that a person puts on so that a clever thought comes to his head.
Both "rafts" and "fields" promote cohesion, sticking. Any of these techniques can be used to stabilize an object that has very little contact with the work surface. However, for smaller and more fragile objects, "fields" may be preferable, since they are in contact with the object only along the outer edge of a very thin layer.
Margins work better for some materials than others. For example, ABS, if the print settings are inaccurate or there are issues with the work surface, may warp (the same effect is achieved when working with just cheap ABS). Therefore, in order to increase grip, it makes sense to reprint the ABS-parts of the “field”. And even more so in the case of supporting structures, if they are installed closely and low.
The "margins" are easily separated from the work surface, so it's better to print with "margins" just in case of supports. This is especially true for props with weak adhesion. As you might guess, the “fields” are made in such a way that they can be easily broken off from the model after printing is completed, and it would not be necessary to grind or solvent-treat its base, as, for example, in the case of soluble supports made of PVA or HIPS.
In other words, it is easier to separate the "fields" from the object than to separate the "raft" from it. This, in turn, means that there is less chance of damaging the object during detachment.
And if there are any rough spots on the printout, they are very easy to clean up. Margins are also excellently removed with special deburring tools.
What is a "skirt" in 3D printing?
Skirt "Skirts" are more common than the two previous options.
The slicer most likely adds a "skirt" at the start of any printing process. The "skirt" is nothing more than "fields", which, however, do not come into contact with the printed object.
"Skirts" have a couple of uses and are usually a couple of layers thick. Firstly, the “skirt” is good for getting an idea of how the equipment works, how the material flows, i.e. before starting to print the model. it allows you to make sure that everything is fine with extrusion and the filament is laid out on the work surface correctly.
You simply lay out the “skirt” with a few lines at a relatively low speed and, by the way it turned out, make a diagnosis. If the "skirt" is printed clearly, you can continue. If not, it is better to interrupt the process and what needs to be adjusted, thus saving time and money.
"Skirts" can also serve as a temperature barrier. The "skirt" can be laid out over the entire work surface to thermally insulate it, leaving only the place where the higher temperature should be maintained.
Or another option: if, for example, you need to isolate the printed object from temperature fluctuations in a draft.
Rafts, brims and skirts are some of the easiest ways to avoid bad grip and skewed print.
For example, printing with ASA UV-resistant filament (like ABS) is very sensitive to rapid cooling, and if there is a draft during cooling, the part may simply crack.
The height of the “skirt” is also possible, it can even be as high as the object itself. This kind of "skirt" will protect the printout from drafts, ensuring uniform cooling. If a "skirt" is used in this way, it may be called a "draft screen".
Finally, if the printer has a dual extruder, an object-high "skirt" can be used to avoid "spider webs" and "blobs". The "skirt" will catch any material that may be escaping from the second extruder before it travels to the object. Then the "skirt" can be called a "leak shield".
Rafts, brims and skirts are some of the easiest ways to improve print results. Yes, you will have to spend more filament, but you will also have to spend it on unsuccessful printouts, which can be avoided with rafts, fields and skirts.
If you're interested in improving print reliability, you might like our Quality Printing Cheat Sheets, which will come in handy when working with any 3D printer and any material. In them you will certainly find some very useful tips that will improve your printouts, no matter how experienced you are in this matter.
In short, a few supportive preventive measures in the form of "rafts", "fields" or "skirts" give a good chance that your efforts will result in a great result.
FAQ for beginners: Rafts, skirts and brims
Technical
Let's try to figure out between rafts, skirts and brim using Simplify3D as an example.

All three methods serve as a starting point for printing a model, but each has its own purpose and benefits.
Rafts
Raft (“raft”) - a horizontal filament mesh located under the model. Rafts are designed to increase the level of adhesion, and are used mainly with ABS and similar plastics that are prone to peeling and curling. In addition, rafts are used as a solid base for the first layers of the model and a raft is needed if the area of touch of the model to the table table is too small (regardless of plastic). Brim, as a rule, does not always help out in this case. If you're only concerned about lack of adhesion, you should move on to Brims, as Brims perform the same task but take much less time to print.
In this example, a raft has been added to the dodecahedron model. It's done like this:
- Import the STL file with the model
- Select "Add a Process"
- Double click on "Process" to open the FFF Settings window Edit Process Settings
- Select Show Advanced
- Select the Additions tab
- Check the box next to Include Raft ")
The Raft Settings dialog box has four modifiable raft building options:
- Raft Layers allows you to change the height of the raft.
 In our example, three coats of were applied.
 - "Raft Offset" determines how far the raft will extend beyond the model print. In our case, the backing protrudes 3mm in each direction.
- "Separation" defines the distance between the raft and the product. The distance will affect the ease of removal of the raft after printing, and can be adjusted according to the model and filament used. Usually this value is set within 0.14-0.2mm.
- Raft Infill controls the density of the raft. The percentage of infill should be high enough for the first layer of the model to come out flat, but not so high that it will then be impossible to tear it off. In our case, 80% filling was chosen.
Play around with these settings and save them with OK. Select "Prepare to print!" ("Prepare to Print!") to go to the preview ("Preview"). If everything looks satisfactory, you can print using an SD card or USB cable.
When finished printing, simply remove the raft from the product. This can usually be done by hand, but in extreme cases a scraper or thin spatula may be needed. At the same time, evaluate the result of the separation settings and the need to change them in the next project.
Skirts The skirt is just a contour line that does not touch the model. Skirts are printed in order to prepare the extruder and achieve smooth extrusion of the filament before printing the product itself. Observing the process of printing a skirt allows you to detect errors in the settings or calibration of the platform in advance. Usually the skirt is printed around the model with a margin of a few millimeters. The number of layers usually does not exceed one, and there may be one or two test circuits. Note: If you have selected the "Supports" option, then the skirt can be moved outside the footprint of the supports.
Skirts may have other uses. When printing ABS, a high skirt can be built - up to the height of the model itself, if desired - to protect the product from drafts that cause rapid shrinkage, buckling and delamination. The high skirt can also be used on printers with two extruders as a "nozzle catcher" to remove plastic residue when changing heads.
Brims
Unlike skirts, brims touch the product, that is, the Separation parameter is set to zero. Brims usually consist of several contours and may consist of 1-2 layers. Brims are often used to stabilize small models or "islands" (i.e. separated areas such as table legs), as the brim helps such parts with small prints stay on the platform.
- Import the STL file and add a process ("Process").
- Double click to open the FFF Settings window.
- Select "Show Advanced", then select the "Additions" tab and check the box next to "Include Skirt/Brim".
When finished printing, simply scrape off the brim with a scraper or rip it off with your fingers
criticisms and additions are welcome...
Follow the author
Subscribe
Don't want
41
More interesting articles
slylis
Loading
11/29/2022
1847
61
Subscribe to the author
Subscribe
Don't want
Greetings! The Chinese bearing crumbled in the midst of printing (8 hours of printing down the drain).