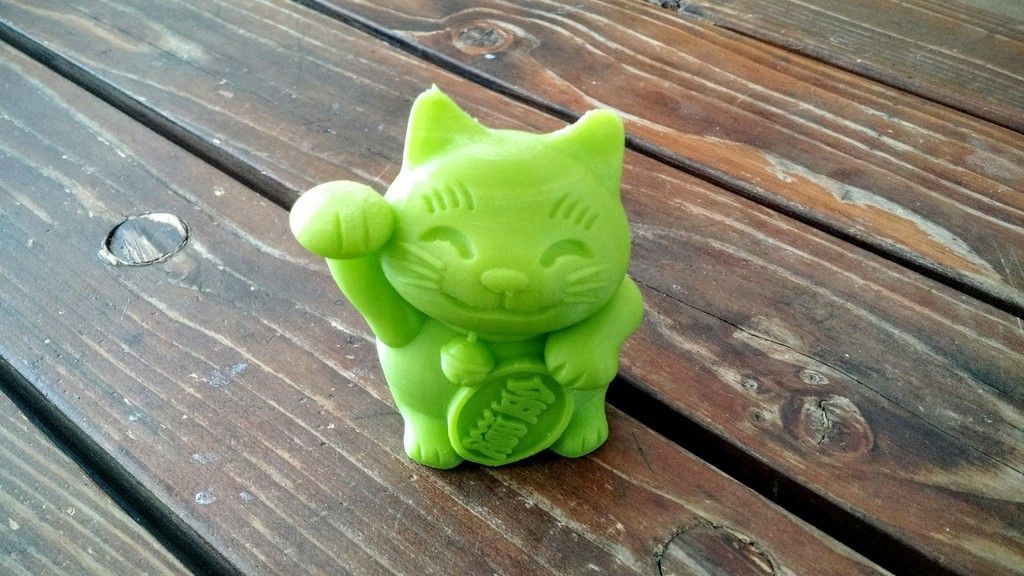
3D print post processing pla
3D Print Post Processing - Ultimate Guide
Get more from your 3D prints with smoother surfaces, improved mechanical properties, enhanced aesthetics, and more.
Get an overview of 16 post-processing techniques in this guide or see some real life examples in the ebook and webinar:
SMOOTH SURFACES
Reduce the appearance of print layers and refine surfaces
Strengthen Parts
Reinforce prints for added strength and durability
ADD FUNCTIONALITY
From UV and weather resistance to conductivity and more
AESTHETIC FINISHING
Transform the surface appearance for visually striking parts
All 3D prints are produced layer by layer, which results in a notched surface texture that is more pronounced with lower print resolutions. If support structures are needed for your part, it may have additional flaws on its touch points. This guide covers the first step to part finishing, support removal, and the three categories of post-processing: Subtractive, Additive, and Material Changing.
Support Removal
Unless your print is optimized for supportless 3D printing, you’ll probably be printing with support structures. These are usually easy to snap off, but even well designed supports will leave behind imperfections where they were once attached. To smooth these areas, it is recommended to post-process the entire part by any number of methods outlined below.
With dual extrusion you can print soluble support structures that disintegrate in water and leave no trace on your part. They’re especially useful when post-processing isn’t otherwise necessary.
SUBTRACTIVE
The most common post-processing category, subtractive post-processing is the act of removing material from the part surface to make it more uniform and smoother.
ADDITIVE
Additive post-processing puts additional material directly onto printed parts. Additive techniques are highly efficient for smoothing parts while adding strength and other mechanical properties.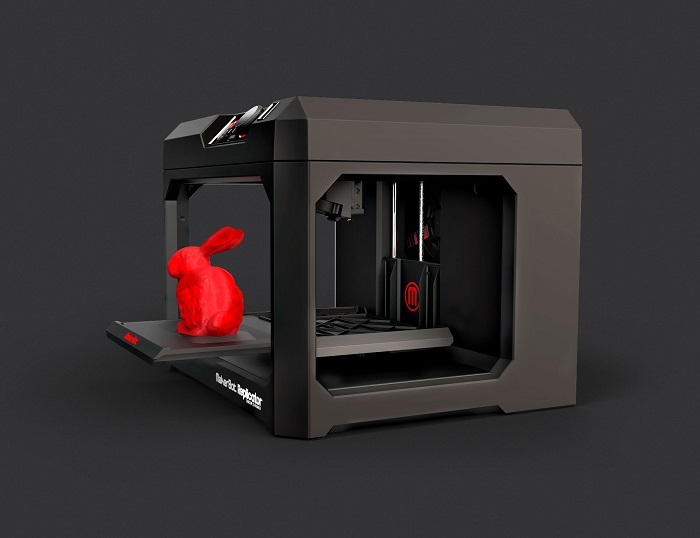
PROPERTY CHANGING
Neither removing nor adding material, property changing post-processing redistributes molecules of a 3D print. Smoother and stronger parts are achieved with thermal and chemical treatments.
Subtractive Post-Processing Methods
Probably the most common post-processing category, subtractive post-processing is the act of removing some of your part’s material. Usually this is in the form of sanding or polishing a part, but there are a variety of other methods that includes tumbling, milling, abrasive blasting, and chemical abrasive dipping.
Sanding & Polishing- DIFFICULTY
- SMOOTHNESS
Both sanding and polishing techniques remove surface layers by rubbing it with an abrasive material. Sanding requires coarser grit sandpaper and sanding tools, while polishing may use finer sandpaper, steel wool, polishing paste, or cloth.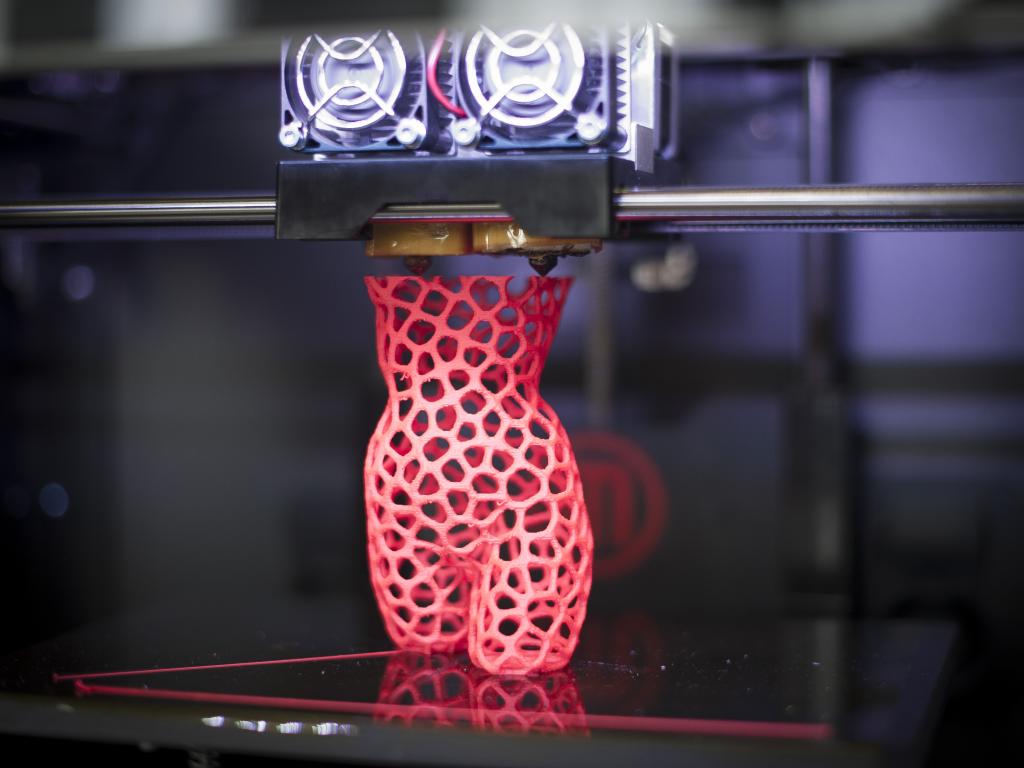
Sanding removes larger blemishes such as support remnants or print irregularities and reduces the visibility of print layers. The sanding process will leave a gritty, although more uniform surface texture, and very course sandpaper will leave surface scratches. Polishing the part after sanding will produce an even smoother surface.
Simplicity and affordability make sanding and polishing the most common methods of post-processing, but both require labor that is time consuming for larger parts and batches. These methods may not be suited for parts with hard to reach cavities.
Tumbling- DIFFICULTY
- SMOOTHNESS
A tumbling machine consists of a vibrating vat containing lubricating fluid and abrasive media, which are specialized stones that wear objects down according to their size, shape, and hardness as they tumble together. A 3D printed part is simply placed into the vat of tumbling abrasive media for a specific length of time. Some expertise is required to pair parts with the correct abrasive media and processing time, but when done correctly it is very effective at producing uniform finishes.
Tumbling is a largely automated subtractive method that can post-process multiple parts simultaneously, which is useful for smoothing batches of parts. Tumbling vats come in a range of sizes so larger parts can also be processed. Since the abrasive media is constantly in contact with the part, larger pieces do not require longer processing time, but only larger machines with the adequate amount of abrasive media. However, complex shapes may lose detail and sharp edges may become slightly rounded by tumbling.
Abrasive Blasting (Sand Blasting)- DIFFICULTY
- SMOOTHNESS
Abrasive blasting, also known as sand blasting, is subtractive post-processing method where abrasive material is blasted onto 3D printed parts at high pressure. For large parts this can be done in an open environment, but smaller parts are typically processed in a containment chamber that collects and reuses the abrasive material. Like other grit-based subtractive methods, there are a range of grits available and grit must be chosen based on part geometry and desired finish. Sand is a frequently used abrasive material, but other small coarse objects such as plastic beads can be used for different results.
Since the abrasive material is smaller than that of tumbling, abrasive blasting is less effective on very rough parts or high layer heights. This method only treats surfaces reachable by the stream of blasted material, so complex geometries and cavities may not be feasible. Additionally, the blasting tool can only treat limited areas at a given time, so this method may be slower and difficult to process multiple parts simultaneously.
CNC Machining (Milling)- DIFFICULTY
- SMOOTHNESS
CNC milling, also called CNC machining, is the inverse of 3D printing - it uses a computer-programmable drill moving (and sometime rotating) in three axes to carve out geometries. Like 3D printers, the technology uses a “G-Code” to program tool movements, in this case a milling bit rather than a filament extruder.
While CNC machining is considered highly accurate from 0.005” to 0.00005”, it cannot produce certain geometries and wastes material, which is often expensive. Conversely, large-format 3D printing cannot achieve the same accuracy, but can achieve much more complex geometries and wastes very little material.
It is typically not time or cost effective to mill the entire surface of a 3D print and it may be difficult to calibrate the milling tool to the print position. But while these two production methods are seemingly at odds, there are some situations where they may be used together. If a portion of a 3D printed part must be extremely smooth or accurate, that specific area can be milled. Alternately, manufacturers can save material by 3D printing a part in a rough finish before milling it to perfection.
- DIFFICULTY
- SMOOTHNESS
Chemical dipping, also called aid dipping, is the process of submerging parts in a chemical bath that eats away the surface. The process involves caustic materials, such as lye, sodium hydroxide, or dichloromethan, and should only be done by experts in facilities with the requisite safety features. The appropriate chemical choice is entirely dependent on the material of the 3D print, as the chemical must be abrasive to the print material.
Some expertise is required to determine how long parts should remain submerged: too brief and the part will not be sufficiently smooth, too long and it could be ruined entirely. Some care should be taken to avoid air bubbles trapped inside the 3D print as they will prevent the chemical treatment of the surface. Typically the submerged part is gently moved to agitate the chemical bath and release any air bubbles.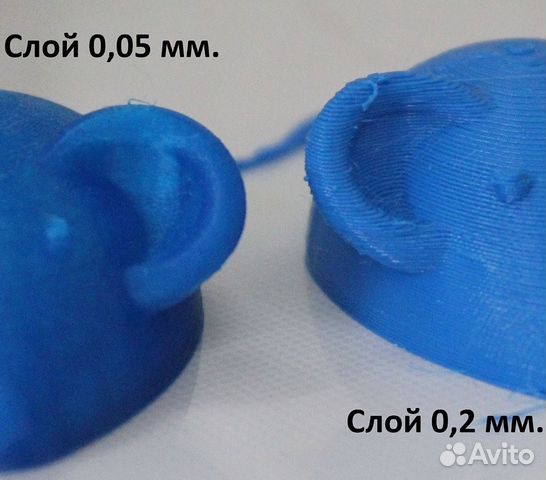
The process is ideal for complex geometries as the chemical bath treats all surfaces of submerged parts simultaneously. However, the size of the chemical dipping container determines the limited part dimensions of treatable prints.
Additive Post-Processing Methods
Additive post processing puts additional material directly onto printed parts and is highly efficient for smoothing parts while adding strength and other mechanical properties. There is a wide spectrum of methods from filling to priming, coating, metal plating, and more.
Filling- DIFFICULTY
- SMOOTHNESS
Filling is a surface treatment that uses a thick adhesive compound, typically a paste, to fill in notches like the tiny gaps between layers of a 3D print. It is commonly used as a first step before sanding or additional additive layers. A wide range of fillers from pastes to sprays are available in many materials from light spackle to 2K resins.
Paste fillers, like wood fillers or household spackle, are usually the most accessible option. They are simply spread over the part surface and can be easily smoothed with light sanding. Spray fillers are easy to apply but provide only a thin surface covering, resulting in a rougher coating. More robust, but more advanced options are resin fillers that must be cured by one of two methods: mixing with a hardener or UV exposure. Resins are available with various viscosity, cure speeds, and advanced features like UV and a high heat deflection temperature. For some UV-cured fillers leaving parts in the sun may be sufficient, but others will require a specialized UV chamber.
When using any kind of resin cover skin, wear gloves, and keep the working space well ventilated. Ensure you’re familiar with the requirements of your filler or coating before applying it to a part as this may drastically change the time or equipment required for post-processing.
- DIFFICULTY
- SMOOTHNESS
Primers prepare 3D-printed parts for the addition of subsequent layers by pre-treating the surface for better adhesion. They are far less viscous than fillers and may only smooth very small surface imperfections, so their main function is adhesive surface preparation. Primers are available in spray or brush form, but spray primer may produce a more even coating.
To prime a part most effectively, the imperfections and layers notches should first be reduced by other post-processing methods such as sanding or filling. Ensure that your primer is made for plastic adhesion and is suitable for additional materials you intend to apply later. Leave the primer to set for 24 hours or as otherwise directed.
Brush Coating- DIFFICULTY
- SMOOTHNESS
Liquid coatings vary widely in material such as paint, varnish, resin, or even plastic. While there are several application methods, brush coating is the simplest way to smooth unique or small batches of 3D printed parts. Although the surface smoothness may be inconsistent due to brush strokes, choosing a material with the proper viscosity can avoid these surface irregularities.
For a robust and smooth surface apply a 2K resin, which is a two-component mixture of resin with a hardener. When combined, the mixture creates an exothermic chemical reaction that cures the resin over a given amount of time. There is a huge range of resin products for a variety of uses: laminating resins for thin surface applications, casting resins for larger volumes, fast and slow curing resins, and resins with additives (like aluminum, for example) for additional performance enhancement such as temperature, UV, or chemical resistance. To achieve the smoothest surface when brush coating, use a resin with an appropriate “self-leveling” viscosity that will even out brush strokes without material dripping off the part. There are resin products specifically formulated for 3D prints that can achieve very smooth surfaces after one coating.
When brushing other materials such as paint or varnish it may be more difficult to avoid brush strokes, but many coatings can be sanded after drying to achieve a smoother surface. It is also possible to apply an additional coating of another material, 2K resin for example, to achieve a smoother final result.
Spray Coating- DIFFICULTY
- SMOOTHNESS
A wide-ranging and scalable post-processing technique, spray coating a offers a number of viable methods ranging from DIY projects to robotic automation at an industrial scale. Spray coatings are available in a huge variety of materials such as paint, varnish, resin, plastics, and rubbers, just to name a few.
The simple approach for DIY projects is a spray can of a chosen material applied in a ventilated/outdoor space. Since this method typically results in minimal surface smoothing, it is recommended to sand the part first and apply several spray coats. Applying a spray primer may help the spray coating adhere to the part. Spray paint can be used for aesthetic enhancements and spray varnish can protect the surface against chipping, wear, and UV damage.
For large volume or industrial spray coating applications, a robotic arm fitted with a spraying tool head can apply a wide range of coatings to a 3D printed part. The application typically takes place in spray booth with an adequate air filter. This method allows a wider range of materials, including 2K spray coatings, primers, paints, and more, and results in higher application precision and uniformity. A robotic arm will speed up the processing time and make high-volume post-processing feasible at an industrial level.
Spray coating is most suitable for finishing large parts, rather than other additive methods such as dipping, foiling, or powder coating. The later methods all require a machine or vat that can contain the entire part, whereas spray coating is only limited by the size of the room in which it is done.
- DIFFICULTY
- SMOOTHNESS
In foiling, or vinyl wrapping, an adhesive foil made of light metals or plastic is wrapped onto an object, often preceded by priming. Commonly known for wrapping vehicles, vinyl wrapping can also be applied to 3D-printed objects with a suitable material. Depending on the material, the foil may increase heat and stress resistance but is often applied for aesthetic enhancement like smoothing and surface quality.
The difficulty of this post-processing technique varies with the size and complexity of your part. A simple geometry, like the gently curved side panel of a vehicle, is relatively easy to foil, but complex shapes are more difficult with some being impossible to foil.
Wrapping is particularly suitable to apply detailed surface designs to 3D-printed parts. Adhesive foils come in a wide range of colors and patterns, as well as custom-printed designs. Foil can be applied by hand, stretching the material over objects to ensure no imperfections like air bubbles remain. Heat guns are often used in the process to make application easier and avoid imperfections. Vacuum foiling will automate the process for faster, precise results to ensure the material wraps around the part as perfectly as possible.
Foiling is usually not suitable for complex parts as the foil will be extremely difficult to apply uniformly and inside cavities.
Dip Coating- DIFFICULTY
- SMOOTHNESS
When dip coating, a part is submerged into a vat of material such as paint, resin, rubber, etc. and removed after a specified time, resulting in an even surface distribution. The part can be redipped multiple times for a thicker coating and smoother surface. Dipping can be used for aesthetic finishing and functional enhancement like increased strength and resistance to heat, chemicals, weather, etc.
The typical dipping process is comprised of five stages:
- Immersion: The 3D printed part is immersed in a vat of material at a constant speed.
- Start-up: The part remains submerged for a specified time for the coating to adhere.
- Deposition: The part is removed at a constant rate as a thin layer of the material is deposited.
- Drainage: Excess material will drip off of the part surface back into the vat.
- Evaporation: As the coating sets the solvent evaporates from the material, leaving a solid film.
Hydro dipping, also known as water transfer printing is a unique method for applying detailed designs onto a 3D print. The part is submerged in a vat of clean water that has a layer of material floating on its surface, typically a water soluble printed film or an oil based paint. As the part passes through the floating layer, the film or paint adheres to the part’s surface. The surface tension of the water ensures that the film curves around any shape. The best results are achieved with parts containing gently curving geometries.
Dip coating is suitable for complex geometries and requires some expertise in the coating material used. The size of the vat determines the dimension of treatable parts. Large prints may not be feasible, although batch processing is possible for smaller parts.
Metal Plating- DIFFICULTY
- SMOOTHNESS
Metal plating is a chemical process where a layer of metal is bonded to a 3D printed part. It is a highly effective method to create 3D printed objects with high resistance to heat, impact, weather, and chemicals, or to create conductive parts.
The first step in metal coating plastic parts is "electroless plating" which metalizes the surface of the print, priming it for proper metal plating. This process ranges from special metal paints that are simply brushed or sprayed onto the part to industrial processes involving numerous steps of cleaning, etching, neutralizing, activating, etc. Typically, this first layer is copper or nickel, although silver and gold layers are also possible.
In the second step in metal plating, the metalized 3D print is submerged in a bath for a specific length of time to deposit a wide range of metals like tin, platinum, palladium, rhodium, and even chrome. In electroplating, the part is placed in a galvanic bath that deposits a thin metal layer from 1 - 50 microns thick. Anode and cathode ions pass through the liquid and adhere to parts in microscopically fine layers. Additional metal plating processes can build up the metallic surface thickness or deposit a different metal material.
When using a metal-acid solution, parts are submerged in the liquid solution for a specific duration, depending on the desired plating thickness. A chemical reaction attracts and adheres the metal ions to the surface of the part. Once removed from the bath, the part can receive a protective coating to prevent oxidation, corrosion, or tarnishing. Heat treatments may be used to strengthen the metal layer adhesion and prevent brittleness.
Metal plating typically works well for complex parts and can produce a range of surface qualities, smoothness, and mechanical enhancements. However, the process requires many stages and expertise.
Powder Coating- DIFFICULTY
- SMOOTHNESS
With powder coating, also known as rotational sintering, a part is heated and rotated within a cloud of powdered plastic. As the powder compound meets the heated part, it is melted to the surface to produce a fine coating. Due to surface tension while spinning, the adhered powder produces a homogeneous, non-porous layer about 400-microns thick. The surface is typically not glossy smooth, but rather has a fine matte texture caused by the plastic cloud particle size, typically 2-50 microns.
Powder coating is a common method for protecting large metal components, but it is difficult to achieve with 3D prints. In traditional powder coating, the metal parts experience temperatures up to 200 °C, but the lower temperature resistance of most 3D printed plastics greatly limits the use of a post-processingsing method. When possible, powder coating is highly efficient for batch production with uniform surfaces, although cavities may be difficult to post-process.
Property Changing Post-Processing Methods
Neither removing nor adding material, property changing post-processing redistributes molecules of a 3D print. Smoother and stronger parts are achieved with thermal and chemical treatments.
Local Melting- DIFFICULTY
- SMOOTHNESS
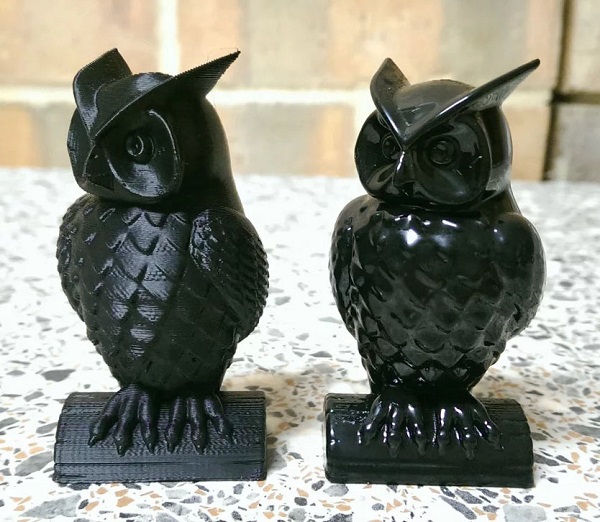
Local melting is an easy way to reduce the appearance of surface scratches from damage, support removal, or abrasive post-processing like sanding.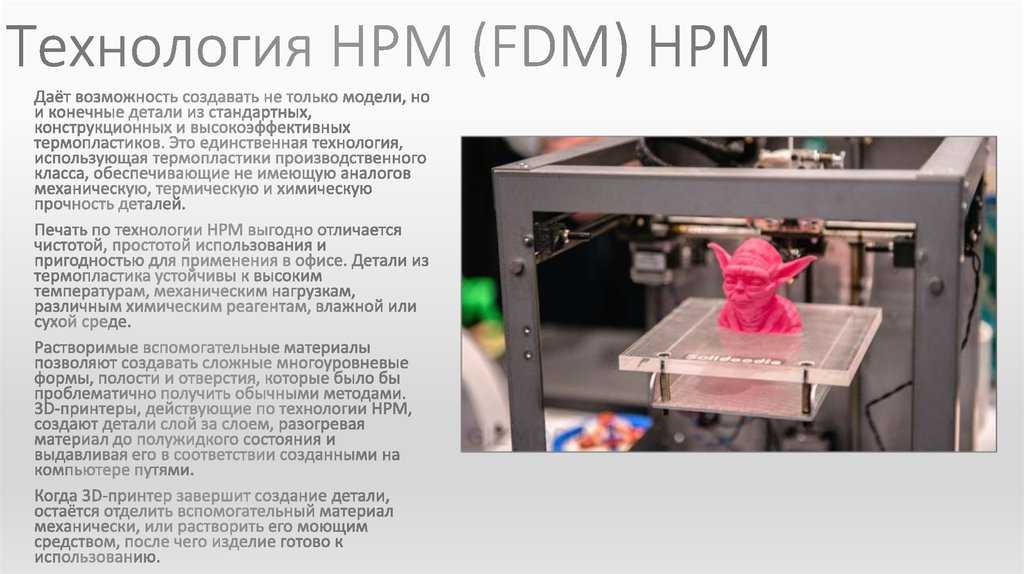 Rough surfaces are particularly visible on dark-colored 3D prints, which appear to be a white-ish color. Using a heat gun set to high heat, quickly pass hot air over the area requiring treatment, keeping the heat gun 10-20 cm away from the part. Within seconds, the surface will melt to resemble the original print surface quality. A heat gun can also remove strings from travel moves during printing. Using the same method as described above will melt and shrink the strings. If the strings are large, small remnants may cling to the part but are often easily removed by brushing or clipping them off.
This method is not suitable for deep scratches as it is only effective for light surface roughness. It also can easily deform the part, so take care to limit the time an area is heated. The best results are achieved by sweeping hot air across the surface for several seconds. Local melting is not recommended for overall surface smoothing, but for the easy and effective smoothing of small defects and scratches.
- DIFFICULTY
- SMOOTHNESS
Annealing is the process of heating a print to re-organize its molecular structure, resulting in stronger parts that are less prone to warping. Untreated 3D prints have an amorphous molecular structure, meaning that the molecules are unorganized and weaker. Being a poor heat conductor, the extruded plastic cools quickly and unevenly during the printing process causing internal stresses, particularly between print layers. These stress points are most prone to breakage.
To strengthen the part at its molecular level, it is heated to its glass transition temperature, but below its melting point. Achieving the glass transition temperature allows the molecules to redistribute into a semi-crystalline structure without melting the part to the point of deforming. Glass transition and melting temperatures vary between materials and some expertise is required to heat parts to the correct temperature for the proper length of time. 3D prints will shrink during the annealing process, which can be corrected by increasing the original printing dimensions accordingly.
- DIFFICULTY
- SMOOTHNESS
Vapor smoothing is the chemical process of smoothing 3D prints in which parts are exposed to vaporized solvents in an enclosed chamber. Similarly to chemical dipping, the correct solvent must be used in correspondence with the 3D print material. The cloud of solvent dissolves the surface of the print, while its surface tension redistributes the dissolved material, resulting in a smoother finish. Unlike chemical dipping, no material is actually removed from the part.
Solvents can either be heated to a gaseous state or vaporized by ultrasonic misting. The 3D print is exposed to the vaporized solvents for a specific length of time: too short and the part is not adequately smoothed, too long and the part can deform and become brittle. Most suitable solvents are caustic and combustible, and therefore require extreme levels of caution, adequate chemical containment, and disposal, and should only be handled by qualified persons.
Many vapor smoothing machines are available for use with a variety of solvents suitable for different print materials. These machines make the process automated and much safer, but most can only treat smaller parts due to the chamber's limited dimensions.
Post-Processing eBookFor real life industrial examples, download our free eBook Post-Processing for FFF Prints and see this webinar about post-processing techniques.
The eBook explores the three types of FFF post-processing techniques: 1) Material Removal, 2) Material Addition and 3) Material Property Change. Also, learn more about how various techniques like high resolution tumbling, resin coating and aluminum plating are transforming 3D printed parts.
3d Printing Post Processing FAQs
What is 3D printing post-processing?
Once the printer has finished printing, there may still be some work to do on the printed piece. For example, many shapes require supports to print properly. Removing those is a post-processing task. Some people might want to sand or put a finish layer onto a piece. Resin, as opposed to filament, based prints need to have any uncured resin washed off and final curing under UV light.
3D printing post processing is used to enhance the surface properties of prints in many aspects to deliver improved mechanical performance and aesthetic appearance. By improving these key surface characteristics, post processing widely extents the range of use cases and applications across all industries. 3 types of post-processing techniques can be applied to fused filament fabrication (FFF) prints:
- Material Removal
- Material Addition
- Material Property Change
How do you post process PLA 3D prints?
Almost every 3D print requires some sort of post-processing after it’s printed.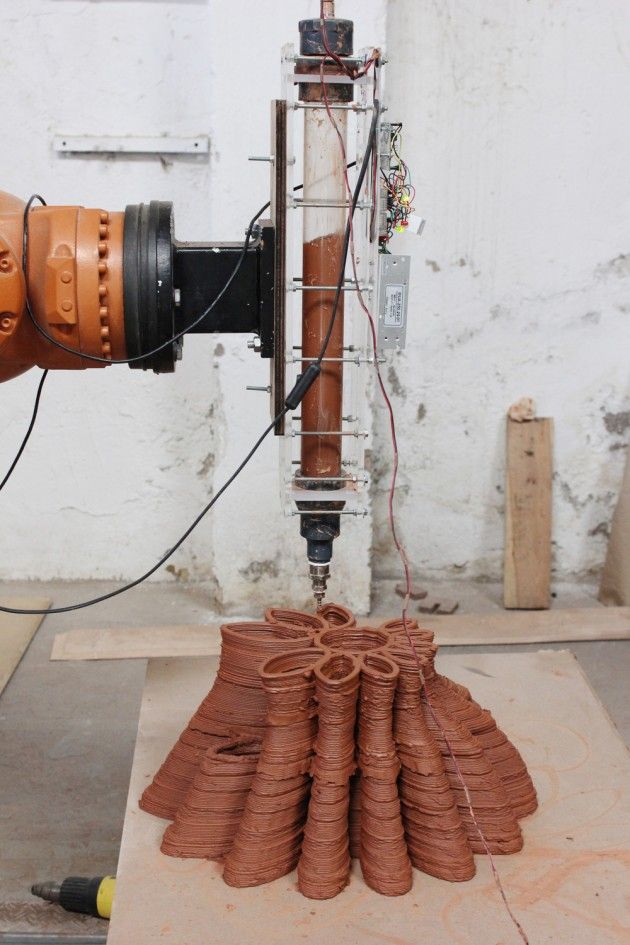
Usually this involves 3 steps:
- Removing support structures
- Sanding or polishing
- Painting or coating
What is the most critical step in the post processing process of 3D printing FDM parts?
When post processing your 3d printed part, there are 2 steps that are most critical:
- Removing the part from the print bed
- Removing the support structures from the part
In both steps you need to be careful, not to break your 3d printed part. To lower these risks, you can try using flexible print beds and water-soluble support material.
How do I complete FDM parts?
When producing your FDM part, often the finished look matters just as much as the functionality. There are 4 ways to complete FDM parts.
- Remove any support structures
- Smoothing your print
- Filling the gaps
- Painting your part.
Can acetone smooth PLA?
When PLA and acetone smoothing works, it's due to other materials added to the PLA. Most PLAs and similar non-acetone-dissolving 3D printer filaments cannot be smoothed the same way. That's because PLA in its pure form is not reactive to acetone.
Do I need to cure 3D prints?
It is necessary to cur SLA prints; you don’t have to cure FDM prints. Even though cleaning off any uncured resin is a great start, the step that really brings out the quality of your 3D print is the curing . A high wavelength UV light has the intensity to cure the entire part, it just takes longer for thicker, more solid parts.
Post Processing For PLA Printed Parts : Easy Techniques
ADVERTISEMENT
Table of Contents
Did you know that PLA is the only polymer that’s made from renewable resources? Some of the raw materials that go into the making of Polylactic Acid are corn starch, tapioca roots, or sugarcane.
Due to this anomaly, the material is used in making packaging that stores food, devices that go inside the human body and return without causing any infection, manufacturing insulating parts, in the textile industry as well as cosmetics industry.
So how come, such a delicate material is utilized in such a sophisticated range of applications?
Well, good quality 3D printing PLA parts functional prototypes is definitely the first answer that will pop up to your mind. But do not forget to include with that answer, PLA post-processing!
There is a lot that’s meant to be taken care of while creating 3D printed objects using PLA because its properties are different than that of ABS.
Having stated so, there’s even more attention need on PLA post-processing. And while the former is generally paid attention to, there are doubts whether the latter is paid necessary notice to.
This partiality can be for any reason, the most common one being, there is not enough information available out there for PLA post-processing as much as it is for its 3D printing.
So, today we’d like to draw your attention to PLA post-processing: the procedure that will make your PLA 3D printed parts or functional prototypes shine out.
And although it depends on the type of product you’ve manufactured and its application, we’ll explain to you all the steps involved. Starting from pre-sanding, ending with painting!
Once your PLA 3D printed part has gone through these steps, you’ll never like to deliver parts without post-processing. It’s that effective.
ADVERTISEMENT
Easy techniques for PLA post-processing
To make your final parts showroom-ready, they need to undergo the process of post-processing which can be divided into two categories:
- Cleaning
- Finishing
The first category involves; pre-sanding, sanding, and smoothing, whereas the second category comprises priming and painting. Painting of PLA 3D printed parts can be done using two methods:
- Brush.
- Spray.
In this guide, we cover the painting with the spray because that’s lesser time-consuming and risk-involving.
The selection of paint is completely dependent on the solvent you use during the smoothing process. However, the most common ones are oils, enamels, lacquers, and acrylics. Expert’s recommendation for beginners is to use acrylic paints as they dry fast and can be cleaned with water.
Pre-sanding
Some of the equipment used in this process are craft knives, sandpaper, tweezers, toothbrush, and pliers.
With the help of these equipments, you need to trim the rough printed surfaces, for example, features such as support stubs.
An effective pre-sanding process involves making the part free of protrusions before it travels to another stage i.e. Sanding.
At times, you would not even need these equipments and use bare hands to do this. Only if it doesn’t work, you can use a knife to ensure the task is accomplished.
The target is to guarantee a part that doesn’t have bumps or protrusions while it reaches the sanding stage.
ADVERTISEMENT
Sanding
There are sandpapers available in the market of varying grit quality. For PLA post-processing, you are advised to begin with 120 grit sandpaper and get a grip while doing circular motions for getting rid of scratches.
Sides are the spaces that will demand more attention than faces. You are advised to avoid the edges, corners, and other fine details because 120 grit sandpaper will be too strong for such small details and you might end up damaging your part.
Remember, sanding is done for smoothing the malformation therefore it could be time-consuming depending on the size of your print or the finish you are aspiring for.
So, you have to be pretty clear in your head about the quality you wish to have. Depending on the same, you will have to decide how much sanding is needed.
For example, you’ve completed sanding the part with 120 grit sandpaper and still not achieved the quality you require; carry on with 200 grit sandpaper.
Although this would not be the case with every PLA 3D printed part, it can be in some rare scenarios.
After you are done with 200 grit sandpaper, start using water to prevent clogging and getting a finer surface finish. Feeling the surface of your part at intervals will give you an idea of its exact smoothness.
On touching if you find it good enough, move on; if not, continue sanding. In case you are willing to use a power tool you are requested to not do so otherwise the high vibrations created by electric tools will easily melt this plastic.
ADVERTISEMENT
Smoothing
Arguably the most important step in PLA post-processing is Smoothing. Sanding alone can never completely eliminate layer lines present on the PLA printed part.
For eliminating it, you need to apply a polishing compound, the one that’s sold in bars, just like sandpapers are sold in the market.
Although these compounds are designed to be used with metals, they work well with plastics too. Application of a wiped-off compound onto a buffer wheel or attaching for a rotary tool on the plastic will provide a smooth and shiny finish.
Another method to smooth PLA 3D printed parts is with a primer spray print like Rustoleum. XTC3D from smooth-on also works fine.
The two liquids that go into the making of the latter create a resin-like material that can be brushed on the PLA printed part.
It does not melt the plastic, but the resin definitely heats-up providing a smooth end result and hard exterior which can be painted over as the final coating.
Priming
Just as we are halfway through the article, so are we in terms of PLA post-processing. Priming is a process that gives your 3D printed part a professional look and creates a flawless final surface that is ready for display.
Spray-on primer is generally preferred with PLA 3D printed parts because it quickly covers the entire surface with an even coating and it’s different from brush-on primers that are good for final touch-ups.
Steps of applying spray-on primer
- In simple words, start with swirling the spray primer in a circular motion until it covers the entire PLA printed part. And avoid shaking the primer as well as the object; otherwise, it can cause bubbles when the coat is sprayed.
- Hold the primer ten to twelve inches away from the printed part and apply rapid strokes. Keep on rotating the part as you spray. If you want, you can mount your model on support where it can freely and steadily rotate to ensure the spraying process is uniform.
- After having completed the second step, check for areas that need extra sanding or filing. In case any of these is required, clean off the dust from the part before respraying. To get a smooth surface, an option that lies in between sanding and spraying is using spot putty for rebuilding the blemishes. It is applied using a scrapper. You can spread it across the part for filling the gaps, but detailing is a must while doing this.
- Finally, you can spray the last coat over the PLA printed part. Here too, rapid strokes are recommended. Don’t apply thick coating; be as light as you can. Make sure you do not build up and drip.
ADVERTISEMENT
Painting
This is the last step of PLA post-processing. Before doing this, you are required to have a mental image of the finished part that you are working for. As you might have guessed, painting is similar to priming.
For painting your PLA 3D printed part you’ll need a painter’s tape and a spray print.
The former will stick firmly to the surfaces and come off cleanly. It will also mask some of the areas and prevent paint from entering in.
The latter is recommended because these come in different colors and finishes. Also, they are very compatible with plastics.
Steps of applying paint on PLA printed parts:
- Start by holding the nozzle of your spray near the rotating model and start moving your hand quickly.
 Advice is to start with two light coats of paint and end with three to four depending on the requirement. In between i.e., after applying two light coats and before applying three or four coats, wait to avoid sagging. In case you wish to refine the surface, buffing and polishing the paint surface is recommended only in scenarios you actually feel the need to do so.
 - Like you have highlighted in the drawing, you have additional topcoats for preserving details. Topcoats are thinner than the first or second coats. After applying topcoats patiently wait for the color to dry and see if it has saturated in the way you wished it had.
- In case you wish to seal the printed model, you can finish by applying a clear coat over the already applied coats. Application of the clear coat in one or two thin and even layers and then waiting for ten minutes is recommended. The painting is considered to be done by now. And if you wish, you can polish or wax it further in case you wish to get a super glossy finish.

ADVERTISEMENT
What Are The Points To Remember While PLA Post Processing?
- For making certain that you have clean and sharp edges between colors, you will have to remove the tape correctly after masking the PLA 3D printed part. While doing so, do not worry about coating the mask because the tape will prevent paint to enter any parts you do not wish it to enter.
- The first coat is meant for blocking the neutral color of the primer and hence it’s only recommended when you need rich color in parts and functional prototypes. White is recommended for first coats on objects that will be finally of light colors and vice versa for black.
- Topcoats on any prints are optional. In case you are looking for a contrast, it will enable you to create gradients of rich color mixtures. Whereas, if you want the first and second coats to manifest, don’t stress much on topcoats.
- Intricate PLA printed parts look eye-catchy when they are printed in layers.
 This is applicable even with a first coat which is the rudiment for the complete painted model. Here there is a scope of improvisation depending on the details you wish to highlight, create reflections or get some specific kind of appearance.
ADVERTISEMENT
The Conclusion
Creating smooth and eye-catchy PLA 3D prints will always require a good number of effort. Sanding is the basis of complete PLA post-processing that prepares your part for processes and hence creates nearly flawless prints.
A point to note is, all the processes mentioned in the above article will remove material in some of the other amounts from your print. For example, if your 3D printed part has sharp edges, it will dull out. And you will find it hard to work with fine detailing in such parts.
Smoothing works fine particularly when you have designed your model into sub-assemblies. Each piece gets separate attention which increases the quality of surface finish of complete part or functional prototype after the finishing of post-processing.
Painting and priming should be done in a controlled environment especially where there is lesser to the point of negligible winds or drafts.
Even the slightest movement of air will change the direction of paint emitting out from the nozzle of your spray.
Spraying too close or too far from your PLA 3D printed part will end up with noticeable drips and gaps respectively.
For ensuring good printing while PLA post-processing, we advise you to paint your part while keeping it on a stand.
Take care of the spray prints because they are hazardous, toxic, and flammable. The best way to paint is to take full safety measures, wear proper clothing, gloves, and mask.
Plastic processing for 3D printer. Plastic post-processing after 3D printing ABS, PLA, Nylon, Petg
Contents:
- Post-processing of FDM parts
- Remove supports
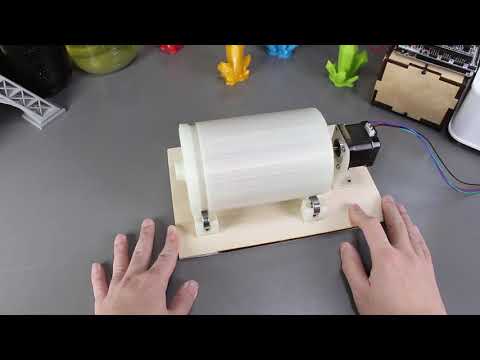
- Removing Soluble Supports When Printing With Dual Extruder 3D Printer
- Sanding plastic 3D printed products
- Application of Acetone in ABS plastic processing
- Filling irregularities in ABS plastics
- Polishing ABS/PLA
- Priming and painting 3D printed products
- Acetone baths for ABS products
- Chemical solvent baths
- Using epoxy to finish prints
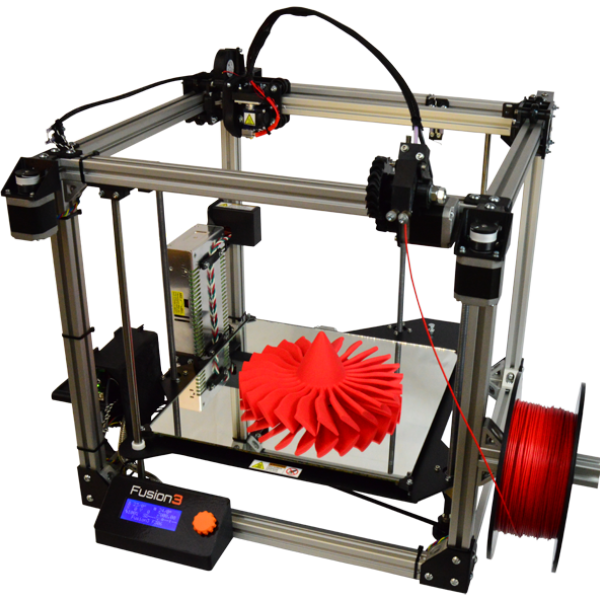
Hello everyone, Friends! With you 3DTool!
With the FDM 3D printing , you can quickly and economically produce plastic parts of any geometric shape. Finished parts show visually the lines of the layers they were printed on, making post-processing an important consideration if a smooth surface is required. Some post-processing techniques can also increase the strength of finished products by helping to reduce their anisotropic properties.
This article will discuss the most common post-processing techniques in FDM 3D printing .
Catalog of FDM 3D printers
Post-processing of FDM parts
This picture above (from left to right) shows the post-processed parts FDM :
- gap filling
- raw
- sanded
- polished
- painted
- epoxy coated
Remove supports
Support removal is typically the first step in post-processing for any 3D printing technologies if the part requires support for precision manufacturing.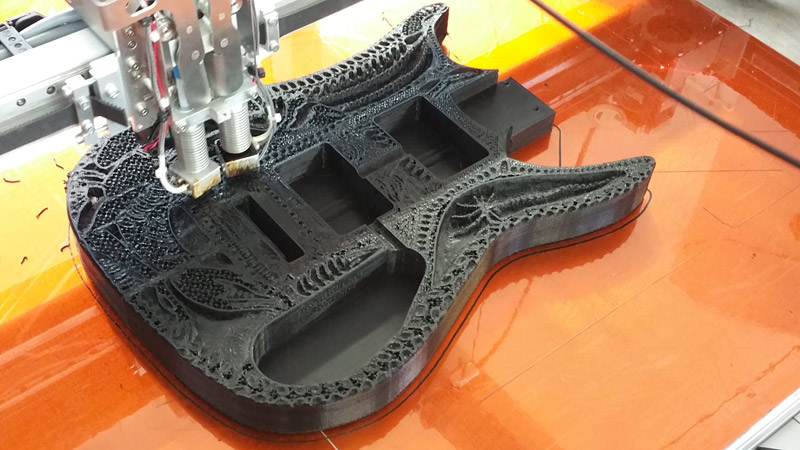 Supports can usually be divided into 2 categories: standard and instant .
Unlike other post-processing methods discussed in this article, support removal is a requirement and does not result in improved surface quality.
Removing supports mechanically is necessary when printing with a 3D printer with a single extruder (for example, PICASO Designer X, Hercules 2018, Zenit, Prusa i3 Steel Bizon) When using 3D printers with two extruders, as a rule, the supporting part of the product is made of special soluble materials.
Catalog of 3D printers with two extruders
Left to right. Original print with support, poor support removal and quality support removal.
Tools and materials you will need for this job:
- Pliers
- Set with small tools (eg watchmaker's set).
Support Removal Process: The support material can usually be removed from the finished model without much effort. Cleaning of the substrate material in hard-to-reach places (for example, in holes) can be done using an awl and pliers. Properly positioned support structures and proper print orientation can greatly reduce the impact of the support material on the aesthetics of the final result.
Plus
- The overall geometry of the part does not change
- Fast on time
Cons
- Does not remove visible layer lines, streaks or spots on print surface
- If support structures leave excess material or marks behind, the accuracy and appearance of the part will be reduced
Soluble support removal when printing with a 3D printer with two extruders
As we said earlier, the removal of supports printed from soluble materials is done differently than manually, mechanically, so the use of 2 or more extruder printers is preferable. (e.g. PICASO Designer X PRO, Raise3D PRO2)
Catalog of 3D printers with two extruders
Tools and supplies you will need for this job:
- Solvent safe container
- Thinner
- Ultrasonic cleaner (optional)
Process : the final model is placed in a bath with the appropriate solvent (for example, for PVA plastic it will be ordinary water, for material HIPS it will be D-limonene ) until the support material dissolves. Support is usually printed with:
- HIPS (in conjunction with ABS )
- PVA (in conjunction with PLA )
Glass storage containers such as jars are excellent receptacles for diluting limonene. For dissolution in water, any non-porous container will do. For prints using HIPS/ABS bath with a 1:1 ratio of limonene to isopropyl alcohol works very well for quick support removal. Many other auxiliary materials such as PVA (used with PLA ) are water soluble.
Helpful Hint: Speed up the dissolution time of the support material by using an ultrasonic bath and changing the solution as soon as it becomes saturated with plastic dissolved in itself. Using a warm (not hot) solvent will also speed up the dissolution time if you don't have an ultrasonic cleaner available.
Catalog of ultrasonic baths
Pros
- Great for complex geometries where standard support removal would be impossible without damaging the base model.
- This results in a smooth surface where the support structure is in contact with the base piece.
Cons
- Improper dissolution of the material can lead to discoloration and deformation of the entire part.
- Does not remove visible layer lines, streaks or spots on part surface
- May cause small spots or holes in the final print if soluble material gets on the object during printing
-
Sanding plastic 3D printed products
Sanded brown ABS plastic part
Tools and materials you will need for this job:
- Sandpaper up to grit 1000
- Rags
- Toothbrush
- Soap
- Face mask
Sanding process: After the supports have been removed or dissolved, sanding can be performed to smooth the part and remove any visible stains or traces of the supports. The initial grit size of the sandpaper depends on the layer height and print quality.
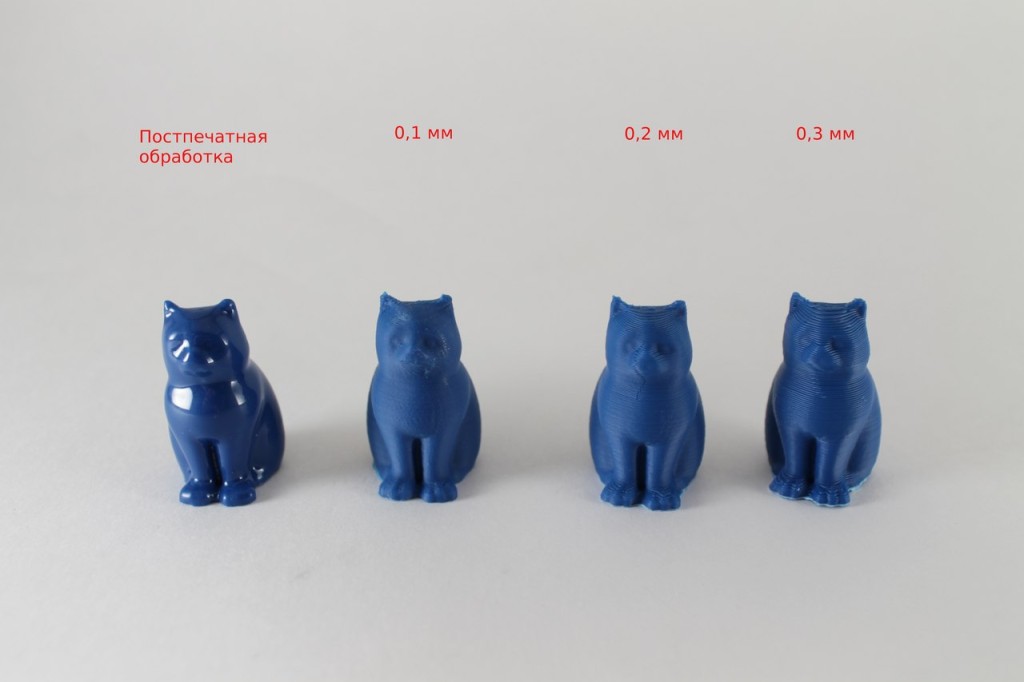
For layers with a height of 0.2 mm or less, or if there are no spots left on the part after printing, sanding can be started with a paper grain of - 150.
If there are obvious spots or the object was printed at a layer height of 0.3 mm or more, start sanding with 100 grit paper.
purity. The print should be cleaned with a toothbrush in soapy water and then with a rag, between sanding gradations to prevent the accumulation of dust and " sintering ". Your FDM parts can be sanded down to 5000 grit to achieve a shiny part surface.
Helpful Hint:
Always sand in small circular motions evenly over the entire surface of the part. Of course, it is more convenient to sand perpendicular or even parallel to the print layers, but this can lead to indentations in the model. If the part becomes discolored or if there are many small scratches after sanding, you can use a blow dryer. With it, you gently heat the part, thereby softening the surface a little and visible unnecessary defects will weaken or disappear altogether.
Pros
- With this method, you get an extremely smooth surface
- This method facilitates additional post-processing (such as painting, polishing, or epoxy coating)
Cons
- Not recommended for thin wall prints as this may damage part
- Difficult for surfaces with difficult geometries and fine details
- May affect overall print accuracy if sanding is too aggressive and too much material is removed
Acetone for ABS plastics
Two white printed halves of ABS bonded with acetone and diluted plastic.
Tools and materials you will need for this job:
- Acetone
- Cotton buds or brush
Machining process: When the size of the finished part exceeds the maximum size of the 3D printer's camera, the model often has to be broken into smaller parts and reassembled later by gluing. For PLA and other materials, bonding can be done using the appropriate adhesive (selection of adhesive will depend on the plastic) . For ABS plastic, multi-piece assemblies can be glued with acetone. The mating surfaces should be lightly moistened with acetone and held firmly together or, if possible, clamped until most of the acetone has evaporated. At this point, the two parts of your model will stick together.
Helpful Hint: increasing the contact area with acetone will increase the strength of the joint. This can be done by including block connections in the design.
Pros
- Acetone will not discolor the part surface like other adhesives
- After drying, the seam will exhibit ABS properties, making further processing easier and more uniform
Cons
- The joint formed by this cold welding is not as strong as a solid impression
- Excessive use of acetone can lead to aggressive dissolution of the part and adversely affect the final result and tolerances
-
Filling irregularities in ABS plastics
The gray ABS model had voids after sanding.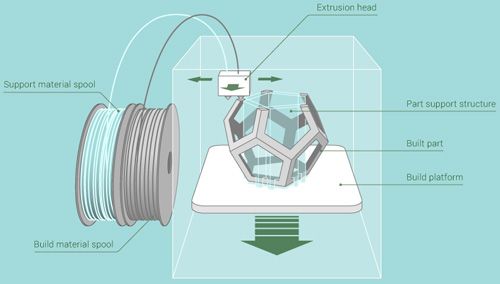 The surface became smooth.
Tools and materials you will need:
- Epoxy resin (for small voids only)
- Automotive Putty (large voids and joints)
- ABS plastic and acetone (for small voids only and for ABS parts only)
Process: After sanding or removing soluble backings, gaps often appear in the print. During printing, gaps are sometimes formed, and often this pattern is unavoidable. Small gaps and voids can be easily filled with epoxy and no further treatment is required. Large gaps, or gouges, left from attaching model assembly parts can be successfully filled with automotive putty, which will require additional sanding after drying.
The putty gives excellent results and can be easily sanded and painted after it has fully cured. The connection will be strong, and will not weaken the plastic. Conversely, autofiller parts tend to be stronger than native plastic.
ABS print gaps can also be filled by making a slurry of ABS filament and acetone ( ABS juice or ABS juice ) that chemically reacts with the part and penetrates any surface voids. A ratio of 1 to 2 between ABS and acetone is recommended. This method will not significantly affect the surface finish around the gap if properly applied.
Help Tip : If gaps are visible on FDM parts before sanding, fill them with epoxy and then sand once until dry. This will greatly reduce the overall time required to achieve a smooth surface.
Pros
- Epoxies are easy to sand and prime, making the surface easy to paint
- ABS juice will be the same color as your part, as long as you use the same filament by color and manufacturer. Therefore, there will be no discoloration of the surface
Cons
- Auto putty or other polyester epoxy will dry opaque resulting in discolored spots on print
- Requires additional sanding to achieve uniform coverage
- May affect overall print accuracy if sanding is too aggressive and too much material is removed
ABS and PLA polishing
Catalog of ABS plastics
Catalog of PLA plastics
Tools and supplies you will need
- Polish
- Sandpaper
- Nonwoven wipe
- Toothbrush
- Microfibre cloth or polishing pad
Process: Plastic polish can be applied after sanding the surface to give standard filament products such as ABS and PLA a glossy finish. After the part has been sanded to 1000 grit, wipe off any excess dust from the Non-woven » cloth, then clean it in a bath of warm water with a toothbrush.
Allow the piece to dry completely and buff it with a buffing pad, or by hand with a microfiber cloth and a jewelry polish designed specifically for plastic and synthetics that provides a long lasting shine.
Other plastic polishes, such as car headlight polishes, work on the same principle, but some may contain chemicals that can damage the original material.
Helpful Hint: For polishing small parts, attach the polishing pad to the Variable Speed Drill (or other rotating tool such as a drill) . Bench grinders equipped with a polishing wheel can be used for larger, stronger prints, but don't polish too long in the same place. This can cause the plastic to melt due to friction.
Pros
- Polishing is applied without the use of any solvents, which can deform the part and change the accuracy tolerances.
- When properly ground and polished, the part will give the impression of a mirror finish, imitating plastic injection molding
- Plastic polish and cleaner is very economical, making this method quite profitable for a quality finish
Cons
- The part must be carefully sanded before polishing if a mirror finish is required. This may affect tolerances
- Primer/paint may not adhere to surface after polishing and you will need additional products
Priming and painting 3D printed products
White PLA part spray painted gray
Tools and supplies you will need:
- Nonwoven wipe
- Toothbrush
- Sandpaper
- Aerosol Acrylic Primer
- Polishing agents
- Masking tape (only if using multiple colors)
- Gloves and petal mask
Finishing process: after the part is properly sanded (up to 500 grit sandpaper is required at this stage) , the print can be primed. The primer should be applied in two coats using an aerosol can.
An aerosol primer designed for painting models will provide an even coverage and be thin enough not to darken the part before painting.
A thick primer, such as one available at the hardware store, may stick together and require more sanding.
Apply the first coat in short, quick strokes at a distance of about 15 - 20 cm from the part to avoid the formation of a thick layer of primer. Let the primer dry and sand down any imperfections with 9 grit sandpaper.0031 500. Apply the final coat of primer with light, quick strokes.
Once the primer is complete, painting can begin. Painting can be done with acrylics and artist's brushes, but using an airbrush or spray can give a smoother surface.
Hardware store spray paint tends to be thicker and harder to control, so it's best to use paints made specifically for painting models.
The primed surface should be sanded and polished (sanding and polishing sticks used in nail salons are ideal for this application) and then cleaned with a non-woven cloth.
Paint over the model using very light layers; the first few layers will look translucent. Once the paint has formed an opaque coat of (usually after 2-4 coats) , allow the model to dry for 30 minutes to allow the paint to set. Carefully polish the paint layer with nail sticks.
Multi-colour models can be painted with masking tape. Once all layers of paint are ready, remove the tape and buff the paint using polish paper. Polishing paper such as 3M or Zona can be purchased in a variety of grit sizes. You can buy it in a pack in many online stores. It will give the paint a shine that cannot be achieved in any other way.
Helpful Hint: Do not shake the can when using spray paint! The goal is to mix the pigment or primer, shaking the propellants will cause bubbles to form in the aerosol. Instead, rotate the jar for 2-3 minutes. The stirring ball should roll, not rattle.
Pros
- Professional results with attention to detail
- Excellent appearance of the final product, regardless of the material/color in which the object was originally printed
Cons
- Paint and primer will increase the volume of the model, which will change the tolerances and can cause problems if the part is part of the assembly
- Buying a high quality spray paint or airbrush is not cheap
Acetone baths for ABS products
Smoothed black model of a petal with a spherical surface made of ABS plastic after an acetone bath.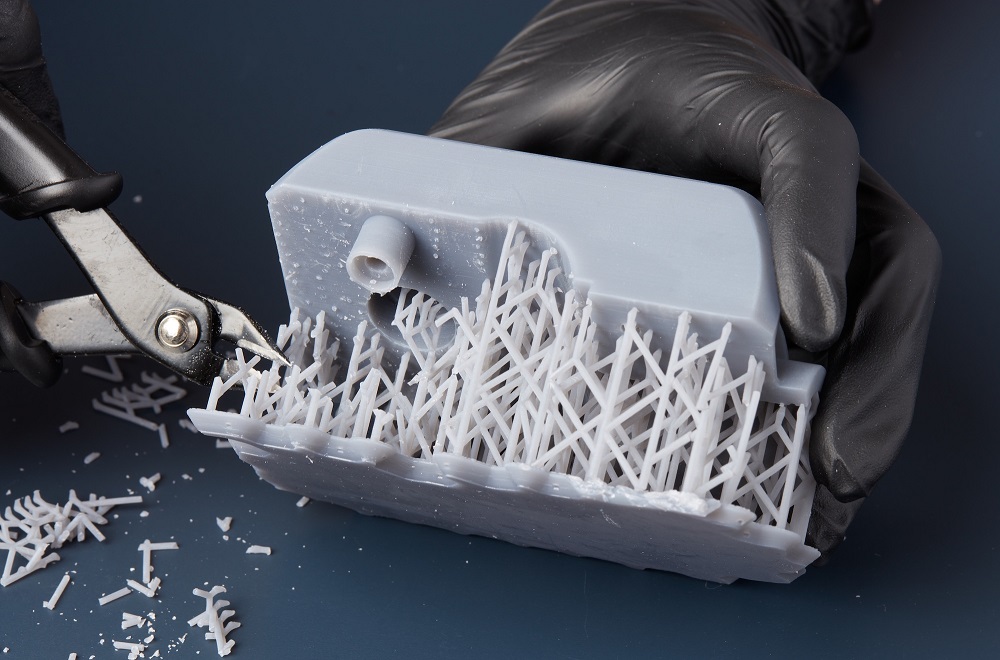
Tools and materials you will need:
- Non-woven cloth
- Sealed container
- Thinner
- Paper towels
- Aluminum foil (or other solvent resistant material)
- Face mask and chemical resistant gloves
Process: line the chosen container with paper towels along the bottom and, if possible, up the sides. It is very important that the steam does not disturb the chamber itself. The chamber may be sealed.
It is recommended to use glass and metal containers.
Pour in enough solvent to dampen but not drown the paper towels. This will also help them stick to the side walls of the container.
Acetone is well known for its ability to smooth out ABS parts. For PLA, smoothing is possible with various solvents, they work well, but generally with PLA, it is more difficult to get a smooth surface than ABS.
IMPORTANT! When working with any solvent, please follow the safety regulations for the chemical and always follow the appropriate safety precautions !
A small "raft" of aluminum foil or other solvent-resistant material should be placed in the middle of a lined paper towel container.
Next, place your part on this raft (either side selected as the bottom on the raft) and close the lid of the container.
Steam polishing can vary in duration, so check the print periodically. Heat can be used to increase polishing speed, but care must be taken to prevent the buildup of potentially explosive fumes.
When removing the part from the chamber, try not to touch it at all, leaving it on the raft and removing it from the container. Any points of contact with the part will generate surface defects because the outer shell will be half dissolved. Allow parts to dry completely before use.
NOTE . Many aerosol and/or spray solvents are flammable/explosive and solvent vapors can be harmful to human health. Be especially careful when heating solvents and always work in a well ventilated area.
Pros
- Smooths out many small spots and reduces layer lines present in the print without any additional work
- Creates a very smooth "shell" around part
- A very fast method that can be implemented with improvised means
Cons
- Doesn't "heal" gaps or completely mask layer height
- The dithering process "dissolves" the outer shell of the print and therefore the tolerances are greatly affected
- Negatively affects print strength due to changes in material properties
Chemical solvent baths
Tools and supplies you will need:
- Solvent safe container
- Thinner
- Hook or small screw
- Wire
- Drying rod or stand
- Face mask and chemical resistant gloves
Process: Make sure the container you are using is wide enough and deep enough to hold the part and solvent.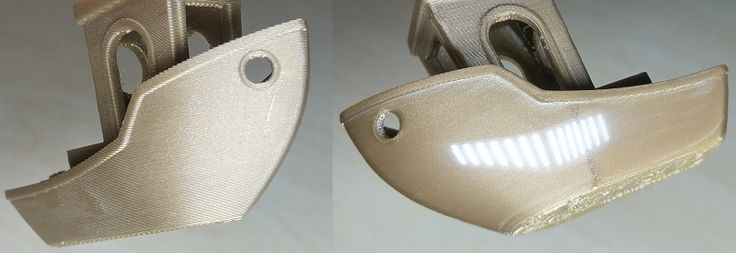 Fill the container with the appropriate amount of solvent, taking care to minimize splashing. As with steam smoothing, acetone should be used to dip the ABS.
PLA is sufficiently resistant to solvents, so it may take several passes to achieve the desired result.
Prepare the part for dipping by screwing an eye hook or small screw into an inconspicuous surface of the print. Pass the wire through the eye of the hook or around the screw so you can lower your piece into the wire bath. If the wire is too thin, you won't be able to submerge the part in solvent.
After the part is prepared, quickly immerse the entire object in the solvent for no more than a few seconds using wire. Pull out the print and attach it to a wire over a dryer rod or rack to allow the solvent to completely evaporate from the surface. The part should be gently shaken after you remove it to facilitate drying and avoid solvent build-up in depressions on the surface.
Helpful Hint: If the part has an opaque whitish color after drying, it can be hung over a solvent bath for a while so that the evaporating vapors slightly dissolve the surface. This will restore the color of the print and provide a glossy outer layer.
Pros
- Print surface smoothes much faster than steam polishing
- Produces much less fumes than other solvent polishing methods and is safer
Cons
- Very aggressively smoothes the surface of the part, so the tolerances deviate very much from the specified
- Immersion too long can lead to complete deformation of the part and a significant change in material properties
Using epoxy to finish prints
The part is sanded and coated with epoxy resin.
Tools and supplies you will need:
- Two-component epoxy (such as XTC-3D)
- Foam applicator
- Brushes
- Mixing container
- Sandpaper 1000 grit or higher
Process : After the print has been sanded (sanding first will give better end results) , completely clean it with a non-woven cloth.
Mix the correct ratio of resin and hardener as directed in the resin instructions. Make no mistake about the proportions. Epoxies are exothermic when mixed, so glass containers and containers composed of low melting point materials should be avoided.
Containers specifically designed for mixing epoxy resins are recommended. The wrong ratio will lengthen the drying time and the epoxy may never be able to fully cure, resulting in a disastrous and sticky part.
Mix resin and hardener thoroughly according to instructions. Stir gently to minimize air bubbles. The faster the epoxy dries, the better. Most epoxies have a working dry time of only 10-15 minutes, so do your post-processing in the proper order.
Apply the first coat of epoxy using the foam applicator and try to minimize resin buildup on recessed surfaces or other details of the print. Once your part is sufficiently covered with resin, allow it to fully cure according to the manufacturer's instructions. One coat may be enough to smooth the detail, but for optimum appearance, the print should be lightly sanded with fine sandpaper (1 000 grit or higher) . Remove dust with a non-woven cloth and apply a second coat of epoxy in the same manner.
Pros
- A very thin coat of epoxy will not significantly affect part tolerances (unless the part has been sanded first)
- Resin provides an outer protective sheath around the part
Cons
- The layer lines will still be visible, they are under the "smooth" shell
- Applying too much epoxy can cause surface dripping and over-smoothing of print details
Tools and supplies you will need:
- Electroplating solution. It can be prepared by mixing a metal salt with acid and water, but if the proportions are not accurate, it will be difficult to get a professional result.
 Buying a ready-made solution guarantees that there are no problems with plating.
 - Sacrificial anode. The anode material must match the metal of the plating solution, so if copper sulfate is used in the solution, then a copper anode should be used. You can use any item made of metal plating (copper wire, for example), or you can purchase a thin strip of metal plating that is made specifically for electroplating.
- Conductive paint or acetone and graphite. The print surface must be conductive for coating, which can be achieved with conductive paint or a 1:1 solution of graphite and acetone. Conductive ink will work on any printed material, but a solution of acetone and graphite will only work on ABS.
- Power Rectifier - A battery can be used instead of a rectifier, but a battery is not as efficient and will not deliver results as quickly and consistently as a rectifier. A rectifier is also a safer option. It can simply be turned off to stop the current flow during electroplating.

- Conductive screw or eyelet
- Non-conductive vessel
- Lead set
- Non-conductive gloves and goggles.
Electrophoresis solutions are acids and can cause eye damage if splashed, so appropriate goggles are required. Also, these solutions can irritate the skin and conduct a charge when used. Therefore, non-conductive gloves should always be used.
Process: metal plating can be electroplated at home or in a professional workshop. Proper plating requires a deep knowledge of materials, and what you can do at home has certain limitations compared to what can be done in a professional workshop.
For a better finish and a wider range of finish options, including chrome plating, a workshop would be the best option. For clarity, the copper plating process will be described below.
At home, galvanization can be done using copper or nickel plate. It is imperative that the surface of the print to be processed is as smooth as possible before coating; any unevenness and visible lines of the layers will start to stand out after coating.
Prepare a cleaned and sanded print. By coating the plastic with a thin layer of high quality conductive paint or a solution of acetone and graphite (if made of ABS) . Allow the conductive coating to dry completely and sand if necessary to ensure a smooth finish. It is extremely important to minimize contact with the print or wear gloves as the sebum on your fingers will interfere with the coating process.
Insert a screw or hook with an eye into an inconspicuous surface of the part, similar to dipping in solvent.
Attach to one of the rectifier leads. This will serve as the cathode. The connection must be made to the negative terminal of the rectifier. Connect the copper anode to the positive terminal of the rectifier using the second power wire and fill the container with enough electroplating solution so that the imprint and the copper anode are completely hidden. Turn on the power rectifier. After the rectifier is turned on, make sure that the part does not touch the anode in any way.
IMPORTANT! Be very careful at this stage. Once the part is lowered into the bath and the system is energized, any contact with the solution, anode or cathode may result in personal injury !
Set the power supply rectifier to 1-3 volts. After that, the metallization process will begin until the part is completely covered with metal. Voltage may be increased to reduce coating time, but should not exceed 5 volts. Simply turn off the straightener and remove the print after a satisfactory finish has been applied. Dry the print with microfiber towels. Coat the part with a special varnish for metal after drying. This will protect it from corrosion.
Pros
- The metal shell increases the strength of the plastic part, which greatly expands the possibilities of its application and use
- The outer metal coating is very thin so if properly applied, tolerances of 9 can be held tightly0006
- Creates a beautiful surface that, if done correctly, will not look like a 3D printed object
Cons
- It is usually very expensive to do this at a professional level, and home plating requires a fair amount of professional processing equipment
- Home electroplating can cause electric shock if not followed
Well, that's all we have! We hope this article was useful for you!
Order 3D printer or FDM consumables , you can
- Email: Sales@3dtool.
 ru
ru - By phone: 8(800)775-86-69
- Or on our website: http://3dtool.ru
-
Don't forget to subscribe to our YouTube channel:
Subscribe to our groups in social networks:
In contact with
3D printed plastic post-processing, mechanical and chemical
The most popular finishing methods for 3D printed objects are sanding, sandblasting and solvent vapor treatment.
It is a misconception that 3D printing cannot produce objects that are as smooth and polished as traditional industrial technologies. Such claims can be countered with simple sandpaper, and this finishing technique is very common.
Which finishing technique is used depends largely on the geometry and material of the part. These factors determine both the level of aesthetics that can be achieved and its functionality, because different methods allow you to achieve different textures and appearances.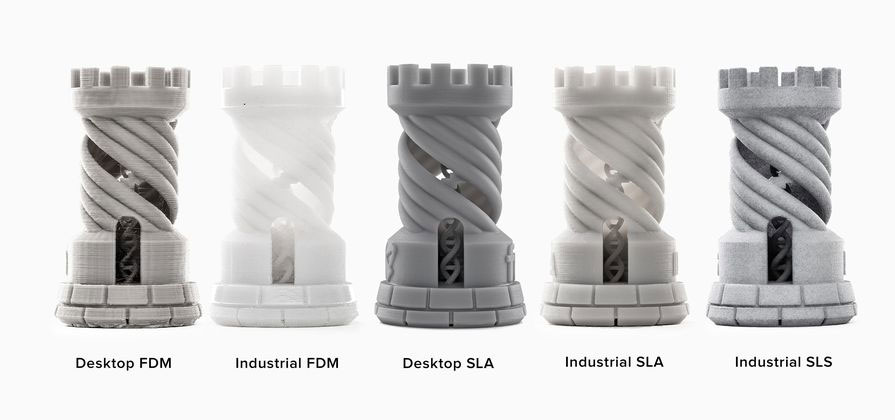 Some methods are better suited for prototypes and exhibition models, while others are better for machine parts.
Sanding
Although fusing systems are designed to produce high-quality parts directly from the printer, the layer lines remain visible and the end user does not need this at all, especially when it comes to a solution in which the aesthetic appearance is priority. Sanding eliminates these shortcomings and can be used for models, sales samples or concepts, fully functional prototypes and end-level assemblies and mechanisms.
Many high-quality 3D-printed objects can be smoothed with sandpaper to get rid of lines where layers overlap.
Everyone knows the process of sanding. Plastic parts are processed by hand or on a grinding machine, as is done with wooden or metal elements. Sanding is inexpensive and effective, and it is a proven method by which a quality finish can be achieved. In fact, this is the most common way of finishing objects printed on a 3D printer.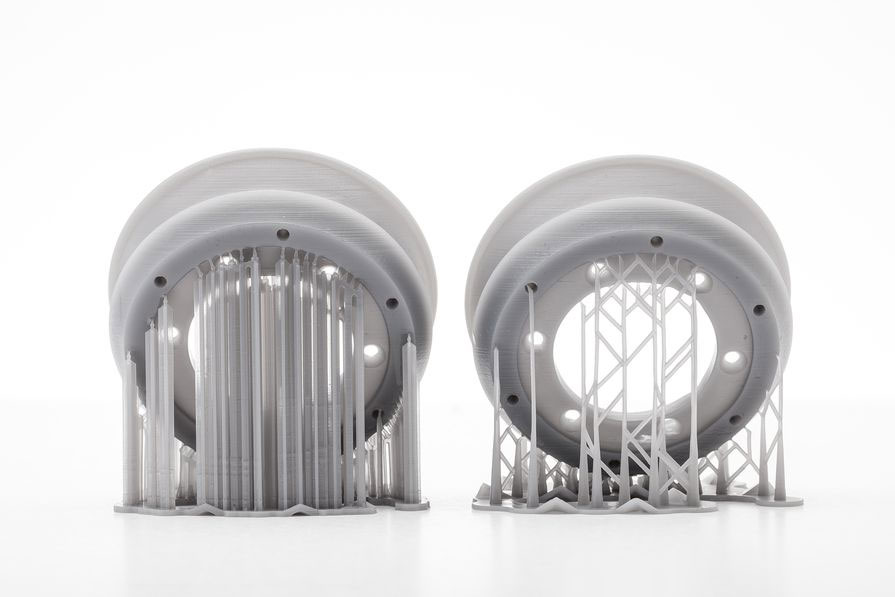
All but the smallest details can be sanded with sandpaper. And they can be large as much as you like, although it can be difficult to manually get to small defects and irregularities. In typical situations, the process is relatively fast. In layer-by-layer welding, we are usually talking about the fight against stepped surfaces. Steps on a part the size of a remote control take about 15 minutes to clean, while painting the same part takes 2 hours due to additional steps such as preparation and drying.
When a part must be precise and durable in the first place, it is very important to consider how much material will be removed by sanding. If a lot of it is removed, it is necessary to make changes to the design before printing, to make the walls thicker. The requirements for the part also determine which sanding technique will be used, manual or mechanical, and which tool will be used.
Sandblasting
The second most common finishing method is sandblasting. In this case, the operator controls the nozzle, from which a finely dispersed material is sprayed under pressure onto the part in order to hide traces of layers on it. The process is fast, takes 5-10 minutes, the result looks whole.
When sandblasting is placed in a closed chamber, a stream of small plastic particles is sent to the part, as a result of which the surface becomes smooth after 5-10 minutes.
This technology is easily modified and can be used with most materials. It is also used during the development and manufacture of a part, at any stage - from prototyping to production. This kind of flexibility is due to the fact that processing is usually done with fine particles of finely processed thermoplastic. It is this "sand", the abrasive characteristics of which, when sprayed, are in the range from medium to high. Baking soda works very well as it is not too harsh. However, it is somewhat more difficult to work with than with plastic.
One of the limitations of sandblasting is the size of the object.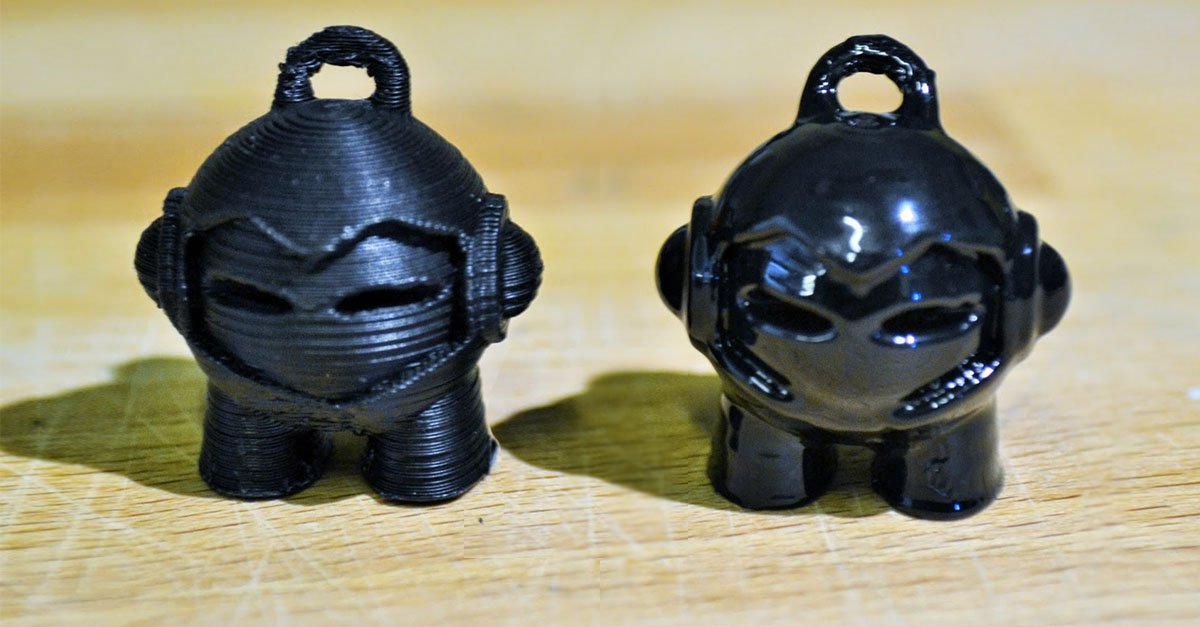 Since the process is carried out in a closed chamber of limited volume, it is usually up to about 60 x 80 x 80 cm.
Steaming
The third most popular finishing method is called steaming or steaming. In this case, the part is in an atmosphere of evaporation of a substance brought to the boiling point. The particles of the evaporating substance are fused into the treated surface to a depth of approximately 2 microns, making it smooth and shiny in just a few seconds. Those who prefer a matte finish can sandblast the part after steam blasting, when the part has already been smoothed and mechanical contact stress has been removed.
Acetone vapor treatment of ABS plastic makes the surface smooth and glossy, the only disadvantage of this technology is that corners and small parts are folded
Since the surface is very smooth, vapor treatment is widely used for consumer goods, prototypes and medical applications. The method does not significantly affect the accuracy of the part.