Sla 3d printer kit
The DIY Resin SLA 3D Printers You Can Build From $20!
With the internet at just about everyone’s disposal, freely shared tutorials and videos have awakened many to the satisfying and rewarding nature of doing things yourself. DIY resin 3D printers have been a popular choice for creators for a while now, and for many different reasons.
- For FDM kits, we have another ranking of the best DIY 3D printers.
High quality 3D printers can be very pricey, and DIY SLA 3D printers have become more prevalent for those who want to get 3D printing, but don’t want to pay full price for a new machine.
Top pick
MatterHackers here
We earn a commission if you make a purchase, at no additional cost to you.
While some of the best resin 3D printers are more affordable these days, this was not always the case. DIY resin 3D printers made waves in the 3D printing community from 2015-2018 as makers scrambled to avoid paying full price for a pre-assembled printer, and there are still those who choose to build their resin 3D printer today.
In this article, we will show why some people are designing and building their own 3D printers, as well as highlight some of the newer and more interesting DIY resin 3D printers from both professional and hobbyist creators that you can build yourself cheaply.
Uses of DIY SLA 3D printers
People from all walks of life have taken to building their own 3D printers.
Because resin 3D printers are known for speed and accuracy, they are ideal for both prototyping and creating working molds and projects for a variety of applications.
For example, resin 3D printers have been used in dentistry to save time and money creating dental models, and these costs are further cut with DIY resin 3D printers over pre-assembled models that cost much more.
For personal use, resin 3D printers are great for projects with smooth surfaces and intricate detailing, like jewelry, toys, and minifigures.
Why Build a Resin 3D Printer?
Just like computers, bikes, furniture, and even cars; people are often keen to build their own home additions and tech, provided they have both the time and the skill. 3D printers are no exception.
Of course, experience and skill is recommended for anyone who wants to try, but anyone willing to put the time and effort in will find DIY resin 3D printing to be a rewarding and worthwhile experience.
Resin printers solidify UV resins with powerful light sources to create models, parts, and prototypes, and are known mainly for their high resolution and speed.
While some resin 3D printers have fallen dramatically in price in recent years, DIY SLA printers can cost as little as $20 in parts. While the time and effort are costs themselves, that’s a price tag as of yet unbeaten in the world of DIY resin 3D printers.
Features such as as build plate sizes, portability, durability, and material compatibility are all customizable with a DIY build. Beyond simple modding, DIY 3D printers can be altered mid-build to suit you.
The best DIY resin 3D printers you can build
Peopoly Moai 130
- Price: $1,395 — Available on Matterhackers here
- Build volume: 130 x 130 x 180 mm
Pros
Affordable for those looking for large, accurate builds.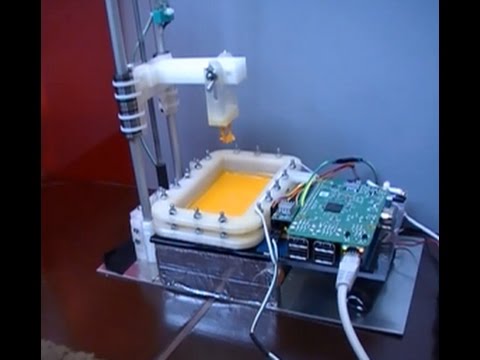
Compatible with third-party resins, allowing for cheaper materials.
Easy modification and tweaking possibilities.
Cons
Limited build space for larger projects.
Can be messy at times.
Born from a Kickstarter campaign in 2017, the Moai is a DIY resin 3D printer that found a huge backing in a short time. Available as a DIY kit or fully-assembled, the Moai is advertised as an affordable resin 3D printer kit for those looking for large, accurate builds.
The Peopoly Moai is also praised for its simplicity in both construction and design. Its compatibility with third-party materials and easy modification and tweaking possibilities make it popular with engineers who know exactly what they want.
Since its initial release, several versions of the Moai have been released after a few upgrades, including more durable frames and accessories such as upgraded build plates.
While still a DIY 3D printer, the Moai has a large following of many users with varying levels of experience and expertise. This means that peer-to-peer support, advice, and information is easy to come by and very useful for anyone who needs it.
Despite the Moai’s popularity, many users have reported the enclosed build space as being very limiting for larger projects, and have noted that the lack of a built-in air filtration or sealing systems as potentially harmful to a project’s success.
For those looking for a larger resin 3D printer, Peopoly released the much larger Peopoly Phenom in 2019.
The Peopoly Moai is capable of a layer resolution of up to 5 microns, which is incredibly accurate, far more so than any pre-assembled 3D printer at this price. Its compatibility with third-party resins also means that cheaper materials can be used to further cut printing costs.
Beyond hobbyists, the Moai is used by researchers for prototypes, and it can be used with biocompatible materials for medical uses such as dental 3D printing.
Overall, the Peopoly Moai is seen as a great (if messy) first step in the world of DIY SLA 3D printing. With enough time, work, and community advice, even newcomers will find themselves printing large, highly detailed resin models like pros.
For more commercially available resin printers, read our resin 3D printer buyer’s guide
For larger resin printers, read our buyer’s guide to large resin 3D printers
Not Just a Professional’s Game: Resin 3D printer kits you can build for cheap
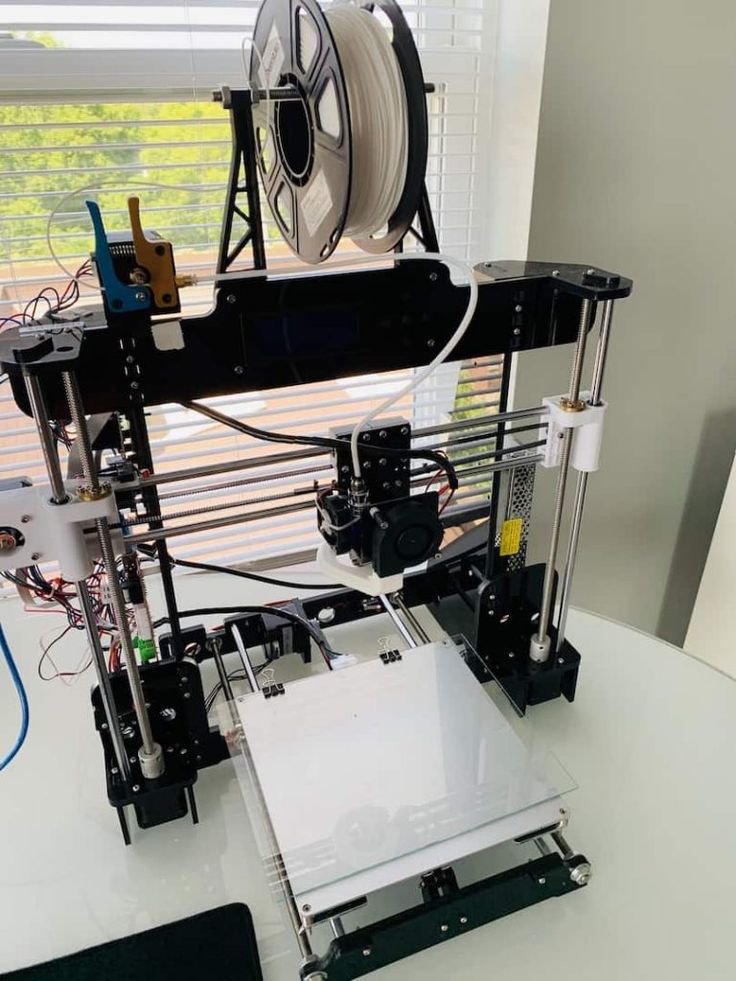
Paulg100’s DIY SLA Printer Build
DIY resin printers are not just projects for professional engineers with crowd-funded goals, anyone with the right skillset and time can make their own tech.
Sites like Reddit, Twitter, and YouTube are full of creators eager to show off their homemade resin 3D printers. Some are more detailed than others, but posts such as this DIY resin printer build by XSimulator user Paulg100 are must-reads for those looking to build their own resin printer.
Paulg100, a dental laboratory owner, uses biocompatible materials with their DIY SLA printer for dental work, and has actively encouraged others to follow their listing. Thanks to the impressive accuracy of his DIY resin printer, he’s able to create remarkably intricate designs on a very tiny scale, something he was unable to do before.
With this build, you too can create complex and accurate prints of anything you like for a fraction of the cost of a pre-assembled 3D printer. If that doesn’t excite you, then we don’t know what will!
From images seen of both practical and cool projects made with this unnamed resin printer, the accuracy and detail look fantastic for the price.
For anyone looking for a challenging build that yields impressive results, this is a DIY 3D printer that should not be overlooked.
Arduino Uno: The $10 DIY Resin Printer
For an impressively cheap DIY SLA printer, Build Your Own SLA user mystamo outlines here their build for a DIY SLA printer made of very cheap parts.
While the concept appears too good to be true, the video below shows the finished project in action.
Peer reviews have also shown this to be a very impressive, if rudimentary, DIY resin printer. While mainly built as a resin test, the speed and reliability of this Arduino Uno build are notably eyebrow-raising given its tiny cost.
TristramBudel DIY SLA Printer
Wanting to spread the gift of 3D printing as far as possible, online builder TristramBudel designed their own DIY SLA 3D printer to share with peers.
As the name suggests, this build prioritizes resolution without sacrificing the speed that resin printers are known for.
Since its creation, this DIY 3D printer has gained a good following of fellow creators looking to sell their ideas, with one reviewer even calling it ‘a piece of 3D printing history.’
3D printing company autum3D even based their industrial DLP 3D printers on the build, showing just how much of an impact these DIY 3D printers can have on the 3D printing industry as well as the larger community.
And, if you’ve built your DIY resin printer and looking for inspiration, we have a list of 50+ cool resin models you can print (with download links).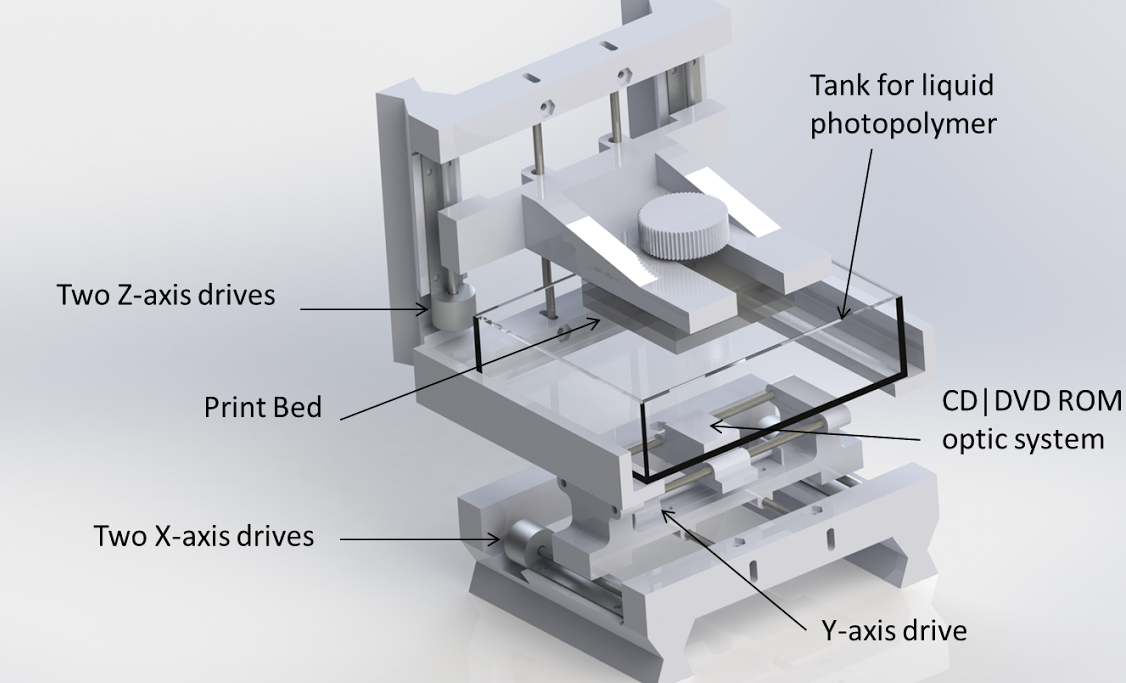
Related posts:
- Best resin 3D printers
- Large resin 3D printers
- Resin SLA 3D slicers
- Best resin curing stations
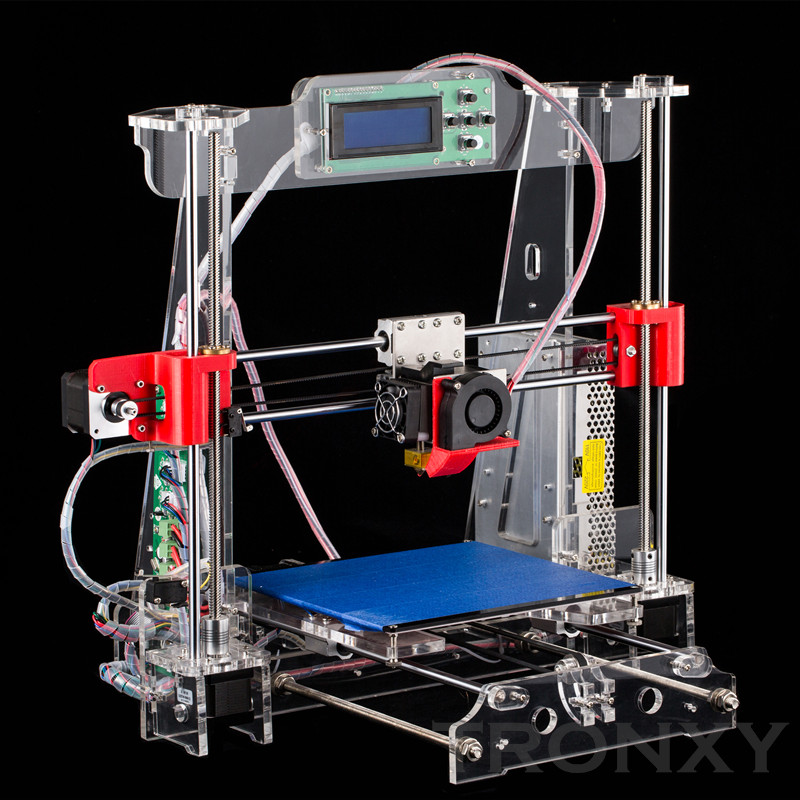
Peopoly Moai Laser SLA 3D Printer - Kit
- Home
- Store
- Resin 3D Printers
- Laser 3D Printers
Clearance
The Peopoly Moai is a high-performance, super-accurate laser SLA 3D printer. It is available either pre-assembled or as a kit that you can build yourself. By building the 3D printer yourself, you will gain valuable insight into how laser SLA 3D printing works and a greater understanding of the Moai itself.
- Prints with high accuracy
- Kit or fully assembled option
- Very affordable
Remove from wishlist Add to wishlist loading...
Available Add-ons (6)
Show More Addons
Product No. M-P86-LX2U
| List Price: | $1,395.00 |
|---|---|
| Price: | $955.75 |
| Price: | $... |
| Order Now: | Ships calculating...MatterHackers Shipping Truck Free U.S. Shipping |
Please Note: This printer kit does not come with resin. Please see Add-On Items if you would like to purchase some resin.
Assembled or a Build-Your-Own Kit
This high-performance, super-accurate laser SLA 3D printer comes with the option of being pre-assembled, or as a kit that you can build yourself.
With the Build-It-Yourself Kit, you gain a huge amount of savings for a few hours of work. The Moai comes with instructions, and we have a companion video here that will help you get your Peopoly Moai up and running in no time. By building the 3D printer yourself, you will gain valuable insight into how laser SLA 3D printing works and a greater understanding of the Moai itself.
You also have the option of purchasing the Peopoly Moai fully assembled and tested by the Pros at MatterHackers. We build and test all the units before shipping them out, making absolutely sure that they are operational and up to our professional standards before shipping it to you.
If you are looking for a fully-assembled Peopoly Moai tested by the Pros at MatterHackers, you can find it here.
So whether you want a ready-to-go, fully-tested unit - still far below the price of most other laser SLA 3D printers on the market - or a kit you can build yourself and save even more money, MatterHackers has you covered.
Speed and Precision
The Moai is powered by an ST 32-bit ARM processor, capable of interpreting Gcode and running the machine incredibly fast, allowing for high precision movements without having to increase print time. While most FDM 3D printers come with a 0.40mm nozzle, the laser spot size of the Moai is only 70 microns, or 0.07mm in diameter. This makes the 'filament path' a much higher resolution than any FDM 3D printer can accomplish. But since the toolpath is a laser curing resin and not a nozzle extruding filament the machine can print very fast and maintain low print times even at this high level of precision. Combined with the 10-micron layer height, this printer offers the most bang for your buck in the laser SLA world today.
Maximum Compatibility for Seamless Integration
Making the jump from FDM to SLA 3D printing is a big change, luckily the Moai makes it easy by using Gcode - the same file type used by FDM machines. Instead of moving the nozzle around the build area, it's just the laser that travels and cures the resin to create your part. Slice your part in MatterControl, export the Gcode to an SD card and the Moai will do the rest! This seamless upgradeability makes the Moai the perfect 3D printer to start using resin-based SLA machines.
Technical Specifications
- Build Volume: 130x130x180 mm
- Laser spot size: 70 microns
- Laser wave length: 405 nm
- Laser power: 150 mW
- Machine size: 330x340x660 mm
- Layer Height: 10 - 200 microns
What's in the Box
- Peopoly Unassembled Moai Printer Kit
- Standard Build Plate
- PDMS Resin Vat
- Keys to Door Lock x2
- Power Supply
- PC Power Cord
- SD Card
- Scraper
- Phillips Screwdriver
- Allen Wrench Set
- Crescent Wrench Set
- 7mm Socket Driver
- Flat Screwdriver
- Flush Cutters
- Laser Safety Glasses
- Letter from Peopoly
- Calibration Test Sheet
Return Policy
Please note that returns are not accepted on opened kits. Only new, unopened kits may be returned within 30 days of purchase. If a part from the kit is determined to be defective during the warranty period, a replacement part will be supplied.
Please note that printer kits are not returnable after having been opened and worked on. If there is a problem with the packaging or damage during shipment please return the product immediately, otherwise a return will not be offered after assembly.
Please note, all Clearance Item purchases are Final Sale and are not covered by the MatterHackers Return Policy - this excludes Refurbished 3D printers and machines which have at least a 6-month warranty.
Electronic kit for self-assembly of the Makerbase MKS DLP SLA 3D printer.
Electronic kit for self-assembly of the Makerbase MKS DLP SLA 3D printer.
Kit consists of motherboard, touch screen control and head-up display.
The head-up display uses the popular 5. 5-inch Sharp LS055R1SX04 display, which has the following parameters:
- Aspect Ratio: 16*9
- Resolution: 1440*2560 pixels
- Pixel density: 538 ppi
- Work area size: 68.04 * 120.96 mm
- Pixel size: 0.04725*0.04725mm
- Outline dimensions: 70.94 (W) × 128.49 (H) × 1.35 (D)
- Glass dimensions: 80.5 *141 * 0.6 rounding with a radius of 5 mm
- Interface: MIPI DSI
Head-up display dimensions are shown in the following image:
The control is implemented using a resistive touch display MKS Robin TFT35 V1.0, which is connected to the motherboard via a cable.
The dimensions of the touch screen are shown in the following image:
Motherboard provides autonomous operation, combining all the functions required for SLA 3D printers:
- reading files from a flash drive
- stand-alone control via touch screen
- direct image output to the projection display via MIPI DSI interface
- UV lamp control and cooling fan
- direct stepper motor control (implemented on A4988 driver)
- control of limit switches in two extreme positions of the Z axis.
MKS DLP supports the following file types:
- mdlp (proprietary file format available when using a slicer specially designed for MKS DLP)
- photon (Photon 3D printer file format)
- cbddlp (ChiTuBox slicer file format).
The printer also sees and tries to process files containing G-code, but at the moment this function is not fully implemented.
Using a flash drive, you can also update the entire motherboard firmware, or partially update the configuration file. The contents of the archive with the firmware must be transferred to the root of the flash drive, inserted into the USB socket of the switched off motherboard and powered on. Firmware update takes about 2 minutes, configuration update is instant.
The UV LED illumination as well as the cooling fans are powered by an incoming voltage, which can be between 12 and 24 volts. Therefore, it is necessary to select fans and UV LED illumination with a suitable supply voltage. The fan and UV LED are controlled by powerful MOSFET transistors HY1403, which are capable of switching current up to 43 amperes. The consumption of the device assembly depends on the consumption of the illumination lamps and cooling fans connected to the motherboard.
The stepper motor is controlled by a driver installed on the board. The maximum current of the stepper motor is configured using the configuration file and cannot exceed 1 ampere. If a more powerful stepper motor is used, then it is necessary to connect an external driver, the control signals for which can be obtained from the connector located next to the built-in driver.
The interface of the device is simple and intuitive, it implements only the basic functions necessary for 3D printing: the direct printing procedure, as well as service manipulations with the illumination lamp, the Z axis.
The dimensions of the motherboard are shown in the following image:
Contents of the configuration file:
######### MKS DLP configuration ######### #===================Language Configuration Language Configuration ========================= ================ >cfg_language_adjust_type 1 #Type of switching language (1:Switching through lcd button, 0:Switching through dlp_cfg.txt). Availability of language change from the printer menu: 1 language change is available, 0 language change is not available, the language is set by the following configuration line >cfg_language_type 1 #Language Language selection, only available if the previous item is set to 0 (1: Simplified Chinese; 2: Traditional Chinese; 3: English; 4: Russian; 5: Spanish, 6: French, 7: Italian ) #This configuration is only valid when "cfg_language_adjust_type" is set to 0. #-------------LCD "Info" content configuration The following information is displayed in the “Settings” - “Info” menu ------------------ ------------------ >cfg_system_type DLP #System type to display, can only be ASCII characters and cannot exceed 200 characters >cfg_version_custom 0 #0:Display the firmware inner version :Display the version of Custom version "cfg_firmware_version" 0 - shows the actual firmware version, 1 - show the value specified in the next line >cfg_firmware_version 1.1.4 #Custom version, can only be ASCII characters and cannot exceed 200 characters #------------LCD "Service" content configuration Information is displayed in the menu “Settings” - “service” ----- >cfg_website www.
makerbase.com.cn #Website to display, can only be ASCII characters and cannot exceed 200 characters >cfg_email [email protected] #Email to display, can only be ASCII characters and cannot exceed 200 characters #---------------------------------------------------------------- ------------ ######## LCD display color configuration Button and LOGO customization please refer to instructions Customizing the color of the GUI menu items ########## >cfg_background_color 0xFFFFFF #Background color of LCD >cfg_btn_bkcolor 0xFFFFFF #Background color of universal button >cfg_btn_text_bkcolor 0xFFFFFF #Background color of universal button-text >cfg_btn_textcolor 0x8DB937 #Color of universal button-text >cfg_filename_bkcolor 0x000000 #Background color of file directory button >cfg_filename_textcolor 0xFFFFFF #Text of file directory text >cfg_msg_area_bkcolor 0x8DB937 #Background color of status information display area >cfg_state_msg_bkcolor 0xFFFFFF #Background color of status text >cfg_state_msg_textcolor 0x8DB937 #Status information text color >cfg_sel_btn_bkcolor 0x000000 #Background color of button when it is selected >cfg_sel_btn_text_bkcolor 0xFFFFFF #Background color of button-text when button is selected >cfg_sel_btn_textcolor 0x43cdff #Color of button-text when button is selected >cfg_dialog_bkcolor 0x000000 #Background color of dialog >cfg_dialog_msg_textcolor 0xffffff #Color of dialog information >cfg_dialog_btn_bkcolor 0xff0000 #Background color of button on dialog >cfg_dialog_btn_textcolor 0xFFFFFF #Color of button-text on dialog >cfg_layer_area_bkcolor 0x8DB937 #Background color of the layer display when printing >cfg_printing_state_bkcolor 0xffffff #Background color of printing infomation when printing >cfg_printing_state_textcolor 0x8DB937 #Color of printing infomation when printing #============================ Basic Settings ================== ======= # Travel limits after homing (units are in mm) working height of the Z axis of the printer, the minimum and maximum values are indicated in millimeters >Z_MIN_POS 0 >Z_MAX_POS 155 >Z_PAUSE_POS 10 #Rising heigth of Z axis when pause printing(mm) How much to raise the Z axis during pause, specified in millimeters #============================= Stepper Motor Settings ================ ============ #Invert the stepper direction >INVERT_Z_DIR 1 #Movement setting >DEFAULT_Z_STEPS_PER_UNIT 1600 #Default Axis-Z Steps Per Unit (steps/mm) How many steps are needed to move one millimeter along the Z axis >DEFAULT_Z_MAX_FEEDRATE 5 #Default Axis-Z Max Feed Rate (mm/s) Default feed rate in millimeters per second >DEFAULT_Z_MAX_ACCELERATION 100 #Default Axis-Z Max Acceleration (change/s) change = mm/s Z-axis acceleration >DEFAULT_ACCELERATION 1000 #X, Y, Z and E acceleration for printing moves >DEFAULT_RETRACT_ACCELERATION 1000 #X, Y, Z and E acceleration for retracts >DEFAULT_TRAVEL_ACCELERATION 1000 #X, Y, Z acceleration for travel (non printing) moves >DEFAULT_MINIMUMFEEDRATE 0.
0 #minimum feed rate >DEFAULT_MINSEGMENTTIME 20000 #minimum time in microseconds that a movement needs to take if the buffer is emptied. the minimum time in microseconds that the movement should take if the buffer is empty >DEFAULT_MINTRAVELFEEDRATE 0.0 # >DEFAULT_ZJERK 0.4 #Default Axis-Z Jerk (mm/s) >CURRENT_VREF_Z 600 #Default motor current for Z in mA range (0~1000) Stepper motor current #============================= Endstop Settings ================= ========== >MIN_SOFTWARE_ENDSTOPS 0 # 0:axes can move below MIN_POS; 1:axes won't move below MIN_POS. Software limits, whether the axis can move below the value specified in Z_MIN_POS >MAX_SOFTWARE_ENDSTOPS 1 # 0:axes can move below MAX_POS; 1:axes won't move below MAX_POS; Software limits whether the axis can move above the value specified in Z_MAX_POS # Mechanical endstop with COM to ground and NC to Signal uses "false" here (most common setup). Mechanical limits are activated when shorted to ground >Z_MIN_ENDSTOP_INVERTING 1 # set to true to invert the logic of the endstop.
Inverting Mechanical Limits >Z_MAX_ENDSTOP_INVERTING 1 # set to true to invert the logic of the endstop. #============================== Home Settings ================= ============= >Z_HOME_DIR -1 # Direction of endstops when homing; 1=MAX, -1=MIN :[-1,1] direction of movement when searching for “home” >HOMING_FEEDRATE_Z 240 # Homing Z speeds (mm/m) Movement speed when searching for “home” #===================Buzzer Settings=========================== ============== >cfg_buzzer_type 1 # 0:Buzzer off 1:Buzzer on Turn sound on/off. regardless of the setting, you can change the value via the touch screen menu.
Firmware available at: https://github.com/makerbase-mks/MKS-DLP
Firmware source code: https://github.com/makerbase-mks/MKS-DLP-FIRMWARE
Comparison of 3D technologies -Prints: FDM, SLA and SLS
Additive manufacturing or 3D printing reduces costs, saves time and expands the technological possibilities in product development. 3D printing technologies offer versatile solutions for applications ranging from rapid concept and functional prototypes in the field of prototyping to fixtures and clamps or even final parts in manufacturing.
Over the past few years, high resolution 3D printers have become more affordable, more reliable and easier to use. As a result, more companies have been able to use 3D printing technology, but choosing between different competing 3D printing solutions can be difficult.
Which technology is right for your needs? What materials are available for her? What equipment and training is needed to get started? What are the costs and payback?
In this article, we take a closer look at three of today's most well-known plastic 3D printing technologies: Fused Deposition Modeling (FDM), Stereolithography (SLA), and Selective Laser Sintering (SLS).
Choosing between FDM and SLA 3D printer? Check out our detailed comparison of FDM and SLA technologies.
Download this high resolution infographic here.
VIDEO MANUAL
Can't find the 3D printing technology that best suits your needs? In this video tutorial, we compare Fused Deposition Modeling (FDM), Stereolithography (SLA), and Selective Laser Sintering (SLS) technologies in terms of the top factors to consider when purchasing.
Watch Video
Fused Deposition Modeling (FDM), also known as Fused Filament Manufacturing (FFF), is the most widely used form of 3D printing at the consumer level, fueled by the rise of consumer 3D printers. On FDM printers, models are made by melting and extruding a thermoplastic filament, which the printer's nozzle applies layer by layer to the model being built.
The FDM method uses a range of standard plastics such as ABS, PLA and their various blends. It is well suited for making basic experimental models, as well as for quickly and inexpensively prototyping simple parts, such as parts that are usually machined.
FDM models often show layer lines and may have inaccuracies around complex features. This sample was printed on a Stratasys uPrint FDM industrial 3D printer with soluble support structures (price starting at $15,900).
FDM printers have the lowest resolution and accuracy of SLA or SLS and are not the best option for printing complex designs or parts with complex features. Surface quality can be improved by chemical and mechanical polishing processes. To address these issues, industrial FDM 3D printers use soluble support structures and offer a wider range of engineering thermoplastics, but they are also expensive.
FDM printers do not handle complex designs or parts with complex features well (left) compared to SLA printers (right).
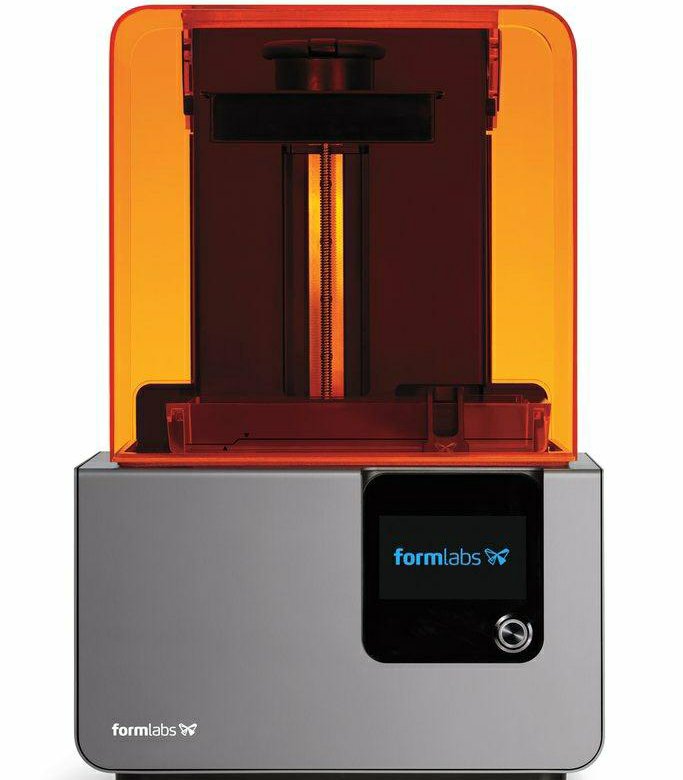
Invented in the 1980s, stereolithography is the world's first 3D printing technology and is still one of the most popular technologies among professionals today. SLA printers use a process called photopolymerization, which is the conversion of liquid polymers into hardened plastic using a laser.
See stereolithography in action.
Models printed on SLA printers have the highest resolution and accuracy, the sharpest detail and the smoothest surface of all plastic 3D printing technologies, but the main advantage of the SLA method is its versatility. Materials manufacturers have developed innovative formulas for SLA polymers with a wide range of optical, mechanical and thermal properties that match those of standard, engineering and industrial thermoplastics.
Models created with SLA technology have sharp edges, a smooth surface and almost invisible layer lines. This sample was printed on a Formlabs Form 3 Desktop Stereolithographic 3D Printer (price starting at $3499).
SLA is an excellent option for making highly detailed prototypes that require tight tolerances and smooth surfaces such as molds, templates and functional parts. SLA technology is widely used in industries ranging from engineering and design to manufacturing, dentistry, jewelry, modeling, and education.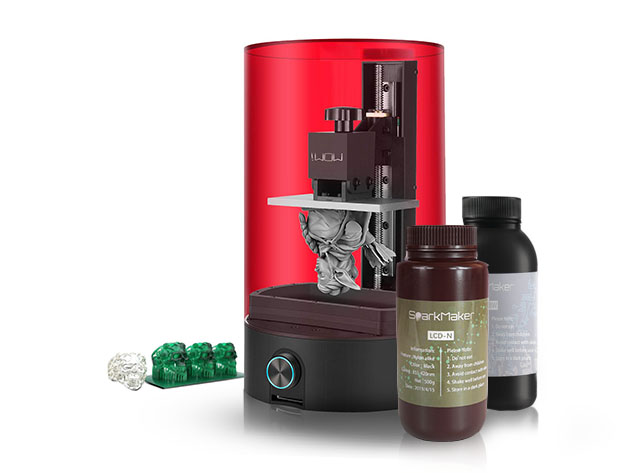
White Paper
Download our in-depth white paper to learn how SLA printing works, why thousands of professionals use it today, and how this 3D printing technology can help your job.
Download white paper
free sample
Experience Formlabs print quality firsthand. We will send a free 3D printing sample directly to your office.
Request a free sample
Selective laser sintering is the most common additive manufacturing technology used in industry.
Selective Laser Sintering (SLS) 3D printers use a high power laser to sinter fine polymer powder particles. The unsprayed powder supports the model during printing and eliminates the need for special support structures. This makes SLS ideal for complex geometries, including internal features, grooves, thin walls, and negative taper. Models produced using SLS printing have excellent mechanical characteristics: their strength can be compared with the strength of injection molded parts.
Models created with SLS technology have a slightly rough surface, but almost no visible layer lines. This sample was printed on the Formlabs Fuse 1 SLS workshop 3D printer (price starting at $18,500).
The most common selective laser sintering material is nylon, a popular engineering thermoplastic with excellent mechanical properties. Nylon is light, strong and flexible, resistant to impact, heat, chemicals, UV radiation, water and dirt.
Due to the combination of low part cost, high productivity and widely used materials, SLS is a popular method of engineering functional prototyping and a cost effective alternative to injection molding in cases where production runs are limited.
White Paper
Looking for a 3D printer to create durable, functional models? Download our white paper to learn how selective laser sintering (SLS) technology works and why it is popular in 3D printing for functional prototypes and end-use products. 9
9

Either way, you should choose the technology that best suits your business. Prices have dropped significantly in recent years, and today all three technologies are offered in compact and affordable systems.
3D printing costing doesn't end with initial equipment costs. Material and labor costs have a significant impact on the cost of each part, depending on the application and production needs.
INTERACTIVE
Try our interactive ROI tool to see how much time and money you can save by printing with Formlabs 3D printers.
Calculate savings
FDM, SLA and SLS printed prototype ski goggle frames (left to right).
We hope this article has helped you narrow down your search for the 3D printing technology best suited to your needs.