How to lubricate 3d printer
How to Lubricate Your 3D Printer Like a Pro – Best Lubricants to Use – 3D Printerly
Being able to maintain your 3D printer properly with care usually involves lubrication in the moving parts of your machine. Light machine oils or silicone lubricant is widely used in the 3D printing world.
This article will be a guide on which lubricants are popular to use with 3D printers, and what techniques people use to get the best results. Keep on reading through this article to get the up-to-date advice on 3D printer maintenance.
What Parts of a 3D Printer Needs to Be Lubricated?
Simply put, all moving parts, i.e. any surface that moves against another surface needs to be lubricated to have a smoothly working printer. In all of this, the following areas of a printer have to be lubricated from time to time.
The X, Y and Z axis: these moving parts of the 3D printer determine where the nozzle is moved to, and so they are constantly being moved around.
The Z-axis which moves vertically and the X and Y which moves horizontally are constantly moving when the machine is on. Wear and tear may occur if they are not lubricated regularly.
These coordinates determine the position of the hot end nozzle, which is moved around by different rails and driving systems.
Guide rails: these help to support the Z-axis as they move. The bearings on the railing can either be metal on metal or plastic on metal.
Many 3D printers will use simple threaded steel rods or lead screws, which are essentially extra-long bolts. These parts also need to be lubricated.
Stepper motors don’t need any maintenance or lubrication since they are a brushless motor which doesn’t have brushes that need to be replaced or anything.
How Do You Lubricate & Maintain a 3D Printer?
No matter the kind of lubrication being used, the steps to carrying out the lubrication is the same. Follow these steps for correct lubrication of your printer.
The first step in lubrication is cleaning. Clean all parts that require lubrication thoroughly. This will ensure that remnants of former lubricants do not get it the way when you are applying the new one.
You can use rubbing alcohol to wipe down moving parts such as the belt, rods and rails. Do not use acetone as it is corrosive and may likely eat through the plastic. Give the parts some time to dry out from the alcohol.
The next thing is to apply the lubricant. Depending on the type being used, space out the lubricants at equal distances and take note not to apply too much of it. With the aid of an applicator, spread the lubricant.
It’s a good idea to use some rubber gloves while you do this so the lubricator doesn’t touch your skin since some lubricants can cause slight irritation.
Once the lubricant has been totally spread on all the moving parts, move the parts from one side to the other to ensure that there is no friction. You can do this manually or make use of the motor controls located in the 3D printer.
Make sure you cannot see excess lubricant while moving the parts because this usually indicate that you have applied too much lubricant. This can do the exact opposite of what it’s supposed to do and make it hard for the parts to move.
If you noticed that you have applied too much lubricant, gently wipe off the excess with paper towels and run the parts along its axes again to make sure everything is smooth.
Find more information about how to lubricate your 3D printer in the video below.
Best Lubricants You Can Use For Your 3D Printer
As easy as lubricating a 3D printer is, the difficult part is figuring out the right lubricant to select. Of course, many new 3D printers now come with maintenance tips and advice on what lubricants to use.
If you do not have this information about your printer, you can visit their website to ensure that you are using the right lubricant. The following are the best printers for your 3D printers.
Super Lube 51004 Synthetic Oil with PTFE
Many 3D enthusiasts use a great product called Super Lube Synthetic Oil with PTFE, a staple lubricant for your 3D printer.
It is a premium, synthetic oil with suspended PTFE particles that bond to surfaces of moving parts providing protection against friction, wear, rust and corrosion.
Product that contains PTFE are types of lubricants which are solid substances usually suspended in a medium such as alcohol or any other similar spirit. They can be sprayed on the printer parts that needs to be lubricated.
The viscosity is similar to that of cooking oils such as canola or olive oil. It adheres to almost any surface and prevents dust and corrosion of metal parts.
3-In-One Multi-Purpose Oil
Another great option that is used in the 3D printing community is the 3-In-One Multi-Purpose Oil.
One user who purchased this oil used it for their motors and pulleys, and it quickly solved their issues.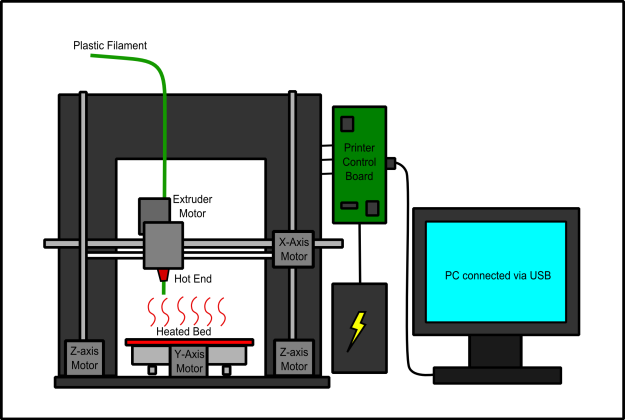 The value of the product is one of the highlights because it is very affordable while getting the job done.
This oil is actually used in the manufacturing of some 3D printers because it works so well, and can even give immediate results for noise reduction. Another benefit is how there is little to no odor unlike some other lubricants out there.
You can also use it successfully on your linear bearings for great results in your prints, while giving extra life and durability to your 3D printer. Most experts recommend using oil regularly for maintenance.
Get yourself some 3-In-One Multi-Purpose Oil from Amazon today.
White Lithium Grease LubricantYou’ll hear plenty about White Lithium Grease if you are looking for a suitable lubricant for your 3D printer, or even other general items that require some maintenance. Permatex White Lithium Grease will work very well for lubricating your machine.
It is an all-purpose lubricant which has metal-to-metal applications, as well as metal-to-plastic. Moisture isn’t a problem for this lubricant and it can easily withstand high heats too.
Permatex white lithium grease makes sure that surfaces and movements are friction-free, allowing you to get that top quality from your 3D printer. You want to use it all around your 3D printer, especially on the lead screw and the guide rails.
You can also use it with door hinges, garage doors, latches and much more.
The White lithium grease is a great, weather-resistant lubricant, and it can also be easily removed and replaced when it’s time to replace it.
Many people who chose this lubricant over something like WD40 saw amazing results, especially to stop squeaks and screeches that occur.
If you are getting vibrations or feedback from the joints in your Z-axis, you can see much better elevation control after using this grease.
Get yourself some Permatex White Lithium Grease from Amazon.
DuPont Teflon Silicone Lubricant Aerosol Spray
Silicone lubricants are more popular among 3D enthusiasts as they are cheaper, easy to apply and non-toxic. A great one to go for which is easier to apply than the lubricants above is the DuPont Teflon Silicone Lubricant Aerosol Spray.
One user described this silicone spray as exactly what they needed for their 3D printer. This clean, light-duty lubricant is excellent for all types of materials and provides a great protection, as well as lubricant for your machine.
It helps prevent rust and corrosion too.
Get the DuPont Teflon Silicone Lubricant Aerosol Spray from Amazon.
The Top Ten Tips for 3D Printer Maintenance
Keeping your 3D printer clean isn't all that it takes to have it running smoothly. We take an in depth look at what you need to do to have your 3D printer at its best.
Posted on April 29, 2021
by
Alec Richter
3D printers are no different than any other machine or tool; keep it clean and keep it lubricated so it’s running at peak performance. Let’s dive into the best practices for keeping your 3D printer running as smoothly and efficiently as possible.
Keep your 3D printer well lubricated
Over time, the lubricants used to keep your 3D printer running smoothly will dry up or be pushed out of the bearings by regular motion and use. You should only add more lubricant if you find your 3D printer’s rods are a little dry after several hundred hours of 3D printing. Everyone recommends something a little different, especially depending on the type of motion system used. Linear rails like those on a Craftbot FLOW IDEX XL’s axes have different requirements than the linear rods used on most other printers. Even still 3D printers like the Ender 3 V2 use V-wheels for motion and have their own requirements. A good rule of thumb to follow is to check the recommended lubrication guidelines in your 3D printer’s manual, otherwise, you want to use greases for leadscrews (except when your leadscrew nut is plastic as the grease can degrade the plastic) and oils for rods. A simple way to apply lubricant is to move the printer to all the minimum limits, add lubricant to the rods and screws, then move the printer to the maximum limits and repeat. This should decently lubricate your printer but in some circumstances you may need to remove the bearing completely in order to adequately lubricate it. In the case of V-wheel 3D printers, lubrication is not something you need to concern yourself with as you have plastic wheels riding on aluminum, so the two surfaces should roll smoothly (but you still should replace the wheels if you can feel flat spots or they don’t turn smoothly).
Regular lubrication of your 3D printer's linear rods and rails is an essential part of the maintenance process.
Dust the printer and its components regularly
As the 3D printer moves around, the seals on the bearings attached to each carriage, will sweep dust to the limits of the motion system. You will find that the fans actually collect dust and can build up a sort of cobweb on them and anything near them including around the hotend. Any horizontal surface, no matter how hard it is to reach will have some amount of dust. It’s an inevitability and while it won’t negatively impact your 3D prints (except if your build plate is dusty as that would prevent adhesion), it would be wise to give your 3D printer a good dusting off every month or so. A quick wipe with a microfiber cloth and canned air to clean off any of the hard to reach area is enough to keep your 3D printer in working order.
As with anything in life, you're going to want to dust it often to keep it working well.
Check for loose nuts and bolts
Although it won’t often matter, in rare cases the fasteners that hold your 3D printer together can shake loose. Maybe they aren’t so loose they fall out, but I have found that some screws I thought were tight had actually loosened up over time and began affecting filament quality. Drive pulleys and lead screw couplers should be the first screws you check up on if you are already having 3D printer issues - screws that are key to proper motion are the most important to keep tight.
The components that hold your 3D printer can loosen over time and will need to be tightened again to have repeatable motion.
Clear any dust and debris from the extruder feeder wheels
Hobbed gears are the key to your 3D printer reliably pushing filament through its system. Some gears have sharper teeth than others that enables them to have a firmer grip on filament, but if there’s a jam it can’t push through then you may find that the gears strip the filament and fill with filament dust. Clearing the jam at the nozzle won’t be the end of it, as now the gears will need to be cleared out before you can print again. With some extruders you can easily see the teeth and clean them out with some tweezers or a hobby knife, others you will need to disassemble to get access to them. In general the teeth should be fine most of the time, but after a period of rough extruding, you will want to clean out the feeder gears.
Your extruder's feeder wheels can fill with filament dust as it grips the filament and pushes it through the system. A quick brushing and some tweezers can clean out the fine teeth.
Tidy up and remove loose bits of 3D printing debris
Skirts, purge blobs, failed prints and filament scraps have a tendency to accumulate around your 3D printer unless you are diligent cleaning it up and keeping a trashcan nearby. It’s much easier to stay on top of it before it becomes a problem, make it a good habit to pick up any debris whenever you get up to check on your prints, after you start a print and walk away, or when you grab your next finished print.
Loose bits of filament in the bottom of a 3D printer can wrap around and jam the lead screw if you aren't careful.
Check for overheated and deformed 3D printed parts
The proliferation of desktops 3D printers has meant that more and more of them are built using 3D printed components - components that would otherwise be much too expensive to manufacture using traditional techniques. However, because these printer parts are still made of plastic, they can encounter a phenomenon called “creep” where a stress exhibited on a part can over time cause it to sag and fail. Weight bearing components or heat-facing components can deform over an extended period of time and necessitate replacing in order to keep the 3D printer operational. The main printed parts you will want to look at are the parts under tension like bed-holders, belt tensioners, or spool holders or parts that may get warm, like motor mounts or hotend mounts. You don’t need to check for this often, maybe once every three months or so is sufficient, or of course if you notice some sudden difficulty with your 3D printer.
This bracket holds a 3D printer's rod in place, but with a crack and a bend to it, motion isn't going to be quite as linear as it needs to be.
Tighten up your belts.
Typically, 3D printer belts are glass-fiber lined TPU. The glass-fibers add enough rigidity to prevent stretching yet are capable of bending around pulleys without weakening like steel-core belts. Stretching is going to happen as these belts will be under tension at all times, so regular replacement is necessary. An obvious way to tell that your belts are at the end of their lifespan is if the belt completely snaps or visibly stretches, or if your 3D prints are significantly over or under-sized despite your steps per mm not being changed from stock. Besides replacement of the belts, you should also give regular checkups to the tension overall as it is common for belts to slip from their attachment points, depending on what holds them in place. A quick way to properly tension is to tighten any belt tensioners to the point that the carriages stick and don’t move smoothly, then slowly loosen the tension just to the point where it runs well again.
Some 3D printers have easy belt tensioners, others are less intuitive and you will need to check your 3D printer's manual to find the best practice.
Maintain and replace your bowden tube
Unless you’re using a PTFE tube as a guide tube on a direct drive 3D printer, you’re going to regularly replace the PTFE tube integral for bowden 3D printers. The small collet that holds the tube in place has small metal teeth and over time the regular retractions and extrusions that a 3D printer makes will pinch the bowden tube until it’s so worn out the collet just can’t grip it anymore. When this happens you will be able to see a clear difference in the outer diameter of the bowden tube or if you encounter even the smallest jam, the bowden tube will slide right out of the hotend or extruder, coiling loose filament everywhere. Temporarily, you can trim the bowden tube a few mm so the collet can grip a new portion of the tube, but you can only do this so much before the tube becomes too short to allow free movement of the printhead. Once it’s short enough, you will need to order a new bowden tube altogether and replace it.
Using a printed tool to cut your bowden tubes straight is the ideal way to trim off the over-used sections of bowden tube.
Clean or replace your nozzle often
Almost every 3D printer comes standard with a brass nozzle for two reasons: brass is inexpensive to machine and is decently thermally conductive so it will heat up nicely. The benefits that make brass nozzles easy to make also means they are quite soft, well relatively so; jamming the nozzle into a glass bed or dragging it across the build surface can deform the nozzle orifice. Some 3D printing materials are abrasive, like the particles in glow-in-the-dark filament that makes them glow or the carbon fiber in NylonX, and they are abrasive enough to rather quickly tear up a brass nozzle, blowing out the diameter from 0.4mm to 0.8mm in less than a spool’s worth of filament in a worst-case-scenario. If your 3D printer just isn’t printing as well as it used to, a nozzle swap might be what you need to bring it back up to snuff. If you have a microscope or some magnifying glasses you might be able to see for yourself just how bad your nozzle actually is. Even if you never print with abrasive materials, you will want to replace your brass nozzle regularly, perhaps even once every 6 months of regular use.
Replacing a heavily used nozzle is one of the easiest things you can do to improve your print quality.
Check that your bed is level regularly
Before the dawn of affordable bed leveling sensors, it was much more common to see 3D printers using springs and wingnuts to hold the printer’s bed to its carriage. Often this would mean that as the printer moves and vibrates the wingnuts and later thumbscrews could shake themselves loose - maybe only a couple turns and in my experience even completely off the printer. Nowadays it is more often to see a bed rigidly mounted to the carriage and a sensor makes up the difference in the bed level before the start of every print. It’s much less pertinent to keep an eye on your 3D printer’s bed, but if your printer still uses springs, watch the skirt of your 3D prints at least once a week to be sure it’s not printing too far or too close.
For 3D printers with bed leveling sensors, releveling the bed is automatic and hands-free, but for simpler machines you will need to adjust the bed knobs to get things back in order.
Honorable Mention: Keep your firmware up to date
As hard as I tried to keep this list limited to ten tips, firmware updates are just too important to ignore. You should regularly check if there is a new firmware update published for your 3D printer by the 3D printer manufacturer. These will often fix bugs or introduce new features for an improved performance, but unless your 3D printer has WiFi functionality and checks for itself for new updates, you will have to do the investigating yourself. Keep in mind that most manufacturers publish beta firmware updates that are mostly ready, but may have some kinks to iron out before calling it good to go, so keep that in mind before trying out any experimental firmware that you find.
Checking that your firmware is current and without major bugs can often clear up 3D printing issues. This firmware from 2019 was well overdue for an update.
Maintaining your 3D printer is an important yet often overlooked part of the 3D printing experience. As tedious as it can be at times to clean and take care of your machine, it’s just that, taking care of it to make sure it is always running at peak performance and you don’t have any premature failures of its components. Are there details of your maintenance routine that I didn’t mention here, because I’d love to hear what you do to keep your 3D printers in tip-top shape.
Happy printing!
Article Tags
- 3D Printing
- Firmware
- 3D Design
- MatterControl
- Press Releases
- Small Business
- Automotive
- E3D
- Jewelry Making
- Engineering
- Entertainment Industry
- MatterControl Touch
- ESD Materials
- NylonX
- BCN3D
- Open Source
- Crafty Pen
- Digital Fabrication Anatomy
- How To
- Hardware and Upgrades
- Tips and Tricks
- Weekend Builds
- Top Ten
- Education
- Tech Breakdown
- Women in 3D Printing
- Project Ideas
- Advanced Materials
- Reference
- Vacuum Forming
- Pulse Dual Extrusion
- Product Spotlight
- Aerospace
- Jobs
- Military & Government
- Multi-Tool Machines
- Getting Started
- Healthcare
- How To Succeed With Any 3D Printing Material
- Creality3D
- Architecture
- 3D Printer Reviews
- Hacker of the Month
Related Products
View all related products3d printer maintenance
3DPrintStory 3D printing process 3d printer maintenance
3d printer, like any other piece of equipment, needs maintenance. And if you haven’t done it until today, it’s better to start right after reading this short article.
I won't categorize maintenance into daily, weekly, or monthly because each of you types at a different rate. For someone, a 3d printer can stand turned off all week, while for someone it works 24 hours a day. Therefore, to a greater extent, you yourself have to determine how often you will carry out maintenance on your 3d printer.
Have you ever heard of preventive maintenance? This is one of the pillars of the concept of general equipment care, the essence of which is that after the equipment has been used for a certain period of time, preventive inspections, various types of scheduled repairs and revisions are made, excluding the possibility of equipment operation in conditions of progressive wear. So you and I, as owners of one piece of equipment or a whole fleet of 3d printers, must track down the precursors of major malfunctions - whether it is extraneous noise during printer operation or an unscrewed screw.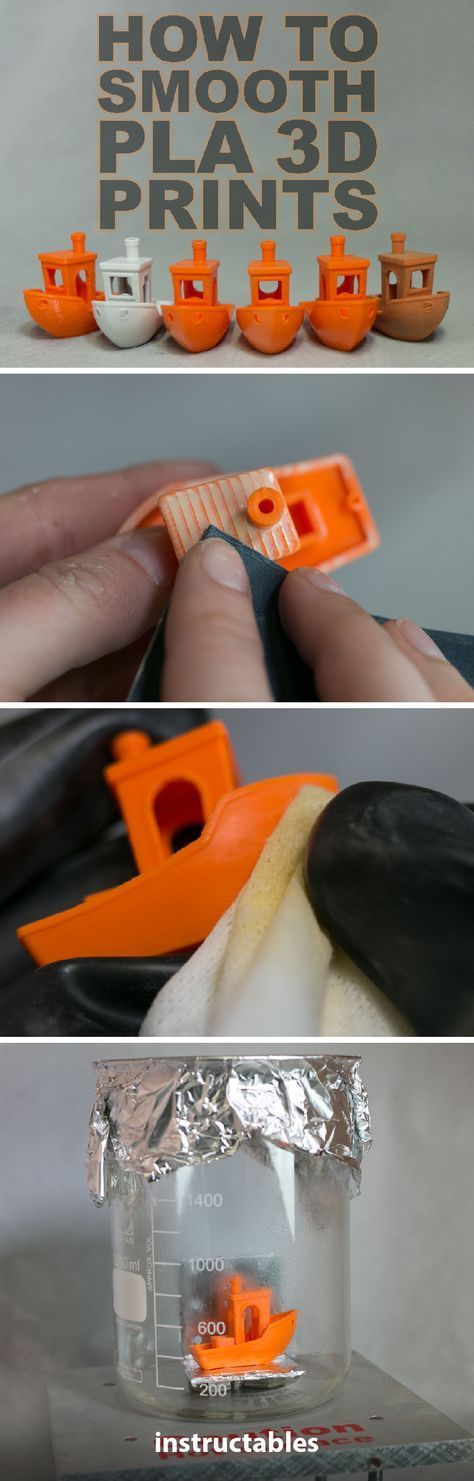
Technical inspection of the 3d printer
Therefore, the first thing we will talk about today is the control and inspection of the 3d printer components to identify deviations that lead to breakdowns, which in turn can lead to equipment downtime. What should you pay attention to first of all?
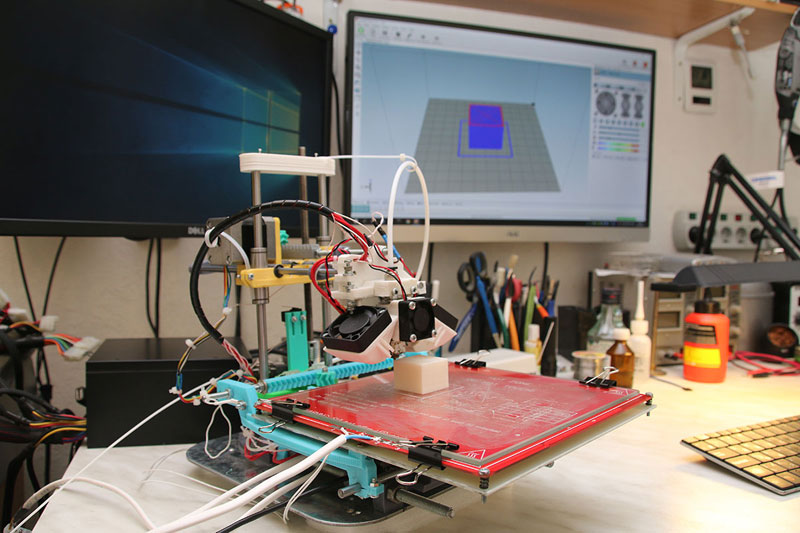
Extruder. It is worth checking it for leakage of the plastic melt and the nozzle-cylinder interface, so the accumulation of polymeric material can form either from above or below the heating block. In case of detection, at least pull the nozzle, or rather, disassemble and clean all elements from polymer material. By noticing the leaking nozzle in time, we can prevent the failure of the thermistor heaters.
From the extruder, move on to the inspection of the kinematics. First to the shafts. Be sure to control the appearance of wear on the shafts, as it often happens that the user does not notice that the linear bearing is wedged, and corresponding marks, scuffs appear on the shafts. Up to a certain point, or rather, depth, they can be removed by grinding, and then not. Therefore, the sooner such wear is diagnosed, and the linear bearing is replaced, the less likely it is to get an expensive shaft replacement.
Just like shafts, belts are subject to wear. This can be either wear on the working surface of the belt or damage to the cord. In any case, during the inspection, check the condition and tension of the belt. Why tension? Because once you pull the belt, you can break the integrity of its cord. Naturally, such a belt will need to be changed. If you notice the wear of the belt in time, you will have time to order it and the 3d printer will not stand idle, waiting for the spare part to arrive.
Speaking of belts, it's worth checking stepper motor pulleys along with them. Namely, whether there is no idle rotation. If necessary, tighten the lock screws. Always check the kinematics of the 3d printer for any play. For the most part, play will affect the quality of the surface of the printed product, but this check should not be neglected. Take the carriage and move your hands to a break, try to pull it. If you do not notice characteristic knocks, then everything is in order. If you notice, then check the tension of the screws. Axes misalignment during 3D printing can also lead to both linear bearing failure and high shaft wear.
| |
You should also check if the fan for blowing the 3d printer board and the extruder heatsink is working. I understand that in some models of 3d printers, the manufacturer did not worry about ease of maintenance, but this should not be neglected, as overheating can lead to failure of the stepper motor drivers.
If you have something to add to the inspection list, write about it in the comments, and we will go directly to maintenance.
3d printer maintenance
What actually needs to be serviced?
Let's start with cleaning. More specifically, from cleaning the filament feed mechanism. There are several ways to get it contaminated. You can get rid of one of them very easily by installing a so-called filament filter. It is a box with a sponge placed inside, which is designed to clean the bar from accumulated dust and other contaminants. A very simple thing. Link to the 3d model on Thingiverse. If you have a bowden extruder, you can clean the filament feed tube from dust by simply blowing it.
Your 3d printer table also needs to be kept clean. I periodically wipe it with a cloth dipped in acetone. It is better to do this procedure with a glove in order to avoid skin contact with acetone.
The table lift screw also needs to be cleaned of dust and dirt before being lubricated. As for the lubricant itself, I read a lot of opinions on this matter and came to the conclusion that the best choice is ordinary Litol-24. I use it both for lubricating screws and for lubricating linear bearings. We lower the table down, apply lubricant to the screw above the nut, then raise the table to the upper end position and apply lubricant from below the nut and drive the table again. Then, if excess grease has formed, remove them.
Also take the time to extruder. Clean the model fan and radiator from dust and dirt. The best way to do this is with a vacuum cleaner. In my 3d printer, the manufacturer did not bother about the ease of removing the extruder, so this procedure is quite time consuming.
Pay attention to the shafts. If your linear bearing seals are working well, then you should see a buildup of dust mixed with grease in the end positions of the axles. It is worth deleting it as it accumulates. The easiest way to do this is with a paper towel.
Moving on to the lubrication of linear bearings. In theory, they should be stuffed with the right amount of grease at the factory. Moreover, this basic packing is calculated for the entire life of the bearing, but whether the Chinese do it or not is unknown. When I bought linear bearings, I found that they are only covered with a liquid lubricant to prevent corrosion, so it’s better to remove and stuff the same lithol inside, because it doesn’t make sense to smear it on the guides, since the seals will simply remove it and nothing will get inside.
Do not neglect the maintenance of your 3d printer and it will serve you faithfully for a long time! I hope the material was useful to you.
Which lubricant is suitable for the printer?
Moving and heating parts of printers are subject to the most rapid wear and destruction. High speeds, friction, and improper operation will adversely affect parts, resulting in increased maintenance frequency and repair costs.
The most loaded friction units of the printer must be periodically lubricated. For these purposes, special lubricants are used for the printer, which can operate at high temperatures, do not interact with inks and toners, and do not affect the printing result.
Lubricant for EFELE printers is the best choice for servicing all types of printers and office equipment. It works effectively at high temperatures on thermal shafts, reduces the friction of the units and the load on the shaft bearings, and allows you to extend the life of the entire equipment as a whole.

A special lubricant is used and is equally effective for laser, dot matrix and inkjet printer assemblies. It works well at high temperatures, does not oxidize, does not dry out and does not break down. Lubricant for EFELE printers does not destroy the thermal film of laser printers, does not lead to its deformation.
This versatile material is white. If grease gets on the paper, it will not affect print quality or stain documents. It is also safe for humans; in case of accidental contact and skin contact, it does not cause allergic reactions.
EFELE grease is suitable not only for shafts and metal parts, it is also compatible with plastics and elastomers, does not cause their premature destruction. Lubricant for printers and office equipment EFELE compares favorably with analogues also in the following characteristics:
-
It has the best value for money.
-
Suitable for metal and plastic elements.
-
At high temperatures, the material does not change its original properties.
-
Does not react with toners, inks and chemically aggressive environments.
-
Works well at high loads and speeds.
-
Provides long service life.
-
Prevents jamming of shafts and movable carriages of printers.
Lubricant is available in dispensers of 10 grams. A convenient form of release allows you to simplify the application process and economically consume the material.
For thermal film laser printers
Thermal roller and thermal film are the most important elements of laser printers. With their help, the toner is melted and fixed on paper. Thermal film damage due to improper use or normal wear and tear is one of the most common problems. To avoid it, you need to use a lubricant.
The lubricant for thermal film and thermal roller must meet two basic conditions: be resistant to heat and not deform plastic parts. Unsuitable types of lubricants burn out, dry out, or vice versa become liquid and flow out.
Printer lubricant for use up to +260°C, compatible with most plastics. Lubrication must be applied to the surface of the shaft along the entire length, which has been previously cleaned of stuck toner and contaminants.
For gears
Many printer lubricants are not universal. That is, for different parts of the equipment it is necessary to use different lubricants. This increases the range of service materials and maintenance costs.
Printer lubricant can be used on metal and plastic parts. It does not destroy gears and does not change the geometry of the teeth. The lubricant creates a protective barrier that reduces friction and extends the life of plastic parts in printers and office equipment.
For bushings
Bushings are rolling and sliding bearings in the printer. They work in conditions of high speeds and friction with metal parts.