Robo 3d r1 plus print bed size
Robo 3D Highlights R1 +Plus and R2 3D Printers at Inside 3D Printing New York - 3DPrint.com
Robo 3D is not your average 3D printer company. They don’t just sell printers, they sell 3D printed model kits, too. Robo 3D’s first printer, the R1, was well received by consumers. The open-source 3D printer was launched through a very successful Kickstarter campaign in 2012. Like many crowd-funded, open-source 3D printers, there were some issues with the original Kickstarter units, but the R1 continued to evolve into a more reliable, robust machine.
At the Inside 3D Printing Conference and Expo New York, I spoke with Robo 3D’s CEO, Braydon Moreno, about the company’s new products. Moreno explained that the company is very focused on getting their printers into schools and that they’ve been very successful doing so. He also wants to make 3D printing accessible to those new to 3D printing — so while Robo 3D offers 3D models for free download on their site, they are also bundling 3D printed kits with their printers, that come boxed up just like a traditional model kit. That’s right, you don’t have to print out the files, you’ll be able to get your feet wet with 3D printing by purchasing one of their model kits. I think this fits in well with Moreno’s vision for getting Robo 3D printers into schools and novice users’ hands. The company is also enticing consumers with their scented PLA filament, which comes in apple, blueberry, grape and strawberry flavors.
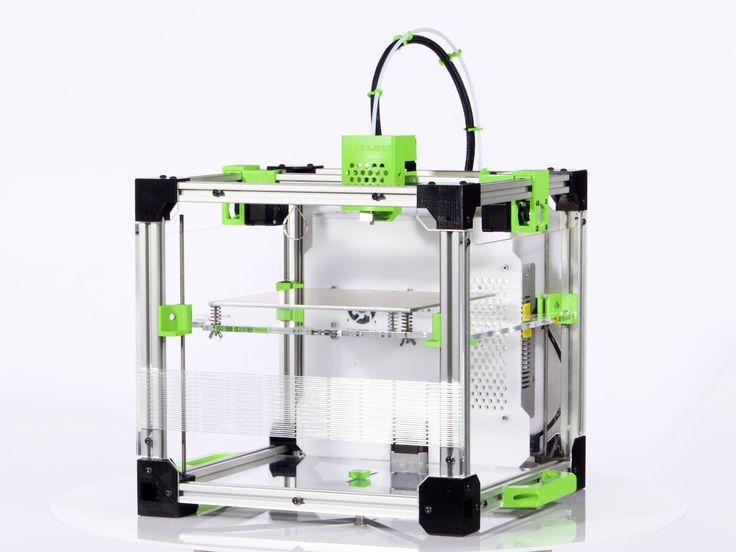
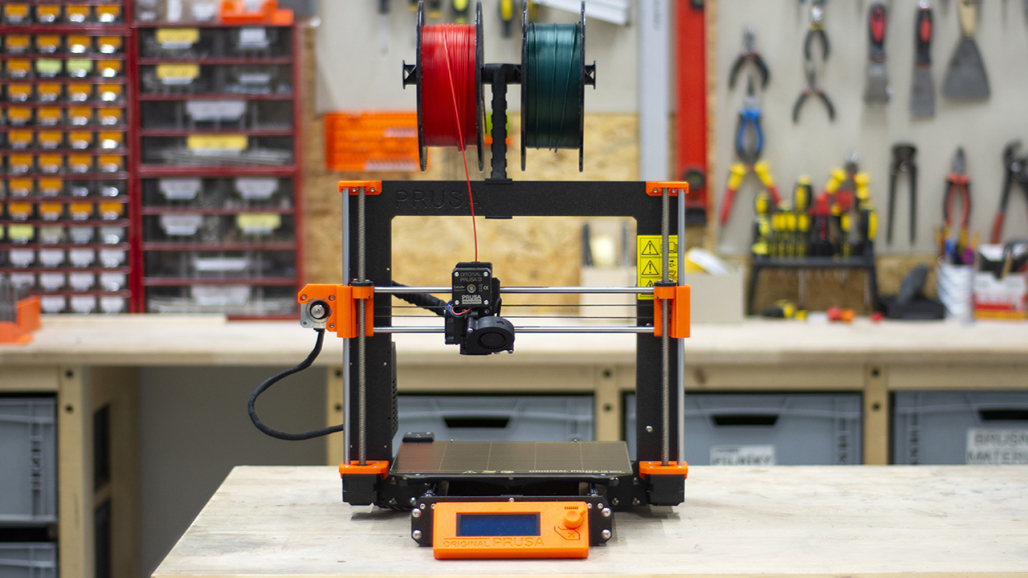
Robo 3D’s R1 +Plus replaces the original R1 3D printer and features a heated bed with auto-leveling, has a build size of 10″ x 9″ x 8″ and can print down to 100 microns. The R1 +Plus will work with any open-source 3D printing slicing software. Robo 3D partnered with MatterHackers to design a customized version of Matter Control Software for use with the R1 that runs on Windows or Mac OS. While it may look like the original R1, this version features new linear motion and lead screws for better quality, performance and consistency. It also includes a better filament feeding system for ease of use. The new Hexagon All Metal Hot End heats up to 290°C, giving customers the ability to print in many high temp/exotic filaments.
The R1 +Plus has your 3D modeling needs covered, as it comes with a 1 year subscription to AutoDesk Fusion 360 ($4300 value) and 20 pre-installed 3D models for printing. 24/7 customer service and a 6 month parts replacement warranty will keep you up and running. In fact, if anything breaks down on the R1 +Plus during the 6 month coverage window, Robo 3D will send you the replacement part and a video showing how to install it yourself. The R1 +Plus, which was recently made available in select Staples and Best Buy locations, is currently on sale for $799.99 (R1 “The Original” Refurbished printers are available for $499.99).
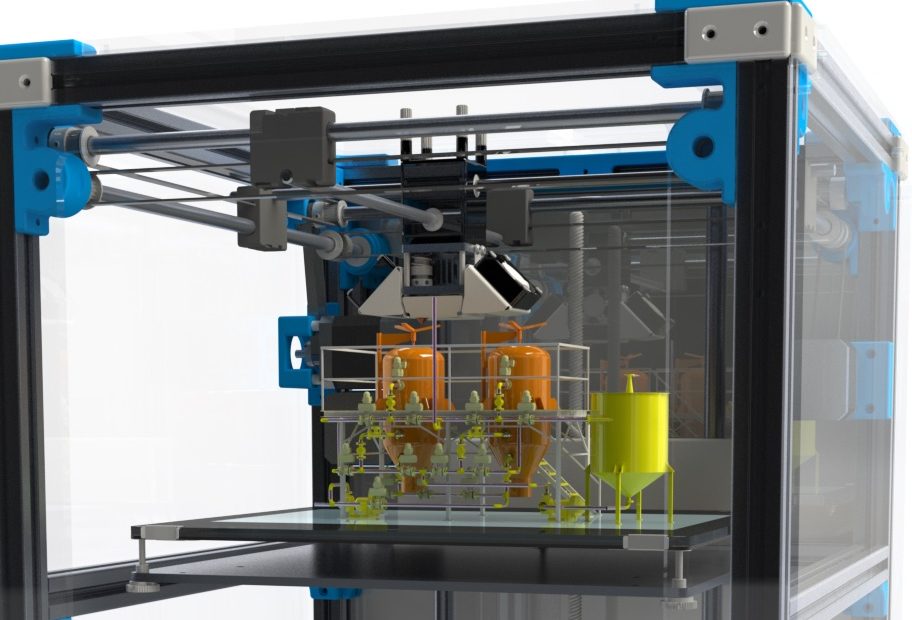
Robo 3D R2 render
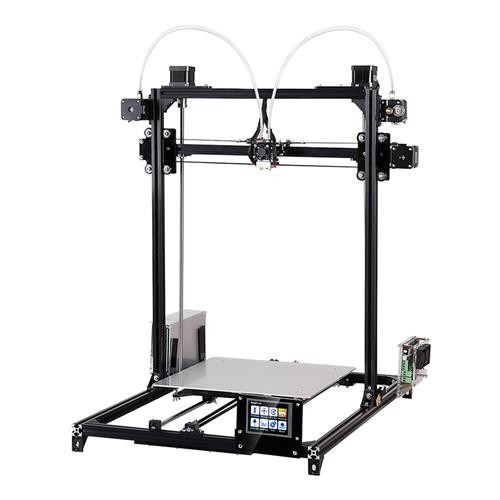
Robo 3D has a couple interesting 3D printers coming down the pike. The R2 was first hinted at over a year ago at CES and has gone through some significant changes since then. The semi-enclosed R2 features a 8″ x 8″ x 8″ build volume and it can print up to 2 to 4 times faster than the Plus, at up to 300mm per second. While the R2 comes with a single extruder, it can be upgraded to a dual extruder, and I think they should seriously consider branding a dual extruder version as R2-D2 (had to do it, sorry not sorry). Artoo, I mean the R2, can print at resolutions as high as 20 microns and features a 5″ color touch screen with SD card slot, auto-leveling and wifi. It has mobile connectivity; you can print directly from your smartphone or tablet PC. Not only can the R2 print all the same filaments as the R1 +Plus (PLA, wood, bronze, carbon fiber, etc.), but it also supports using paste extruders for chocolate and food, ceramic extruders and even bio-printing extruders. The R2’s estimated sale price is $999.99.
Joining the R2 is the R2 Mini. The R2 Mini has many of the same features as its big brother but in a smaller package. It can also print at 20 microns, at up to 300mm/sec., features auto-leveling, wifi and mobile connectivity and can print in all the same materials (with the possible exception of the paste, ceramic and bio-printing extruders). The R2 Mini has a 3.5″ color screen with scroll wheel and a build volume of 5″ x 5″ x 5″. The estimated sale price for the Robo 3D R2 Mini is $599.99.
Robo 3D is a company on the rise, with a strong focus on getting their printers into schools and into the homes of the average consumer, with little or no previous 3D printing experience. It seems with Robo 3D you get a lot of printer for a low price point and the flexibility of an open-source product. I’ll be eagerly awaiting the release of the R2…hopefully the Jawas won’t get to it first.
Below is a Robo 3D promotional video and a very through “getting started” video for the Robo 3D R1 +Plus:
Stay up-to-date on all the latest news from the 3D printing industry and receive information and offers from third party vendors.
Tagged with: braydon moreno • Inside 3D Printing 2016 New York • robo 3d • robo 3d R1 +Plus • robo 3d r2 • ROBO 3D R2 Mini
Please enable JavaScript to view the comments powered by Disqus.
Robo 3D R1 + Fully Assembled 3D Printer
Sorry, this product is currently unavailable
Perhaps some of these categories are of interest:
- 3D Printer Accessories
- 3D Printer Filament
- 3D Printer Resins
- 3D Printers
- CNC Machines
- Clearance
- Sale
- Digital Designs
- Education & Curriculum
- Laser Cutters & Engravers
- Sale
- Refurbished Machines
- Software and Add-ons
- Home
- Store
- Robo 3D R1 + Fully Assembled 3D Printer
The Robo 3D R1 + is an affordable, fully assembled 3D printer with an all-new linear motion and lead screws for better quality, performance, and consistency. The improved filament feeding system and enhanced leveling makes the Robo 3D R1 + better than ever. Enjoy a low and precise layer height of 0.01mm when printing with PLA, ABS or other specialty materials without additional assembly or modification. Make your ideas come to life with the Robo 3D R1 + with an impressive build volume of 10 x 9 x 8 inches.
Remove from wishlist Add to wishlist loading...
Product No. M-J11-2NE5
| List Price: | $499.00 |
|---|---|
Use your SD card or print directly from your computer with this affordable, and fully assembled, 3D printer. The automatic calibration makes it easy to print 3D objects with greater accuracy and quality. The Robo 3D R1 + has the poise of 100-micron resolution which adds value without losing the quality in your prints. And with the large build volume, it is over twice the size of other 3D desktop printers at a fraction of the price.
Includes
- Fully assembled printer and power cable
- SD printing card
- Upgraded rods and linear bearings
- Upgraded linear motion system
- Prints in PLA, ABS, as well as LAYWOO-D3 , t-glase , and other specialty filaments
- One 300g spool of Robo blue filament to get your project started
- Six-month parts replacement warranty
Tech Specs
- With Spool Holder: 15 x 22 x 18.
 25 in (38.1 x 55.88 x 46.35 cm)
 - Without Spool Holder: 15 x 17 x 18.25 in (38.1 x 43.18 x 46.35 cm)
- Single Head Extrusion
- 8.4 x 8.4 heated surface on 10 x 10 bed
- Large 10 x 9 x 8 inch build volume
- Prints in PLA and ABS as well as multiple specialty filaments
- 0.4mm Hexagon All Metal hotend nozzle diameter; prints with any material available.
- Uses 1.75mm filament
- Plastic injection molded parts for longer lasting 3D printer
- 8 Im8uu bearings for precise movement
- 5 Nema 17 motors with 48 oz/in holding torque
- 12V 30amps switching power supply (good for both 115v and 230v outlets)
- 100 Micron Resolution
Why Buy A Robo
Enjoy a six-month manufacturer warranty which covers parts replacements and unparalleled service and support from MatterHackers as well as free shipping on all our items. Each Robo 3D unit ships with a custom version of MatterControl so you can get the most out of your printer. Robo 3D, based in San Diego, California, started as an initial Kickstarter project exceeding their campaign goals to provide an exceptional 3D desktop printer at an extraordinary value of $499 unmatched by competitors.
Check out the ROBO 3D R1 in action!
Questions about your ROBO 3D R1 PLUS? Check out our forum !
Monday with kickstarter: Review of art Nonists #17
3D Printer Gigabot-Gigabot
We have already written quite a lot about various 3D printers on kikstarter (see, for example, materials about 3DODler and RoBo 3D Printer), so let's move on to the specifications of this project.
Gigabot, as the name implies, differs from its counterparts in impressive size. It is a 3D printer with the largest print volume of any printer currently on the consumer market. With it, you can print really large objects.
The dimensions of the printed surface are 600 × 600 × 600 mm, the volume is 215 thousand cm³. The area of the printing platform is more than 3 thousand cm³. The print layer resolution is 100 microns. As consumables, you can use any of the two standard 3D printing plastics: PLA and ABS. The thread diameter is 3 mm or 1.75 mm. The mechanics of the device are optimized for reliability and resistance to long-term continuous printing (on tests, the printer printed without problems for 24 hours without the slightest interruption). The design of the Gigabot is open, providing easy access to print controls and finished products. The printer weighs 68 kg.
For the Austin, Texas-based team, this is the first startup ever designed to be promoted through Kickstarter. The calculation was justified, in 2 days they have already collected the requested amount of 40 thousand dollars, and 58 days are left before the end of the campaign. Stretch goals are not marked yet.
Gigabot cost $2,750 as parts for self assembly, $4,000 assembled and calibrated (minimum setup and assembly required). Initially, for the delivery of a 3D printer outside the United States, the developers requested 1.5 thousand dollars. But they could not resist the hail of indignant comments from potential backers, now the cost of delivery will be calculated personally for each backer in individual correspondence.
Gigabot 3D Printing launched on Kickstarter on March 10, 2013. End date: May 9, 2013. Goal: Raise $40,000. As of March 11, 44 thousand dollars have been collected.
A new type library in Africa - Librii
High -speed Internet changed our world, changed your lifestyle and ways to work with information. A technological failure at a provider lasting only a few hours can completely paralyze the work of an entire company or a lone freelancer. Even if you don't surf social media and multiplayer online games, continuous internet access is vital. Without it, your client bank will not work; it is impossible to choose and book a place in a hotel or a plane ticket; a huge database of information becomes inaccessible, which we used to turn to literally on the go for help and additional information, etc. , etc.
But is the whole world using the network? Africa currently has 1 billion people. And only 13% of them have access to the Internet, regardless of its quality. Only 3% of Africans use broadband Internet services. Meanwhile, access to knowledge and opportunities provided by the global network is a prerequisite for technological development, social mobility and, ultimately, well-being.
The Librii project is about to create easy access points in Africa. It was initiated by the non-profit organization Architecture for Humanity DC (Washington). They call access points libraries of a new type, since the services of Internet cafes will be supplemented by the ability to access paper books and educational programs. Visitors will be served by professional librarians who will help find the most relevant sources of information regarding the requests of library clients.
Function.
Despite the fact that the fundraising campaign was launched by a non-profit organization, part of the services of the new type of libraries will be paid. The business model is to raise enough funds to make libraries financially independent from the constant collection of philanthropic funds and the request for government subsidies. All profits will be directed to the further development of the library network.
Free and paid services.
A pilot library will be built in Accra, the capital of Ghana. Architecture for Humanity DC studied 55 countries in Africa, taking into account a variety of factors, including per capita income, literacy, IT infrastructure, political stability and economic growth. It turned out that Ghana, one of the leaders of the industrial revolution in Africa, is an almost ideal platform for pilot testing libraries of a new type. An important factor was the fact that Accra is a very "young" city, 56% of the population is under 24 years old (the population of Greater Accra is now approaching 4 million people, and is increasing by 3. 3% annually).
The library itself will consist of several buildings. The base building will house librarians, space for training programs and an on-demand printing service.
Base library building.
The modular library building (e-hub) will house sections with computers connected to the Internet.
Modular library cabinet.
The base building and library buildings will be covered with a sun roof, the space under which forms a plaza - an open public space.
Library Plaza.
In 2013, it is planned to create only one library, test all technologies, identify shortcomings, and from 2014 organize a whole network of libraries across Africa. For funds for the second stage, the organizers are going to turn to major charitable foundations and organizations that actively support digital libraries: the Bill and Melinda Gates Foundation (Gates Foundation), Google, Microsoft, etc.
Library module interior.
Backers, who wish to help spread digital library technologies in Africa, are waiting for numerous souvenirs (branded T-shirts, pens, reader covers, etc.) and priority access to information about the construction of the library.
The Librii project launched on Kickstarter on March 5, 2013. End date: April 4, 2013. Goal: to raise 50 thousand dollars. As of March 11, 24,000 dollars have been collected.
Reviewed by Tribble.
Printing from the Curao program on the 3D printer Wanhao Duplicator i3
1.1 Appendix Slizer CURA
General representation 9000 9000 9000
For new users, we recommend that you are working through the CARA application. it has a special mechanism for cutting models - slicer. For software software, we recommend using Repitator.
Slicer
This program uses a 3D model (usually in STL/OBJ formats, etc.) to plot the trajectory of the 3D printer's print head based on the settings specified by the user. In the slicer settings, the user selects the nozzle diameter, printing and moving speed, layer height, etc. This information is exported from the program as a gcode file. A gcode file is a simple text file with a series of text codes and a list of the complete x, y, and z axes of the coordinate system used to print the 3D model. We recommend that new users get started with the Cura app, as it also includes a central host printer.
1.2 Installing Cura
Download Cura from our website and run the installation exe file. In the first window, you must select a location to install the software. After you have chosen the installation path, click the Next button, as shown in the screenshot.
After clicking the next button ( Next ), the next window will ask you to select the types of files you would like to open in the application
If for some reason the program was installed in English, then go to the File - Program settings section, change the language to Russian and restart the program go to the tab Printer , and in the drop-down menu select Add New Printer Wizard . In the window that appears, select and mark: Other ( Ex : RepRap , MakerBot . witbox 9018) and so on. Then select Pursa Mendel i 3 and proceed to the next section. After adding the printer profile, go to the "Printer" - "Printer Settings" section again to adjust the print area size according to the Wanhao duplicator i3 specification as shown in the picture:
In this section you can remove the Ultimaker 2 printer profile as unnecessary and rename the Prusa Mendel profile as Duplicator i3 for convenience.
Load the object using the File Load button as shown below and set the print settings as shown in the image.
1.2 Printer Quick Setup
After installing the Cura application for the first time, you will be shown the main interface screen (photo 1. 1)
1)
Photo 1.1 Printer Quick Setup
Select print quality settings.
Selecting the quality of print options is located in the upper left corner of the window. For most types of plastic, there are following types of printing: high quality, standard quality, or settings for fast printing. Some of the exotic plastics are only suitable for standard print settings.
High print quality ( HIGH Quality Print ) 9000 9000 9000
9000 This type of printing has the smallest layer height, which makes each layer thinner, and thus the transitions between layers are less noticeable. The total print time, with this setting, increases, since the printed object will consist of more layers.
Medium print quality. ( Normal quality print )
The medium print quality setting is designed for producing parts with a medium level of detail. These settings make the transitions between layers rougher (stepped) than with high print quality, but the print time is reduced.
Fast print . (Fast low quality print)
The fast print setting is recommended when printing a part does not require a high detail print. These settings are mainly used for quickly printing simple shape objects.
Material selection
Choose the plastic you want to use. The Wanhao i3 comes with ten meters of PLA (Polyactide) plastic that you can use for your first prints. In the Diameter column, you must specify the value 1.75, because. the diameter of the plastic with which your printer works is of such importance.
Layers support . (Print support structure)
The Wanhao i3 printer can print models with floating elements without support material depending on the size of these elements. Select the option Print support structure if the model to be printed has a lot of overhangs and using support material for printing it will give the best result.
Territory. ( BRIM )
Use option BRIM , If necessary to increase the surface area of the press, thus ensuring the best adhesion . Around the outer part of the first layers of the part, an enlarged silhouette of the part is printed, which promotes adhesion of the first layer and prevents the part from peeling off the surface during printing.
Loading
Select the model you want to print. Click the Load Model button or select File - Load model from the top tab. As soon as the file is loaded, you will see a 3D image of the object on the work surface. Click on a model to view a variety of options.
Model position ( Model orientation )
Move the model to reposition it and prepare it for printing on the Platen. Left click on the model and drag it to the desired location. The corner highlighted in black represents the left corner of your printer's build platform. To view the model from different angles, press the right mouse button and move the cursor while holding the button.
Photo 1.2: Options after model selection.
Rotate ( Rotate)
The Rotate button allows you to position the model in all three coordinate axes. As soon as you click on the Rotate button, three circles will appear around the model. The red circle allows you to rotate the model around the Z axis. The yellow circle allows you to rotate the model around the Y axis. The green circle allows you to rotate the model around the X axis.0002 Lay Flat ( Lay flat )
The Lay Flat button ensures that the flat part of the printed part is located on the base of the build platform. We recommend using this option after rotating the model in the Z axis.
Reset button
The Reset button returns the model to its original position, as defined by the CAD program used to create the model.
Button Scale
The Scale button displays the dimensions of the model along with the ability to change the scale in the X, Y, Z axes. Any value less than 1.0 reduces the size of objects, a value greater than 1.0 increases the size of objects. The default scale is set to standard. This option also allows resizing one of the axes to automatically resize the remaining X, Y, or Z axes. To cancel this option, select the Lock symbol at the bottom of the zoom window.
Photo 1.4 Model Scaling
1.3 View Options
This section allows you to view the model in a variety of ways. The preview option is handy for checking all the details before printing.
Standard View
The Standard View shows the hard outer surface of the model (Photo 1. 5).
5).
Photo 1.5: Standard view of model
Overhang
The Overhang mode displays the areas of the part where support material needs to be applied. In photo 1.6, the areas highlighted in red show projections, irregular angles, and parts that require support material.
Photo 1.6: Overhang View
Sectional View (Ghost)
The Ghost option gives the model a translucency that allows you to see what is behind the outer layer.
photo 1.7: View
mode x - RAY 9036
X -RAY mode is very similar to the mode of view. It allows you to look inside the objects and make sure that all the internal details are in order.
Photo 1.8: X-Ray View
Layers
This option is used to view the print head path and to check for missing layers or voids. Use the guide bar on the right side of the window to move up and down the layer path.
Photo 1.9: View in layers
Photo 1.10: Overview of specific layers .
1.5 Removing the printed part from the platform
It is necessary to wait some time for the printer to cool down completely after the printing process. The finished part will be easier to remove from the heated base if it is allowed to cool to the optimum temperature. The plastic will harden and be easier to remove. The print head of the printer will move forward and you can remove the finished model. Once the heated base has cooled down, use the tools provided with the printer to remove the model. Gently insert the spatula between the printed model and the heated base. With part of the model slightly raised, turn the blade and slide the sharp edge down to gently lift the finished model from the base.
1.6 Full setup
Full setup is not recommended until the user has sufficient experience to confidently handle all the options and operations of the 3D printer. Simple settings will give good results for most models. The first time you install Cura, it defaults to the Quick Print option. Go to full customization for more control over the slicing process and gcode generation. Select the Expert tab - go to the Switch to full settings section. There is also access to Expert settings.
Photo 1.12: Screenshot image of full setup operations.
Profile download. ( Load profile)
The first time you switch to full setup, Cura returns to general settings. We recommend using the profiles we have verified, available here: www.wanhao3dprinter.com--download. You need to choose a profile that matches the material of your plastic and the required quality. Once you have loaded the profile, you can then load the file into Cura as follows: File - Open Profile. Select the desired profile. This way all settings will be automatically updated for use on your printer.
1.7 main tab options
Layer height (Layer height)
The lower the layer height, the higher the detail of the printed model.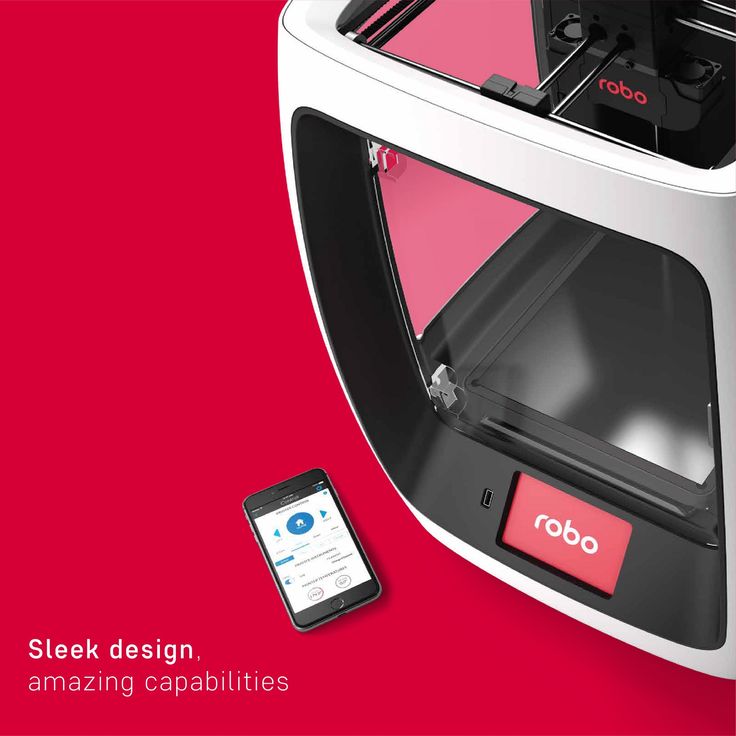
Photo 1.13: Difference in layer height
Wall thickness0003
The wall thickness parameter defines the number of external walls in your model. Your 3D printer is equipped with a 0.4mm nozzle.
Retraction
The retraction mode allows the printer to pull the plastic out of the print head as it moves. We recommend using this feeder for all types of plastic.
Bottom/Top Thickness (mm)
This option determines the thickness of the top and bottom layers of the object. The higher the number, the thicker the upper and lower layers of the part, which has a positive effect on the connection of the part to the print surface and giving the part a better quality. We recommend that this digital indicator vary depending on the height of the layer.
Fill density (Fill destiny)
Expressed as a percentage. 0% is an empty part, and 100% is a model completely filled with plastic inside. Fill density between 20% and 40% has been found to be suitable for most parts.
Print speed ( Print speed ) (mm/s) If no other speeds are defined, your printer will automatically switch to the default speed. The speed varies depending on the plastic material you are using.
Printing temperature ( Printing temperature )
When using different types of plastic, it is necessary to set the required temperature for the heated worktable and for the print head. Printing will not start until the set print temperature is reached. type
Support layers are required for correct printing on some models This happens when the model has an angle from 0 to 45 degrees with respect to the heated desktop. It is highly recommended to position the object on the desktop in a way that minimizes or eliminates the need for support.
Supports between worktable and part
The printer will only apply support layers between worktable and model. The red part in the picture is printed with this type of support.
Support wherever required
The printer will apply layers of support wherever it is technologically needed. The green part in the picture is printed with this type of support..
Photo 1.14: Printing of supporting elements.
Adhesion of the part to the work table. ( Platform adhesion type )
In some models, only a small area of the surface of the part in contact with the desktop during printing can cause part sticking to the desktop, this can cause To avoid this problem, use the Brim or Raft options. Raft is best used when the model has few points of contact with the heated platform and has ridges.
Edge ( Brim )
The backing uses a single layer of plastic that supports and surrounds the model. The substrate increases the area of contact between the desktop and the model, therefore, prevents the model from sticking off the desktop during printing. Brim settings are located in the Expert settings section.
Substrate( Raft )
The substrate is also used to increase the contact area of the part with the desktop, but in the main in printers not equipped with desktop heating. Installation Options
Head diameter
Head diameter setting is one of the most important settings. Make sure you update the setting data regularly according to the average head diameter. If the diameter of your plastic is indicated as 3 mm, then in fact it is 2.9mm +/- 0.1 mm. This will be an accurate value as it will allow your printer to calculate how much plastic is being sent to the print head.
Plastic flow (in %)
This option controls the amount of plastic fed in relation to the speed. This option is mainly used to control variations in plastic density. Set this option to 100% and get a high surface density.
1.8 Expanded Option Options
The thickness of the nozzle ( NOZZLE SIZE ) (mm)
9000 9000 9000 9000 9000 9000 9000 9000 9000 is needed for this. The slicer uses this option in conjunction with other settings to determine how often plastic is fed into the print head.
Nozzle Nozzle .
Plastic output rate ( Retraction Speed ) (mm/s)
The rate of withdrawal of plastic determines the speed at which the plastic is unloaded from the circuit (movements between layers, etc.). We recommend setting the speed to 25 mm/s.
Retraction size ( Retraction distance )
The plastic ejection size determines how much plastic is ejected from the print head during its idle movement. Changing this distance depends on the temperature settings and the type of plastic. High thermal plastics such as PLA polyactide are best for long feed distances. A distance of 1 to 3 mm is a good starting point.
Thickness first layer (Initial layer thickness)
This option allows you to set the thickness of the first printed layer on the heated bed. The high height of the first layer prevents the model from sticking off the platform. The Wanhao Duplicator i3 automatic layer detection system is activated when changing from the default settings to the first layer thickness settings.
Line width of the first layer ( Initial layer line width)
This option controls the lay width for the first layer. The wider the plastic laying line, the greater the adhesion to the platform. To start, set the rate to 125%. For models with moving parts, a narrower plastic laying line is recommended.
Travel speed
This setting determines how fast the print head is moving when the plastic is not being ejected. Recommended standard speed is 125-150 mm/s.
Lower Press Printing ( Bottom Layer Speed ) 9000 9000 9000
Controls the seal of the first layer. The slower printing speed of the first layer contributes to the best adhesion of the layers.
Infill speed
The option determines the speed of the print head during the filling of the internal cavity of the printed part with plastic. It is acceptable to use high speed, since the inside of the model is not visible to anyone. If the fill is too fast, the plastic may get caught on the print head, which can lead to poor print results.
Filling speed of the model with material on the outer walls ( Outer0185 shell speed )
This setting is the most important as it controls the speed of the print head on visible layers. The slower the print speed, the more beautiful the detail will be.
Speed of filling the model with material on the inner walls0186
This setting affects the vertical walls that are located between the outer walls and the material that fills the model. This process is not noticeable, but helps to hold the outer walls and inner walls of the part. We recommend using this speed setting between the plastic filling speed of the part and the speed of printing the outer wall of the part.
Minimum time spent per layer ( Minimal layer time )
This option determines the minimum amount of time the printer spends laying each layer. If the print time for a layer is less than the time set in this option, the printer automatically slows down to catch up with the minimum standard time before moving on to the next layer. After reaching this run time, the models will be cleaner and more accurate.
Turning on the cooling fan ( Enable Cooling FAN 9000 9000
This option allows the Option for Extra Out of Extra. The settings are adjusted in the Expert settings section.
1.10 Plugins
Plugins are general settings that change the model at specific points. Two of these that come with the Cura software suite are the Z-Axis settings and Stop at Layer Height. More plugins and other information can be found here: http://wiki.ultimaker.com/Category:CuraPlugin. To activate, highlight the desired plugin and click the dropdown arrow below the plugins window.
Photo 1.16: Screenshot of plugin location
Axis settings Z .
This option makes major changes to certain Z-axis heights. You can select the Z-axis height or layer number for which you want to make changes. Then choose how to change the settings. You can change the temperature, fan speed, print speed. Fine-tuning certain STL files results in cleaner prints.
Stop at axle height Z .
Stop printing at a specified height in the Z-axis. You can specify where to move the print head and how much plastic to load. This setting is mostly used when turning on plastic colors in the middle of printing.
1.11 Start and end setup gcode
The standard gcode is valid for the movements and operations of complex automatic printers. By adding gcode to the beginning or end of the file, you can change the printing. A complete list of gcode commands can be found here: http://www.wanhaosdprinter.com--download.
1.12 Expert settings ( Expert Settings
Expert settings (Expert Settings) are offered by more specialized options for cooling, internal values, internal cules. To go to this section, use the following path: Expert - Open Full settings or press Ctrl + E on the keyboard.
Photo 1. 17: Expert settings
This section is dedicated to describing how the extruder extracts the plastic.
Minimum travel
Minimum printhead travel distance to eject. If the printhead does not move to the moving mechanism, then the model will not be removed.
Combing
This option prevents the print head from passing through holes in the X and Y planes during printing. This increases the printing time, but prevents the filaments from getting stuck in the holes as they pass through. We recommend enabling these settings.
Minimum ejection before ejection
This option controls the ejection distances if the print movement exceeds the minimum ejection count. This option stops the extrusion process if the extruder has not ejected X mm of plastic since the last extrusion. With this setting, the print head is raised by X mm before being extruded, preventing sticky liquid and fibers from appearing on the print.
1.14 Skirt
The Skirt option creates a line around the object from the outside. Mostly used as a safety net to avoid skipping the plastic at the start of printing.
Line count
This option counts the number of loops that the skirt command creates around an object. .For smaller models, you will need to set more loops.
Initial distance
Defined as the distance from the model, where . It is recommended to be close to the model to use the guard as an envelope to prevent blowout,
Minimum length
Minimum extruded line length for skirt. Using this option will print as many lines as needed to meet the minimum criteria you set.
1.15 Cooling
This chapter describes the operation of the print head cooling fan during printing. The fan will not start until the speed exceeds 25% of the speed you set. If the print speed slows down due to the minimum layer print time setting, the fan will run between the minimum and maximum speeds based on how slow the layer print speed is.
Fan for full height
At the height in the Z-axis, the fan turns on at the minimum percentage of settings. Varies from 0% to minimum fan speed, depending on layer height.
Maximum fan speed
Minimum fan speed
The fastest speed the fan can run. As soon as the print speed slows down to the value of the set minimum layer print time, the fan will start to run between the minimum and maximum speed. The maximum fan speed is reached when the printer needs to be slowed down by 50% or more.
1.16 Supports
In this option the support material is defined as a sample. In the basic settings, you need to enable support for it to run.
Print structure
Support material can be selected in net or line pattern. The grid will be staggered in the x and y directions. The linear option creates lines along the y axis for support. The mesh version of the support is more reliable than the linear one, but it will be more difficult to remove it.
Protruding corner for support
The option determines where the support material is formed. As a rule, the model can be printed at an angle of 45 to 90 degrees with respect to the print head without support. We recommend setting the settings to 45 degrees.
Infill Amount
This setting determines the print density of the backing material, similar to the internal infill percentage. The higher the density of the bay, the stronger the support material, but it will be more difficult to remove it and the material consumption will increase.
Distance X/ Y
This option determines how far the support material is located from the created model in the X/Y plane section.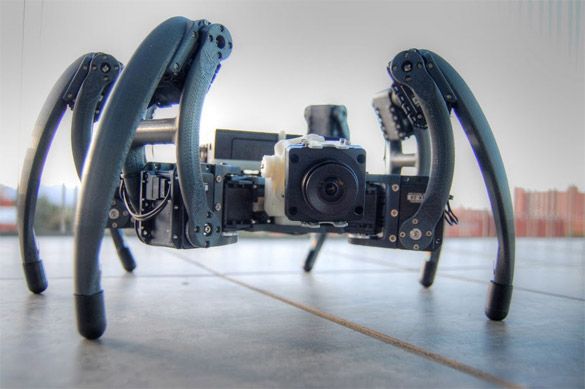
Axis distance Z.
This option determines the distance of the support material from the created model in the vertical direction. A smaller value makes object support more reliable, but harder to retrieve.
1.17 "Black Magic"
This section allows you to convert the model into a hollow shell inside. Make the outer contour in the form of a spiral. This will cause the Z-axis to constantly move up when printing a single-layer shell outer wall. The result is that the lines of the layer are preserved, making the surface smoother. Use these settings only for special artwork, as the model will be very fragile.
Grid surface only
The option causes the print to flood the model from the outside, making it completely hollow with a single shell wall. The only difference between this option and the spiral option is that the z-axis is constantly moving. Thus, a layer is printed, and then it moves to another.
1.18 Boundary border
The bounding border surrounds the base of the print, helping it to adhere firmly to the heated platform. This takes only one layer of thickness, and the model is easily removed from the platform. This option determines the border formation process when enabled in the main settings.
Limiting border material cost
Sets the distance that the border covers outside the model. The larger the size of the manufactured protective border, the better the model keeps on the heated platform.
1.19 Barrier
Barrier is a platform located under the model, designed to increase the stability of the model; prevents it from falling. The option first lays the support material and then the platform over the support. On top of this platform, a model is produced. The bottom surface of the printed model will not be completely clean. Generally, a fence is not recommended.
Additional field
The distance around the outside of the model created by the fence. Useful for preventing lower layers from falling out.
Spacing between layers
This option delimits the space between the guard lines. The use of less space between the lines makes the support structures closer together, improving the strength of the barrier, but more material is wasted.
Main thickness
The option defines the thickness of the fence.
Base line width
Defines the width of the insurance material to the fence. This setting determines the print quality of the surface of the barrier layers.
Surface thickness
This option defines the surface thickness of the barrier layers. The surface of the layers is a platform that is built on supports.
Surface Line Width
This option defines the thickness of the top layers of the platform. As a rule, this setting can be used for the size of the nozzle, since the surface quality of the moving boom is not so important.
Air gap
The option defines the distance between the fence and the print. The larger the gap, the easier it is to remove the model, but the top of the print will look worse.
Surface layers
Defines the number of layers that form the "platform" of the barrier. If the gap between the layers is wide, then you can increase the number of layers to make sure the platform is strong.
1.20 Bug fixes
There are other advanced and experimental options. They are designed to help correct errors in models and adapt them to the 3D printing process. They don't always work. Be careful when using these options as they may have an unintended effect on print quality.
Connecting everything (View A)
Attempt to correct all external errors while leaving the internal holes intact.