Raspberry pi 3d printer camera
How to control your 3D printer using OctoPrint and Raspberry Pi
All tutorialsControl and manage your 3D printer and more using OctoPrint and Raspberry Pi. Here’s everything you need to know to get started!
What you’ll need:
- Raspberry Pi
- Suitable power supply (depending on model of Raspberry Pi — see Choosing the right Raspberry Pi below)
- microSD card (we recommend a minimum storage size of 8GB. If you plan to use a camera and save timelapse recordings of your prints, you’ll need a larger capacity card)
- SD card adapter
- USB cable (this will depend on your printer)
- Raspberry Pi camera or USB webcam (optional)
For the initial SD card setup, you’ll also need:
Another computer connected to your network. We’ll refer to this as “your usual computer”, to distinguish it from the Raspberry Pi computer that you are setting up for retro gaming.
Choosing the right Raspberry Pi and accessories
While older Raspberry Pi devices are supported by OctoPrint, we’ll be using a 2GB Raspberry Pi 4 for our tutorial, because this will give you a faster, smoother experience. With this model you will need a USB-C power supply. If you plan to use an older model, you’ll need a micro USB power supply instead.
Installing OctoPi
We’re going to use an application called Raspberry Pi Imager to write Raspberry Pi OS to our microSD card. Raspberry Pi Imager is available for free for Windows, macOS, Ubuntu for x86, and Raspberry Pi OS. You can download it to your usual computer here.
Open Raspberry Pi Imager and connect your microSD card to your usual computer using a microSD card adapter. Now we can go ahead and install OctoPi to the SD card. In Raspberry Pi Imager:
CHOOSE OS: Select Other specific purpose OS, followed by 3D printing.
Next, select OctoPi, then OctoPi (stable).
Open the advanced menu: select the cogwheel icon in the bottom right corner.
Enable SSH: check the Enable SSH box and set a username and strong memorable password.
Configure wifi: enter the SSID of your network and its password, then select Save to close the advanced menu.
CHOOSE STORAGE: select your microSD card.
WRITE: lastly, click to write OctoPi to your microSD card.
Set up your Raspberry Pi
Once your microSD card is ready, insert it into your Raspberry Pi. Next, connect your 3D printer using your USB cable. The type of 3D printer you have will determine what type of USB cable you need. For this tutorial, we’re using an Ender 5, which requires a USB-A-to-mini-USB cable.
Lastly, connect the USB-C power supply to your Raspberry Pi.
Set up OctoPrint
Open a web browser on any computer connected to the same local network as your Raspberry Pi, and type http://octopi.local into the address bar. This will allow you to set up OctoPrint. Follow the on-screen instructions to set up OctoPrint and enter details of your 3D printer. Once complete, OctoPrint will restart and you’ll be able to get printing by following the on-screen instructions.
You can access OctoPrint at any time by visiting http://octopi.local on a computer or mobile device that is connected to the same network as your Raspberry Pi.
Optional: add a camera
Add a Raspberry Pi camera or a USB webcam to your Raspberry Pi to allow you to keep an eye on your model as it prints.
To do this, unplug your Raspberry Pi from the power supply, and connect your Raspberry Pi camera or webcam.
Reconnect the power supply and open OctoPrint by going to http://octopi.local.
Next, go into OctoPrint settings by clicking the wrench icon at the top, and select Webcam & Timelapse under FEATURES.
Here, you can click the Test button to make sure your camera is working properly and make any necessary changes, such as altering aspect ratio and rotation.
You can also enable timelapse recordings of your prints and save them to your Raspberry Pi.
You can view your camera settings under Control on the main OctoPrint dashboard.
Using OctoPrint
OctoPrint offers an easy-to-use dashboard that most users will be able to navigate quickly. More advanced users, and those interested in expanding their 3D printing experience may want to look into the vast array of third-party plugins managed by its wide community of users. You can find them in the OctoPrint Settings menu.
OctoPrint is a free-to-download open-source web interface created and maintained by Gina Häußge. If you would like to support OctoPrint, you can make a contribution via their website.
Learn more about 3D printing with HackSpace magazine
Would you like to learn more about 3D printing? HackSpace is a monthly magazine for creative people, and it provides a wealth of 3D-printing tips and tricks, along with news, reviews, interviews and tutorials for every kind of making and crafting you can think of. You can download HackSpace for free here, or buy it in print from your favourite supermarket or newsagent, as well as from the Raspberry Pi Press store.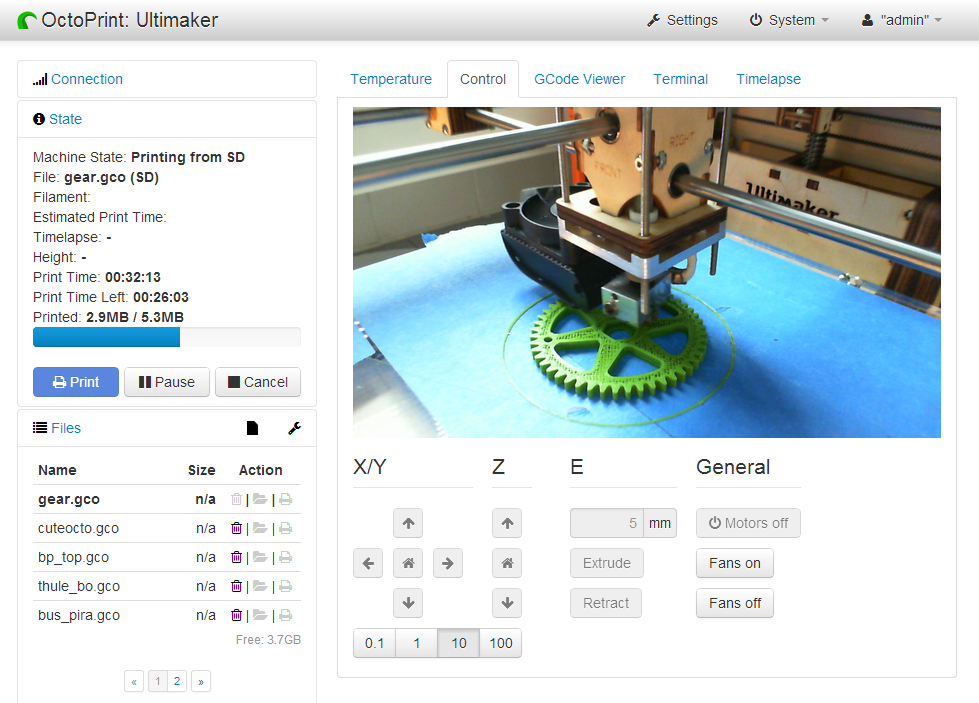
For a taste of what to expect from HackSpace, here’s their video all about 3D printing infill patterns.
Help and support
More help and information on OctoPrint is available from their website and forums.
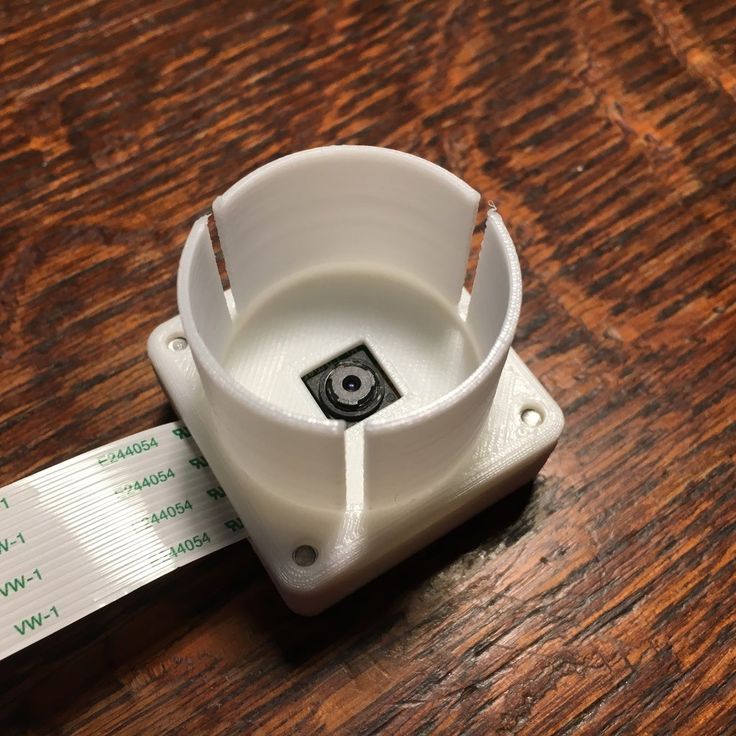
Arducam 5MP OV5647 Autofocus Camera for Monitoring 3D Printer, 3.28FT/100CM Long Extension Flex Ribbon Cable for Raspberry Pi
Buy Now
- Convenience: Native to Raspberry Pi 4/3B+/3 and more, and Arducam has solved the problems with the installation and setup on OctoPi
- Motorized Focus: See closer and easier than the fixed focus lens, which is better to monitor the 3D printer nozzle and make you pay close attention to your creation
- Focus Controllable: Using the OctoPrint Control tab, which utilizes custom commands from your slicer to adjust focus while printing
- Long Extension: 100cm/3.
 28ft extension cable included, especially useful when you don’t want to place the camera near the Raspberry Pi
SKU: B0176R Categories: 5MP OV5647 Cameras, Cameras for Raspberry Pi, Native Raspberry Pi Cameras - 5MP/8MP/12MP
SKU: B0176R Categories: 5MP OV5647 Cameras, Cameras for Raspberry Pi, Native Raspberry Pi Cameras - 5MP/8MP/12MP
- Description
Overview
Most 3D models take more than a few hours to print, so you may wish to leave the 3D printer at some point in the printing process. Using an Arducam camera to monitor 3D printing can make you pay close attention to your creation. Since most cameras are not made specifically for the use of 3D printing software, it is impossible to obtain proper support from the manufacturer. Fortunately, Arducam can help you solve all installation and setup problems.
For more details, please refer to our Doc page: https://www.arducam.com/docs/cameras-for-raspberry-pi/native-raspberry-pi-cameras/how-to-use-arducam-motorized-focus-camera-with-octopi-to-monitor-3d-printers/
Applications
- IoT cameras
- OctoPrint, Monitoring 3D Printer
- Robot cameras
- Wildlife cameras
- Other battery-powered products
- Can be used in MCU, Raspberry Pi, ARM, DSP, FPGA platforms
Specifications
| Sensor | Omnivision OV5647 sensor |
| Sensor size | 1/4” (OV5647) |
| Resolution | 5MP 2592×1944 |
| Video | 1080p 30 fps, 720p 60fps, 480p 90fps |
| Field of View (FOV) | 54°(H), 44°(V) |
| Focus Type | Motorized Focus |
| Focus Distance | 2” to infinity |
| IR Sensitivity | Integral IR filter, visible light only |
| Full-frame SLR lens equivalent | 35 mm |
| Dimension | 25mm×24 mm |
| Peak Current | 300mA |
Package Including
- 1×5MP OV5647 camera board with motorized lens for Raspberry Pi
- 1 set acrylic case for the camera module
- 1×5.
 9″(15cm) flex ribbon cable for Raspberry Pi Model A&B series (Pi Zero cable not included)
 - 1×39.4″(100cm) flex ribbon cable for Raspberry Pi Model A&B series (Pi Zero cable not included)
- 3×Manuals
Note
- Raspberry Pi Board is not included in the package
- The camera’s autofocus function needs to be operated by using python scripts, etc. Please see the following documentation for detail
- Contact [email protected] for customization and [email protected] for support
Documentation
Manual | User guide video |
Video
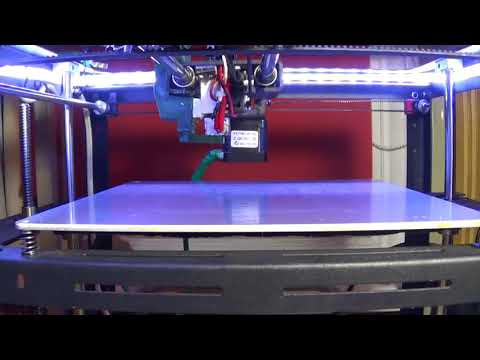
Making a time lapse for a 3D printer using Raspberry Pi
A time lapse is a video made from a series of pictures taken at a certain interval over a long period of time.
In this example, we will make a time-lapse that will take pictures of not after a time interval, but by events such as: pressing a button, triggering a limit switch, triggering a sensor, etc. In our case, it will be digital line sensor and we will make a time lapse for a 3D printer. In order for this example to work, it is necessary to add to the gcode file for printing the coordinates of "retracting" the printer head after each layer to a given coordinate, where the line sensor will be attached. To do this, you can use our g-code modifier. Before proceeding with this guide, you need to set up your Raspberry Pi according to this guide. nine0008
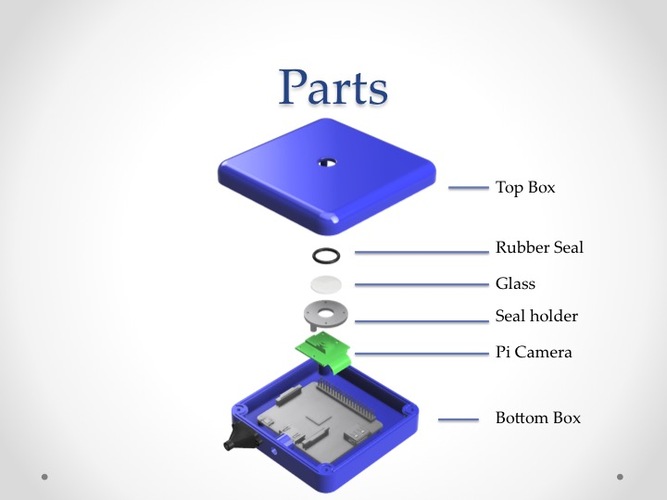
We need:
- Raspberry Pi Zero W;
- Raspberry Pi Camera;
- Camera cable for Raspberry Pi Zero;
- Trema-module Digital Line Sensor;
- PC running Windows, MacOS or GNU/Linux;
- Putty;
- Bonjour Print Services.
A Windows, GNU/Linux or MacOS computer is required to connect to the Raspberry Pi. We will use ssh to connect. Computers running GNU/Linux and MacOS must have the openssh package, for Windows you can use Putty, Cygwin, Windows Terminal, Termius, etc. In our example, we will use a Windows PC and the PuTTY remote connection manager. nine0008
Also, starting with Windows 10 october 2018 update, Microsoft did something with the mDNS server, and in order to detect Raspberry not by IP address, but by name, you need to install mDNS. We'll be using Apple's lightest (ironic), Bonjour Print Services for Windows v2.0.2. You can download it here.
Connection:
To connect the camera, you need to carefully pull the black latch to the stop away from the printed circuit board in the plane of the printed circuit board on the camera connector, insert the camera cable with contacts to the printed circuit board and close the latch:
Next, we will solder a block of three pins to the GND, GPIO23, GPIO24 pins, connect the line sensor to it and prepare a USB cable for connecting to the power supply:
Attention! We will power the sensor from the GPIO23 output. The Raspberry GPIO pins can handle a maximum load of 16mA per pin, while the total load on all pins must not exceed 51mA.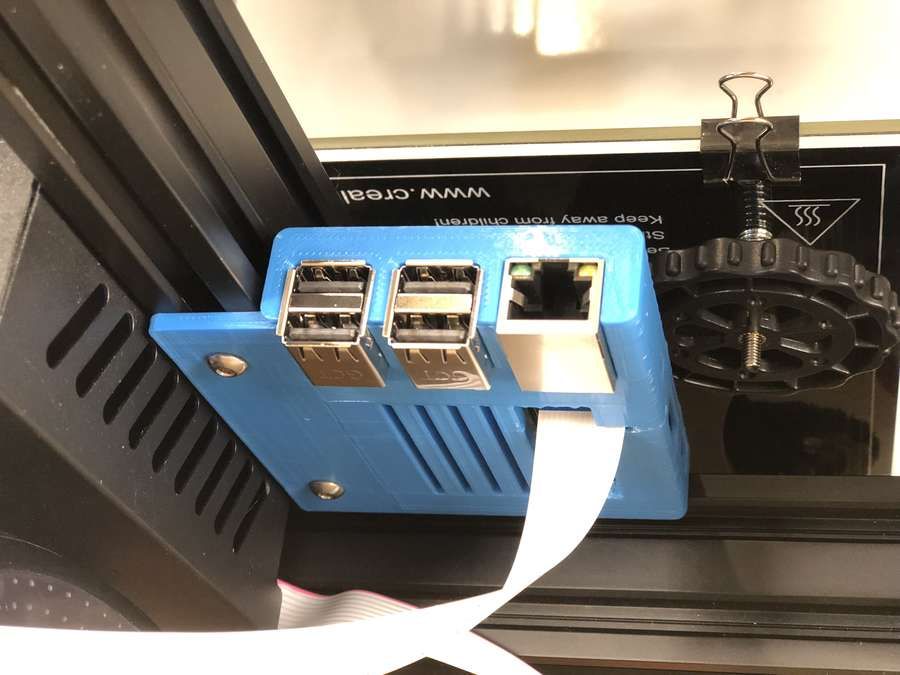 Our sensor draws 10 mA, which fits into these requirements.
Before switching on:
We want our Raspberry to connect to WiFi and open SSH access on the first boot, so before removing the SD card from the computer on which it was made, we need to create two files ( ssh.txt and wpa_supplicant. conf ) in a section called boot.
- The first file must be empty and named ssh.txt - this is necessary for the Pi to understand that ssh access is required
- The second file must be named wpa_supplicant.conf and contain data for connecting to WiFi. When booting, Raspberry will transfer the data from this file to
/etc/wpa_supplicant/wpa_supplicant.conf
update_config=1 network={ ssid="WiFi hotspot name" psk="WiFi PASSWORD" key_mgmt=WPA-PSK }
The name of the access point and the password are written in quotes, for example, if the wifi point is called Druidia and the password is 12345:
ctrl_interface=DIR=/var/run/wpa_supplicant GROUP=netdev update_config=1 network={ ssid="Druidia" psk="12345" key_mgmt=WPA-PSK } After creating the files, safely remove the SD card from the PC:
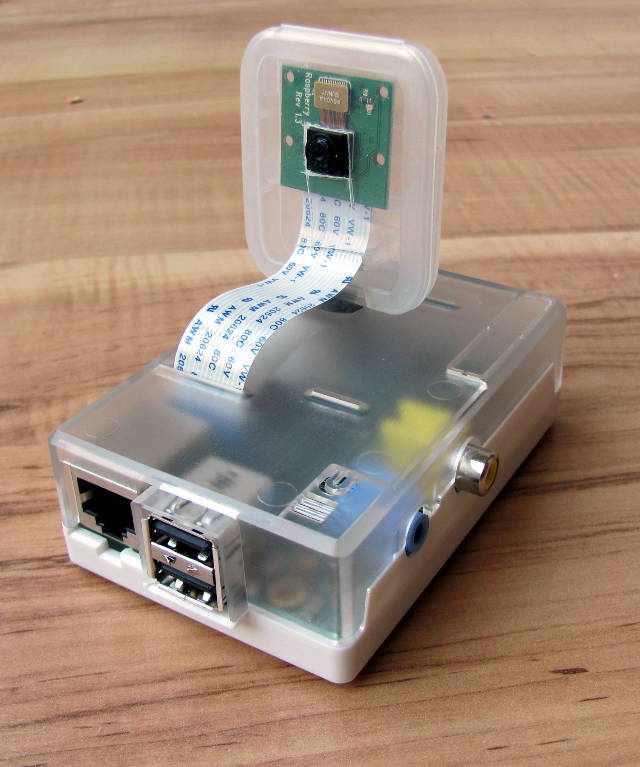
Next, insert the card into the Raspberry. Connect the camera and turn on the power. After a few seconds, the Pi will boot up and you can start working with it.
Connect via SSH:
In this step we will do the following:
- install mDNS server 9 on the PC0017
- install the PuTTY remote connection manager program on the PC
- connect to Raspberry via ssh
Before connecting via SSH, you need to install an mDNS server to connect by computer name. We will be using Bonjour Print Services for Windows. After installing it, you do not need to configure anything, everything will work automatically . This is not a typo.
Next, you need to connect via SSH. In this example, we will use PuTTY as it is the easiest way to SSH into devices from Windows. You can download it here. nine0008
After installation, open Putty: open the run window (win + r), type putty and press enter. Next, enter the following information in the "Host Name" field: [email protected] and click Open
A warning window will pop up, click Yes:
input, you must press enter:
If the password was entered correctly, we are welcomed by the Raspberry bash console:
Set up the Raspberry:
In this step we will do:
- Change the name of the Raspberry on the network
- Set up boot without GUI
- Enable the camera interface another Raspberry board will appear on the network.
 We will call this timelapsepi, and then we will connect to it by this name: [email protected] Here we will enable the camera interface.
 To do this, we will run the pre-installed raspi-config utility with superuser rights. To do this, before a command with such requirements, you must enter
sudo(short for super user do).Enter in the console:
sudo raspi-config
Then enter. The window will look like this:
Use the DOWN arrow keys to select "Network Options":
Press enter, the window looks like this:
Press enter again, the window will look like this:
Press enter again:
Erase the name backspace key and enter the new name timelaplsepi:
Press enter, we are back in the main raspi-config menu. Now we will make sure the Raspberry boots into the console. Select "Boot Options":
Enter, then "Desktop/CLI":
Enter, then "Console Autologin":
Enter. We are back at the main menu.
 Now we will enable the camera interface. Select "Interfacing Options":
Press enter, then "Camera":
Enter and answer yes to the next question:
Then press enter:
In the main menu, press the right arrow on the keyboard twice, the red selection box will appear on the "
" button. Press enter: We answer yes to the question about reboot:
We wait a couple of minutes until the Pi reboots, start PuTTY again (win + r, putty, enter). Enter a new name ([email protected]) and click Open. PuTTY will issue a security alert again, since this is a new computer on the network for it, click "Yes", enter the password "raspberry" and we are again in the Raspberry bash console with a new name:
Writing a script for Python
For convenience Let's create the Capture and Python directories in the Pi's home directory and change to the latter. To do this, use the commands
mkdirandcd. At the end of each line press enter:mkdir Capture mkdir Python cd Python
To edit files, we will use nano , a simple console text editor that comes pre-installed in almost every GNU/Linux distribution.
 When starting the editor, specify the name of the script file in the command:
 nano timelapse.py
The editor window will open:
We can enter the text of the script:
#encoding=utf-8 import RPi.GPIO as GPIO # connect the GPIO module from picamera import PiCamera # connect the camera module from time import sleep # include the sleep module import glob # include the glob module switchVcc = 23 # assign sensor power output switch = 24 # assign the output of the sensor status GPIO.setmode(GPIO.BCM) # set the pin numbering mode according to the BCM nomenclature GPIO.setup(switchVcc, GPIO.OUT) # set power pin to output mode GPIO.output(switchVcc, 1) # set power pin to logic one GPIO.setup(switch, GPIO.IN) # set sensor output to input mode directory = "/home/pi/Capture/" # directory for storing snapshots camera = PiCamera() # create a camera object i = len(glob.glob(directory + "image[0-9]*.jpg")) # write the number of .jpg files in the directory to the variable i while True: # main program loop if GPIO.
 input(switch) == GPIO.LOW: # if line sensor is triggered #take a new snapshot in the Capture directory: camera.capture(directory + "image"+str(i)+".jpg") print("image"+str(i)+" was captured") # print to the console information that the picture was successfully taken i+=1 # increment i while GPIO.input(switch) == GPIO.LOW: # stop the program until the state of the output changes sleep(0.1) # stop the loop from running too fast and cpu sleep(0.1) # let the processor "rest" in the main program loop nine0075
 Press ctrl + x, then Y - save the changes and enter, exit nano back to the console. To run the script, enter the following command:
python timelapse.py
Now, each time the line sensor is triggered, a new photo will appear in the Capture folder and the name of the photo file will be displayed in the console. To end the program, press ctrl+c.
Working in the background:
In this step we will:
- create a unit file for systemd
- start the timelapse service
We want to make sure that our script not only starts when Raspberry boots, but also runs in the background.
 To do this, we will make a boot unit for systemd. Systemd is the so-called system daemon that controls almost everything in modern GNU/Linux.
 First let's create a file in /lib/systemd/system/ called timelapse.service
sudo nano /lib/systemd/system/timelapse.service
The nano editor will open in which we will enter the unit setup text
[Unit] Description=Timelapse Service After=multi-user.target [Service] Type=simple ExecStart=/usr/bin/python /home/pi/Python/timelapse.py Restart=on-abortion [Install] WantedBy=multi-user.target
Press ctrl+x, then Y and enter.
Next, we will add the module to systemd using systemctl and it will be loaded on the next system restart:
sudo systemctl enable timelapse
If everything went well, the console will write "Created symlink" - a symbolic link has been created.
Set up a shared folder:
For the convenience of downloading and deleting photos, we will set up a network folder on Raspberry, which will be available to other computers on the local network.
 We will do this using the Samba package.
 Installing the Samba package:
We will install the package using the package manager apt-get . To do this, enter the following in the console, pressing enter after each line:
sudo apt-get update sudo apt-get -y upgrade sudo apt-get -y install samba samba-common-bin
samba setup:
Now we need to setup samba . The settings are in the file /etc/samba/smb.conf
sudo nano /etc/samba/smb.conf
Use the PageDown key to go to the very end of the file and add the following:
[share] Comment = Timelapse Capture path = /home/pi/Capture read only = no public = yes writeable=yes nine0075
Then ctrl+x, Y and enter, we are back in the bash console. Allow all users on the network to change the contents of the Capture folder:
sudo chmod a+w Capture/
Restart samba:
sudo /etc/init.
 d/samba restart
 Browse files over the network:
Set up a network folder in Windows .
Select in the window Explorer "This PC", right-click in the window and select " Add a new item to the network environment ":
The wizard for adding a network location will open, click next:
Click next:
Specify the network address of our folder with photos ( \\timelapsepi\share ) and click next:
Specify the name that will be displayed in File Explorer:
Click done, a folder with our photos will open:
Now you can copy and delete photos, paste them into your favorite NLE video editor and make time-lapses!0315 Reviews 10 Reasons to Use OctoPrint for 3D Printing
Surely everyone had problems with 3D printing, which was left overnight in the hope of getting a finished 3D model in the morning.
 Or it was simply not possible to constantly monitor the 3D printing process in order to stop it in time. e in case of an error. It is this problem - the problem of monitoring 3D printing - that is solved with the help of the wonderful free and open source software OctoPrint. nine0008
 OctoPrint is a Raspberry Pi-based 3D printer application that allows you to remotely control your 3D printer. Created by Gina Heusge in 2012, the software is constantly being improved with new versions and new features (via plugins) coming out regularly.
In this article, we highlight the top 10 reasons to use OctoPrint. Some of the problems in this list are solved with the help of additional plugins. By the end of this list, you'll probably want to try OctoPrint if you haven't already. nine0008
Wireless 3D printing
Many budget 3D printers do not provide the ability to control or monitor the 3D printer wirelessly. Models must either be downloaded to an SD card or transferred directly via cable.
 These connection options have their limitations. OctoPrint offers an excellent solution to this problem.
 As we briefly mentioned earlier, OctoPrint provides software that is installed on the Raspberry Pi and then connected to the 3D printer. Thanks to the wireless capabilities provided by Raspberry Pi, you can control your 3D printer wirelessly via LAN. nine0008
OctoPrint allows you to remotely send G codes, control the temperature of the extruder and hot end, monitor the 3D printing process, and much more. Thanks to OctoPrint's wireless 3D printing capabilities, you can always control your 3D printer, even if you are not physically present.
3D printing from anywhere in the world
As you know, wireless 3D printing is convenient if you are at home and on the same network. But what if you left home and wanted to start printing and was finished when you got home? Or what if you want to keep an eye on the 3D printing process when you're not at home? nine0008
The OctoPrint Anywhere plug-in allows you to manage (start and stop) and control 3D printing from literally anywhere.
 This is a website that can be accessed from your computer or mobile device.
 This plugin has a large following, but keep in mind that the OctoPrint developers recently announced that it will eventually be replaced by a more elaborate and updated plugin called Spaghetti Detective.
View G-code
Typically, OctoPrint users monitor the 3D printing process via a webcam connected to their Raspberry Pi. However, if you don't have a webcam or just want to check your 3D print in a different way, the G-code viewer is a great tool.
This underrated OctoPrint feature shows nozzle position and layer number in real time. You can also find the status of your 3D print in the window just below the renderer, which shows the current G-code commands being sent to the 3D printer. nine0008
Commands from the terminal
The ability to send commands from the terminal is a great feature for more advanced users. You can view the codes sent to the 3D printer in real time.

One of the most useful features is sending custom G-code commands to your 3D printer. Instead of relying on another program to communicate with your printer, such as Pronterface, you can directly send commands to the OctoPrint terminal. nine0008
This feature can be useful in a number of scenarios. If you need to calibrate your 3D printer, you can view the existing system presets in a terminal command. Some commands also allow you to enter and save new calibrated values. This is a very handy feature for those who like to tinker with their 3D printer at a deeper level.
Slow motion
You know that 3D printing is a long process, it can take hours to print one model. Setting up a time-lapse video allows you to view the entire 3D printing process, which lasts several hours, in a matter of seconds. nine0008
With OctoPrint, and with a camera connected to your Raspberry Pi, you can capture great frame-by-frame 3D printing video by setting the frame rate and interval between shots.
 For true enthusiasts, there are also more advanced customization options.
 OctoPrint stores the timelapse locally on the Raspberry Pi and you can download it to your computer. Another useful feature of time-lapse video is the ability to determine the exact cause of a 3D print failure, or at least the point at which the failure occurred. nine0008
Octolapse is a plug-in that builds on the functionality of OctoPrint's Timelapse section to produce cleaner, crisper videos.
Slicing 3D Models in the Cloud
Cloud Slicing, as the name suggests, is a remote slicing feature that allows you to slice your 3D models without actually installing the slicing software on your computer. Model slicing is performed using a plugin installed on the Raspberry Pi. nine0008
Consider the scenario where your laptop is full of applications and you can't/don't want to install a new slicer. Or imagine not wanting a slicer for every computer you use. This is where the Cloud Slicing plugin fits in perfectly.
 This feature uses the Cura or Slic3r engine plugin.
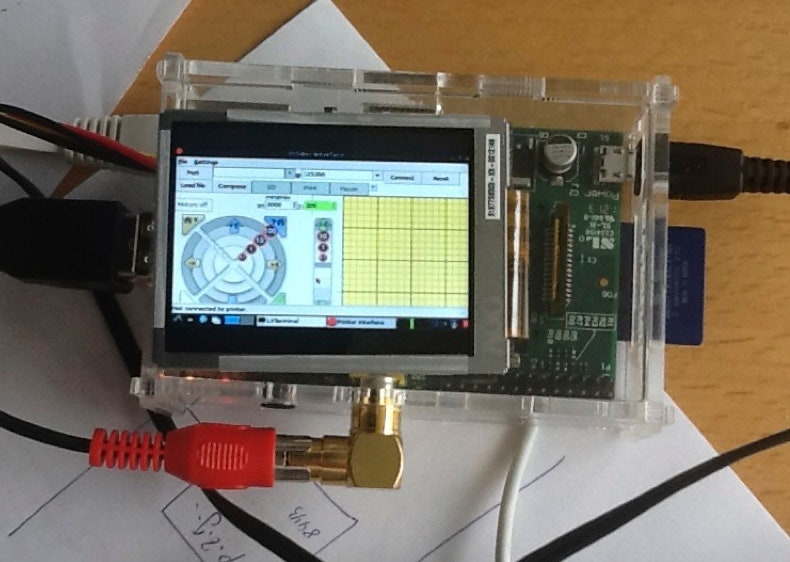
 Touch screen for user interface
Touch screen user interface has become the norm for many everyday devices. However, many 3D printers still lack this useful feature. nine0008
With the OctoPrint TouchUI plugin, you can add this feature and display the OctoPrint interface on a touch screen. This plugin will allow you to use OctoPrint without connecting a computer. The user interface on the touch screen is very similar to that in the browser, so the transition in terms of learning a new interface will not be difficult.
Installing a touch screen can seem like a tedious task, but there are plenty of tutorials and videos to help you through the process. nine0008
Open-source community
Individual developers have spent hours of their time improving 3D printing, including free and open source software such as Marlin, Cura and OctoPrint itself.
OctoPrint's popularity is largely due to open source and free access.
 All source code is available on the GitHub page. Thanks to this, many users and developers have shared their ideas and brought them to life. User-developed plugins greatly extend the functionality of OctoPrint. nine0008
 Manage multiple 3D printers
As you can imagine, this function is useful if you are working with more than one 3D printer. You can connect multiple webcams to one Raspberry Pi.
The video below provides instructions (in English) on how to install three printers on a Raspberry Pi:
Another option is to use OctoFarm, a free and open source service that allows you to control and monitor multiple 3D printers on a single Raspberry Pi. With it, you can monitor multiple 3D printers on the same screen, send files for 3D printing, and monitor the printing progress. nine0008
List of useful plugins for OctoPrint
In general, it is quite difficult to make the top 10 useful OctoPrint features, as the list is really huge.
 So below is a small selection of additional plugins that will help you simplify and secure the 3D printing process.
 - Pushover: This plugin sends you push notifications when a print is completed or 3D print fails for some reason. A simple and very practical plugin.
- Heater timeout: It often happens that the 3D printer stays on and the extruder is still hot, which can cause a fire. This heater timeout plug-in disables hot end heating after a set amount of time. This will help you avoid potential fires and excessive electricity bills.
- Emergency stop: there is always the possibility that something might go wrong during 3D printing. This plugin adds a large red bar at the top of the OctoPrint user interface which, when clicked, will stop the 3D printer from working. nine0017
- Bed level visualizer: This plugin is great for those who have installed a bed level sensor on their 3D printer. This plugin allows you to view the table level measured by the sensor.
Learn more