3D printer remote extruder
Downloads - Flex3Drive
This page is under active construction!! Will be updated frequently as more files and information added. The Flex3Drive G5 and supporting files are now available for download. Some of the available downloads include STP file assemblies. The STLs will have been run through Netfab to clean them up ready for printing. The Flex3Drive G5 is designed so that is can be effectively printed by the printerist with either FDM or SLA machines, meaning you only need a hardware kit, thus significantly reducing costs to you by design, whilst plastics including SLS printed parts are offered in the shop should you require them. The main extruder files are provided in two variants, one each for SLA and FDM printing processes. The sections below are grouped as follows:
- Main G5 files – Main print files for the G5
- Common files (required on each install) – ancillary parts required for each install
- Installation files – machine specific printable files
G5
Extruder
These are the main printable files for the Flex3Drive G5. Base Top Cap and Tension Arms. SLA and FDM versions are provided. FDM Print Settings: Layer height – 0.16mm or less Nozzle Diameter – 0.4mm Material – ABS recommended however any material can be used.
Flex3Drive G5 FDM version STL files
G5 Extruder v0.99 FDM STL files
Flex3Drive G5 SLA version STL files
G5 Extruder v0.99 SLA STL files
Installation Parts
All installation files can be printed with any layer height settings apart from where supports are used, in which case those parts should be printed with reduced layer heights. Check the toolpath in your slicer to ensure there is a single layer between any support structure and the actual part.
Common Parts
Common parts required for each installation are below. These include the motor mount, motor cap, and flex shaft coupler.
Motor Cap STL file – bolts to the E axis motor to support the flex-shaft outer sleeve.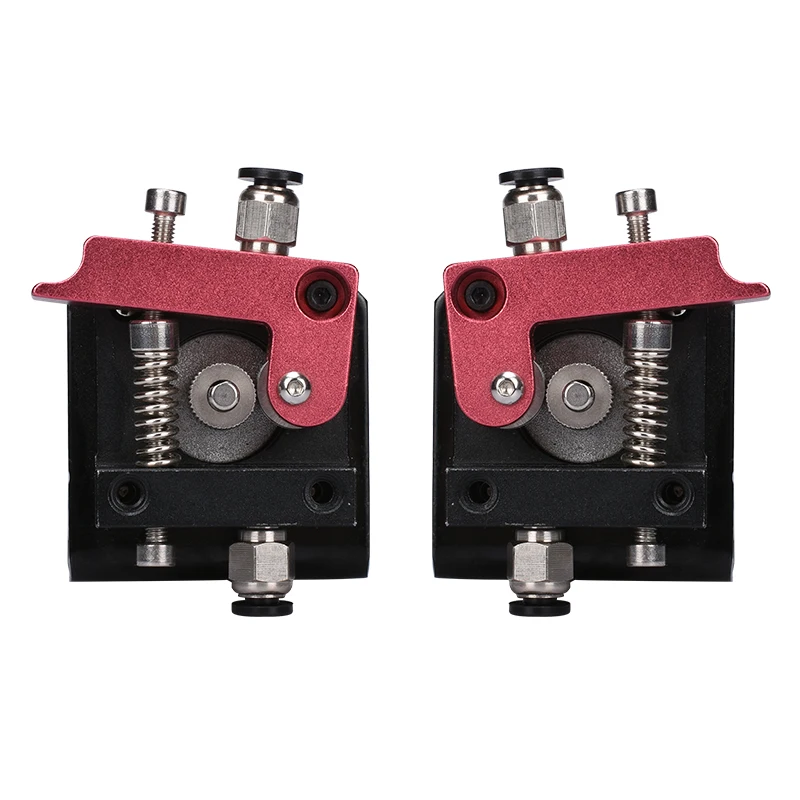
MotorCap.zip
Flex shaft to motor shaft coupler – Attaches flex-shaft to extruder motor shaft.
Coupler v3 large.stl
Simple Motor mount clamp – Simple clamp style motor mount to fit onto printer frame extrusion.
Motor Mount clamp style.stl
SMART Effector
These are the Flex3Drive files for the SMART effector from DUET3D. Files include the main mounting adaptor that the G5 mounts onto, and the cooling parts that sit under the effector.
SMART-Mount using inserts.stl
G5 SMART Mount-inserts.stl
SMART Mount using M2.5 nuts
G5 SMART Mount-nuts.stl
SMART Shroud-E3D
SMART Fan Shroud.stl
Fan Ducts
Fan Duct.stl
CR10/Ender 3
There are a couple of options available for the CR10/Ender3 style printers based on the hotend being used. This includes the original hotend, E3D v6 and Cyclops/Chimera.
CR10 Original Hotend
G5 CR10 MicroSwiss STL Files
G5_CR10_MicroSwiss.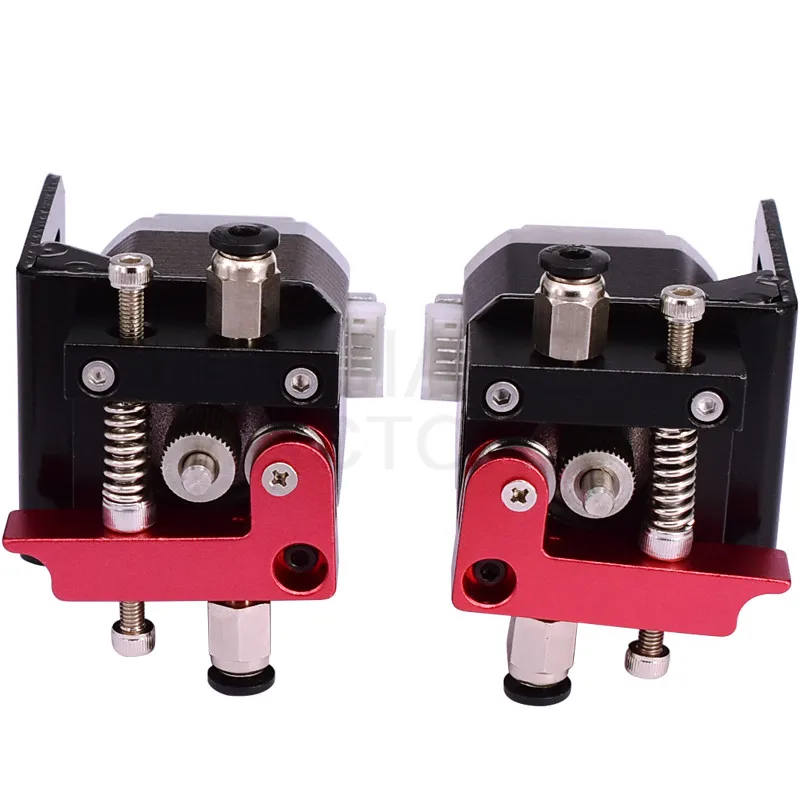 zip
zip
G5 CR10 MicroSwiss STP files
G5-CR10-Microswiss-Mount-v2.stp
CR10/Ender3 E3D v6
G5 CR10 E3D STL Files
G5-CR10-E3D-v6.zip
G5 CR10 E3D STP Files
G5-CR10-E3D-Assembly.stp
CR10/Ender3 Cyclops
G5 CR10 Cyclops/Chimera STL Files
G5-CR10-Cyclops-STLs.zip
G5 CR10 Cyclops/Chimera STP files
G5-CR10-Cyclops-STP.zip
PrusaMK2/2.5
Prusa MK2/2.5
F3D-G5-Prusa-Mk2-STLs.zip
A10M Dual
A10M Dual G5 Adaptor Mount
G5-A10M-Dual-Mount.stl
A10M Dual Motor Mount
G5-Dual-Motor-Mount.stl
Kossel Mini
Kossel Mini G5 End Effector
KM-G5-EndEffector-E3D-175mm.zip
Kossel XL
KosselMag-G5-E3D-175.zip
CoreXY
CoreXY G5 Carriage Assembly STP Files
F3D-CoreXY-G5-175-STP.zip
CoreXY G5 Carriage Assembly STL Files
F3D-CoreXY-G5-175-STL.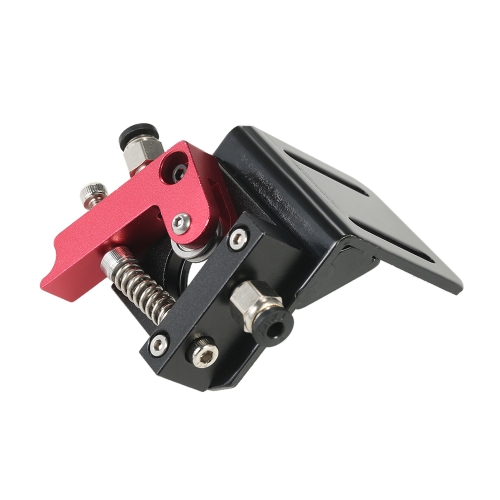 zip
zip
RailCore
RailCore G5 Simple Mount
RailCore-G5-Mount-simple.stl
RailCore G5 E3D Mount
RailCore-G5-E3D-STL.zip
RailCore G5 Mosquito Mount
RailCore-G5-Mount-MosquitoHotend.stl
Mega Prusa
Mega Prusa X carriage mount
G5-Prusa-Mega-Carriage.stl
DBot
D-Bot 1.75mm STLs
G5-DBot-E3D-175.zip
Tevo-BW
Tevo-BW G5 Cyclops 18mm version
TevoBW-G5-Cyclops-18mm.zip
Tevo-BW G5 Cyclops 20mm version
TevoBW-G5-Cyclops-20mm.zip
Ultimaker
Ultimaker Original
Ultimaker Original 3.00mm
F3D-UMO-Print-Head-STL.zip
Ultimaker 2
Ultimaker 2 1.75mm
UM2-175-Full-STL.zip
Ultimaker 2 3.00mm
UM2-300-Full-STL.zip
License
License Flex3Drive by Jason Perkes is licensed under a Creative Commons Attribution-NonCommercial-NoDerivatives 4.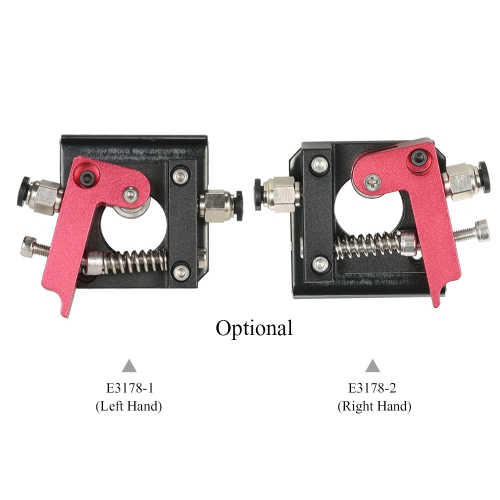 0 International License.
Nimble in Detail - Zesty Technology
Genesis
In the beginning, there were direct drive extruders, they were heavy. Bowden tubes came along but must be banned. So what to do?
We looked at the existing options, there was nothing suitable.. The Nimble is a response to this frustration.
The story continues
Introducing the Nimble V3 or better known as the Flex.
Based on the same principles that made the Nimble and Sidewinder so great, the Flex does away with the need of two separate models. With the Flex you can position the drive cable where you need it for your printer.
We have kept all the nice features of the original Nimble.
- It is still ambidextrous.
- Increased the ease of installation and use
- Improved the strength of our parts and heat deflection temperature
- Made the breech easier to open and close
We listened to our customers to understand what they liked and what needed to be improved.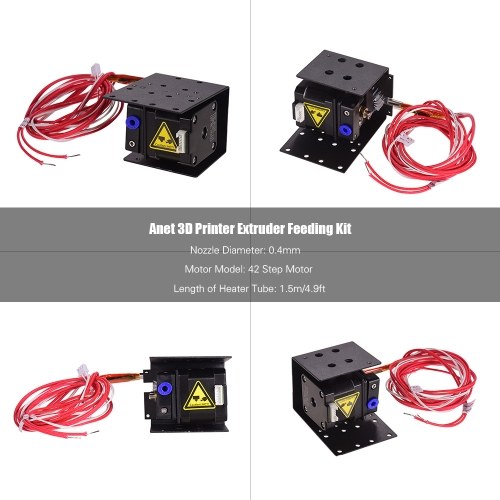 So we started with a clean sheet and a list of things that could not be changed and a list of what had to be improved.
Form
There were three primary driving forces behind the design evolution and form of the Nimble
- Modular Approach
- Size
- Elegant Design
The extruders modular approach means you don't have to replace your extruder if you upgrade to multiple extruders or move to a new printer. It resulted in fewer parts, and a few surprising extra features.
The tiny size of the Nimble required purpose designed parts, this means you don't suffer the functional compromises that other extruders have through the use of off the shelf parts.
But foremost in our thoughts was always Form follows Function, which resulted in the minimal and elegant design of the Nimble.
Function
What is the function of an extruder? Duh! It pushes filament.
The Nimble is special, not only does it push filament it does it with the following added benefits.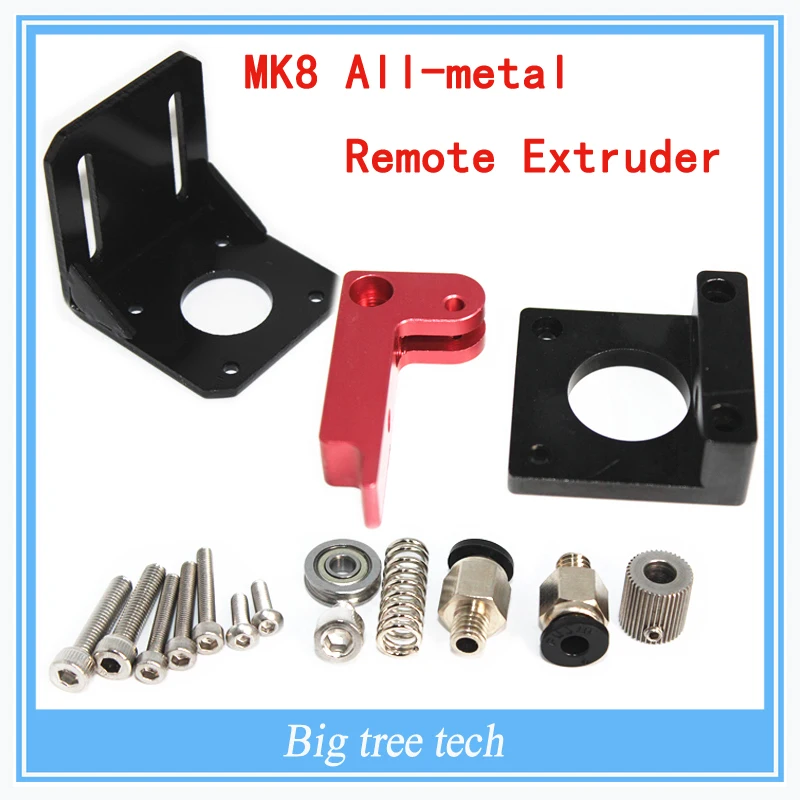
Only 25 grams, including mounting hardware! Easily the worlds lightest extruder. This lack of weight improves your motion control and allows you to print faster. You not only get better prints, you get them quicker as well.
The easiest and fastest filament change of any extruder, a simple click and done. It's tiny which means it is easy to fit on almost every printer.
The 30:1 gear ratio of the Flex means you have better control. You benefit directly from the much finer control of extrusion rate than is possible with other extruders.
Essentially, with the Nimble you can print faster and with much better extrusion control. This means better layers and smoother prints.
Features
How does all this work translate to features that make this one of the best extruders? There is a whole raft of features that make using the Nimble and printing better and make your 3D printing life easier.
Drive cable position
We made the body of the Flex in such a way that you can rotate the part the holds the worm and drive cable, in 22.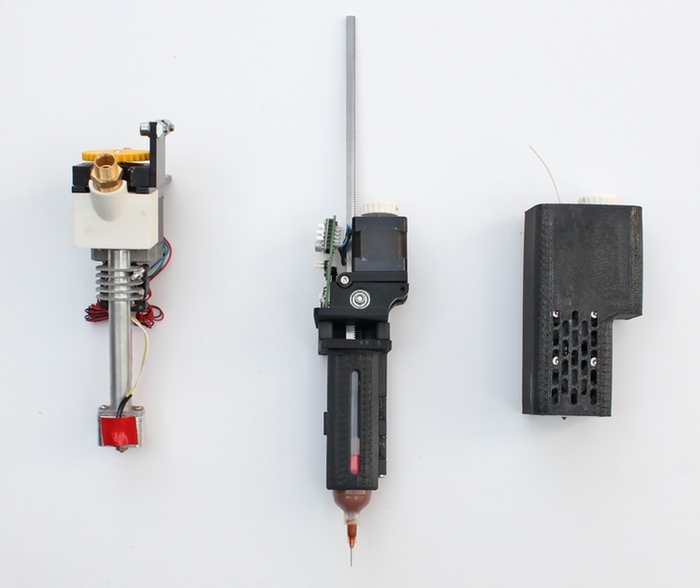 5 degree steps. The part that holds the hob (the Hobbit) is fixed, to ensure a centred filament path.
The Drive cable can be positioned horizontal (backwards pointing), vertical, or steps in between.
The Breech: its a lever-lution
V1 Nimble shown
This little device makes filament changes so easy
- Pinch to open
- Remove old filament
- Insert new filament
- Click it shut
When the breech is open, with most Nimble adapters, you see the filament path all the way to the top of your hot end.
With the breech open you can push filament by hand and actually feel how well filament is extruding, and just push new filament through to purge the old filament in the hotend.
No more gummed up hob, you can actually see it and it's easy to clean with a small stiff brush.
Ambidextrous: there is no right way up, or left way.
One of our biggest and most challenging achievements was the left and right handed mounting capability.
V1 Nimble shown
The Nimble can be installed in the best orientation for you and your printer, one way or the other. Simply flip it over and mount it. If you are using more than one Nimble and placing them side by side, filament centers can be as little as 12.4mm apart, it's amazing really.
You can move you Nimble to a different printer by simply substituting a suitable adapter, that's freedom!
We give you all you need to design your own adapter, but better yet we will design the adapter or you free of charge if you want.
Here is more information about adapters.
Hob: not the goblin type
The combination of the Nimble breech and its custom-designed hob allows you to print pretty much any filament.
We have successfully printed many filaments, from the hardest to the softest, from the most brittle to the most floppy filament, everything has been tested.
CarbonFil, a very stiff and hard filament that is infused with carbon fiber, printed smoothly.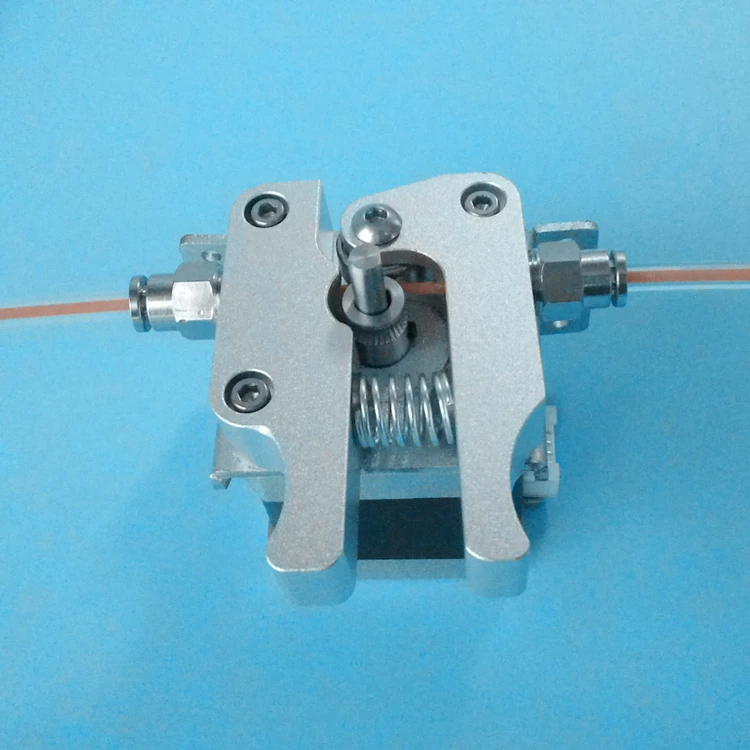 X60 filament, widely known as the most elastic and floppy filament available, we simply closed the breech, adjusted the temp and speed and off it went, printing perfectly.
Overall, as we said before, form follows function. Great form results in great features.
We think you'll agree this makes the Nimble the easiest, lightest and best extruder you can find.
Get your Nimble now
Top 5 extruders for 3D printer Anet A8
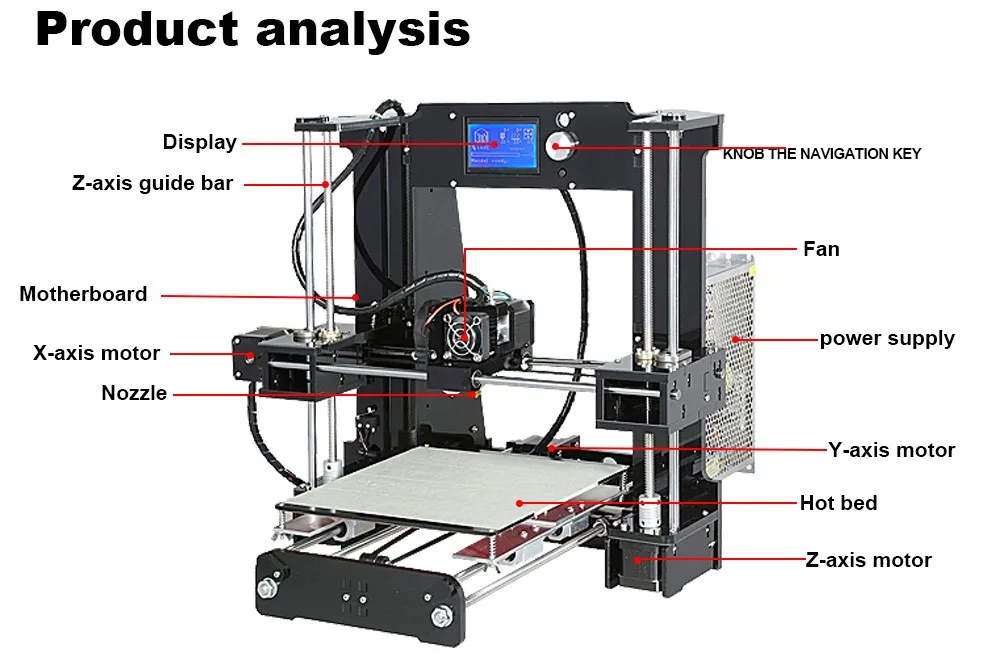
TheAnet A8 is a very popular 3D printer due to its affordability and wide customization options. This is certainly an interesting project that you can assemble yourself or buy as a set. Thanks to its affordable price and clear design, Anet A8 has long been the "people's 3D printer" and a great option to get acquainted with the intricacies of 3D printing.
Due to the extensive modification options, 3D printing results on the Anet A8 can vary greatly. And some modifications simply turn this model into an analogue of expensive 3D printers in terms of 3D printing quality. There are a lot of modifications on the Internet, and in this article we will touch on the modifications of one node - the extruder. Believe me, there are a lot of modifications to the Anet A8 extruder and they are worth discussing. nine0003
For example, the original design of this 3D printer does not include a duct fan to help direct air from the Anet A8 extruder fan to the nozzle. And air is needed to cool the extruded plastic and keep the 3D printer in proper working order. But there is also good news - Thingiverse already has a lot of mods for blowing. Here's a great one from a user named Arjjck.
One of the simplest mods is adding an extruder button to make it easier to use the 3D printer. This 3D printed button is definitely better than the standard extruder screw, which is almost impossible to press with your fingers. Such a simple 3D printed Anet A8 extruder button will save you the pain of changing 3D printing material. nine0003
The extruder replacement is one of the Anet A8 upgrades that can greatly improve the quality of 3D printing, so let's take a look at the interesting options.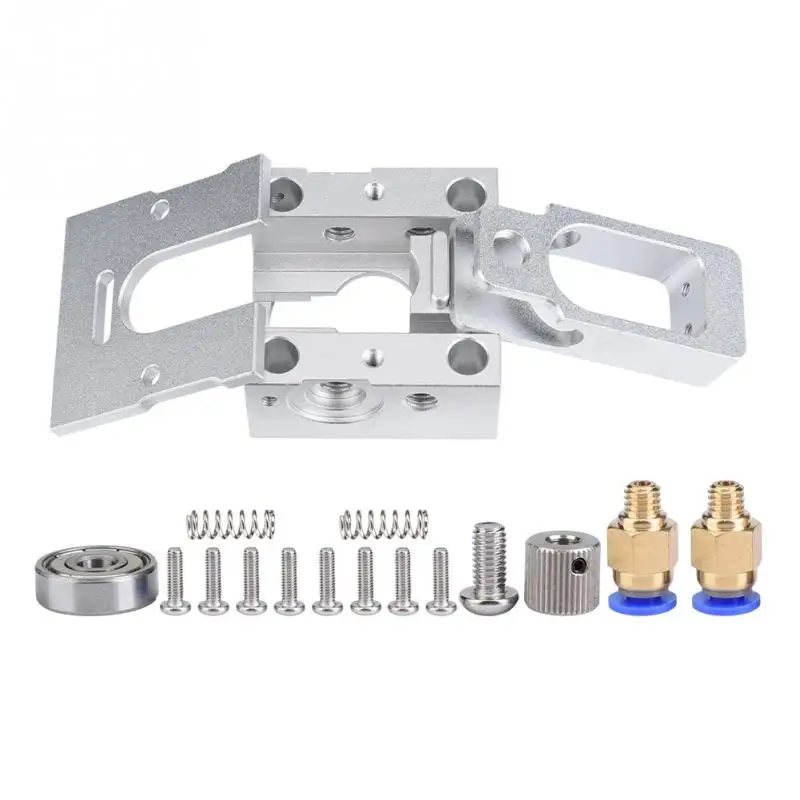
E3D Titan extruder
The E3D Titan extruder is ideal for those who want to print using different materials, not just PLA plastic. Lightweight E3D Titan reduces clogging and features specially machined teeth that are curved to grab fibers at right angles. The teeth improve the grip of the thread and increase the accuracy of its feeding. nine0003
This extruder has been manufactured to increase torque, reduce clogging and 3D print at higher resolutions. It is designed for use with the E3D v6 hotend, allowing you to print at higher temperatures, and the 3:1 gear ratio ensures more precise movement.
According to the manufacturer, this ratio gives the E3D Titan extruder the best performance in terms of accuracy and speed. Obviously lower gear ratios run too slow while higher gear ratios run too fast. Thus, the manufacturer concluded that a ratio of 3:1 is the best option, allowing the extruder to cope with the required degree of extrusion. The gear ratio increases resolution and promotes smooth 3D printing at low layer heights. nine0003
The extruder supports 3D printing with 1.75 mm and 3 mm filaments and allows the use of materials such as abrasive carbon fiber, TPU, TPE and a number of other harder plastics. The E3D Titan has a solid construction thanks to injection molded parts. Unlike other more clumsy extruders, the design details eliminate the possibility of wiggle and improve accuracy. In addition to being lightweight for more torque, the E3D Titan has been built to be easy to assemble or disassemble. nine0003
LulzBot Taz Single Extruder Tool Head v2
LulzBot TAZ Single Extruder Tool Head v2 comes with a solid metal hex and can withstand temperatures up to 300°C (572°F). Thus, you will not have problems with materials such as ABS, PLA and HIPS. You can also use materials such as T-Glase, polycarbonate, nylon, as well as various types of threads filled with stone and wood.
The extruder comes with two fans, one for the nozzle to help produce highly detailed prints, and one for the heatsink.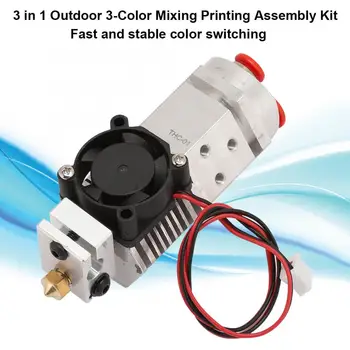 The LulzBot Taz has gone through countless hours of testing and is a suitable replacement for the Anet A8 extruder. nine0003
Single Flexion Retrofit Kit Extruder
This extruder is much better than the standard Anet A8 extruder and guarantees high resolution and fewer failures. The Extruder Upgrade Kit includes precision machined components that give you the ability to print at full speed on flexible materials, using adjustable fine filament tension to maintain high 3D printing accuracy.
The Flexion extruder pushes the filament harder and the self-cleaning drive ensures no clogging during long 3D prints. This extruder uses a high rigidity lever to compress the filament, and an adjustable screw and cam is used to control the compression - for precise tension control. The Flexion extruder will work well with TPU, TPE, flexible PLA, Filaflex and Ninjaflex in addition to standard materials like PLA, PETG or ABS. nine0003
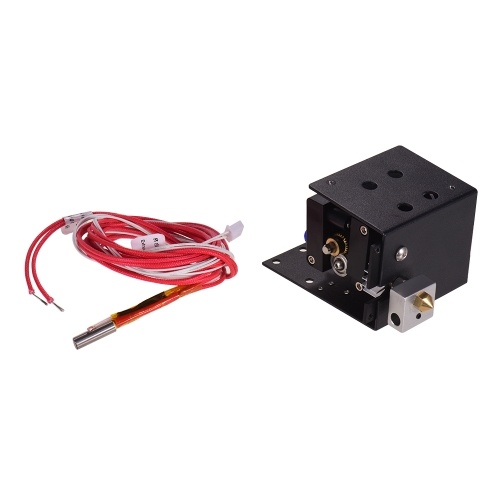
Flex3Drive Extruder
The Flex3Drive extruder is compatible with a wide range of hot ends and has a ratio of 40:1.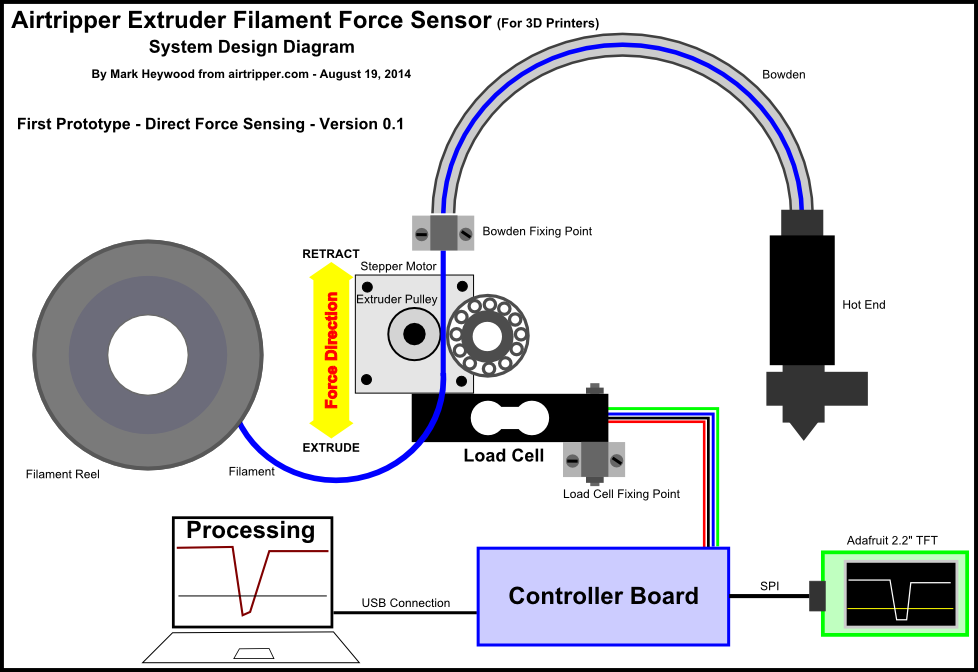 With this ratio, it will print great first layers. It provides a direct feed to the hotend, but the motors are spaced apart to reduce moving mass and lighten the extruder. This results in smoother print head movement and reduces vibration.
This shaft-driven extruder is compact, small and fairly light. The extruder is equipped with cam-lock tensioners for constant material tension without the use of springs or screws. This is particularly suitable for tough materials, but there is an adjustable thread tension lever that does not require a firm grip. nine0003
Material loading is greatly simplified and the filament can be changed without stopping the 3D printing process.
Mounting the Flex3Drive hot end on the bottom of the extruder can be a pain, but worth it. This extruder is suitable for working with nozzles of the widest diameter. The drive gears are made on high-precision CNC machines, so there are no questions about the quality of the manufacture of these extruders.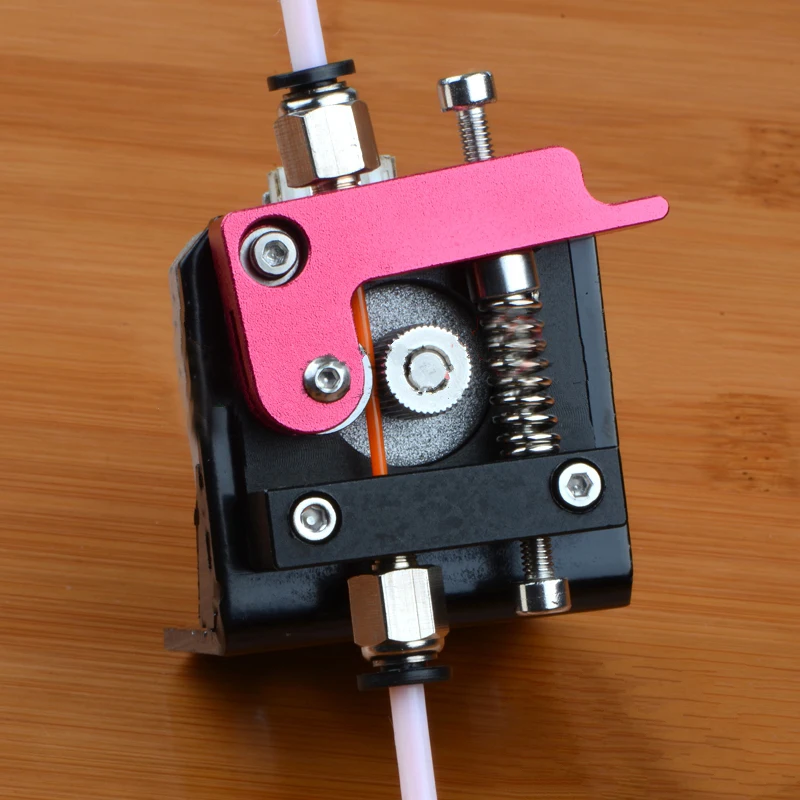
Bowden Type Extruders
Well, here's the holi comrade on our list of the best Anet A8 extruders. Bowden type extruder. An extruder in a Bowden layout means that the hot end is physically separate from the extruder. Typically the extruder is mounted on the inside or back of the Anet A8 3D printer and works like a "remote" extruder in the same way as a direct extruder: grabs the material and pushes it. However, the main difference is that the thread must pass through the tube before it reaches the hot end. nine0003
The Bowden Extruder significantly reduces the weight that the carriage needs to move during 3D printing and reduces carriage vibration, backlash and twitching. This is because when the extruder (with its mounts and motor) is out of the way, only the hot end can move. Therefore, less momentum needs to be overcome, and this makes Bowden designs the best choice for 3D printing complex parts.
But this type of extruder has a downside. The separation of the hot end and extruder usually causes a delay or hysteresis.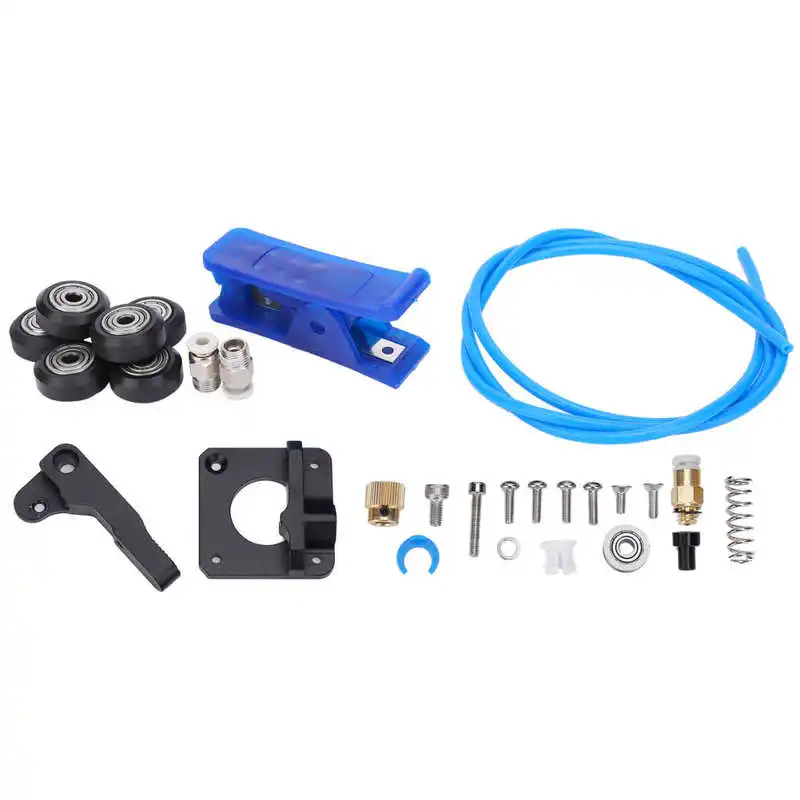 A longer material path means longer contact and more friction that the extruder must counteract. Therefore, the motors will need more torque to deliver the filament to the hot end. This makes it difficult to use Bowden extruders with flexible filaments. The longer path also means that the filament can warp, shrink, or stretch, resulting in inconsistent 3D printing. nine0003
While the Bowden extruder may work well on the Anet A8 3D printer, it may require some technical knowledge to install as the above issues may require certain settings in the 3D printer firmware. Hence, buying a Bowden type extruder can cause problems if you are not a true 3D printing enthusiast.
On the other hand, if you are confident in your skills and have no problem setting up your 3D printer, the Bowden Extruder may come in handy. With the right settings, you can get cleaner and smoother 3D models. nine0003
Another crazy idea for remote direct...
nik_vr
Loading
04/07/2021
1508
Personal diaries
Subscribe to the author
Subscribe
Don't want to
1
This kind of response to the "crazy ideas of. I have also been interested in remote direct schemes for a long time. All sorts of nonsense is spinning in my head.
For example, for a long time I've been thinking about the option for kinematics for CoreXY and all sorts of MakerBot/Ultimaker. On such kinematics, the extruder moves in one plane, which means that there is no need for a flexible cable (a typical solution for remote direct), and it can be replaced with a thin steel shaft of non-circular cross section. Mount the extruder motor on the back of the portal, in the center, on a rotating platform. From it - the shaft to the printing head, we transfer the movement to the gear with a hole for the shaft (the shaft itself can move longitudinally relative to this gear so that when the head moves, the shaft remains engaged with the gear). nine0003
Something like this:
when the head moves, the shaft moves inside the gear, and causes the extruder motor to turn. Rotation is transmitted to the head without problems.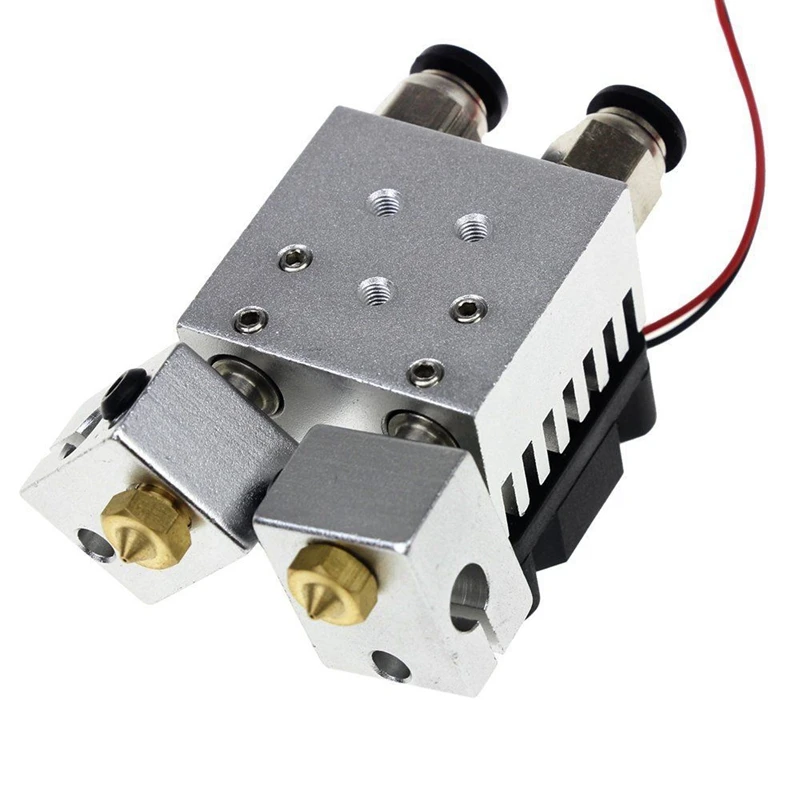 Next, you need to change the direction of rotation (for example, with a worm, or just something like a differential pair) and feed the bar. But the mechanism for changing direction must also somehow be made movable relative to the head itself, because. the angle between the shaft and the head will change as it moves. This is where I still can't figure out how to do it. nine0003
But it's all nonsense, of course. Although... :)
remote drive exposed remote direct
Article comments
More interesting articles
nine
Subscribe to the author
Subscribe to the author
Don't want to
Maybe someone is interested - after many years of silence, a preview of the new Simplify3D has appeared.