Polish 3d printer
6 Ways How to Polish PLA 3D Prints – Smooth, Shiny, Glossy Finish – 3D Printerly
PLA is the most popular 3D printing material, so people wonder how they can polish their 3D prints to make them smooth, shiny, and give them a glossy finish. This article will take you through the steps to make your PLA prints look great.
Keep on reading for more information about making PLA prints polished and shiny.
Here’s how to make PLA 3D prints shiny & smooth:
- Sanding your Model
- Using Filler Primer
- Spraying Polyurethane
- Applying Glazing Putty or Airbrushing it
- Using UV Resin
- Using Rub ‘n Buff
1. Sanding your Model
One of the most important steps to make your PLA 3D prints shiny, smooth and looking as good as they possibly can is to sand your model. Sanding can be a lot of work but it’s worth the effort as it will hide the layer lines making it a lot better to paint and apply other finishing touches.
For that, you can use sandpapers of different grits, like the PAXCOO 42 Pcs Sandpaper Assortment from Amazon, ranging from 120-3,000 grit.
It’s a good idea to move from a low grit sandpaper, then more to finer grits as you progress.
One user recommended doing the following:
- Start with 120 grit sandpaper and sand your pieces
- Move up to 200 grit
- Then give it a finer sand with 300 grit sandpaper
You can move up to a higher grit depending on how smooth and polished you want your 3D print to be. It’s always good to have a wide variety of grits, going from course to smooth, and you can even do dry or wet sanding.
Even when you plan on using other methods to smooth and polish your PLA 3D prints, you still want to sand it first.
Here’s a great example of some successful sanding of a PLA model.
First attempt at sanding PLA, critiques? from 3Dprinting
If you are getting small white grooves on your PLA print after sanding, try heating them a bit with a lighter or heat gun to get rid of them. Make sure you don’t heat up the model too much or it can quickly deform, especially if the model’s walls are thin.
Sanding your PLA prints? from 3Dprinting
You can use something like the SEEKONE Heat Gun from Amazon. One user said using a heat gun is great for restoring the original color of PLA after sanding since it can get discolored easily.
If you gradually move up in sandpaper grit, that can also get rid of the white marks on your PLA.
Darkwing dad has a great video on YouTube about how to properly sand PLA printed parts, check it out below:
2. Using Filler Primer
Another great option to get your PLA prints smooth and glossy is using filler primer to smooth out the imperfections of your 3D print. Filler primer can help hiding layer lines as well as making sanding a lot easier.
There are a few different options of filler primer to choose but one of the most recommended for PLA 3D prints is automotive filler primer, such as Rust-Oleum Automotive 2-in-1 Filler, available on Amazon with great reviews.
One user started to use Rust-Oleum filler primer on his PLA pieces and found that they got a lot smoother, offering a better end-product.
Filler primer really smooths things up from 3Dprinting
Another user found that 90% of his layer lines disappeared when spraying filler primer on the printed object besides also cutting down on sanding time. Just be careful not to lose too much dimensional accuracy by using too much filler if that’s something you want.
Many people have been impressed with the results achieved after sanding and using filler primer on PLA objects because it allows for a very smooth and polished surface, perfect for painting afterwards.
Using a good filler is a great way to cover up imperfections and layer lines on a 3D print.
A user that has gotten good results recommended following these steps:
- Sand with low grit sandpaper like 120
- Assemble any pieces if needed
- Use filler putty in big gaps – spread a thin layer over the whole model
- Let it dry then sand with 200 grit sandpaper
- Use some filler primer and sand again with 200-300 grit sandpaper
- Paint if desired
- Apply a clear coat
FlukeyLukey has an awesome video on YouTube about spraying automotive filler primer to smooth your PLA 3D print, check it out below.
3. Spraying Polyurethane
If you’re looking to leave your PLA prints smooth and shiny then you should consider the method of spraying polyurethane on the printed model as it is thick enough and dries fast enough to fill in the layer lines, helping to create a better look to the finished object.
I’d recommend going with something like the Minwax Fast Drying Polyurethane Spray from Amazon. It’s a popular choice with the 3D printing community for smoothing PLA prints to a polished finish.
Be careful not to apply too much polyurethane because it is really thick and can remove a lot of detail, as it happened to one user who was trying to smooth out a blue PLA print. He still thinks the polyurethane added a lot of shimmer to his object.
Another user really recommends using this Minwax Polyurethane Spray as it makes adding it much easier than using a brush, he suggests doing a couple of coats in satin, high-gloss or semi-gloss to really add some shine to your object.
He also thinks it is extremely useful for clear PLA as it removes the “haze” present on surfaces and allows the print to become really transparent.
Spraying polyurethane helps to seal PLA 3D prints and even slows down the process of absorbing moisture and degrading, making the models last longer. It’s great for waterproofing PLA prints, even one coat getting the job done.
Even food safe objects can be created by using a coat of food safe polyurethane.
3DSage has a really cool video about spraying polyurethane to help smooth out PLA prints that you can check below.
4. Applying Glazing Putty or Airbrushing It
There is another great method you can try in order to polish and properly smooth out your PLA 3D prints and make them as shiny as possible. It consists of airbrushing glazing putty on your object to help hide layer lines and give it a nice smooth finish.
You will need to reduce the glazing putty in acetone so be aware that you will need to take the adequate safety measures, using proper gloves and a mask/respirator to handle toxic materials.
If you don’t have an airbrush setup you can still use glazing putty normally and just not reduce it in acetone. The most popular glazing putty in the market seems to be Bondo Glazing and Spot Putty, which is available on Amazon with great reviews.
One user really likes Bondo Glazing and Spot Putty to smooth out his PLA prints, he doesn’t use the airbrush method, he just applies it normally but he does recommend you to sand the piece after applying the putty.
A reviewer said he uses this putty to fill in print lines on his 3D printed cosplay pieces. He mentioned that plenty of people recommend it and there are many video tutorials that show people how to use it. It’s easy to apply and sands easily.
It’s a good idea to sand the object before the putty fully dries out since it’s easier to sand before that.
Another user said he uses the Bondo Putty to smooth out his 3D printed Mandalorian armor models and gets amazing results. You can use it to fill in any gaps in your final 3D prints.
Check out the video below by Darkwing Dad who shows you how to airbrush Bondo Putty on your 3D print.
5. Using UV Resin
Another method of smoothing and polishing your PLA 3D prints is to use UV resin.
It consists of applying standard clear 3D printer resin to the model like some Siraya Tech Clear Resin with a brush then curing it with a UV light.
When you do this method, you want to brush the resin along the layer lines to avoid creating bubbles. Also, you don’t want to dip your whole model in the resin since it’s not very thick and you don’t need to apply much of it.
It can be done with just one thin coat, especially if you don’t want to decrease the detail in the model too much.
After the coat of resin is on, use a UV light and a rotating turntable to cure the model. It could be a good idea to tie some string to a part of the model so you can elevate it, then coat and cure it in one go.
You can use something like this Black Light UV Flashlight from Amazon. Many users have said they used it for their resin 3D prints to cure them.
Some users recommend that you pour some of the clear resin on a paper towel, then dry it on a UV light to use it as a curing time reference so you know how long to cure it for.
Using this technique can really get you a smooth polished surface and hide your layer lines in PLA models.
One user who has an Ender 3 said he achieved great results by filling out the layer lines and smoothing it out using the UV resin technique. He said the UV resin immediately got rid of the layer lines and help make sanding easier.
You can watch the video below by Panda Pros & Costumes on how to use the UV resin method.
6. Using Rub ‘n Buff
Rub ‘n Buff (Amazon) is one of the easiest options when making PLA prints smooth and shiny. It is a paste you can apply by rubbing it on the object’s surface to leave it more shiny and give it a unique look. Just remember to use rubber gloves to avoid any skin irritation.
It comes in a variety of different colors and metallic tones and it can give your object a unique finishing touch.
One user who put this product on their 3D prints said it worked great for making objects look like metallic silver. He uses it for post-processing 3D printed replicas successfully.
Another user said he uses it to add elegance to some lightsabers he 3D printed with black carbon fiber PLA. It works great and lasts a long time as one person put it. You can apply it with a small brush for better accuracy, then rub it with a clean cotton cloth.
Even a tiny blob of this stuff can cover large areas. Check out the example below of Rub ‘n Buff on black PLA.
Another user really liked how Rub ‘n Buff performed on PLA 3D printed objects. Even without any other finishing touch, the final result looked very shiny and smooth, being a perfect option for those that lack the painting abilities.
Rub n buff on black PLA from 3Dprinting
Check out this other example also.
Having some fun with Rub n Buff. Predator mugs that perfectly fit beer/pop cans. Design by HEX3D from 3Dprinting
Check out this awesome video about applying Rub ‘n Buff to your 3D printed parts.
How To: Smooth and Finish Your PLA Prints - Part 1
Making your 3D prints look fresh off the assembly line isn't as hard as you think. Follow these simple techniques to finish your 3D prints and make them shine.
Updated on November 14, 2022
by
Alec Richter
PLA (Polylactic Acid) filament is one of the two most commonly used desktop 3D printing materials (with the other being ABS filament). It is the ‘default’ recommended material for many desktop 3D printers, and with good reason - PLA is useful in a broad range of printing applications and can be produced in a variety of colors. It has the virtue of being both an odorless and low-warp material, and does not require a heated bed. PLA plastic is also one of the more eco-friendly 3D printer materials available; it is made from renewable resources (corn-starch) and requires less energy to process compared to traditional (petroleum-based) plastics. Cool, but what do you do to finish a PLA print to make it truly good?
Yes, this Halo helmet is 3D printed!
There are several techniques to remove or diminish the striations or layer lines of a 3D print. Some of the different processes that can be applied to PLA can be applied to ABS, but not vice versa. Generally, for PLA filament, the methods you can use involve the continual adding and subtracting of different materials back and forth until it is as smooth as you want it.
What do I mean by finishing?
Think of your 3D prints as the Great Pyramids of Giza. They used to be totally smooth down the side, but age has revealed the layered and rough base built underneath. To make the pyramids smooth, Ancient Egyptians added limestone over the top, since it was a much softer material than the base stone. If they had the technology, they also could have cut away the jagged levels to make smooth, flat faces. This is what finishing consists of; a fine balance between adding and subtracting material to achieve the desired surface finish. The key is to remove enough material to hide some striations (layer lines) and adding just as much to fill in the gaps.
To help showcase the benefits and problems that can arise with each technique, I’ve designed a “Finishing Torture Test.” This simple model has sharp corners on the outside of the cube and the inside of the hole, along chamfers, and the edges of the pyramid. It also has round faces, fillets, and a cylinder. I chose to include all these in the model as they are different examples of some common features you might find in the various models you can print, and to show how some of the features can be lost or diminished.
If you'd like to put your finishing skills to the test, you can download this model from our Thingiverse or from the Design Store
Finishing Torture Test
I started by printing out the model in MatterHackers Silver PRO Series PLA. This will serve as the control print. I then repeated the print eight more times. The eight prints will be used to demonstrate four different techniques, each with two different finishes.
The control print.
As this in an introduction to finishing PLA, this list is non-exhaustive of the techniques you can learn to clean up your 3D prints. More tools can be used, small tips can be learned, and starting with a good model are all techniques you can use to produce finished prints, but the ones I will be going over are:
- Painting alone
- Sanding and painting
- Sanding, filler primer, and painting
- Sanding, filler primer, spot putty, and painting
Note:
If I were doing this with the intent to mold these or use these as a finished product, I would have gone through each step half a dozen times over, moving from low to high grits, priming, more sanding, priming, sanding, spot putty, sanding again, etc. Since the purpose of this article is to show the difference each material introduces to the finish of your part, only one pass of sanding and finishing is done to each part.
Painting
Painting is the least involved of any of the techniques; all you need is a rattle can and some open air and you can paint your 3D print.
Materials:
- Spray Paint
Some recommendations to follow when spray painting:
- Don't spray right up against your print: if you spray too close to your print, you risk getting noticeable drips in the paint job.
- Spray in a back and forth motion, overlapping each pass.
- Multiple coats will fill in the striations better than one coat alone, but keep each coat light.
Total Time: 1 minute (not including drying times)
Here you can see that there are still a lot of striations visible even after the paint, but it's less than if it was unpainted.
Left: Control, Right: Spray Paint
Sanding and Painting
Sanding is going to be the most common finishing technique, with any 3D printing filament. It’s easy, and it’s cheap, but that doesn’t make it any less tedious. The lower the grit, the coarser the sandpaper is, and the quicker it’ll remove material. I use 3M Pro Grade Precision because its backing is a little sturdier so it doesn't rip as easily and it lasts a while longer because the grit doesn't gum up as quickly as normal sandpaper.
Materials:
- Sandpaper
- 120 grit
- 200 grit
- 400 grit
- Water
- Paper towels
- Spray Paint
Start with the 120 grit and focus on the sides of the print. 120 grit will tear away material pretty quickly, so avoid sanding corners, edges, and any fine details.
Sanded using 120 grit
Continue to progress through the grits as you need to remove less and less of your print. Once you’ve finished with 200, start using water as you sand. 400 grit and above is going to remove very little material, any major blemishes or layer lines in the model will be mostly unaffected at this point, and will more or less be polishing what you have.
Dip your piece of 400 grit sandpaper into some water and continue sanding your print. The water helps keep the paper from clogging and gets a much finer finish than dry sanding with the same grit. As you sand, run your fingers over the print to get a feel for how smooth it is. When you think it’s pretty smooth, you're ready for paint.
Here is what the 3D print looks like after two matte gray coats of paint or two gloss gray coats. Keep in mind these are cheap Rustoleum rattle cans, but these prints do look better after having been sanded and painted.
8 minutes using 120 grit
6 minutes using 220 grit
5 minutes using 400 grit
1 minute spray painting
Total time: 20 minutes (not including drying time).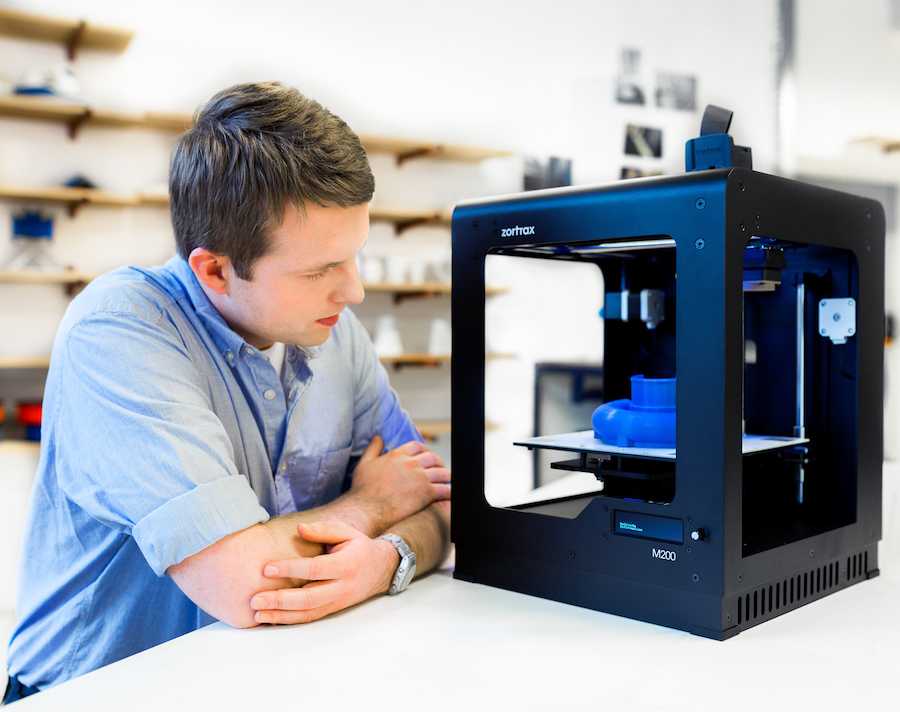
Left: sanded, matte paint; Right: sanded, gloss paint
Filler Primer
Once you’ve given it a quick sanding, spray on some filler primer to coat the entire 3D print. Keep alternating through sanding with 120 and spraying filler primer until things like the dome on top are filled in enough to make one smooth surface, rather than the clear layer lines on top. Once it’s filled in enough, repeat the steps listed in Sanding and Painting.
Materials:
- Filler Primer
- 120 grit
- 200 grit
- 400 grit
- Water
- Paper towels
- Spray Paint
Start by sanding with 120 grit sandpaper to bring down some of the surface texture. Before adding more material on top, it’s always better to remove some material first.
8 minutes using 120 grit
1 minute spraying the filler primer
7 minutes using 120 grit
10 minutes using 220 and 440 grit
Total time: 26 minutes (not including drying time).
Left: sanded, filler primer, sanded, matte paint; Right: sanded, filler primer, sanded, gloss paint.
Spot Putty
Spot putty is a great material and like any great material, slightly toxic. Gloves are a must as spot putty is basically dye, resin, and talcum powder, and a mask is based on personal preference but always encouraged. The label does list the vapor as harmful, but it's in such small quantities I usually ignore it, although it has given me headaches on several occasions.
Materials:
- Filler Primer
- Bondo Glazing and Spot Putty
- 120 grit
- 200 grit
- 400 grit
- Water
- Paper towels
- Spray Paint
- Gloves
- PPE
This is basically the same as the last process, except you will be using the spot putty to fill in any low spots to fill in some of the major layer lines, or rebuild minor blemishes like the top of round surface.
First, you're going to want to follow the steps I've given for filler primer, up to the point of switching to 220 grit. Instead of changing grits, you're going to do the following steps instead.
To apply spot putty, either use your gloved finger, a small paddle, scrapers, the side of a plastic scrap, a popsicle stick, it doesn't really matter. My personal preference is to use my finger for most and a small spreader for the tight spaces. Using a pea sized amount of putty, I smear it across the surfaces of the print and try to spread it thick enough to fill gaps but thin enough to not lose the details I'm trying to preserve. Either way, it's really easy to sand off so don't worry about overdoing it.
Once you've covered the entire 3D print with spot putty, wait 15 minutes or so until it has cured. After it has cured and is no longer gummy, start sanding again at 120 very briefly. Like I said, it's mostly talcum powder so it's going to be really easy to sand, you're basically wiping it off. When your 3D print looks like you initially did only a light coating, with pink spots of putty all over, you're ready to bump it up to 220 grit. At that point, follow the previously listed directions for sanding.
8 minutes with 120 grit
1 minute spraying filler primer
5 minutes applying spot putty
3 minutes with 120 grit
10 minutes with 220 and 400 grit
1 minute spray painting
Total time: 29 minutes (not including drying time).
Left: sanded, filler primer, sanded, spot putty, sanded, matte paint; Right: sanded, filler primer, sanded, spot putty, sanded, gloss paint.
Comparisons and Final Thoughts
From left to right: Control, Painted Matte, Painted Gloss, Sanded with Matte, Sanded with Gloss, Filler with Matte, Filler with Gloss, Spot Putty with Matte, Spot Putty with Gloss
Each technique took more time than the last, but you also get much better results - after all, it is a craft. Keep in mind that only one coat of filler primer and spot putty was used during the process (for the sake of time), but you can use as many coats as you'd like to eliminate layering. As you can see in the picture above, the results are still pretty stellar for only half an hour of work. For reference, the picture below is the 3D printed Torture Test before they were spray painted.
From left to right: control, sanded, sanded with filler primer, sanded with spot putty.
For part two in this series, read the sequel article, How To: Smooth and Finish Your PLA Prints - Part 2
Article Tags
- 3D Printing
- Firmware
- 3D Design
- MatterControl
- Press Releases
- Small Business
- Automotive
- E3D
- Jewelry Making
- Engineering
- Entertainment Industry
- MatterControl Touch
- ESD Materials
- NylonX
- BCN3D
- Open Source
- Crafty Pen
- Digital Fabrication Anatomy
- How To
- Hardware and Upgrades
- Tips and Tricks
- Weekend Builds
- Top Ten
- Education
- Tech Breakdown
- Women in 3D Printing
- Project Ideas
- Advanced Materials
- Reference
- Pulse Dual Extrusion
- Product Spotlight
- Aerospace
- Jobs
- Military & Government
- Multi-Tool Machines
- Getting Started
- Healthcare
- How To Succeed With Any 3D Printing Material
- Creality3D
- Architecture
- 3D Printer Reviews
- Hacker of the Month
Related Products
View all related products3D printers Poland.
 Large selection of printers and scanners
 Europeans are actively mastering 3D technologies - every year new European brands appear on the world market of 3D equipment, among which the Polish Zortax deserves undeniable trust, which is gradually becoming a confident leader in the segment of personal desktop 3D printers.
Polish 3D printers are generally distinguished by their concise design - much more attention is paid to the internal stuffing when creating them. Despite its compact dimensions, each Polish-made 3D printer has a decent print area and excellent quality characteristics. nine0003
You can buy 3D printers from Poland at the most attractive prices in our 3DMall online store - we offer you the best models from famous brands with delivery throughout the country.
Functional and inexpensive 3D printers from Poland are characterized by high performance and a wide range of applications. They can be used to create architectural models, 3D printing of advertising and souvenir products, for medicine, education and hobbies.
3DMALL offers products from the Polish manufacturer Zortrax. The entire line of devices is distinguished by:
- High print quality.
- Large working chamber for 3D modeling.
- Modern design.
- Steel housing that reduces noise and vibration.
- Controlled by LCD screen. The entire interface is completely Russified, which makes working with the device simple and understandable.
Products have their own characteristics. So, ZortraxInventure includes two extruders that perform several functions: speed up printing, allow you to use multiple materials at the same time and create a 3D model from several colors. Consumables for additive manufacturing are placed in a cartridge, making replacement simple and fast. nine0003
Zortrax M300 has a flow control for material residues. A large area for printing 3D objects allows you to make models the size of a motorcycle helmet in it. The side walls make the printer completely safe and maintain a constant temperature level in the working chamber. The goods are delivered completely ready to work.
The material used for 3D printing is plastic filament. Here are some of the plastics that are used for 3D printers from Poland:
- Impact and heat resistant ABS. Easily gives in to the subsequent technical and chemical processing.
- Biodegradable PLA. Has very low shrinkage during 3D prototyping.
- HIPS. It has good electrical insulating properties.
The 3DMALL website contains all the necessary products for 3D scanning and subsequent printing. We have equipment and consumables from well-known manufacturers from Russia and Europe such as Leapfrog, Maestro 3D, SeeMeCNC, Zenit, Asiga and many others. All devices work on popular international technologies FDM, FFF, SLA, DLP, PolyJet. 3DMALL employees will always answer all questions that arise during the installation and operation of the equipment. Delivery of the order is carried out in Moscow (Moscow time) and the Russian Federation. nine0003
- 3D printers (4)
- Installation, repairs, repairs of machines and industrial equipment (72)
- Household fans (8) nine0018
- Jacks, cranes and construction hoists (50)
- Equipment for CNC machines, accessories for CNC machines (1) nine0017 Wholesale of machines for the textile industry, as well as sewing and knitting machines (18)
- Wholesale of machinery and equipment for offices (145) nine0017 Wholesale of metalworking and woodworking machines (79)
- Wholesale of industrial machinery and equipment (336)
- Wholesale of agricultural machinery and equipment, including the sale of tractors (54) nine0018
- Wholesale of construction equipment (60)
- Printing and binding machines and equipment, machines for the paper industry (45) nine0017 Manufacture of hydraulic and pneumatic equipment and devices (45)
- Engine and turbine manufacturing (13)
- Production of conveyors and sorting machines (21) nine0018
- Production of air conditioning plants (15)
- Manufacture of mining and construction machinery (68) nine0017 Production of woodworking machines, equipment for the woodworking industry (18)
- Manufacture of machines for metal processing, equipment for ferrous and non-ferrous metallurgy (41) nine0017 Manufacture of machinery for food processing, beverage production and tobacco processing (78)
- Production of machinery for agriculture and forestry (75) nine0017 Manufacture of machines for the textile, clothing and leather industries (11)
- Manufacture of machinery and office equipment, banking machines, fiscal cash registers (12) nine0017 Manufacture of pumps and compressors (50)
- Manufacture of other machinery and equipment (53)
- Manufacture of other mechanical tools (23) nine0018
- Manufacture of furnaces, furnaces and furnace burners (22)
- Manufacture of radiators, boilers and heating equipment (61) nine0017 Production of agricultural tractors (7)
- Production of packaging machines (22)
- Manufacture of refrigeration and ventilation equipment (63) nine0018
- Rental of machinery and equipment for construction, land and water works (24)
- Rental of other types of machinery and equipment (3) nine0017 Industrial fans (17)
- Solar collectors (15)
- Heat exchangers (20) nine0018
- Filter equipment and accessories (56)
Display search results: 1 - 4 from 4
BIBUS MENOS Sp.