Polar 3d printer price
Polar 3D — 3D Printer Review
Skip to main contentWhen you purchase through links on our site, we may earn an affiliate commission. Here’s how it works.
This education-focused 3D printer offers a good range of features and excellent software for multiple users, but there are better printers for home users.
Tom's Guide Verdict
This education-focused 3D printer offers a good range of features and excellent software for multiple users, but there are better printers for home users.
Pros
- +
Excellent software for group use
- +
Easy to manage prints and users
- +
Affordable, especially for schools
Cons
- -
No heated print bed makes it difficult to use ABS
- -
Primitive built-in modeling tools lack some key features
- -
Occasional Wi-Fi glitches
Why you can trust Tom's Guide Our expert reviewers spend hours testing and comparing products and services so you can choose the best for you. Find out more about how we test.
Today's best Polar 3D deals
No price information
For more information visit their website
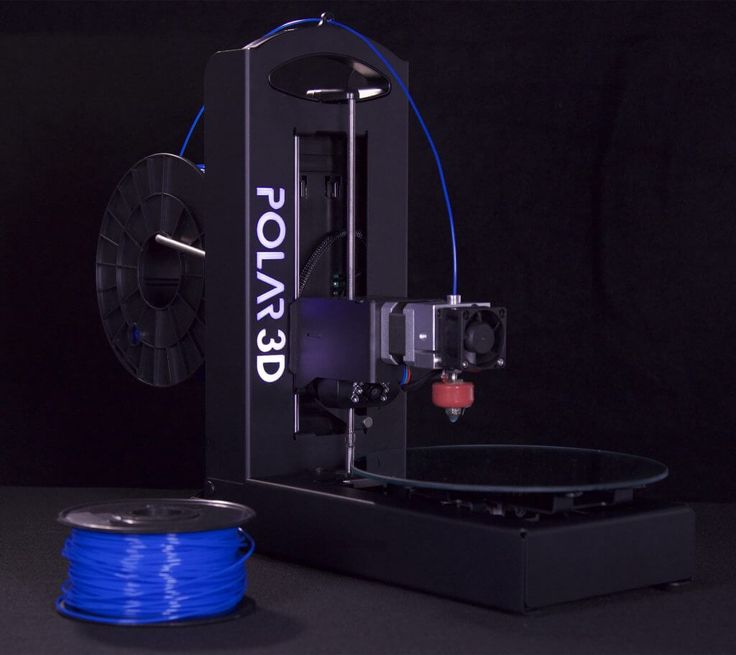
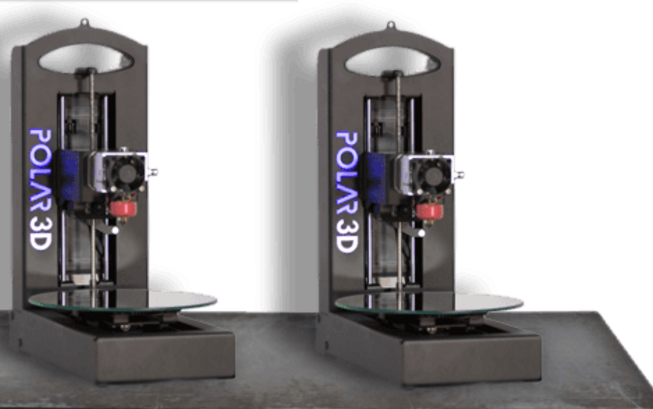
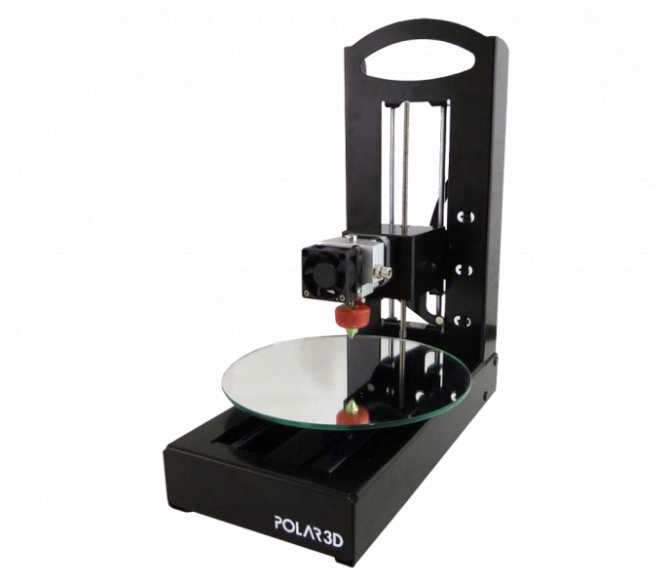
Aimed at the education market, the $799 Polar 3D takes an unusual approach to 3D printing, with a rotating print bed. It offers a good range of features, including support for multiple types of filament and a webcam to monitor prints.
The real high point is the software, which lets multiple users build and load 3D models, and then queue them to a printer under one person's control. Educational users get a price break: The company is offering the printer for $599 to schools, teachers and students.
Usually, 3D printers produce objects by moving the printhead left to right, front to back and up and down over a static, square print bed (or sometimes moving the printhead left to right and up and down, and the print bed front to back). In contrast, the Polar 3D moves the printhead up and down, moves the print bed front to back and also spins the print bed around.
It sounds odd, but by combining the motions, the Polar 3D can reach every part of the large 8-inch-diameter print bed without requiring a large overhanging mechanism. That allows a small printer to produce a sizable print volume of a little more than 400 cubic inches (8 inches high, and 6 inches in diameter) — nearly double the print area of the much larger LulzBot Mini, which manages 223.2 cubic inches (6 x 6 x 6.2 inches).
The lack of a heated print bed means that you have to use different methods to get the print to stick.
The Polar 3D has a simple look; it's composed of a black-painted "L"-shaped metal frame. The printhead protrudes from the upward arm of this "L," driven up and down by a motor in the base. A roll of plastic filament fits onto a hook on the back of the arm, with the filament fitting through a guide loop in the top and into the printhead.
The printhead is not covered, so you'll need to use some caution — you could easily burn your fingers on the exposed hot end from which the melted filament extrudes. The circular print bed sits on the bottom arm of the "L," with another motor in the base pushing it forward and backward. Additionally, a third motor underneath the print bed spins it around.
The print bed is made of mirrored glass. It isn't heated; instead, the printer comes with a canister of hair spray (Aqua Net Extra Super Hold brand) that you spray onto the print bed to make the plastic stick to the glass surface during printing.
MORE: Best 3D Printer - Top-Rated 3D Printers - Tom's Guide
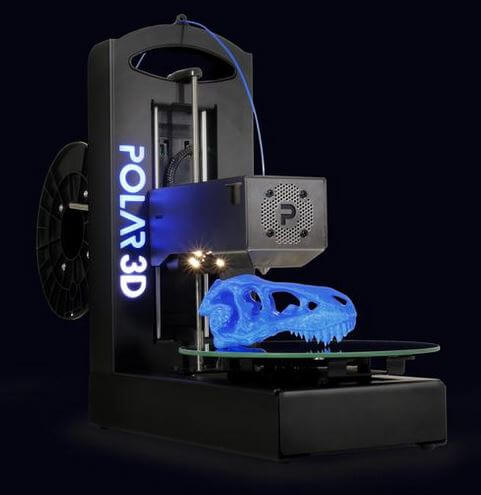
You'll find a camera just under the print head, which is an unusual placement for 3D printers. This provides a live view of the print on the print bed, to see how well it's progressing.
The back of the L features a power port, Ethernet port and two USB ports (one input, one output). The Ethernet port is the primary method of connecting to the Internet, but the Polar 3D includes 802. 11b/g wireless capabilities. When we tried to set the printer to automatically join an existing wireless network, it often failed to do so, creating its own wireless network instead. This is the default mode of the Polar 3D, so to get it onto our existing test network, we had to connect to it with another device and reset it from the Web interface.
Print Materials: Wide Range, But No Heated Bed
The Polar 3D comes with a roll of 1.75-mm PLA filament, but the printer supports other materials as well. However, the lack of a heated print bed means that you have to use different methods to get the print to stick.
With the included PLA, a quick spray of the included hair spray makes the glass build plate sticky enough that the PLA sticks to it. However, this won't work with ABS, the other commonly used print material. Instead, Polar 3D recommends the use of Elmer's X-treme Glue Stick, which is basically water-soluble superglue. After the printing model, you use water to remove the glue and lift the print off the print base.
We tried this method when printing in ABS, spreading a thin layer of the glue before printing — and it works, though removing the prints is rather awkward. With a heated print bed, ABS prints usually pop right off or require only a bit of prying to lift. Here, we did need to do quite extensive soaking to get a print with a large base (like our Thinker model) to lift off.
Print Speed: Midrange
The Polar 3D is a fairly fast printer, with our Thinker model taking about 5 hours and 19 minutes to print with the Draft quality setting, which has a default layer height of 0.32 mm. Changing this to the Medium quality setting (which had a layer height of 0.2 mm) upped the print time to 6 hours and 51 minutes. Those are the only two quality presets offered by this printer.
The printing times put the Polar 3D in the middle of the 3D printer pack for speed, comparable to both the more expensive Taz Mini, which took about 5 hours and 13 minutes for a similar print, and the similarly priced XYZ da Vinci 1. 0 (5 hours and 9 minutes).
Interface: Controlled Through the Cloud
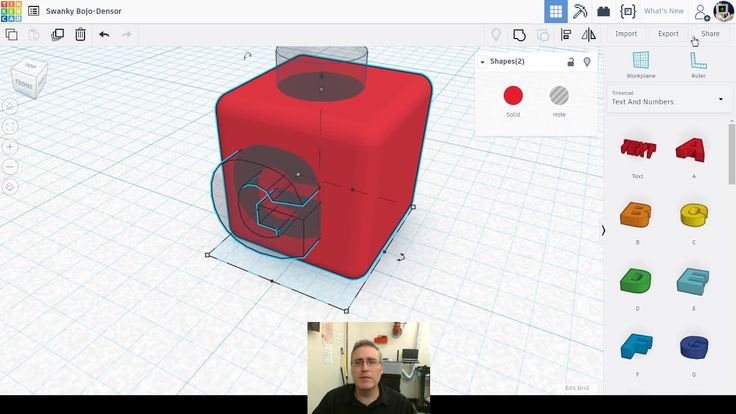
In addition to its rotating print bed, the Polar 3D is different from other 3D printers in how you control it. Rather than controlling the printer directly or through a program running on a PC, you run the Polar 3D via the Web, with a cloud interface that puts all of the features of the printer online. This ties in with the educational approach of the Polar 3D, as it allows a teacher to set up and control the printer, deciding which models are printed and in which order. These users (called managers) can also add, remove or alter models and printers, so a group of students can upload models and schedule prints, with the administrator overseeing the process and intervening as required.
This online approach also covers the creation of models. A basic Web-based modeling program comes with the 3D Polar and can create models from scratch using simple modeling tools. You can also use the modeling program to upload and edit other files in . STL format. Either way, models can be scaled, rotated and prepared for printing.
While this approach is adequate for basic use, the Polar 3D is missing some features. For instance, there's no way to scale a model to a particular size or to see the specific dimensions of a model. You're presented with a 3D view of the model on the build plate, but no specific measurements.
Once the model has been loaded or created, it can be saved (again to the cloud), shared or sent to a printer for printing. You can scale a model here, but again, you can't set a specific size; you have to look at the size and then calculate the scaling yourself.
You run the Polar 3D via the Web, with a cloud interface that puts all of the features of the printer online. This ties in with the educational approach of the Polar 3D, as it allows a teacher to set up and control the printer.
Polar 3D's online approach generally works well. It is easy to navigate and edit models, and create and share them. But it becomes a little confusing when you are looking at a saved model, and it isn't clear what, exactly, the buttons marked Edit and Open do. Edit opens the information for the model (who created it and when), while Open, somewhat confusingly, loads the model for more detailed editing in the built-in 3D modeler.
This interface also hides many of the features that other programs offer. Most of the technical settings that you customize for different printing materials (such as the layer height, the speed at which the printhead moves and so on) are kept out of sight. These are available by opening the model and selecting Cura Settings, although this process isn't really covered much in the documentation.
Print Process: Straightforward
To print with the Polar 3D, you first load the model to the cloud service, saving it for future printing. Then, you open the model and select Load To Printer. The system then gives you the option of which printer to use if you have more than one.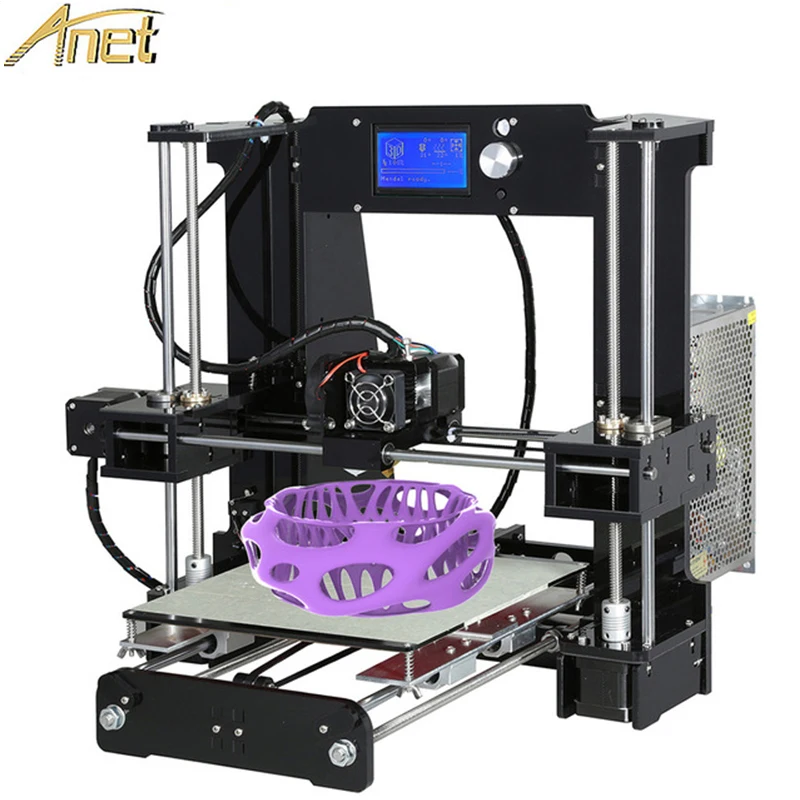 From there, you go to the printer in the Printers tab, and hit Start Print.
MORE: 8 Awesome 3D Printing Trends to Watch
The printer screen shows the basic information on the printer and the progress of the print, including the time remaining, the printhead temperature and the amount of filament remaining. There is also a live view of the print in progress. It isn't necessary to stay on this Web page; the printer will happily keep printing if you turn off the computer and walk away. This page also works on portable devices; we had no problem loading and starting prints from an iPad and an Android phone.
Print Quality: Good, But Some Issues
We found that the Polar 3D generally produced high-quality prints with good levels of detail and smooth, natural curves. However, it struggled with one of our test models, and prints did require some cleaning up to remove odd whiskers of print material.
Our first test model was a scan of Auguste Rodin's "The Thinker" statue.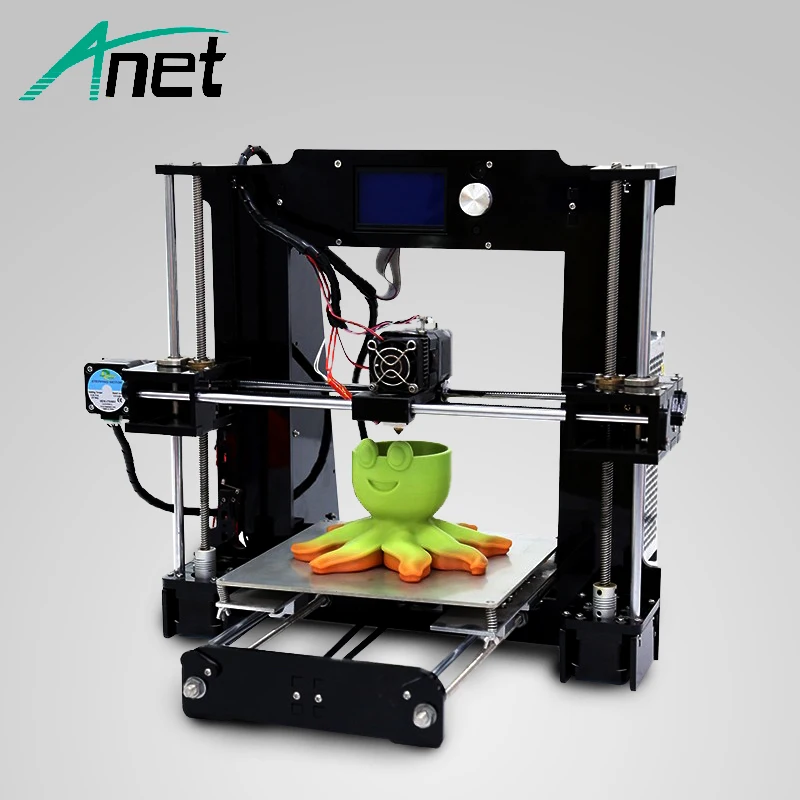 We print this model (which is created from a scan of the original) at a height of about 4.5 inches. The Polar 3D had no major problems with this, producing a print that accurately captured the smooth curves and fine details of the original, especially around the shoulders and head. The levels of the print were fairly visible, and we did see some whiskers of the print material from where the printer had shifted the printhead between parts of the print, dragging a small whisker of material with it. These are easily removed, but they do leave some traces on the print that require trimming.
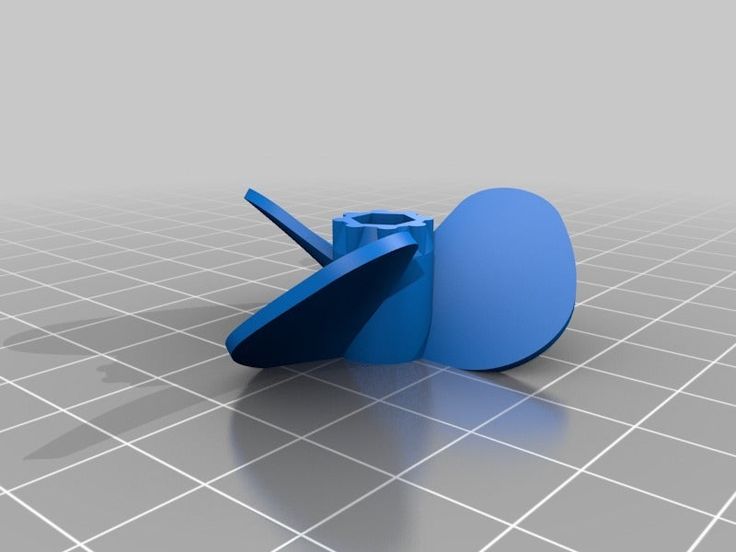
Next, we tried a set of gears that can be assembled into a planetary gears set. The Polar 3D did a decent job here, but again, some of the parts had to be trimmed with a knife to fit together. In particular, we found that the small holes in the gears that fit over pegs on other parts were overfilled with material, caused by the material slumping and spreading slightly as the print was formed.
Finally, we tried a 3D model of a modern sculpture that has lots of hard-to-print angles and edges. We were not able to get this model to print on the Polar 3D using the default settings, as the slicer — the program that converts the 3D model into layers that are printed one by one — created insufficient support for the model to stick to the print bed. After some testing, we were able to create a print by using the advanced settings to build a raft, a layer of plastic underneath the model that supported it while printing. But that's a weakness of the Polar 3D: Its hairspray method for getting models to stick does not work very well for small areas, so you need to make sure that there is sufficient area on the print bed to keep it held down.
The Polar 3D is designed for educational users, and it excels in that area. The combination of excellent, cloud-based software for creating and managing 3D models and the printer itself makes it easy for a large group of users to build models and have them printed on one or a number of these printers. It is less suited for other users, though; these features are overkill for home users.
Although the Polar 3D is well priced, at $799, and can produce good-quality prints, the lack of a heated print bed makes the use of materials like ABS more complicated. If you are happy to stick to PLA or don't mind messing around with glue sticks and the like, the Polar 3D can work. But those who want to experiment more with other print materials will be better off spending a bit more on a printer that can handle them, like the LulzBot Mini.
Today's best Polar 3D deals
No price information
For more information visit their website
Richard Baguley has been working as a technology writer and journalist since 1993. As well as contributing to Tom's Guide, he writes for Cnet, T3, Wired and many other publications.
Tom's Guide is part of Future US Inc, an international media group and leading digital publisher. Visit our corporate site .
© Future US, Inc. Full 7th Floor, 130 West 42nd Street, New York, NY 10036.
dp polar launches AMpolar i1 3D printer with Xaar printheads: Technical specifications and pricing
0Shares
Industrial 3D printer manufacturer dp polar will unveil the latest addition to its range, the AMpolar i1, at Formnext 2021 next week.
The firm has once again opted for 1003 printheads from inkjet printhead developer Xaar to kit out its new machine and enable the mass production of 3D printed parts on an industrial scale.
Based on dp polar’s patented single-pass 3D printing process, the AMpolar i1 will reportedly facilitate build volumes of up to 240 liters across its continuously rotating print platform, while achieving an output that traditionally would have required multiple conventional 3D printers.
“The AMpolar i1 delivers all the production benefits of the AMpolar i2, but at a scale and in a format that facilitates businesses in their early stages of exploring what is possible in mass production 3D printing,” said Florian Loebermann, dp polar’s Managing Director.
“Xaar’s printheads have proved invaluable in unlocking the full potential of our systems, and the openness of the Xaar team to support our innovations is helping to establish 3D printing and additive mass manufacturing as a practical reality in the volume production of parts for many businesses.”
dp polar’s single-pass printing technology
The AMpolar i1 leverages dp polar’s patented single-pass material jetting 3D printing process, which is based on a rotating print platform. The rotating platform allows the firm’s technology to work continuously to facilitate the uninterrupted printing of parts from the first to the last layer.
dp polar develops industrial 3D printing systems for use within a variety of industries, including the automotive, aerospace, mechanical engineering, and consumer sectors.
dp polar launched its first 3D printer at Formnext 2019, the AMpolar i2, in partnership with German chemical group ALTANA AG, which had previously acquired a stake in the company in 2017. The machine’s large build volume, rotating print platform and single-pass printing combination opened it up to industrial series production of additively manufactured parts.
The firm has worked with Xaar over several years for the use of its printheads, which are key to maximizing the scalability and productivity of its single-pass printing technology.
The AMpolar i1 3D printer. Photo via Xaar.Achieving industrial-scale production with Xaar printheads
Best known as a manufacturer of inkjet technologies, Xaar also has a background in high-speed sintering (HSS), having opened a dedicated 3D printing hub in 2016.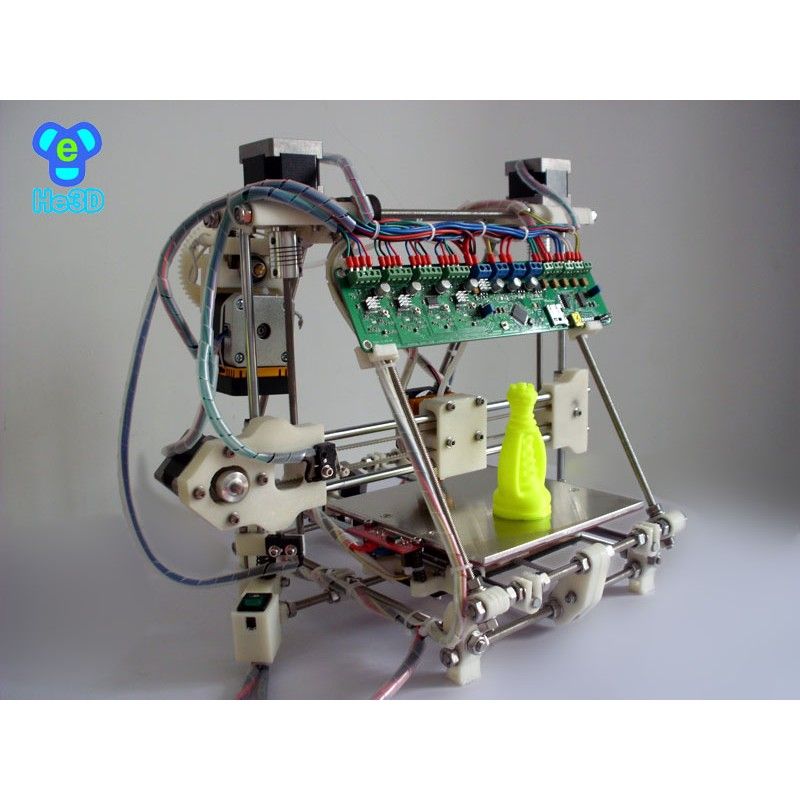 Just last month, industrial 3D printer manufacturer Stratasys took full control of Xaar after acquiring all remaining shares in the company. The two had worked together to integrate selective absorption fusion (SAF) technology into Stratasys’ H Series machines to accelerate production-scale 3D printing.
Xaar’s ultra high viscosity technology enables its printheads to jet fluids up to 100 centipoises (cP) in a single pass, a capability leveraged by dp polar’s new AMpolar i1 printing system. In particular, the printer is equipped with the Xaar 1003 printhead which combines speed and reliability with the capacity to jet a multitude of fluids at increasingly high viscosities.
The printhead therefore enables the AMpolar i1 to jet parts at volume and deliver 3D printed objects on an industrial scale, while opening up a range of new applications.
The AMpolar i1 is a more compact version of the AMpolar i2, enabling build volumes of up to 240 liters across its rotating print platform, with a build volume of just under one square meter. The machine prints layer of between 4-25µm and can achieve a resolution of up to 720 x 720 x 5.000 dpi.
According to dp polar, the combination of its single-pass printing technology and Xaar printheads delivers scalability, productivity and agility to its production process. The machine reportedly achieves an output that would require multiple conventional 3D printers, and significantly more capital investment, to match.
“The innovative and agile AMpolar i1 firmly establishes the use of resin jetting as a truly practical and commercially viable manufacturing process,” said Gareth Neal, Xaar’s Customer Applications Manager for Advanced Applications, Technologies and Fluids. “With Xaar’s range of printheads including our unique Ultra High Viscosity Technology providing the speed, flexibility and reliability demanded, functional inkjet applications have never been more accessible, affordable or productive.”
Visitors to Formnext will be able to see the AMpolar i1 for the first time at dp polar’s stand in Hall 12.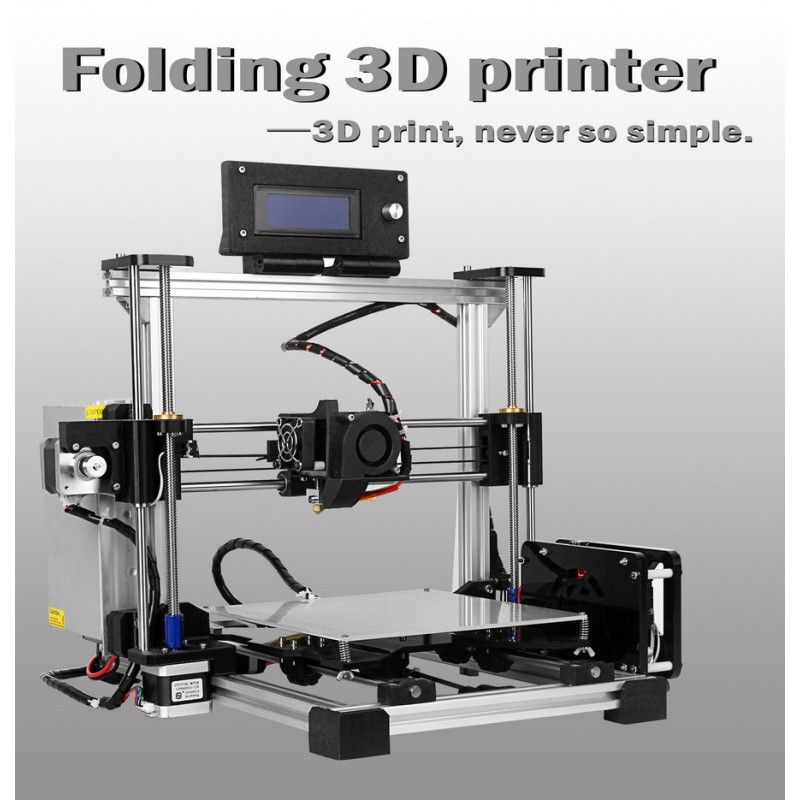 1. To keep up with all the news and launches at the show, make sure to tune in to 3D Printing Industry’s livestreams, taking place each day of the event, by subscribing to our YouTube channel.
Technical specifications and pricing
| Application technology | Material jetting |
| Build width | max. 280 mm (11.0 in) |
| Build area | 0.96m2 (10.3ft2) |
| Build volume | 240 L (8.5ft3) |
| Layer thickness | 4-25µm |
| Resolution (xyz) | up to 720 x 720 x 5.000 dpi |
| Productivity | max. 7 L/h (0.25 ft3/h) |
Subscribe to the 3D Printing Industry newsletter for the latest news in additive manufacturing. You can also stay connected by following us on Twitter and liking us on Facebook.
Looking for a career in additive manufacturing? Visit 3D Printing Jobs for a selection of roles in the industry.
Subscribe to our YouTube channel for the latest 3D printing video shorts, reviews and webinar replays.
Featured image shows the AMpolar i1 3D printer. Photo via Xaar.
Tags ALTANA AG AMpolar i1 AMpolar i2 dp polar Florian Loebermann Gareth Neal Selective absorption fusion Stratasys Xaar
Hayley Everett
Hayley is a Technology Journalist for 3DPI and has a background in B2B publications spanning manufacturing, tools and cycling. Writing news and features, she holds a keen interest in emerging technologies which are impacting the world we live in.
Starting with polar 3d printer
Technician
Hello! I have long wanted, I have been burning with a 3d printer for a long time.
 It burned when this movement was not yet so diversified, and apparently burned out. :o But years passed, periodically thoughts returned and disturbed the mind, and finally they got a chance to be realized ...
 So I would like to share some thoughts about my project, I will be sincerely grateful for advice, criticism, comments and in general, any useful information on the subject. Let's clarify a couple of things right away. This is my first experience in the field of 3d printing, but I am well acquainted with similar CNC milling machines, I have a specialized education in this area, and also worked as a CNC machine operator and currently I work as a technologist-programmer of 3-axis milling machines with CNC. nine0003
So. I drew attention to the polar schemes of printers (rotating 3D printers), compared to conventional Cartesian printers, they are distinguished by a lower material consumption of the design, smaller dimensions with a larger print volume, and judging by information from the network, this type has promising characteristics of print speed. Well, in general, as for me, this design attracts with its overall simplicity and 'elegance'.
In terms of mechanics, I want to take the design of Pimaker 3D as a basis.
I think this is by far the most successful layout in which you can achieve high-quality and fast printing among polar 3D printers. Aluminum frame (bed), guides of round section with linear bearings. The Z-axis guides will simultaneously serve as a support for attaching the upper beam, so I will make them bold Ø25-30mm. Bearings from China, guides will most likely be made on their own. Ball screws from the same China or a home-made pair of screw + nut will be used as drives. This is due to the desire to get the highest possible quality and print speed. In addition, there are ideas to use heavier extruders for printing clay materials. I think the platform for the extruder should be made with the ability to quickly change the working tool. nine0003
But there are questions with electronics .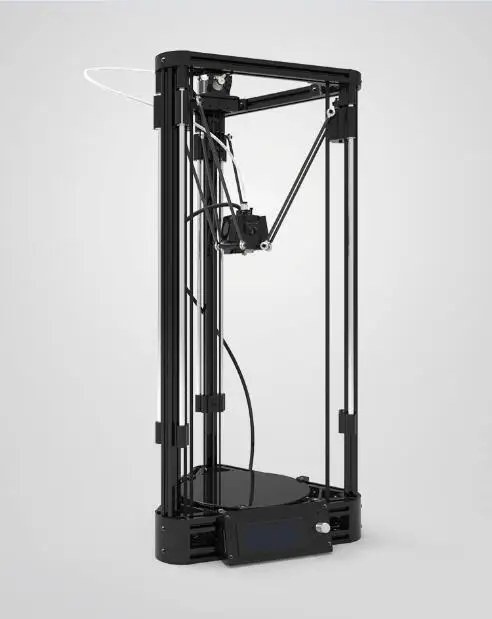 ... and a lot :oops: Namely, what to control and with what software? The ideal option, in view of my meager knowledge of electronic components, would be to have some kind of ready-made solution. For me, this is the main issue at the moment, which stops the development of the mechanical part. Perhaps because of this issue, you will have to abandon the polar coordinates altogether.
In general, it would be interesting to hear the opinions of experienced users about such an undertaking. Does this design have the right to life? Does it make sense to bother? Has anyone tried to do something similar? Perhaps someone wants to do it? At worst, maybe someone has some kind of useful information. nine0003
Best regards, Andrey!
Follow author
Follow
Don't want
2
Top 20 Inexpensive 3D Printers ($199 to $1000)
3DPrintStory Reviews Top 20 Inexpensive 3D Printers (from $199 to $1000)
Just 10 years ago, a 3D printer cost over $100,000.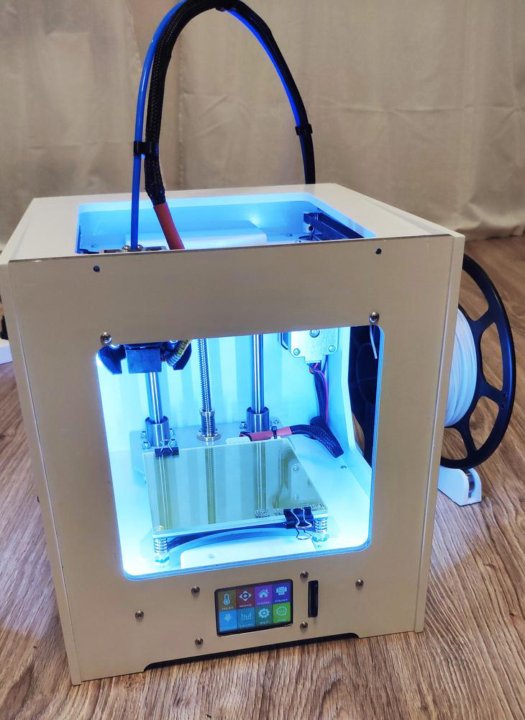 Today, you can easily find a cheap 3D printer for under $200. It's amazing.
Naturally, the lower the price, the more restrictions. Some of the printers on our list will not have a heated bed and the workspace will be small. Naturally, the quality of most of the models presented below cannot compete with more expensive counterparts.
But with a little patience and diligence, it is quite possible to achieve high-quality 3D printing on a printer that costs half the price of a flagship smartphone. And it's really cool! nine0003
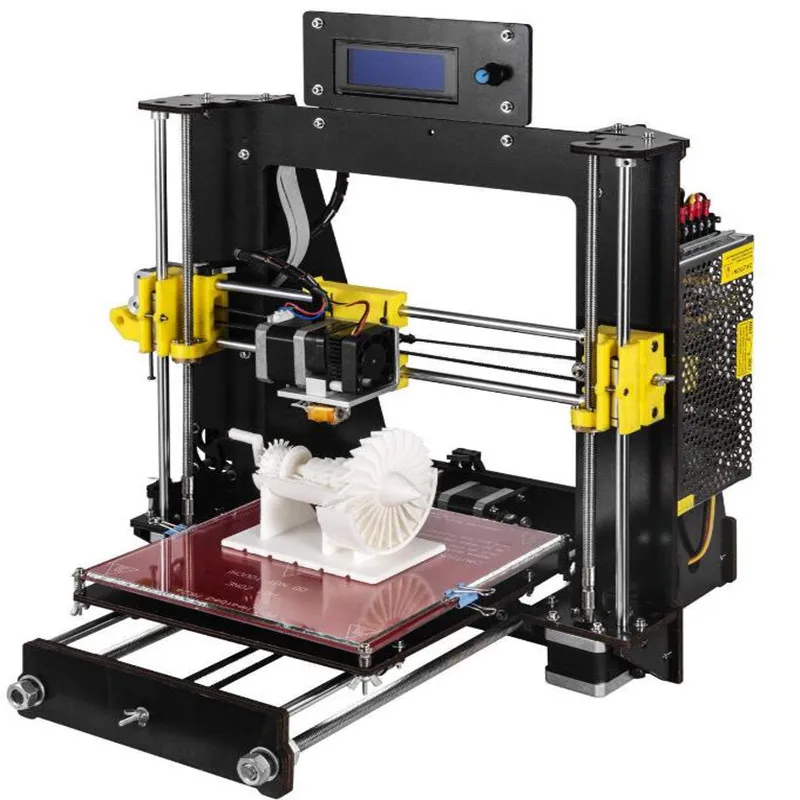
Important note : All 3D printers in this top are supplied assembled by the manufacturer. If you have free time and want to spend less money, you can buy DIY kits and assemble the 3D printer yourself according to the instructions.
List of the best cheap 3D printers in the price range from $200 to $1000
| 3D printer | 3D printing material | USD Working space (mm) 58 | 459 |
|---|---|---|---|
| Flashforge Finder | Pla | 140 x 140 90 | 499 | XYZPRINTING DINCI 1. 0 Pro 0 Pro | PLA | 150 x 150 x 150 | 499 |
| XYZprinting da Vinci Jr. Mix 2.0 | PLA | 150 x 150 x 150 | 599 |
| Printrbot Simple | |||
| Dremel Idea Builder | PLA | 230 x 150 x 140 | 899 |
| Printrbot Simple Pro | PLA | 200 x 150 x 200 | 999 |
| Prusa i3 MK2 | PLA, ABS, exotic | 250 x 210 x 20058 | |
In the article we are considering unfinished, but high -quality 3D printers on ABAY etc. nine0003
If you want to buy them, even if you live in large cities such as Kyiv, Moscow, St. Petersburg, Minsk, it may turn out that these models will not be in the online stores of your city, or they may be with a decent mark-up relative to the cost that indicated in the article.
Since most of them are European / American, it is possible that they will not be in stores at all.
Therefore, before making a choice, I recommend looking directly at eBay, Amazon, Aliexpress, etc. - many sellers on these planforms deliver to the CIS countries within 1-4 weeks on average. nine0003
It is especially worth monitoring these platforms during the discount period - Black Friday or Chinese New Year (Aliexpress or Gearbest) - prices on such days can be 2 or more times lower than usual and it is worth waiting a few weeks.
Monoprice MP Select Mini ($199)
Probably the best 3D printer on our list. Why? Because the Monoprice MP Select Mini is an impressive development with a thoughtful, compact design at a very low price. This model has a quick-change steel material feed wheel, a cooler for cooling the nozzle, a color LCD screen, a heated table, plus the ability to transfer models for 3D printing via microSD or USB. nine0003
The heated bed and the wide temperature range of the extruder are especially pleasing, because for such a small price you get the opportunity to print in different materials: from ABS B to PLA or exotic materials like conductive PLA plastic, wood, metal-based composites and PVA.
For those who are worried about the lack of a guarantee - for such a price it is possible without it. This model is upgradeable. For example, you can install a new nozzle, change the table and add WiFi connectivity. nine0003
Small working space - 120 x 120 x 120 mm. Over time, this will definitely not be enough for you.
Specifications of cheap 3D printer Monoprice MP Select Mini
- Printer type: FDM;
- 3D printing materials: ABS, PLA, exotic;
- Working space: 120 x 120 x 120 mm;
- Minimum layer height: 100 microns;
- Number of extruders: 1;
- 3D printing speed: 55 mm/s;
- Compatible with materials from other manufacturers: yes; nine0382
- Heated table: yes;
- Nozzle diameter: 1.75 mm;
- Control panel on 3D printer: yes;
- Connection: SD card, USB.
Back to the list of 3D printers
M3D Micro Retail ($249)
The M3D Micro 3D printer hit the market thanks to Kickstarter. This model was presented with an incredible price of $349.
The working space of the M3D Micro is 109 x 113 x 166 mm. There are several body color options. The company has implemented "Micro Motion Technology" - a set of innovative solutions - thanks to which you get excellent quality 3D printing at a small price. nine0003
Today, this inexpensive 3D printer already costs even less than the price announced on Kickstarter. You can buy it for $249 with a 12 month warranty. By the way, it is already possible to pre-order the next "pro" version.
Specifications of cheap 3D printer M3D Micro Retail
- Printer type: FDM;
- 3D printing materials: PLA;
- Working space: 116 x 109 x 113 mm;
- Minimum layer height: 50 microns; nine0382
- Maximum layer height: 350 microns;
- Number of extruders: 1;
- XY accuracy: 15 microns;
- Open Source: no;
- 3D printing speed: 55 mm/s;
- Compatible with materials from other manufacturers: yes;
- Heated table: yes;
- Nozzle diameter: 1.
 75 mm;
 - Control panel on 3D printer: no;
- Connection: USB.
Back to 3D printer list
XYZprinting da Vinci Mini ($289)
Da Vinci Mini is a successful attempt to make a 3D printer user-friendly. This model has only one button and 5 multi-colored indicators that reflect the current status of 3D printing. In addition, this affordable 3D printer is WiFi capable so you can control it over a network in your home, office or lab.
Unfortunately, you can only use the manufacturer's own 3D materials. On average, they cost 20% more than usual. However, the company also argues that the materials used (PLA) will be 100% non-toxic. nine0003
Specifications of cheap 3D printer XYZprinting da Vinci Mini
- Printer type: FDM;
- 3D printing materials: PLA;
- Working space: 150 x 150 x 150 mm;
- Minimum layer height: 100 microns;
- Number of extruders: 1;
- Open Source: no;
- Compatible with materials from other manufacturers: no;
- Heated table: no;
- Nozzle diameter: 1.
 75 mm;
 - Control panel on 3D printer: yes; nine0382
- Connection: USB, WiFi.
Back to 3D printer list
Monoprice Maker Select V2($299)
The next cheap 3D printer with a good reputation is the Monoprice Maker Select V2.
This model is an analogue of the Wanhao Duplicator i3, which, in turn, borrowed the design from the Prusa i3. But this does not affect the quality, as the Monoprice Maker Select V2 is easy to use and gives excellent 3D printing results.
Monoprice Maker Select V2 design feature is that the power supply and control panel are placed outside the 3D printer. The working space of this model is 200 x 200 x 180 mm. And this is really a good indicator for the money. nine0003
Specifications of cheap 3D printer Monoprice Maker Select V2
- Printer type: FDM;
- 3D printing materials: ABS, PLA, exotic;
- Working space: 200 x 200 x 180 mm;
- Minimum layer height: 100 microns;
- Number of extruders: 1;
- Open Source: software;
- Compatible with materials from other manufacturers: yes;
- Heated table: yes;
- Nozzle diameter: 1.
 75 mm; nine0382
 - 3D printer control panel: yes;
- Connection: USB, SD card.
Back to the list of 3D printers
New Matter MOD-t ($299)
New Matter is a young startup that offers a 3D printer MOD-t - An interesting design with a minimalistic design. This cheap 3D printer is WiFi enabled so you can manage print settings and print from your computer, tablet or smartphone. The working space is 150 x 150 x 125 mm. Thanks to the case, the noise during its operation is reduced. But the most interesting and attractive thing about MOD-t is the price. Only $299. In general, this is an interesting, high-quality model.
Specifications of cheap 3D printer New Matter MOD-t
- Printer type: FDM;
- 3D printing materials: PLA;
- Working space: 150 x 100 x 125 mm;
- Minimum layer height: 100 microns;
- Number of extruders: 1;
- Open Source: no;
- Compatible with materials from other manufacturers: yes;
- Heated table: no;
- Nozzle diameter: 1.
 75 mm; nine0382
 - Control panel on 3D printer: no;
- Connection: USB, WiFi.
Back to the list of 3D printers
Printrbot Play ($399)
The Printbot Play is a very popular budget 3D printer that is often used in education. This inexpensive, reliable model, which is almost entirely made of metal.
The working space is 100 x 100 x 130 mm. Printbot Play has an extruder manufactured by the company itself - Alu Extruder v2. The body is made of powder coated steel and aluminium. SD slot provided. nine0003
You can upgrade the basic design of the Printrbot Play with a heated stand or increase the Y-axis stroke.

Back to the list of 3D printers
Wanhao Duplicator i3 Plus ($459)
The Wanhao Duplicator i3 Plus is an upgraded version of the popular Wanhao Duplicator i3 (which in turn is based on the Prusa i3).
The main features of this cheap 3D printer are a large working space of 200 x 200 x 180 mm, a steel frame, electronics integrated into the design itself (previously it was taken out separately), a slot for a full-size SD card and a touchscreen display for control. nine0003
Specifications of cheap Wanhao Duplicator i3 Plus 3D printer
- Printer type: FDM;
- 3D printing materials: ABS, PLA, exotic;
- Working space: 200 x 200 x 180 mm;
- Minimum layer height: 100 microns;
- Number of extruders: 1;
- Open Source: design and software;
- Compatible with materials from other manufacturers: yes;
- Heated table: yes;
- Nozzle diameter: 1.75 mm; nine0382
- 3D printer control panel: yes;
- Connection: USB, SD card.

Back to the list of 3D printers
Flashforge Finder ($499)
FlashForge Finder is one of the newest 3D printers on our list. This affordable 3D printer offers an average working space of 140 x 140 x 140mm.
This Finder features a transparent sidewall design so you can view the 3D printing process from any angle. A color display is installed, it is possible to transfer data via WiFi network. The printer comes with some supplies and a USB flash drive, so you can start 3D printing almost immediately. nine0003
Specifications of cheap 3D printer FlashForge Finder
- Printer type: FDM;
- 3D printing materials: PLA;
- Working space: 140 x 140 x 140 mm;
- Minimum layer height: 100 microns;
- Number of extruders: 1;
- XY accuracy: 11 microns;
- Open Source: no;
- Compatible with materials from other manufacturers: yes;
- Heated table: no;
- Nozzle diameter: 1.
 75 mm; nine0382
 - 3D printer control panel: yes;
- Connection: USB, WiFi.
Back to 3D printer list
XYZprinting da Vinci Jr. 1.0 Pro ($499)
What's so special about the da Vinci Jr. 1.0 pro? This is a new model from XYZPrinting, which includes many advanced features, such as support for printing materials from other manufacturers and increased speed of 3D printing.
Also features an auto-calibration mechanism, a closed chamber with a unique cooling system, and a 0.3mm nozzle option for high-quality printing of fine model details. All in all, this is a great 3D printer with a lot of useful features and at a low price. nine0003
Specifications for cheap 3D printer da Vinci Jr. 1.0 Pro
- Printer type: FDM;
- 3D printing materials: PLA;
- Working space: 150 x 150 x 150 mm;
- Minimum layer height: 100 microns;
- Number of extruders: 1;
- Open Source: no;
- Compatible with materials from other manufacturers: yes;
- Heated table: no;
- Nozzle diameter: 1.
 75 mm;
 - Control panel on 3D printer: yes; nine0382
- Connection: USB, SD card.
Back to 3D printer list
XYZprinting da Vinci Jr. Mix 2.0 ($599)
XYZprinting provides a wide range of low cost 3D printers. And paying attention to each model is quite difficult, although many of them are very interesting.
XYZprinting da Vinci Jr. Mix 2.0 stands out because it can print with two different materials and mix them to create multi-colored models. This dual-color 3D printing technology is rare in this price range ($500 to $1,000), so if you're interested in experimenting with multicolor printing, XYZprinting da Vinci Jr. Mix 2.0 is a great choice. nine0003
However, there is a drawback. This 3D printer is not compatible with materials from other manufacturers, so you will have to buy special materials from XYZprinting (as we mentioned above, they cost 20% more, but are not toxic).
Specifications of cheap 3D printer XYZprinting da Vinci Jr.
 Mix 2.0
 - Printer type: FDM;
- 3D printing materials: PLA;
- Working space: 150 x 150 x 150 mm;
- Minimum layer height: 200 microns; nine0382
- Number of extruders: 1;
- Open Source: no;
- Compatible with materials from other manufacturers: no;
- Heated table: no;
- Nozzle diameter: 1.75 mm;
- Control panel on 3D printer: yes;
- Connection: USB, SD card, WiFi.
Back to the list of 3D printers
Printrbot Simple ($599)
Printrbot Simple is the flagship of the Printbot empire. This model has a great open design with a solid aluminum frame and a working space of 150 x 150 x 150mm. This inexpensive 3D printer comes fully assembled at a very good price. As you need and want to experiment, you can add a heated table and expand the workspace in the horizontal plane. nine0003
Specifications of cheap 3D printer Printrbot Simple
- Printer type: FDM;
- 3D printing materials: PLA;
- Working space: 150 x 150 x 150 mm;
- Minimum layer height: 100 microns;
- Number of extruders: 1;
- 3D printing speed: 80 mm/s;
- Open Source: design and software;
- Compatible with materials from other manufacturers: yes;
- Heated table: optional; nine0382
- Nozzle diameter: 1.
 75 mm;
 - Control panel on 3D printer: no;
- Connection: USB.
Back to the list of 3D printers
UP mini 2 ($599)
The UP mini 2 is a low cost 3D printer that packs in impressive design and functionality. For starters, it has a touch screen panel and the ability to connect via WiFi.
But the most interesting is further. Implemented power failure protection system. 3D printing will continue after the emergency stop. Built-in HEPA air filtration system. Automatic detection of the height of the extruder nozzle. A separate, closed container for the material, thanks to which it does not deteriorate under the influence of moisture from the environment. nine0003
Great 3D printer for a small price. The only thing that upsets me a little is the small working space - 120 x 120 x 120 mm.
Specifications of cheap 3D printer UP mini 2
- Printer type: FDM;
- 3D printing materials: PLA, ABS;
- Working space: 120 x 120 x 120 mm;
- Minimum layer height: 150 microns;
- Maximum layer height: 350 microns;
- Number of extruders: 1;
- Open source: no;
- Compatible with materials from other manufacturers: yes;
- Heated table: yes;
- Nozzle diameter: 1.
 75 mm;
 - Control panel on 3D printer: yes;
- Connection: USB, WiFi.
Back to 3D Printer List
Monoprice Maker Select Ultimate ($699)
The Monoprice Maker Select Ultimate is an extraordinary beast that combines elements from two leaders in the world of 3D printing - Zortax and Ultimaker. The Monoprice Maker has an aluminum perforated printing table, which was offered in the Zortax M200 (thanks to this table, the grip of the base of the model with the table is much better), and the software part is almost identical to Ultimaker 2 (very user-friendly interface and functionality). nine0003
This model uses a "Bowden extruder", that is, the feed blocks and nozzle are separated, unlike direct feed. This improves reliability and reduces the likelihood of 3D printing errors (although, most likely, it was necessary to sacrifice printing speed, as the weight of the printing unit increases). Given the cost, this is a good model, the analogues of which are much more expensive.
Specifications of cheap 3D printer UP mini 2
- Printer type: FDM; nine0382
- 3D printing materials: PLA, ABS, exotic;
- Working space: 200 x 200 x 175 mm;
- Minimum layer height: 20 microns;
- Number of extruders: 1;
- Open Source: no;
- Compatible with materials from other manufacturers: yes;
- Heated table: yes;
- Nozzle diameter: 1.75 mm;
- Control panel on 3D printer: yes;
- Connection: USB, SD card.
Back to the list of 3D printers
Robo C2 ($799)
The Robo C2 is a small 3D printer with tons of connectivity options. Using a specialized application, you can monitor the status of 3D printing from your smartphone or tablet. It can be connected to a Chromebook. Thanks to the built-in slicing program, you do not need to install additional printing software.
Probably the most impressive is the integration with Amazon Alexa. Users can stop, cancel and check the status of 3D printing in real time using voice commands. nine0003
What does this inexpensive 3D printer offer? Working space 127 x 127 x 150 mm. The 3D printing speed is 300 mm/s and the resolution is 20 microns. There is a built-in 3.5'' color touch screen, a system for monitoring the amount of remaining material for printing, automatic calibration and a removable self-aligning print platform. The only drawback is that the table is not heated, so you have to use PLA plastic.
Specifications of cheap 3D printer Robo C2
- Printer type: FDM;
- 3D printing materials: PLA;
- Working space: 127 x 127 x 150 mm;
- Minimum layer height: 20 microns;
- Number of extruders: 1;
- Open Source: software;
- Compatible with materials from other manufacturers: yes;
- Heated table: no;
- Nozzle diameter: 1.75 mm;
- Control panel on 3D printer: yes;
- Connection: USB, WiFi.
Back to the list of 3D printers
Wanhao Duplicator 4S ($829)
The Duplicator 4S has 2 extruders. It's essentially a copy of the MakerBot Replicator. Behind the steel body is the MK10 material feed mechanism, which is currently the easiest to use and most sought after in the market for 3D printer components.
One of the features of this model is a high-precision material feed wheel, which ensures the same filament feed speed. The Duplicator 4S is equipped with a 0.4mm precision nozzle. nine0003
Specifications of cheap 3D printer Duplicator 4S
- Printer type: FDM;
- 3D printing materials: ABS, PLA, exotic;
- Working space: 225 x 145 x 150 mm;
- Minimum layer height: 100 microns;
- Maximum layer height: 500 microns;
- Number of extruders: 2;
- XY accuracy: 11 microns;
- 3D printing speed: 40 mm/s;
- Open Source: software;
- Compatible with materials from other manufacturers: yes;
- Heated table: yes;
- Nozzle diameter: 0.4 mm;
- Control panel on 3D printer: yes;
- Connection: USB, SD card.

Back to the list of 3D printers
Polar 3D Printer ($899)
Polar 3D belongs to a separate category of 3D printers in this top, since this model implements the polar coordinate system. This causes the table to rotate and the print head to move up, down, right, and left. nine0003
Thanks to the polar coordinate system, this 3D printer is powered by two stepper motors, so it consumes less power. In addition, it turned out to realize a larger size of the working area: 203 (table diameter) x 152 (Z coordinate) mm.
Rated $899, but there are special discounts for educational institutions. The discounted price is only $599.
Specifications of cheap 3D printer Polar 3D
- Printer type: FDM;
- Materials for 3D printing: PLA;
- Working space: 203 (table diameter) x 152 (Z-coordinate) mm;
- Minimum layer height: 50 microns;
- Maximum layer height: 400 microns;
- Number of extruders: 1;
- 3D printing speed: 40 mm/s;
- Open Source: no;
- Compatible with materials from other manufacturers: yes;
- Heated table: no;
- Nozzle diameter: 1.
 75 mm;
 - Control panel on 3D printer: no; nine0382
- Connection: USB, WiFi, SD card.
Back to 3D printer list
FlashForge Creator Pro ($899)
You've probably heard of this 3D printer. FlashForge Creator Pro is very similar to Makerbot Replicator 2X. This inexpensive 3D printer has 2 extruders, it has a steel closed case.
Other features include a table sizing system, and a guide screw that makes the guide system more stable and durable. The design is nothing special, but this model has earned positive reviews from the 3D community due to its reliability, versatility and ease of use. nine0003
Specifications of cheap 3D printer FlashForge Creator Pro
- Printer type: FDM;
- 3D printing materials: ABS, PLA, exotic;
- Working space: 225 x 145 x 150 mm;
- Minimum layer height: 100 microns;
- Maximum layer height: 500 microns;
- Number of extruders: 2;
- XY accuracy: 11 microns;
- 3D printing speed: 40-100 mm/s;
- Open Source: design and software; nine0382
- Compatible with materials from other manufacturers: yes;
- Heated table: yes;
- Nozzle diameter: 1.
 75 mm;
 - Control panel on 3D printer: yes;
- Connection: USB, SD card.
Back to 3D Printer List
Dremel Idea Builder ($899)
The Idea Builder is plug and play. This 3D printer is designed by Dremel. It has a color touch screen display. Sufficiently large working space - 230 x 150 x 140 mm. Unfortunately, the table is not heated. On the other hand, since only PLA plastics can be used, this model is great for classrooms and teaching labs. nine0003
Specifications of cheap 3D printer Dremel Idea Builder
- Printer type: FDM;
- 3D printing materials: PLA;
- Working space: 230 x 150 x 140 mm;
- Minimum layer height: 100 microns;
- Number of extruders: 1;
- Open Source: no;
- Compatible with materials from other manufacturers: no;
- Heated table: no;
- Nozzle diameter: 1.75 mm;
- Control panel on 3D printer: yes; nine0382
- Connection: USB, SD card.
Back to the list of 3D printers
Printrbot Simple Pro ($999)
Printrbot Simple Pro is a major upgrade of the original Simple. Same open design, no body. Like its predecessor, the Printrbot Simple Pro is compact and portable. All-metal construction for excellent vibration damping and shock resistance.
The main differences are the built-in color touch screen, the ability to connect via WiFi and the free cloud service (optional), which greatly improves the 3D printing process. Simple Pro has a 32-bit processor, which ensures smooth and fast movements. And at the same time, this model is included in our top 20 cheap 3D printers, since its cost is $999.
Specifications of cheap 3D printer Printrbot Simple Pro
- Printer type: FDM;
- 3D printing materials: PLA;
- Working space: 200 x 150 x 200 mm;
- Minimum layer height: 50 microns;
- Number of extruders: 1;
- Open Source: design and software;
- Compatible with materials from other manufacturers: yes;
- Heated table: optional;
- Nozzle diameter: 1.
 75 mm; nine0382
 - 3D printer control panel: yes;
- Connection: USB, WiFi.
Back to 3D printer list
Prusa i3 Mk2 ($999)
This is one of the best 3D printers you can buy in this price range. All nodes are open-source licensed and part of the Rep-Rap project, so there are many copies around ... but all replicas are worse than the original.
The Prusa i3 Mk2 is equipped with a heated table that has technology to compensate for temperature differences in the center and corners. There is an automatic calibration system. And of course, amazing documentation. This is an extremely versatile 3D printer that you will 100% appreciate when you start printing with unusual materials such as PLA, PET, HIPS, Flex PP or Ninjaflex, etc. nine0003
The Prusa i3 Mk2 is a 3D printer that is constantly being developed and supported by the manufacturer. Its developer Josef Prusa regularly adds new features, software and design improvements (for example, the ability to color 3D print).