Outdoor 3d scanner
Guide to 3D Scanning - 15 Outdoor Photogrammetry Tips
Outdoor photogrammetry is one of the most accessible forms of 3D scanning and can be done by anyone with a camera. With free unlimited sunlight all you need is photogrammetry software and an object you can walk around to photograph at different angles.
As simple as it may seem, scanning objects outdoors can be a long and tedious process with many opportunities for poor results and failure.
If you’re a 3D artist just getting started with outdoor photogrammetry then this part of our guide to 3D scanning is for you. We took our own experience with scanning tree bark for HyperTrees and put together the following 15 tips to help you avoid common problems and get the best possible outdoor scans.
1. Avoid Sunny Days
The key to getting the most consistent results with any 3D scan is in balancing your lights and diffusing/softening the shadows so that the object is evenly lit from all angles.
Direct sunlight provides uneven lighting around an object and casts hard shadows. These shadows need to be removed if you aim to extract PBR textures and relight your scanned object.
Unity’s delighting tool can remove shadows from your scans, but it does have limitations. In our experience there is no guaranteed solution, so it’s best to avoid direct light sources that cast hard shadows altogether.
Your only other option with sunlight is to soften the shadows with a light diffuser. To diffuse direct sunlight, you need some kind of diffusion material that is as large as the entire object you’re scanning.
This may sound impractical for large objects like trees or cliffs, but luckily nature has you covered. Check the weather and schedule your trip for days with full cloud coverage.
Clouds do a great job at diffusing and scattering the sunlight all around your object. The soft and subtle shadows that you get from a cloudy day can be easily removed with baked ambient occlusion. In some cases, no additional work in post is even needed.
2. Avoid Partially Cloudy Days
The only thing worse than a sunny day, is a partially cloudy day.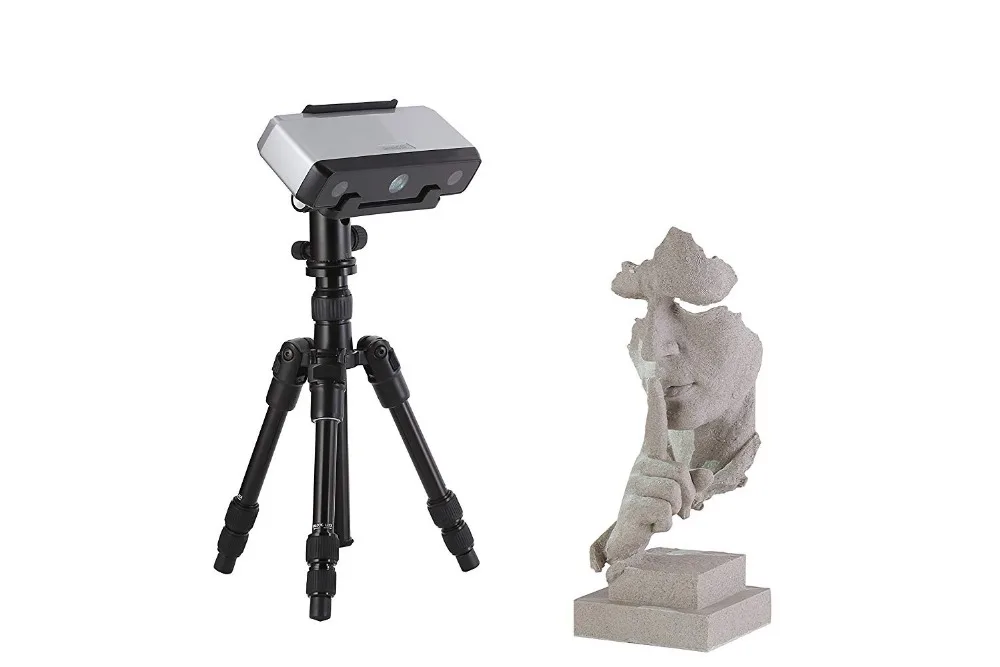 Photogrammetry requires many photos of an object at different angles. This takes time. If you’re capturing on a partially cloudy day, the lighting conditions will be constantly changing.
Your first photo may have perfect soft diffused lighting. Your next one may have hard shadows from the sun that just appeared from the clouds. This will give you wildly inconsistent results and your photogrammetry software may have trouble aligning all the camera angles.
3. Always Use a Tripod
There is no denying that handheld is faster and more agile than carrying around a tripod. But even with the best image stabilisation and ninja breathing skills, your images may never be as sharp and pixel-perfect as with a tripod. The sharper your images, the higher quality your scan and textures will be.
One major advantage to using a tripod is the ability to capture at slower shutter speeds. This means you can use a lower ISO for less noise, or lower your aperture size to reduce the unwanted blur from depth of field. This is especially useful for the dim lighting conditions on cloudy days.
A tripod can also be useful for measuring the distance between each angle you capture. As you move around an object, you can very quickly use the tripod legs to work out how far you should move to your next angle.
4. Fill the Frame with Your Object
No matter what camera you have, there is a fixed amount of pixels in each image. Don’t let these pixels go to waste. Frame up your object as close as possible so that it fills the entire image. The more space the object takes up in each image, the higher resolution your scan will be.
5. Capture the Right Amount of Overlap
The first step in photogrammetry is the alignment of all your images. The key to a good alignment is in getting the right amount of overlap across multiple images. A certain amount of your first image should be visible in the second image and similarly in the following images. Anywhere between 50% and 80% is a good range in most cases.
Anything above 80% means you need to take a whole lot more images for full coverage of your object. Since you don’t gain additional resolution from increased overlap, this can be a waste of time. Anything below 50% means you can take less images, but your software may have problems finding common tie points for alignment.
6. Partial/Spot Metering
Almost all modern cameras have built-in light metering with a few different metering modes. If your images have some of the background or sky visible, you shouldn’t be exposing for whole frame. You only want to expose for the object you are scanning.
Spot Metering will evaluate the exposure only in the centre of the frame, where your object should be. This will give you a more accurate reading of the light hitting your object and help you achieve more consistent exposures.
Some cameras also offer a Partial Metering mode, which is similar to spot metering, except the area that is measured is slightly larger. As such Partial Metering will give a more averaged exposure, but if your camera doesn’t support it, Spot Metering should work just fine.
7. Use a Small Fixed Aperture Size
Increasing the aperture size(smaller f-number) results in a shallower depth of field and more bokeh. This is good for artistic photography, bad for scanning. You want your entire object to be as sharp as possible.
The best aperture to use will depend on many things such as your specific camera and lens, the lighting conditions, etc. But as a general guide, try to stay above f8.0.
Whatever aperture you choose, make sure you stick to it for the entire capture. Every image should have the same depth of field.
8. Use Aperture Priority Mode
Getting consistent exposure across all your images is critical to an accurate scan and uniform textures. Most cameras have multiple exposure modes that will ensure consistent exposure. The best one for photogrammetry is aperture priority, often depicted with the Av symbol.
Aperture priority mode will automatically adjust the shutter speed to get an optimal exposure. This will let you keep a fixed aperture and ISO. It’s also faster to use than full Manual mode.
First pick a reasonable aperture size for the largest depth of field and let the camera determine the correct shutter speed. Since you’re scanning an object that doesn’t move, you can get away with slow shutter speeds. But it’s best to stay above 1/50 to reduce any minor vibrations caused by wind or movement of the camera shutter.
With that in mind you should also aim to use the lowest possible ISO. Finding the right balance between aperture, ISO and shutter speed comes down to practice with your specific camera and lens.
9. Check Exposures in Post with Histograms
After you’ve finished your capture the first thing you should do is an exposure check across all your images. The best way to read relative exposure is by looking at a histogram. Most photo editing suites have one.
The histogram of a correctly exposed image will depend on the actual colour and brightness of the object you are scanning. If your object is relatively flat and uniform, then the histogram should have a bell curve shape. A darker object should have a peak closer to the left side of the histogram and the right for a white object.
If you followed tips 6-8 and your object has a fairly uniform surface, the histogram across all your images should look very similar. Otherwise take the time to balance the exposures and match the histograms on all your images.
10. Use a Shutter Release Cable
This one is optional but can help a lot in getting super sharp images. Every time you press the shutter button on your camera, you are moving it ever so slightly. Using a shutter release cable takes your hands off the camera entirely.
Some cameras also have timer functions that delay the shutter release after your press it. If you don’t have a shutter release cable, this is a good alternative, but it is slower.
11. Use a Macro Lens
Macro lenses are often among the sharpest lenses available and usually come in longer focal lengths like 100mm. This generally gives a comfortable distance away from the object and less barrel distortion.
Macro lenses are also generally quite affordable and at higher apertures, they can be just as good as more expensive prime lenses.
Our go-to lens for 3D scanning and texture photography is the Canon EF 100mm f/2.8L Macro.
12. Always Use a Colour Chart
If you’re scanning the real world, why shouldn’t you also aim to get real-world colour? A colour chart is essential tool to getting accurate colour and is also useful for white balancing your images.
Colour charts come in various sizes. The best one for outdoor use is the X-Rite Colour Checker Passport. It’s compact and includes a decent sized grey card for white balancing. It also has a clamshell folding design that makes it easy to position next to your object.
13. Stay Focused and Move Quickly
When you’re outdoors, you are always at the mercy of the weather and nature. Capturing all your angles as quickly as possible gives you better chances of avoiding weather changes that can ruin your scan.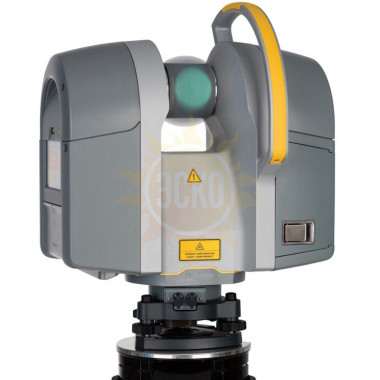 Scouting the location and planning your capture ahead of time can really help in getting through a whole day of scanning without problems.
14. Takes Notes and Scale Reference
Taking notes of what you scanned and in which order will help to organise your images in post. This is especially important if you’re planning to scan lots of objects across multiple days.
You should also take measurements and note down the real world size of everything you scan. This will make it easy to scale your scans to the correct relative size later.
If you’re doing anything special for certain scans, such as using different lenses, neutral density filters, polarisers, then make sure to also record those in your notes.
15. Surface Lighting Reference
There are various ways to create PBR textures from scans. No matter how you do it, taking surface reference of your object will help you calibrate and match your PBR textures to the real-world appearance of the object.
A portable flash or battery-power LED video light can be very useful for this.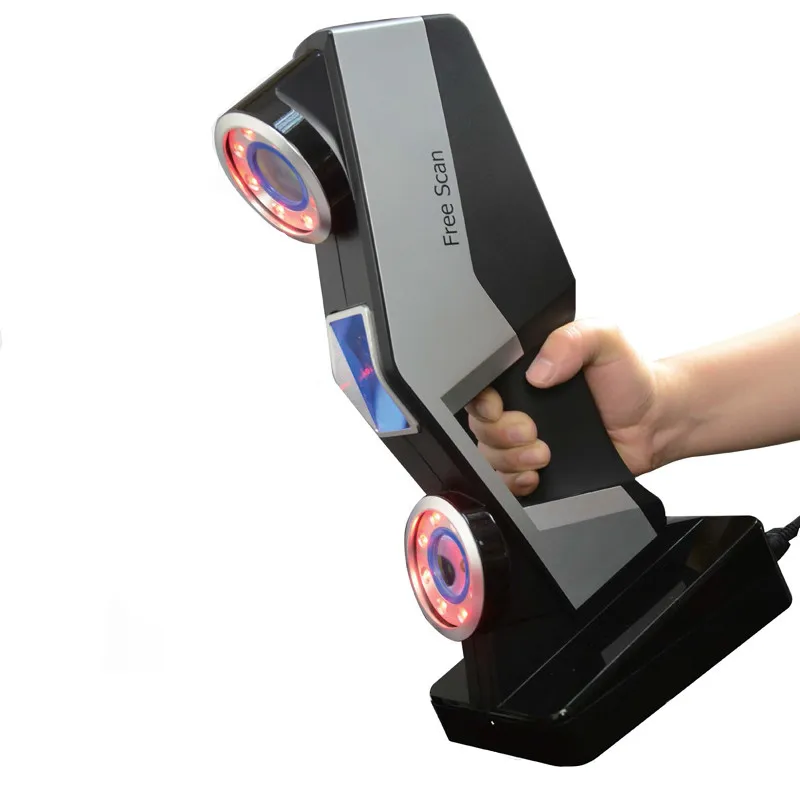 You should aim to take a few close up shots from different perspectives and shine the light at various incident angles to get good reference of the specular reflection across your object.
3D Laser Scanner Artec Ray
Ultra-high precision, fast laser 3D scanner with submillimeter precision to ensure you capture every detail
Cleanest 3D data capture for minimum post-processing time
Ideal for reverse engineering, inspection and construction. Scan large objects both indoors and outdoors!
Easy 3D scanning
Lightweight and user-friendly, Artec Ray was especially designed to ensure you get the most out of this powerful 3D laser scanner, whether it is getting the 3D measurements for quality control of a large industrial object or creating an accurate 3D model for heritage preservation. With no need for any lengthy preparations, you can 3D scan almost anything by simply mounting your Artec Ray on a tripod in front of your object and pressing a button!
Accessible and convenient 3D data capture
Portable and compact, this versatile long-range LIDAR solution is the latest in 3D laser scanning.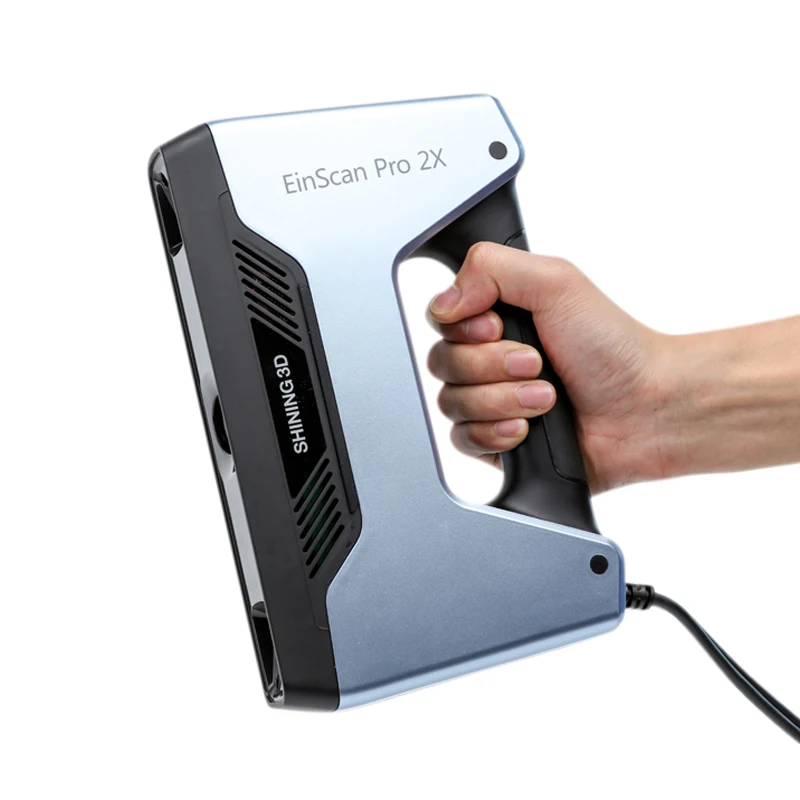 An inbuilt battery lets you scan both indoors and outdoors for up to 4 hours, without a need for a power source nearby, making this a perfect solution for onsite 3D scanning.
Advanced software compatibility
3D scan and process data directly in the powerful Artec Studio software with a wide range of comprehensive tools available, then seamlessly export to Geomagic Design X at the touch of a button to make the most out of your 3D laser scanning experience.
Control Artec Ray 3D scanner with your phone or tablet
Using the Artec Remote app, you can easily scan all angles of a large object without being tethered to a computer. The scanning process can be controlled by any mobile device or tablet via WiFi. The Artec Remote is available for iOS and Android.
Artec Studio for professional processingProcessing your data in Artec Studio is the next step for your 3D scanning process. With our software, you have easy access to an advanced autopilot mode and the most accurate algorithms for quick and easy data processing, as well as HD Mode and high accuracy used to create the most true-to-form 3D models possible. Power up your workflow as you save time and get excellent results!
The full 3D scanning package
Pair Artec Ray with an Artec handheld 3D scanner, such as Eva or Spider, to effortlessly capture difficult to reach areas, e.g. the interior of a car, or to add intricate detail to a large-scale 3D model. The smart combination of Ray’s long-range 3D scanning capabilities along with the convenience and precision of all of Artec’s handheld 3D scanners ensures limitless 3D scanning potential.
Achieving maximum accuracy with your 3D laser scanner
Combine Artec Ray with a laser tracker and professional target units for the best possible alignment and registration of scanned data. Get the highest possible accuracy and tight tolerance results for your project.
Quality inspection of large objects right at your fingertips
Looking for a professional solution to do quick quality inspections of big industrial objects? Look no further. With Artec Ray, you can scan large complex parts with metrological accuracy and then import your models into Artec Studio software to carry out basic quality control, and compare it to the original CAD file all in one place. For advanced operations, you can also export the model to Control X and other full package inspection software.
Best-in-class industrial laser scanner
A large working facility, an airplane, an oil rig, or even an outdoor space — whatever industrial object or scene you need to scan, Ray has you covered. Versatile and portable, this industrial 3D scanner is perfect for digitizing and measuring large structures with metrology-grade accuracy at any time and place — day or night, indoors or outdoors.
LiDAR 3D scanner for exact 3D measurements
Thanks to built-in LiDAR 3D scanning technology, Artec Ray allows you to capture precise long-range 3D measurements of complex objects and shapes from up to 110-meters.
Perfect long-range 3D scanner
Capture complex constructions such as warehouses, factories, airports, and apartment buildings to get precise and clean 3D data about the building, such as its size, structure, facade, and more. Thanks to Ray’s extreme accuracy and cleanliness of data, you don’t need to spend much time on processing.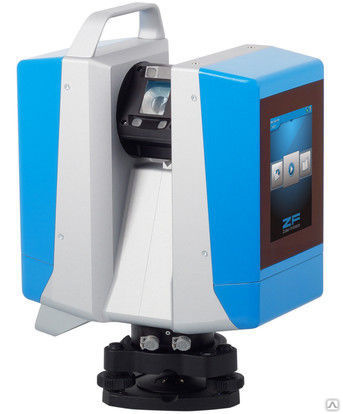 Put the scanned material to work right away!
Artec Ray technical specs:
| Range | Up to 110 m |
| Ranging error | <0.7 mm @ 15 m |
| Angular accuracy | 25 arcseconds |
| Range Noise, 90% reflectivity | 0.12 mm @ 15 m |
| Range Noise, 10% reflectivity | 0.3 mm @ 15 m |
| Color | Two fully integrated 5 megapixel cameras |
| Weight | Under 5 kg |
Reverse engineering
- Product design
- Customisation
- 3D documentation
Industrial design and manufacturing
- Reverse engineering
- Quality control
- Rapid prototyping
- Aerospace
Healthcare
- Orthopedics
- Prosthetics
- Plastic surgery
- Custom wheelchairs
Science and education
- Research
- Training
- Online museums
Art and design
- Heritage preservation
- Architecture
- CGI
- Fashion
Learn more about Artec Ray
Got a question about Artec Ray 3D scanner?
Can the Artec Ray be controlled remotely?
Yes. You can control the scanner remotely via the Artec Remote mobile application.
What size objects is Artec Ray able to scan?
We recommend using Ray to capture large objects such as wind turbines, ship propellers, airplanes, warehouses, and buildings.
What's the difference between Artec Ray and other long-range laser 3D scanners?
The most distinguishing difference and advantage of Artec Ray is that it’s much more accurate. The scanner is able to capture objects and scenes with submillimeter accuracy over long distances. This feature makes Ray a perfect, precise solution for reverse engineering, dimensional control, forensics, and more.
Another difference is that Ray captures much cleaner 3D data than other laser scanners. This means that you can spend significantly less time on processing and cleaning up the noise to get a final 3D model.
Another critical advantage is that data scanned with Ray can be easily paired with the data from other Artec scanners, all-in-one software — Artec Studio. For example, a large and complex object such as an airplane or a ship can be scanned with Ray to capture the shape and all the bigger elements, while other smaller parts can be scanned with a different Artec scanner such as Leo, Eva, or Space Spider and in even higher resolution.
| Recommended work range | 1-50 m | 1-110 m |
| Ranging error | 0.7 mm @ 15 m | <0.9 mm @ 15 m |
| Angular accuracy | 25 arcsecs | |
| Range noise, 90% reflectivity | 0.12 mm @ 15 m | 0.25 mm @ 15 m |
| Range noise, 10% reflectivity | 0.3 mm @ 15 m | 0.7 mm @ 15 m |
| Speed, points/second | 208,000 | |
| Scanning modes | Autonomous or via USB | |
| Color | Two fully integrated 5-megapixel cameras | |
| Horizontal (maximum) | 360° | |
| Vertical (maximum) | 270° | |
| Scanner type | Phase-shift, hemispherical scanner with 360° × 270° field of view | |
| Distance measurement method | Phase shift | |
| Laser wavelength | 1550 nm | |
| Laser type | Continuous wave | |
| Laser class: (IEC EN60825-1:2007) | Class 1 | |
| Internal coordinate representation unit | 0. 001 mm 001 mm | |
| Beam diameter at aperture | 3 mm | |
| Internal angular representation unit (vertical/horizontal) | 1 arcsec | |
| Min. vertical point density | 20 points/degree | |
| Min. horizontal point density | 20 points/degree | |
| Max vertical point density | 80 points/degree | |
| Max horizontal point density | 80 points/degree | |
| Weight with battery | 5.74 kg | |
| Dimensions L × H × W | 287 × 200 × 118 mm | |
| External power supply voltage | 14-24 V DC, 30 W | |
| Internal battery power supply | Two Li-Ion 14 V, 49 Wh batteries, powers the scanner for up to 4 hours | |
| Power consumption | 30 W | |
| Supported OS | Windows 7, 8 or 10 – x64 | |
| Minimum computer requirements | Intel Core i5, i7 or i9, 32GB RAM, GPU with 2 GB VRAM | |
3D scanner Shining 3D FreeScan X5 Go
2 700 000 ₽
Notify me of admission
Official distributor
We work directly with manufacturers.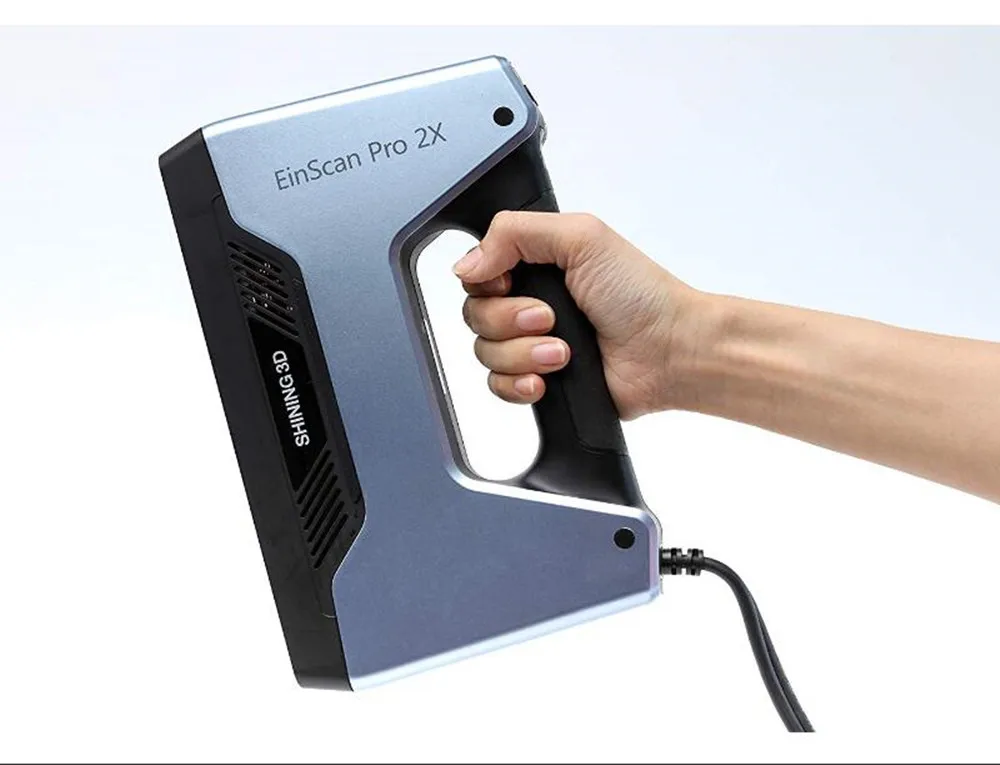
Any form of payment
The opportunity to see the 3D printer in action in our demo room.
Own warranty service
Warranty and post-warranty service of equipment purchased from us.
Permanent 10% discount on consumables
When you buy a 3D printer from us,
, you get a 10% discount on all consumables.
The FreeScan X5 3D Scanner is a portable scanner from Shining 3D's FreeScan series designed for manual scanning without additional positioning tools, mount or tripod. It perfectly adapts to work in difficult conditions: outdoors in bright light, in a small room or hard-to-reach places. With high-speed scanning technology of 350,000 scans/sec and a 10-line laser array, the scanner has virtually no limits, perfectly capturing objects of any color, texture, and size from 1cm to 8m.
Advantages:
- The light source is a more precise 10-line laser array. The laser is completely safe for the eyes
- High-speed scanning technology capable of scanning at 350,000 dots/s
- Improved scanning accuracy to 0.35mm compared to 0.4 for the X3 scanner. Accuracy according to German standards VDI / VDE 2634
- Flexible and convenient manual scanning mode. Ergonomic body design, ultra-light weight, only 950gr
- The scanner is compatible with the DigiMetric photogrammetric positioning system, which allows even faster and better scanning of both large and small objects, and also increases the size of the scanned object up to 50m
- Unlimited 3D scanning. You can scan any object regardless of its color, texture, or size. Scanner adapts to challenging environments: bright street lights or hard-to-reach places
- Compared with the X3 scanner, the size of the scan object has been increased to 8000 mm and the size of a single image is 300 mm × 250 mm
- Wide file and program compatibility: STL, ASC, DGM, OBJ, etc.

- 3DScan 3D software developed by Shining 3D
Payment and delivery
Scale of delivery
Delivery to all regions of Russia and countries of the Customs Union.
Free shipping
When you buy a 3D printer (except assembly kits) you get free shipping.
Cash
In our store you can pay for your order in cash.
Online payment on the website
You can pay for orders with a bank card on the website of our online store.
3D Laser Scanner (3D LIDAR) HOKUYO YVT-35LX-F0
3D Laser Scanner (3D LIDAR) HOKUYO YVT-35LX-F0About
Hokuyo
Japanese company Hokuyo manufactures laser scanners (also known as lidars), advanced optical sensors and optical communication devices. Hokuyo's laser scanners are well known...
More →
3D laser scanners (3D-LiDAR) YVT-35LX allow you to realize almost continuous scanning of the surrounding space, regardless of whether the recognized objects are moving.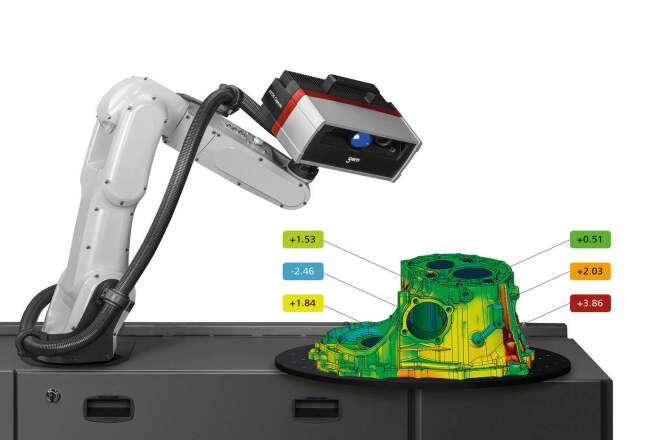 In one frame, the scanner generates a cloud of 2590 points. Using the interlaced mode, you can increase the density of points in the cloud. The scanner is equipped with an accelerometer and a PPS input.
To determine the distance, the scanner generates a pulsed laser beam using the TOF (time of flight) measuring principle. The scanner emits a laser beam in a wide 3D field, providing data on the height, width and depth of objects. Such information cannot be obtained using classic 2D scanners.
BENEFITS:
Wide field of view
The scanner has a measuring range of 210° horizontally and 40° vertically. The working range is 35 m at the front and approximately 14 m at the sides. For detailed information on the detection range in each direction, see the scanner data sheet.
Input signal PPS
When using a GPS signal, the PPS input resets the scanner's time stamp to eliminate a time offset error.
Interlace mode
The direction of the laser beam is gradually shifted in each cycle, creating a denser point cloud. You can increase the density in two planes independently - up to 20 times horizontally and 10 times vertically. At maximum density, this is called HD (High Density) mode.
Environmental resistance
The IP67 rated YVT-35LX can be used in a variety of environments, up to 100,000 lux, and is shock resistant up to 10G.
Multi-Echo Function
The scanner beam can generate multiple returns in the same direction when reflected from rain, dust, and fog. In this case, distance messages are received for each return.
When using the scanner outdoors, the Multi-echo function allows you to separate rain, dust and fog from targets and the housing cover, supporting up to 4 echoes (first, second, third and last echoes).
ATTENTION: the scanner processes up to 8 returns and reports only 4 of them
Areas of use:
- Self-propelled vehicles (AGV): Safe monitoring and terrain mapping
- Robotics: Recognition of surrounding objects
- Loaders: obstacle detection, pattern matching and height measurement
- Construction: determining the scope and depth of excavation, determining the profile of bulk soil
- Ports: Crane Collision Prevention
- Public places: counting people in shopping malls
- Entertainment: access control
YVT-35LX-F0 laser scanner price:
6725.