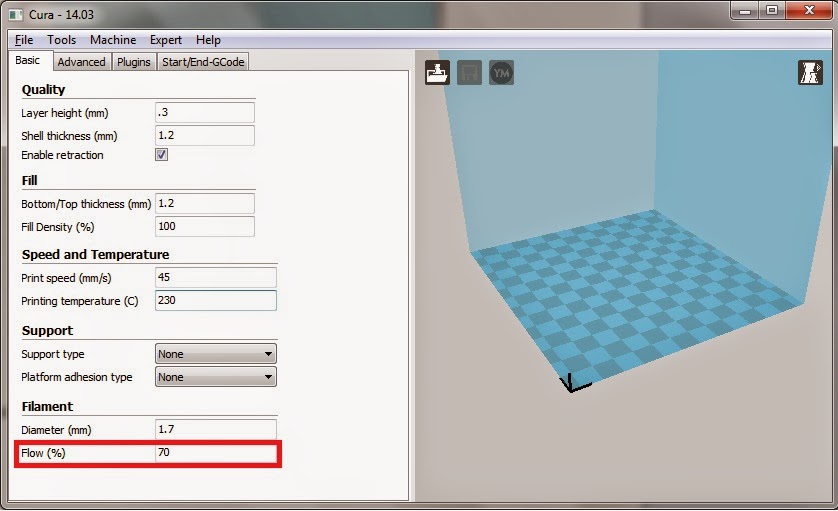
Mp select mini 3d printer cura settings
▷ monoprice select mini 3d printer v2 cura settings 【 STLFinder 】
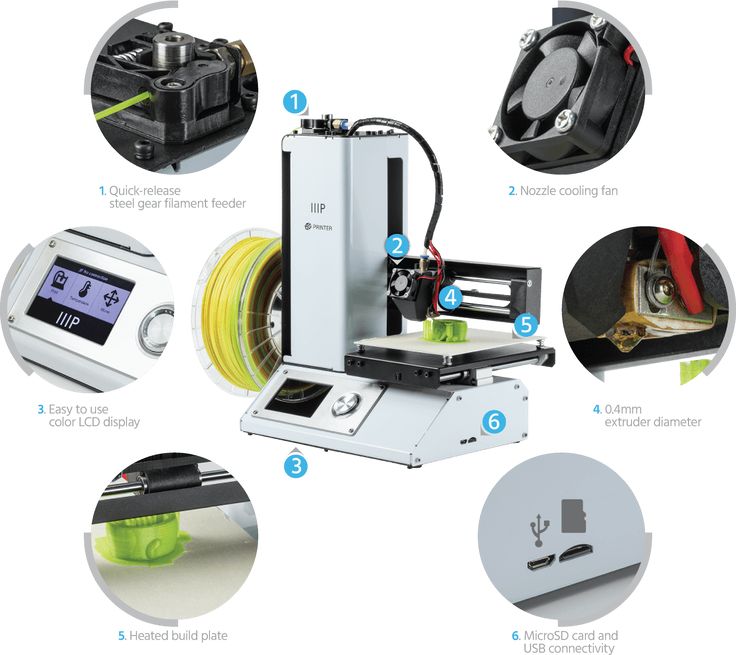
Monoprice Select Mini (MPSM) v2 3D printer power console
myminifactory
I love my Monoprice Select Mini v2 3D printer but I decided that having a front power switch and some 5V USB sockets to run lights and fans off would make it even better. So I designed this power console which also includes a cheap 30V...
Monoprice Select Mini 3D Printer Model
thingiverse
This is a model of the popular entry level MP Select Mini 3D printer
Monoprice Select Mini 3D Printer Model
myminifactory
This is a model of the popular entry level MP Mini
monoprice select mini v2 printer dual fan hotend upgrade
thingiverse
This should work for any monoprice select mini v2 from 2017 . I'm not sure it will for newer ones .... I would do 100% infill, support touching build plate setting to make it easy to clean. ...
ill include some different sizes to attach different fans...
Monoprice Select Mini (MPSM) v2 3D printer power console with USB sockets
thingiverse
I love my Monoprice Select Mini v2 3D printer but I decided that having a front power switch and some 5V USB sockets to run lights and fans off would make it even better. So I designed this power console which also includes a cheap 30V...
Monoprice Select Mini Base for "Mini 3D Printer" by RayneMan
thingiverse
The Printer model was designed by RayneMan https://www. thingiverse.com/RayneMan/about Please go to his post for the file: https://www.thingiverse.com/thing:2494219 I absolutely loved the design he made, and I thought I could make a base for this...
Knob for Monoprice MP Select Mini 3D Printer
grabcad
Monoprice MP Select Mini 3D Printer Knob
Monoprice Select Mini v2 Knob
thingiverse
I couldn't find a knob for my Monoprice Select Mini 3D v2 printer that really fit like I wanted it to so I went to Tinker CAD, pulled up a gear, and turned it into a button. ... I added v2 with a rounded top and a smaller finger hole.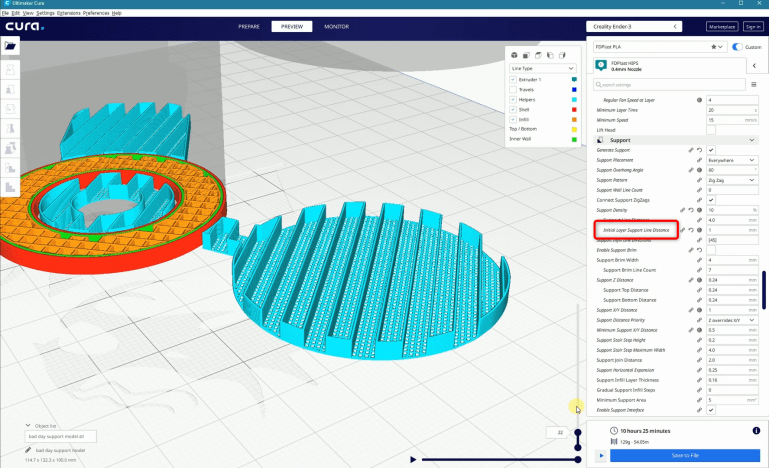
Monoprice MP Select Mini 3D printer Upgrade - knob
pinshape
Replacement knob for the Monoprice MP Select Mini 3D printer user input knob/button. ... Full details available here: http://www.projectsbyzac.com/1...
Monoprice Mini 3D Printer V2 Tool Holder
thingiverse
... memory card box and storage area for USB cord, USB stick, measuring tape and other tools. Tool holder hides behind the 3D printer. See pictures for more details. Strongly recommend to add-on accessory for your Monoprice Select Mini 3D Printer V2.
Cork insulation for Monoprice Select Mini 3D Printer
cults3d
This is a printable outline for the cork underlay I created for my MP Select Mini 3D Printers. Print the PDF on a standard 8.5"x11" Letter sized sheet of paper and use it to cut out your foam and cork. ... Attach together and insert under the bed,...
Cork insulation for Monoprice Select Mini 3D Printer
thingiverse
This is a printable outline for the cork underlay I created for my MP Select Mini 3D Printers. Print the PDF on a standard 8.5"x11" Letter sized sheet of paper and use it to cut out your foam and cork. Attach together and insert under the bed,...
Monoprice Mini Select V2 knob
thingiverse
Prusa inspired knob for the Monoprice Mini Select, V2. The knob is designed to clear above the LED ring, and let some light through. It's small enough to clear the bed if you need to reach it while the bed is forward. The knob is easy to spin...
Monoprice Select Mini V2 Feet
thingiverse
I wanted the same thing for my Select mini V-2 . This design uses both screws on each side of printer, you only need to remove the old rubber foot pad before installing the new feet. Has not been tested on the V-1 yet. ...If you have a V-1 please let me...
Spike Control Knob for Monoprice MP Select Mini 3D Printer
thingiverse
Print Settings Printer: Monoprice MP Select Mini Rafts: No Supports: No Resolution: 0.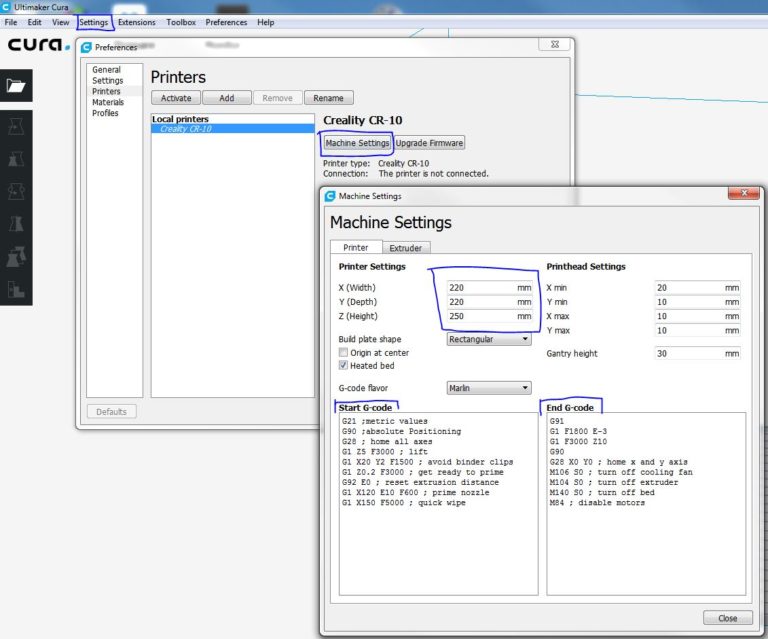 1mm or 0.2mm Infill: 20% Notes: The spike pattern comes out well on both 0.1mm and 0.2mm resolution, the spikes are slightly sharper and the fit is slightly looser...
Monoprice MP Select Mini 3D Printer glass bed Clips
thingiverse
I wanted to add a glass bed to my Monoprice Mini Select 3D Printer but could find no clips for it so I created my own. These clips will allow you to level your bed and you can remove the glass easily for print removal. I found a 130mmx130mmx3mm...
6mm Belt Tensioners for Monoprice Select Mini 3D Printer
thingiverse
Print Settings Printer: Monoprice Select Mini Rafts: No Supports: No Resolution: 0.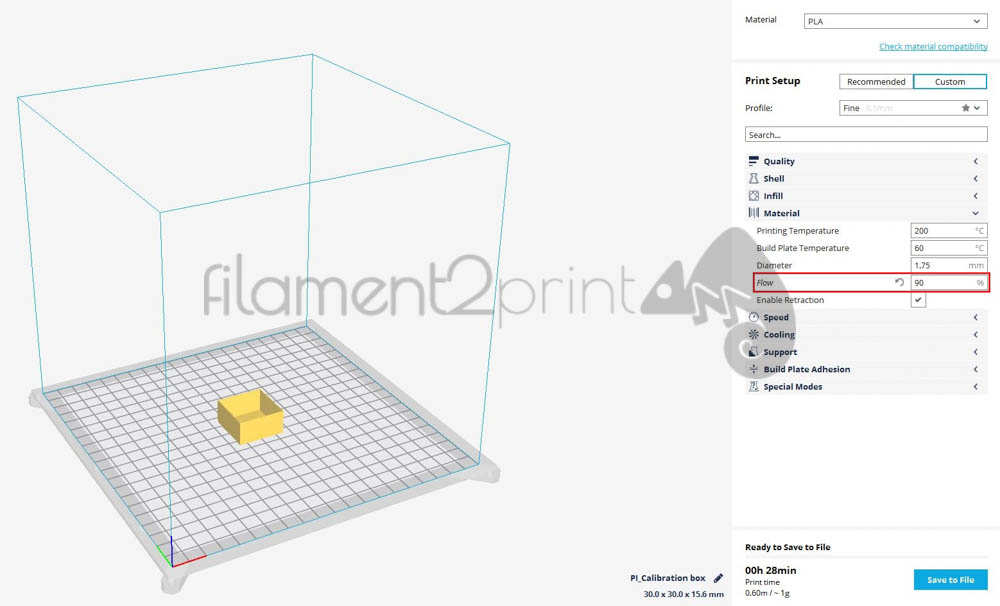 4mm Nozzle / 0.1mm Layer Infill: 100% Notes: I printed these with 100% infill, as the print time was so short for such small parts that less infill did not make a...
Webcam (Logitech C270) Mount for Monoprice Select Mini 3d Printer
thingiverse
Remixed to support a single part print for Logitech C270 webcam being mounted on Monoprice Select Mini. C270 is cheap and works great with Octoprint. This mount reuses the plastic pin and existing screw that comes with the camera. Simply pull off...
Monoprice MP Select Mini 3D Printer Spool Holder
thingiverse
Small changes to cantizzy's spool holder: Made slightly wider to allow for 1kg spools from Monoprice to be used Shortened a bit - I don't use any spools that needed this height ~2cm Improved the tolerances where the sides attach so they'll attach. ..
..
Monoprice Maker Select 3D Printer v2 Spool Holder Extention
thingiverse
This is an a longer version of the spool holder that is shipped with the Monoprice Maker Select 3D Printer v2 printer. This should allow you to use larger spools that will not fit on the factory holder. Printing Reccomendations Print with raft bed.
Filament Holder Bracket - Monoprice Maker Select 3D Printer v2
thingiverse
This bracket is for connecting the filament spool to the right side of the printer (Monoprice Maker Select V2). It requires 2 nuts and bolts to connect the bracket to the right side of the printer in the existing holes.
I used 2 10mm m3 bolts.
... ...
It requires 2 nuts and bolts to connect the bracket to the right side of the printer in the existing holes.
I used 2 10mm m3 bolts.
... ...
Monoprice Maker Select 3D Printer v2 Tool Holder
thingiverse
Tool holder for Monoprice Maker Select v2 To be mounted on top of the supply casing 39 gram filament (PLA) Changelog: 07.10.17: Widened SD-card slot and hole for Allan key
Monoprice Maker Select 3D Printer v2 Tool Holder
grabcad
Tool holder for Monoprice Maker Select v2To be mounted on top of the supply casing39 gram filament (PLA)Created in Fusion 360Additional models in renderings:Sd card:SD CardAllen keys:Allen Keys - inch #0 to 1" cap screwspatula:espatula
Monoprice Select Mini 3D V2 Stormtrooper control dial
thingiverse
This is a dial that replaces the silver one that ships with the monoprice mini select v2.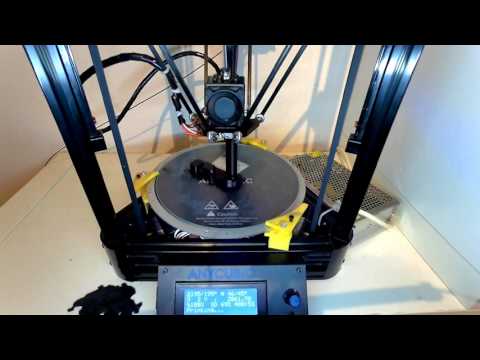
MonoPrice Maker Select 3D Printer
grabcad
Top half of a MonoPrice Maker Select 3D printer. ...I CAD'ed mine for a class project where I had to learn PTC Creo.
Endoscope Camera Mount for Monoprice Mini Select V2 3D Printer
thingiverse
The camera mount clips into Y-arm. A common 8mm endoscope style camera can clip into the mount. ...https://youtu.be/0kU32KxSSpU
Monoprice Select Mini V2 Filament Guide V2
thingiverse
I wanted a filament guide that would look more liked it belonged on the printer and would fit along the curved edge nicer. This shouldn't need support as long as you print it on its back and use the existing screw on the printer. You may need to...
Monoprice select mini v2 filament guide
thingiverse
filament guide for monoprice select mini v2
Arcade1Up SwitchBracket_v2 for Monoprice Select Mini
thingiverse
Just trimmed the edges of Bumbumbum's Arcade1Up SwitchBracket v2 so it will fit the print bed area of the Monoprice Select Mini printer
MonoPrice Select Mini v2 Container (Storage)
thingiverse
When I got the Monoprice Select Mini v2, I realized that there were no models on here for a storage container that would easily bolt on the printer so I designed one and printed it out. ...
...
Monoprice MP Select Mini | Hackaday
November 1, 2018 by Tom Nardi
If you’ve used a desktop 3D printer, you’re likely familiar with the concept of layer heights. Put simply: thicker layers will print faster, and thinner layers will produce better detail. Selecting your layer height is making a choice between detail and speed, which usually works well enough. For example, prints which are structural and don’t have much surface detail can be done in higher layer heights to maximize speed with no real downside. Conversely, if you’ve got a model with a lot of detail you’ll have to just deal with the increased print time of thinner layers.
At least, that’s how it’s been up till now. Modern slicer software is starting to test the waters of adaptive layer heights, which change the layer height during the print. So the software will raise or lower the layer height depending on the level of detail required for the current area being printed.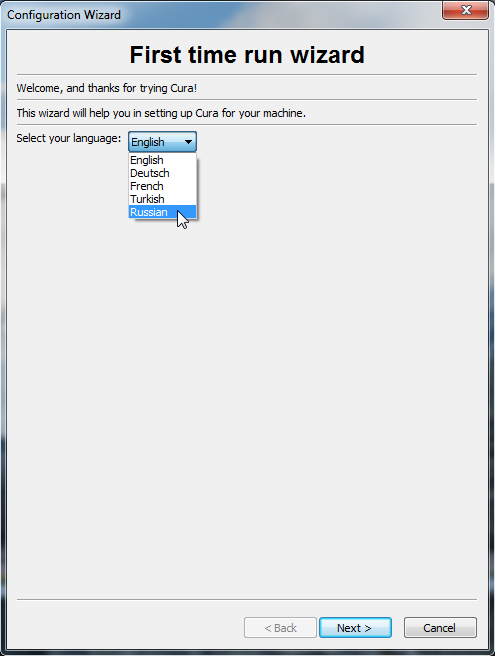 [Dylan Radcliffe] wanted to experiment with this feature on his Monoprice Select Mini, but it took some tweaking and the dreaded mathematics to get Cura’s adaptive layer height working on the entry-level printer. He’s documented his settings for anyone who wants to check out this next-generation 3D printing technology without forking out the cash for a top of the line machine.
While Cura is a popular slicer, the fact of the matter is that it’s developed by Ultimaker primarily for their own line of high-end printers. It will control machines from other manufacturers, but it makes no promises that all the features in the software will actually work as expected on lesser printers. In the case of the Monoprice Mini, the issue is the rather unusual Z hardware. The printer uses a 7.5° 48-step motor coupled to 0.7 mm thread pitch M4 rod. This is a pretty suspect arrangement that was no doubt selected to keep costs down, and results in an unusual 0.04375 mm step increment. For the best possible print quality, layer heights should be a multiple of this number. That’s where the math comes in.
After enabling adaptive layers in Cura’s experimental settings, you need to define the value which Cura will add or subtract to the base layer height. In theory you could enter 0.04375 mm here, but while that’s the minimum on paper, the machine itself is unlikely to be able to pull off such a small variation. [Dylan] recommends doubling that to 0.0875 for the “variation step size” parameter, and setting the base layer height to 0.175 mm (4 x 0.04375 mm).
[Dylan] reports these settings reduced the print time on his topographical map pieces from 12 hours to 7 hours, while still maintaining high detail on the top surface. Of course print time reduction is going to be highly dependent on the model being printed, so your mileage may vary.
If Cura isn’t your style, our very own [Brian Benchoff] gave us a tour of “variable layer height”, the Slic3r version of this technique. Perfect for that Prusa i3 MK3 you finally spent the cash on.
Posted in 3d Printer hacks, Software HacksTagged adaptive layer height, cura, Monoprice, Monoprice MP Select Mini, slicerJuly 25, 2018 by Tom Nardi
Would you believe that you can take a cheap 3D printer and easily convert it into a full function pick and place machine to help assemble your PCBs? No? Well good, because you can’t. A real pick and place needs all kinds of sensors and logic to identify parts, rotate them, make sure everything is aligned, etc, etc. There’s no way you could just bolt all that onto a cheap 3D printer, and let’s not even talk about the lack of closed loop control.
But if you have a very specific use case, namely a PCB that only has a relatively large single part that doesn’t need to be rotated, [Connor Nishijima] might have a solution for you. He bought a $150 USD Monoprice Mini, and with the addition of a few printed parts, was able to build a machine that drastically cuts down the time it takes for him to build his LED boards. Best of all the modification doesn’t involve any permanent changes to the printer, he can just pop off the vacuum attachment when he wants to print something.
Beyond the 3D printed parts (which were made on the printer itself), the only thing you need to make the modification is the vacuum pump. [Connor] is using a hot air station that includes a vacuum pump for picking up SMD components, but he mentions that you’d probably better off just modifying an aquarium pump and using that. A printed holder snaps over the cooling fan of the Monoprice Mini to hold the vacuum pickup tool, and another printed piece holds the strip of LEDs and the PCB. It’s worth noting that the machine has no ability to control the vacuum pump, and doesn’t need to. The pickup tool is so weak that when the LED lands in the solder paste it sticks to the board well enough that the tool can’t lift it back off.
The real genius in this build comes from the manually written G-Code. You load it from the printer’s built in menu system as if it was a normal 3D print, and it instructs the printer to move the vacuum tool over the line of LEDs, pick one up, and drop it in place on the PCB. It then uses a small peg built into the vacuum tool holder to advance the line of LEDs before starting the cycle all over again. Incredibly, it does this whole complex dance 20 times for each PCB without ever having any kind of feedback or alignment check. It only works because [Connor] was willing to go through the trial and error of getting the calibration and G-Code down as close to perfect as can be expected for such a cheap machine.
This isn’t the first time we’ve seen the Monoprice Mini converted into something a bit more impressive than a cheapo 3D printer. Seems that for whatever the machine lacks in the printing department, it more than makes up for in hackability.
Continue reading “Monoprice Mini Converted To Pick And Place (Kinda)” →
Posted in 3d Printer hacks, Parts, Tool HacksTagged conversion, Monoprice MP Select Mini, pcb, pick and place, smdOctober 15, 2017 by Tom Nardi
In case you missed it, prices on 3D printers have hit an all time low. The hardware is largely standardized and the software is almost exclusively open source, so it makes sense that eventually somebody was going to start knocking these things out cheap. There are now many 3D printers available for less than $300 USD, and a few are even dipping under the $200 mark. Realistically, this is about as cheap as these machines are ever going to get.
A startup by the name of 3D Cultures has recently started capitalizing on the availability of these inexpensive high-precision three dimensional motion platforms by co-opting an existing consumer 3D printer to deliver their Tissue Scribe bioprinter.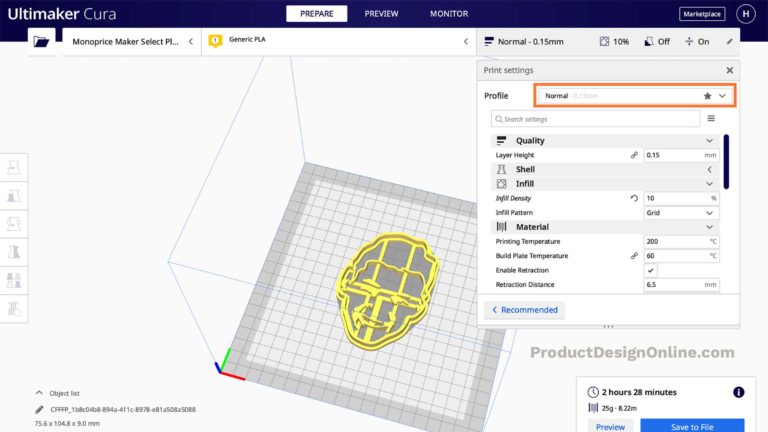 Some may call this cheating, but we see it for what it really is: a huge savings in cost and R&D time. Why design your own kinematics when somebody else has already done it for you?
Despite the C-3PO level of disguise that 3D Cultures attempted by putting stickers over the original logo, the donor machine for the Tissue Scribe is very obviously a Monoprice Select Mini, the undisputed king of beginner printers. The big change of course comes from the removal of the extruder and hotend, which has been replaced with an apparatus that can heat and depress a standard syringe.
At the very basic level, bioprinting is performed in the exact same way as normal 3D printing; it’s merely a difference in materials. While 3D printing uses molten plastic, bioprinting is done with organic materials like algae or collagen. In the Tissue Scribe, the traditional 3D printer hotend has been replaced with a syringe full of the organic material to be printed which is slowly pushed down by a NEMA 17 stepper motor and 8mm leadscrew.
The hotend heating element and thermistor that once were used to melt plastic are still here, but now handle warming the metal frame used to hold the syringe. In theory these changes would have only required some tweaks to the firmware calibration to get working. Frankly, it makes perfect sense, and is certainly a much easier to pull off than some of the earlier attempts at homebrew biological printers we’ve seen.
We won’t comment on the Tissue Scribe’s price point of $999 USD except to say that in the field of bioprinters, that’s pocket change. Still, it seems inevitable that somebody will build and document their own bolt-on biological extruder now that 3D Cultures has shown how simple it really is, so they may find themselves undercut in the near future.
If all this talk of hot extruded collagen has got you interested, we’ve seen some excellent resources on the emerging field of bioprinting that will probably be right up your alley.
Continue reading “Cheap 3D Printers Make Cheaper(er) Bioprinters” →
Posted in 3d Printer hacks, chemistry hacks, Medical HacksTagged 3d printer, algae, bioprinting, collagen, Monoprice MP Select MiniJune 20, 2017 by Brian Benchoff
When the Monoprice MP Select Mini 3D printer was released last year, it was a game changer.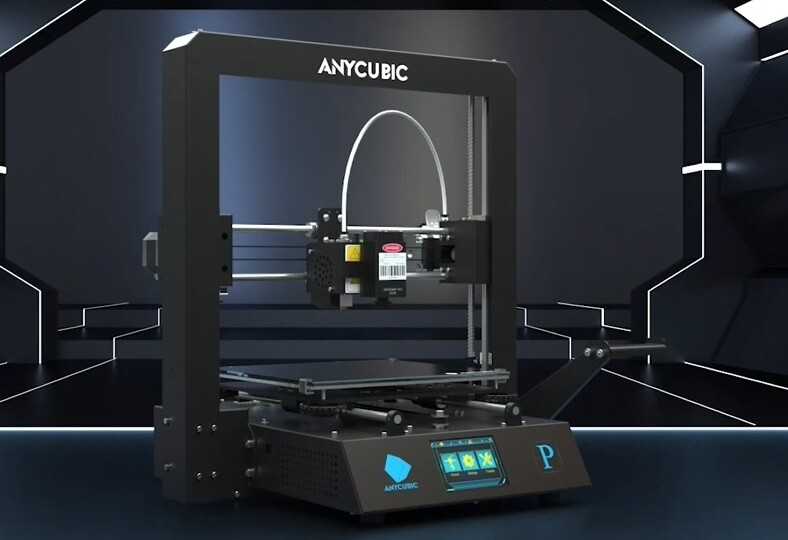 This was a printer for $200, yes, but it also held a not-so-obvious secret: a 3D printer controller board no one had ever seen before powered by a 32-bit ARM microcontroller with an ESP8266 handling the UI. This is a game-changing set of electronics in the world of 3D printing, and now, finally, someone is reverse engineering it.
[Robin] began the reverse engineering by attaching the lead of an oscilloscope to the serial line between the main controller and display controller. The baud rate is weird (500 kHz), but apart from that, the commands readily appear in human-parsable text. There is a web server built into the MP Mini printer, and after inspecting the web page that’s served up from this printer, [Robin] found it was possible to send G-code directly from the controller board, get a list of files on the SD card, and do everything you would want to do with a 3D printer.
After deconstructing the circuit on the display board, [Robin] found exactly what you would expect from such a simple board: an SPI display driven by an ESP, and a big flash chip sitting off to the side. [Robin] found the the model of the display, and quickly built a project on Platform.io to draw text to the LCD. This isn’t the end of the project – there’s still a lot that must be done before this printer is squirting out parts with custom firmware.
While this isn’t a hack of the driver board inside the MP Mini, that’s not really a problem. The motor driver board in this printer doesn’t really need any changes, and was already ahead of its time when this printer was released last year. As with most things, the UI is the weak point, and upgrading the firmware and built-in web server for this printer is the best way forward.
[Robin] put together a truly phenomenal video of how he reverse engineered this display controller. You can check that out below.
Continue reading “Reverse Engineering The Monoprice Printer” →
Posted in 3d Printer hacksTagged 3d printer, Monoprice, Monoprice MP Select Mini, reverse engineeringMay 17, 2017 by Brian Benchoff
Around this time last year, Monoprice quietly unveiled a small, $200 3D printer. At the time, a fully functioning printer at this price point wasn’t unheard of. A good 3D printer at this price point was. It turned out this printer was actually fantastic and completely changed the value proposition of desktop 3D printers.
In the year since the release of the MP Select Mini printer, Monoprice has been hard at work bringing costs down, reworking designs, and creating an even less expensive printer. Now, it’s out. It’s available for pre-order on Indiegogo right now. Is this still a $150 printer? Not quite: the ‘early bird’ price is $159 with free shipping and August delivery, and a regular price of $169 plus $10 shipping with September or October delivery. There’s also a bundle for $279 that includes the printer, 2kg of filament, and a software package.
The first time we saw this tiny printer was way back in January at CES. It looked to be an extremely capable printer; the only question was if Monoprice could produce it and get it out the door. This would be a tall order; this printer comes with NEMA 17 stepper motors, a heated bed, a 32-bit controller board, and has WiFi enabled.
Here’s what we know about the capabilities of this printer. It’s a fairly standard delta printer with Bowden extruder and a heated bed. PLA and ABS is supported. The printer has auto bed leveling that measures the bed by ‘tapping’ the nozzle against the bed in about a dozen places before printing. From what we saw at CES, the hot end appears similar to the first revision of the $200 MP Select Mini — possibly opening up the door to E3D hot end installations.
Is this printer worth it? Every 3D printer released on a crowdfunding platform should come with the standard warnings, but Monoprice says this machine is in production right now. This raises the question: why release it on Indiegogo when Monoprice already has the whole ‘taking orders for products online’ thing in the bag? I suspect this crowdfunding campaign is just building a buffer; a year ago, the MP Select Mini was perpetually out of stock, and demand far outstripped supply. The same thing will happen with a 3D printer that’s even deeper into impulse buy territory.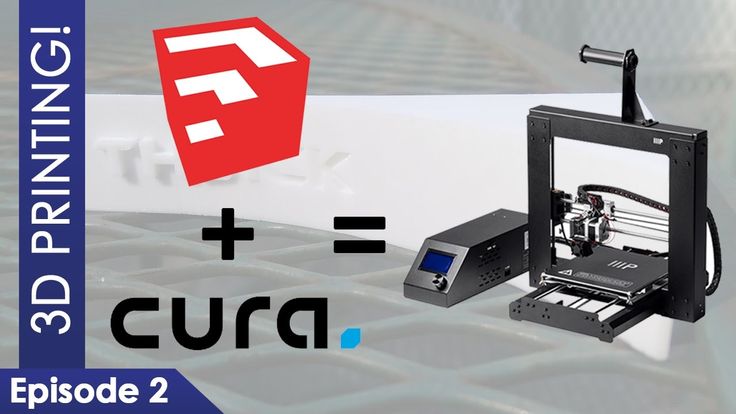
In any event, the printer we’ve all been waiting for has been ‘released’, for varying values of ‘released’. The first units will start making their way onto desktops this summer, and we’re going to pick one up and put it through its paces. You can check out Monoprice’s video of this printer below.
Continue reading “Monoprice Releases Their Mini Delta Printer (On Indiegogo)” →
Posted in 3d Printer hacks, Crowd Funding, SliderTagged indiegogo, Monoprice, Monoprice Delta, Monoprice MP Select MiniMay 9, 2017 by Al Williams
We’ve had a love affair with the Monoprice Select Mini since it came out. The cheap printer has its flaws, though. One of them is that the controller is a bit opaque. On the one hand, it is impressive that it is a 32-bit board with an LCD. On the other hand, we have no way to modify it easily other than loading the ready-built binaries. Want to add bed leveling? Multiple fans? A second extruder and mixing head? Good luck, since the board doesn’t support any of those things. [mfink70] decided the controller had to go, so he upgraded his Mini with a Smoothie board.
On the plus side, the Smoothie board is also a 32-bit board with plenty of power and expansion capability. On the downside, it costs about half as much as the printer does. Just replacing the board was only part of the battle. [mfink70] had to worry about the steppers, the end stops, and a few other odds and ends.
Continue reading “Monoprice Select Mini Gets Smooth” →
Posted in 3d Printer hacksTagged 3d printing, Monoprice MP Select Mini, MP Select Mini, smoothieboardJune 13, 2016 by Brian Benchoff
2016 is the year of the consumer 3D printer. Yes, the hype over 3D printing has died down since 2012. There were too many 3D printers at Maker Faire three years ago. Nevertheless, sales of 3D printers have never been stronger, the industry is growing, and the low-end machines are getting very, very good.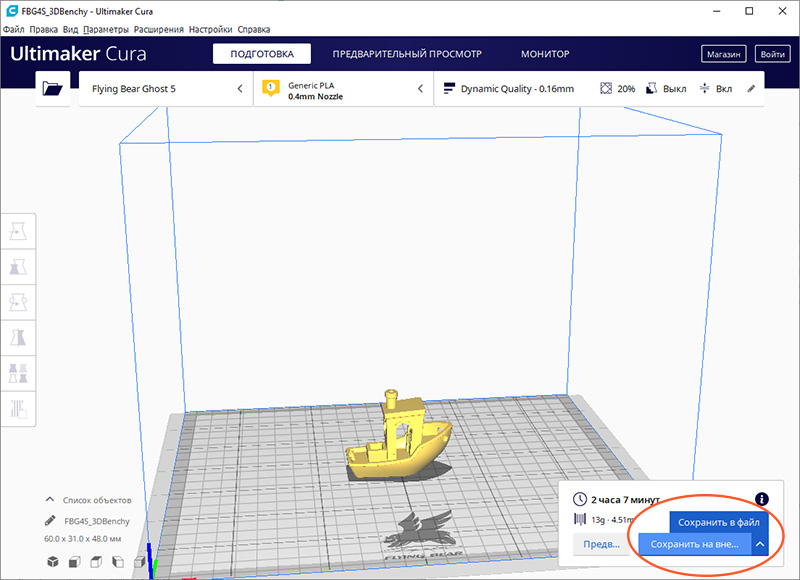
Printers are also getting cheap. At CES last January, Monoprice, the same company you buy Ethernet and HDMI cables from, introduced a line of 3D printers that would be released this year. While the $300 resin-based printer has been canned, Monoprice has released their MP Select Mini 3D printer for $200. This printer appeared on Monoprice late last month.
My curiosity was worth more than $200, so Hackaday readers get a review of the MP Select Mini 3D printer. The bottom line? There are some problems with this printer, but nothing that wouldn’t be found in printers that cost three times as much. This is a game-changing machine, and proof 2016 is the year of the entry-level consumer 3D printer.
Continue reading “Review: Monoprice MP Select Mini 3D Printer” →
Posted in 3d Printer hacks, Featured, Reviews, Skills, SliderTagged 3d printer, 3D printers, Monoprice, Monoprice MP Select Mini, MP Mini, MP Select Mini, printerbest Cura profile for Ender 3
3DPrintStory 3D printing process Ender 3 Cura Settings: Best Ender 3 Cura Profile
Creality's Ender 3 is one of the most popular 3D printers and has become the starting point for many to enter the world of 3D printing. Competing with some of the more expensive printers in terms of speed, quality and 3D printing space, this model surprises with its price-performance ratio.
Naturally, for a 3D printer of this price, manual calibration and possibly a few modifications are required, but even with this, the price and quality are still excellent.
The standard Ender 3 Cura profile will work for you as a start, so definitely download that as a base.
- Click Settings > Printer > Manage Printers”
- In the settings window, select Add > Add a non-networked printer.
- Scroll to Creality3D, expand the section and select Ender 3.
Here you will have default settings from which you can create your ideal profile. Naturally, you will have to adapt to individual materials and 3D print resolutions. By default we will modify this profile for PLA, but we will also mention settings for ABS and PETG.
Below is a summary of the profile we recommend, and the rest of the article provides a more detailed explanation of each setting.
Optimum Ender 3 profile for PLA:
- 3D printing temperature: 200° C
- Table temperature: 60° C
- Speed: 50 mm/s
- Layer height: 0.12 mm
- Retract: 6 mm at 25 mm/s
- Infill: 20%
- Start Layer Print Speed: 20mm/s
- Initial Fan Speed: 0%
3D Print Temperature
One of the most important settings is temperature. Incorrect temperature setting can result in over or under extrusion of the material, curling, or cavities. Most grades of PLA require at least 180°C for good extrusion. This temperature range can be extended up to 220°C.
Ideal temperatures vary for different materials (ABS: 220-250° C, PETG: 220-245° C), but the grade of the material can also be important. When trying out a new material, it's worth starting to print at different pitches. In general, 200°C is considered a great start for PLA plastics.
Remember: when calibrating the 3D printer, change only one setting at a time.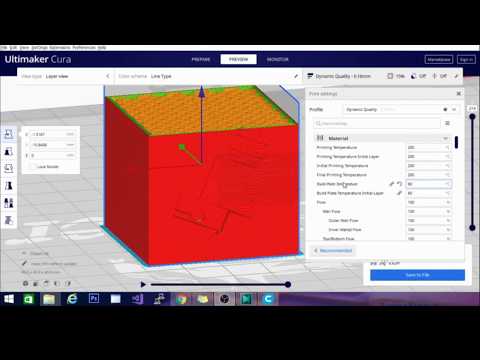
Summary:
- PLA: 200°C
- ABS: 230°C
- PETG: 240°C
3D printer bed temperature
The bed temperature also depends a lot on your material. PLA doesn't really require the table to be heated (although heated is better). You can easily get by with glue, hairspray, or blue tape. But ideally, the temperature of the table should of course be just a little higher than the ambient temperature.
The table temperature for ABS should be significantly higher than for PLA - around 110°C. If you are going to use Ender 3 in conjunction with ABS plastic, you will also probably need to add a 3D printer case to eliminate excess cooling and prevent deformation and delamination of layers.
Summary:
- PLA: 50° C
- ABS: 110° C
- PETG: 70° C
3D print speed
quality. Unfortunately, as the print speed increases, the quality drops. On the other hand, no one wants to wait two weeks to print one 3D model.
On average, most users print PLA at 45 to 65 mm/s. You can increase this speed by using OctoPrint and alternative firmware like Klipper or Marlin. We recommend a starting speed of 60mm/s and reduce the value for 3D models that require a higher level of detail.
When 3D printing with flexible materials, the speed must be significantly reduced. We recommend 3D printing speed from 20mm/s to 40mm/s.
PETG is slightly more fibrous than PLA and to combat this you can reduce the print speed to 20mm/s or so. From 30 to 55 mm / s, you can also try. It is better to start with the lower bar and gradually increase it.
ABS requires about the same print speed as PLA. Ideally from 45 mm/s to 65 mm/s.
For larger 3D models that require less detail, you can increase the Ender 3 print speed to 120mm/s.
In general, the travel speed can be increased up to 150 mm/s.
Summary:
- PLA: 60 mm/s
- Flexible materials (e.g. TPU): 30 mm/s
- PETG: 40 mm/s
- ABS: 60 mm/s
- Travel speed /s
Layer height
Decreasing layer height increases 3D print resolution.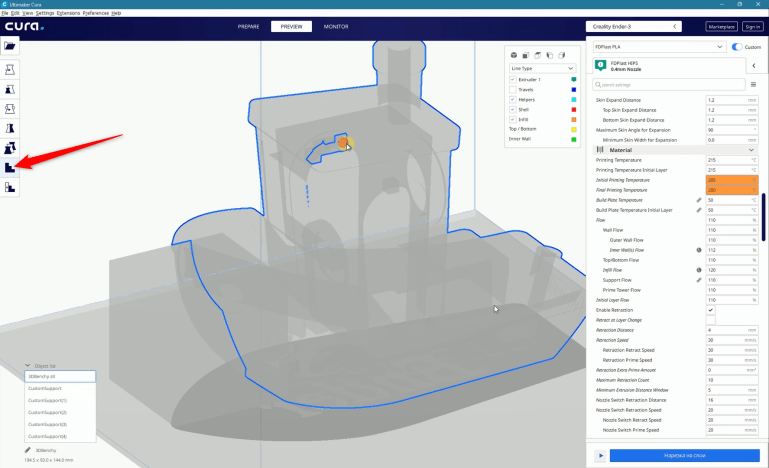 That is, by halving the layer height, you fit twice as many layers in one 3D model.
The negative side of high resolution is again the increase in long-term 3D printing. Finding the perfect combination of print speed and layer height is essential to getting high quality prints in the shortest possible time. Layer height can be broken down into "magic numbers". The magic numbers are essentially the height of the layer, which works best on Ender 3:
- 0.24 mm
- 0.20 mm
- 0.16 mm
- 0.12 mm
- 0.08 mm
You may notice that all magic numbers are multiples of 0.04 mm. The reason is that the Z-axis stepper motor on the Ender 3 raises the printhead by 0.04mm per step.
Summary:
- Fine Detail, Slow: 0.12mm
- Coarse Detail, Fast: 0.20mm
Retract
Retract is your best weapon for fighting 3D problems print. The retract can be divided into two main parameters:
- Retraction distance
- Retraction speed
Essentially, the retraction reverses the motor shaft to reduce material pressure in the nozzle during idle strokes. In this case, without pressure on the nozzle, excess material will not be squeezed out.
After the release of the Ender 3 model, he quickly became known precisely for his problems with plastic residues (cobwebs) between the parts of the model. But this is already a long time in the past, and the optimal retract settings have been found. For PLA, this is a distance of 6 mm at a speed of 25 mm per second. PETG should be set to a shorter retract distance, ideally around 4mm. ABS should be set to retract distance of 6mm, but at a higher speed of 40mm per second. However, we still recommend playing around with these settings to find the most suitable for you. To set up the retract, you can use the 3D model from Thingiverse.
Summary:
- PLA: 6 mm at 25 mm/s
- PETG: 4 mm at 25 mm/s
- ABS: 6 mm at 40 mm/s
Filling affects how filling
9002 strength and weight of your finished 3D model. There is no "ideal" infill setting as it depends entirely on the purpose of 3D printing. For light decorative 3D prints, you can reduce the infill to 5% or 10%. This will reduce print time and make the model much lighter.
 For functional 3D models you will need a higher infill to increase strength and durability. Ideally between 20% and 60%. Some models or even certain parts of the model may require 100% infill.
Summary:
- Decorative 3D models: 10%
- Standard 3D models: 20%
- Functional 3D models: 40%
The initial layer
good quality 3D printing. Poor first layer adhesion will almost always cause 3D printing to fail.
The thickness of the initial layer can be increased to 0.20 mm or 0.24 mm to obtain a thicker first layer and improve substrate adhesion.
The 3D print speed of the initial layer should be slightly slower than the normal print speed. A lower speed gives the first layers more time to stick to the table. Decreasing the initial layer speed should not greatly affect the overall print time, since there are not many base layers. We believe that 30 mm per second is the optimal speed for printing the initial layer. If you have problems with the adhesion of the first layer, you can reduce this value.
The first 5 layers are usually sufficient and will print at a slower speed. The initial fan speed should be set to 0%. Excessive cooling of the earlier layers may cause the model to shrink or warp slightly, causing it to slide off the table.
We hope that the material was useful to you and it will help you for high-quality 3D printing on Ender 3.
Cura 3D tutorial for beginners
3DPrintStory 3D printing process Cura 3D tutorial for beginners
Cura 3D is such a handy slicing program that many users don't even realize what they are doing.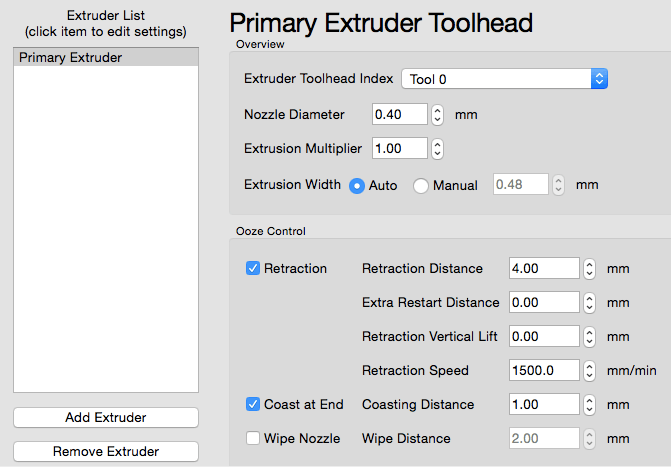 Simply upload your model, select the 3D print quality and start printing. It's as easy as printing with a regular 2D printer.
Intro
Basically, Cura 3D is a 3D printing program - a method of transferring a digital file from your personal computer to a 3D printer so that the latter can process the data and start printing.
Compared to many other slicing programs, Cura 3D seems extremely simple. But if you need more flexible settings, they are also there. It's just that the user interface is implemented really competently and conveniently.
Cura 3D is developed and maintained by Ultimaker, a 3D printer manufacturer known for its perfectionism and strong support for the open source movement. There are a lot of manual settings, but they are hidden from the user (not really that deep), so if you are one of those who are interested in experimenting or need certain non-standard 3D printing settings, you can implement them.
For those who just want to print a part, just adjust the speed and quality.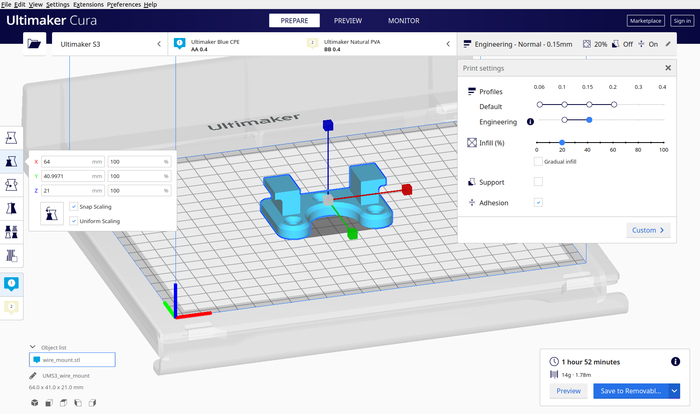
This tutorial is aimed at those who are just getting started with their 3D printer. We assume that you have just turned on the printer and loaded the media. From now on, we will look at the necessary steps in Cura 3D to start 3D printing.
What is Cura 3D?
Cura 3D is a slicing software for 3D printers. Cura takes a 3D model as input and forms separate vertical layers to create a G-coded file that your 3D printer understands.
Before getting started with Cura, it's worth understanding the entire process of preparing a 3D model file. Even if you use ready-made 3D models, there should be a general understanding.
Three main steps in preparing files for 3D printing:
- Modeling. Modeling (formation of a virtual solid 3D model) is implemented in special applications like 123D Design or SketchUp, etc. These applications support their own specific file formats and allow you to open, edit, save, and export these files.
- Export 3D model file. After you have created your model, you need to export it to STL or OBJ file. These formats are supported by Cura 3D. They differ from native 3D modeling application formats in that they only contain information about the final geometry, without separate nodes and editable content.
- Slicing file export. STL or OBJ file can be imported into Cura 3D, where it is processed and G-code is generated as output. G-code is just a text document, with commands that a 3D printer follows. For example, the temperature of the extruder, movement to the left, right, etc. are indicated.
At the first stage, a solid model is developed, but if you have no such experience, don't worry, on Thingiverse, Youmagine you will find a huge number of finished models. There are other sites where you can download models for free 3D printing. As a rule, in such repositories, models are already exported in STL format, so you can immediately import them into Cura 3D.
What exactly does Cura3D do?
Cura 3D converts a .stl or .obj file of a 3D model into a format that the 3D Printer can process. FFF 3D printers form each new layer on top of the previous one. Cura 3D takes a 3D model, cuts it into layers, and feeds those instructions to the 3D printer, layer by layer.
These instructions are transmitted as a G-code, a text document with a .gcode extension. If you open the file, you can view the code itself and even understand the commands.
For example, here is a small piece of code:
G0 F7200 X19.698 Y28.262 Z.36 G1 F1500 E0 G1 F1350 X22.467 Y26.175 E0.15654 G1 X23.338 Y25.568 E0.20447 G1 X24.246 Y25.027 E0.25218
Over time, as you become more familiar with 3D printing, you will be able to adjust the speed of the coolers, the height of the layers, the temperature of the extruder at different points. This is a very useful skill for troubleshooting some 3D printing issues.
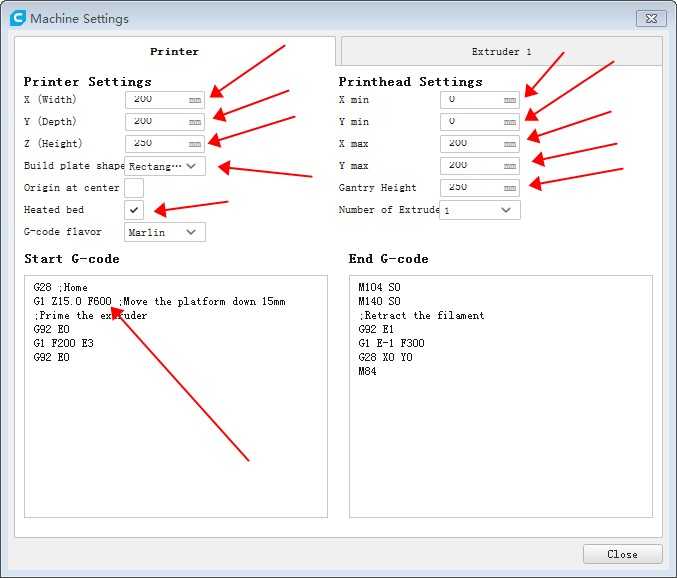
Since each 3D printer has its own characteristics: print volume, table area and nozzle diameter, Cura 3D needs to know these parameters in order to correctly generate the G-code.
After you specify the design features of your 3D printer model, you can proceed to the settings for the height and layer thickness. Only then will Cura 3D be able to generate a valid G-code with motion path calculations.
The resulting G-code can be saved to an SD card or transferred to 3D printing via WiFi (depending on the interface that your 3D printer supports).
Getting Started with Cura 3D
In this part of the article, we will explain how to get started with Cura 3D. Namely - downloading and installing, optimizing your .stl and .obj files for further export to G-code.
Step 1: Install Cura 3D
Cura 3D is a multi-platform program that is available for Linux, Mac and Windows OS. All versions can be downloaded free of charge from the Ultimaker website.
You will download a file that will install Cura 3D. The installation procedure may differ slightly depending on your OS. In this tutorial, we used Cura 3D version 2.3.1.
- Launch Cura 3D.

- Select your 3D printer model. The first time you launch Cura 3D, it will ask you to select your printer model. If you have Ultimaker or Lulzbot, then they come with a special version of Cura 3D with ready-made settings. If not, or if you want to set up a new 3D printer, then after loading the program select ' Select -> Printer '.
The 3D printer selection menu will load. If you downloaded the program from the link above, then all available printers will be Ultimaker. To select another model, press Other . If you're lucky, your 3D printer will be on the list.
If not, you can go to your printer manufacturer's website and look for a custom version of Cura 3D to download. If it is not there, then select Custom -> Add Printer .
A window will open with the option to add 3D printer settings. At this point, you will need information about your model. Again, you can probably find this information on the manufacturer's website. And if you assembled a 3D printer yourself, then you probably remember all the parameters!
Enter all required parameters and click Finish .
Step 2: Overview of the Cura 3D interface
The screenshot below shows the main blocks of the Cura 3D interface.
Block
Top Navigation- Open File : Use the button in the top left corner of the menu or the option File -> Open File to open your .stl or .obj file.
- Edit : Use to select all models, delete or merge 3D models. Standard, useful commands.
- View Mode : This button allows you to switch between Solid, X-Ray and Layers views of the model.
- Settings : Opens the material and 3D printer settings.
- Extensions : This is for more advanced users. Allows you to install Cura 3D Extensions, which, for example, activate the ability to manually edit the G-code.
- Help : If you have questions, you can't figure something out - this is a great place for
Block
Tool bar (left)- Open File : Allows you to open the .stl or .obj file you want to print.
- Move : When clicked, arrows will appear around the selected model. Using the arrows you can move the model on the desktop.
- Scale : Increase or decrease the size of your 3D model.
- Rotate : A handy tool for adjusting the orientation of the model, its rotation.
- Mirror : When clicked, arrows appear around the selected model. Click to mirror the position of your model.
- Select Settings : A handy feature for adding frequently used settings to the sidebar. For example, you can display the wall thickness ( wall thickness ), model infill ( infill ) and speed ( speed ).
 Active only for loaded 3D model.
 - View Mode . Solid X Ray and Layers . If Layers is selected, a slider will appear that will allow you to "cut" the model into layers.
Settings Palette box (right)
In this box, you can adjust the print quality and select media.
Printer . This is the 3D printer you chose in the first step. If you have more than one 3D printer, they can be configured and selected from this list.
Material . Quick selection of the material that is used for 3D printing.
Profile . There are three 3D print qualities available: Low , Normal and High . Selected from dropdown. At the first stages, it is recommended to use the provided blanks. Over time, as you get comfortable with your 3D printer and printing, you can experiment and create your own profiles that suit you better.
Print Setup . There are two options - Simple (Recommended) and Advanced (Custom)
- Simple (Recommended) . The settings Simple (Recommended) are pulled from the 3D printer settings you enter when you first start Cura 3D. This option is a great option for beginners or for the first launches of a new 3D printer model to see if the connection between the printer and the software is established. The number of settings is limited, but you can still quickly adjust the infill percentage of the 3D model, print table adhesion and add support material.
- Advanced (Custom) . This is where the main fan begins. With custom advanced settings, you can customize everything from quality to 3D print speed. We will explore this section and its capabilities later in the article.
Step 3: Processing the model in Cura 3D
Now that you are familiar with the Curs 3D interface, you can get to work. The first step is to upload the 3D model file. You can export your own model to STL or OBJ file or download from one of the sites with models for 3D printing.
Loading a 3D file into Cura 3D:
- Click on the "Open File" icon or use the menu File -> Open File and select the desired STL or OBJ file. For this tutorial, a 3DBenchy 3D model was used. This is a great model for testing new 3D printers or software.
- When the model has loaded, you can check if it is positioned correctly. If everything is OK, then the model will be highlighted in yellow. If there is a problem, it will turn gray and Cura 3D will tell you exactly why it is not possible to start printing.
It is also useful to learn the navigation options in the Cura 3D workspace.
Travel . Hold Shift and the left mouse button to move the workspace along the coordinate axes. This is a useful option when you are zooming in to check small details of a model.
Rotation . Hold Ctrl and left mouse button to rotate around the workspace. This is useful for checking the model from different angles.
Zoom (zoom) . If your mouse has a wheel on the middle key, use it to zoom. If not, then we recommend to buy :).
Different display options for 3D models
Cura 3D has three main options for displaying a model. Each option is useful in its own way, and if you're having trouble with 3D printing, one or the other option can help you sort it out.
Solid . This display is used by default and makes it possible to evaluate how the model will look after 3D printing. The dimensions and shape of the model are shown relative to your print table. As a general rule, if you have looked at the model from all angles and it looks good, 3D printing will be successful.
X-Ray . If you encounter problems during 3D printing, this display option will help you evaluate the internal structure of the model.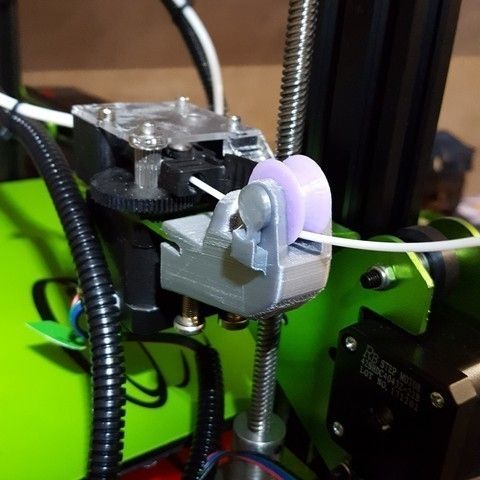 Perhaps you will see what exactly needs to be reworked into details (for example, intersecting planes may appear inside).
Layers (Layers) . If you have a problem with 3D printing at the same point, or you just want to see a specific cut across a layer, you can use this option. The most accurate way to move between layers is to use the up/down buttons on the keyboard. There is a second option - to use the slider for a quick view. Over time, as you gain experience with 3D printing, this display option will help you to change settings in the G-code (for example, increase the speed of the cooler, adjust the height of the layer or the amount of material fed to the extruder) at the level of certain layers.
3D model setup for Cura 3D . If you need to tweak the model, all you have to do is click on it to highlight it and select one of the options from the toolbar on the left. Here you can quickly move, rotate and scale the model.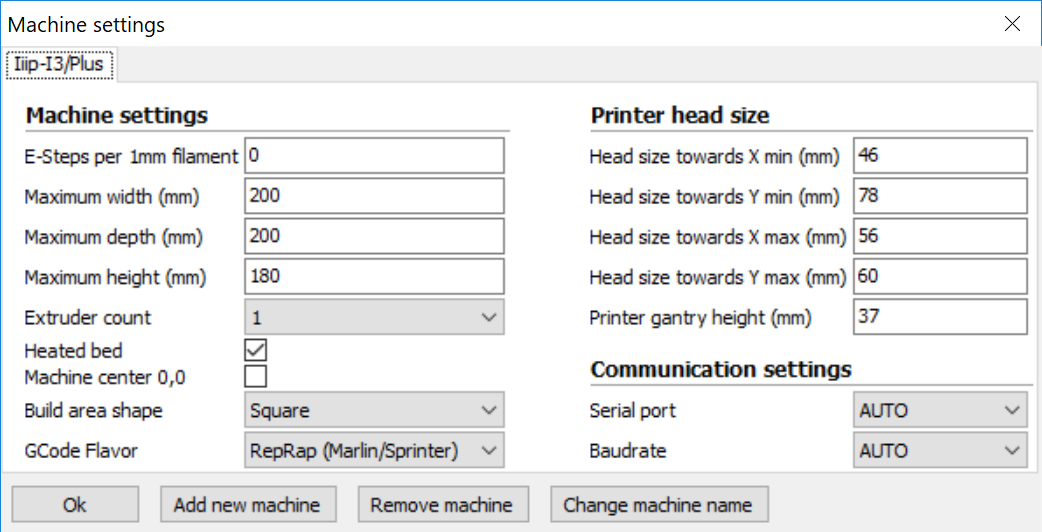
When you click on one of the options provided, arrows will appear around the model. Just grab the arrow or ring to apply changes in the direction you want. If you make a mistake right click and select R eset .
If you need to print more than one model, right-click on the base surface and select Duplicate . Cura 3D will automatically try to place the models as well as possible. If there is enough space to print two or more models, the platform will be yellow. If there is not enough space, the print space will be highlighted in gray.
Step 4: Simple (Recommended) 3D printing settings
The easiest 3D printing option is to let Cura 3D apply settings Simple (Recommended) . Although most of the settings will already be specified, you will be able to select the 3D print quality and specify the support material settings.
- Printer . Make sure your 3D printer is selected.
- Material . Make sure the 3D printing material is up to date.
- Profile . Select the 3D print quality.
- Infill . Hollow - printing will be as fast as possible, but inside the model will not be filled with material. Solid (Full filling) - the model will be with maximum rigidity due to full filling, but printing will take a lot of time and material. For starters, it is better to use the most versatile setting Light (Low filling) .
- Helper Parts These are the settings for the support material and adhesion. If you are typing for the first time, it is best to enable both options. If the contact area of your model with the print table is large, then you can disable option Print Build Paste Adhesion . If the model does not have sharp changes in angles and peculiar "canopies" (for example, arms spaced at 90 degrees in a human model), then you can disable the option Print Support Structure .

Step 5. G-code generation
At this point your model is ready to be 3D printed and all you have to do is export the file from Cura 3D to an SD card or send it directly to your 3D printer. Cura 3D will take care of all the necessary steps to convert an STL or OBJ file into a G-code that your 3D printer will understand.
- Save the 3D model file . In Cura, press Save to file , Save to SD or Send to Printer .
- Estimate 3D printing time . Cura 3D will provide you with an estimate of the time it will take to print your model.
- Start 3D printing . If you transmitted the G-code directly, sit back and relax while your printer prints. If you are using an SD card, install it in your 3D printer and start printing.
Cura 3D Settings
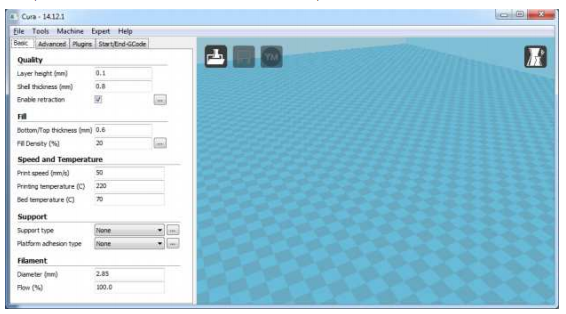
Using Simple (Recommended) settings is just the beginning.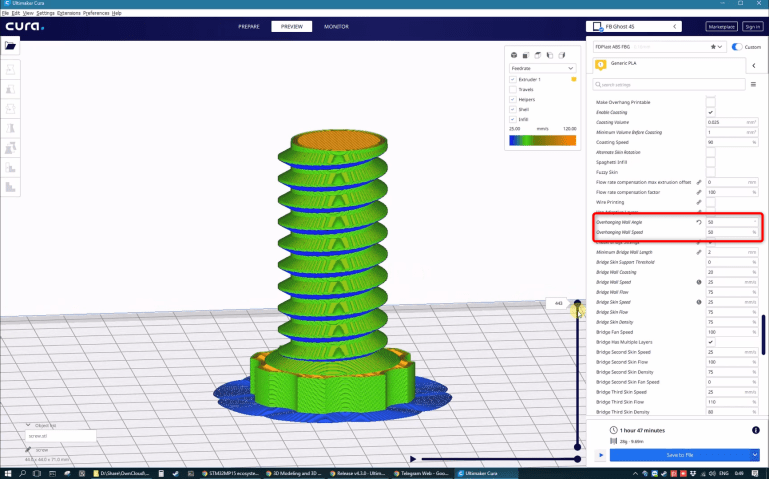 Over time, you will want to implement more flexible settings. You can find these settings in the Advanced tab . We will review them below.
Select Advanced (Custom) from the print preferences panel on the right.
- Quality . This is related to Layer Height (Layer height) . This setting depends on the capabilities of your 3D printer. The lower the layer height, the better the quality, and increasing the layer height will increase the print speed. By default, the layer height is set to 0.1mm for Ultimaker 2 Extended.
- Shell . This parameter controls the thickness of the walls of your model, as well as the thickness of the bottom and top layers. This parameter must be proportional (1x, 2x, 3x, etc.) to the nozzle diameter. For example, a wall thickness of 0.8, if you are printing on an Ultimaker 2 3D printer, will mean that the wall will consist of two lines, since this model has a nozzle diameter of 0.
 4 mm.
4 mm. - Speed . Generally speaking, the lower the speed, the better the 3D printing.
- Cooling . An important component of any 3D printer and you definitely need to activate this option. As a rule, coolers do not operate at full capacity until the end of the 5th layer.
- Support . Allows you to add support structures.
- Build Plate Adhesion . Not all models have sufficient footprint to make good contact with the print bed. If so, this setting will help you make good contact with the substrate.
- Special Modes . If you are printing more than one model, this option will allow you to specify that they will be printed one by one.
3D Print Quality Settings
- Quality . Every 3D printer has a maximum and minimum material layer height. In this window, you can specify the desired layer height. 0.02 mm is high quality and slow 3D printing speed, and 0.
 6 mm is the opposite, low quality and high printing speed.
 - Shell . Choice of wall thickness. Thicker walls will allow you to print a more rigid model with a better surface. If a nozzle with a diameter of 0.4 mm is used, then the wall thickness must be set proportionally: 0.4, 0.8, 1.2 mm, etc.
- Top/Bottom Thickness . Again, as a rule, it is set in proportion to the size of the nozzle. One recommended practice is to start with twice the size of the nozzle diameter.
Material settings
- Material . Each material for 3D printing has its own characteristics. In most cases, the ability to use a particular material is determined by the structural components of a 3D printer, and not by software. So this setting is unlikely to be useful to you.
- Enable Retraction . It is recommended to always enable this option. Thanks to it, the material is fed in the opposite direction during the idle movements of the extruder.
Speed settings
- Print Speed . This is the overall speed of 3D printing during direct feed. Generally speaking, the lower the speed, the better the print quality. The recommended 3D printing speed is 60mm/s. If you want to increase this speed, it is recommended to increase the printing temperature at the same time ( Printing Temperature ).
- Travel Speed . This is the speed at which the print head moves when no media is being fed. On the Ultimaker 2, this speed is set to 120 mm/s by default. This speed is recommended to be set depending on the speed of direct printing. And to be more precise, it is 2 times more. In this case, acceleration and deceleration will occur smoothly enough to provide high-quality and at the same time fast printing.
Infill settings
Infill Density . This is the amount of material that is fed to the inside of the model. The higher the filling, the greater the rigidity of the model. As a rule, this parameter is set to 20%.
Cooling
Enable Fan Cooling . Disabling this option is not recommended. As a rule, no matter what material you use, cooling is necessary for high-quality 3D printing.
Support Material Settings
- Option Enable Support is best left unchecked unless you are 100% sure you don't have knots with sudden angle changes.
- Option Placement allows you to choose where exactly the calipers will be located: Touching Build Plate means that the calipers will be located only on the print table. Everywhere means that support structures can also be based on the part.
Bed adhesion settings
One of the most common 3D printing problems is when the model comes off the print bed. Buil Plate Adhision are just the settings that help improve the contact between model and bed. There are three options for improved contact - Skirt , Brim or Raft .
Skirt . This is the setting that is best used at all times. This is the line around the 3D model during the first layer printing that helps clear the nozzle when the 3D print starts.
Brim . These are a few additional lines that are printed before the first layer of the model and provide better adhesion of the bottom layer of the model and the table.
Raft . Grid under the first layer of the 3D model, thanks to which the contact between the model and the table is significantly improved.
Each of the listed settings has additional options that will allow you to more flexibly adjust the quality of the contact between the 3D model and the print table.
Generate G-code file
Once you have defined these settings, the model will be ready to print. All that's left is to export the file from Cura 3D to a card or directly to a printer.