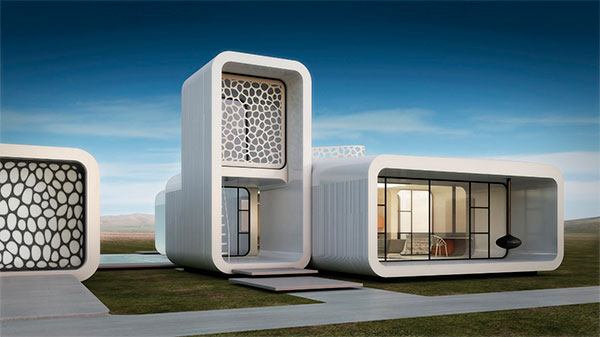
Wanaho 3d printer
Wanhao Duplicator i3 Review 2022
3.7
See Price
3D printing can be an expensive hobby to get into. Despite the proliferation of open source and low-cost printers, it’s often difficult to find one that’s actually worth your time. Of course, all the technical specs and jargon don’t help.
In this article, we’ll attempt to demystify the Wanhao Duplicator i3. There are several variants of this printer, but we’ll be focusing on the V2 since that’s the most up-to-date version. So is it worth the price? You’ll have to read on to find out.
| Filament Diameter | 1.75mm |
| Extruders | 1 |
| Supported Materials | PLA, ABS, PVA, PEVA, HIPS |
| Connectivity | USB, SD Card |
| Printing Speed | 30-60mm per minute |
| Build Volume | 200 x 200 x 400mm |
Table of ContentsShow
Design
Unlike many other budget-friendly 3D printers, the Duplicator i3 V2 boasts an open design that allows you to create bigger structures with ease. It comes in several separate pieces, but all you have to do is screw them together and configure the bed level. In total, the whole process takes less than 30 minutes.
The frame itself is made from hardened steel, and both the extruder and base are capable of moving independently of one another. You’ll interact with the printer either via dedicated software on your computer or with the gcode-based microcontroller that sits at the side. Evidently, this isn’t as easy to use, but it’s fine for making small changes to the positioning.
View post on imgur.com
This printer supports both 110V and 220V inputs, but you’ll have to make sure you flip the switch into the right position before plugging it in. If you live in an area with a different outlet voltage, make sure to use a step-down or step-up converter in conjunction with this product.
Printing
As you might expect from a budget printer, there’s just one extruder. This can be removed and swapped out if you’d like to use wood or carbon-fiber filaments. The V2 actually supports a decent range of materials, though: you can choose between PLA, ABS, PVA, PEVA, or HIPS.
Using these materials, you can create supporting structures for more convoluted prints, although with a single extruder, it will take a bit longer. Still, for a low-cost model, that’s not half bad!
Generally, prints come out looking pretty good. That said, they’re not ideal: even at the lowest setting (0.10mm), layers are easily distinguishable. The good news is that it handles overhangs well, with very little distortion even on fairly intricate models.
Features
Wanhao has really tried to make using this product as simple as possible. They’ve addressed customer feedback and made some small but important changes including using thumb screws instead of wingnuts on the base, including a leveling card, rounding off the edges of the bed itself.
There’s no way to automatically level the bed, but they do include a small instruction leaflet that walks you through the process.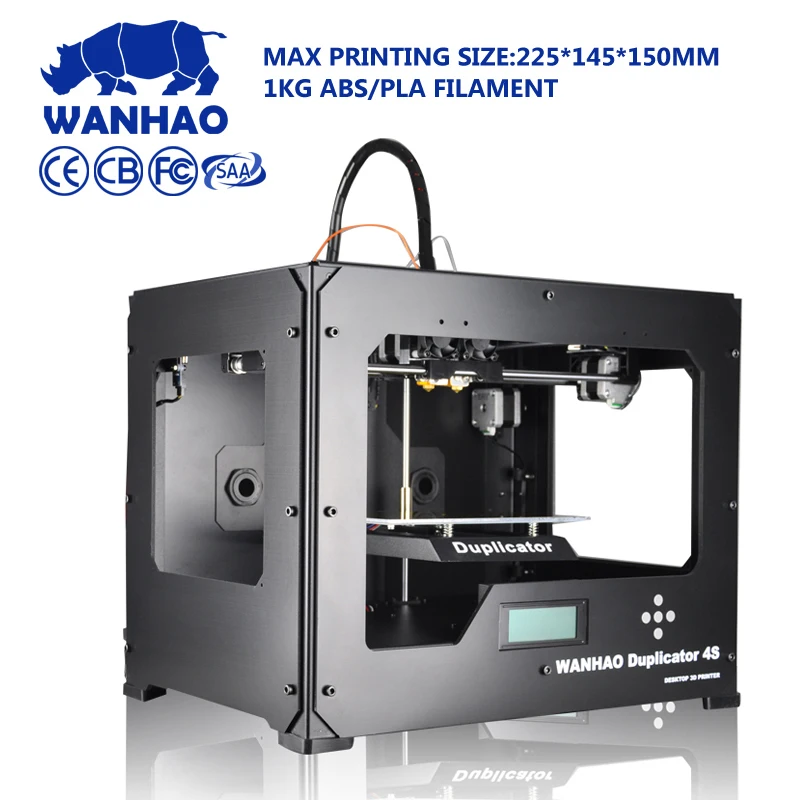 The heating plate can range from 40-60°C, which is fairly low, but fewer options mean less confusion for novice users, so it’s not a deal breaker unless you’re planning to use this printer commercially.
Both USB and SD card connectivity is included, although this printer isn’t WiFi or LAN compatible. A basic SD card is included in the box, as is a small sample roll of filament, some Buildtak, and a scraper.
Cost
The Wanhao Duplicator i3 V2 retails for around $450, which is around half the price of some more popular models. Of course, for this price, you can’t expect the world on a plate – there are a couple of minor issues you’ll have to put up with, such as the bed leveling and single extruder.
The good news is that you don’t have to fork out for software. This printer comes with a customized version of Cura for Windows devices. Their website also offers a version for MacOS, but unfortunately, there’s no Linux support at this time. The product manual can also be downloaded from the site.
Since this product is open, it’s easy to remove and clean various components, which keeps the overall maintenance and replacement costs very low. Consider how often you’ll be printing – if it’s a lot, your filament costs will, of course, be higher than if you only print occasionally.
Support
Wanhao’s website offers several tutorials and troubleshooting information for the i3 V2, and although they’re often written in broken English, it’s still easy enough to follow along thanks to the numerous photographs used. There are also a couple of helpful videos available so you can follow along in real time.
Now, while Wanhao encourages its customers to improve and upgrade their printer, they say very clearly that mishandling or modifying it will void the warranty. This warranty lasts for three months and while returns aren’t accepted, the team will always try to help you fix any issues you experience.
Customer support is available via email, over the phone, or through a Google Group. As ever, we’d advise you to use email where possible so that you have an undeletable record of any communication with the company.
Summary
The Wanhao Duplicator i3 V2 is an excellent choice for people looking to break into the world of 3D printing. It offers a good degree of flexibility without overwhelming the user with options, and as a bonus, it’s priced so as to be affordable for most people.
The warranty and support options leave a little to be desired, and the website itself can be confusing since it’s clear the designer wasn’t an English speaker, but if you can push past these problems, you’ll find the V2 a solid, dependable printer that allows you the freedom to do whatever you want.
Read our review on the Wanhao Duplicator 7. This 3D printer might be the one what you’re looking for.
Wanhao Duplicator D12/230 Review: Dual-Color With Single Nozzle
Dual-color printing with a single nozzle. This is what the Wanhao Duplicator D12/230 promises to do, for an attractive price.
I never tested a printer which uses a single nozzle to print dual-color. Mostly because I always thought that the wasted filament from the purge towers is too high for my liking, but let’s give it a chance and see how the Wanhao Duplicator D12/230 performs. Is it a good dual-color budget 3D printer?
Wanhao Duplicator D12/230 Shipping and Packaging
The Wanhao Duplicator D12/230 comes in a cardboard box with ample protection on all sides. A nice feature of the box is the inclusion of plastic inserts for handles that make manipulating the box a bit easier.
Inside the box, everything is well protected and I’m sure the contents of the package will arrive safely.
Assembly of the Wanhao Duplicator D12/230
Assembling the Wanhao Duplicator D12/230 takes around 30 minutes. the printer is partially assembled, but besides attaching the gantry to the base, you also need to install the extruders, spool holders and print head.
All the steps are nicely described in the manual, and every component is carefully labeled making the assembly process effortless.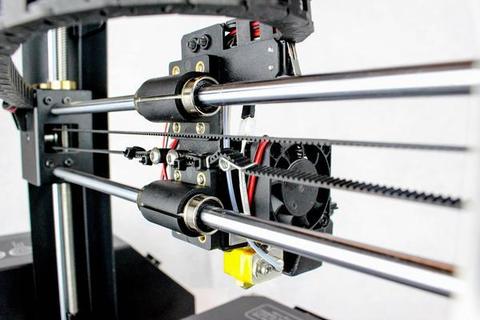 I really like the attention to detail for this matter.
Wanhao Duplicator D12/230 Design
When assembled, the Duplicator D12/230 looks great, and the spool holders in the back make it look like a race car with huge spoilers. There’s also a small drawback to this setup – you need more space on the Y axis to fit the printer on your workbench.
The empty space on the left side of the screen is not used, and I feel like Wanhao missed the opportunity of installing a small drawer like the Creality CR-6 SE, but I’m sure somebody will design something like that soon.
I also like the silver color which is a breath of fresh air in a world of mostly black 3D printers.
Wanhao Duplicator D12/230 Specs
Hotend with dual filament inputs
The hotend asembly is quite interesting. The whole unit is contained with a plastic cover to keep things tidy. The hotend is PTFE lined with a big heatsink to keep it cool by the 3010 fan.
Next to the hotend, there’s a small breakout board which conects everything together with the RJ45 cable.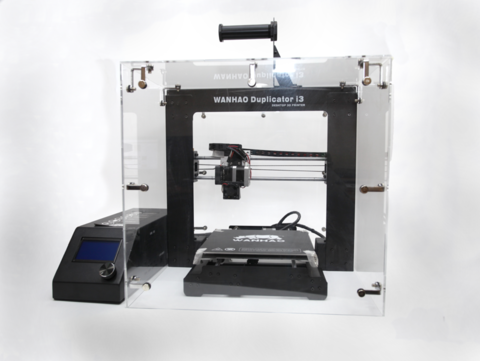
Part cooling is done using a radial fain and the airduct is mounted with a screw on the side. This also has a small cover to keep the nozzle clean.
Besides that, the hotend is wrapped with a fiberglass sheet and kapton tape to insulate it.
Connection from the board to the printhead is made using a customized RJ45 cable which locks in place with two thumbscrews. Having this extra way of securing the cable is a welcome addition because it improves the rigidity of the connector and acts like a strain relief for the wires.
There’s also a section on the side where you can attach a BLTouch.
Dual BMG Extruder clone setup
The Wanhao Duplicator D12/230 comes with a pair of clone BMG extruders. These extruders are not the best quality, but they work just fine, and they are probably better than the titan extruders they used a while ago.
They are made from plastic, and the machining on the gears leaves a bit to be desired (compared to other popular clones, or the original) but as long as it works, I don’t even mind this.
I’ve noticed that some early models use dual Titan extruder clones, but it seems that Wanhao replaced them with BMG extruders. Hopefully, all the future machines will come with BMGs.
Dual filament sensors
With dual extruders, it’s only fair to also have a pair of filament sensors. They are mounted on the spool holders and when filament is running out, the print will be paused.
The filament doesn’t move as smooth as I would like trough them, but I can’t say they interfere with the printer functionality to cause under extrusion. The BMG extruders have enough pulling power to overcome the small friction.
32-bit MKS Robin Nano Board and Wi-Fi
A MKS Robin Nano 1.2 board is the brains of the Wanhao Duplicator D12/230. It’s a 32-bit board which we’ve seen on other printers like the Bluer Plus and Sapphire Plus from Two Trees.
On the D12/230, the board uses two TMC2209 stepper drivers for the X and Y axis, and three A4988 drivers for the Z axis and extruders. These drivers are a bit louder than the TMC drivers, but they only make their presence noticed when switching the filament.
It’s a bit of a shame that Wanhao didn’t use TMC drivers for all stepper motors, because this would make the printer quieter and the cost wouldn’t be much higher. Fortunately, they can be swapped if needed.
The Wi-Fi modules comes pre-installed and it allows you to send prints remotely to the printer, if you use Cura. Unfortunately, I was not able to test this feature because I’m not a Cura fan and I also know that the print speeds are not that fast.
What I can say is that I was able to connect to Wi-Fi easily using the screen interface.
5 inch MKS Touchscreen
The touchscreen is nothing new. If you’ve used a MKS screen in the past, then you know what to expect. On the D12/230, the touchscreen interface has the old MKS theme which is customized by Wanhao for this type of printer.
The screen is nice and responsive, but please keep in mind that if you operate it while a print is running, you can cause small pauses during printing which will show up on your models. This is because the screen and the board share the same CPU, and it’s a common issue for the MKS Robin Nano 1.2.
Magnetic flex plate print surface
Having a removable magnetic flex plate as a print surface is starting to become the norm in the last few months, and the Wanhao Duplicator D12/230 makes no exception.
The print surface has good adhesion even though it’s not covered with the popular PEI surface like on other printers.
In the back of the heated bed, there are three metal brackets which help when you install the magnetic plate back on the printer.
Belt tensioning knobs for X and Y axis
Of course, belt tensioners are present on both X and Y axis, with easy to use knobs. Most of the printers nowadays come with belt tensioning systems, so this is not a specific feature for the D12/230.
Fanless W power supply
One of the reasons why this Duplicator D12/230 is so quiet is the inclusion of a fanless power supply. Most of the times, the power supply for any 3D printer is under high load only when heating up.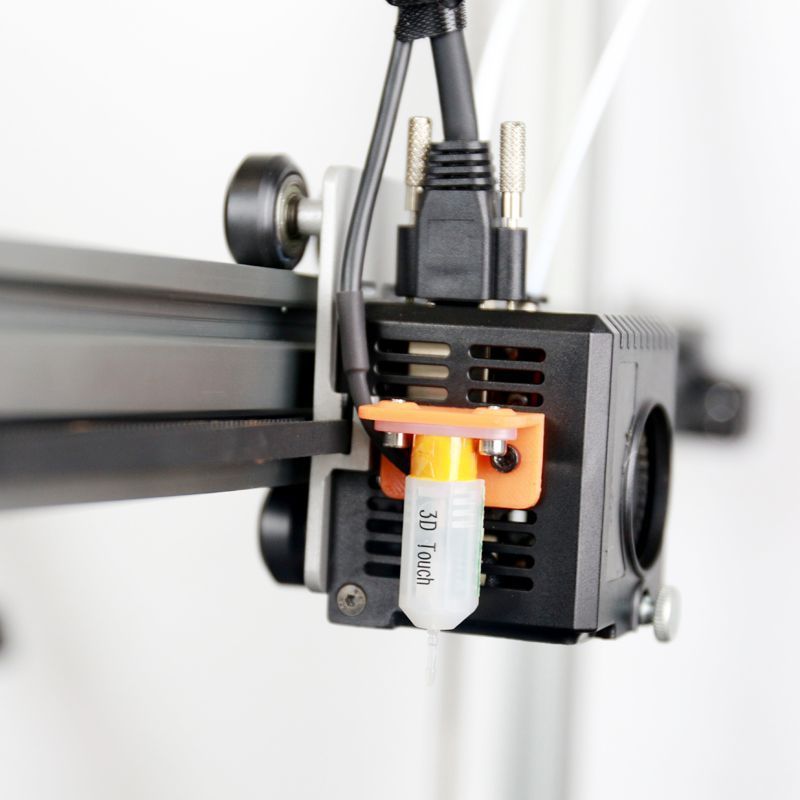 After it starts printing, the power requirements are not that high so not much ventilation is needed.
Heating time and power consumption
I tested the heating time for both hotend and heat bed and here are the results:
Hotend
- 200C in 1 minutes and 40 seconds
- 250C in 2 minutes and 20 seconds
Heatbed
- 60C in 5 minutes
- 95C in 15 minutes
The heating time is longer than most of the printers, but this is probably set up this way to avoid overheating the fanless power supply. The Wanhao D12 230 was unable to reach 100C.
Power Draw
Idle power draw is around 12W. When the hotend and heatbed are heating up, the Duplicator D12/230 draws around 175W. After it starts printing, the power draw stabilizes to around 120W.
All these measurements were taken with a Blitzwolf smart power socket which indicates the power draw, and it can also be used for remotely powering on and off the printer.
Bed Temperature Uniformity
I tested the temperature uniformity for the Wanhao D12/230 bed with the Flir Camera installed on the CAT S62 Pro. The bed has been set to 60C and I waited 2 minutes after reaching that temperature for the temperature to stabilize.
The temperature is mostly uniform across the surface with minor differences in the corners.
An interesting thing I noticed is the real temperature of the bed. While the bed temperature is set to 60C, the top surface reaches ~70C. This is somewhat similar to what I encountered with the Two Trees Bluer Plus.
Wanhao Duplicator D12/230 Noise Levels
I’m quite impressed by how silent the Duplicator D12/230 is when idle, and when printing it’s still quiet enough, but it gets noisy when the printer performs a filament change and during retractions. This is caused by the noisy stepper drivers used for the extruders.
IdeaMaker profiles for Wanhao Duplicator D12/230
During my time with the printer, I also tuned three IdeaMaker profiles for the Bluer Plus using the tools available in the 3D Printer Calibration Guide using IdeaMaker article. These profiles are tuned for the stock printer and worked well for me. Feel free to give them a go.
Wanhao D12/230 IdeaMaker Profile – PLA – 3DPrintBeginner
Test prints on Wanhao Duplicator D12/230
Z wobble test
Tony Tony Chopper
Usually, my fist print on any 3D printer is a 3D Benchy, but this time I chose to print the included model from the SD card.
This model took around 34 hours to print, which is quite a lot considering the size. Most of the print time is caused by the constant filament changes which need to be performed after each layer.
As you can see, the purge block is 20 grams heavier, and to print the model, I used ~136 grams and more than half of that will be discarded.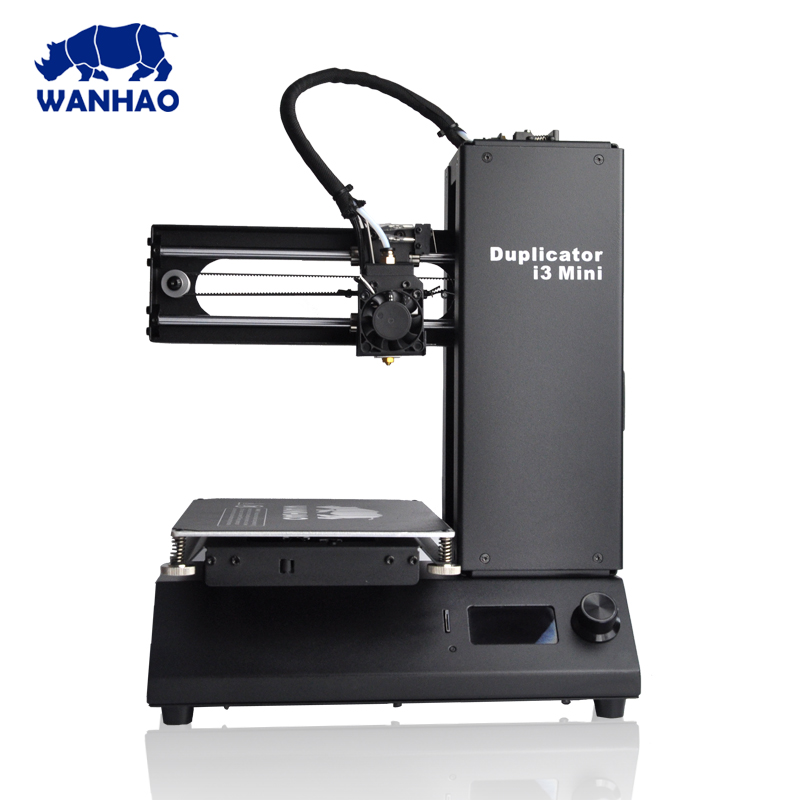 I’m not really a fan of this wasted material.
Stegosaurus
For the Stegosaurus, I used a 30×30 mm purge tower, but with 20 mm3 of purged material. This caused the color separation to be a bit worse.
As you can see, the purge tower is a 3rd compared to the weight of the model.
- Material: Devil Design Azure Green PLA and Raise3D White PLA
- Layer Height: 0.15mm
- Nozzle Temperature: 215C
- Bed Temperature: 50C
- Print Speed: 50 mm/s
Chipmunk
After tuning the purge, a bit better (by increasing the purge amount to 50 mm3 and size to 40x40mm) I finally managed to print a great dual-color model. This chipmunk failed close to the end, so I needed to print the rest and glue it together, but overall, the print is great.
The purge tower weight is half of the model, so not too bad.
- Material: FilamentOne Glint Gold PLA and Raise3D White PLA
- Layer Height: 0.
 15mm
15mm - Nozzle Temperature: 215C
- Bed Temperature: 50C
- Print Speed: 50 mm/s
Diamond Hands
I also printed a single-color model, in silk filament. Print quality is good, but there are still small imperfections caused by the supports. This can be further tweaked for better finish, but still happy with the print quality
- Material: SUNLU Silk Copper PLA
- Layer Height: 0.12mm
- Nozzle Temperature: 215C
- Bed Temperature: 50C
- Print Speed: 50 mm/s
Princess Leia
Finally, I printed Princess Leia in Glint filament and the print quality is excellent. I also used some angled supports in Ideamaker to save a bit of filament.
- Material: FilamentOne Glint Red PLA
- Layer Height: 0.12mm
- Nozzle Temperature: 215C
- Bed Temperature: 50C
- Print Speed: 50 mm/s
Conclusions: Is the Wanhao Duplicator D12/230 worth it?
I kind of like the Wanhao Duplicator D12/230. It’s a complete printer which is great for beginners because it comes mostly pre-assembled, and the required assembly process is well documented. It’s noticeable that Wanhao takes more care when it comes to quality control and documentation compared to other manufacturers which is nice to see.
With a properly calibrated profile, the print quality is good and consistent, but it’s not foolproof. I had two somewhat failed prints but the good part is that I was able to fix them without too much trouble.
I would recommend getting the Wanhao Duplicator D12/230 if you are 100% that you will use the dual-color feature quite often. Without it, the printer is not much different from a regular printer.
For around 250$, the D12/230 is an attractive solution if you are looking to get a dual-color printer which prints well in both scenarios. But a new wave of lower cost printers will show up in the next few months, and the D12/230 might become a harder purchase at this price.
Where to buy the Wanhao Duplicator D12/230?
The Wanhao Duplicator D12/230 can be purchased from the following websites:
AliExpress
Wanhao
The Wanhao Duplicator D12/230 was provided free of charge by Wanhao for the purpose of this review.
While the article includes affiliate links, all opinions are my own. Nobody reviewed the article before it was posted, following the Review Guidelines.
Liked it?Consider supporting 3DPrintBeginner if this content helped. You can also join Patreon for exclusive perks! |
Wanhao Duplicator 7 v 1.5 3D printer
Out of production
Add to comparison
Product added to comparison Go
Free shipping within Russia
Official distributor
We work directly with manufacturers.
Any form of payment
The opportunity to see the 3D printer in action in our demo room.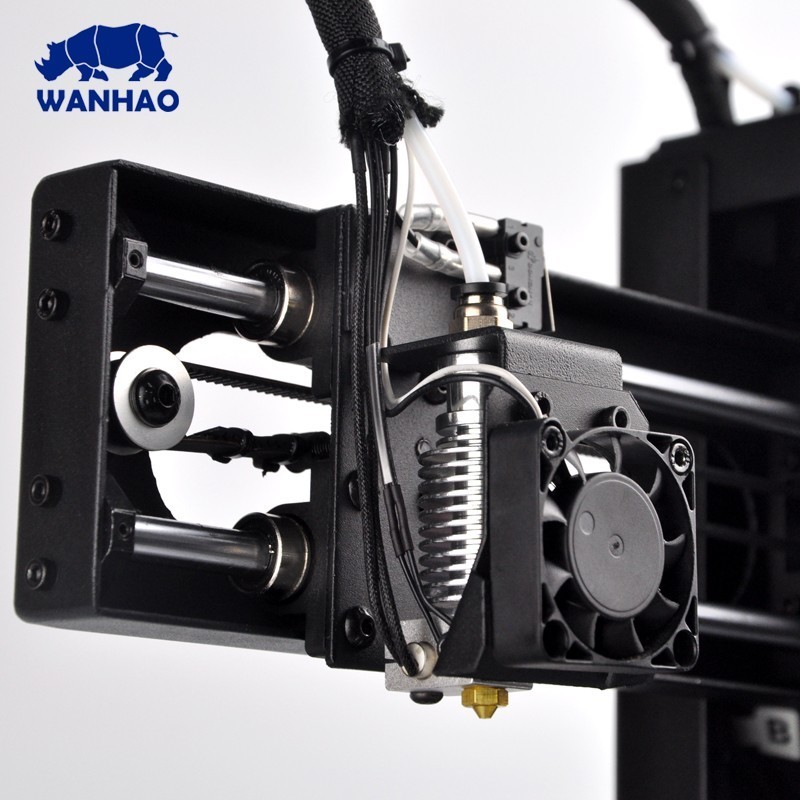
Own warranty service
Warranty and post-warranty service for equipment purchased from us.
Permanent 10% discount on consumables
When you buy a 3D printer from us,
you get a 10% discount on all consumables.
Wanhao D7 1.5 is a budget photopolymer 3D printer that prints using LED / DLP technology.
Instead of traditional 3D printer plastic, he uses photopolymer resins that harden when exposed to ultraviolet radiation. The product is formed in layers: first, one layer of photopolymer hardens, then a new layer is projected over it, which also hardens under ultraviolet light. The advantage of such a technological approach over SLA is that it is much cheaper for the end user with a comparable quality of manufactured samples. At the same time, Duplicator 7 v 1. 5 is not a DLP printer in its classical form. To illuminate the material, a liquid crystal screen is used here, which further reduces the cost of this 3D printer and makes it affordable for the masses.
Important!
To connect the Wanhao Duplicator 7, you will need a video card with two HDMI outputs. When connected, the 3D printer is defined as a "second monitor". Additionally, you need to connect the printer via USB. Next, the slicer is launched.
The new version 1.5 received a number of upgrades compared to the previous one:
1. The surface of the print platform was again made of aluminum (without applying special black paint). Models made from most known photopolymers adhere much better to an aluminum surface.
2. Version 1.5 adopts dual guide system, greatly reducing wobble. The centrally positioned trapezoid screw provides better fixation of the mount in the Z-axis and helps to achieve perfect printing results.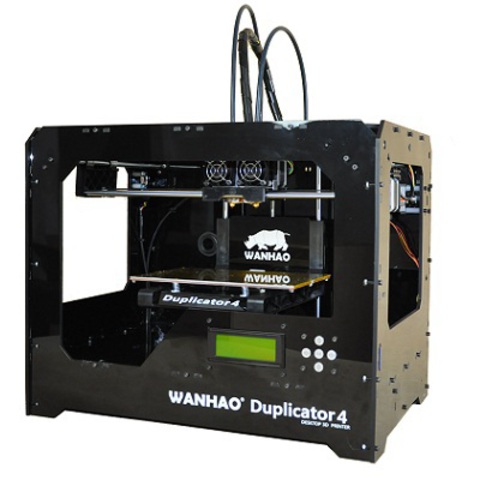
3. All-aluminum Z-axis block contributes to better mechanical strength and stable operation of linear guides.
4. Improved Z-zero control system ensures high stop accuracy and better protection of the LCD display.
5. The stop line in Wanhao D7 version 1.5 ensures 100% smooth movement of the platform along the Z axis without any tilt.
The new design allows the print surface to be set absolutely level with respect to the LCD display, without any tilt.
6. In version 1.5, the anti-wobble system is more securely mounted on top, which guarantees a reduction in wobble problems.
At a relatively low cost, this 3D printer provides print quality sufficient to implement detailed models with complex geometry. These can be prototypes of various details, figurines and even jewelry. The minimum layer thickness in the case of the new version of Wanhao Duplicator 7 is only 35 microns, which ensures the highest printing accuracy.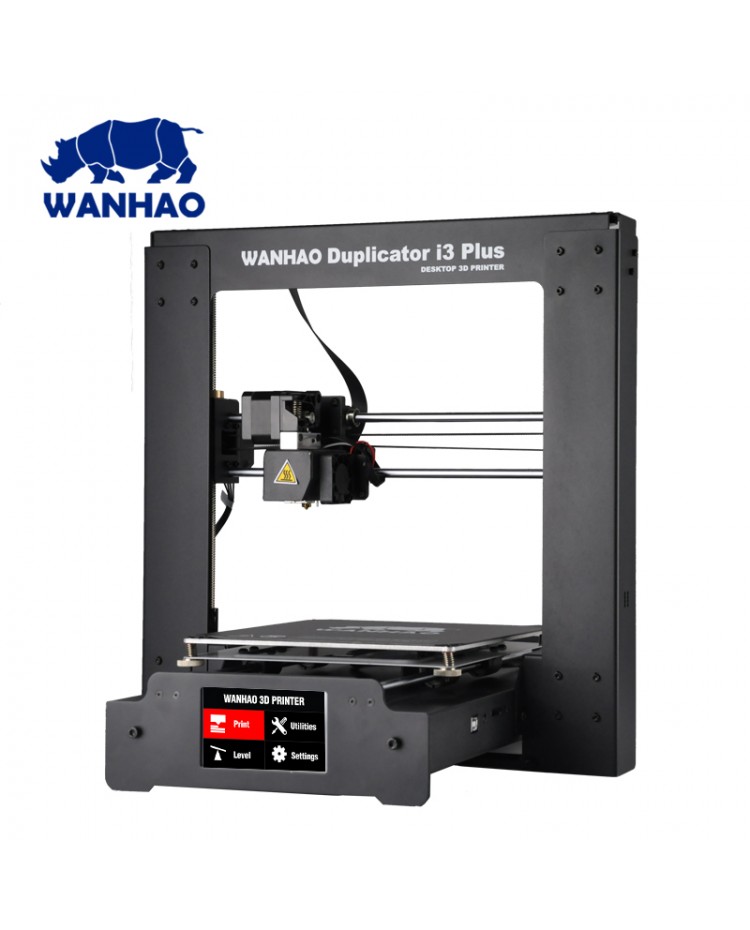 If the priority is high print speed, then it can be increased due to some loss in accuracy. Depending on the type of photopolymer and the settings of the 3D printer, the models produced can be either solid or have rubber properties.
| Wanhao Duplicator 7 3D Printer | 1 PC |
| Mains power cord | 1 PC |
| HDMI cable | 1 PC |
| USB cable | 1 PC |
| work table | 1 PC |
| Spare film for the bath | 1 PC |
| Printed bath | 1 PC |
| Photopolymer (250 ml.) | 1 PC |
| Gloves | Two pairs |
| Putty knife | 1 PC |
| Screwdriver | 1 PC |
| Jar for washing models | 1 PC |
| Mounting screw set | 1 PC |
| Manual in Russian in electronic form | 1 PC |
| Warranty card | 1 PC |
Elizabeth
04/13/2019
This is a very beautiful outwardly printer
Andrey
11/22/2018
Simple and compact printer for home use. I ordered delivery in the store, I live in Moscow, delivery was free. After the first seals, I realized that something was not right, since it was stated that he did not print at all. Sent in for repair under warranty. Moreover, the store has a service for exporting goods for repairs, which is very convenient for busy people. In fact, it turned out that the printer had a defective matrix, the case was recognized as a warranty, and they changed the matrix for me and tested it. The repair took a week, after which it was brought back to me. I made a control print with test models (calibration, see one of them in the photo with a layer of 50 microns). I am satisfied with the print quality. I am a modeler and I print for my own needs. Unfortunately, due to the fact that from the very beginning it was broken in 3 weeks, only test models were printed. And now I'm just putting it into production. I am satisfied with the store's service, as I was provided not only with qualified technical support, but also with support in terms of printing advice, since before that I had printed only on FDM printers.
 In terms of setting up, assembling the printer, preparing for printing, it is very simple, the settings allow you to print directly from the standard settings and get a quality part. The only downside is that your computer will be busy, it does not print from a USB flash drive, but for me this is not a problem, because I always printed like that. I am satisfied with the purchase. I leave the obvious marriage of the Wanhao manufacturer company on their conscience. And I express my gratitude to the team of the Tsvetnoy Mir for the service provided.
Delivery scale
Delivery to all regions of Russia and countries of the Customs Union.
Free shipping
When you buy a 3D printer (except assembly kits) you get free shipping.
Cash
In our store you can pay for your order in cash.
Online payment on the website
You can pay for orders with a bank card on the website of our online store.
Unpacking and setting up the Wanhao Duplicator i3 3D printer
Wanhao's Duplicator i3 3D printer is by far the most popular 3D printer in Russia and Europe. Due to the simplicity of design, low price and high print quality, the Duplicator i3 will impress any user. The Duplicator i3 3D printer is already widely used in various fields and solves many 3D printing tasks, from simple home to complex engineering.
In this article, we will show you how to properly unpack, assemble and set up the Duplicator i3 3D printer for the first test print.
Unpacking and assembly. |
Instructions for setting up, calibrating and test printing. |
1 . Safety Information
1.1 Caution: The Duplicator i3 generates high temperatures and includes moving parts that can cause injury. Do not touch the printer platform and print head (extruder) of the Duplicator i3 while it is in use. Stop printing and allow the platform and extruder to cool down.
The Duplicator i3 is sensitive to ESD. Make sure you are free of static electricity by touching a grounded object before using the Duplicator i3 or attempting to make any changes. When opening the Duplicator i3 for service, make sure the power is off and the cord is unplugged.
2. Setting up
The spools of thread are mounted on the spool holders. Now you can connect the power supply.
When you're done, turn on the power button on the back of the Duplicator i3. If the output air flow is too strong, you should contact technical support at [email protected]
When you turn on the Duplicator i3, you should see the Wanhao logo on the LCD screen and the initial temperature settings. As a rule, at the first start, the ambient temperature is displayed on the screen.
There is a control joystick near the LCD screen. Rotate and press it to navigate and select.
The next step in this manual is to help you level the bed, load the filament, and run a test print.
Follow the instructions below to set up your Duplicator i3 for the first time! And remember, if anything goes wrong, or if anything happens differently than what's in this manual, unplug the printer and contact us.
Attention! Before proceeding with the next step, remove all shipping labels from the platform and from the level sensors.
3. Platform Leveling
3.1 Pay special attention: Correctly leveled platform affects print quality! First of all, go to menu function "Quick setup" - "Home All". The extruder should move to the bottom left of the printer.
Attention! When setting up for the first time, be sure to watch the extruder move, if the extruder nozzle presses on the platform, be sure to turn off the printer, check if the transport stickers on the extruder height level sensor are removed, then lower the edge of the platform according to the note described below.
Go to function Quick Setup --- "Disable stepper" . Now there is no power on each motor. Thus, you can move the extruder freely in the X-axis. The print bed can also move freely in the Y-axis. Manually move the extruder to different positions above the print platform while adjusting the distance between the extruder nozzle and platform with adjustment screws and a sheet of paper placed between the platform and nozzle.
Note:
To level the build platform, you need to install the four adjustment screws that are under the print platform. Loosen these four adjustment screws and raise the work platform.
• Tightening the adjusting screws [turning them to the right] moves the build platform away from the extruder nozzle.
• Loosening the adjusting screws [by turning them to the left] moves the build platform towards the extruder nozzle.
• The distance between the extruder nozzle and the work platform must be suitable for the thickness of the A4 paper. For successful operation, this thickness should be about 0.12 mm.
The following is a diagram of how to correctly calculate the distance between the nozzle and the platform.
Duplicator i3 nozzle height is now normal.
If your platform is set too low, the print may not adhere to the surface, if it is too high, it will damage the platform coating and nozzle. These cases are out of warranty If you have problems, or if you just need to re-level your platform, you can always return to the chapter on assembling the working platform.
4. Loading the filament
4.1 The first step in loading the filament is to trim the end of the filament so that it is as sharp as possible. Then go to function "Quick setting" - "Filament preheat" depending on your material type PLA or ABS. The printer will start heating the extruder to the set temperature.
4.3 At this time, insert the filament into the hole all the way to the end of the extruder. Then release the lever and you can feel the filament being tightly gripped by the extruder.
Turn the control joystick clockwise to load the filament.
Make sure the filament is loaded from the top of the spool so you don't get any jams while printing. After you have skipped the thread, release the Control Joystick. The machine will stop extrusion.
IMPORTANT NOTE
Wait a few minutes after heating starts. Be careful not to touch the bottom of the Stepped Extruder while it is heating up - it heats up to 220°C, which is too hot and could cause burns!
After the nozzle has reached the correct temperature, you can load the filament.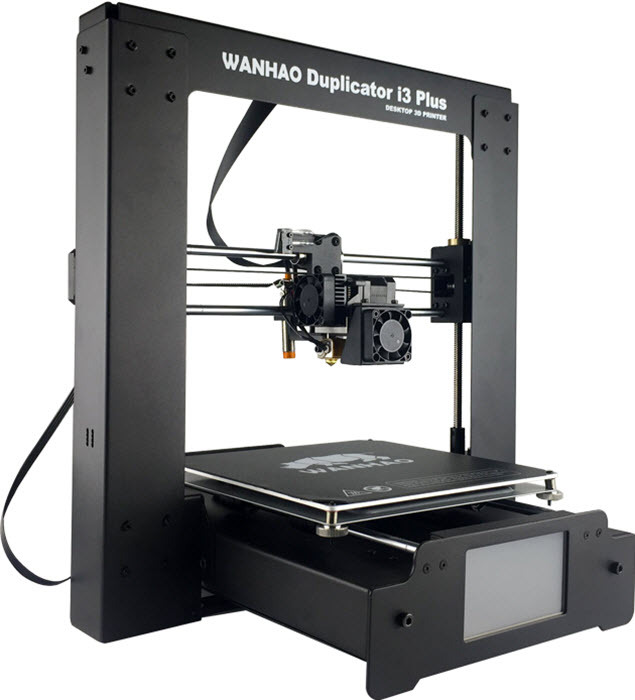 You will need to apply some force, but as long as you only hold the thread, you will not damage the Duplicator i3.
Maintain tension on the thread, release the spring lever and after a few moments you should feel the motor tighten the thread. You will see a small amount of plastic begin to come out of the nozzle. After that, release the control joystick. Don't be surprised if you don't see the color you expect - there may be some plastic left inside the extruder from the testing process.
After the Duplicator i3 has finished extrusion, wait a few seconds for the extruded plastic to cool before pulling it out. You can dispose of it with your regular trash, or recycle if your recycling system can process PLA or ABS filament. Do not leave plastic on the extruder nozzle - if plastic remains on the nozzle, the newly extruded plastic may stick to the nozzle instead of the print bed.
5. Your first print
5.