Mk2 3d printer
Prusa i3 MK2 Review 2022
We review the very popular Prusa i3 MK2 3D printer. So does this 3D printer live up to the hype or is it all for nothing? The answer might surprise you!
By Justin Evans
4.5
See Price
Today, we’re going to review a 3D printer that’s often imitated yet never surpassed. We’re talking, of course, about the Prusa i3 MK2. Now, before we begin, you should be aware that Prusa’s website is the only legitimate vendor of this product so don’t buy it from any other marketplace.
Is this an entry-level printer? In some ways, yes, but the price tag (around $600) would suggest otherwise. That’s pretty pricey, and the unit doesn’t even come assembled, although a pre-built version is available for an extra $200. So what makes this 3D printer so highly recommended?
But before we continue, now is probably the time to tell you that we were only joking with the title. This 3D printer is worth your money!
Table of ContentsShow
A Host Of Advanced Features
Simply, the i3 MK2 takes the hassle out of setting up a print. It comes with a heated bed and cold corner compensation, but what does this mean? Basically, filament tends to stick to cold surfaces and this feature ensures the bed remains at a constant temperature all over. That’s not bad, but there’s more.
Before you can even begin printing, you have to calibrate the nozzle. This model comes with automatic calibration tools, saving you a lot of time. Even if it’s not quite perfect, you can fine tune things like the Z-step distance to get it exactly right.
Most other 3D printers require lots of manual tweaking to get the print surface completely flat but this one actually does it for you. It even has an open build area that’s larger than most, with 10,500cm3 of space to play with.
Technical Specifications
The Prusa i3 MK2 features a built-in LCD display and SD card, controller. An 8GB SD card is also included to get you started but if you’re a heavy user, you’ll likely want to upgrade this in the future. It also uses cutting edge modern technology to stay as quiet as possible during the printing process – usually around 50dB, which is comparable to the noise from moderate rainfall.
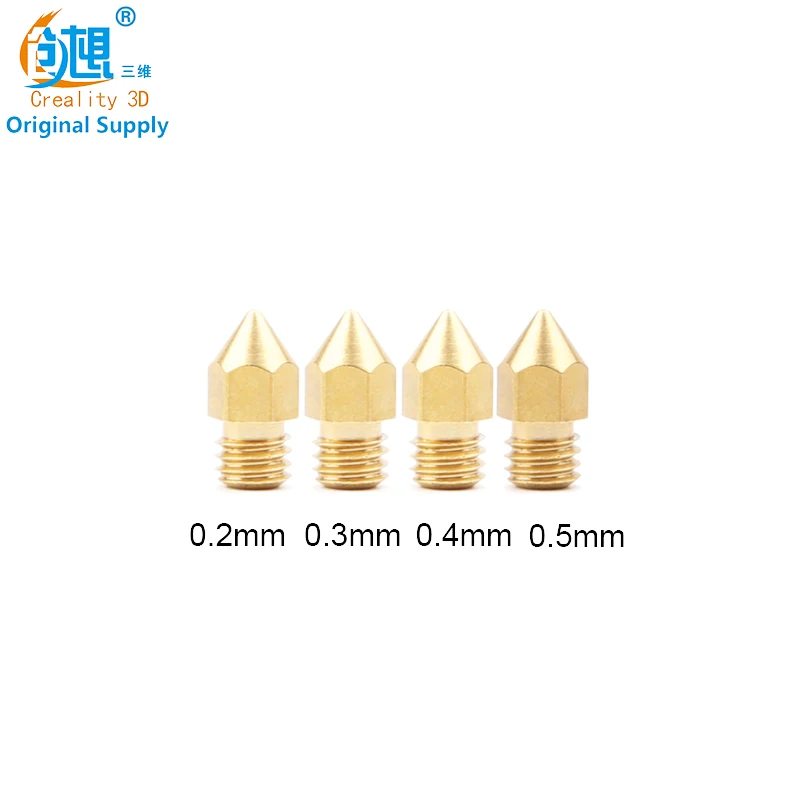
Because this printer is open source, you can use whatever hardware or software you like. A 0.4mm nozzle is included but can be changed out. This is suitable for standard 1.75mm filament – speaking of which, you’re spoiled for choice here.
The MK2 can print with the usual suspects: PLA, ABS, and PET, but also supports HIPS, Flex PP, Ninjaflex, Laywood, Laybrick, nylon, Bamboofill, Bronzefill, ASA, T-Glase, carbon fiber, and polycarbonate filaments. That’s outstandingly versatile, even for a printer of this price. A single 2lb spool of silver PLA is included so you can get started as soon as possible.
Having Trouble?
We’ve all seen them: instructions that look like they’ve been translated into Chinese and back. They’re almost useless and unfortunately, all too common. In contrast, Prusa provides a thick instruction booklet with illustrated, concise directions on how to set up and configure your new 3D printer.
Even if you find yourself struggling, you can make use of their 24/7 customer service. Buyers have the option to call, email, or use the live chat to contact someone qualified to help out. The only challenge is that if you don’t buy the pre-built version, your warranty only covers individual parts, not the unit as a whole.
Conclusion
All in all, the Prusa i3 MK2 is an excellent choice for anyone looking to get into 3D printing. Yes, it has a higher upfront cost than some other 3D printers, but the time it will save you during setup and before printing is incalculable. Plus, with such a vast array of supported materials, you have unlimited potential for growth.
Zcorp 3D Printer Review
Original Prusa i3 MK2 release!
Hi guys, I wrote about our growth couple of months ago and it has been almost 9 months since we switched to 1. 75mm. It’s about time for a new release, right?! I am very happy that we proved people want to use quality parts. What is the point of buying the cheapest kit when you eventually end up upgrading all the components? I had plenty of time and a few thousands printers to collect all the feedback on the already awesome Original i3 so I decided to push it even further and create the ultimate i3 design. So let’s take a look at the brand new Original Prusa i3 MK2 3D printer!
Original Prusa i3 MK2
New features:
- New HeatBed MK42!
- Hassle free PEI print surface
- Integrated leadscrew Z axis
- Full mesh bed auto leveling
- Improved construction
- Faster printing and more materials with E3D V6Full
- Improved firmware and printer self test
- Slicer support including Windows 10
New HeatBed MK42!
Why is it special? Everything in this release is tied to it. First, I finally got to finish my idea of compensating for cold corners. We took our thermal cam and iterated over couple of months until we got the best heat distribution. The problem with normal heated beds is the temperature difference. For example if you measure the center against the corners of the glass plane that most people print on, you will see roughly 15°C difference. This can play a big role in printing materials tending to warp. My final design uses three power zones where the corners heat couple °C more than the center to form warm air shield at the edges of the print bed. This is a game changer in printing of bigger parts!
Heat distribution MK2B vs MK42
You might ask why I called it MK42? 42 is the answer to the Ultimate Question of Life, the Universe, and Everything including heated beds 😉 This number is also very close to the amount of prototypes we had made until everything was right!
Prusa i3 MK2 Heatbed MK42 with PEI film
Hassle free PEI print surface
We ditched the glass. Glass is a great insulator which can sometimes prevent the heated bed from doing it’s job – heating up the object to prevent warping. Only reason to use glass was to get a flat surface. No material sticks to it on its own and that means you have to put something on the surface. Usually messy glue and ABS Juice. We needed an alternative! We experimented with velvet polycarbonate film (BuildTak) which was no good. It is very easy to damage the thing and fuse object to it permanently. Kapton made a comeback on some printers so we decided to test it too, but it is still too easy to tear and degrades over time. Painters tape is only good for PLA and we needed something for all the materials. Later we found Ultem PEI which proved to be almost indestructible! You can crash fully heated nozzle into the surface without damaging it. We even laminate it directly on top of the heater traces. This way the heat transfer from the bed to the object is pretty much as good as it gets! Heatbed substrate is also much thicker at 3mm, which insulates the bottom side.
 These changes allow for the true edge to edge printing.
Ultem PEI goodness
This also led to a possibility of ditching few more annoying things: binder clips, glue and ABS juice. The bed is completely hassle free for printing PLA, ABS, PET, FLEX and many more.
Oh and one more thing, it is 31% larger at 250x210x200 mm and fits into the same frame! That’s a bigger volume than Ultimaker 2+ and Zortrax M200!
Prototype Prusa i3 MK2 with full build volume print
Integrated leadscrew Z axis
You can see a lot of clones using trapezoidal threads for Z axis but they always have one big problem. Cheap, springy, spongy coupler which introduces wobble into the print. From my experience M5 threaded rod with flexible tube coupling works better. But there is one way to improve – ditch the coupling. We ended up having our custom motors manufactured with integrated trapezoidal lead screws. This means no coupling, no wobble and awesome layer alignment!
This way Z axis got also way faster and more wear resistant which leads to possibility of using Z Lift where the nozzle lifts up on travel moves and prevents scarring (leaving unpleasant mark on already finished layer, by dragging the nozzle on top of it).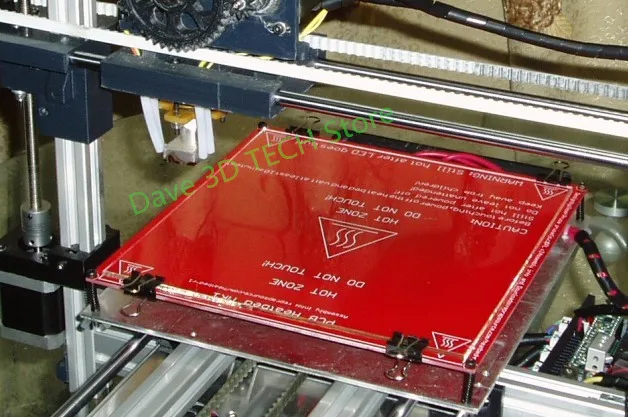 The i3 MK2 is an ideal platform for this as the extruder is quite small and won’t wobble compared to boxed printers which would have to quickly lower and raise a heavy print bed in Z axis to achieve something similar but not quite as the object moves the whole time as well causing further issues.
Prusa i3 MK2 Z stepper with integrated lead screw
A wear resistant Z axis is very important for one more reason, autocalibration!
Full mesh bed auto leveling
The feature our users wanted the most is autocalibration. This proved to be more difficult than we expected, just enabling the feature in Marlin does not cut it. The more points you probe, the more inaccurate the calibration got. Eventually we completely rewrote this part of Marlin. And we now not only compensate for the tilt of the heatbed but also even its slightest curvatures. We developed specialized 9 calibration points on the bed substrate to get great repeatability. As it turns out, you can’t just use induction probes on normal PCB heated beds. The printer then approximates 15×15 3D grid, basically 3D model of the bed tilt and curvature and uses it to compensate in Z axis. This way, you will always get perfect first layer and the heatbed can be completely bolted to the printer frame. Hassle free.
Prusa i3 MK2 probe on calibration mark
Improved construction
We improved the frame stability with connections between the main frame and Y axis without affecting the sexy i3 look 🙂
As I have already described, the bed is now completely bolted to the Y carriage with classic corner screws and two more in the center. This makes it easier to safely transport and ship the printer.
Electronics cover is completely reworked and gained an easy access door. Well, actually only one printed part remains the same as in the old release – y-idler 🙂
LCD cover has radically improved too, mainly to easily guide the SD card into the slot.
Prusa i3 MK2 enstop mount and RAMBo mini cover in the background
Faster printing and more materials
We upgraded the hotend from E3D V6Lite to E3D V6Full. This way we can push more plastic out faster which is very handy with the now increased build volume! Although we also had to improve the print cooling to be able to cool the extruded material in time. Temperature limit is increased to 300°C which allows us to print with few more advanced polymers like PC and more Nylon blends.
V6Lite had occasional problems with the longevity of the PTFE tube inside it, this is solved with V6Full. You get state of the art top of the line hotend.
Prusa i3 MK2 with E3DV6 in custom mount
Improved firmware and printer self test
We continue to improve our fork of Marlin to be usable by real humans.
Most notable new feature is printer self test. Printer is able to diagnose itself after you finish building it and guide you to fix the problems on it’s LCD! We never saw a 3D printer kit which is able to do that.
We added printer statistics counting the filament used and time elapsed. Both for actual print and also for the lifetime of the printer.
Prusa i3 MK2 self test in progress
Slicer support including Windows 10
We continue to extend the range of provided slicing software support.
We provide settings for Slic3r, Cura, Simplify3D, Kisslicer and latest addition for MK2 is a Windows 10 support! You can check this out at Microsoft booth at Makerfaire Bay Area 2016!
In Slic3r I created settings for more than 12 materials!
Upgradability
The best part is, if you own an older Original Prusa i3 with Rambo Mini you can upgrade to MK2 without buying the whole printer. We are extremely proud of this, to keep thousands of our users up to date with latest hardware and not forcing them to buy a new printer. And we can promise, MK2 will be upgradable in the future too!
What do you think about all the upgrades? Let us know 🙂
Once again, me and my team want to thank you for all the awesome feedback and all the 5 star reviews. Please keep sending us your projects, ideas and improvements. You are awesome 🙂
Original Prusa i3 MK2 kit is currently available for preorder for 699 USD (or 739 EUR with VAT) and will be shipping very soon…
Original Prusa i3 MK2
3D printer reviewSpecifications and features
Prusa i3 is an open source software and mechanical project. And the MK2 model gives us new interesting features.
The MK2 design is a tried and tested solution with a vertical center plate that is the base for the Z and X axes and M12 guide screws. This design allows for a working space of 250 mm wide, 210 mm deep and 200 mm high.
The model is printed on the heated table MK42. This solves most adhesion problems. This table has good rigidity, so you don’t have to invent a bicycle and install some kind of heat-resistant glass surface on top. In addition, the top of the printing table is covered with a thin PEI film. Thanks to this, fingerprints will not remain on it. The table heats up and cools down very quickly. If you're printing with PLA, the platen heats up at about the same speed as the extruder.
In addition, the MK42 table has zones with different heating characteristics. Due to this, such an unpleasant moment as more intense cooling at the corners of the table is compensated (the fact that the table has different temperatures from the edges to the center has a bad effect on printing 3D models from high-temperature plastics with a large contact surface).
The Original Prusa i3 MK2 has an E3D v6.1 all-metal extruder. This means that you can use almost any material for 3D printing: PLA, ABS, PET, nylon, wood-based materials or brass particles. If you want to experiment with carbon, you can put a hardened nozzle. If you need precision, you can install a nozzle with a diameter of 0.25 mm. In fact, the print quality with the original nozzle is excellent, but you can't help but notice how much flexibility the E3D v6.1 gives you.
An inductive sensor is located next to the extruder. In my opinion, such a solution should be implemented in all modern 3D printers. This inductive sensor is easy to set up, operates directly from 5V, takes up very little space.
The sensor performs several tasks. First, the virtual mesh of the 3D printing table is corrected. Due to this, even if there are small deformations, they are included in the extruder movement program. Secondly, if you have built the original Prusa i3 MK2, it has special calibration spots on the print table. Thanks to these calibration sections, the X and Y axes are automatically calibrated and small deviations, which are bound to occur during assembly, will also be compensated.
By the way, in many reviews of this 3D printer model, for some reason the last moment is missed. Well, it calibrates itself, and it's great ... But! Automatic calibration technology using calibration squares was not just developed by the Prusa Research team. Since it's open-source, this technique has become part of the Marlin firmware and now anyone can use it!
In most cases, you will interact with the Original Prusa i3 MK2 via an inconspicuous LCD control panel. In our opinion, the handle with the wheel looks amazing! In addition, the handle is very comfortable to use. Yes, this seems to be a trifle, but in fact, it is precisely such trifles in total that make a 3D printer as a whole better and more convenient. And it is the little things that distinguish a quality product from a quality fake.
Using the LCD screen, you can start calibration, feed media. And it won't be running simple scripts. If something goes wrong, such as the heating elements don't respond with the correct signal or the sensor doesn't send a signal at the expected distance, the Original Prusa i3 MK2 will not continue in "self-destruct mode"
During operation, the heating systems are protected by the Ultimachine Mini Rambo .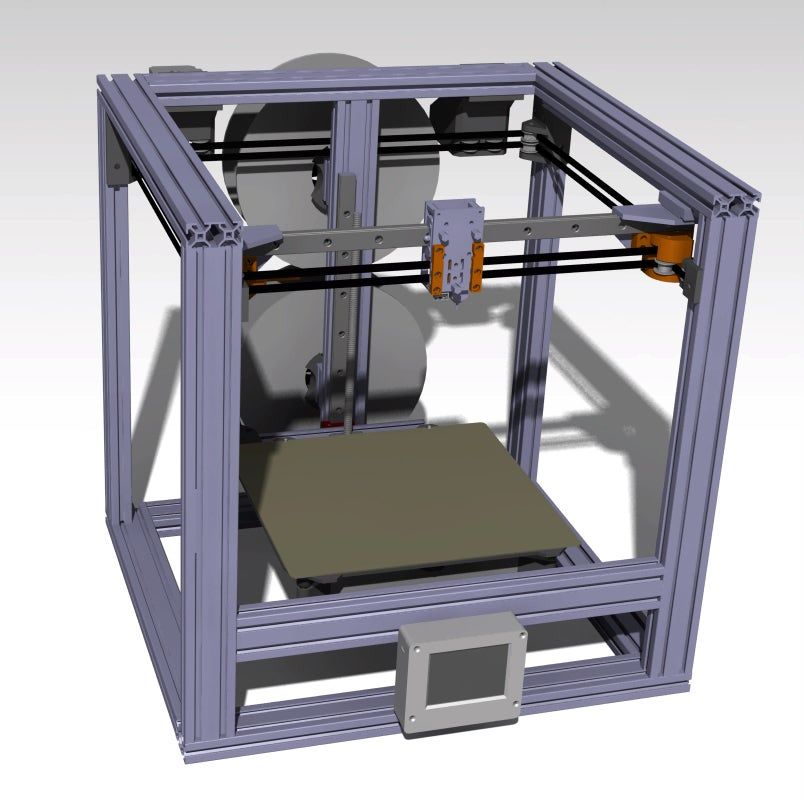 On the opposite side of the frame is a power supply without a cooler. During operation, it is hot to the touch.
It is very convenient that the power supply has a special cover on the side of the connectors. You do not have to worry about connecting individual wires, just connect the power cord to the IEC fuse connector, and the other side of the cable to the Mini Rambo motherboard. It's amazing! The frame is also grounded using the power supply.
Another interesting innovation concerns wires. Among the wires that go to the extruder and the heated table, 3 mm nylon thread is mixed in, which prevents them from tangling and bending. In our opinion, a very interesting and elegant solution to the problem with wires.
Assembly and print quality
If you decide to assemble the Original Prusa i3 MK2 yourself, you need to set aside five hours. There is a high-quality video of the complete assembly and launch of this model, which was recorded by Thomas Sanladerer (the author of the original English review, by the way).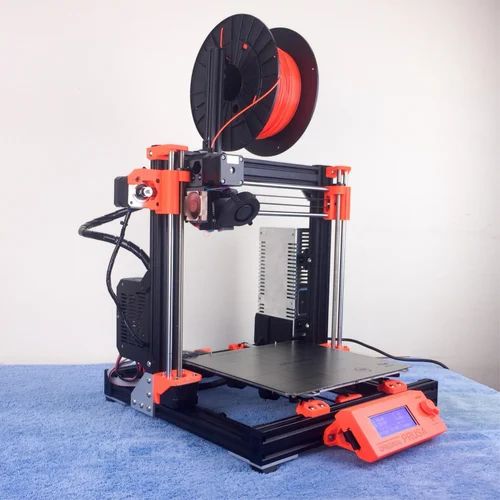 On the video, the assembly took more than 5 hours, but you also had to spend time on entertaining the audience ;).
The manual covers each assembly step, the automatic calibration process. Although the quality of the photographs in the printed version is not the best, you can find the same instructions online. There, the images are stored in excellent quality.
Two 3D printers were ordered for the review. One fully assembled and the second as separate parts for self-assembly. Unfortunately, the assembled printer arrived with minor damage. Apparently, the table latch broke and as a result the LCD case was damaged. I printed the new case myself, but in fact, if such a situation arises, Prusa Reseach will send you a new part under warranty without any problems.
After assembling the Prusa Kit, it turned out that they work exactly the same. In fact, if it weren't for damage in transit and slight differences in frame color, they could only be distinguished by the serial number.
Each printer comes with a test program. And the quality is really amazing!
The dragon pictured below is the first piece printed on the assembled Original Prusa i3 MK2. Printed through a cloud service, without installing software on a PC. There is simply nothing to complain about!
But what's the point of a quality test print? After all, we are counting on excellent printing of our own, not test 3D models. Well, Prusa Research provides all the necessary programs for installation on different operating systems: Windows, Mac OS. If you are using GNU/Linux, there are separate instructions for installing the required packages. The software contains all the necessary drivers, pre-configured slicer, printer host, Netfabb installer, tools for color printing.
I would like to consider drivers separately. When you connect Original Prusa i3 MK2 via USB, it connects via serial port. So you can use it from PC, Raspberry PI, Octoprint or other cloud based 3D printing solution. There is full support for Windows 10 (most likely Windows 8.1 as well), so you can use the integrated Builder app to print directly from professional CAD programs like Solidworks.
This is really cool, and apart from 3D Systems and Stratasys, no other 3D printer provides such a wide range of possibilities. In general, if you become the proud owner of an Original Prusa i3 MK2, you can use any Windows application that supports direct 3D printing. Very, very comfortable.
Naturally, you can use the traditional methods of exporting your model to an STL file and processing it in a slicing software. Slicing software Slic3r with ready-made settings is included. This version has some features and modifications compared to those available for official download.
It has a full profile with settings for a 3D printer, for different layer heights, nozzle sizes and a whole range of 3D printing materials - from standard ones like PLA, ABS, PET to Taulman T-Glase or Bridge Nylon. All the materials we tried to work with gave excellent 3D printing results (if, of course, you choose the right settings).
If you prefer to work with other slicing programs such as Cura or Simplify3D, you can download ready-made profiles with printer settings from the official Prusa website.
In our opinion, the availability of ready-made settings for different slicing programs is a huge plus. After spending half a day or more building a 3D printer, having fun with settings and messing up the first 5-10 models is not the most inspiring thing to do. And thanks to ready-made configurations, you can set up your usual software in one click and get excellent quality 3D printing on the Original Prusa i3 MK2.
You will only have to play with the settings if you are using a really unusual material for 3D printing.
Let's now move on to the software part. The software for the Original Prusa i3 MK2 is constantly being improved and if you use Slic3r you will see notifications about the possibility of updating the firmware. After tuning, we were offered some updates that should improve performance, but to be honest, the difference is not noticeable.
One of the coolest features is color printing. Even though the Original Prusa i3 MK2 prints in one color, the development team has included some features to implement color 3D printing (by changing the material in the extruder). You can set up color printing using the LCD controller or by adding G-code coordinates, after reaching which the 3D printer will prompt you to change the material in the extruder.
Original Prusa i3 MK2 - the perfect 3D printer?
Yes, we can say that the testing of the Original Prusa i3 MK2 showed that it is indeed a very good 3D printer. But do not forget that although this is a very successful, but still an ordinary FDM printer, which has certain limitations inherent in the technology of layer-by-layer deposition modeling.
There was an example of bad 3D printing. But in defense, we can say that the model is already complicated and at the same time was reduced relative to the base dimensions.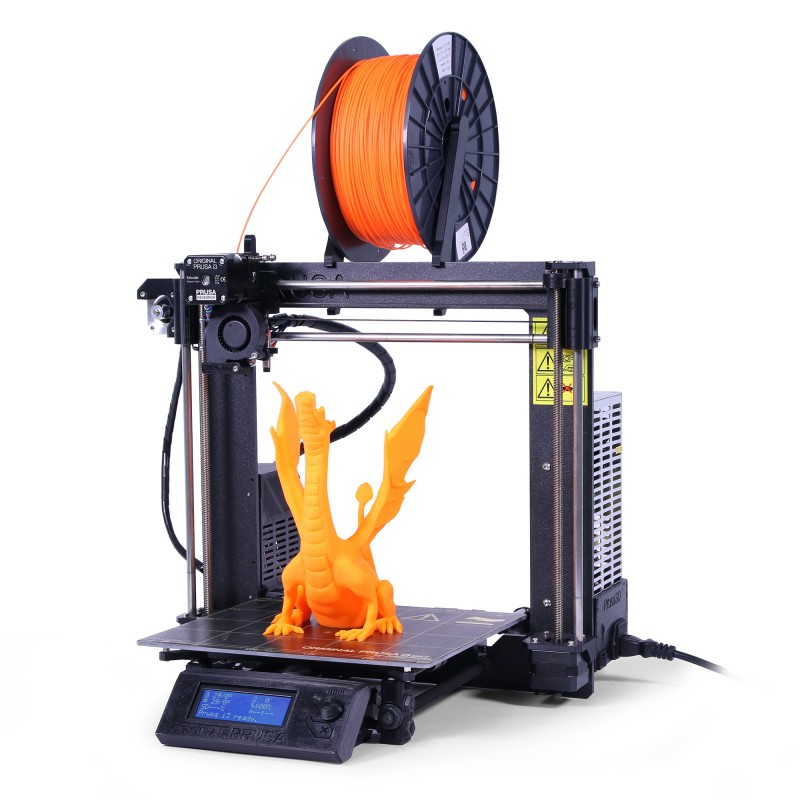 As a result, the transitions were too sharp and you can see the result in the photo below.
While the Original Prusa i3 MK2 is running, you can choose between "power" or "silent" mode. The failed model was printed in quiet mode (this mode is really quiet. The loudest part is the working cooler to cool the model). Perhaps printing in powerful mode would be better. But if you use the powerful mode, being in the same room with a 3D printer is not comfortable. 9The 0005
Original Joseph Prusa i3 MK2 is $845.79 (self-assembled) or $1,087.79 (assembled). Although not the most "advanced" mainstream model, it is in many ways superior to its counterparts and even the most innovative models. At the same time, some fundamentally new and really useful features have been implemented.
Original Prusa i3 MK2 prints great right from the start, without the need for tedious manual adjustments. Probably, this is really one of the highest quality open-source 3D printers today.
3D Printer Electric Hobs MK2 Dual Power RepRap Mendel and Ramps Supported
JavaScript seems to be disabled in your browser.
You must have JavaScript enabled in your browser to utilize the functionality of this website.
Proceed to Checkout
Total price
$0.00
Basket 0
Want free shipping? click here Learn more!
{{/findAutocomplete}}
SKU: {{sku}} {{#isFreeshippingEnabled}} Free shipping on eligible orders {{/isFreeshippingEnabled}}
{{#isDiscountFlag1Enabled}}
{{/isDiscountFlag1Enabled}} {{#isDiscountFlag2Enabled}}
{{/isDiscountFlag2Enabled}} {{#isDiscountFlag3Enabled}}
{{/isDiscountFlag3Enabled}} {{#isDiscountFlag4Enabled}}
{{/isDiscountFlag4Enabled}} {{#isDiscountFlag5Enabled}}
{{/isDiscountFlag5Enabled}} {{#isDiscountFlag6Enabled}}
{{/isDiscountFlag6Enabled}} {{#isDiscountFlag7Enabled}}
{{/isDiscountFlag7Enabled}} {{#isDiscountFlag8Enabled}}
{{/isDiscountFlag8Enabled}} {{#isDiscountFlag9Enabled}}
{{/isDiscountFlag9isProhibited}} More {{/isProhibited}} {{/is_combo_product}} {{#isProhibited}}
We are sorry, this product is not available in your country
{{/isProhibited}}
{{#hbk_price.